


 本文介绍了一段使用HTML和JavaScript构建的网页,展示了如何通过JavaScript实现图片放大镜效果,包括遮盖层、放大区和背景图的交互,以及响应式布局。
放大镜效果展示:
HTML代码:
<!DOCTYPE html>
<html lang="en">
<head>
<meta charset="UTF-8">
<meta http-equiv="X-UA-Compatible" content="IE=edge">
<meta name="viewport" content="width=device-width, initial-scale=1.0">
<title>Document</title>
<style>
*{
margin: 0;
padding: 0;
}
li{
list-style: none;
}
a{
text-decoration: none;
}
img{
display: block;
width: 100%;
height: 100%;
}
.box{
width: 900px;
margin: 50px auto;
position: relative;
}
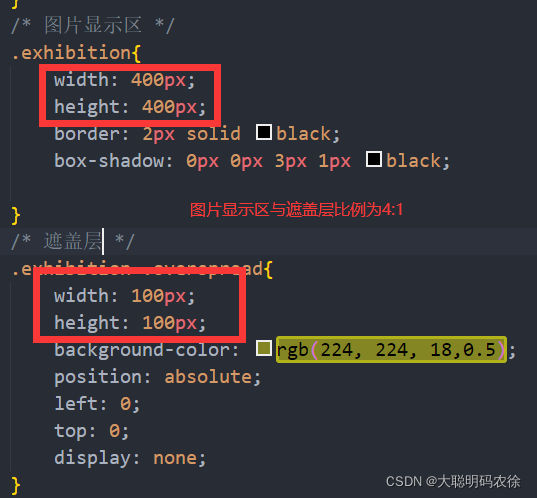
.exhibition{
width: 400px;
height: 400px;
border: 2px solid black;
box-shadow: 0px 0px 3px 1px black;
}
.exhibition .overspread{
width: 100px;
height: 100px;
background-color: rgb(224, 224, 18,0.5);
position: absolute;
left: 0;
top: 0;
display: none;
}
.sol{
width: 400px;
height: 200px;
display: flex;
justify-content: space-between;
align-items: center;
}
.sol li{
width: 100px;
height: 100px;
}
.active{
border: 1px solid red;
}
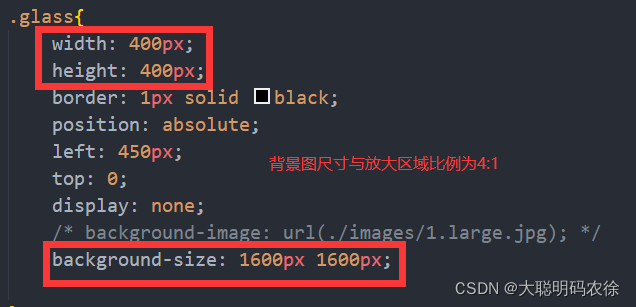
.glass{
width: 400px;
height: 400px;
border: 1px solid black;
position: absolute;
left: 450px;
top: 0;
display: none;
/* background-image: url(./images/1.large.jpg); */
background-size: 1600px 1600px;
}
</style>
</head>
<body>
<div class="box">
</div>
<script src="./glass.js"></script>
<script>
// 数组模拟后端传参
const arr = [{big:"./images/1.large.jpg",small:"./images/1.small.jpg"},
{big:"./images/2.large.jpg",small:"./images/2.small.jpg"},
{big:"./images/3.large.jpg",small:"./images/3.small.jpg"}];
// 获取标签对象
const oDiv = document.querySelector(".box");
// 面向对象编程
// 调用 构造函数 生成 实例化对象
const glass = new CreateFunction(oDiv,arr);
// 入口函数
glass.init();
// 页面放大缩小事件监听
window.addEventListener("resize",function(){
glass.getSize();
})
</script>
</body>
</html>
JavaScript代码:
class CreateFunction{
    constructor(element,ImgArr){
        // 定义属性 存储 形参
        this.ele = element;
        this.arr = ImgArr;
        // 全局变量
        this.exhi;
        this.over;
        this.oImg;
        this.oSol;
        this.glass;
        this.imgArr;

        // 存储 标签 占位属性
        this.marginLeft;
        this.marginTop;

        this.borderLeft;
        this.borderTop;

        this.exhiWidth;
        this.exhiHeight;

        this.overWidth;
        this.overHeight;
    }
    // 入口函数
    init(){
        this.setPage();
        this.mouseShow();
        this.mouseList();
        this.mouseMove();
    }
    // 动态生成
    setPage(){
        // 创建标签节点
        this.exhi = document.createElement("div");
        this.over = document.createElement("div");
        this.oImg = document.createElement("img");
        this.oSol = document.createElement("ul");
        this.glass = document.createElement("div");
        // 添加class属性
        this.exhi.classList.add("exhibition");
        this.over.classList.add("overspread");
        this.oSol.classList.add("sol");
        this.glass.classList.add("glass")
        // 添加节点
        this.exhi.appendChild(this.oImg);
        this.exhi.appendChild(this.over);
        this.ele.appendChild(this.exhi)
        this.ele.appendChild(this.oSol)
        this.ele.appendChild(this.glass)
        // 动态写入内容
        var liStr = "";
        this.arr.forEach((item,key)=>{
            liStr += key === 0 ? `<li   ><img num = "${key}" class="active" src="${item.small}" alt=""></li>`:`<li ><img num = "${key}" src="${item.small}" alt="" ></li>`;
            this.oSol.innerHTML = liStr;
        });
        // 设定 ul>li 中img 标签 图片内容
        // 设定 img标签 src 属性的属性值
            this.oImg.setAttribute( 'src' , `${this.arr[0].big }` );
        // 设定 glass中的背景图样式
        // 标签的 background-image css样式属性
            this.glass.style.backgroundImage = `url(./${this.arr[0].big })`;
        // 获取生成的li>img标签的伪数组
        this.imgArr = this.oSol.querySelectorAll("img");

        // 获取占位数据
        // 外边距
        this.marginLeft = this.ele.offsetLeft ;
        this.marginTop = this.ele.offsetTop ;
        // 边框宽度
        this.borderLeft = this.exhi.clientLeft ;
        this.borderTop = this.exhi.clientTop ;
        // 内容+padding
        this.exhiWidth = this.exhi.clientWidth ;
        this.exhiHeight = this.exhi.clientHeight ;
        // 遮盖层 宽高
        this.overWidth = parseInt(window.getComputedStyle(this.over).width);
        this.overHeight = parseInt(window.getComputedStyle(this.over).height);

    }
        // 鼠标移入显示遮盖层和放大镜
        mouseShow(){
        // 鼠标移入 show 显示 遮盖层和放大镜
        // 使用 mouseenter 事件类型
            this.exhi.addEventListener("mouseenter",()=>{
                this.glass.style.display = "block";
                this.over.style.display = "block";
            })
        // 鼠标移出 show 隐藏 遮盖层和放大镜
        // 使用 mouseleave 事件类型
            this.exhi.addEventListener("mouseleave",()=>{
                this.glass.style.display = "none";
                this.over.style.display = "none";
            })
        }
        // 鼠标经过列表区
        mouseList(){
            // 当鼠标经过ul区域
            this.oSol.addEventListener("click",e => {
                if(e.target.tagName === "IMG"){
                    // 清除所有class
                    this.imgArr.forEach(item =>{
                        item.classList.remove("active");
                    })
                    // 给点击的标签对象添加class
                    e.target.classList.add("active");
                }
                // 设定 放大镜 背景图片 css样式
                this.glass.style.backgroundImage = `url(./${this.arr[Number(e.target.getAttribute("num"))].big })`;
                 // 设定 oImg中img标签 src属性值
                // 图片 是 当前标签num属性存储的属性值 也就是 索引下标
                this.oImg.setAttribute( 'src' , `${this.arr[Number(e.target.getAttribute("num"))].big }` );
            })
        }
        // 鼠标拖拽效果
        mouseMove(){
            this.exhi.addEventListener("mousemove",e =>{
                // 给 exhi 添加 鼠标移动事件mousemove
                // 页面滚动 放大镜一起滚 使用 事件对象.pageX 获取鼠标坐标
                let x = e.pageX - this.marginLeft - this.borderLeft - this.overWidth/2 ;
                let y = e.pageY - this.marginTop - this.borderTop - this.overHeight/2 ;
                // 计算极值
                x  = x < 0 ? 0 : x ;
                y = y < 0 ? 0 : y ;
                x = x > this.exhiWidth - this.overWidth ? this.exhiWidth - this.overWidth : x;
                y = y > this.exhiHeight - this.overHeight ?  this.exhiHeight - this.overHeight : y;
                // 将设定好的数值 赋值给 mask标签的定位
                this.over.style.left = x +'px';
                this.over.style.top = y +'px';
                // 给 背景图片 做 定位
                // 背景图片定位方向 和遮盖层拖拽方向相反
                // 背景图片定位数值 和遮盖层拖拽数值成等比例关系 当前 是 1:4
                this.glass.style.backgroundPosition = `${-x*4}px ${-y*4}px`;
            })
        }

        // 重新获取数据函数
        // 这个函数不用一开始就执行 不写入 init()
        // 只有页面大小改变时 再触发执行
        getSize(){
              // 获取占位数据
        // 外边距
        this.marginLeft = this.ele.offsetLeft ;
        this.marginTop = this.ele.offsetTop ;
        // 边框宽度
        this.borderLeft = this.exhi.clientLeft ;
        this.borderTop = this.exhi.clientTop ;
        // 内容+padding
        this.exhiWidth = this.exhi.clientWidth ;
        this.exhiHeight = this.exhi.clientHeight ;
        // 遮盖层 宽高
        this.overWidth = parseInt(window.getComputedStyle(this.over).width);
        this.overHeight = parseInt(window.getComputedStyle(this.over).height);
        }


}
页面结构:
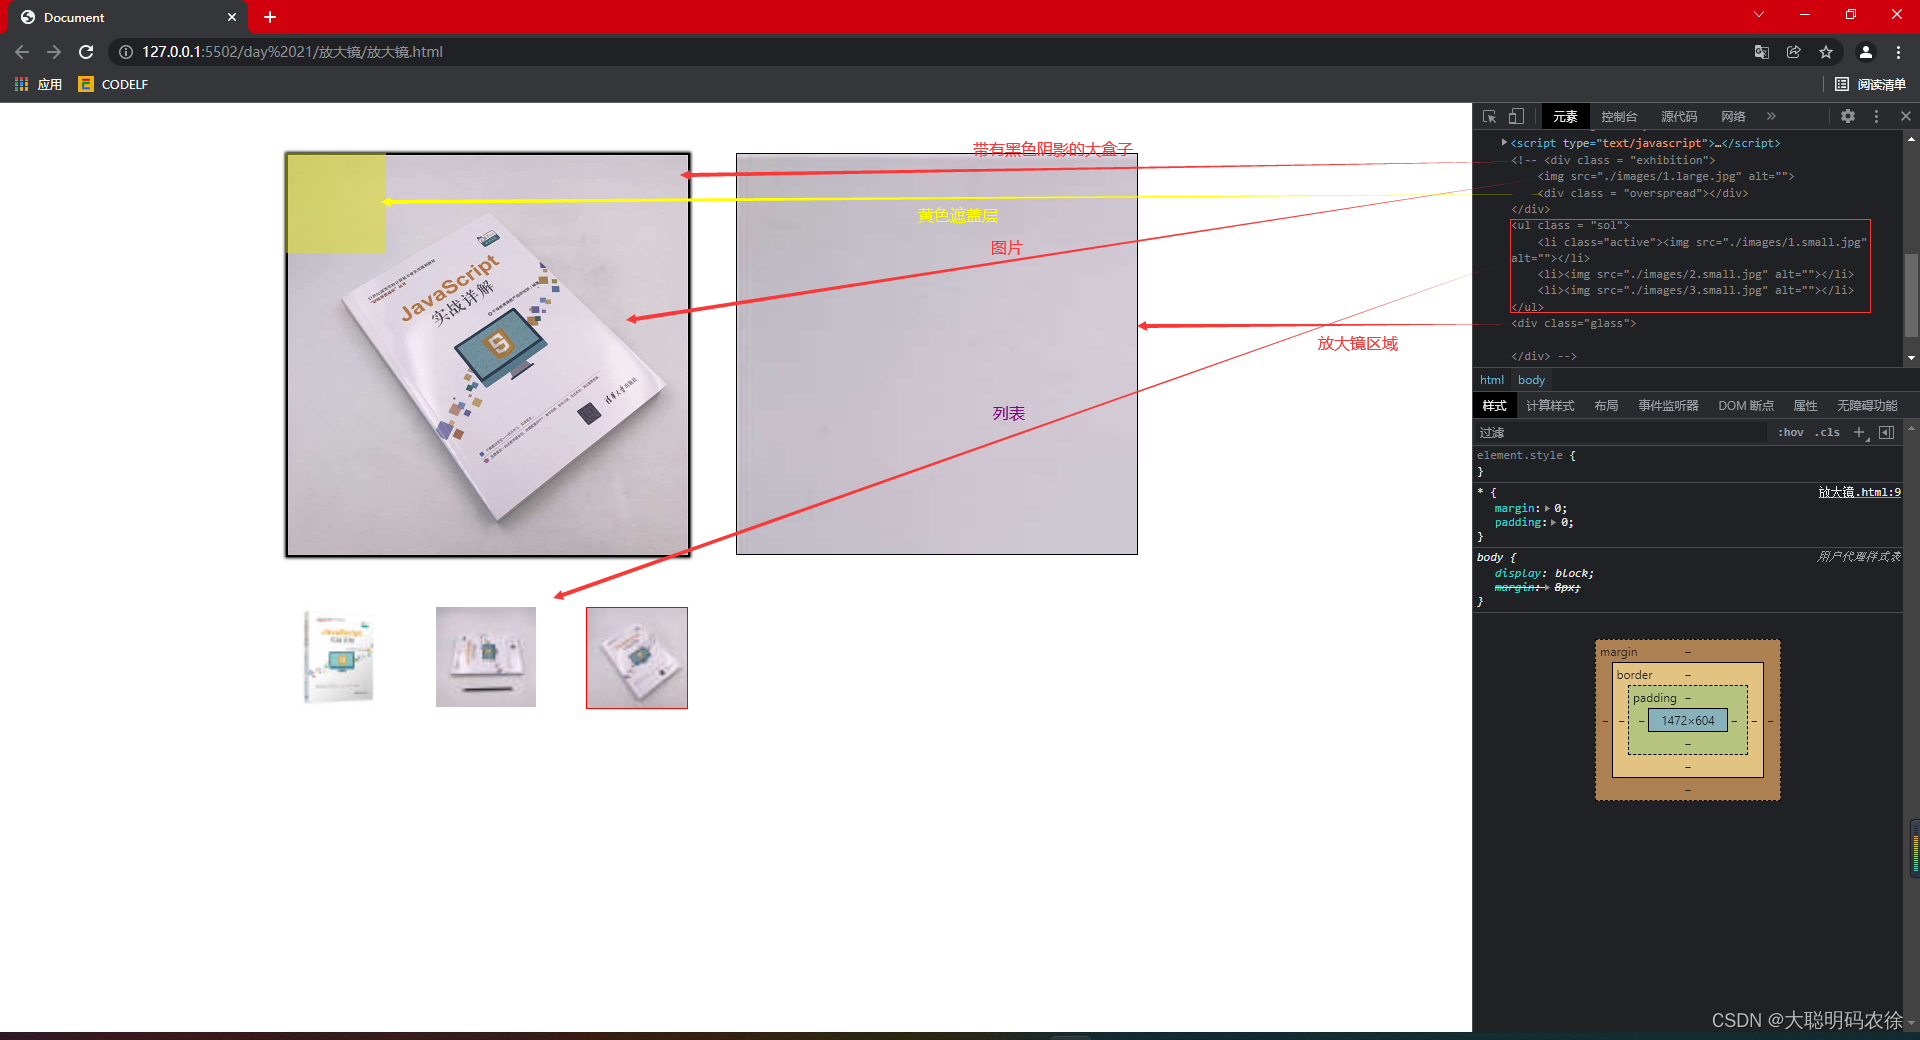
注意点:
遮盖层 放大区
------ ===== -------
显示区 背景图
原始比例相等!!!


 1201
1201

 被折叠的 条评论
为什么被折叠?
被折叠的 条评论
为什么被折叠?
 到【灌水乐园】发言


