


有一个业务,实现刷脸登录功能,这两天整理了一下,整体思路就是利用video标签,获取其中某一帧,结合canvas绘制出图片,将图片传给后端,后端进行图片比对确认是否是已经注册的用户。
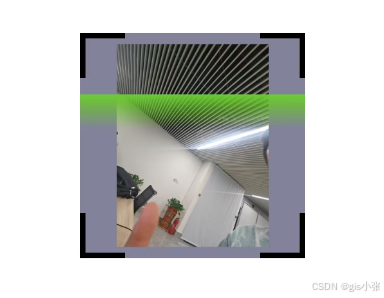
最终效果
代码
<template>
  <div>
    <div class="box">
      <video ref="video"></video>
      <div class="box1"></div>
      <div class="box2"></div>
      <div class="box3"></div>
      <div class="box4"></div>
      <!-- <div class="scanHidden"></div> -->
      <div class="scanLine"></div>
    </div>
    <canvas id="canvasCamera"></canvas>

    <!-- <button @click="OpenCamera">打开摄像头</button> -->
    <!-- <button @click="CloseCamera">关闭摄像头</button> -->
    <!-- <button @click="takePicture">拍照</button> -->
    <!-- <img
      :src="imageData"
      v-if="imageData"
      alt="Captured Image"
    /> -->
    <!-- <p v-if="message">{{ message }}</p> -->
  </div>
</template>

<script>
export default {
  data() {
    return {
      canvas: null,
      context: null,
      imageData: null,
      photoCount: 0,
      message: '',
      isTakingPhoto: true // 正在拍照标志
    }
  },
  mounted() {
    this.OpenCamera()
    this.canvas = document.getElementById('canvasCamera')
    this.context = this.canvas.getContext('2d')
  },
  methods: {
    takePicture() {
      this.isTakingPhoto = true // 设置正在拍照标志
      this.context.drawImage(this.$refs.video, 0, 0, 100, 100)
      this.imageData = this.canvas.toDataURL('image/png')

      // 上传图片到后端
      this.uploadImage(this.imageData)
        .then((result) => {
          this.isTakingPhoto = false // 拍照完成
          this.message = result.message // 显示后端返回的信息

          // 根据后端结果决定是否继续拍照
          if (result.success && this.photoCount < 3) {
            this.photoCount++
            this.takePicture() // 继续拍照
          } else {
            // 拍摄三次或者失败,关闭摄像头
            this.CloseCamera()
          }
        })
        .catch((error) => {
          console.error('上传失败:', error)
          this.isTakingPhoto = false
          this.message = '上传失败,请重试'
        })
    },
    uploadImage(imageData) {
      // 使用 FormData 上传图片
      const formData = new FormData()
      formData.append('image', imageData)
      return fetch('/your-upload-api', {
        method: 'POST',
        body: formData
      })
        .then((response) => response.json())
        .then((data) => {
          return data
        })
    },
    OpenCamera() {
      navigator.mediaDevices
        .getUserMedia({ video: true })
        .then((stream) => {
          this.$refs.video.srcObject = stream
          this.$refs.video.play()

          // 3秒后自动拍照
          setTimeout(() => {
            this.takePicture()
          }, 3000)
        })
        .catch((err) => {
          console.log(err)
        })
    },
    CloseCamera() {
      this.$refs.video.srcObject.getTracks()[0].stop()
    }
  }
}
</script>

<style>
.box {
  width: 200px;
  height: 200px;
  position: relative;
  z-index: -1;
  background-color: rgba(5, 5, 55, 0.5);
  overflow: hidden;
}
.box video {
  margin: 10px;
  width: 180px;
  height: 180px;
}
.box1,
.box2,
.box3,
.box4 {
  width: 40px;
  height: 40px;
  position: absolute;
  border: 5px solid black;
}
.box1 {
  top: 0;
  left: 0;
  border-right: none;
  border-bottom: none;
}
.box2 {
  top: 0;
  right: 0;
  border-left: none;
  border-bottom: none;
}
.box3 {
  bottom: 0;
  left: 0;
  border-top: none;
  border-right: none;
}
.box4 {
  bottom: 0;
  right: 0;
  border-top: none;
  border-left: none;
}
/* .lineHidden {
  position: absolute;
  z-index: 100;
  width: inherit;
  height: inherit;
  overflow: hidden;
} */
.scanLine {
  position: absolute;
  top: 0;
  left: 0;
  width: inherit;
  height: 30px;
  animation: scan 2s linear infinite;
}
@keyframes scan {
  0% {
    /*最开始块从顶部往下移动,块的位置需要溢出容器,处于容器顶部上方,块的背景颜色从底部到顶部由绿色逐渐透明*/
    margin-top: calc(0px - 20px);
    background: linear-gradient(#0000 0%, rgb(90, 206, 23) 100%);
  }
  49% {
    /*动画进行到一半时间时,块必须移动到容器底部并溢出,完成从上到下扫描效果*/
    margin-top: 200px;
    background: linear-gradient(#0000 0%, rgb(90, 206, 23) 100%);
  }
  50% {
    /*调转颜色方向,准备往回扫(从下往上)*/
    margin-top: 200px;
    background: linear-gradient(rgb(90, 206, 23) 0%, #0000 100%);
  }
  100% {
    /*往回扫*/
    margin-top: calc(0px - 20px);
    background: linear-gradient(rgb(90, 206, 23) 0%, #0000 100%);
  }
}
</style>


 3356
3356

 被折叠的 条评论
为什么被折叠?
被折叠的 条评论
为什么被折叠?
 到【灌水乐园】发言


