


 本文介绍了在一个5台服务器的环境中,如何搭建双VIP的MySQL高可用集群,包括主从复制、读写分离和使用MySQL Router与Keepalived实现高可用。详细步骤包括设置主从复制、配置MySQL Router服务和Keepalived实例,以及解决可能出现的问题。
项目环境
5台服务器(1G,2核)centos7 mysql5.7.30 mysqlrouter8.0.21 keepalived2.0.10
项目详细配置
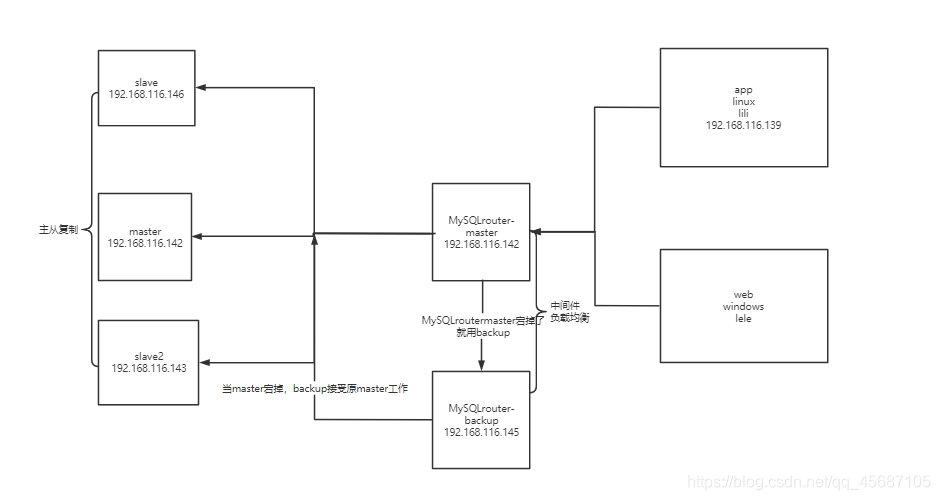
1.项目图解
2.项目步骤
一、安装好centos7的系统,.除了作为中间件的两台机器,其他机器都用二进制安装好mysql
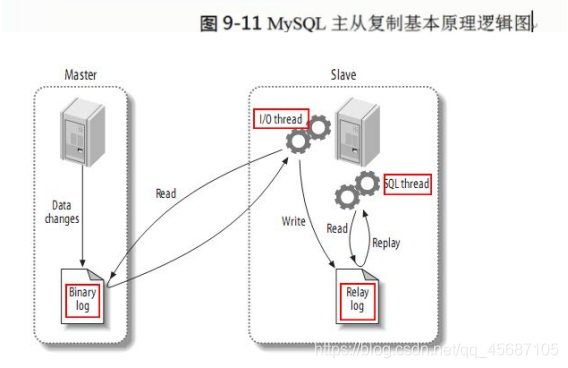
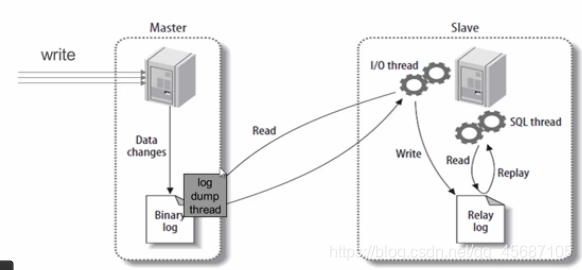
二、主从复制
三、高可用和负载均衡
详细步骤
二、主从复制
在3台MySQL服务器上配置主从复制,建立读写分离的用户,形成一个master+2个slave节点的集群,提供数据库服务
①.在master上布置
1.确认mysql已经开启二进制日志
在/etc/my.cnf内配置
#开启二进制日志
log_bin
server_id=1
2.建立一个授权有复制权限的用户
[root@localhost ~]# mysql -uroot -p'lesleyC123#'
mysql: [Warning] Using a password on the command line interface can be insecure.
Welcome to the MySQL monitor.  Commands end with ; or \g.
Your MySQL connection id is 2
Server version: 5.7.30-log MySQL Community Server (GPL)

Copyright (c) 2000, 2020, Oracle and/or its affiliates. All rights reserved.

Oracle is a registered trademark of Oracle Corporation and/or its
affiliates. Other names may be trademarks of their respective
owners.

Type 'help;' or '\h' for help. Type '\c' to clear the current input statement.

root@(none) 12:54  mysql>
root@(none) 12:54  mysql>grant  replication slave on *.* to 'lily'@'192.168.116.141' identified by '123456';
Query OK, 0 rows affected, 1 warning (0.11 sec)
3.备份所有的库
[root@localhost ~]# cd /
[root@localhost /]# mkdir backup
[root@localhost /]# cd backup
[root@localhost backup]#  mysqldump -uroot -p'lesleyC123#' --all-databases >/backup/2021-07-13-all-db.sql
mysqldump: [Warning] Using a password on the command line interface can be insecure.
[root@localhost backup]# ls
2021-07-13-all-db.sql
4.上传数据到从服务器
[root@localhost backup]# scp  2021-07-13-all-db.sql   root@192.168.116.141:/root
root@192.168.116.141's password:
2021-07-13-all-db.sql                             100%  832KB   4.4MB/s   00:00
5.查看二进制日志文件名和位置号
root@(none) 12:57  mysql>show master  status;
+----------------------+----------+--------------+------------------+-------------------+
| File                 | Position | Binlog_Do_DB | Binlog_Ignore_DB | Executed_Gtid_Set |
+----------------------+----------+--------------+------------------+-------------------+
| localhost-bin.000002 |      451 |              |                  |                   |
+----------------------+----------+--------------+------------------+-------------------+
1 row in set (0.00 sec)
==========
②.在slave1上配置
1.配置server_id(必须的)也开启二进制日志(二进制日志不是必须的)
也是配置/etc/my.cnf
server_id=2
log_bin
2.刷新mysql服务
[root@localhost ~]# yum install psmisc  -y
已加载插件:fastestmirror
Loading mirror speeds from cached hostfile
 * base: mirrors.163.com
 * extras: mirrors.aliyun.com
 * updates: mirrors.163.com
base                                            | 3.6 kB     00:00
extras                                          | 2.9 kB     00:00
updates                                         | 2.9 kB     00:00
软件包 psmisc-22.20-17.el7.x86_64 已安装并且是最新版本
无须任何处理
[root@localhost ~]# killall -9  mysqld_safe
[root@localhost ~]# killall -9  mysqld
[root@localhost ~]# ps  aux|grep mysqld
root       2236  0.0  0.0 112824   980 pts/0    S+   13:26   0:00 grep --color=auto mysqld
[root@localhost ~]# service  mysqld start
Starting MySQL.. SUCCESS!
[root@localhost ~]# ps  aux|grep mysqld
root       2270  0.0  0.0  11820  1620 pts/0    S    13:26   0:00 /bin/sh /usr/local/mysql/bin/mysqld_safe --datadir=/data/mysql --pid-file=/data/mysql/localhost.localdomain.pid
mysql      2450  0.7 11.7 1694972 219108 pts/0  Sl   13:26   0:00 /usr/local/mysql/bin/mysqld --basedir=/usr/local/mysql --datadir=/data/mysql --plugin-dir=/usr/local/mysql/lib/plugin --user=mysql --log-error=localhost.localdomain.err --open-files-limit=8192 --pid-file=/data/mysql/localhost.localdomain.pid --socket=/data/mysql/mysql.sock --port=3306
root       2485  0.0  0.0 112824   984 pts/0    S+   13:28   0:00 grep --color=auto mysqld
3.确保mysql已经运行
[root@localhost ~]# ps  aux|grep mysqld
root       2270  0.0  0.0  11820  1620 pts/0    S    13:26   0:00 /bin/sh /usr/local/mysql/bin/mysqld_safe --datadir=/data/mysql --pid-file=/data/mysql/localhost.localdomain.pid
mysql      2450  0.7 11.7 1694972 219108 pts/0  Sl   13:26   0:00 /usr/local/mysql/bin/mysqld --basedir=/usr/local/mysql --datadir=/data/mysql --p
最低0.47元/天 解锁文章


 198
198

 被折叠的 条评论
为什么被折叠?
被折叠的 条评论
为什么被折叠?
 到【灌水乐园】发言


