


一、创建事实并且安装Apache
在受管主机上编写自定义事实文件和playbook。要求playbook可以完成受管主机上Apache的安装和启动
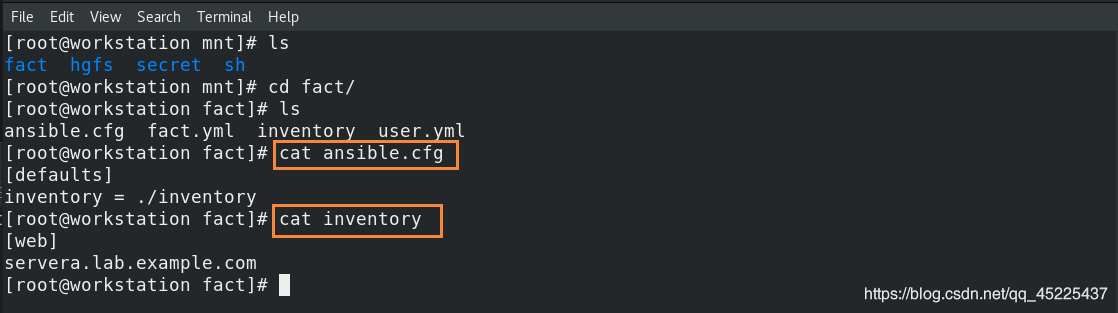
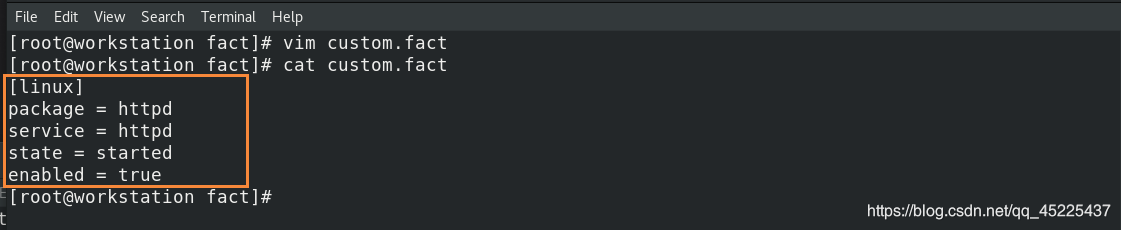
(1)在控制主机上创建自定义事实文件:
(2)编写playbook将控制主机上的事实文件并拷贝到受管主机指定位置:
---
- name: Install facts
  hosts: servera.lab.example.com #受管主机
  vars:
    remote_dir: /etc/ansible/facts.d #指定远程受管主机的事实存放目录
    facts_file: custom.fact  #指定管理主机上的源事实文件
  tasks:
    - name: Create Directory  #创建远程主机事实目录
      file:    #使用file模块
        state: directory
        recurse: yes
        path: "{{ remote_dir }}"
    - name: Install new facts  #使用copy模块创建受管主机的事实文件
      copy:
        src: "{{ facts_file }}"
        dest: "{{ remote_dir }}"
...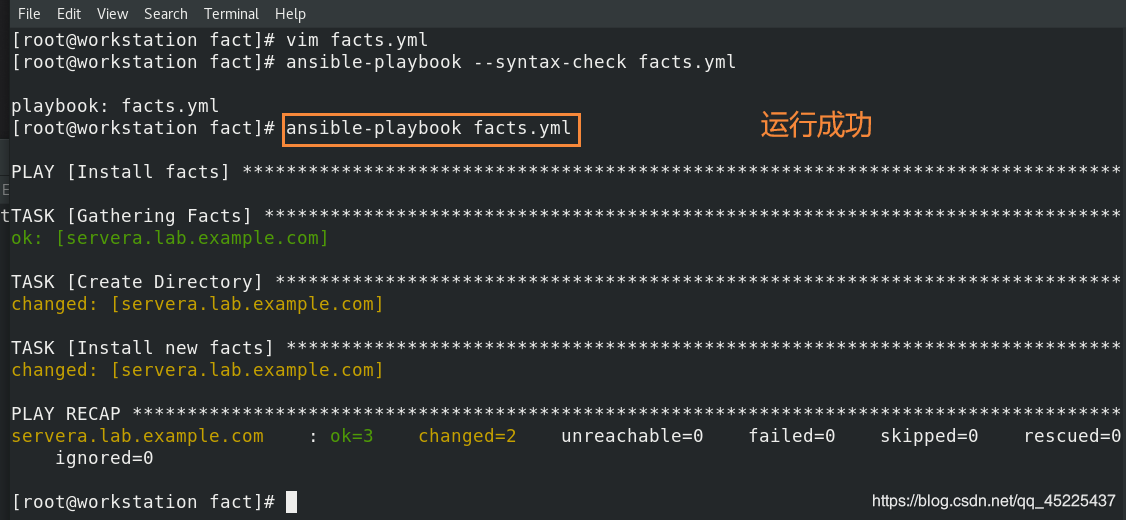
验证playbook是否编辑成功:使用setup模块查看受管主机事实:ansible servera.lab.example.com -m setup

(3)使用自定义事实,编写并运行主playbook,让受管主机安装并启动Apache
---
- name: Install and start Apache
  hosts: servera.lab.example.com
  tasks:
    - name: Install Apache
      yum:
        name: "{{ ansible_facts['ansible_local']['custom']['linux']['package'] }}"
        state: latest
    - name: Start Apache
      service:
        name: "{{ ansible_facts['ansible_local']['custom']['linux']['service'] }}"
        state: "{{ ansible_facts['ansible_local']['custom']['linux']['state'] }}"
        enabled: "{{ ansible_facts['ansible_local']['custom']['linux']['enabled'] }}"
...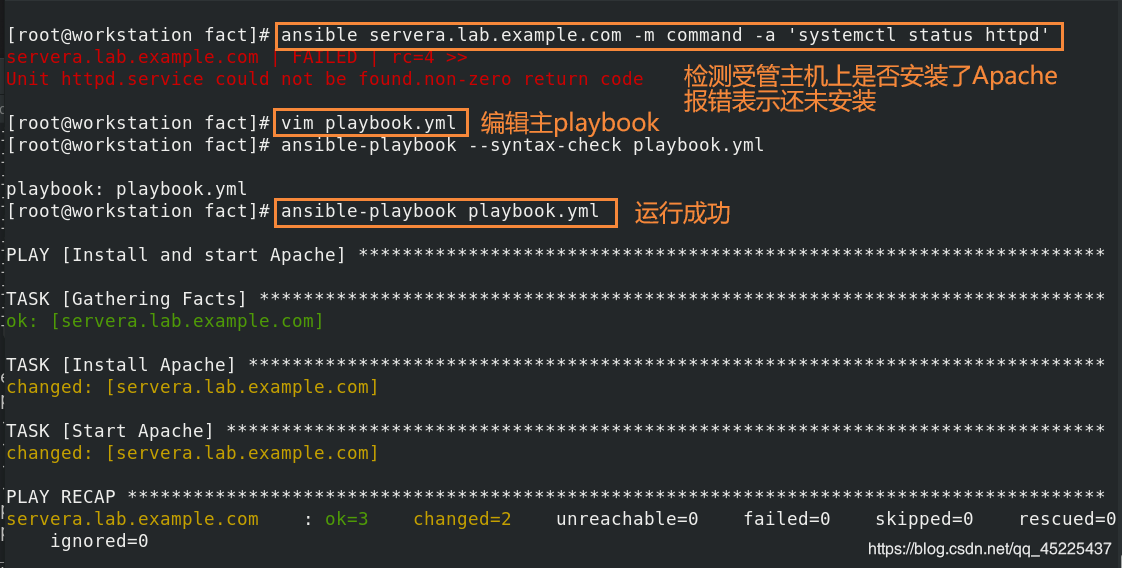
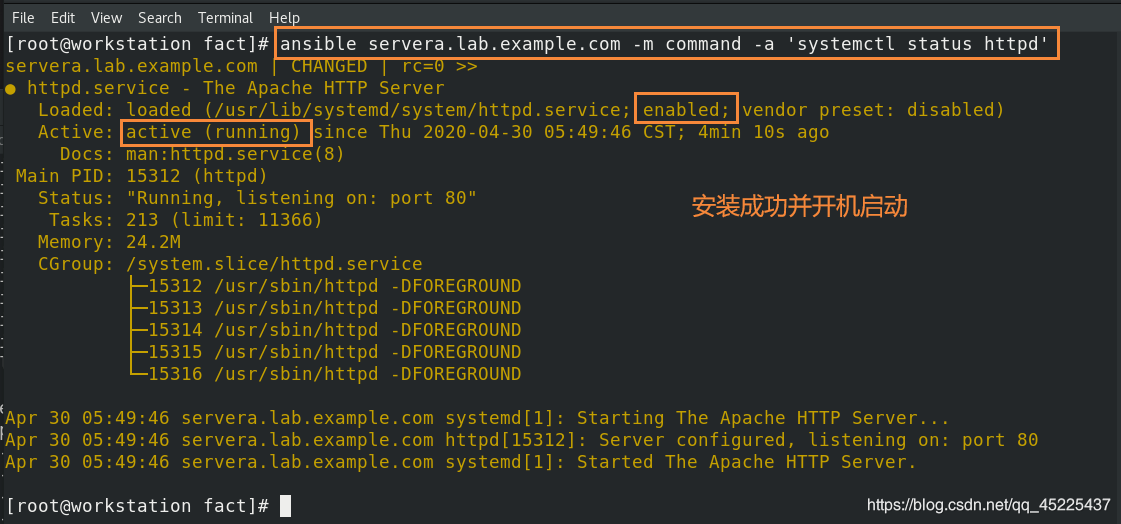
(4)验证受管主机:ansible servera.lab.example.com -m command -a ‘systemctl status httpd’
二、使用基本身份认证的httpd
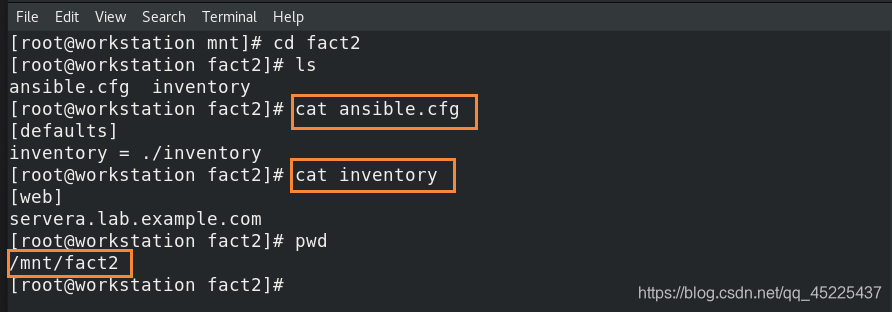
(1)创建项目目录,编写清单和配置文件:
(2)编写playbook:vim playbook.yml
---
- name: webserver Vars
hosts: web
become: yes
vars:
firewall_pkg: firewalld ###火墙的包
firewall_srv: firewalld ###火墙服务
web_pkg: httpd ##Apache的包
web_srv: httpd ##Apache的服务
ssl_pkg: mod_ssl ##Apache加密需要的插件
httpdconf_src: files/httpd.conf ##指定的httpd配置文件源,需要后续创建
httpdconf_dest: /etc/httpd/conf/httpd.conf ##httpd默认配置文件存放目的地
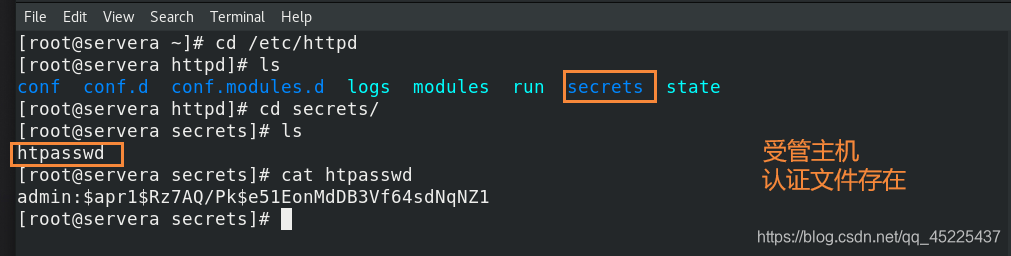
secrets_dir: /etc/httpd/secrets ##加密目录,存放加密文件,需要后续新建
secrets_src: files/htpasswd ##用户加密文件源,
secrets_dest: "{{ secrets_dir }}/htpasswd" ##加密文件存放目的地
web_root: /var/www/html ##httpd默认发布页面目录
tasks:
- name: Install Packages #安装服务包
yum:
name:
- "{{ firewall_pkg }}"
- "{{ web_pkg }}"
- "{{ ssl_pkg }}"
state: latest
- name: Configure service #配置服务
copy:
src: "{{ httpdconf_src }}"
dest: "{{ httpdconf_dest }}"
owner: root
group: root
mode: 0644 #文件权限
- name: Creat secrets directory #创建加密目录
file:
path: "{{ secrets_dir }}"
state: directory
owner: apache
group: apache
mode: 0500
- name: Create htpasswd #创建加密文件
copy:
src: "{{ secrets_src }}"
dest: "{{ secrets_dest }}"
owner: apache
group: apache
mode: 0400
- name: Create index.html #配置默认发布界面
copy:
content: "{{ ansible_facts['fqdn'] }} ({{ ansible_facts['all_ipv4_addresses'] }})\n"
dest: "{{ web_root }}/index.html"
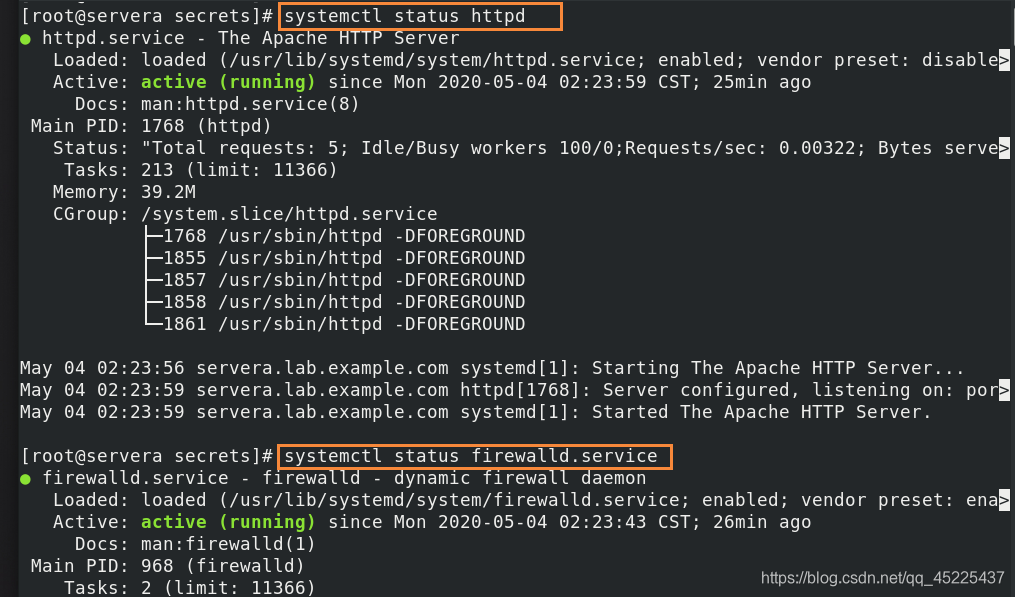
- name: Configure furewalld service #配置防火墙服务
service:
name: "{{ firewall_srv }}"
state: started
enabled: true
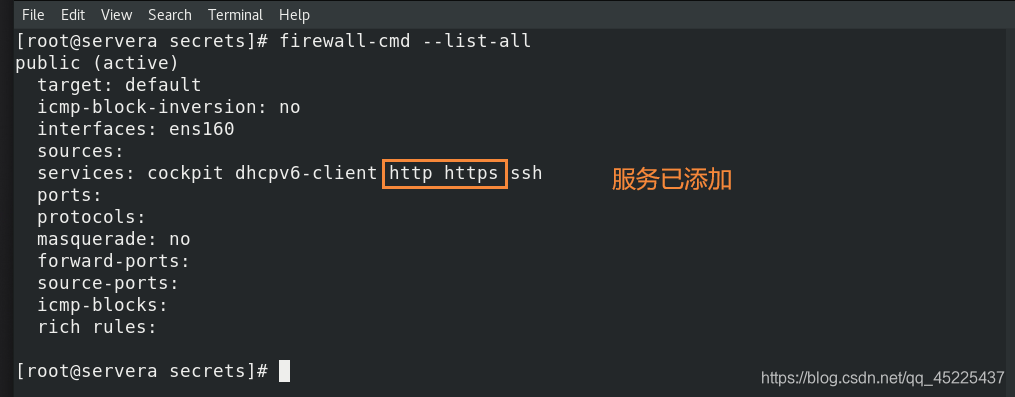
- name: Firewalld permits https #添加允许Apache服务访问
firewalld:
service: https
state: enabled
immediate: true
permanent: true
- name: Configure Apache Servicr #配置Apache服务
service:
name: "{{ web_srv }}"
state: started
enabled: true
- name: Test Apache #验证:测试Apache
hosts: localhost
become: no
vars:
- web_user: admin #指定用户身份为admin
vars_files:
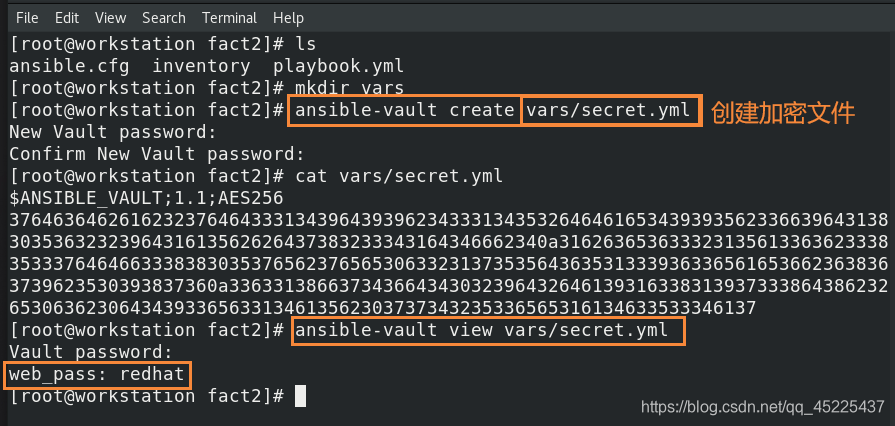
- vars/secret.yml #指定加密文件,需要后续创建
tasks:
- name: Connect Apache with Auth
uri:
url: https://servera.lab.example.com
validate_certs: no #没有证书
force_basic_auth: yes #打开强制基础认证
user: "{{ web_user }}"
passwd: "{{ web_pass }}" #定义了访问 apache 的用户密码
return_content: yes
status_code: 200
register: auth_test
- debug:
var: auth_test.content(3)创建加密文件,设定加密用户访问Apache的用户密码为redhat
注意在受管主机上创建加密用户时,设定的加密用户密码一定也要是redhat:
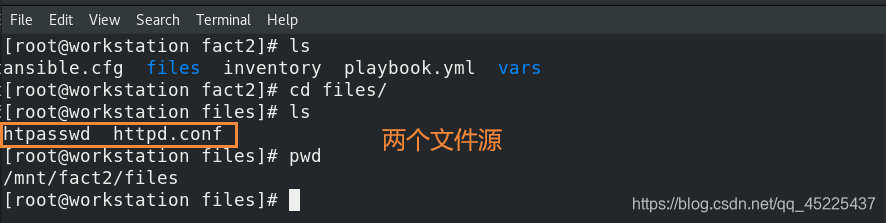
(4)创建files目录,建立Apache配置文件源和用户加密认证文件源:
为了方便可以从直接主机上复制本地上已经存在的Apache配置文件到当前项目目录中,再更改配置文件;用户加密认证文件在受管主机上生成后远程传输到主机中


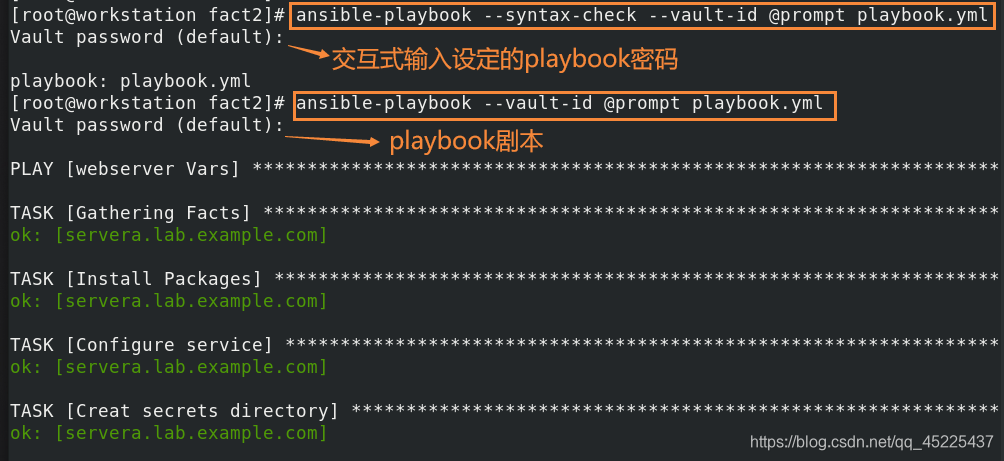
(5)交互式进行语法检测,执行playbook:
ansible-playbook --syntax-check --vault-id @prompt playbook.yml
ansible-playbook --vault-id @prompt playbook.yml

(6)在受管主机中验证:


 1705
1705

 被折叠的 条评论
为什么被折叠?
被折叠的 条评论
为什么被折叠?
 到【灌水乐园】发言


