


一、图形框介绍
1、Form介绍
1.1、简介
1、例子
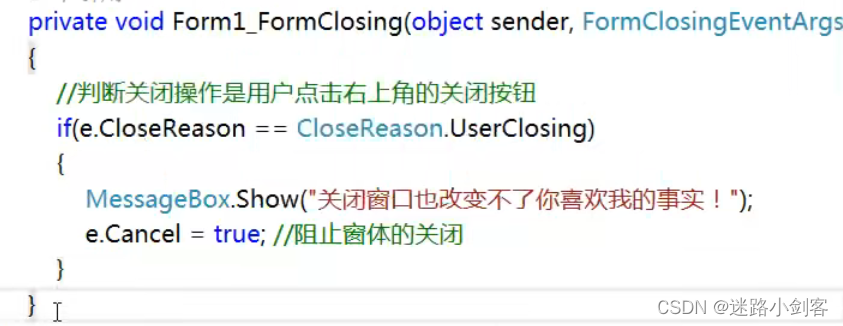
DialogResult resullt=MessageBox.Show("确定关闭窗体吗?, “提示框”,MessageBoxBtton.YesNo,MessageBoxIcon.Question);

if(result==DialogResult.No)      { e.Cancel=true;}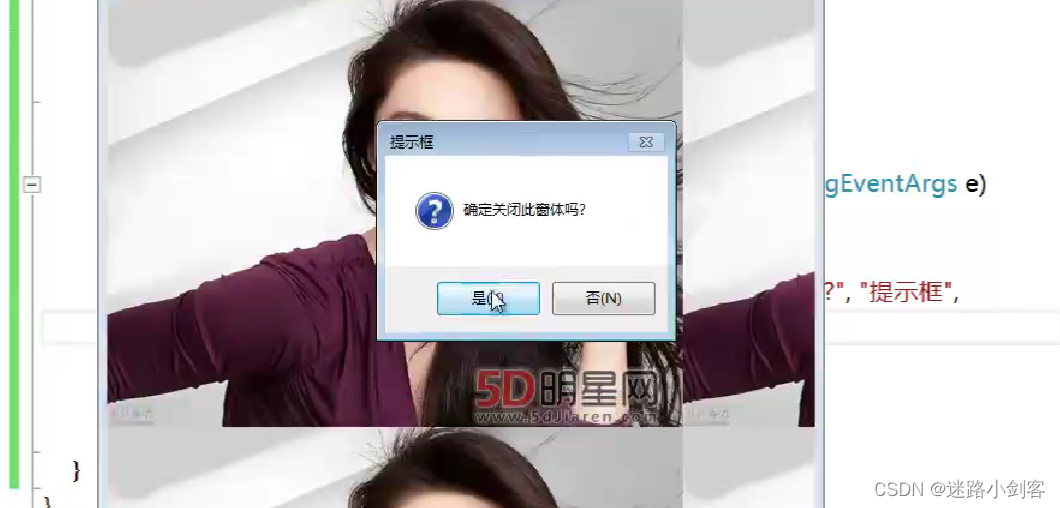
1.2、Form多窗体应用
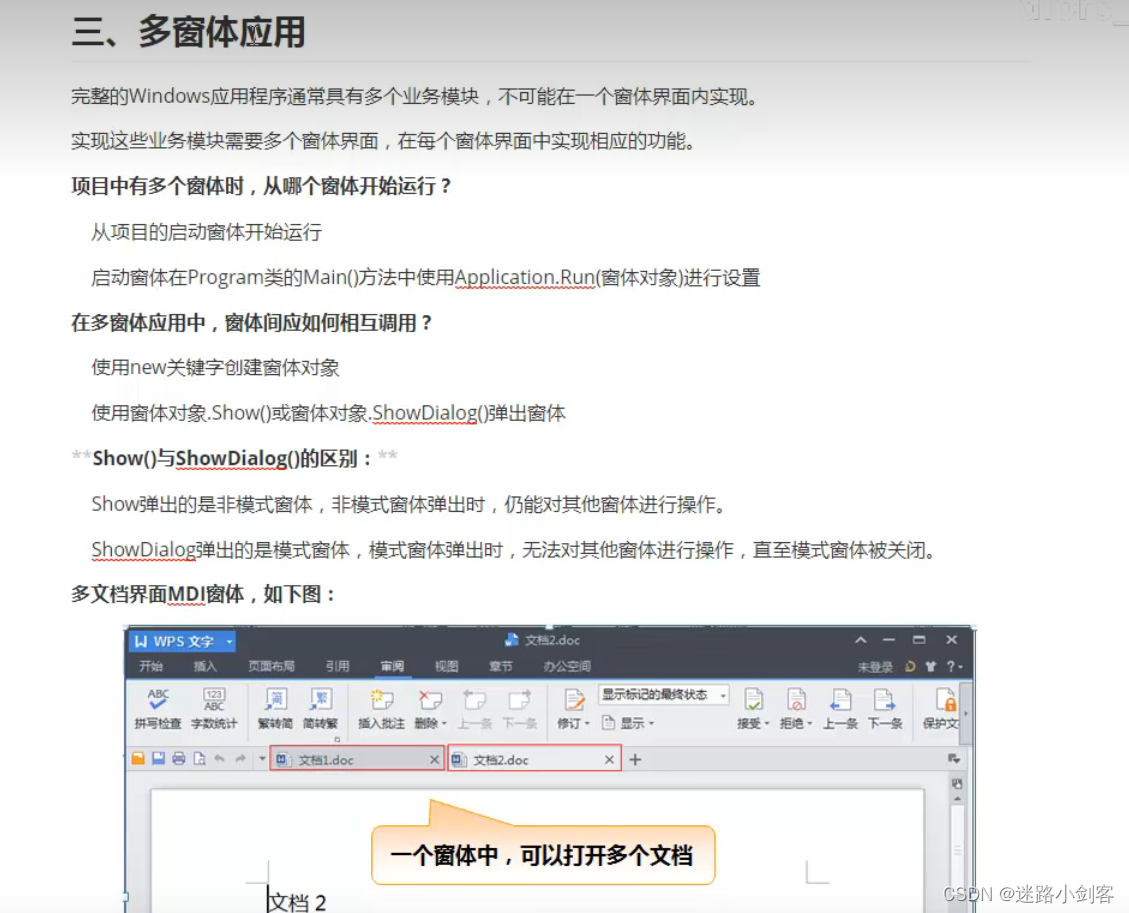
多窗体时候:启动问题
//  1、第一种打开方式
Application.Run(new Form1());


//  2、第二种打开方式
Form form = new Form2();
form.ShowDialog();
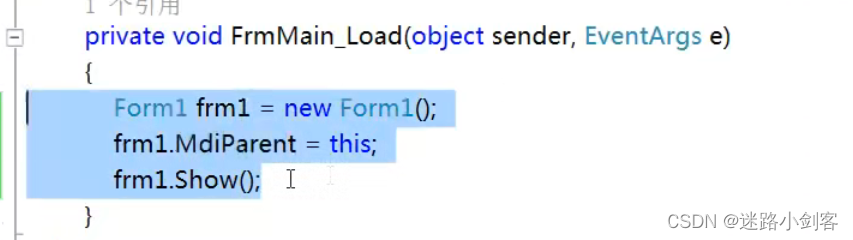
在父类框里边打开框
1.3、多窗体改变
1、pannel
为容器
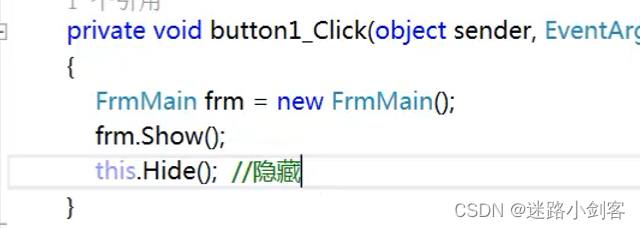
2、Close与Application
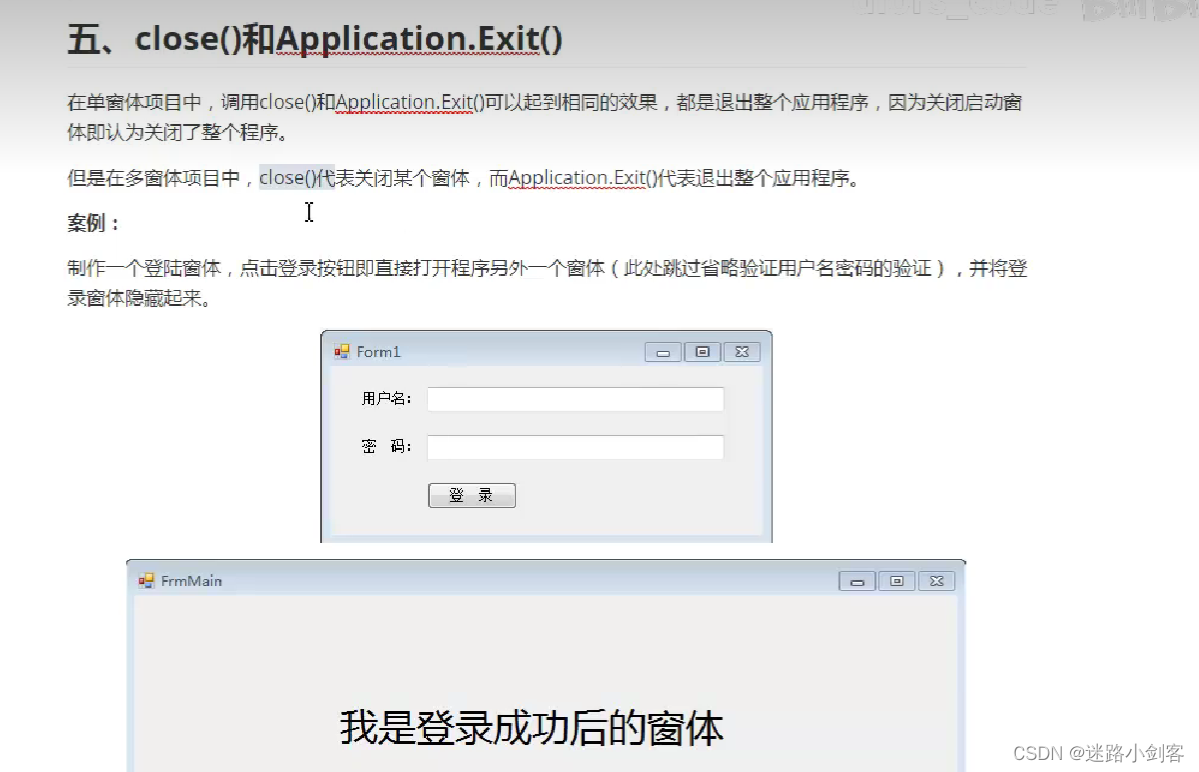
form.Hide() ; // 隐藏
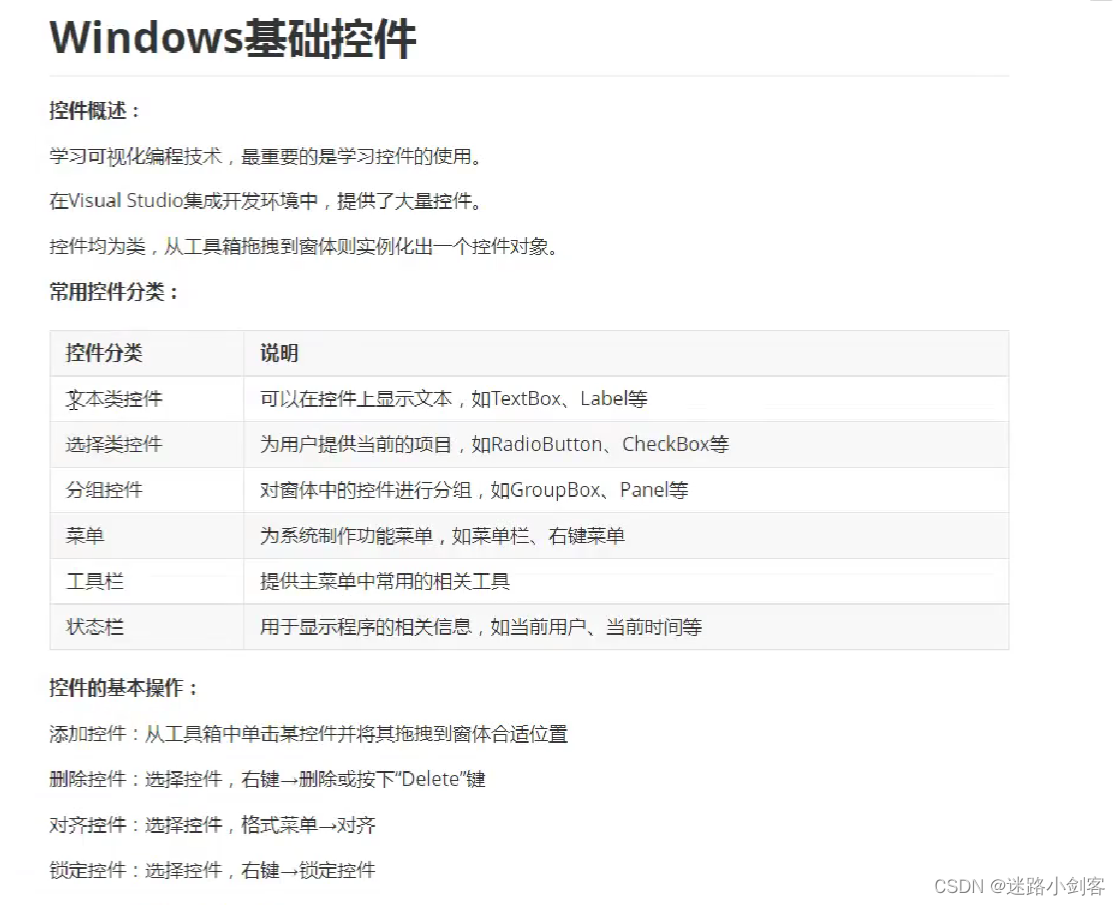
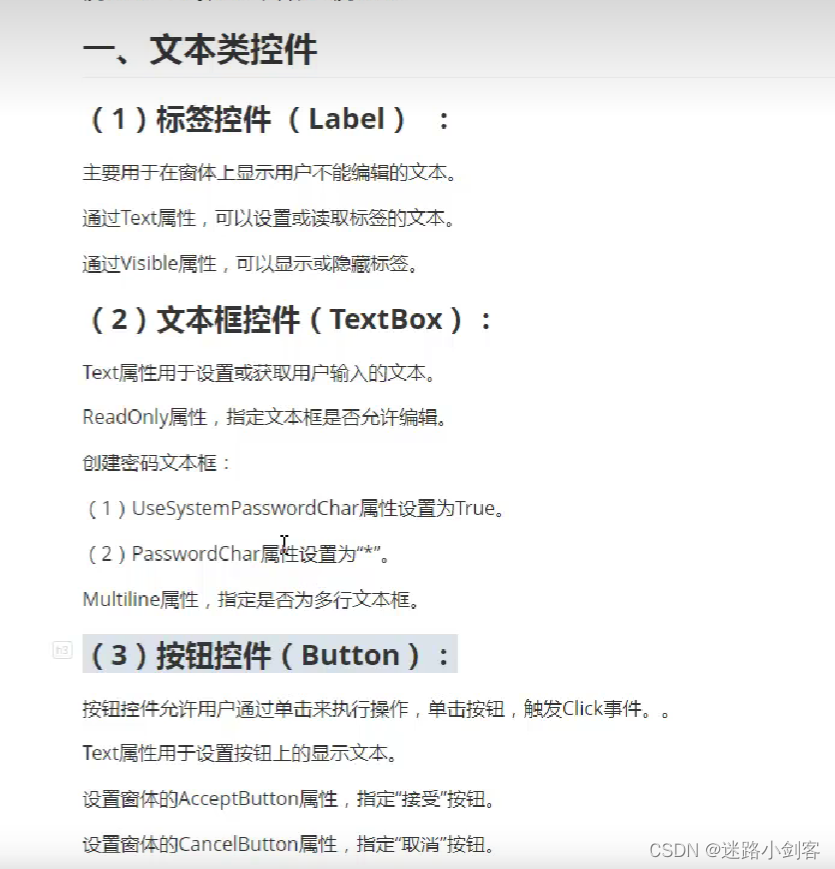
2、基础控件
2.1、文本类控件
2.2、菜单栏
2.2.1、下拉菜单
memuStrip
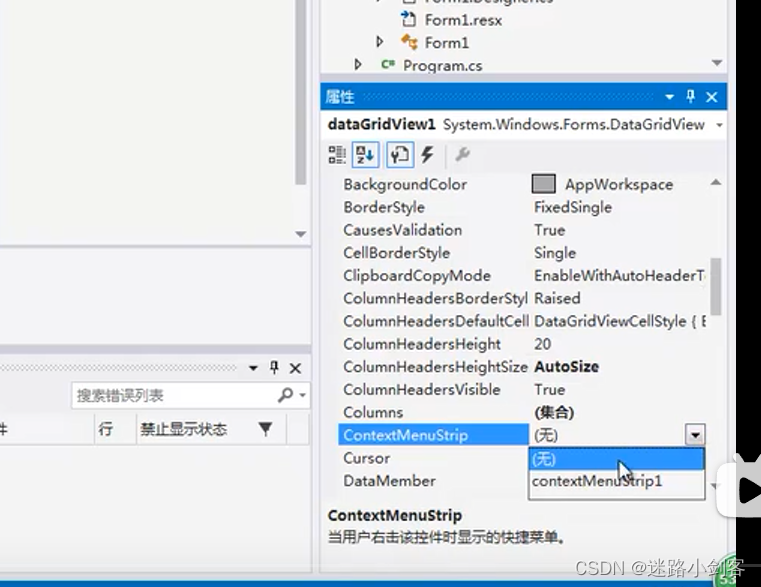
添加dataGridView控件 实现选中单元右键显示contextMenuStrip控件内容
2.2.2、弹出菜单
contextMenuStrip
弹出菜单必须与一些控件绑定才能在运行时候右键显示
2.2.3、工具栏
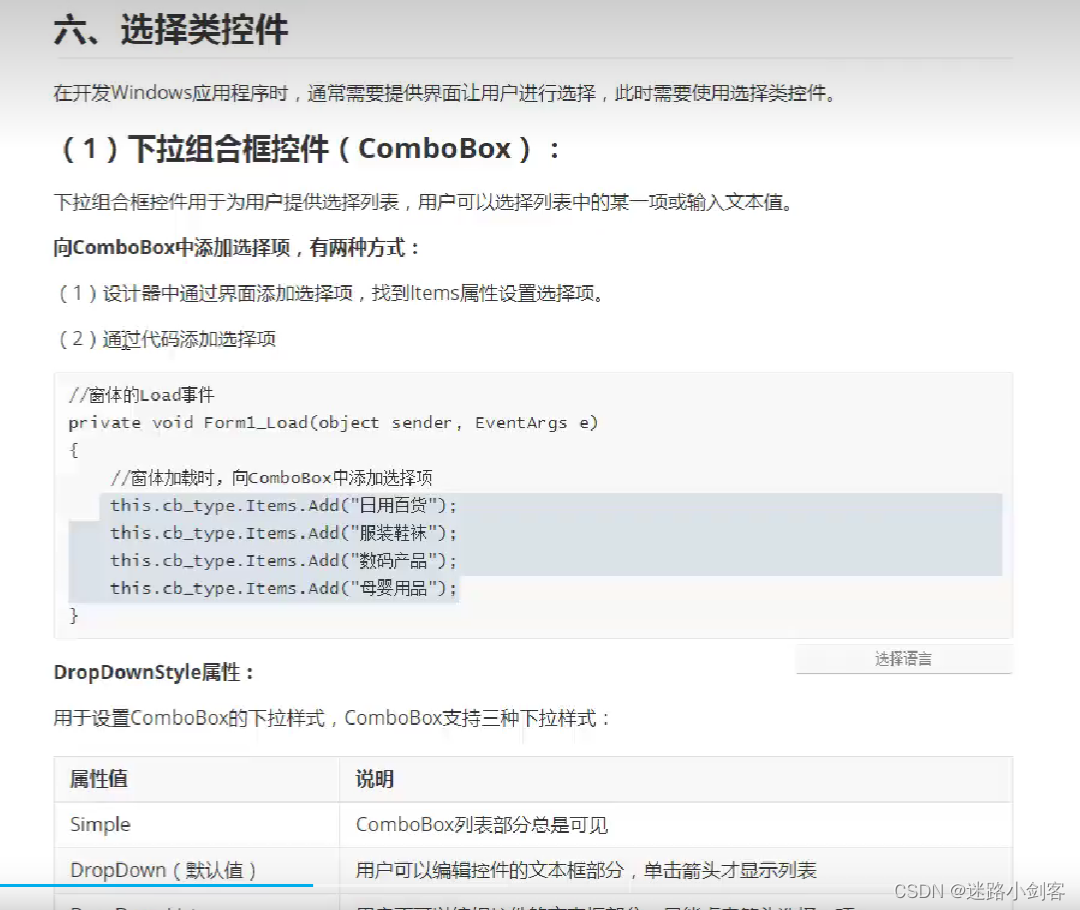
2.3、选择类控件

2.3.1、复选框控件
checkBox
2.3.2、单选框控件
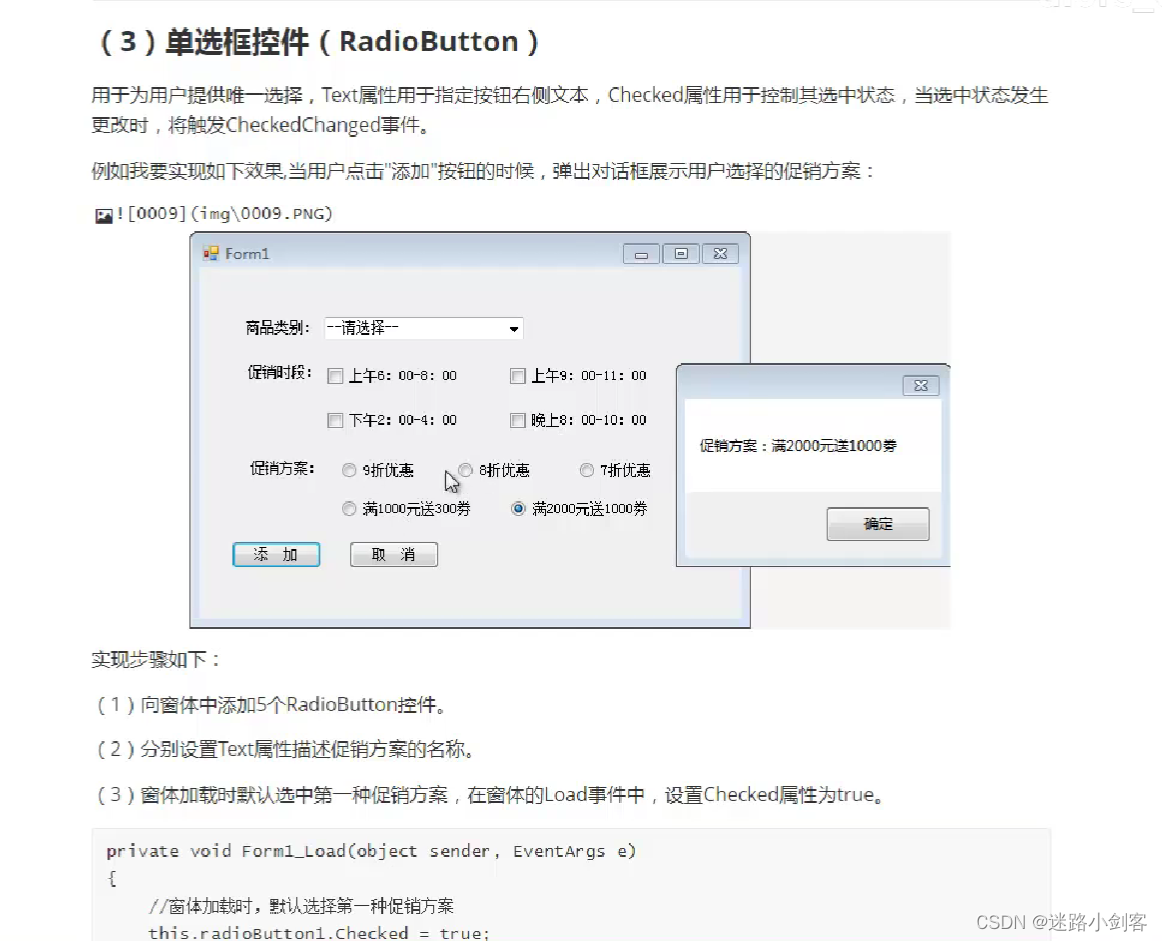
RadioButton
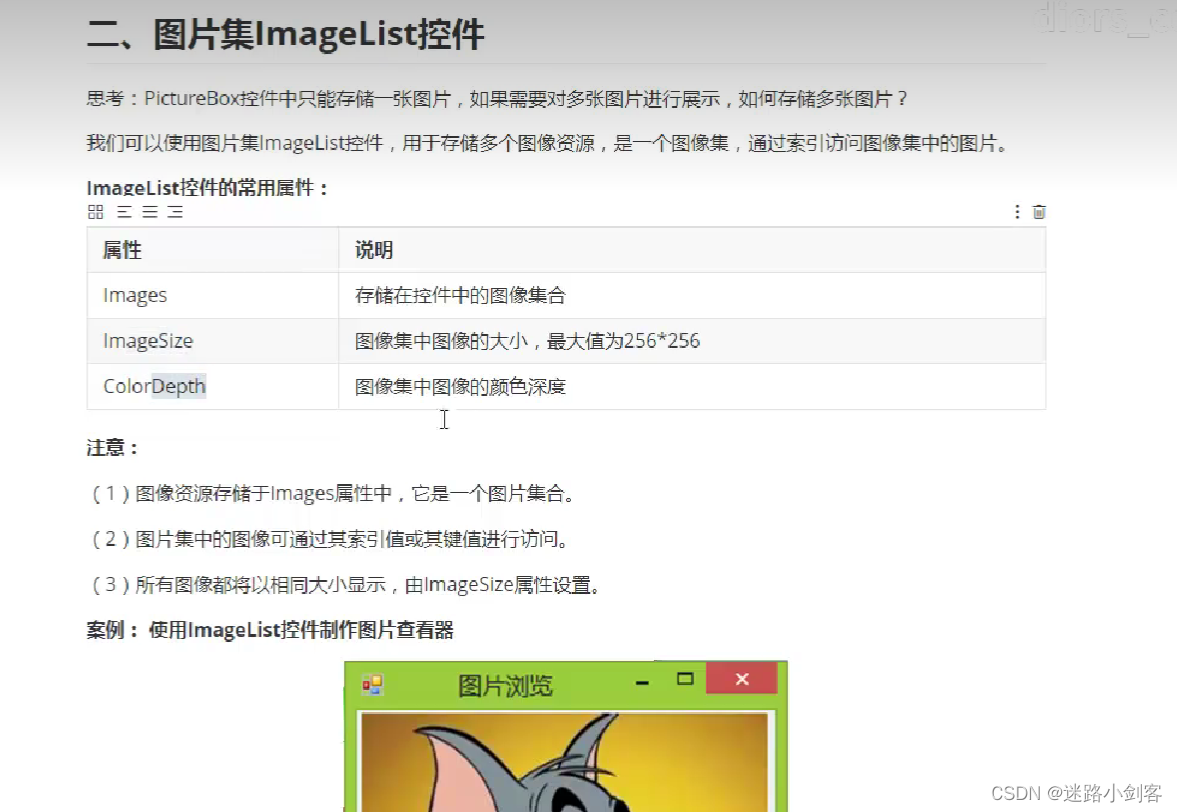
2.4、图片控件
2.4.1、图片控件

2.4.2、图片集
2.5、计时器控件
2.5.1、Timer控件
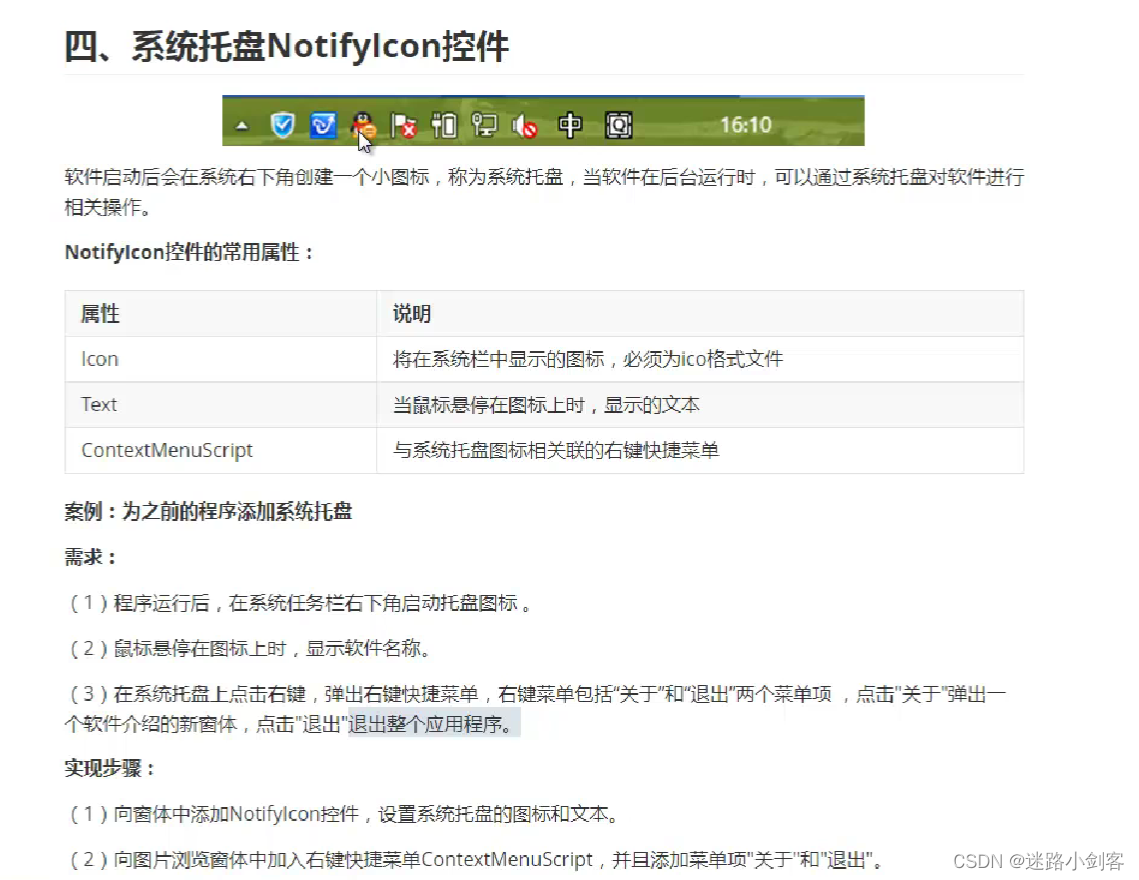
2.6、系统托盘
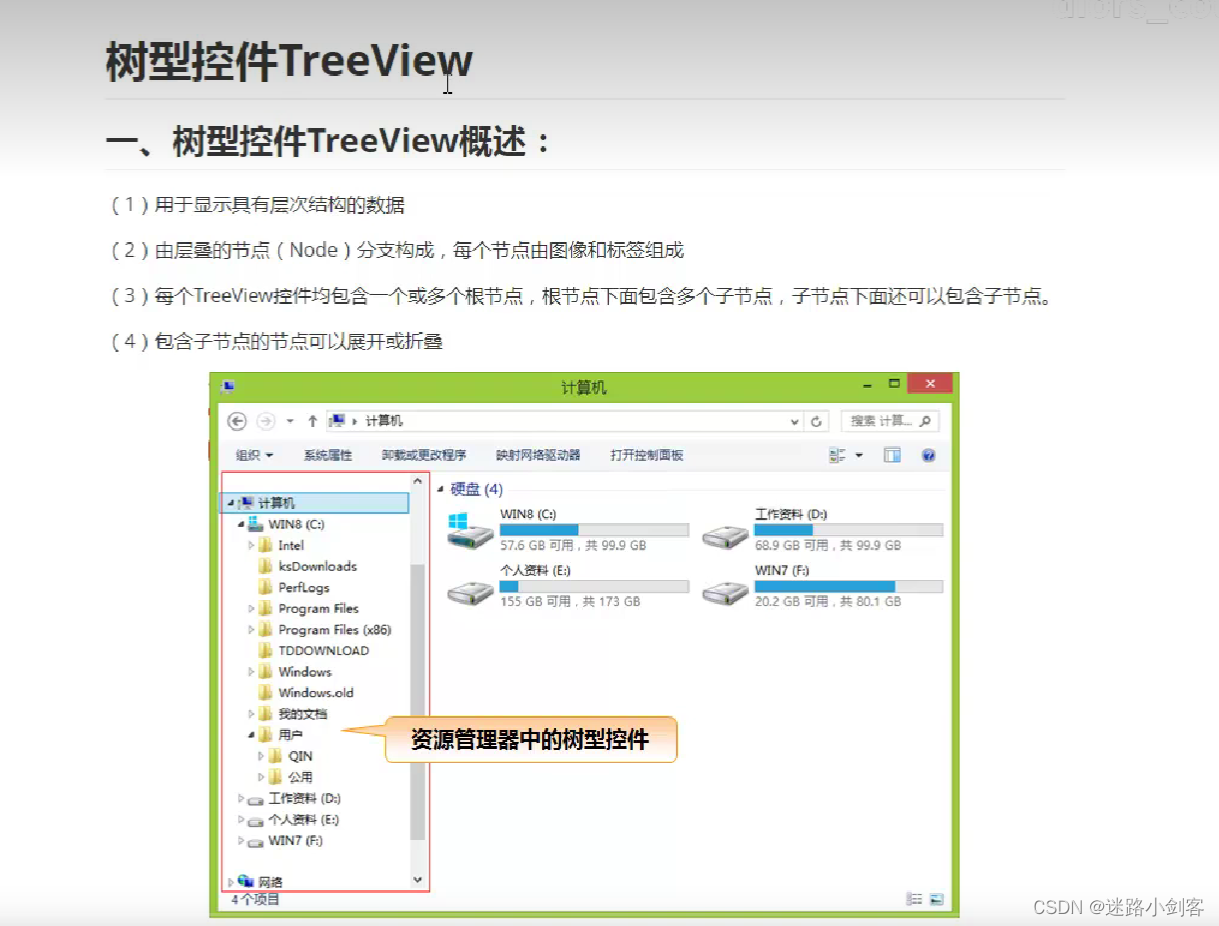
2.7、树形控件
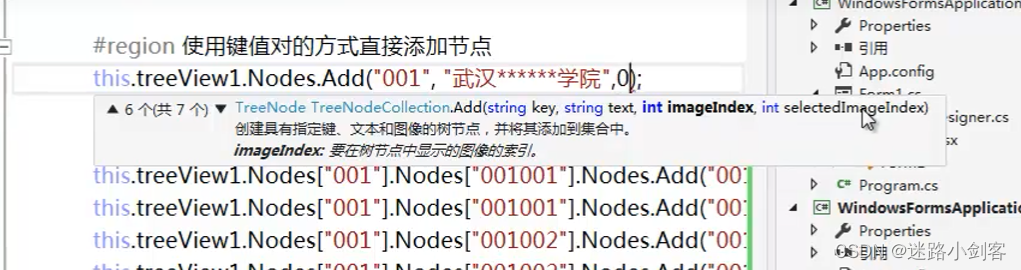
private void Form1_Load(object sender, EventArgs e)
{
# region 树形控件
// this.treeView1.ExpandAll();
TreeNode root = new TreeNode("安徽***大学");
this.treeView1.Nodes.Add(root);
TreeNode root1 = new TreeNode("电子上午");
// 将专业节点你加入根节点
root.Nodes.Add(root1);
// 创建课程节点
// 键值对添加
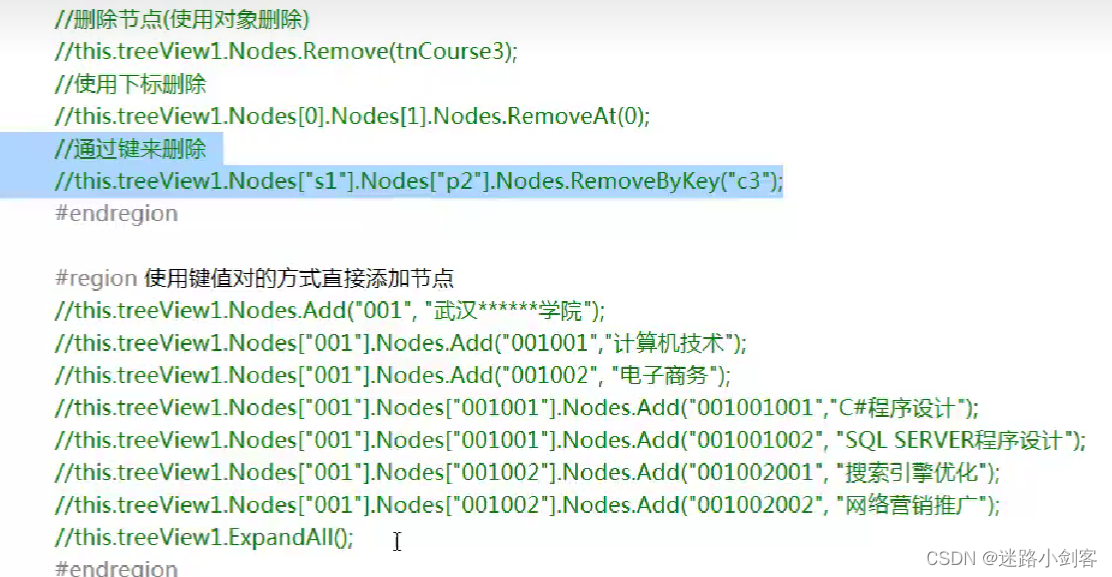
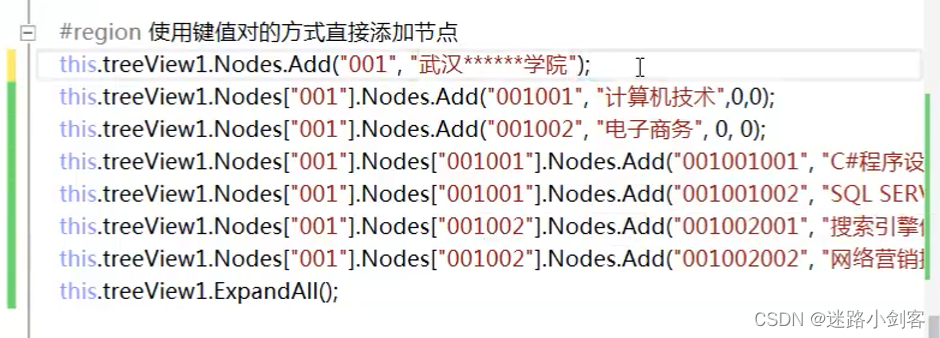
this.treeView1.Nodes.Add("001","002");
this.treeView1.Nodes["001"].Nodes.Add("001", "dianzishahgnwu ");
// 三级节点
this.treeView1.Nodes["001"].Nodes["001"].Nodes.Add("001", "我是三级节点");
this.treeView1.Nodes["001"].Nodes[0].ImageIndex = 2;
// this.treeView1.Nodes["001"].Nodes.RemoveAt(0);
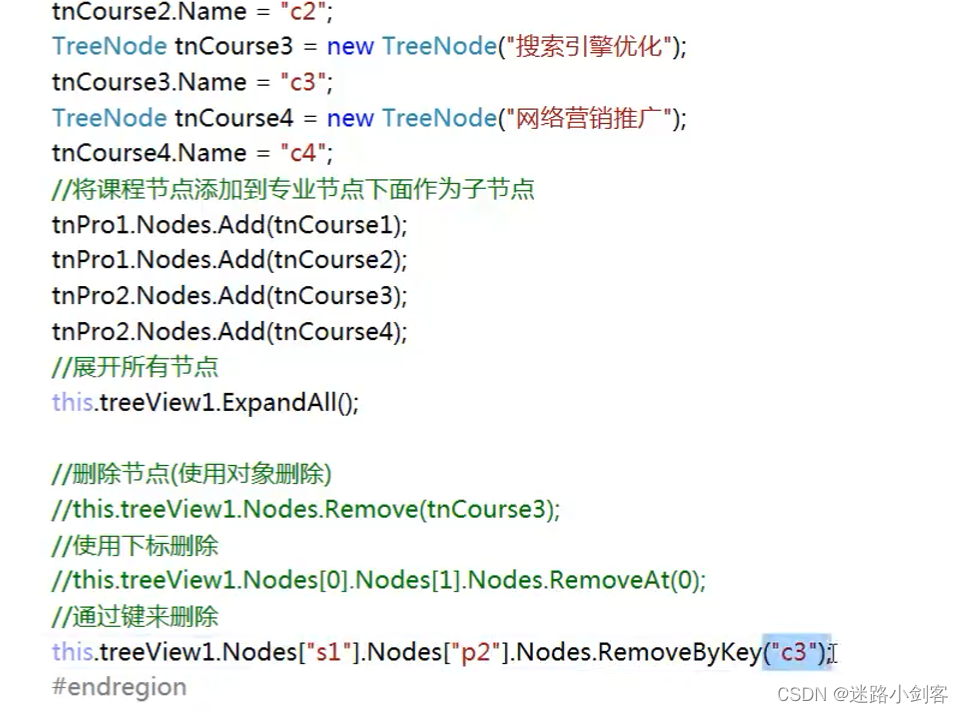
// 键值对删除
#endregion
}
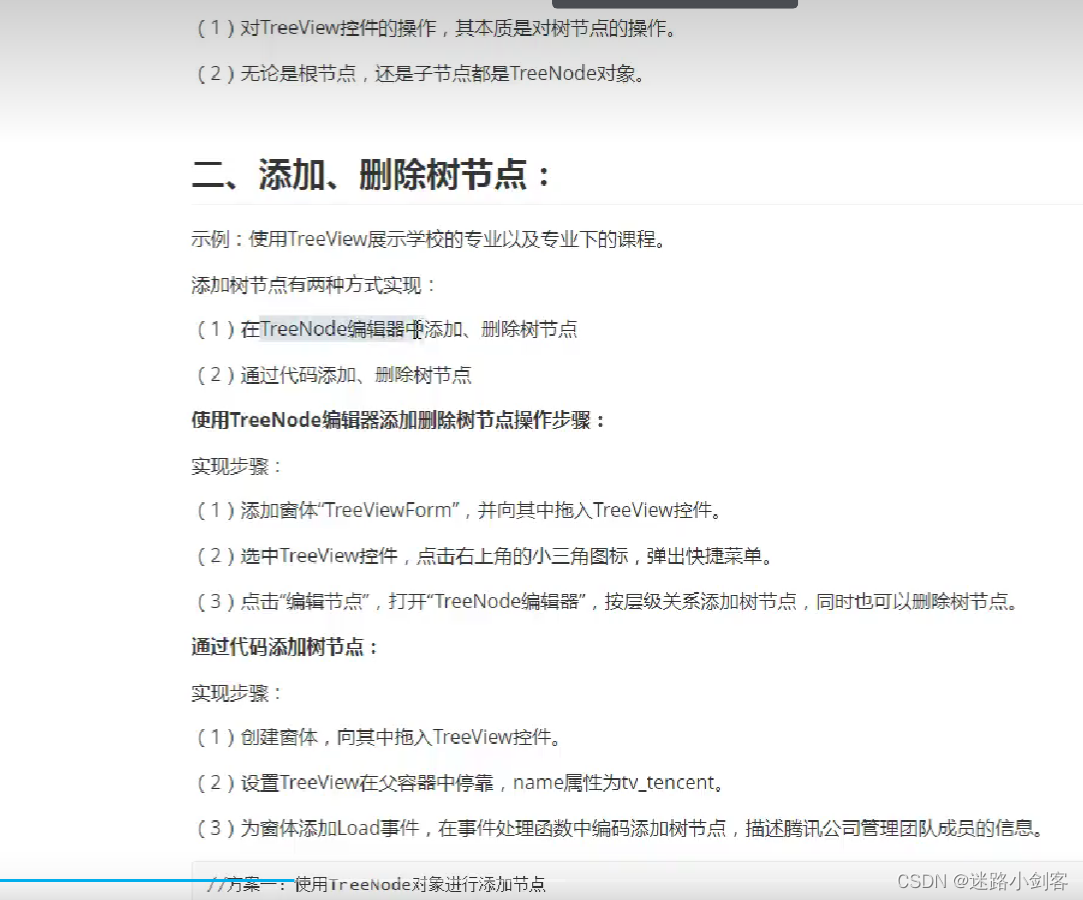
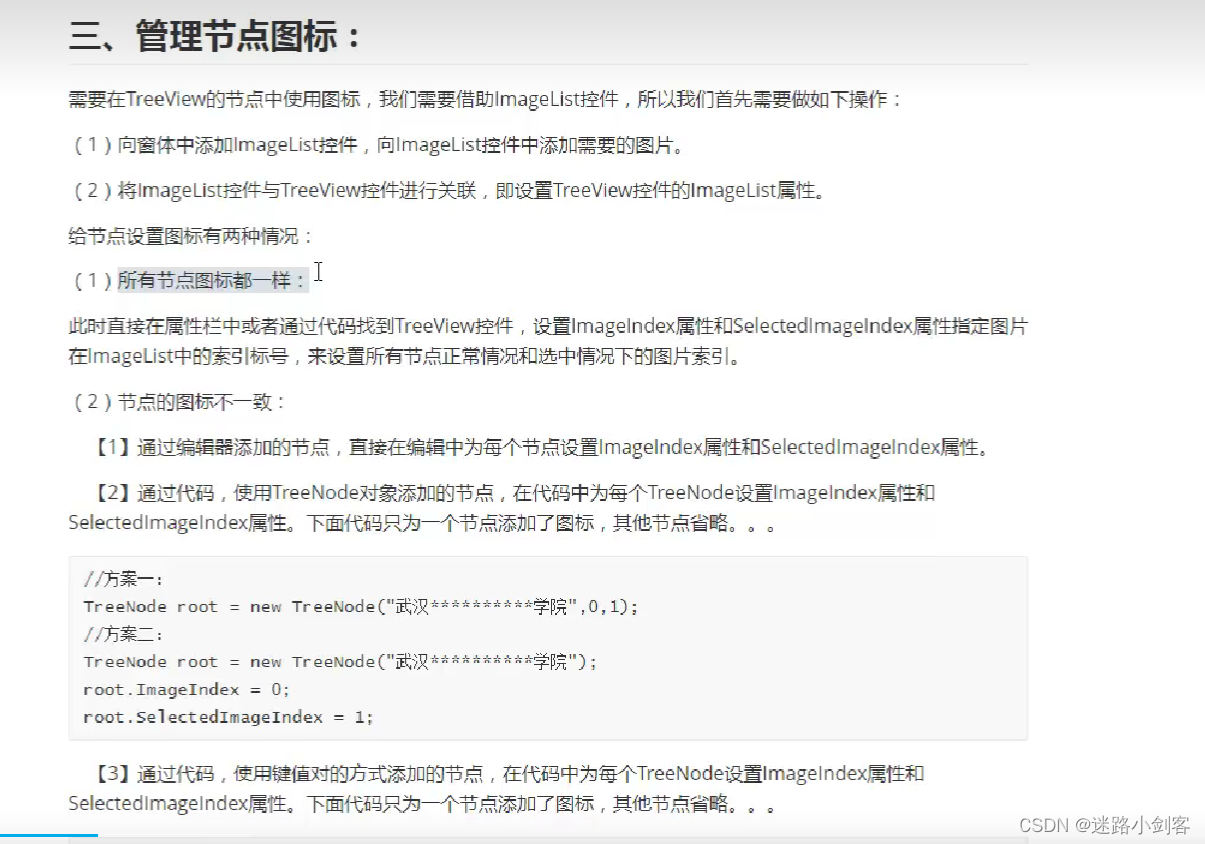
2.7.1、管理节点图标
2.7.1、响应事件
// 选中控件触发
private void treeView1_AfterSelect(object sender, TreeViewEventArgs e)
{
TreeNode node = this.treeView1.SelectedNode;
MessageBox.Show(node.Name + ",", node.Text);
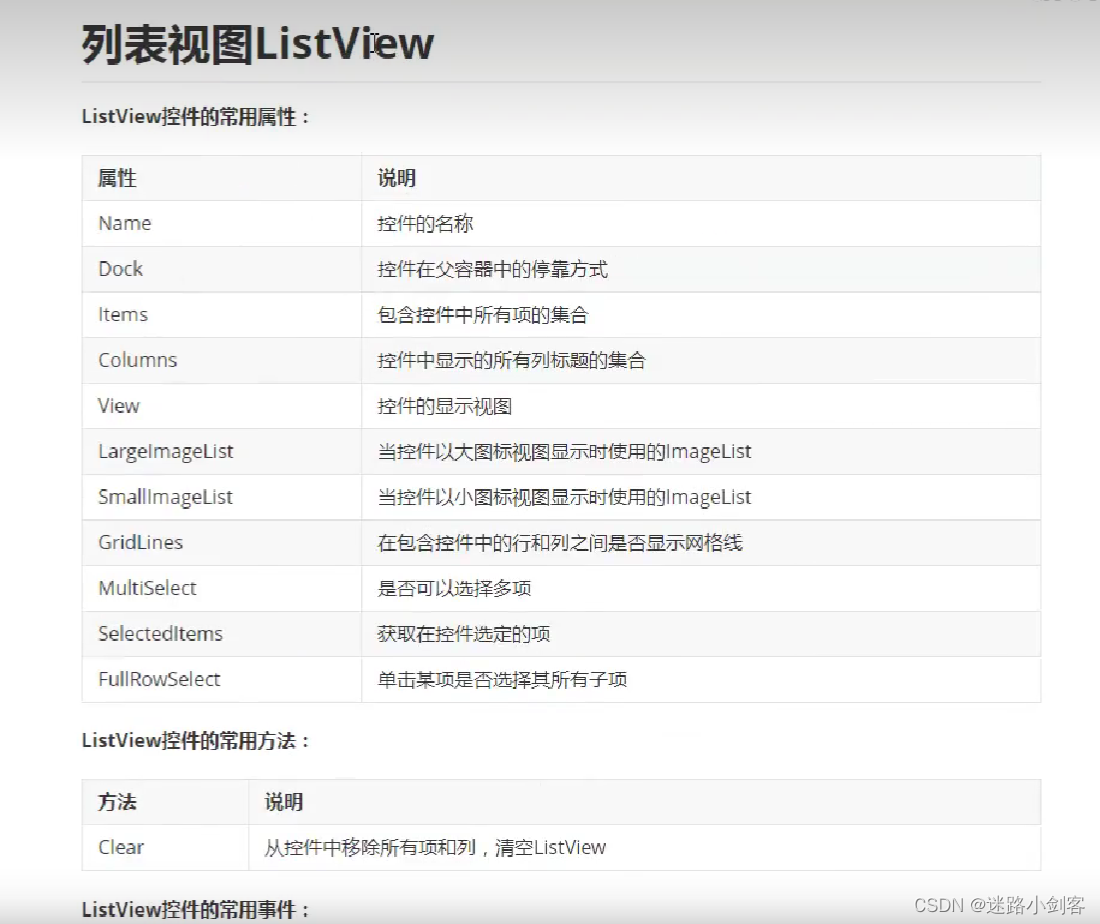
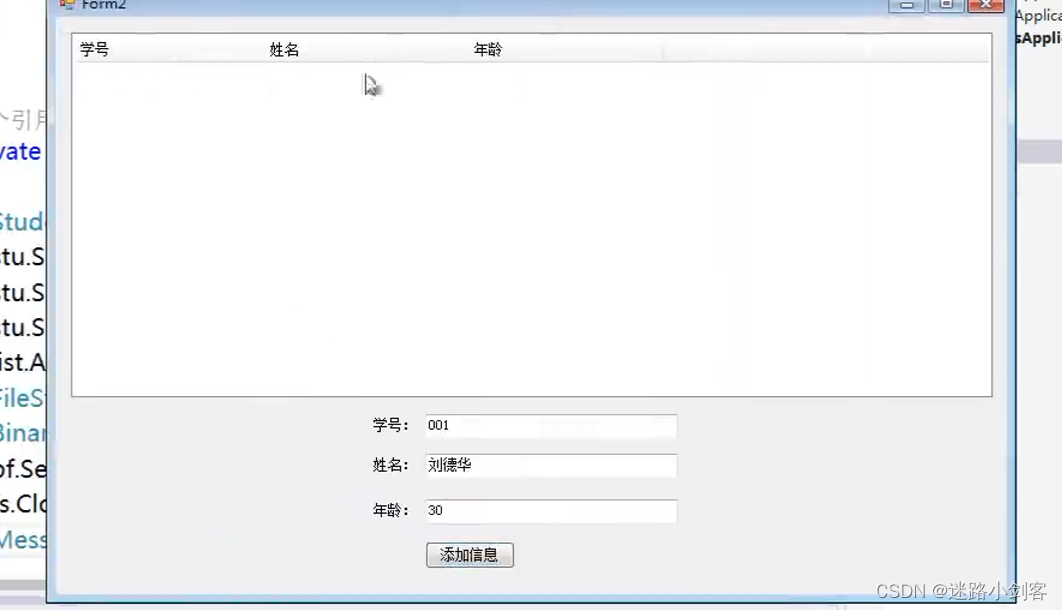
}2.8、列表视图
private void Form1_Load(object sender, EventArgs e)
{
    ListViewItem item1 = new ListViewItem("云中君");
    item1.SubItems.Add("中等");
    item1.SubItems.Add("超强");
    item1.SubItems.Add("中等");
    item1.SubItems.Add("难");

    this.listView1.Items.Add(item1);
    ListViewItem item2 = new ListViewItem("猪八戒");
    item2.Name = "zbj";
    item1.SubItems.Add("中等");
    item1.SubItems.Add("超强");
    item1.SubItems.Add("中等");
    item1.SubItems.Add("难");

    this.listView1.Items.Add(item2);

    //  移除,,键值对删除
    // this.listView1.Items.Remove(item1);
    //  this.listView1.Items.RemoveAt(1);
    this.listView1.Items.RemoveByKey("zbj");


}
2.8.1、视图切换

2.9、文件操作
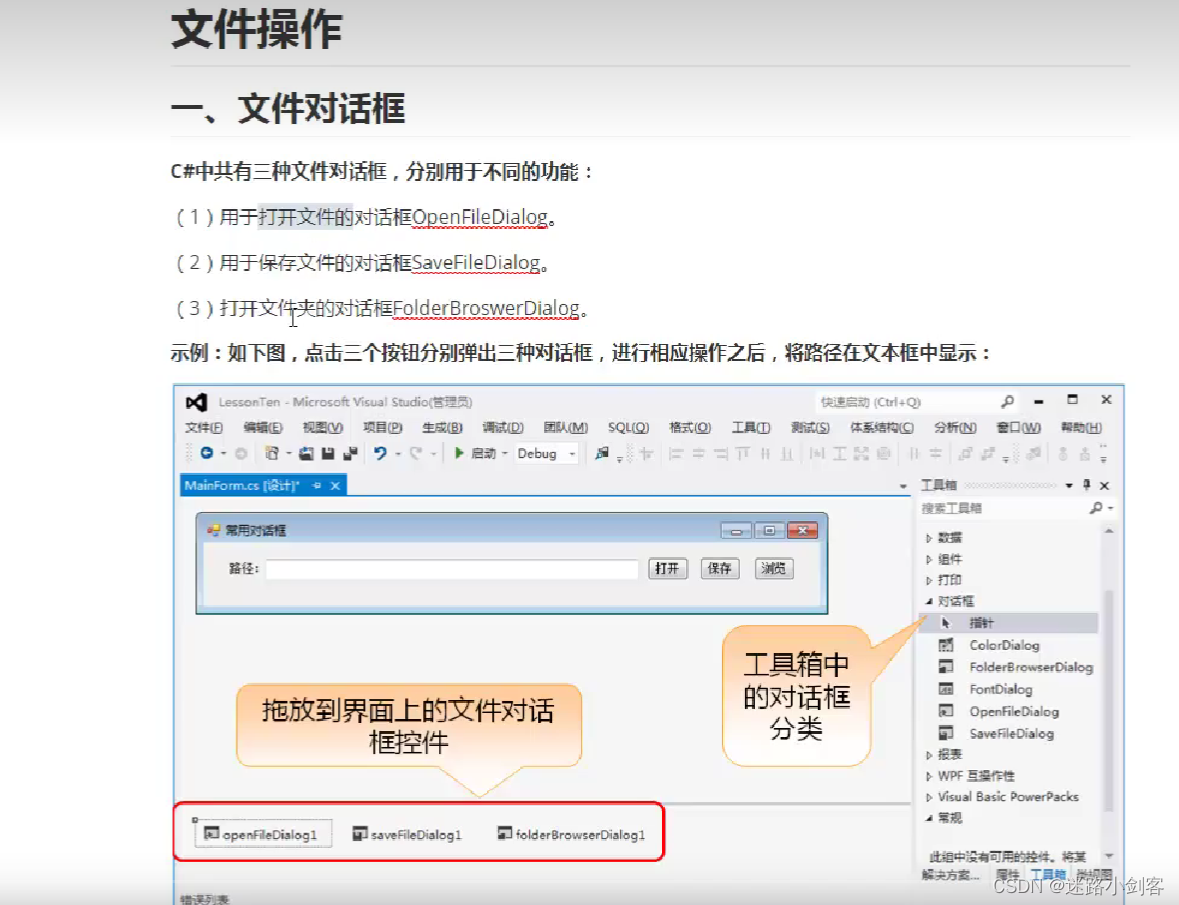
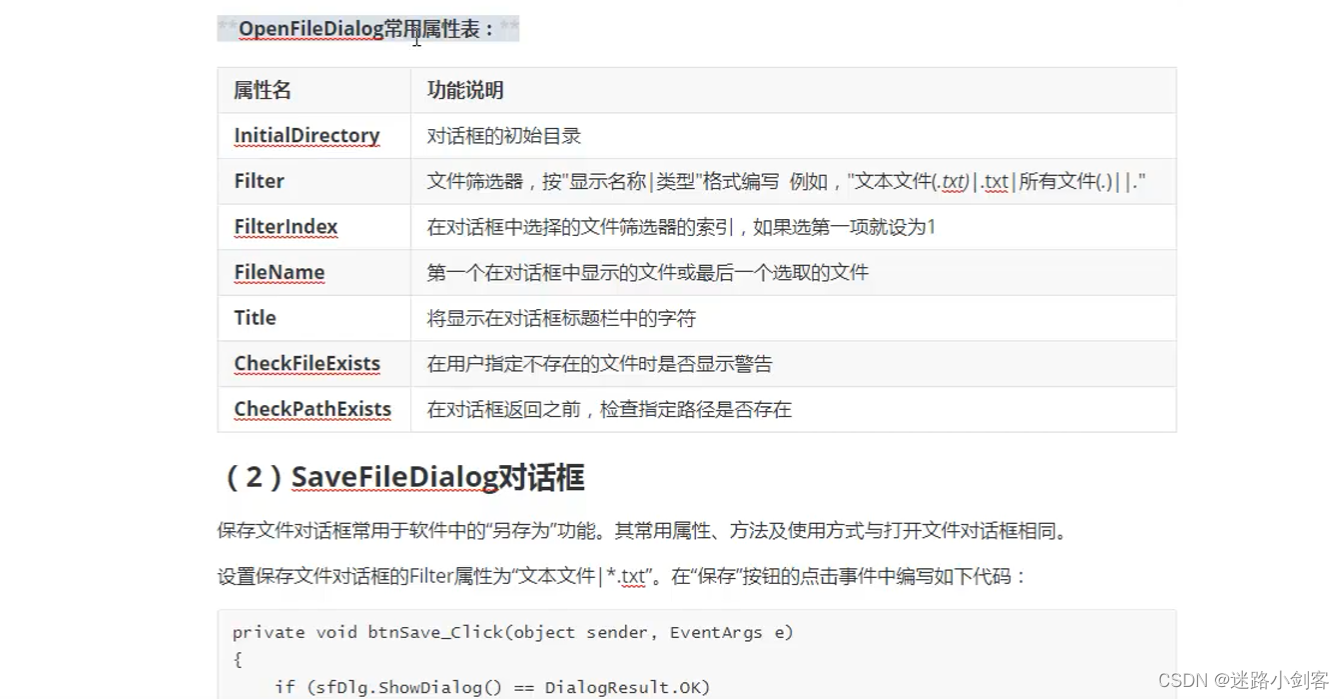
2.9.1、打开文件对话框
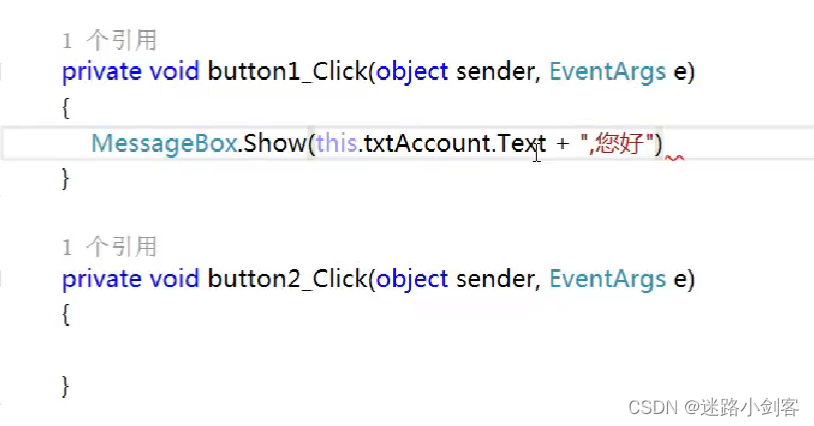
private void button1_Click(object sender, EventArgs e)
{
// this.openFileDialog1.ShowDialog(); // 打开文件夹
if (this.openFileDialog1.ShowDialog() == DialogResult.OK)
{
this.txtPath.Text = this.openFileDialog1.FileName; // 选中的文件路径
}
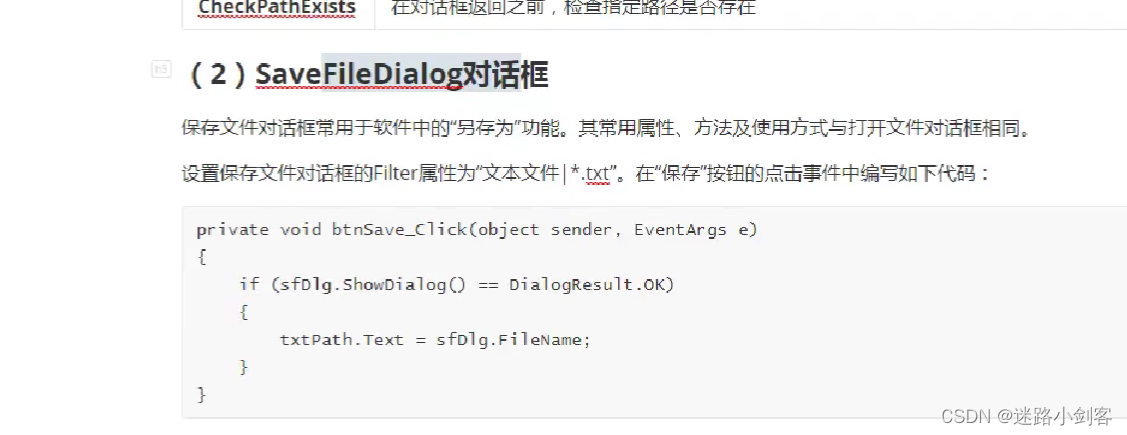
}2.9.2、保存文件对话框
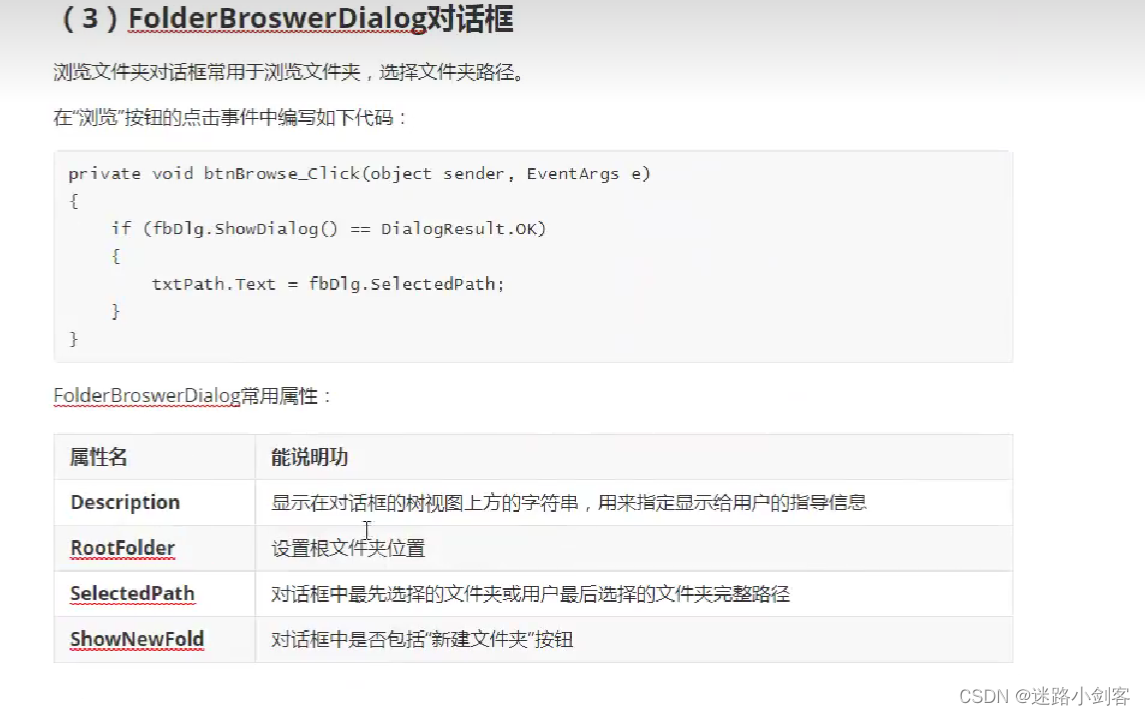
2.9.3、浏览文件对话框
2.9.4、文件常用操作
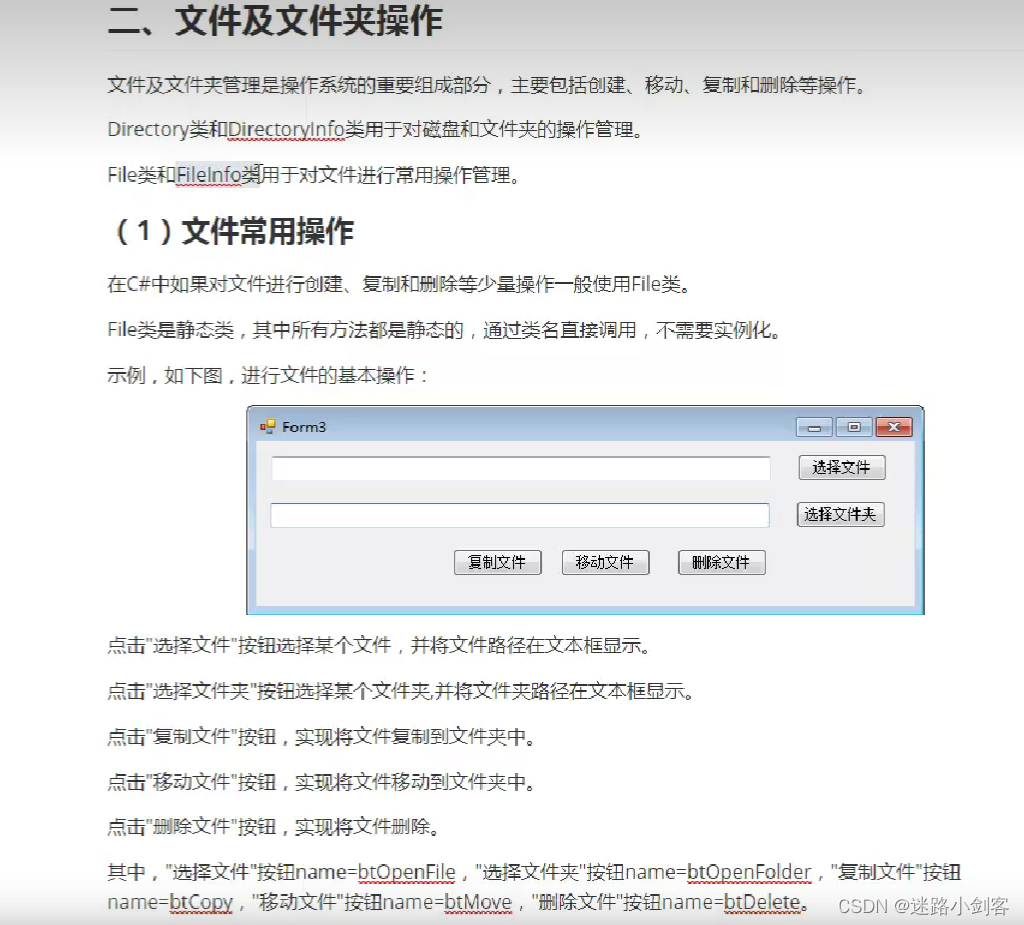
private void btOpenFile_Click(object sender, EventArgs e)
{
if (this.openFileDialog1.ShowDialog() == DialogResult.OK)
{
this.texFileName.Text = this.openFileDialog1.FileName;
}
}
private void Form1_Load(object sender, EventArgs e)
{
}
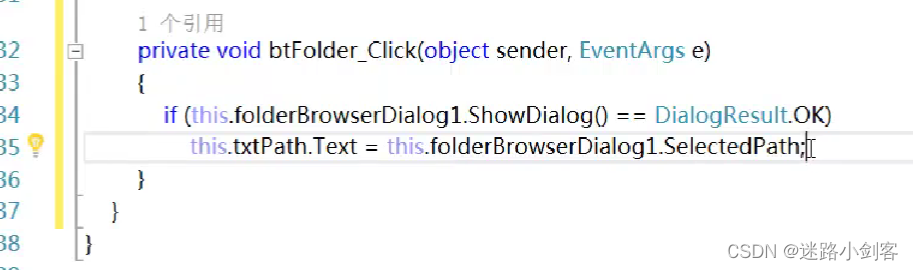
private void btOpenFolder_Click(object sender, EventArgs e)
{
if (this.folderBrowserDialog1.ShowDialog() == DialogResult.OK)
{
this.tetFolderName.Text = this.folderBrowserDialog1.SelectedPath;
}
}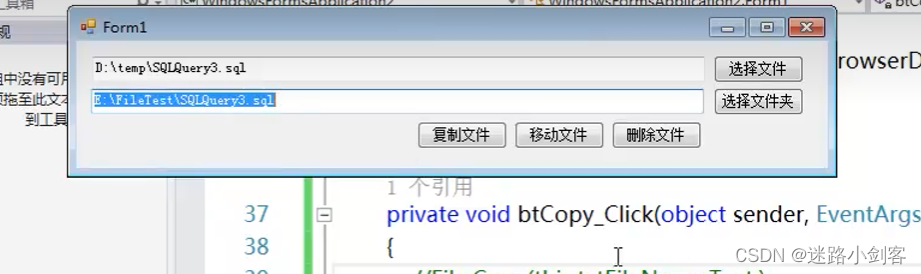

 private void btCopy_Click(object sender, EventArgs e)
 {
     string[] arrString = this.txtFileName.Text.Split('\\');
     string newName = arrString[arrString.Length - 1];
     File.Copy(this.txtFileName.Text, this.txtFolderName.Text +"\\"+newName ,true);

 }
2.9.4、FileInfo
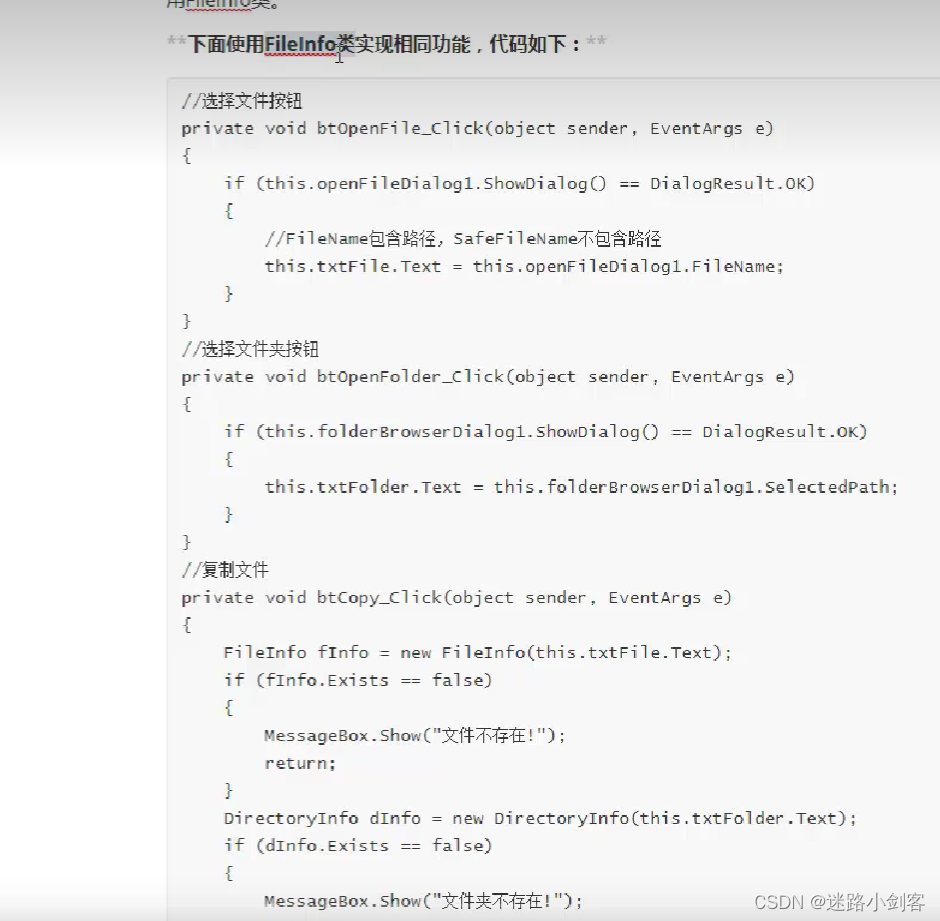
File提供的是一个静态方法
FileInfo 提供的实例化方法, 必须实例化一个文件对象
FileInfo fInfo=newFileInfo("路径");

fInfo.Exists==true;
fInfo.CopyTo( "目标文件路径” );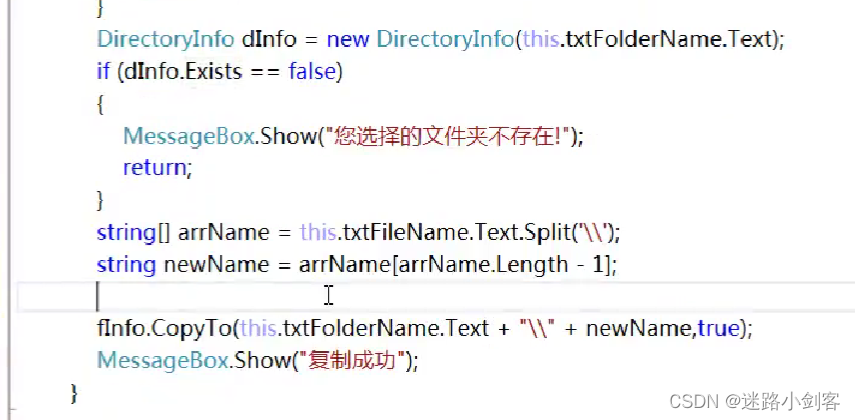
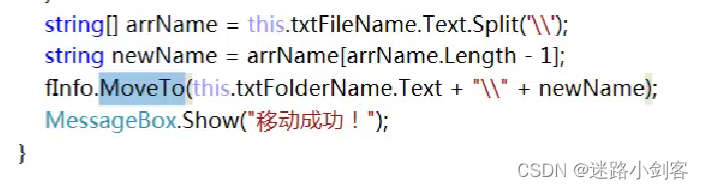
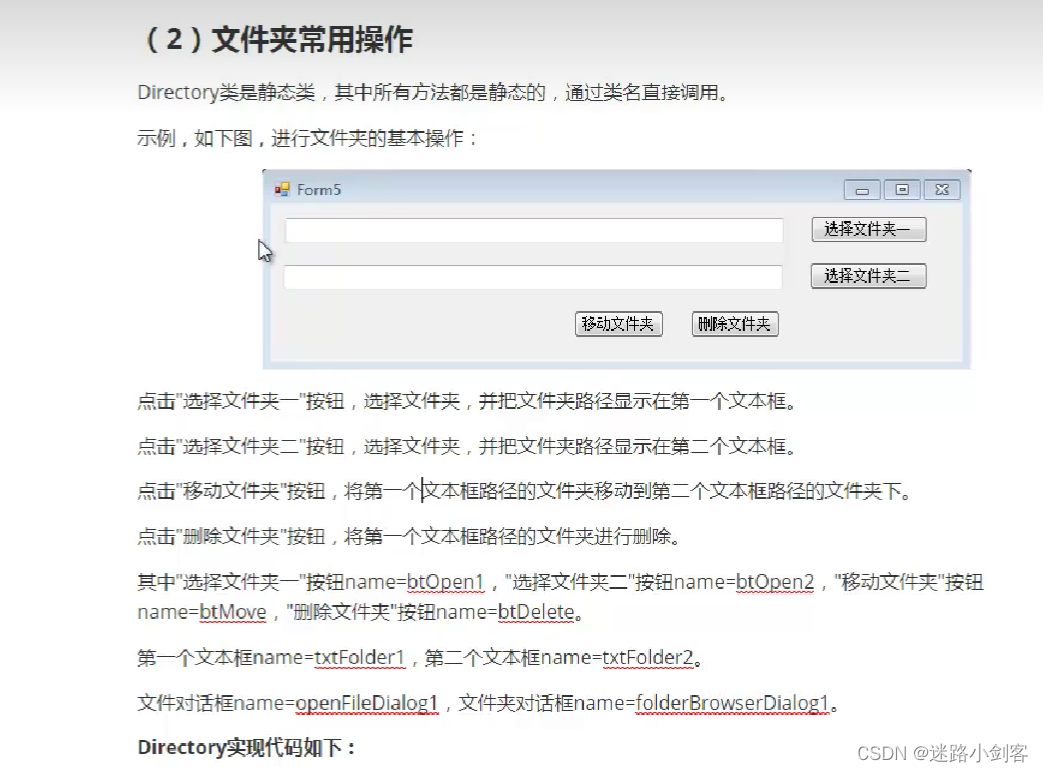
2.9.5、文件夹操作
stringl] arrFolderName = this.txtFolder1.Text.Split('\1');
string newName = arrFolderName[arrFolderName.Length-1];
if (Directory.Exists(this.txtFolder2.Text +"!" + newName)){
//MessageBox.Show("对不起,目标文件夹已经存在了");
//return;
Directory.Delete(this.txtFolder2.Text + "ll" + newName,true);}
/ /move只支持相同盘符操作。
Directory.Move(this.txtFolder1.Text, this.txtFolder2.Text+"1l"+ newName);
}


private void btDelete_Click(object sender,EventArgs e){
DirectoryInfo startInfo = new DirectoryInfo(this.txtFolder1.Text);
if (startInfo.Exists == false)
{
MessageBox.Show("文件夹不存在");return;
}
startInfo.Delete(true);
MessageBox.Show("删除成功!");
}
}
2.9.6、文件夹的复制移动 跨盘

string sourceDir = @"c:\current";
string backupDir = @"c:\archives\2008";

try
{
    string[] picList = Directory.GetFiles(sourceDir, "*.jpg");
    string[] txtList = Directory.GetFiles(sourceDir, "*.txt");

    // Copy picture files.
    foreach (string f in picList)
    {
        // Remove path from the file name.
        string fName = f.Substring(sourceDir.Length + 1);

        // Use the Path.Combine method to safely append the file name to the path.
        // Will overwrite if the destination file already exists.
        File.Copy(Path.Combine(sourceDir, fName), Path.Combine(backupDir, fName), true);
    }

    // Copy text files.
    foreach (string f in txtList)
    {

        // Remove path from the file name.
        string fName = f.Substring(sourceDir.Length + 1);

        try
        {
            // Will not overwrite if the destination file already exists.
            File.Copy(Path.Combine(sourceDir, fName), Path.Combine(backupDir, fName));
        }

        // Catch exception if the file was already copied.
        catch (IOException copyError)
        {
            Console.WriteLine(copyError.Message);
        }
    }

    // Delete source files that were copied.
    foreach (string f in txtList)
    {
        File.Delete(f);
    }
    foreach (string f in picList)
    {
        File.Delete(f);
    }
}

catch (DirectoryNotFoundException dirNotFound)
{
    Console.WriteLine(dirNotFound.Message);
}
2.9.6、文本读写器
//  字节读取
int code =fs.ReadByte();  //  读取一个字节
//  强制转换为 Int32 的字节;或者如果已到达流的末尾,则为 -1

FileStream.ReadByte();
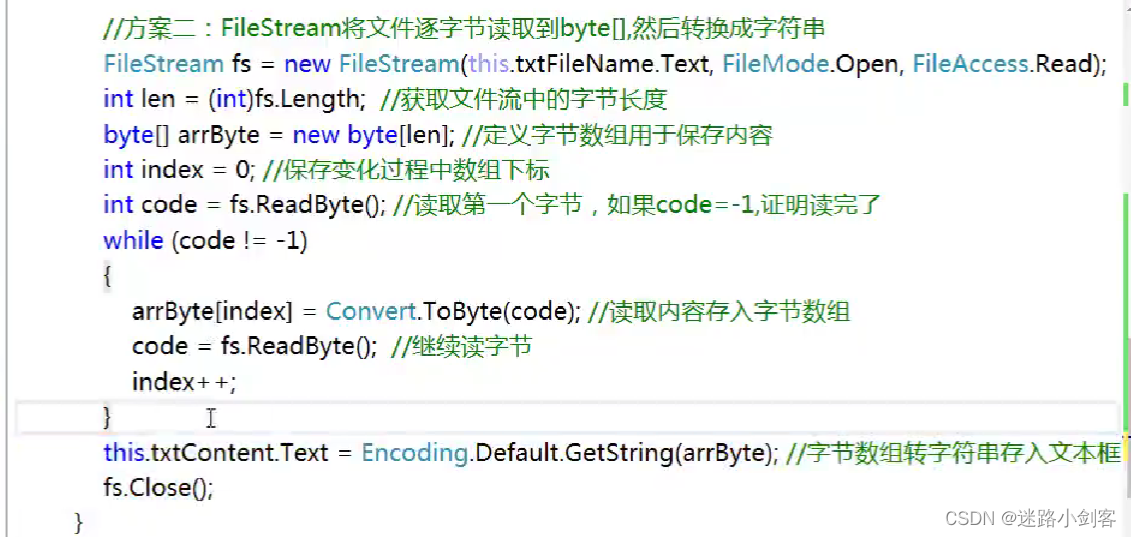
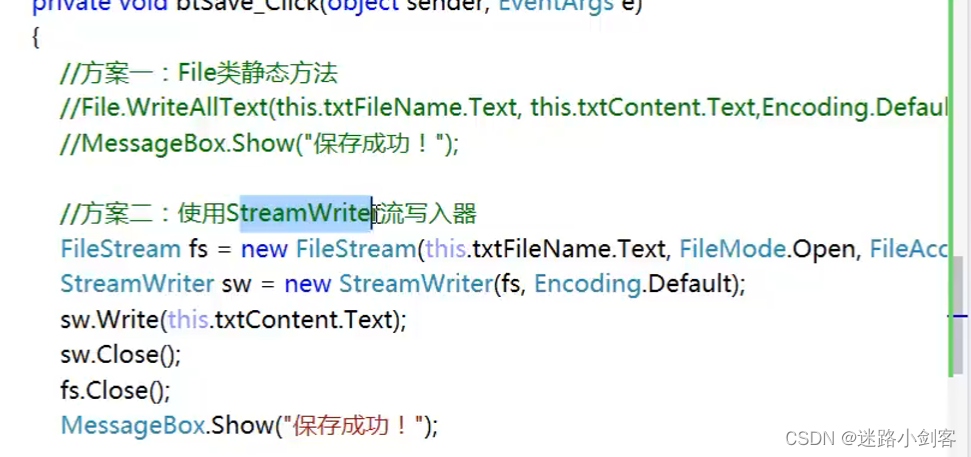
2.9.7、写入器
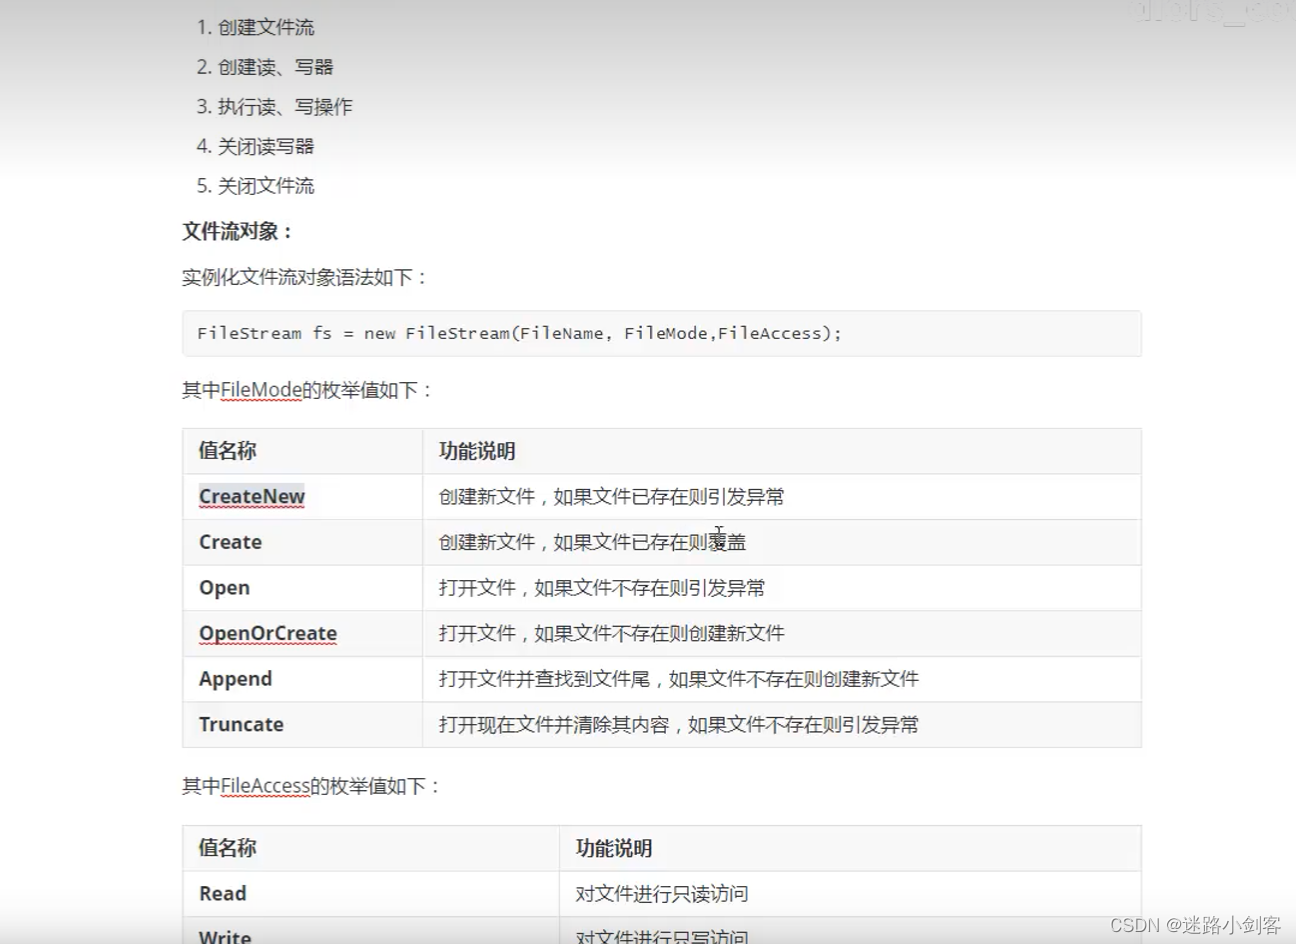
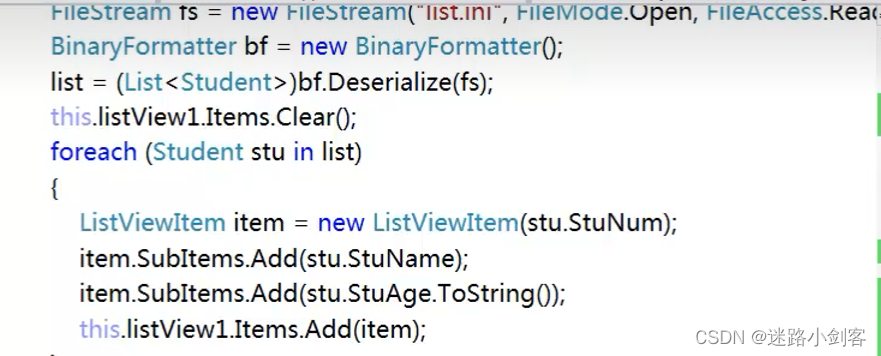
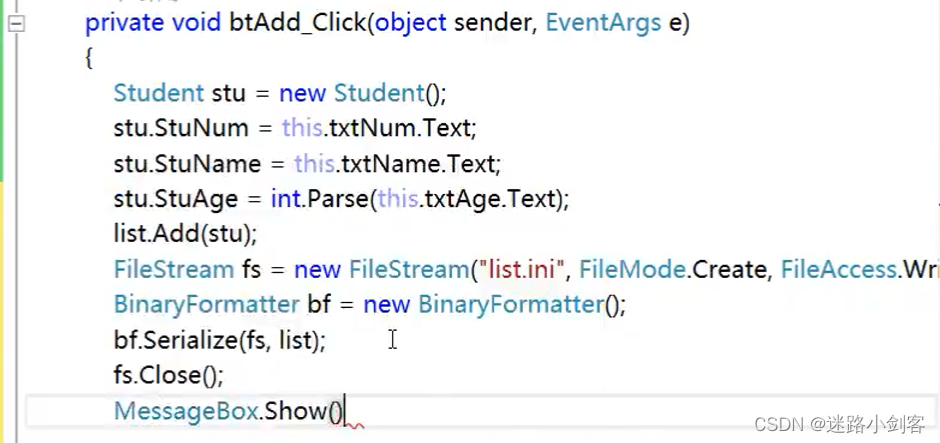
2.9.8、序列化与反序列化

序列化就是将文本存到对象中去
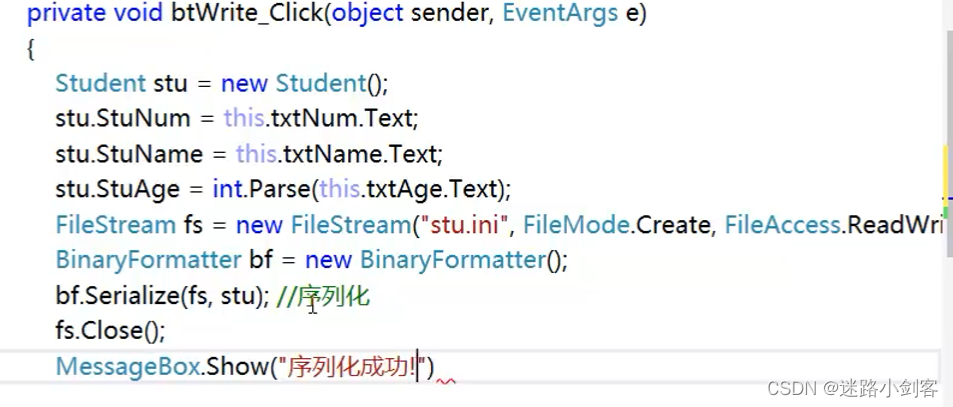
类可序列化,类必须标明属性 [ Serializable]
FileStream fs =new FileStream("文件路径",FileMode.Open,FileAccess.ReadWrite);
BinaryFormatter by = new  BinaryFormatter();
bf.Deserialize(fs)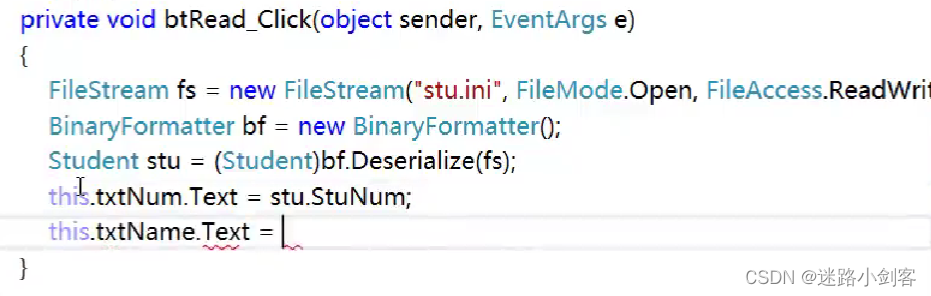
绑定数据函数:BindData();
ListView: 列表视图

2.10、数据栏目
2.10.1、dataGridView
private void BindData()
{
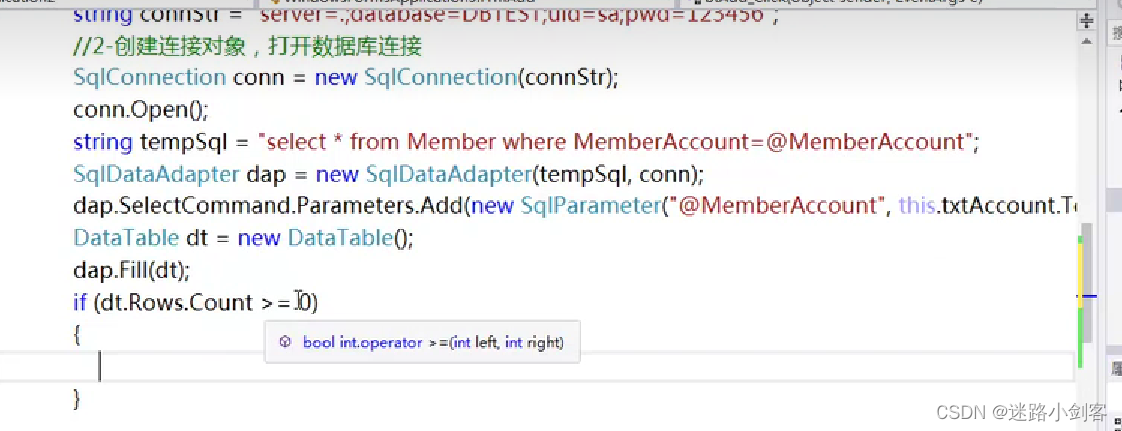
// 1-编写连接数据库字符串(SQL 用户名密码)
string constr = "server=.;database=DBTEST;ud=sa;pwd=123456";
// 2-创建连接对象,打开连接
SqlConnection conn = new SqlConnection(constr);
conn.Open();
// 3-编写sql查询语句
string sql = "select*from Member"; // 查询语句sql
SqlDataAdapter adp = new SqlDataAdapter(sql, conn); // 执行对象
adp.Fill(dt); // 把读取的数据库内容送到DataTable dt里边
this.dataGridView1.DataSource = dt; // 通过这个语句直接整个送入表里,还有DataPropertyName 中名字对应
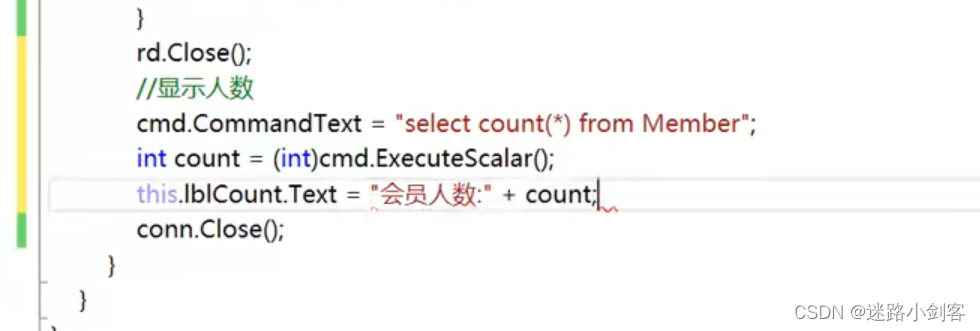
// 显示会员人数
adp.SelectCommand.CommandText = "select count(*) from Member";
int b = (int)adp.SelectCommand.ExecuteScalar();
this.label1.Text = "会员人数:" + b;
conn.Close();
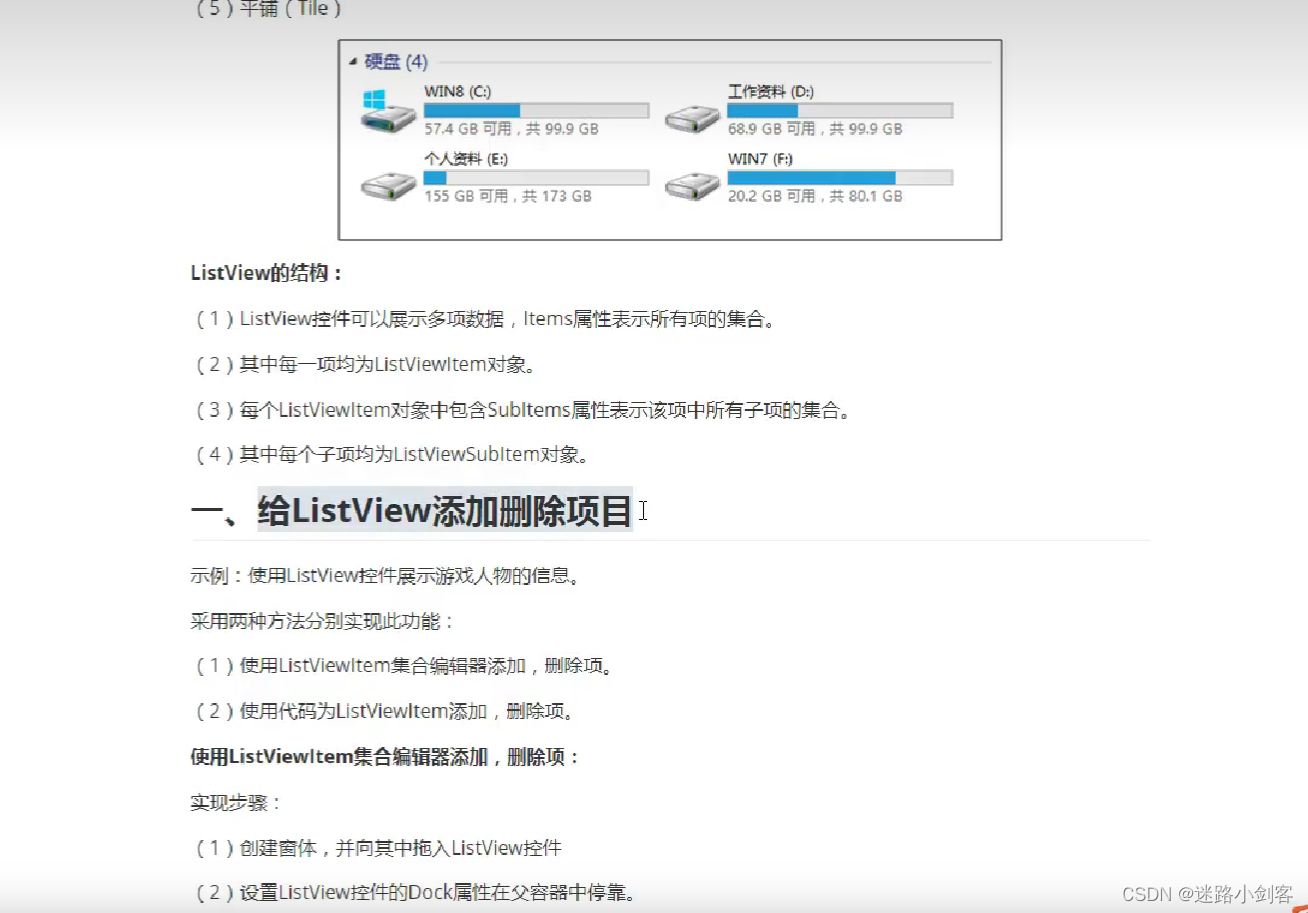
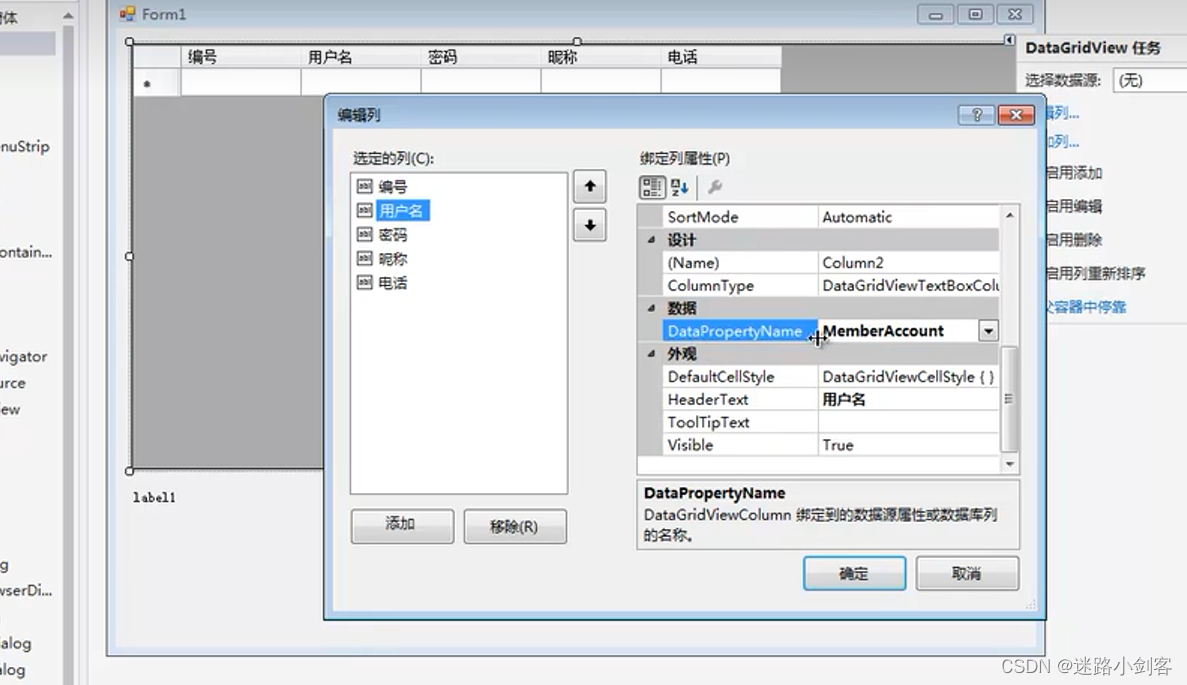
}添加dataGridView控件 实现选中单元右键显示contextMenuStrip控件内容需要在dataGridView属性中绑定创建的contextMenuStrip控件,如下图:
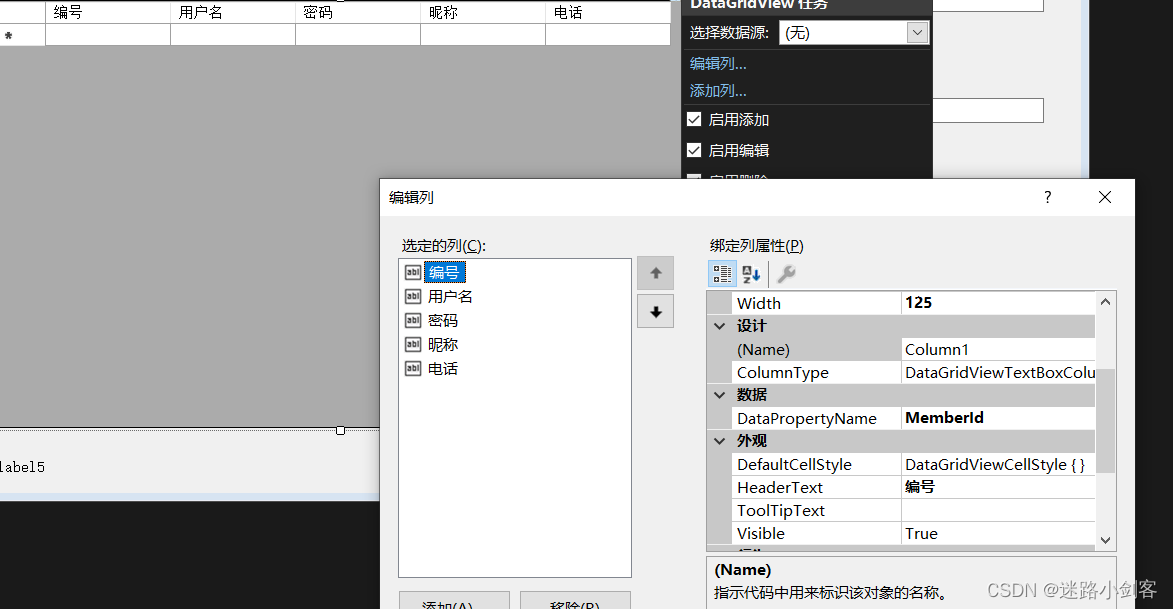
列属性名 DtatProptertyName 与数据库表的对应列名称一样
之后执行DataGridView1.DataSource=dt
2.11、DevExpress布局和控件
引用:Winform企业级框架DevExpress课程(C#/.Net)_哔哩哔哩_bilibili
2.12、DevExpress和报表
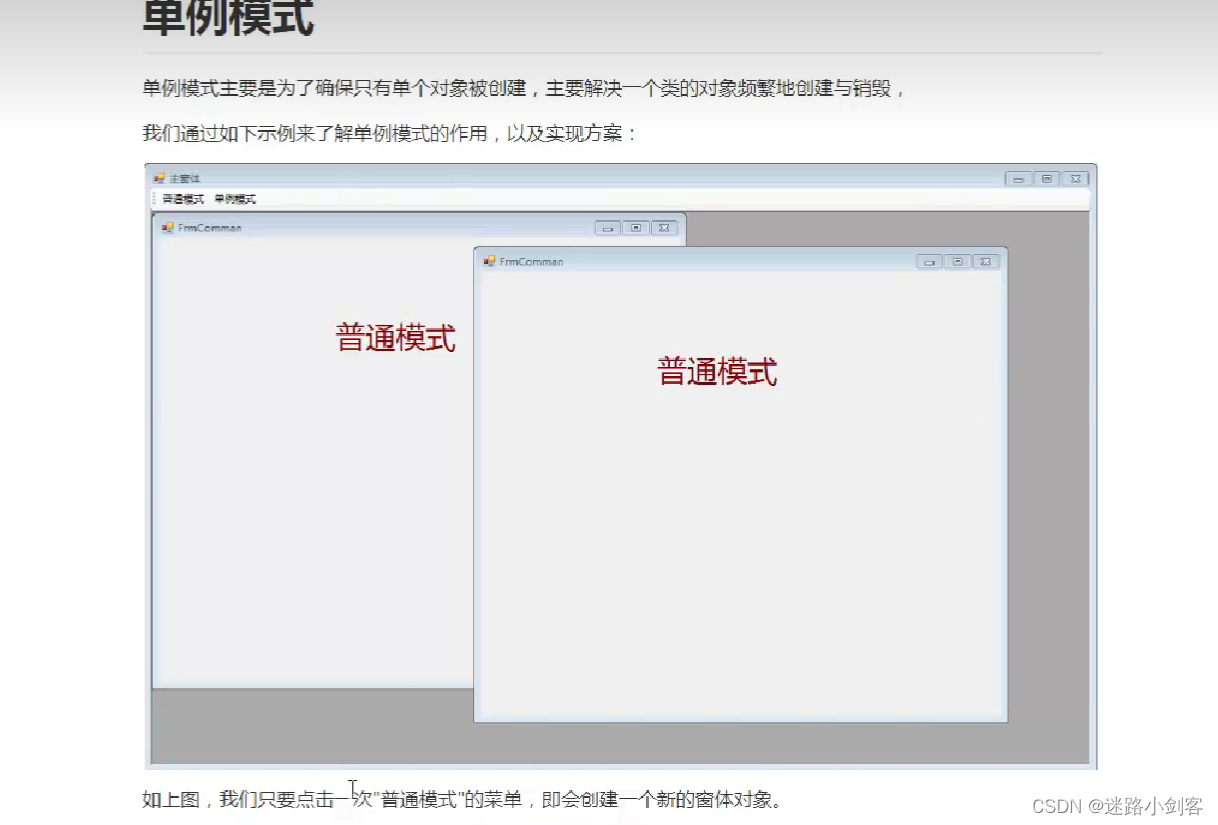
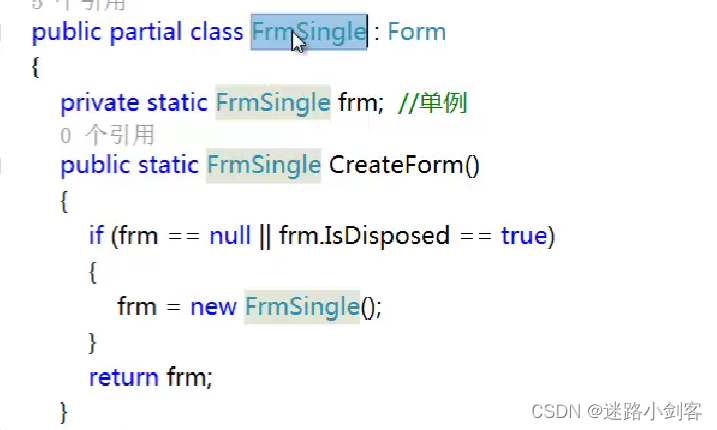
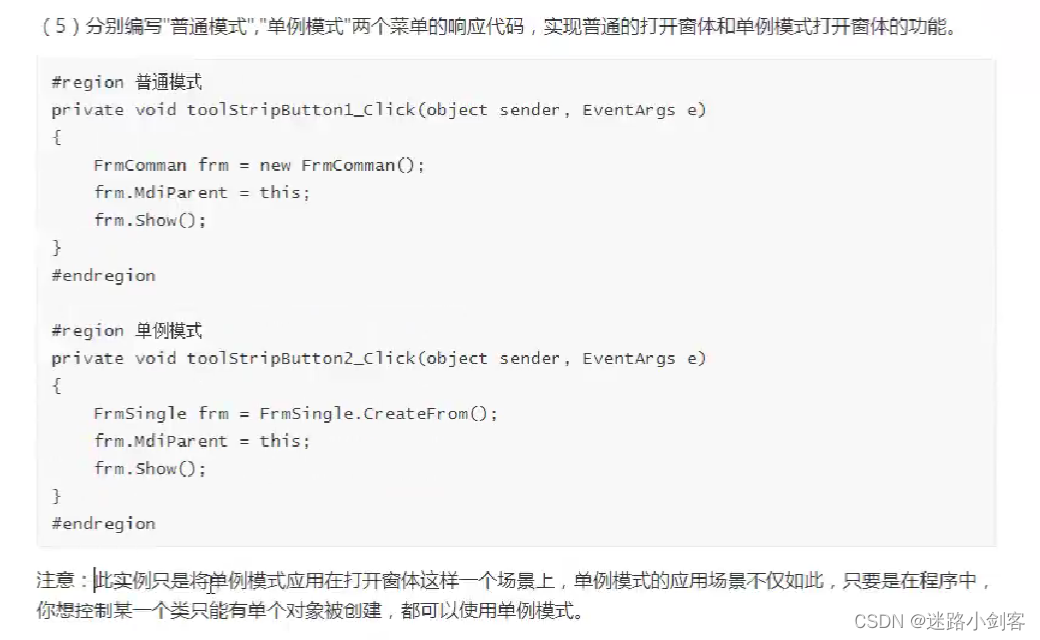
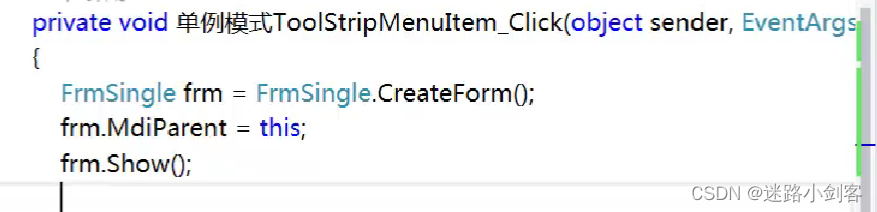
3、单例模式
某一个类只想创建一个,都可以用单例模式
单例模式是设计模式
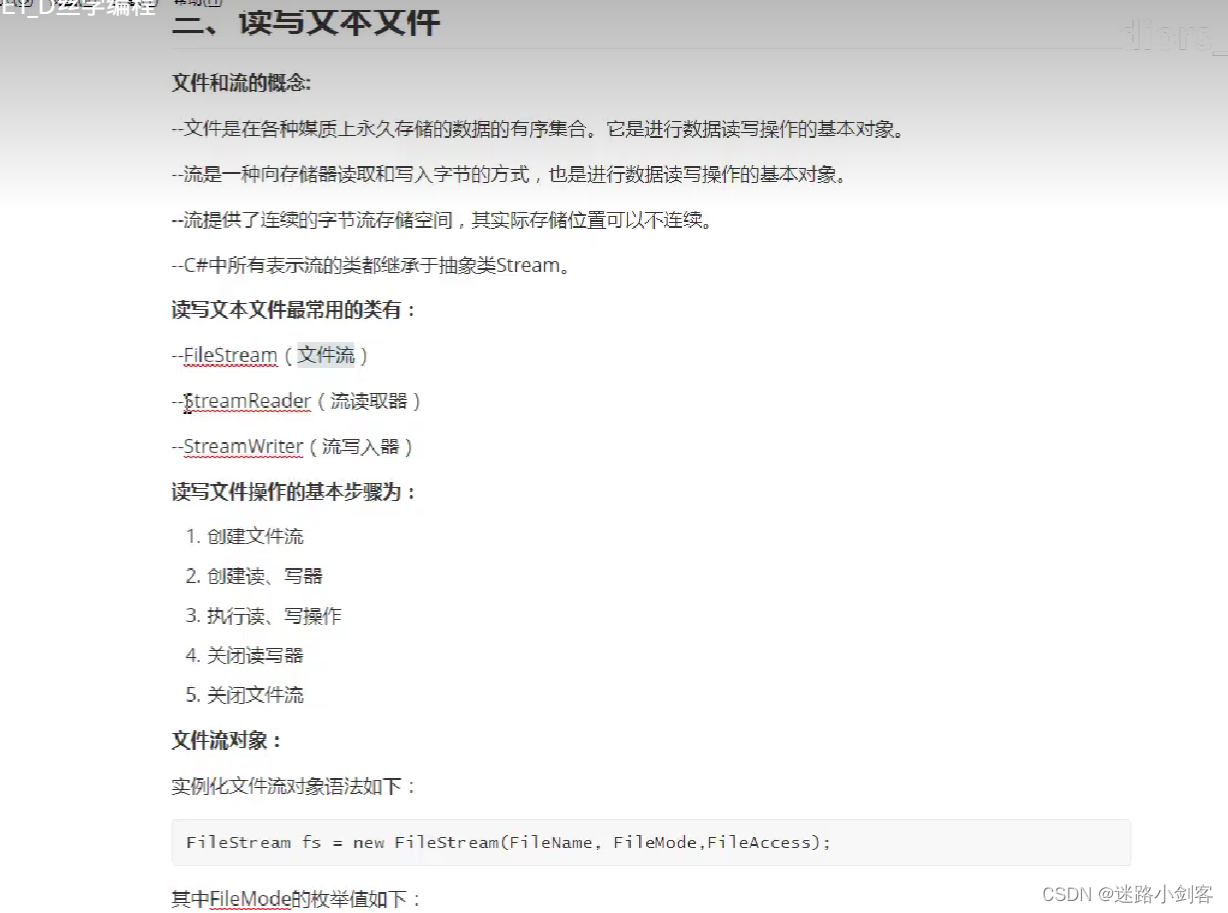
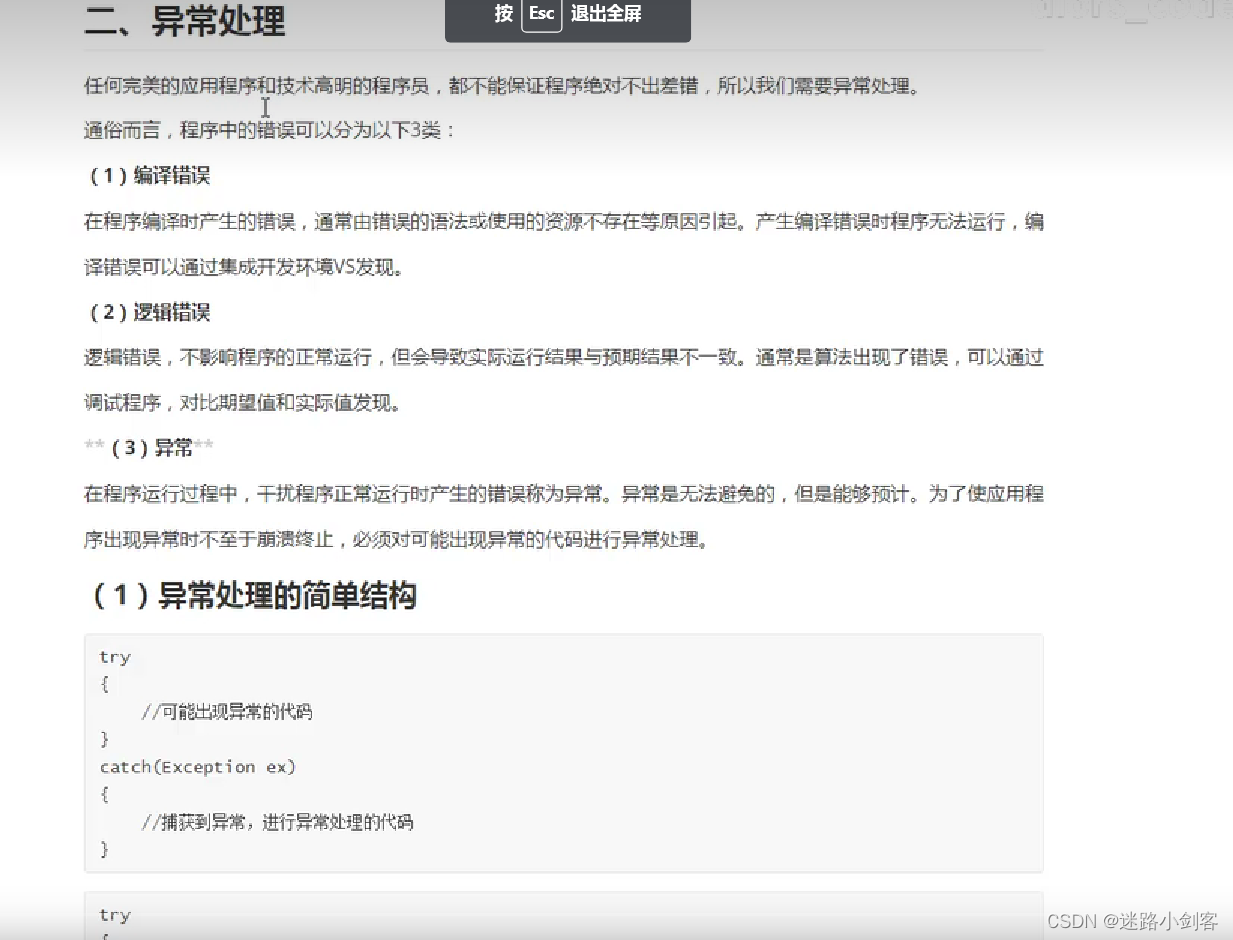
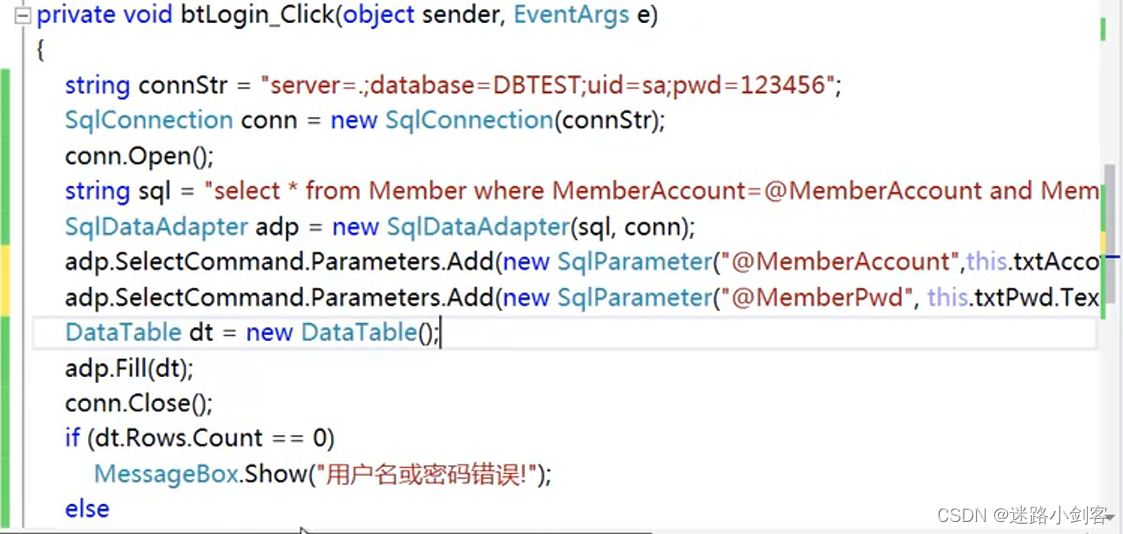
2、异常处理
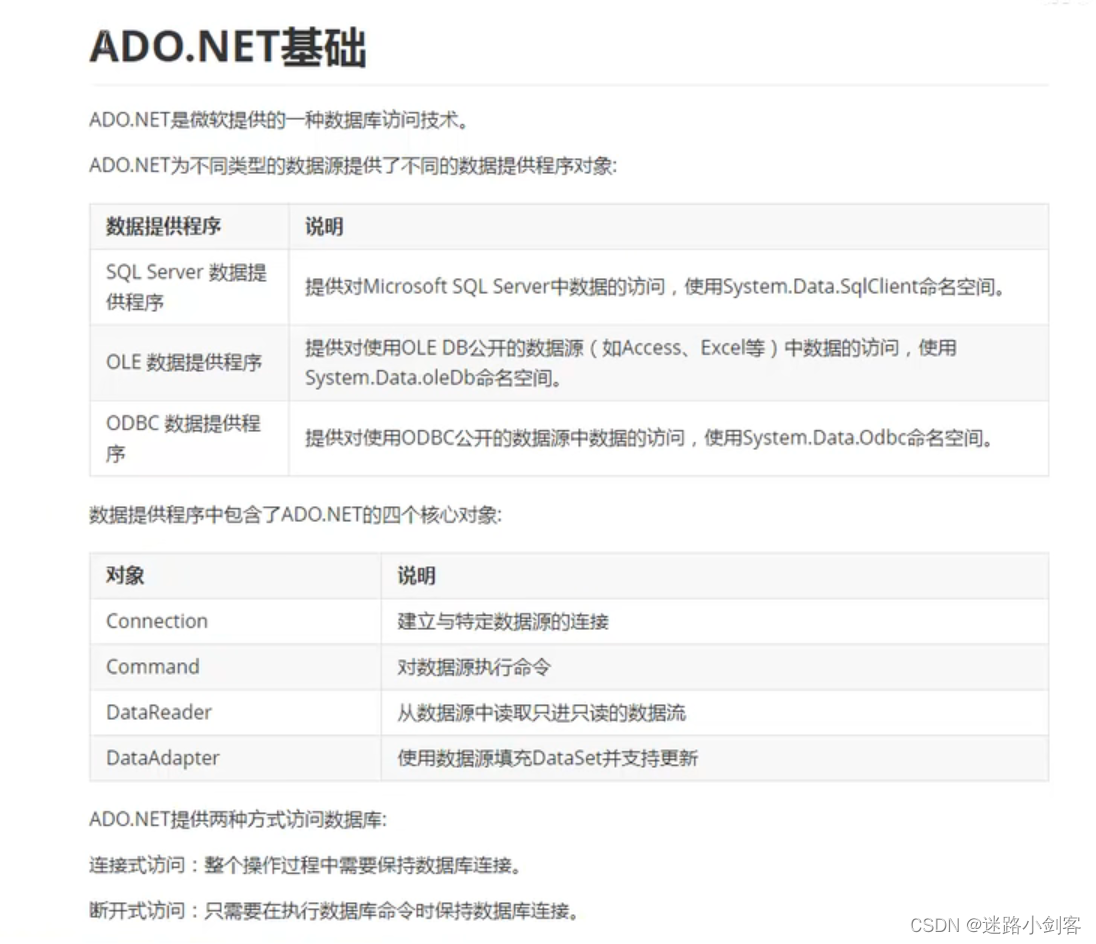
二、DOT.NET 数据库操作
1.1、查询操作
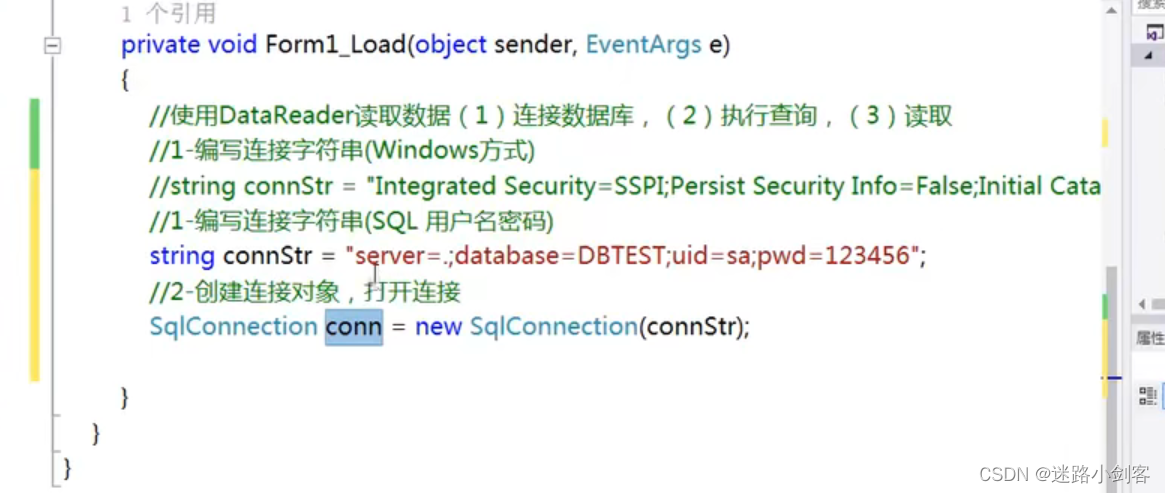
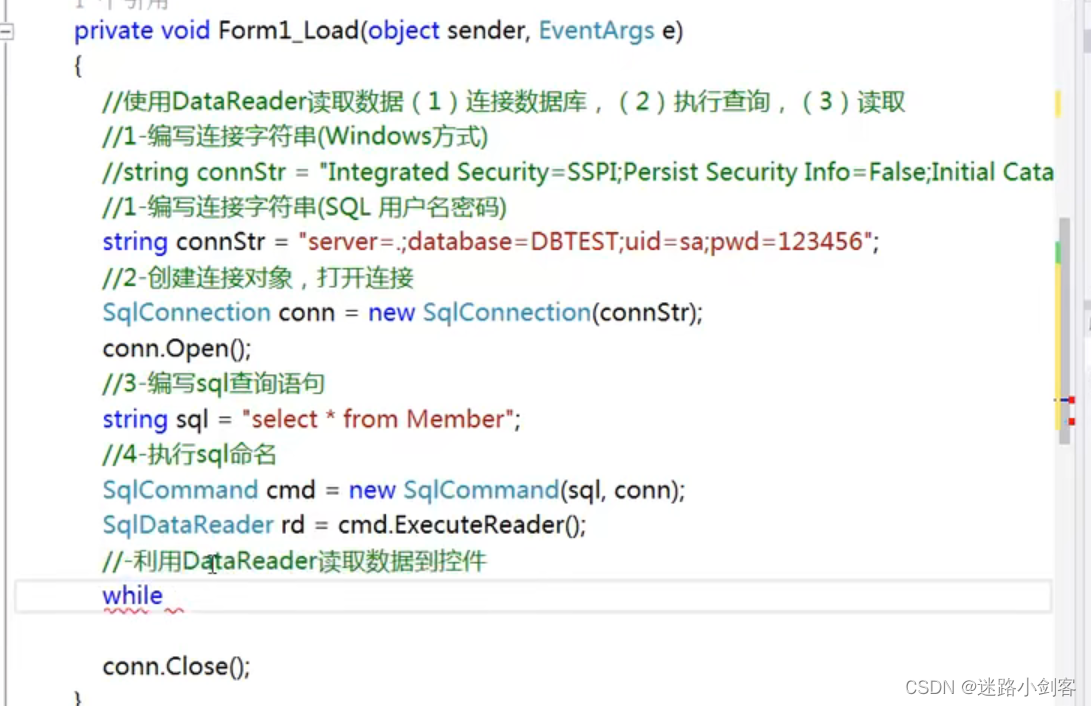
1.1.1、DataReader
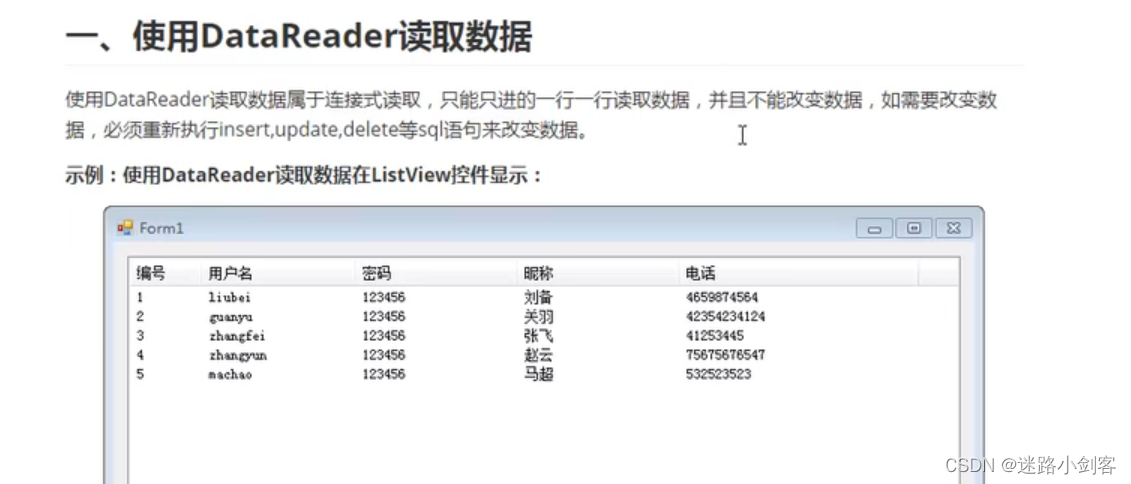
DataReader不可以回写,只能读取
1.1.2、数据库连接

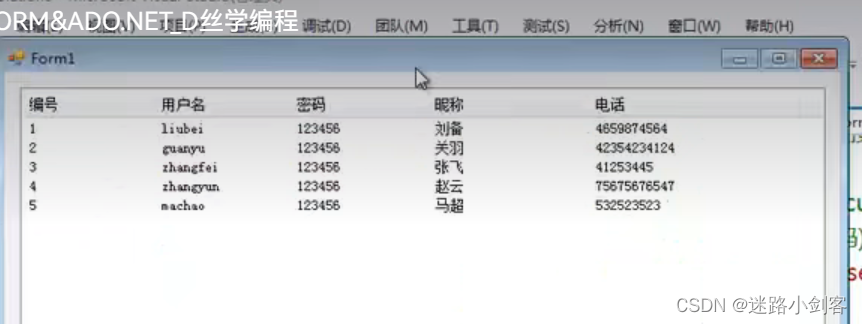
运行结果:listview
cmd.CommandText 要执行的语句
1.1.2、DataAdapter抽取数据
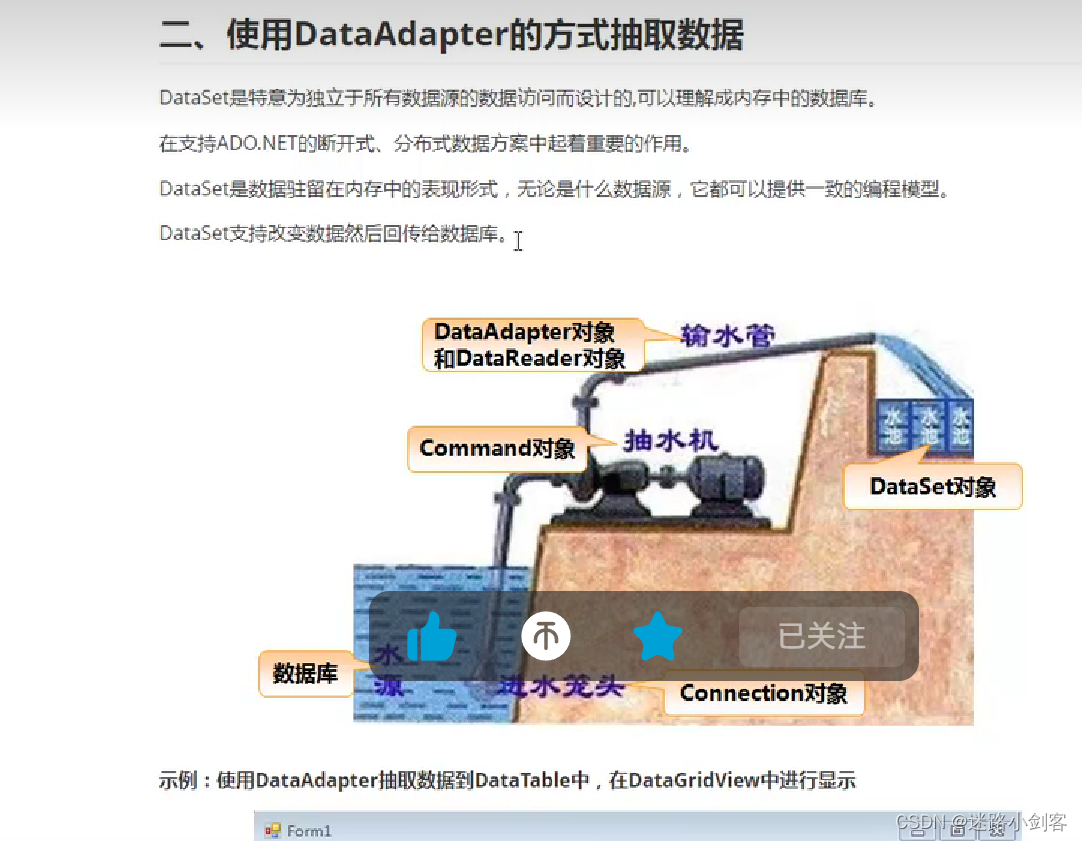
无论什么数据源都可以提供一直的编程模式
内存中的数据
DataTable dt = new DataTable(); // 把读取的数据库内容送到DataTable dt里边 private void BindData()
{
// 1-编写连接数据库字符串(SQL 用户名密码)
string constr = "server=.;database=DBTEST;ud=sa;pwd=123456";
// 2-创建连接对象,打开连接
SqlConnection conn = new SqlConnection(constr);
conn.Open();
// 3-编写sql查询语句
string sql = "select*from Member"; // 查询语句sql
SqlDataAdapter adp = new SqlDataAdapter(sql, conn); // 执行对象
adp.Fill(dt); // 把读取的数据库内容送到DataTable dt里边
this.dataGridView1.DataSource = dt; // 通过这个语句直接整个送入表里,还有DataPropertyName 中名字对应
// 显示会员人数
adp.SelectCommand.CommandText = "select count(*) from Member";
int b = (int)adp.SelectCommand.ExecuteScalar();
this.label1.Text = "会员人数:" + b;
conn.Close();
}可以整个复制过去,通过DataPropertyName属性去对应
修改数据直接对数据库操作
    //  先读取
    //  1-编写连接数据库字符串(SQL 用户名密码)
    string constr = "server=.;database=DBTEST;ud=sa;pwd=123456";

    //  2-创建连接对象,打开连接
    SqlConnection conn = new SqlConnection(constr);
    conn.Open();
    //  3-编写sql查询语句
    string sql = "select*from Member";     //  查询语句sql
    SqlDataAdapter adp = new SqlDataAdapter(sql, conn);    //  执行对象

    adp.Fill(dt);     //  把读取的数据库内容送到DataTable  dt里边
    //  添加
    DataRow dr = dt.NewRow();
    dr["MemberAccount"] = "liudehua";
    dr["MemberPwd"] = "123456";
    dr["MemberName"] = "刘德华";
    dr["MemberPhone"] = "13256974567";
    dt.Rows.Add(dr);
    //  修改
    dt.Rows[1]["MemberPwd"] = "123956";
    // 删除
    dt.Rows[3].Delete();
    //  以上知识改变了临时数据库内容,真正的数据库还未修改,需要回写

    //  回写
    SqlCommandBuilder sqlBuilder = new SqlCommandBuilder(adp);
    adp.Update(dt);      //  完成修改
    //  重新刷新界面
    BindData();

    conn.Close();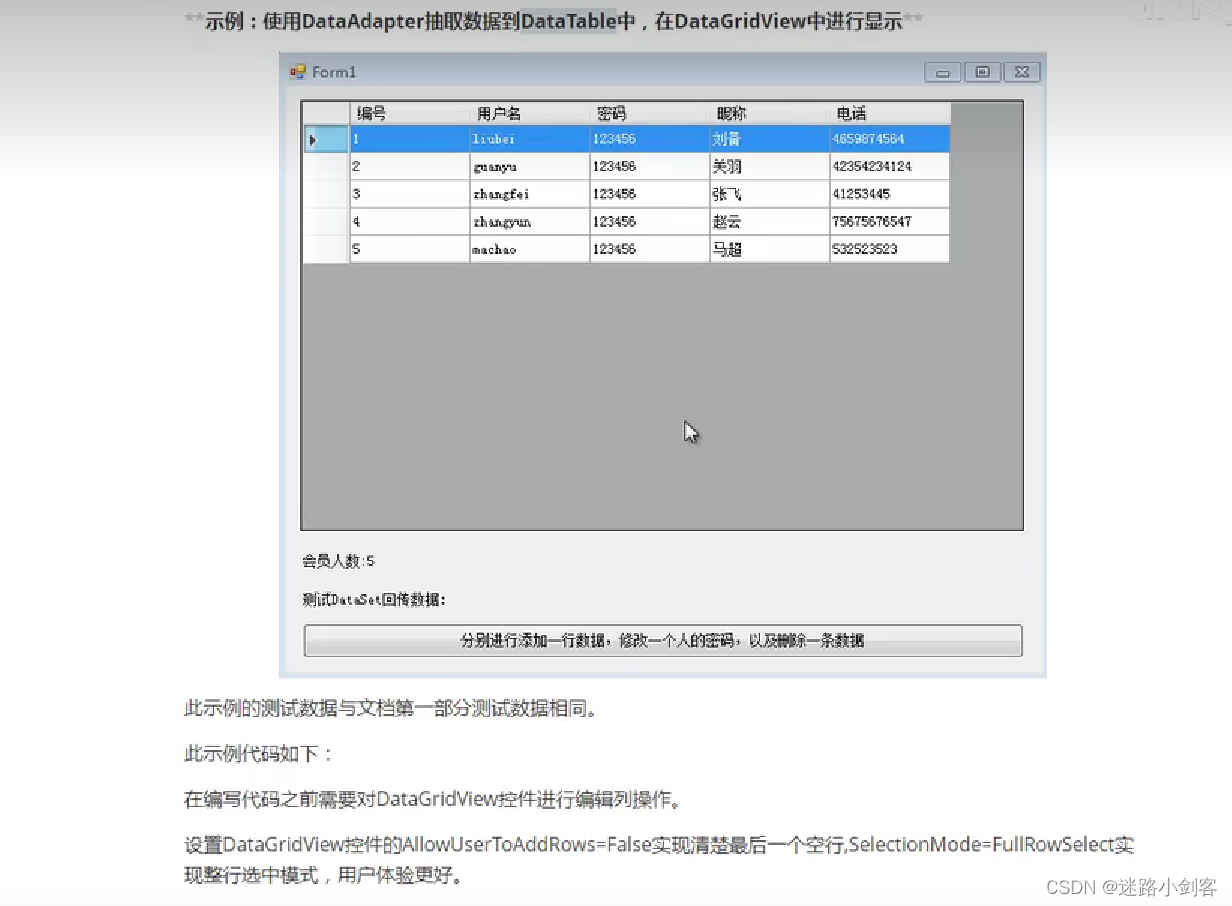
1.2、非查询操作
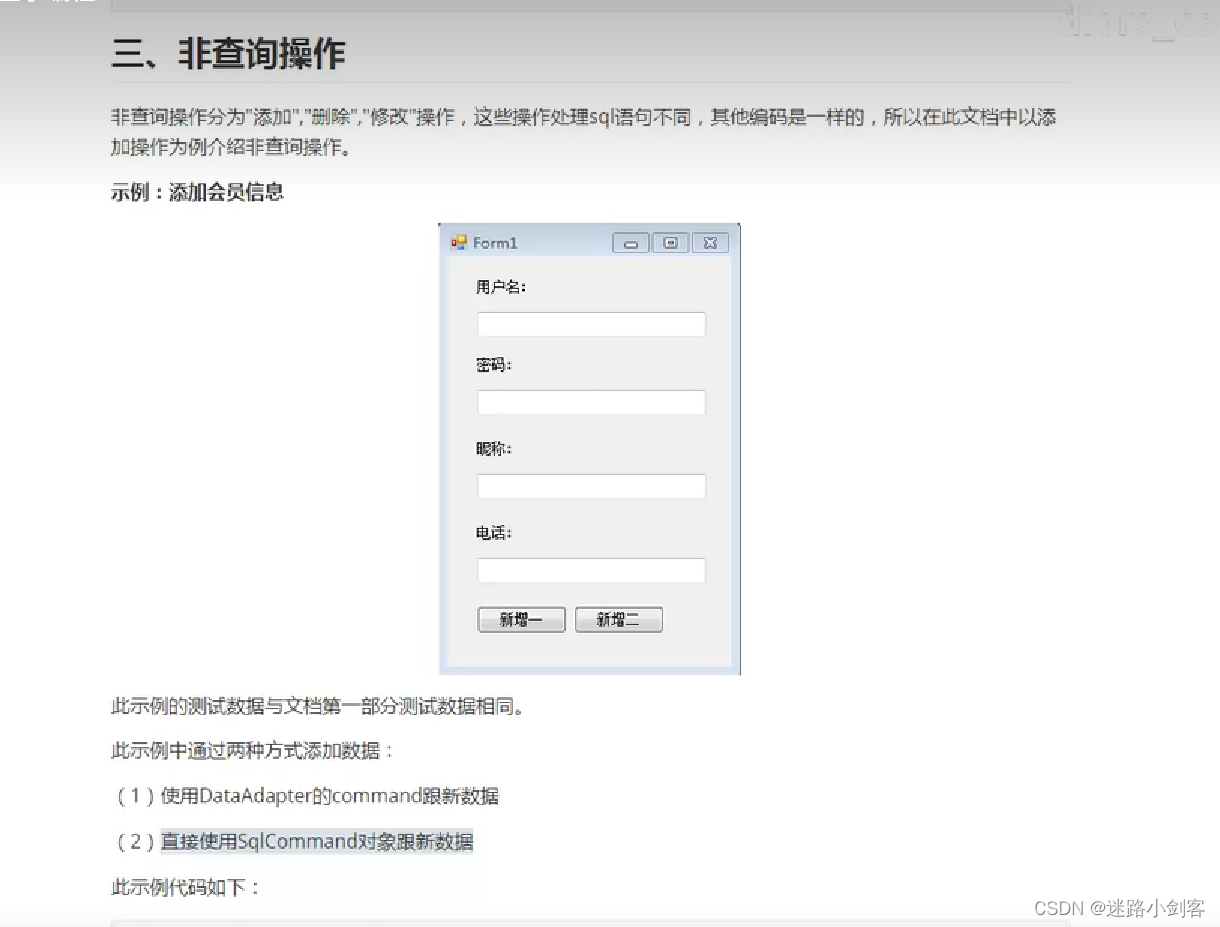
1.2.1、添加SqlCommand、DataAdapter
DataAdapter中的command ; SqlCommand
直接修改数据库内容
        string connstr = "server=.;database=DBTEST;uid=sa;pwd=12";
        SqlConnection conn = new SqlConnection(connstr);   //  连接数据库
        conn.Open();
        //  sql查询语句  ,用
        //  string sql = "insert into Member(MemberAccount,MemberPwd,MemberName) value('liubei','123456','刘备','12345678999')";
        string sql = string.Format("insert into Member(MemberAccount,MemberPwd,MemberName) values('{0}','{1}','{2}','{3}')",
            this.textBox1.Text, this.textBox2.Text, this.textBox3.Text, this.textBox4.Text);

        //  第一种
        //SqlDataAdapter  adp = new SqlDataAdapter(sql, conn);
        //conn.Close();
        //int rowCount = adp.SelectCommand.ExecuteNonQuery();
        //  第二种
        SqlCommand cmd = new SqlCommand(sql,conn);
        int rowCount = cmd.ExecuteNonQuery();
        conn.Close();
        if (rowCount == 1)
            MessageBox.Show("添加成功");
        else
            MessageBox.Show("添加shibai");
1.3、单窗口显示

h
        private void BindData()
        {
            //  1-编写连接字符串(SQL)用户名密码
            string connstr = "server=LAPTOP;database=DBTEST;uid=Sa;pwd=loooo";
            // 2-创建连接对象,打开链接
            SqlConnection conn = new SqlConnection(connstr);
            conn.Open();
            //  3-编写sql查询语句
            string sql = "select*from Member";
            SqlDataAdapter adp = new SqlDataAdapter(sql, conn);
            DataTable dt = new DataTable();
            adp.Fill(dt);

            this.dataGridView2.DataSource = dt;
            //  显示人数
            adp.SelectCommand.CommandText = "select count(*) from Member";
            int count = (int)adp.SelectCommand.ExecuteScalar();
            this.label5.Text = "会员人数" + count;
            conn.Close();


        }

        private void button1_Click(object sender, EventArgs e)
        {
            //  数据连接
            string constr = "server=LAPTOP;database=DBTEST;uid=Sa;pwd=jjn";
            SqlConnection  conn= new SqlConnection(constr);
            conn.Open();
            //  sql语句
            string sql = string.Format("insert into Member(MemberAccount,MemberPwd,MemberName,MemberPhone) values('{0}','{1}','{2}','{3}')",
                this.textBox1.Text,this.textBox2.Text,this.textBox3.Text,this.textBox4.Text);
            SqlCommand cmd = new SqlCommand(sql,conn);
            int rowCount = cmd.ExecuteNonQuery();
            conn.Close();
            if (rowCount==1)
                MessageBox.Show("添加数据成功");
            else
                MessageBox.Show("添加数据失败");

            BindData();


        }
1.3.1、删除数据
   private void 删除ToolStripMenuItem_Click(object sender, EventArgs e)
   {
       //  取得选中的编号
       Int selectedRowCount =int.Parse( MessageBox.Show(dataGridView2.SelectedRows[0].Index.ToString()));
       if (selectedRowCount<1)
       {
           MessageBox.Show("caozuo");
           return;
       }
       //int memid = int.Parse(this.dataGridView2.SelectedCells[0].Value.ToString());
       //  连接字符串
       string connstr = "server=LAPTOP;database=DBTEST;uid=Sa;pwd=lui";
       SqlConnection conn = new SqlConnection(connstr);
       conn.Open();
       string sql = "delete from Member where MemberId =" + selectedRowCount;
       SqlCommand cmd = new SqlCommand(sql, conn);
       int count = cmd.ExecuteNonQuery();
       conn.Close();
       if (count == 1)
           MessageBox.Show("添加数据成功");
       else
           MessageBox.Show("添加数据失败");

       BindData();


   }
1.3.2、选中某行
//  取得选中的编号
Int32 selectedRowCount = int.Parse(this.dataGridView2.SelectedRows[0].Index.ToString());
//  连接字符串
string connstr = "server=LAPTOP;database=DBTEST;uid=Sa;pwd=ln";
SqlConnection conn = new SqlConnection(connstr);
conn.Open();
string sql = "select * from Member where MemberId = " + selectedRowCount;
SqlDataAdapter adp = new SqlDataAdapter(sql, conn);
DataTable dt = new DataTable();
adp.Fill(dt);
if (dt.Rows.Count == 0)
{
    MessageBox.Show(selectedRowCount.ToString());
    return;
}
this.textBox1.Text = dt.Rows[0]["MemberAccount"].ToString();
this.textBox2.Text = dt.Rows[0]["MemberPwd"].ToString();
this.textBox3.Text = dt.Rows[0]["MemberName"].ToString();
this.textBox4.Text = dt.Rows[0]["MemberPhone"].ToString();

conn.Close();
//MessageBox.Show(this.dataGridView2.SelectedRows[0].Index.ToString());
1.3.3、获得选中行的编号
          取得选行的编号
        int selectedRowCount = int.Parse(this.dataGridView2.SelectedRows[0].Index.ToString());
        int a = int.Parse(this.dataGridView2.Rows[selectedRowCount].Cells[0].Value.ToString());
修改数据库内容
            //  取得选中的编号
            int memid = int.Parse(this.dataGridView2.SelectedRows[0].Index.ToString()) + 1;
            //  连接字符串
            string connstr = "server=LA;database=DBTEST;uid=Sa;pwd=ghnj";
            SqlConnection conn = new SqlConnection(connstr);
            conn.Open();
            string sql = string.Format("update Member set MemberAccount = '{0}',MemberPwd='{1}',MemberName='{2}',MemberPhone='{3}' where MemberId='{4}'",
                this.textBox1.Text, this.textBox2.Text, this.textBox3.Text, this.textBox4.Text, memid);
            SqlCommand cmd = new SqlCommand(sql, conn);
            int count = cmd.ExecuteNonQuery();
            conn.Close();
            if (count == 1)
                MessageBox.Show("修改数据成功");
            else
                MessageBox.Show("修改数据失败");

            BindData();
1.4、多窗口显示
调用其他窗体方法,,与单窗体结合
   frmAdd frm = new frmAdd();
   frm.Owner = this;   //  添加所有者是这个窗体,建立练习,使frm窗体可以调用this窗体的内容
   //  在frm窗体调用时候  ((Form1)(this.Owner)).(form1中方法名)例如 ((Form1)(this.Owner)).BindData();
   frm.Show();

// 调用时候记得关闭
   ((Form1)(this.Owner)).BindData();   //  方法绑定,在其他窗体调用这个方法
   this.Close();
// 数据连接
string constr = "server=LAPTOP\;database=DBTEST;uid=Sa;pwd=jjj";
SqlConnection conn = new SqlConnection(constr);
conn.Open();
//sql语句
string sql = string.Format("insert into Member(MemberAccount,MemberPwd,MemberName,MemberPhone) values('{0}','{1}','{2}','{3}')",
this.textBox1.Text, this.textBox2.Text, this.textBox3.Text, this.textBox4.Text);
SqlCommand cmd = new SqlCommand(sql, conn);
int rowCount = cmd.ExecuteNonQuery();
conn.Close();
if (rowCount == 1)
MessageBox.Show("添加数据成功");
else
MessageBox.Show("添加数据失败");
((Form1)(this.Owner)).BindData(); // 方法绑定,在其他窗体调用这个方法
this.Close();
2、SQL高级
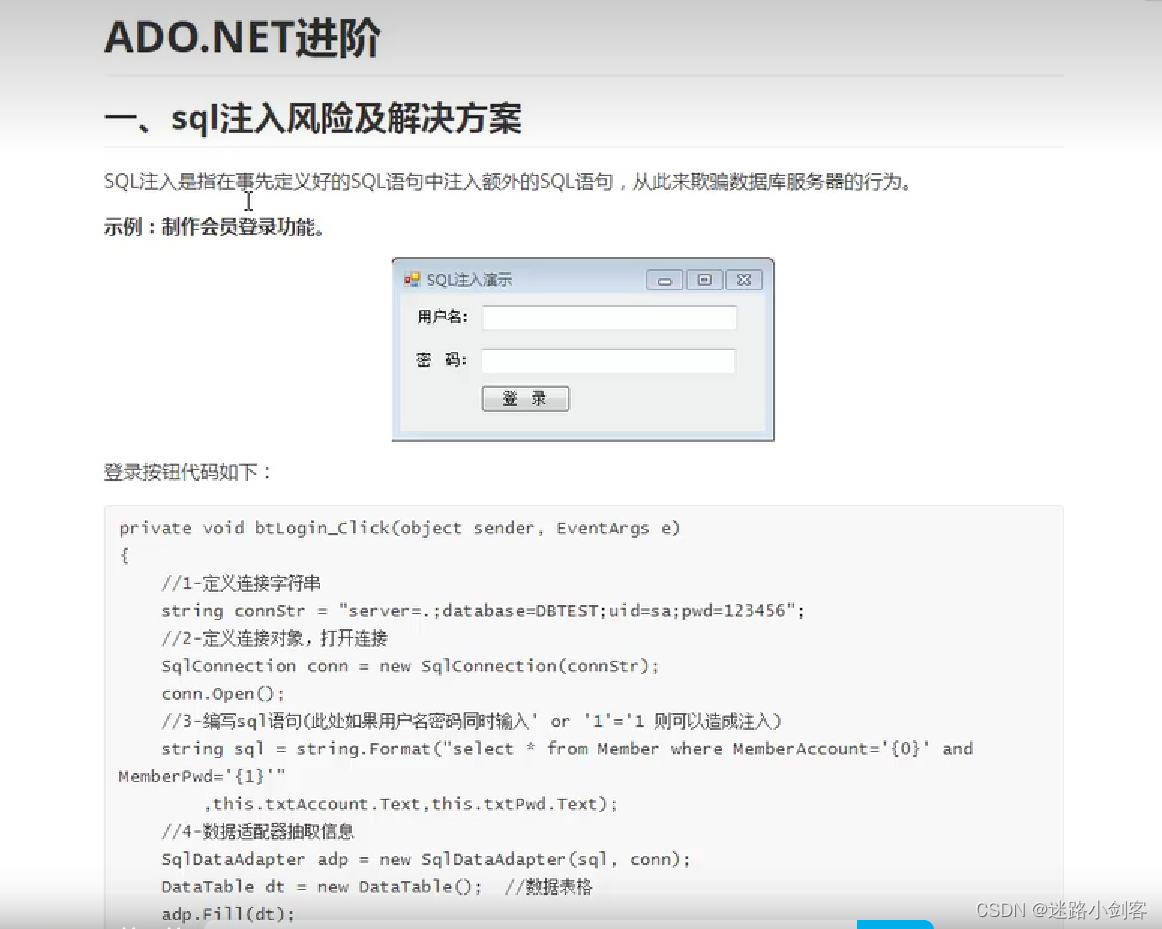
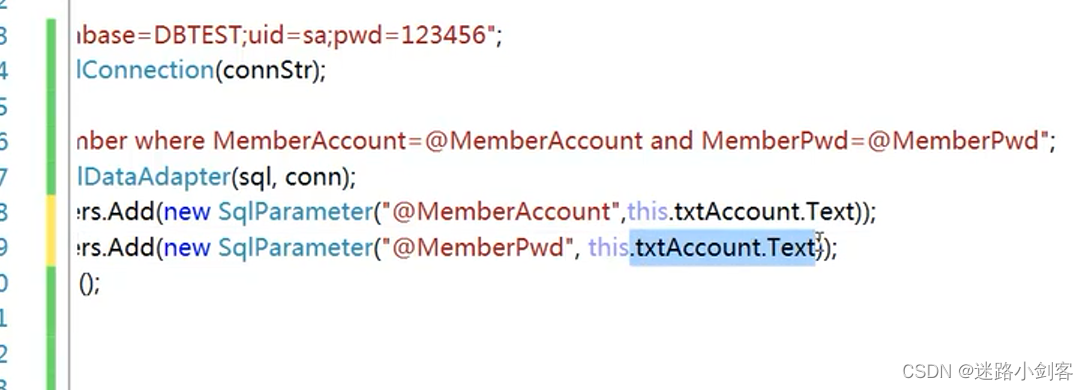
2.1、SQL注入
SQL注入是指在事先定义好的SQL语句中注入额外的SQL语句,以此来七篇数据库服务器的行为
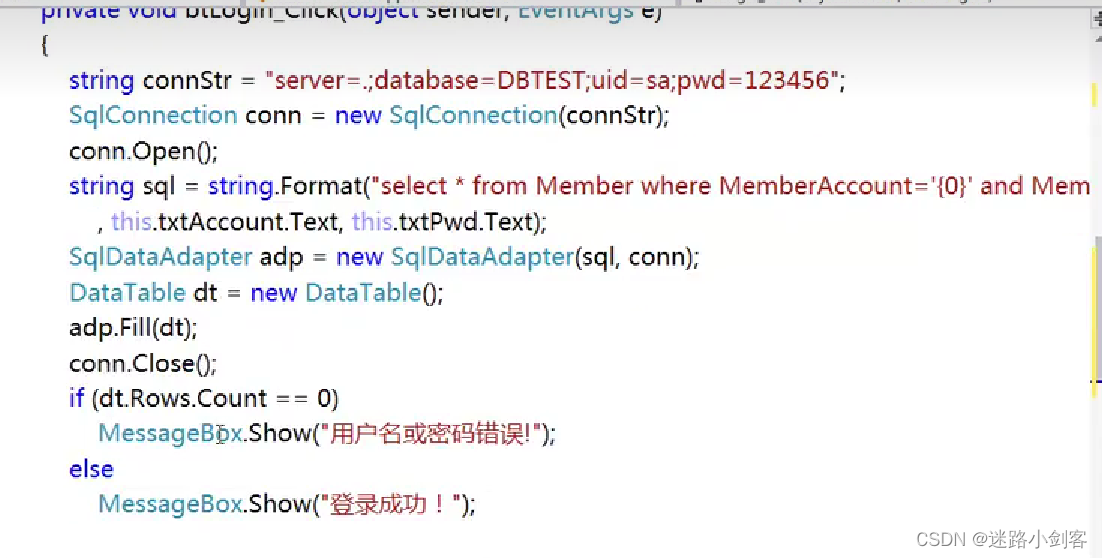
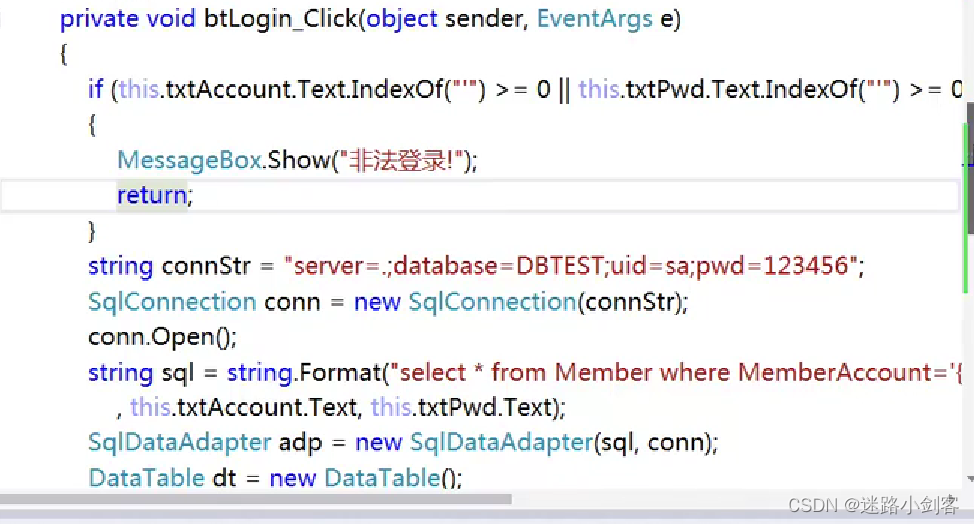
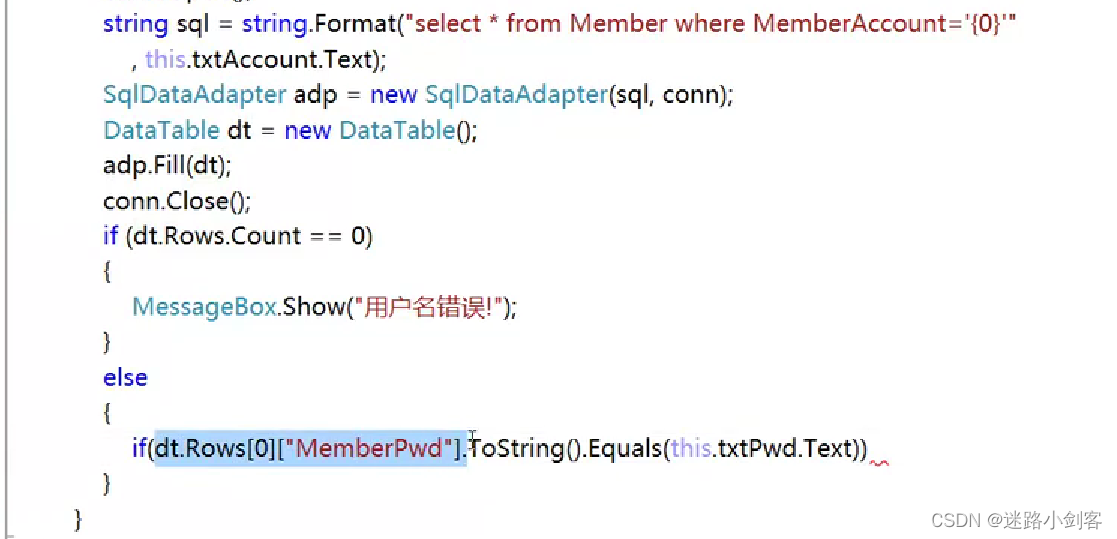
2.2、如何防范SQL注入攻击
第一种方法
第二种:
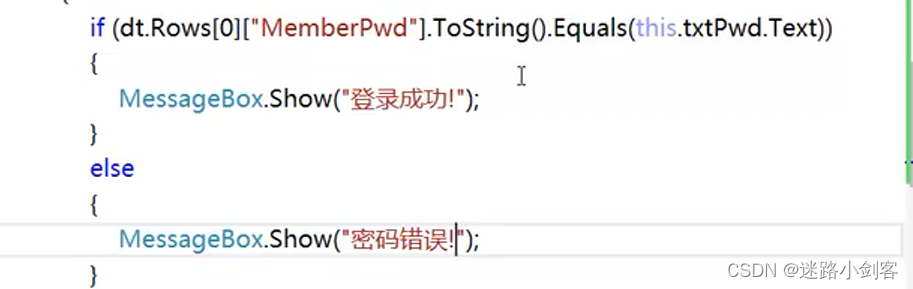
第三种解决方法:占位符变为参数名 加 @ ,参数化
引用:02-防止SQL注入的解决方案_哔哩哔哩_bilibili
3、参数化实现增删改查
// 2-编写连接字符串
SqlConnection conn = new SqlConnection(constr);
conn.Open();
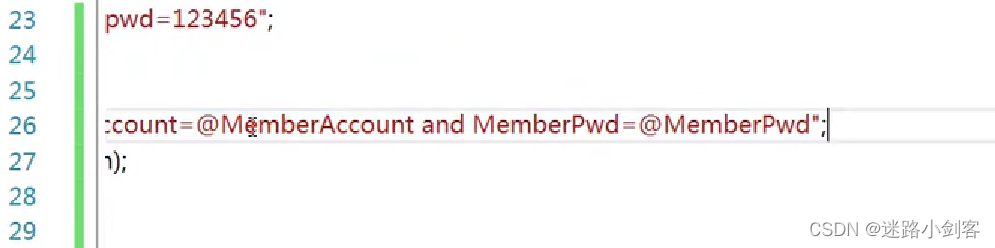
string sql = "insert into Member(MemberAccount, MemberPwd,MemberName,MemberPhone) values(@MemberAccount, @MemberPwd,@MemberName,@MemberPhone)";
// 执行命令
SqlCommand cmd = new SqlCommand(sql, conn);
1 - 语句
cmd.Parameters.Add(new SqlParameter("@MemberAccount", this.textBox1.Text));
cmd.Parameters.Add(new SqlParameter("@MemberPwd", this.textBox2.Text));
cmd.Parameters.Add(new SqlParameter("@MemberName", this.textBox3.Text));
cmd.Parameters.Add(new SqlParameter("@MemberPhone", this.textBox4.Text));
int counta = cmd.ExecuteNonQuery();
if (counta > 0)
{
MessageBox.Show("插入成功");
}
else
{
MessageBox.Show("插入失败");
}
// 2-
SqlDataAdapter adp= new SqlDataAdapter(sql,conn);
adp.SelectCommand.CommandText = sql;
cmd.Parameters.Clear();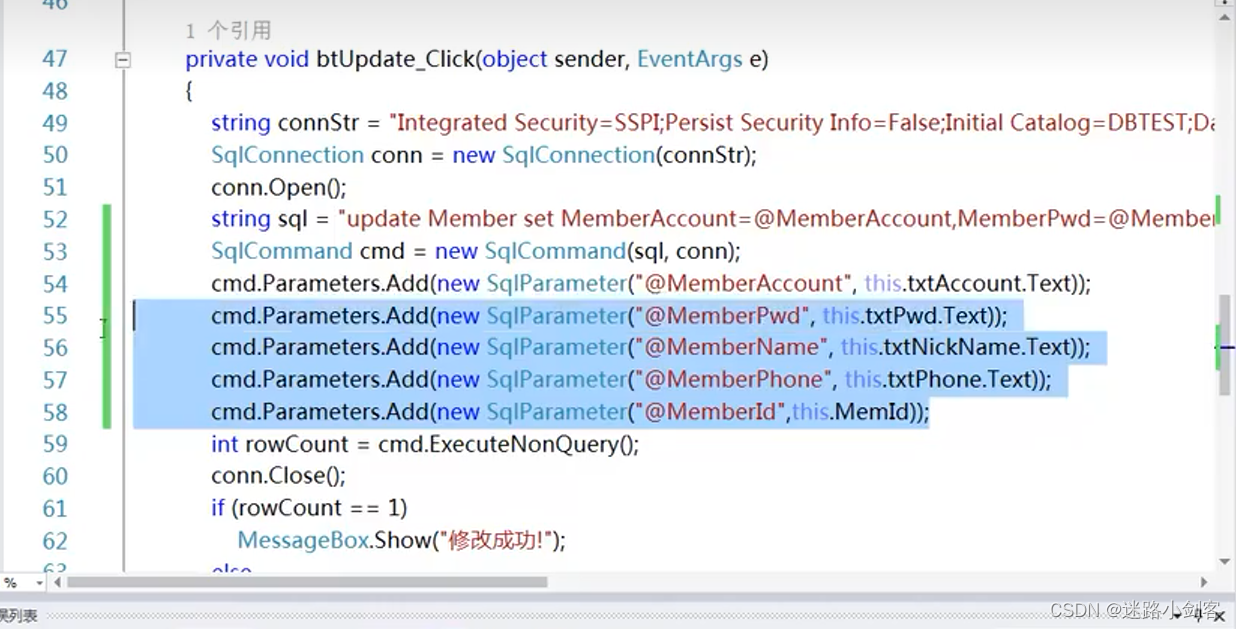
4、DBHelper、SQLHelper封装
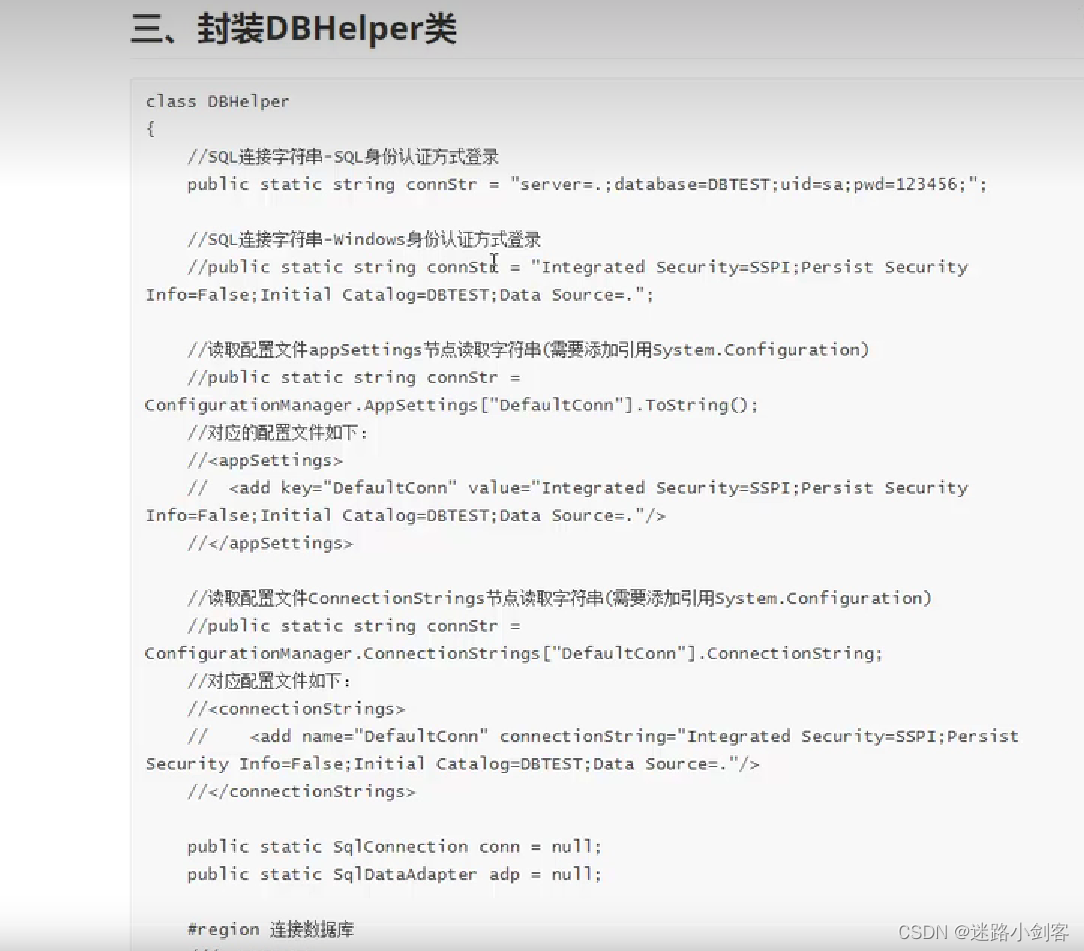
代码冗余:连接语句封装
4.1、代码
 // 1、连接字符串

 static string constr = "server = ;database=DBTEST;uid=Sa;pwd=1236";
 // 2-编写连接字符串
 public static SqlConnection conn = null;

 public static SqlDataAdapter adp = null;

 #region
 public static void OpenConn()
 {
     if (conn == null)
     {
         conn = new SqlConnection(constr);
         conn.Open();
     }
     if (conn.State == System.Data.ConnectionState.Closed)
     {
         conn.Open();
     }
     if(conn.State== System.Data.ConnectionState.Broken)
     {
         conn.Close();   //  先关闭再打开
         conn.Open();
     }

 }
 #endregion

 public static void PrepareSql(string sql)
 {
     adp = new SqlDataAdapter(sql,conn);

 }

 #region   设置SQL语句
 public static void SetParameter(string parameterName, object parameterValue)
 {

     parameterName = "@" + parameterName.Trim();   //  C# Trim() 方法用于从当前 String 对象中删除所有前导和尾随空白字符
     if (parameterValue == null)
         parameterValue = DBNull.Value;  //  DBNull.Value,是适用于向数据库的表中插入空值。
          //null,是指在程序中表示空引用。或者对象为空。就是没有实例化。
     adp.SelectCommand.Parameters.Add(new SqlParameter(parameterName,parameterValue));

 }


 #endregion


 #region 执行SQL语句

 public static int ExecNonQuery()
 {
     int count = adp.SelectCommand.ExecuteNonQuery();
     conn.Close();
     return count;

 }

 public static DataTable ExecQuery()
 {
     DataTable dt = new DataTable();
     adp.Fill(dt);
     conn.Close();
     return dt;
 }

 public static SqlDataReader ExecReader()
 {
     return adp.SelectCommand.ExecuteReader(CommandBehavior.CloseConnection);
 }
 public static object EExecScalar()
 {
     object obj = adp.SelectCommand.ExecuteScalar();
     conn.Close();
     return obj;
 }

 #endregion
4.2、传递参数
private void button1_Click(object sender, EventArgs e)
{
string sql = "insert into Member(MemberAccount, MemberPwd,MemberName,MemberPhone) values(@MemberAccount, @MemberPwd,@MemberName,@MemberPhone)";
SQL.PrepareSql(sql);
SQL.SetParameter("MemberAccount",this.textBox1.Text);
SQL.SetParameter("MemberPwd",this.textBox2.Text);
SQL.SetParameter("MemberName",this.textBox3.Text);
SQL.SetParameter("MemberPhone",this.textBox4.Text);
SQL.ExecQuery();
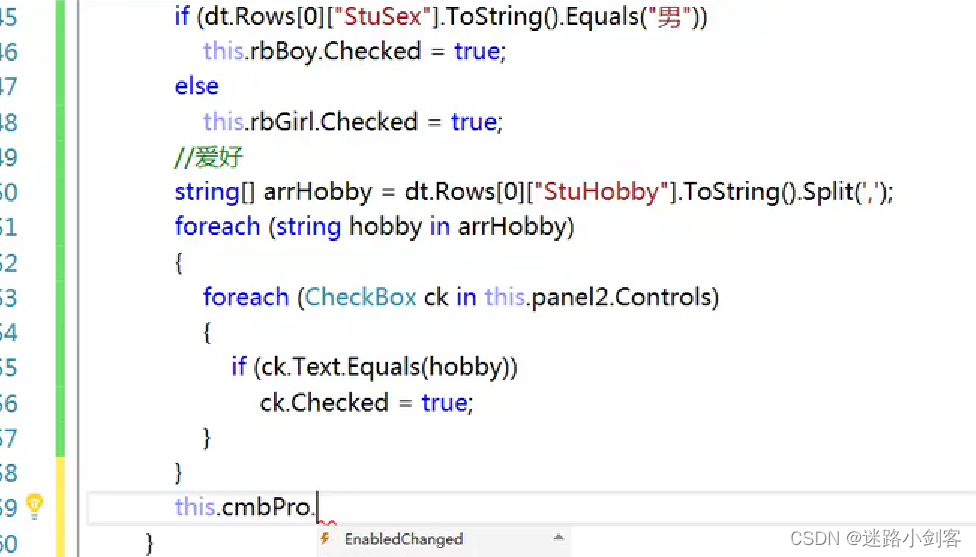
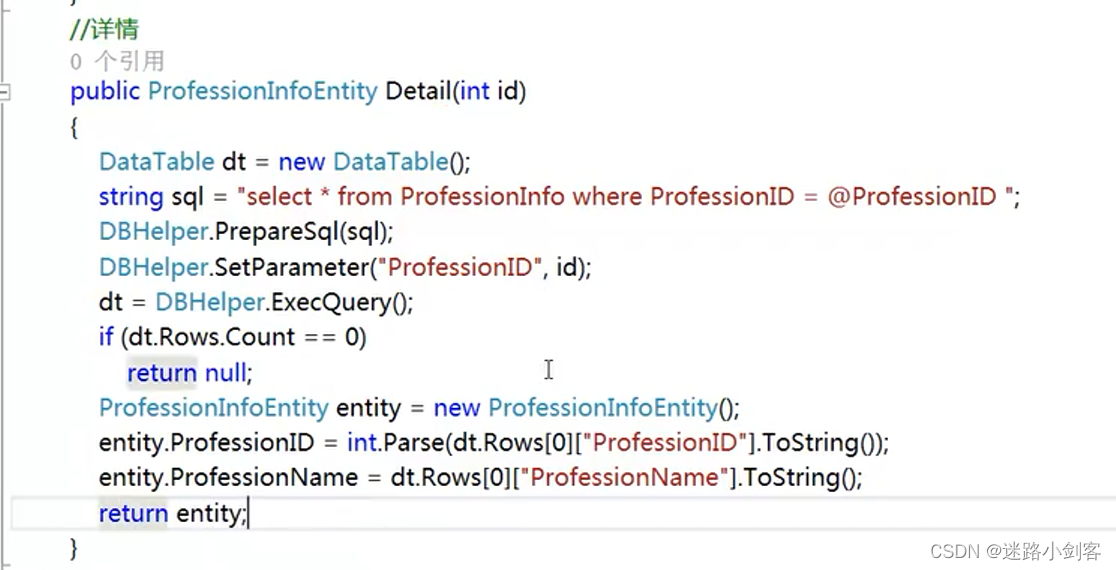
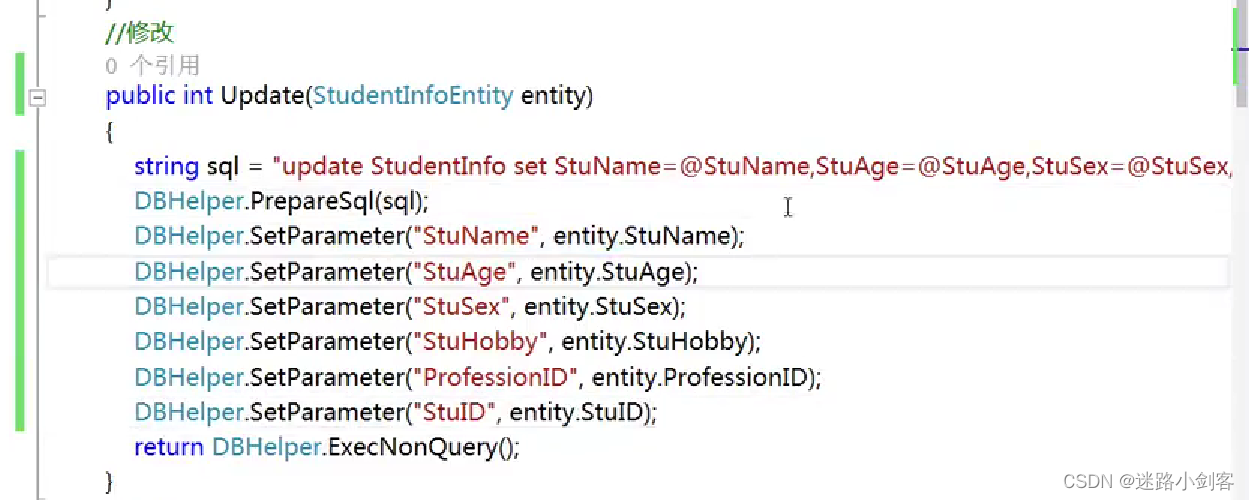
}5、学生信息查询与修改
配置文件里边:
6、调试
打断点执行
7、调用exec语句的执行过程
8、三层架构
8.1、三层架构
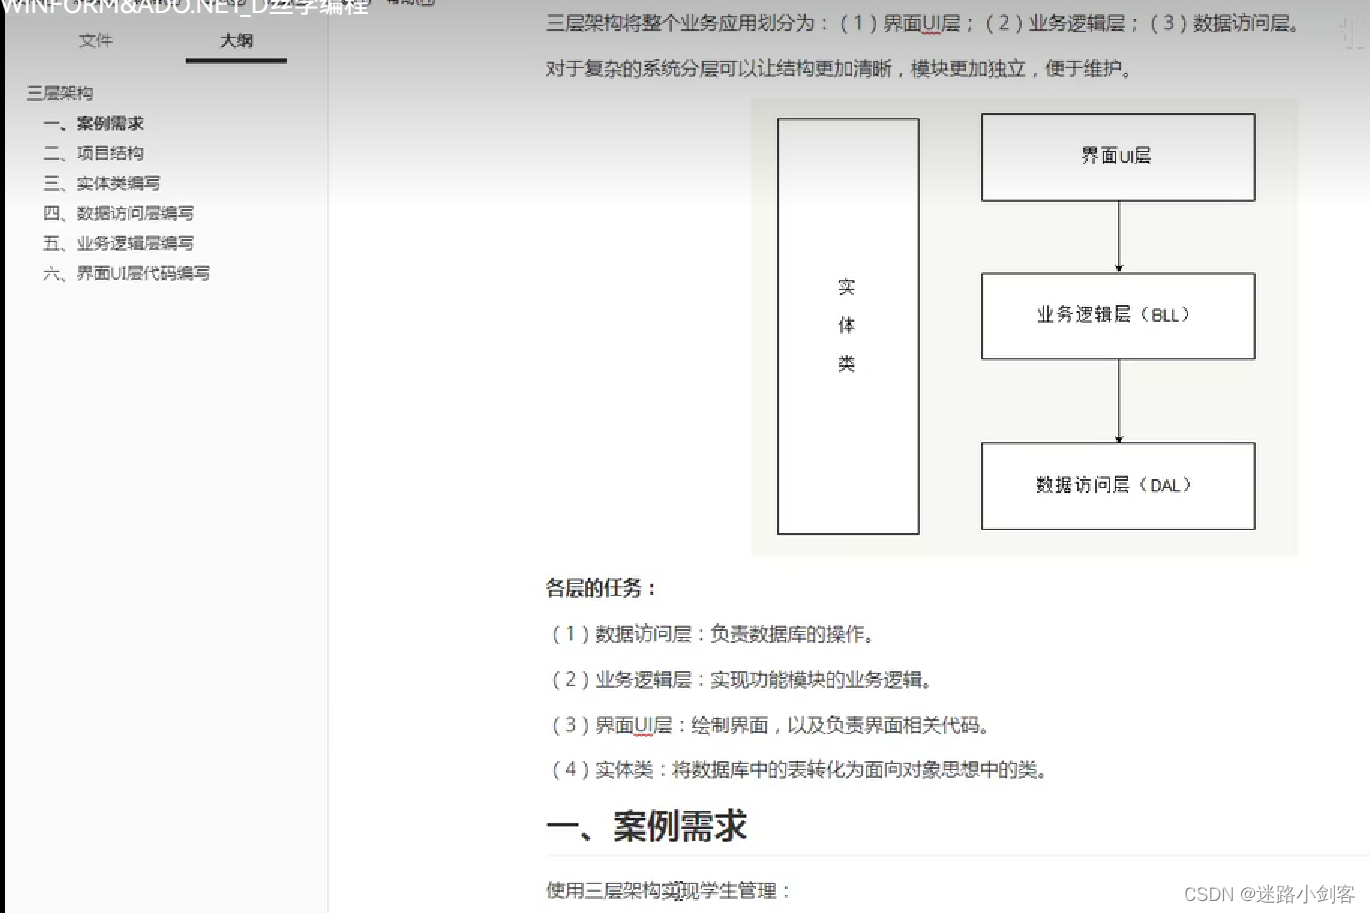
数据访问层:负责数据库的操作;
业务逻辑层:实现功能模块的业务逻辑;
界面UI层:绘制界面,以及负责界面相关代码;
实体类:讲数据库表转化为面向对象思想中的类;
8.2、实体类
与表格数据相对应
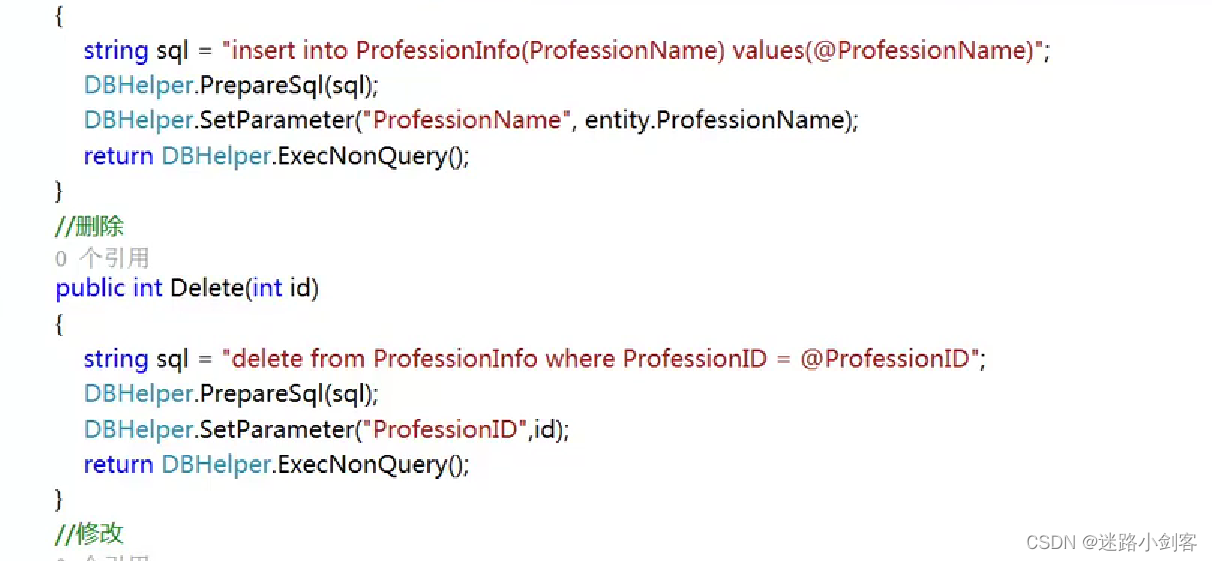
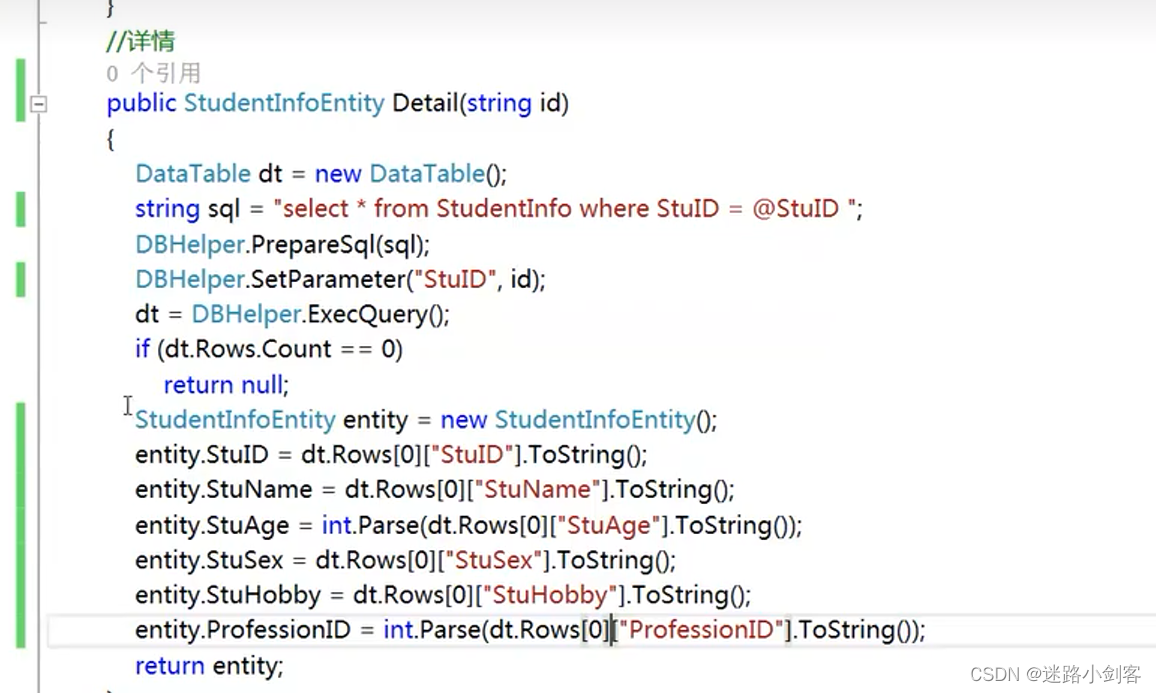
8.3、数据访问层

8.4、业务逻辑层
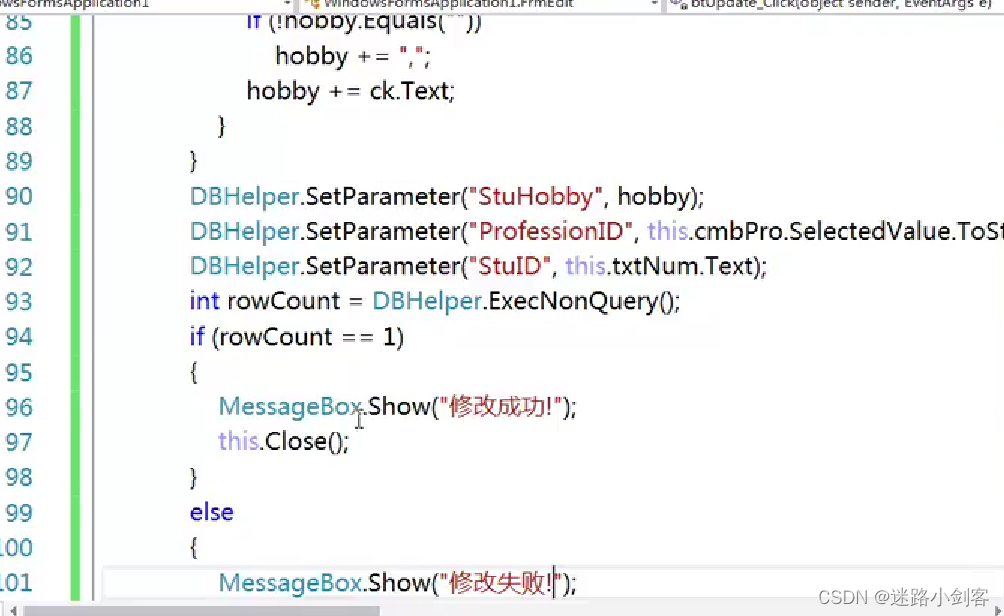
8.5、界面UI层
6、ORM使用


 3万+
3万+

 被折叠的 条评论
为什么被折叠?
被折叠的 条评论
为什么被折叠?
 到【灌水乐园】发言


