


一.什么是AOP
AOP(Aspect Oriented Programming),是面向切面编程的技术。AOP基于IOC基础,是对OOP的有益补充。
AOP将应用系统拆分为个部分:核心业务逻辑及横向的通用逻辑,也就是所谓的切面。
利用AOP可以对业务逻辑的各个部分进行隔离,从而使得业务逻辑各部分之间的耦合度降低,提高程序的可重用性,同时提高开发效率。
AOP取代了传统的继承体系重复性代码,抽取采用横向的机制,可以在不修改源码的情况下,对程序进行增强。
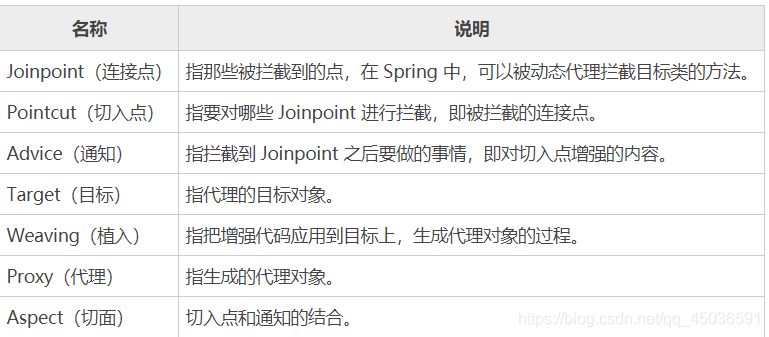
二.AOP所需要知道的知识点
1.AOP专业术语
三、AOP的实现
1.SpringAOP技术——使用配置文件的方式
配置prom文件
<?xml version="1.0" encoding="UTF-8"?>
<project xmlns="http://maven.apache.org/POM/4.0.0"
         xmlns:xsi="http://www.w3.org/2001/XMLSchema-instance"
         xsi:schemaLocation="http://maven.apache.org/POM/4.0.0 http://maven.apache.org/xsd/maven-4.0.0.xsd">
    <modelVersion>4.0.0</modelVersion>
    <groupId>com.dinglin</groupId>
    <artifactId>SpringDemo</artifactId>
    <version>1.0-SNAPSHOT</version>

    <dependencies>
        <!-- Spring 需要的依赖 -->
        <dependency>
            <groupId>org.springframework</groupId>
            <artifactId>spring-context</artifactId>
            <version>5.2.0.RELEASE</version>
        </dependency>
        <!-- 日志需要的依赖 -->
        <dependency>
            <groupId>ch.qos.logback</groupId>
            <artifactId>logback-classic</artifactId>
            <version>1.3.0-alpha5</version>
        </dependency>
        <!-- https://mvnrepository.com/artifact/aopalliance/aopalliance -->
        <dependency>
            <groupId>aopalliance</groupId>
            <artifactId>aopalliance</artifactId>
            <version>1.0</version>
        </dependency>
        <!-- https://mvnrepository.com/artifact/org.springframework/spring-aspects -->
        <dependency>
            <groupId>org.springframework</groupId>
            <artifactId>spring-aspects</artifactId>
            <version>5.0.3.RELEASE</version>
        </dependency>


        <!--         https://mvnrepository.com/artifact/org.aspectj/aspectjweaver-->
        <dependency>
            <groupId>org.aspectj</groupId>
            <artifactId>aspectjweaver</artifactId>
            <version>1.8.5</version>
        </dependency>


    </dependencies>

    <build>
        <!-- 相关的插件 -->
        <!-- 明确指定一些插件的版本,以免受到 maven 版本的影响 -->
            <plugins>
                <plugin>
                    <groupId>org.apache.maven.plugins</groupId>
                    <artifactId>maven-compiler-plugin</artifactId>
                    <version>3.8.1</version>
                    <configuration>
                        <source>1.8</source>
                        <target>1.8</target>
                        <encoding>UTF-8</encoding>
                    </configuration>
                </plugin>
            </plugins>
    </build>

</project>
在这里插入代码片
配置application.xml文件
<?xml version="1.0" encoding="UTF-8"?>
<beans xmlns="http://www.springframework.org/schema/beans"
       xmlns:xsi="http://www.w3.org/2001/XMLSchema-instance"
       xmlns:context="http://www.springframework.org/schema/context"
       xmlns:aop="http://www.springframework.org/schema/aop"
       xsi:schemaLocation="http://www.springframework.org/schema/beans
        https://www.springframework.org/schema/beans/spring-beans.xsd
        http://www.springframework.org/schema/context
        https://www.springframework.org/schema/context/spring-context.xsd
        http://www.springframework.org/schema/aop
        http://www.springframework.org/schema/aop/spring-aop.xsd">
        <!--这里是需要操作的地方>
</beans>
创建目标类:
public class Person  {
    public void eat() {
        System.out.println("人是动物,所以需要吃东西");
    }
}
创建通知类:
//通知类
public class MyAspect {
    //这里是增强的内容
    public void getProxy(){
       System.out.println("增强的代码执行了");
    }
}
在application.xml文件中进行配置
//创建通知类的bean
  <bean id="myAspect" class="aoplearn.spring.MyAspect"/>
  //创建目标类的bean
    <bean id="person" class="aoplearn.spring.Person"/>
    //开始进行代码增强
    <aop:config>
        <aop:aspect ref="myAspect">
            <aop:before method="getProxy" pointcut="execution(public void aoplearn.spring.Person.eat())"/>
        </aop:aspect>
    </aop:config>
//表示aoplearn.spring包下所有的类都受此文件支配
    <context:component-scan base-package="aoplearn.spring"/>
测试一下:
public static void main(String[] args) {
          //创建bean对象的容器
          ApplicationContext context = new ClassPathXmlApplicationContext("application.xml");
          Person person=(Person) context.getBean("person");
          person.eat();

    }
运行结果:
增强的代码执行了
人是动物,所以需要吃东西

Process finished with exit code 0
关于spring的5种通知类型:
1.前置通知[Before advice]:在连接点前面执行,前置通知不会影响连接点的执行,除非此处抛出异常。
<aop:before method="getProxy" pointcut="execution(public void aoplearn.spring.Person.eat())"/>
2.后置通知[After returning advice]:在连接点正常执行完成后执行,如果连接点抛出异常,则不会执行。
<aop:after-Returning method="getProxy" pointcut="execution(public void aoplearn.spring.Person.eat())"/>
3.异常通知[After throwing advice]:在连接点抛出异常后执行。
<aop:after-throwing method="getProxy" pointcut="execution(public void aoplearn.spring.Person.eat())"/>
**4.最终通知[After (finally) advice]:**在连接点执行完成后执行,不管是正常执行完成,还是抛出异常,都会执行返回通知中的内容。
<aop:after method="getProxy" pointcut="execution(public void aoplearn.spring.Person.eat())"/>
5.环绕通知[Around advice]:环绕通知围绕在连接点前后,比如一个方法调用的前后。这是最强大的通知类型,能在方法调用前后自定义一些操作。
<aop:around method="getProxy" pointcut="execution(public void aoplearn.spring.Person.eat())"/>
代码实例中用的是前置通知,关键字:before
//前置通知,会在eat方法执行前生效
<aop:before method="getProxy" pointcut="execution(public void aoplearn.spring.Person.eat())"/>
除了环绕通知,其他通知的使用方法是一样的。
环绕通知的使用方式:
环绕通知主要在通知方法里加参数:
public class MyAspect {
    //这里是增强的内容
    public void getProxy(ProceedingJoinPoint joinPoint){
        try {
            System.out.println("增强的代码执行了1");
            joinPoint.proceed();
            System.out.println("增强的代码执行了2");
        } catch (Throwable throwable) {
            throwable.printStackTrace();
        }
    }
}
在 joinPoint.proceed();的前后都可以加我们增强的部分
运行结果:
增强的代码执行了1
人是动物,所以需要吃东西
增强的代码执行了2

Process finished with exit code 0
关于切入点(pointcut)的描述
execution()中的内容是定位我们所要增强的方法,方法的前面必须加包名+类名,否则定位不到切入点,格式应该与目标方法保持一致,权限符可以省略,但是返回值应该保持一致,如果不一致,当我们执行eat方法时会正常运行,但是增强的部分就不会生效。,例如:
<aop:before method="getProxy" pointcut="execution(int aoplearn.spring.Person.eat())"/>
人是动物,所以需要吃东西

Process finished with exit code 0
可以使用通用的描述方式(推荐),使用*来代替原来返回值部分,表示任意的返回值,增强部分都会生效
例如:
<aop:before method="getProxy" pointcut="execution(* aoplearn.spring.Person.eat())"/>
增强的代码执行了
人是动物,所以需要吃东西

Process finished with exit code 0
*还可以代替类名* aoplearn.spring.*.eat())表示该包下所有类的eat()方法都可以增强
也可以指代替一部分* aoplearn.spring.*Person.eat())表示只要是Person关键字结尾的类中的eat()方法都会增强
方法的名称也可以用*代替* aoplearn.spring.Person.*)表示该类下所有方法都增强。
还可以在方法里传入指定参数
* aoplearn.spring.Person.eat(int))
表示只有参数int的eat方法才会被增强,可以传入多个参数
也可以用..表示任意类型和个数的参数* aoplearn.spring.Person.eat(..))
2.SpringAOP技术——注解方式
目标类的配置:
@Component("person")  //声明这是一个id=person的bean,交给iOC管理
public class Person  {
    public void eat() {
        System.out.println("人是动物,所以需要吃东西");
    }
}
通知类配置:
@Component  //把该类交给IOC管理
@Aspect  //声明是切面类
//通知类
public class MyAspect {
    //这里是增强的内容
    //切入点表达式
    @Before(value ="execution(public void aoplearn.spring.Person.eat())")
    public void getProxy(){
       System.out.println("增强的代码实现了");
    }
}
创建一个配置类:
@Component
@ComponentScan(basePackages = "aoplearn.spring")  //扫描该包下的所有bean
@EnableAspectJAutoProxy //开启AOP自动代理
public class MyConfig {
}
验证:
public static void main(String[] args) {
        ApplicationContext context = new AnnotationConfigApplicationContext(MyConfig.class);
        Person person= (Person) context.getBean("person");
        person.eat();
    }
运行结果:
增强的代码实现了
人是动物,所以需要吃东西

Process finished with exit code 0
五个通知注解:
前置通知:@Before
后置通知:@AfterReturning
最终通知:@After
异常通知:@AfterThrowing
环绕通知:@Around
前四个通知用法一致
环绕通知的用法:
  @Around(value ="execution(public void aoplearn.spring.Person.eat())")
    public void getProxy(ProceedingJoinPoint joinPoint){
        try {
            System.out.println("增强的代码实现了1");
            joinPoint.proceed();
            System.out.println("增强的代码实现了2");
        } catch (Throwable throwable) {
            throwable.printStackTrace();
        }
运行结果:
增强的代码实现了1
人是动物,所以需要吃东西
增强的代码实现了2

Process finished with exit code 0
AOP支持两种代理:
JDK动态代理
CGLib实现机制
这两种代理方式的区别:
jdk基于接口实现:jdk动态代理对实现了接口的类进行代理。
CGLIB基于继承:CGLIB代理可以对类代理,主要对指定的类生成一个子类,因为是继承,所以目标类最好不要使用final声明。
通常情况下,鼓励使用jdk代理,因为业务一般都会抽象出一个接口,而且不用引入新的东西。如果是遗留的系统,以前没有实现接口,那么只能使用CGLIB。


 被折叠的 条评论
为什么被折叠?
被折叠的 条评论
为什么被折叠?
 到【灌水乐园】发言


