


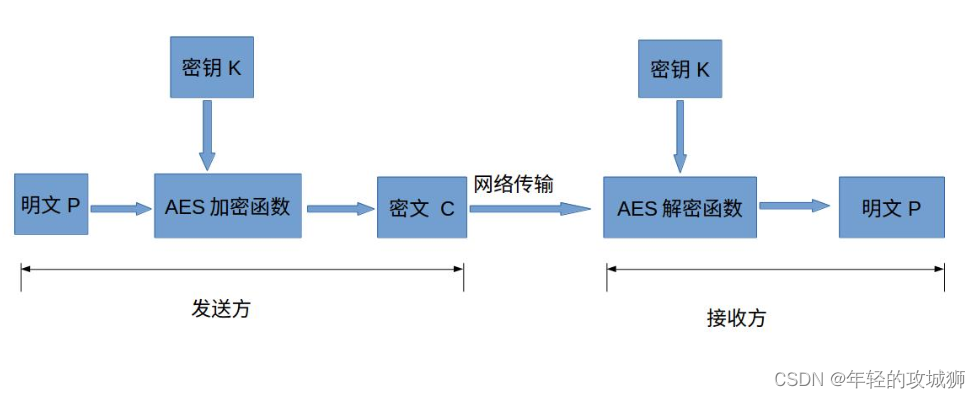
AES简介
高级加密标准AES(Advanced Encryption Standard)是一种常见的对称加密算法.
详细介绍如下链接:
https://blog.youkuaiyun.com/qq_28205153/article/details/55798628
其余基本概念,我这不再加以描述了,主要攻克一些技术难点:
实现AES算法主要包括以下学习步骤:
1、GF(2^8)域上的多项式运算
2、扩展的欧几里德算法
3、生成S盒
4、生成逆S盒
5、S盒置换
6、行移位
7、列混合
8、生成秘钥
9、循环加密
详细学习路径如下:
https://blog.youkuaiyun.com/u013605322/article/details/83443612
以上两篇链接,你就可以对AES算法有个大致的了解
算法流程如下:
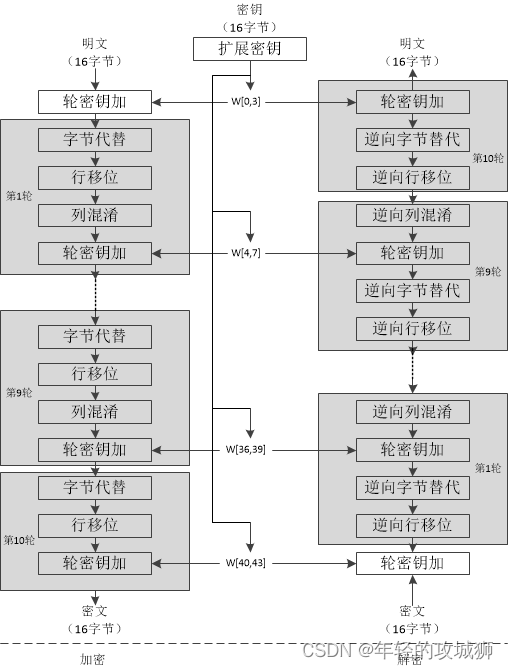
具体实现如下:
加密接口函数:
// AES-128加密接口,输入key应为16字节长度,输入长度应该是16字节整倍数,
// 这样输出长度与输入长度相同,函数调用外部为输出数据分配内存
int aesEncrypt(const uint8_t *key, uint32_t keyLen, const uint8_t *pt, uint8_t *ct, uint32_t len) {

    AesKey aesKey;
    uint8_t *pos = ct;
    const uint32_t *rk = aesKey.eK;  //解密秘钥指针
    uint8_t out[BLOCKSIZE] = {0};
    uint8_t actualKey[16] = {0};
    uint8_t state[4][4] = {0};

    if (NULL == key || NULL == pt || NULL == ct){
        printf("param err.\n");
        return -1;
    }

    if (keyLen > 16){
        printf("keyLen must be 16.\n");
        return -1;
    }

    if (len % BLOCKSIZE){
        printf("inLen is invalid.\n");
        return -1;
    }

    memcpy(actualKey, key, keyLen);
    keyExpansion(actualKey, 16, &aesKey);  // 秘钥扩展

	// 使用ECB模式循环加密多个分组长度的数据
    for (int i = 0; i < len; i += BLOCKSIZE) {
		// 把16字节的明文转换为4x4状态矩阵来进行处理
        loadStateArray(state, pt);
        // 轮秘钥加
        addRoundKey(state, rk);

        for (int j = 1; j < 10; ++j) {
            rk += 4;
            subBytes(state);   // 字节替换
            shiftRows(state);  // 行移位
            mixColumns(state); // 列混合
            addRoundKey(state, rk); // 轮秘钥加
        }

        subBytes(state);    // 字节替换
        shiftRows(state);  // 行移位
        // 此处不进行列混合
        addRoundKey(state, rk+4); // 轮秘钥加

		// 把4x4状态矩阵转换为uint8_t一维数组输出保存
        storeStateArray(state, pos);

        pos += BLOCKSIZE;  // 加密数据内存指针移动到下一个分组
        pt += BLOCKSIZE;   // 明文数据指针移动到下一个分组
        rk = aesKey.eK;    // 恢复rk指针到秘钥初始位置
    }
    return 0;
}
秘钥扩展函数:
//秘钥扩展
int keyExpansion(const uint8_t *key, uint32_t keyLen, AesKey *aesKey) {

    if (NULL == key || NULL == aesKey){
        printf("keyExpansion param is NULL\n");
        return -1;
    }

    if (keyLen != 16){
        printf("keyExpansion keyLen = %d, Not support.\n", keyLen);
        return -1;
    }

    uint32_t *w = aesKey->eK;  //加密秘钥
    uint32_t *v = aesKey->dK;  //解密秘钥

    /* keyLen is 16 Bytes, generate uint32_t W[44]. */

    /* W[0-3] */
    for (int i = 0; i < 4; ++i) {
        LOAD32H(w[i], key + 4*i);
    }

    /* W[4-43] */
    for (int i = 0; i < 10; ++i) {
        w[4] = w[0] ^ MIX(w[3]) ^ rcon[i];
        w[5] = w[1] ^ w[4];
        w[6] = w[2] ^ w[5];
        w[7] = w[3] ^ w[6];
        w += 4;
    }

    w = aesKey->eK+44 - 4;
    //解密秘钥矩阵为加密秘钥矩阵的倒序,方便使用,把ek的11个矩阵倒序排列分配给dk作为解密秘钥
    //即dk[0-3]=ek[41-44], dk[4-7]=ek[37-40]... dk[41-44]=ek[0-3]
    for (int j = 0; j < 11; ++j) {

        for (int i = 0; i < 4; ++i) {
            v[i] = w[i];
        }
        w -= 4;
        v += 4;
    }
    return 0;
}
使用ECB模式循环加密多个分组长度的数据
/* copy in[16] to state[4][4] */
int loadStateArray(uint8_t (*state)[4], const uint8_t *in) {
    for (int i = 0; i < 4; ++i) {
        for (int j = 0; j < 4; ++j) {
            state[j][i] = *in++;
        }
    }
    return 0;
}
轮秘钥加
// 轮秘钥加
int addRoundKey(uint8_t (*state)[4], const uint32_t *key) {
    uint8_t k[4][4];

    /* i: row, j: col */
    for (int i = 0; i < 4; ++i) {
        for (int j = 0; j < 4; ++j) {
            k[i][j] = (uint8_t) BYTE(key[j], 3 - i);  /* 把 uint32 key[4] 先转换为矩阵 uint8 k[4][4] */
            state[i][j] ^= k[i][j];
        }
    }

    return 0;
}
// 从uint32_t x中提取从低位开始的第n个字节
#define BYTE(x, n) (((x) >> (8 * (n))) & 0xff)
字节替换,行移位,列混合
//字节替换
int subBytes(uint8_t (*state)[4]) {
    /* i: row, j: col */
    for (int i = 0; i < 4; ++i) {
        for (int j = 0; j < 4; ++j) {
            state[i][j] = S[state[i][j]]; //直接使用原始字节作为S盒数据下标
        }
    }

    return 0;
}
//行移位
int shiftRows(uint8_t (*state)[4]) {
    uint32_t block[4] = {0};

    /* i: row */
    for (int i = 0; i < 4; ++i) {
    //便于行循环移位,先把一行4字节拼成uint_32结构,移位后再转成独立的4个字节uint8_t
        LOAD32H(block[i], state[i]);
        block[i] = ROF32(block[i], 8*i);
        STORE32H(block[i], state[i]);
    }

    return 0;
}
// 列混合
int mixColumns(uint8_t (*state)[4]) {
    uint8_t tmp[4][4];
    uint8_t M[4][4] = {{0x02, 0x03, 0x01, 0x01},
                       {0x01, 0x02, 0x03, 0x01},
                       {0x01, 0x01, 0x02, 0x03},
                       {0x03, 0x01, 0x01, 0x02}};

    /* copy state[4][4] to tmp[4][4] */
    for (int i = 0; i < 4; ++i) {
        for (int j = 0; j < 4; ++j){
            tmp[i][j] = state[i][j];
        }
    }

    for (int i = 0; i < 4; ++i) {
        for (int j = 0; j < 4; ++j) {  //伽罗华域加法和乘法
            state[i][j] = GMul(M[i][0], tmp[0][j]) ^ GMul(M[i][1], tmp[1][j])
                        ^ GMul(M[i][2], tmp[2][j]) ^ GMul(M[i][3], tmp[3][j]);
        }
    }

    return 0;
}
把4X4状态矩阵转换为uint8_t一维数组输出保存
/* copy state[4][4] to out[16] */
int storeStateArray(uint8_t (*state)[4], uint8_t *out) {
    for (int i = 0; i < 4; ++i) {
        for (int j = 0; j < 4; ++j) {
            *out++ = state[j][i];
        }
    }
    return 0;
}
解密即为上面解密的逆运算:
解密函数:
int aesDecrypt(const uint8_t *key, uint32_t keyLen, const uint8_t *ct, uint8_t *pt, uint32_t len) {
    AesKey aesKey;
    uint8_t *pos = pt;
    const uint32_t *rk = aesKey.dK;  //解密秘钥指针
    uint8_t out[BLOCKSIZE] = {0};
    uint8_t actualKey[16] = {0};
    uint8_t state[4][4] = {0};

    if (NULL == key || NULL == ct || NULL == pt){
        printf("param err.\n");
        return -1;
    }

    if (keyLen > 16){
        printf("keyLen must be 16.\n");
        return -1;
    }

    if (len % BLOCKSIZE){
        printf("inLen is invalid.\n");
        return -1;
    }

    memcpy(actualKey, key, keyLen);
    keyExpansion(actualKey, 16, &aesKey);  //秘钥扩展,同加密

    for (int i = 0; i < len; i += BLOCKSIZE) {
        // 把16字节的密文转换为4x4状态矩阵来进行处理
        loadStateArray(state, ct);
        // 轮秘钥加,同加密
        addRoundKey(state, rk);

        for (int j = 1; j < 10; ++j) {
            rk += 4;
            invShiftRows(state);    // 逆行移位
            invSubBytes(state);     // 逆字节替换,这两步顺序可以颠倒
            addRoundKey(state, rk); // 轮秘钥加,同加密
            invMixColumns(state);   // 逆列混合
        }

        invSubBytes(state);   // 逆字节替换
        invShiftRows(state);  // 逆行移位
        // 此处没有逆列混合
        addRoundKey(state, rk+4);  // 轮秘钥加,同加密

        storeStateArray(state, pos);  // 保存明文数据
        pos += BLOCKSIZE;  // 输出数据内存指针移位分组长度
        ct += BLOCKSIZE;   // 输入数据内存指针移位分组长度
        rk = aesKey.dK;    // 恢复rk指针到秘钥初始位置
    }
    return 0;
}
//逆行移位
int invShiftRows(uint8_t (*state)[4]) {
    uint32_t block[4] = {0};

    /* i: row */
    for (int i = 0; i < 4; ++i) {
        LOAD32H(block[i], state[i]);
        block[i] = ROR32(block[i], 8*i);
        STORE32H(block[i], state[i]);
    }

    return 0;
}
//逆字节替换
int invSubBytes(uint8_t (*state)[4]) {
    /* i: row, j: col */
    for (int i = 0; i < 4; ++i) {
        for (int j = 0; j < 4; ++j) {
            state[i][j] = inv_S[state[i][j]];
        }
    }
    return 0;
}
// 逆列混合
int invMixColumns(uint8_t (*state)[4]) {
    uint8_t tmp[4][4];
    uint8_t M[4][4] = {{0x0E, 0x0B, 0x0D, 0x09},
                       {0x09, 0x0E, 0x0B, 0x0D},
                       {0x0D, 0x09, 0x0E, 0x0B},
                       {0x0B, 0x0D, 0x09, 0x0E}};  //使用列混合矩阵的逆矩阵

    /* copy state[4][4] to tmp[4][4] */
    for (int i = 0; i < 4; ++i) {
        for (int j = 0; j < 4; ++j){
            tmp[i][j] = state[i][j];
        }
    }

    for (int i = 0; i < 4; ++i) {
        for (int j = 0; j < 4; ++j) {
            state[i][j] = GMul(M[i][0], tmp[0][j]) ^ GMul(M[i][1], tmp[1][j])
                          ^ GMul(M[i][2], tmp[2][j]) ^ GMul(M[i][3], tmp[3][j]);
        }
    }

    return 0;
}
罗华域乘法运算的实现
* Galois Field (256) Multiplication of two Bytes */
// 两字节的伽罗华域乘法运算
uint8_t GMul(uint8_t u, uint8_t v) {
    uint8_t p = 0;

    for (int i = 0; i < 8; ++i) {
        if (u & 0x01) {    //
            p ^= v;
        }

        int flag = (v & 0x80);
        v <<= 1;
        if (flag) {
            v ^= 0x1B; /* x^8 + x^4 + x^3 + x + 1 */
        }

        u >>= 1;
    }
    return p;
}
最后测试一下对应的加解密的输出数据和结果
/*
   AES加解密:采用对称分组密码体制
   待加解密字符串:32字节长度字符串明文
   算法模式: ECB (Electronic Code Book , 电子密码本) 模式
   秘钥长度:秘钥长度输入key应为16字节长度,输入长度应该是16字节整倍数,
   秘钥:key[]="1234567890123456"
   秘钥偏移量:None
   补码方式:None
   输出编码:十六进制(Hex)
*/
#include "AES128.h"

int main()
{
/* 加密步骤
            1.申明秘钥 key2[]
            2.明文  *data
            3.加密  aesEncrypt
*/
//****************************************************************************//
    // 16字节字符串形式秘钥
    const uint8_t key[]="1234567800000000";
    // 32字节长度字符串明文
    const uint8_t *P = (uint8_t*)"WOSHINIANGQINGDEGONGCHENGSHI111";
    //外部申请输出数据内存,用于存放加密后数据
    uint8_t Encrypted_data[32] = {0};
    //外部申请输出数据内存,用于存放解密后数据
    uint8_t Decrypted_data[32] = {0};
    //加密32字节明文
    aesEncrypt(key, 16, P, Encrypted_data, 32);  //加密
//****************************************************************************//
    printf("\n原始明文:\n%s\n", P);  //原始明文数据
    printHex(Encrypted_data, 32, "加密编码(HEX):");//加密后Hex
/* 解密步骤
                解密函数 aesDecrypt(key, 密钥数据长度, 加密后的数据存放的地址, 用于存放解密后的数据地址, 解密数据的长度)
*/
//****************************************************************************//
    // 解密32字节密文
    aesDecrypt(key, 16, Encrypted_data, Decrypted_data, 32);
//****************************************************************************//
    // 打印16进制形式的解密后的明文
    printHex(Decrypted_data, 32, "解密编码(HEX):");  //解密后Hex
    // 因为加密前的数据为可见字符的字符串,打印解密后的明文字符,与加密前明文进行对比
    printf("解密后反编译出原始明文 \n");
    for (int i = 0; i < 32; ++i) {
        printf("%c ", Decrypted_data[i]);
    }
    return 0;
}
输出结果如下:


 2583
2583

 被折叠的 条评论
为什么被折叠?
被折叠的 条评论
为什么被折叠?
 到【灌水乐园】发言


