


 本文详细介绍了如何在Hadoop集群环境中,替换Hive的默认Derby数据库为MySQL,包括下载安装、MySQL配置、Hive配置、数据库初始化及使用Beeline客户端的步骤,以支持多用户并发访问。
前置条件:Hadoop集群已安装并成功启动
(主机hadoop0,从机hadoop1和hadoop2)
hadoop集群安装参考:https://blog.youkuaiyun.com/qq_44734154/article/details/125157180
一、安装mysql
Hive默认的Derby数据库一次只能打开一个会话,不支持多用户并发访问,需要替换Hive的存储引擎为mysql
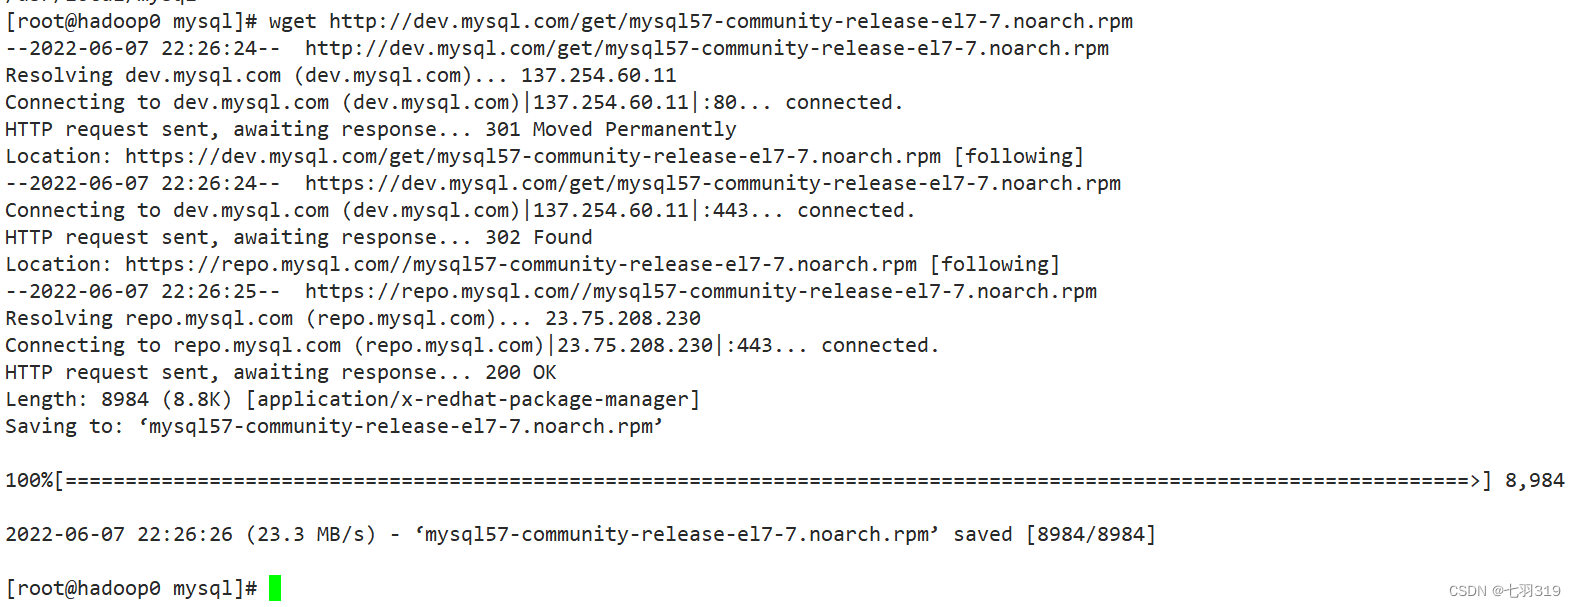
1. 下载mysql安装包
wget http://dev.mysql.com/get/mysql57-community-release-el7-7.noarch.rpm
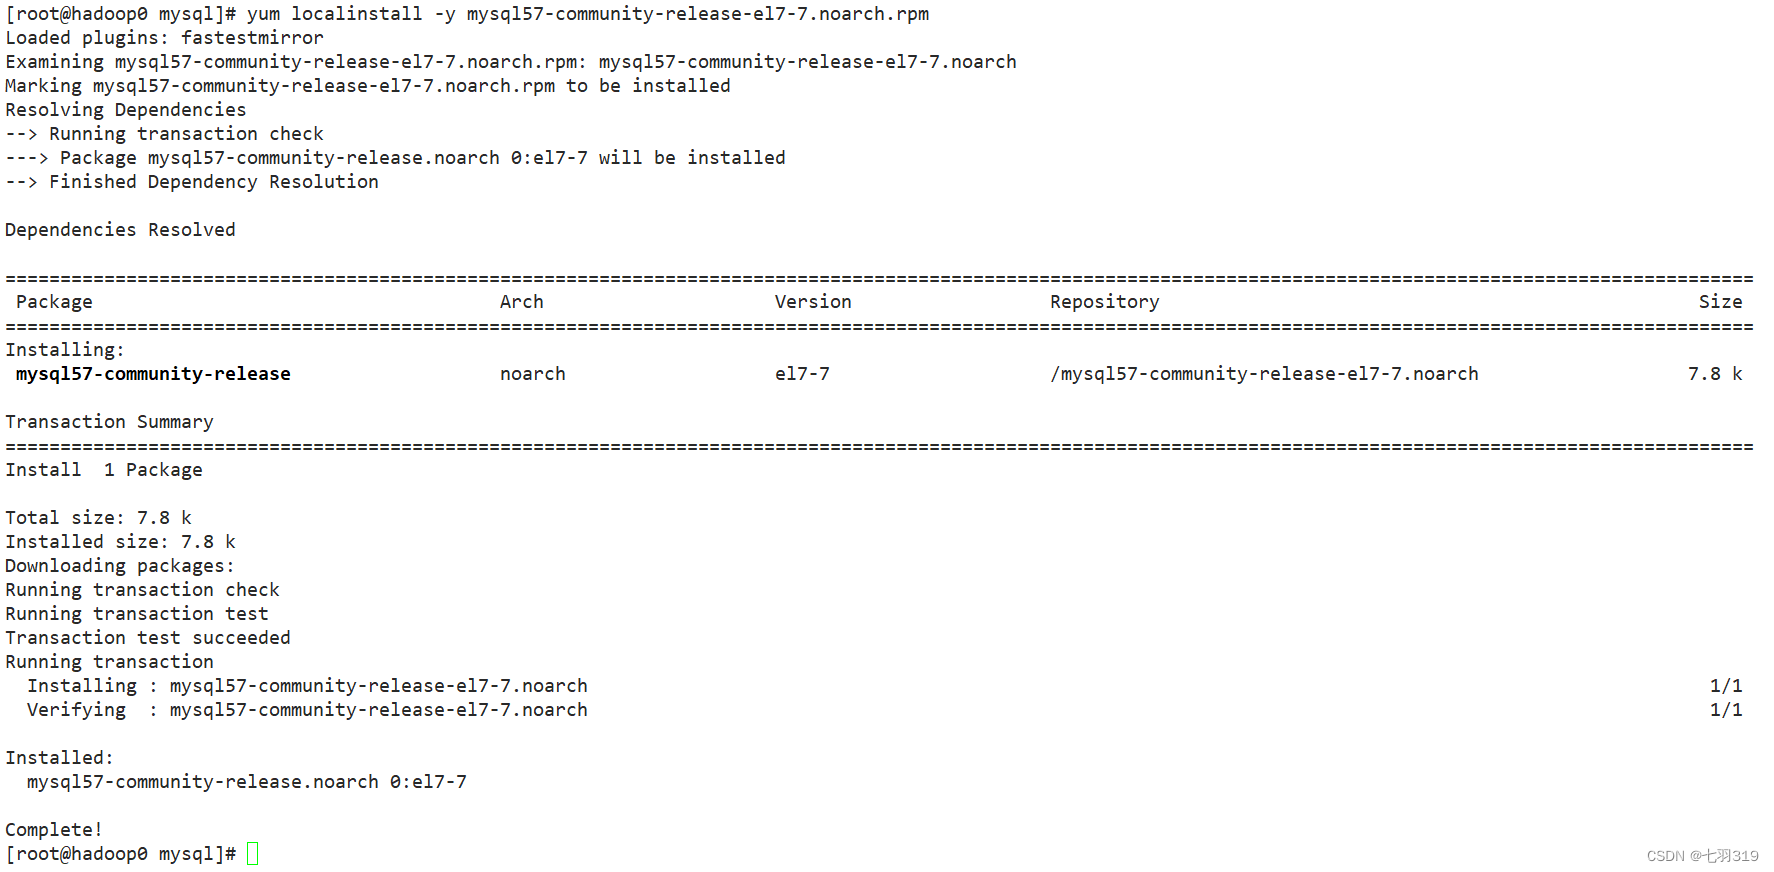
2. 安装mysql源
yum localinstall -y mysql57-community-release-el7-7.noarch.rpm
3. 安装mysql
yum install -y mysql-community-server
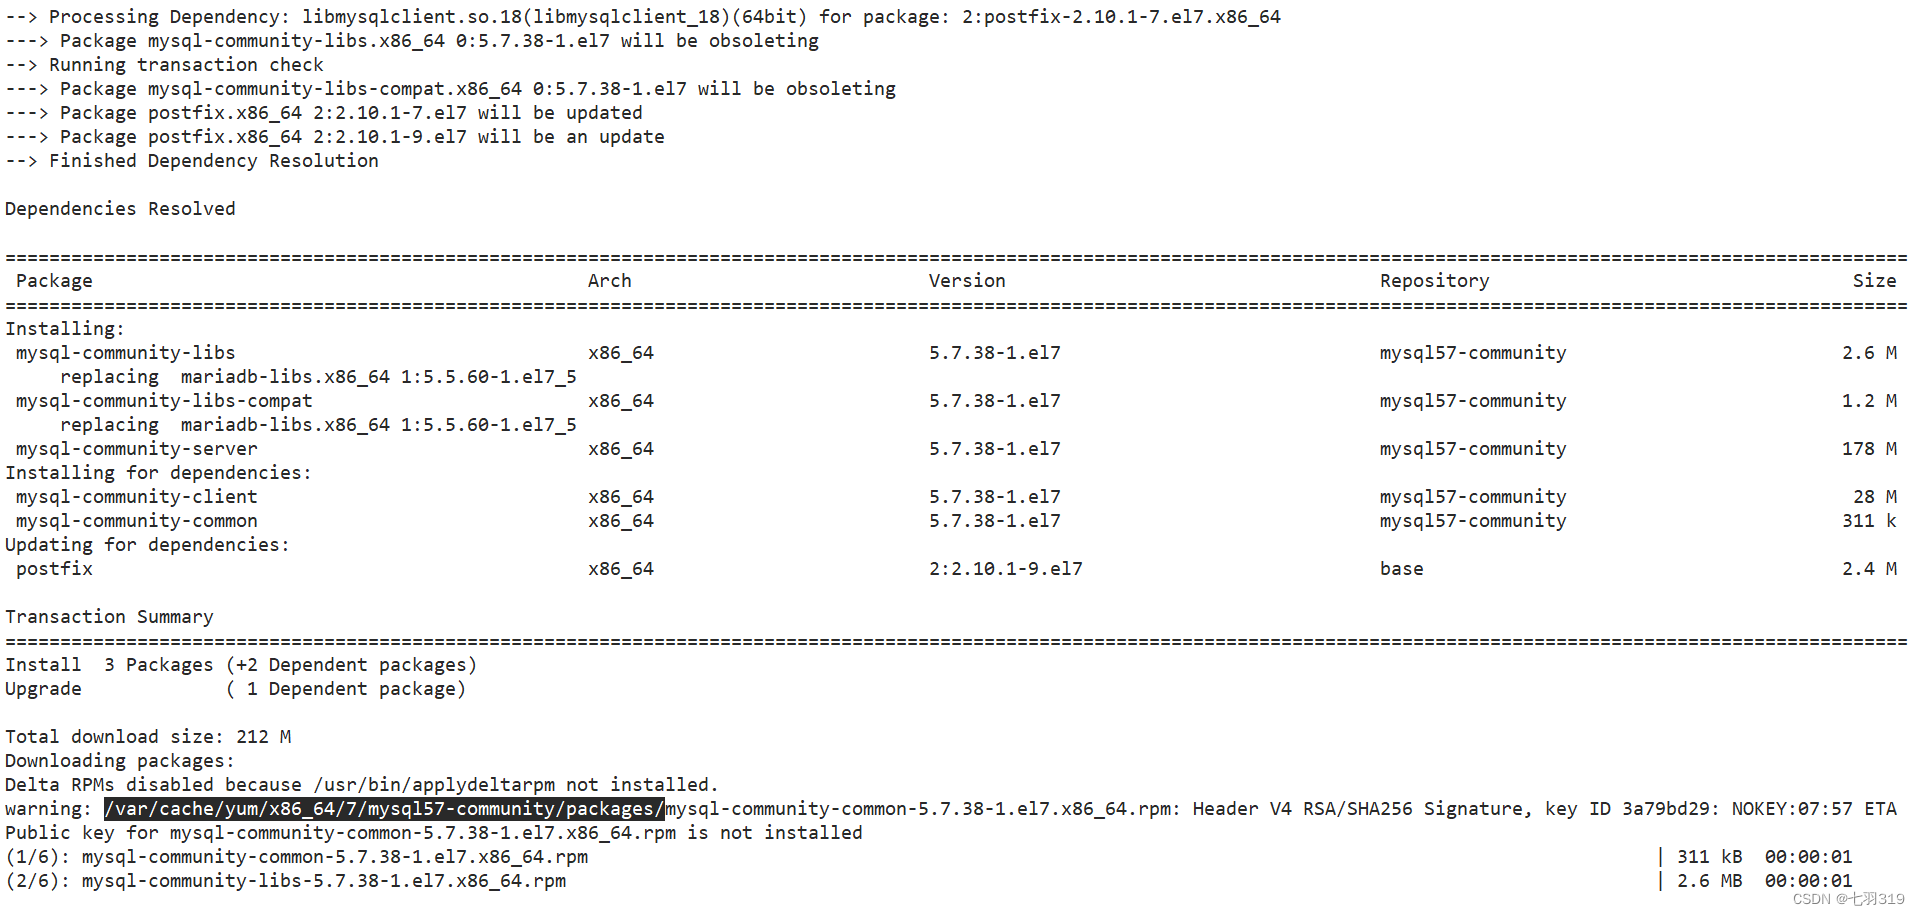
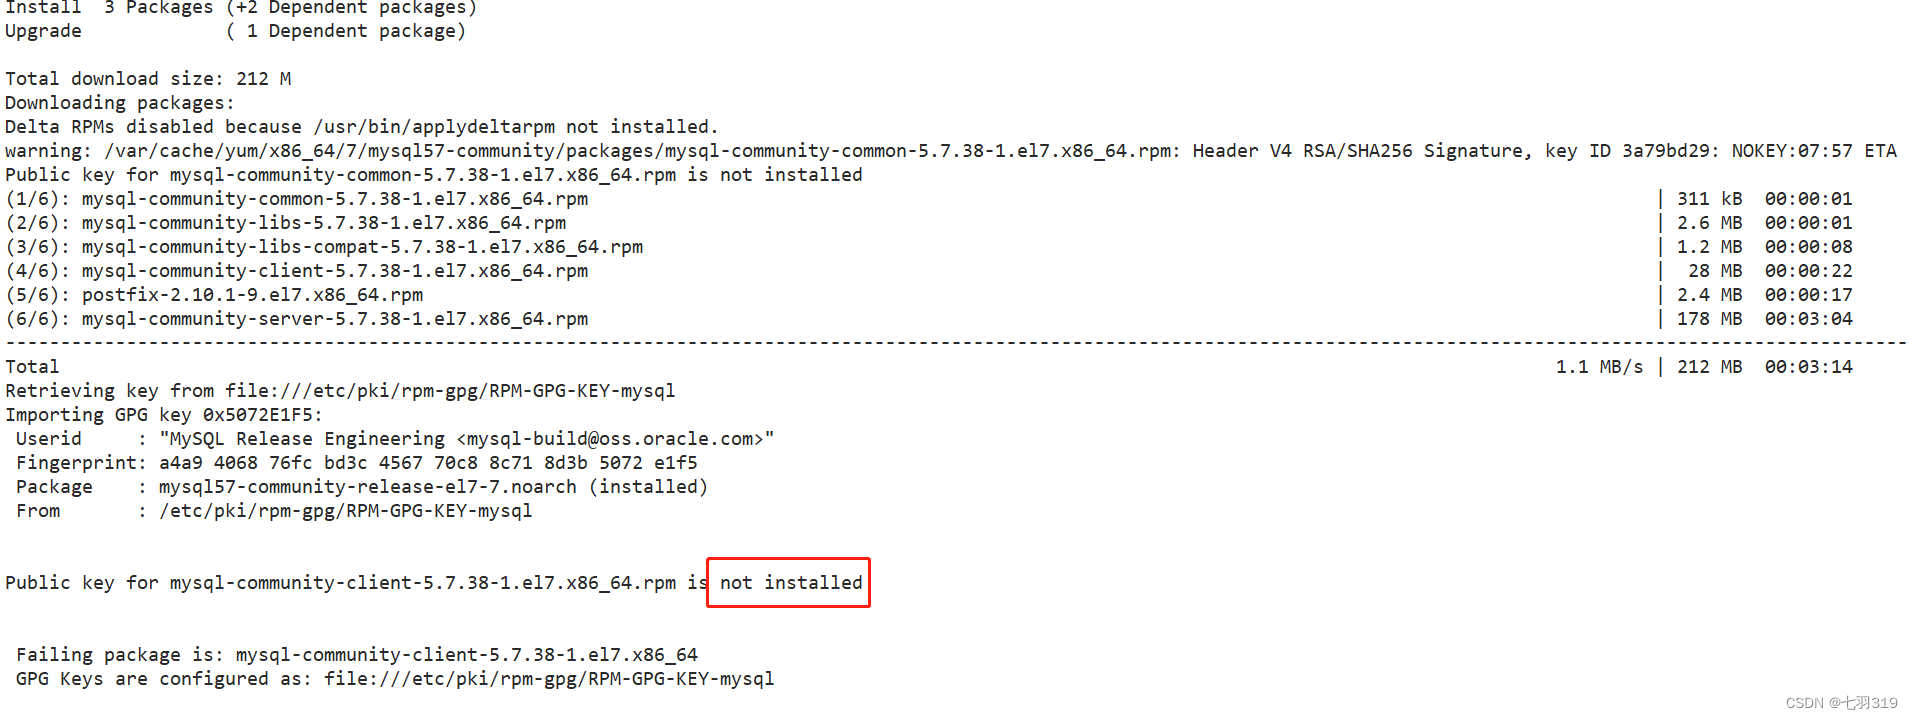
安装失败,一般都是存在包冲突导致的,根据提示找到安装包的位置,手动安装:
cd /var/cache/yum/x86_64/7/mysql57-community/packages/ && ll

尝试手动安装确定冲突:
一般根据common和lib的安装提示就可以确定所有包的冲突结果了
安装common
rpm -ivh mysql-community-common-5.7.38-1.el7.x86_64.rpm

提示有mariadb的包冲突,再试试安装lib
安装lib
rpm -ivh mysql-community-libs-compat-5.7.38-1.el7.x86_64.rpm
安装lib包时报错了,确定有mariadb安装包冲突:

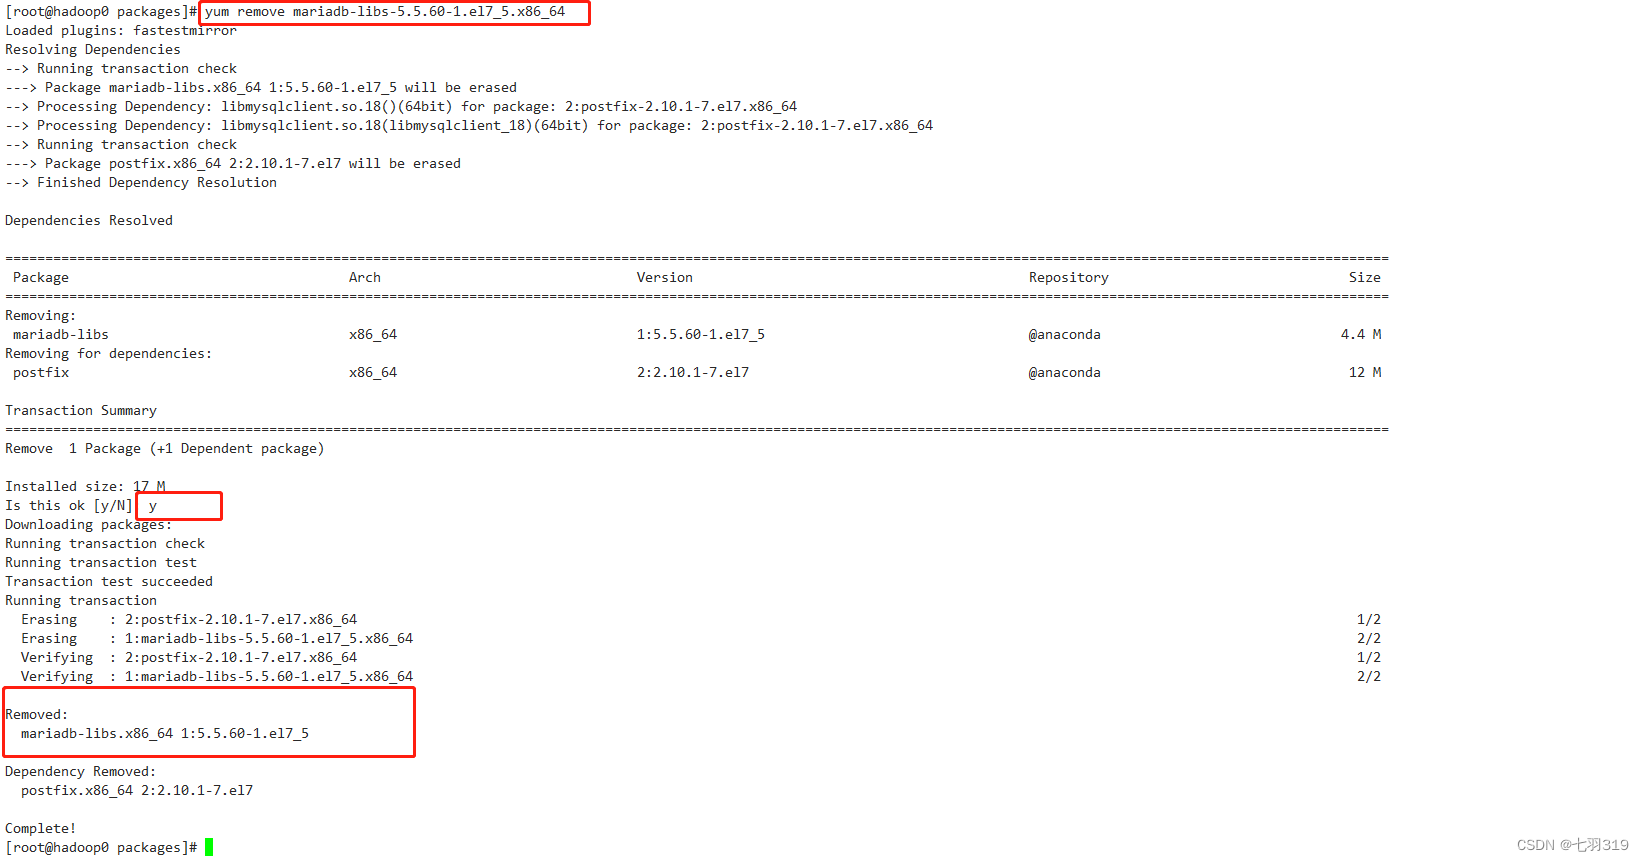
查询是否已安装mariadb
rpm -qa | grep mariadb

卸载mariadb
yum remove mariadb-libs-5.5.60-1.el7_5.x86_64
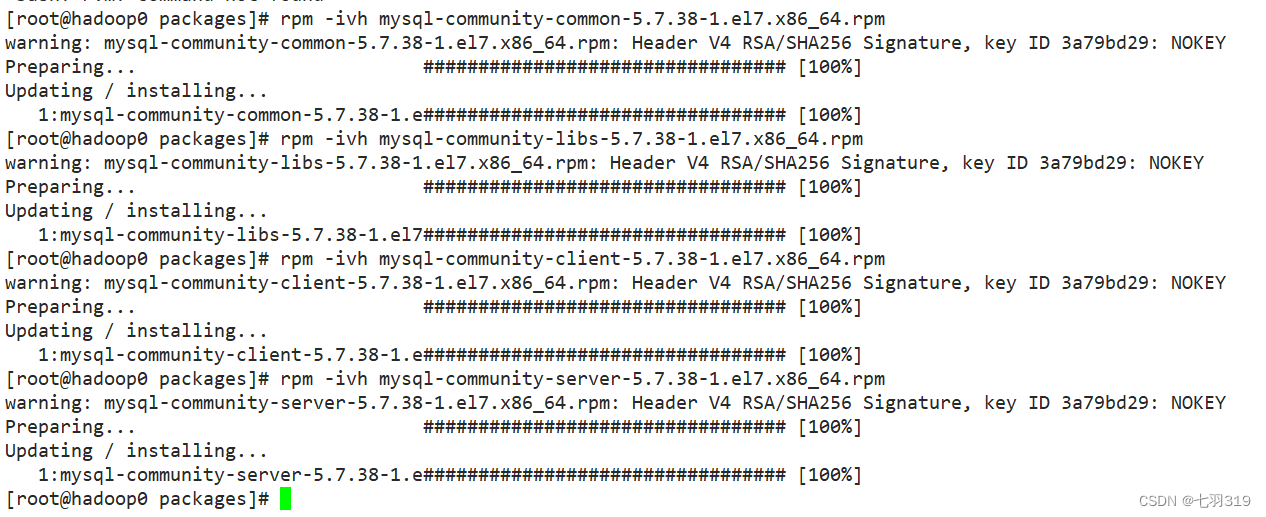
重新按顺序安装:
rpm -ivh mysql-community-common-5.7.38-1.el7.x86_64.rpm
rpm -ivh mysql-community-libs-5.7.38-1.el7.x86_64.rpm
# 兼容库,可以不装
rpm -ivh mysql-community-libs-compat-5.7.38-1.el7.x86_64.rpm
rpm -ivh mysql-community-client-5.7.38-1.el7.x86_64.rpm
rpm -ivh mysql-community-server-5.7.38-1.el7.x86_64.rpm
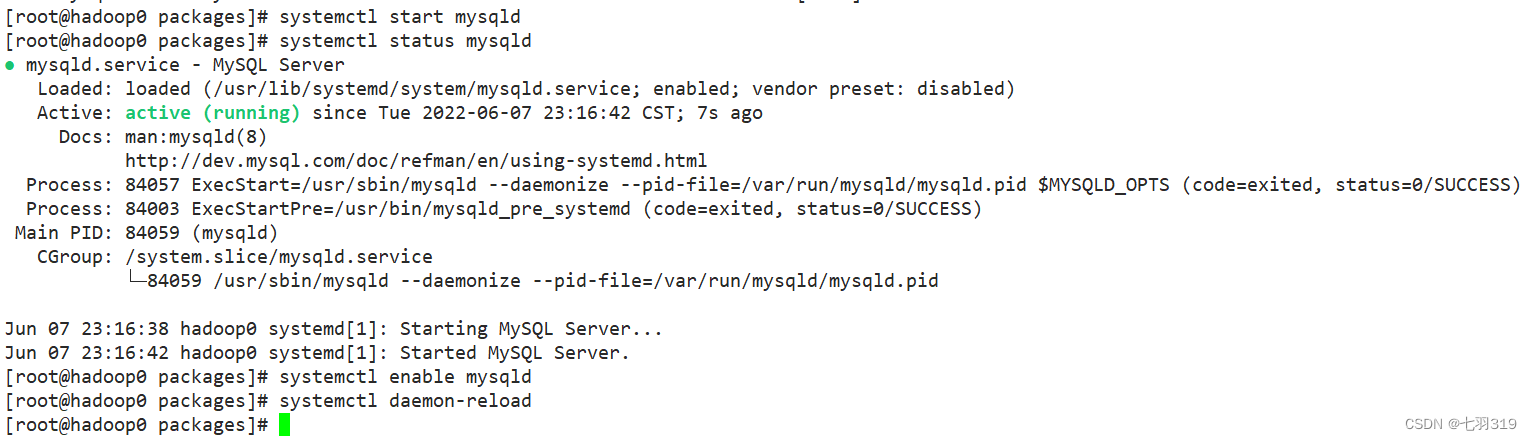
4. 启动mysql和设置开机启动
# 启动
systemctl start mysqld
# 重启
systemctl restart mysqld
# 查看状态
systemctl status mysqld
# 设置开机启动
systemctl enable mysqld
systemctl daemon-reload
修改/etc/my.cnf配置文件,配置默认编码为utf-8,
(注意其他目录不要动)
character_set_server=utf8
重启服务:systemctl restart mysqld
5.查询默认密码并修改密码
查询默认密码:
grep 'temporary password' /var/log/mysqld.log

并修改密码:
使用临时密码登录mysql,密码有安全插件检测(大小写字母+数字+特殊字符,大于7位)
mysql -uroot -p
alter user 'root'@'localhost' identified by 'xxxxxx@123A';


6.创建hive数据库用户
create user 'hive'@'%' identified by 'xxxxxx@123A';
grant all privileges on *.* to 'root'@'%' identified by 'xxxxxx@123A';
grant all privileges on *.* to 'hive'@'%' identified by 'xxxxxx@123A';
flush privileges;
二、Hive安装
1.修改hive-config.sh配置
vim /usr/local/hive/apache-hive-3.1.3-bin/bin/hive-config.sh
文件后面添加:
export JAVA_HOME=/usr/java/jdk1.8.0_221-amd64
export HADOOP_HOME=/usr/local/hadoop/hadoop-3.3.3
export HIVE_HOME=/usr/local/hive/apache-hive-3.1.3-bin
2.下载mysql驱动
https://downloads.mysql.com/archives/c-j/
选择版本下载:
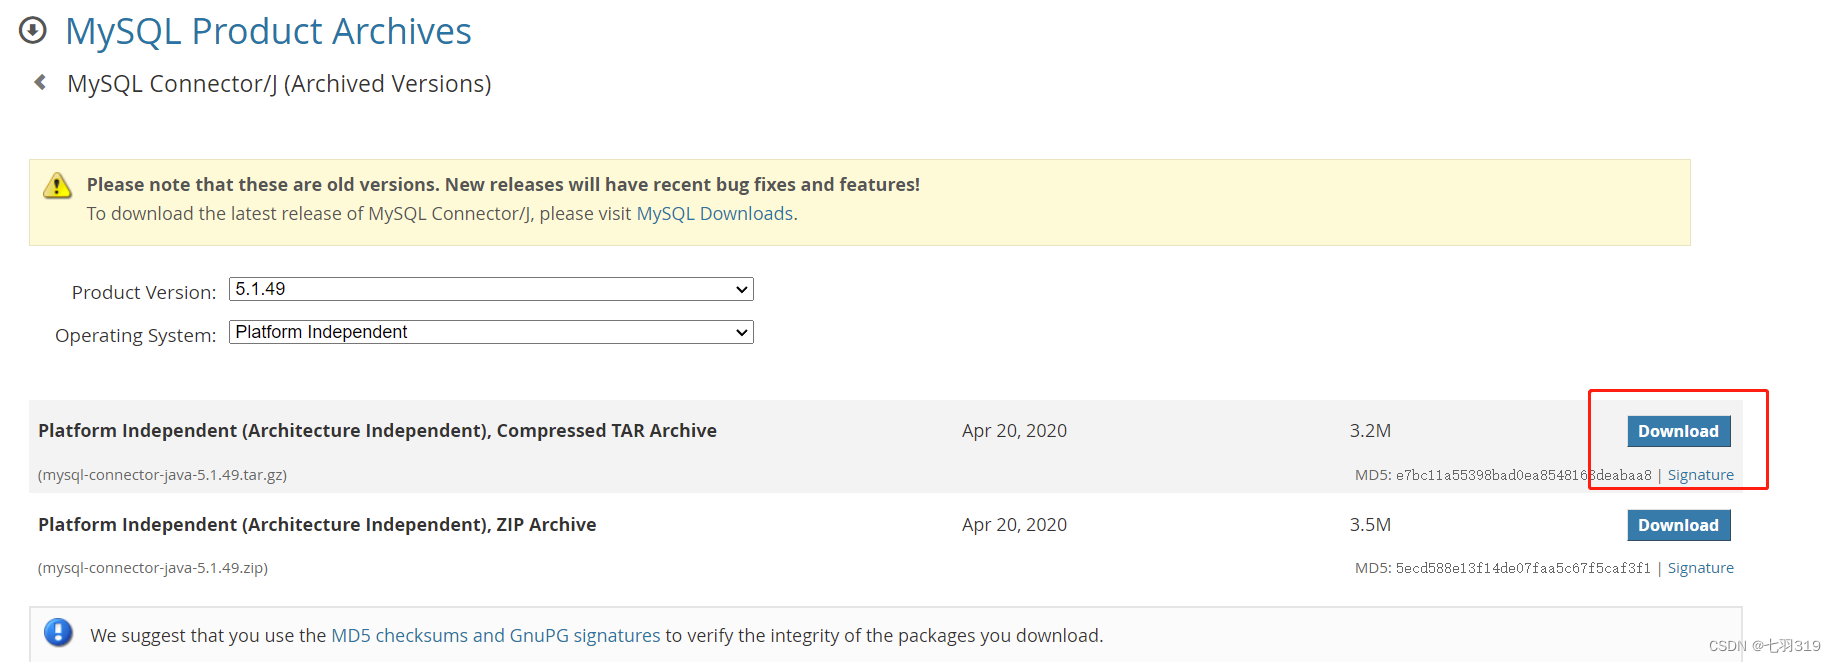
上传驱动包至hadoop0服务器的/usr/local/mysql目录解压
tar -zxvf mysql-connector-java-5.1.49.tar.gz
复制驱动包至$HIVE_HOME/lib目录下
cp mysql-connector-java-5.1.49-bin.jar /usr/local/hive/apache-hive-3.1.3-bin/lib
3.Hive配置修改
创建临时目录
mkdir $HIVE_HOME/tmp
修改hive-site.xml,更换Derby数据库的连接信息为mysql的,
vim hive-site.xml 命令模式下使用/向后查找关键字Connection,使用?向前查找,更改ConnectionPassword、ConnectionURL、ConnectionDriverName、ConnectionUserName四项配置:
<property>
<name>javax.jdo.option.ConnectionPassword</name>
<value>xxxxxx@123A</value>
</property>
<property>
<name>javax.jdo.option.ConnectionURL</name>
<value>jdbc:mysql://hadoop0:3306/hive?createDatabaseIfNotExist=true&useUnicode=true&serverTimezone=GMT%2B8&characterEncoding=UTF-8&zeroDateTimeBehavior=convertToNull&allowMultiQueries=true&autoReconnect=true&rewriteBatchedStatements=true&useSSL=false</value>
</property>
<property>
<name>javax.jdo.option.ConnectionDriverName</name>
<value>com.mysql.jdbc.Driver</value>
</property>
<property>
<name>javax.jdo.option.ConnectionUserName</name>
<value>hive</value>
</property>
替换系统临时目录和用户名:
替换hive-site.xml文件中:
${system:java.io.tmpdir} 替换为 ${HIVE_HOME}/tmp
${system:user.name} 替换为 root
[root@hadoop0 conf]# cat hive-site.xml | grep "tmpdir"
    <value>${system:java.io.tmpdir}/${system:user.name}</value>
    <value>${system:java.io.tmpdir}/${hive.session.id}_resources</value>
    <value>${system:java.io.tmpdir}/${system:user.name}</value>
    <description>Local temporary directory used to persist intermediate indexing state, will default to JVM system property java.io.tmpdir.</description>
    <value>${system:java.io.tmpdir}/${system:user.name}/operation_logs</value>
[root@hadoop0 conf]#
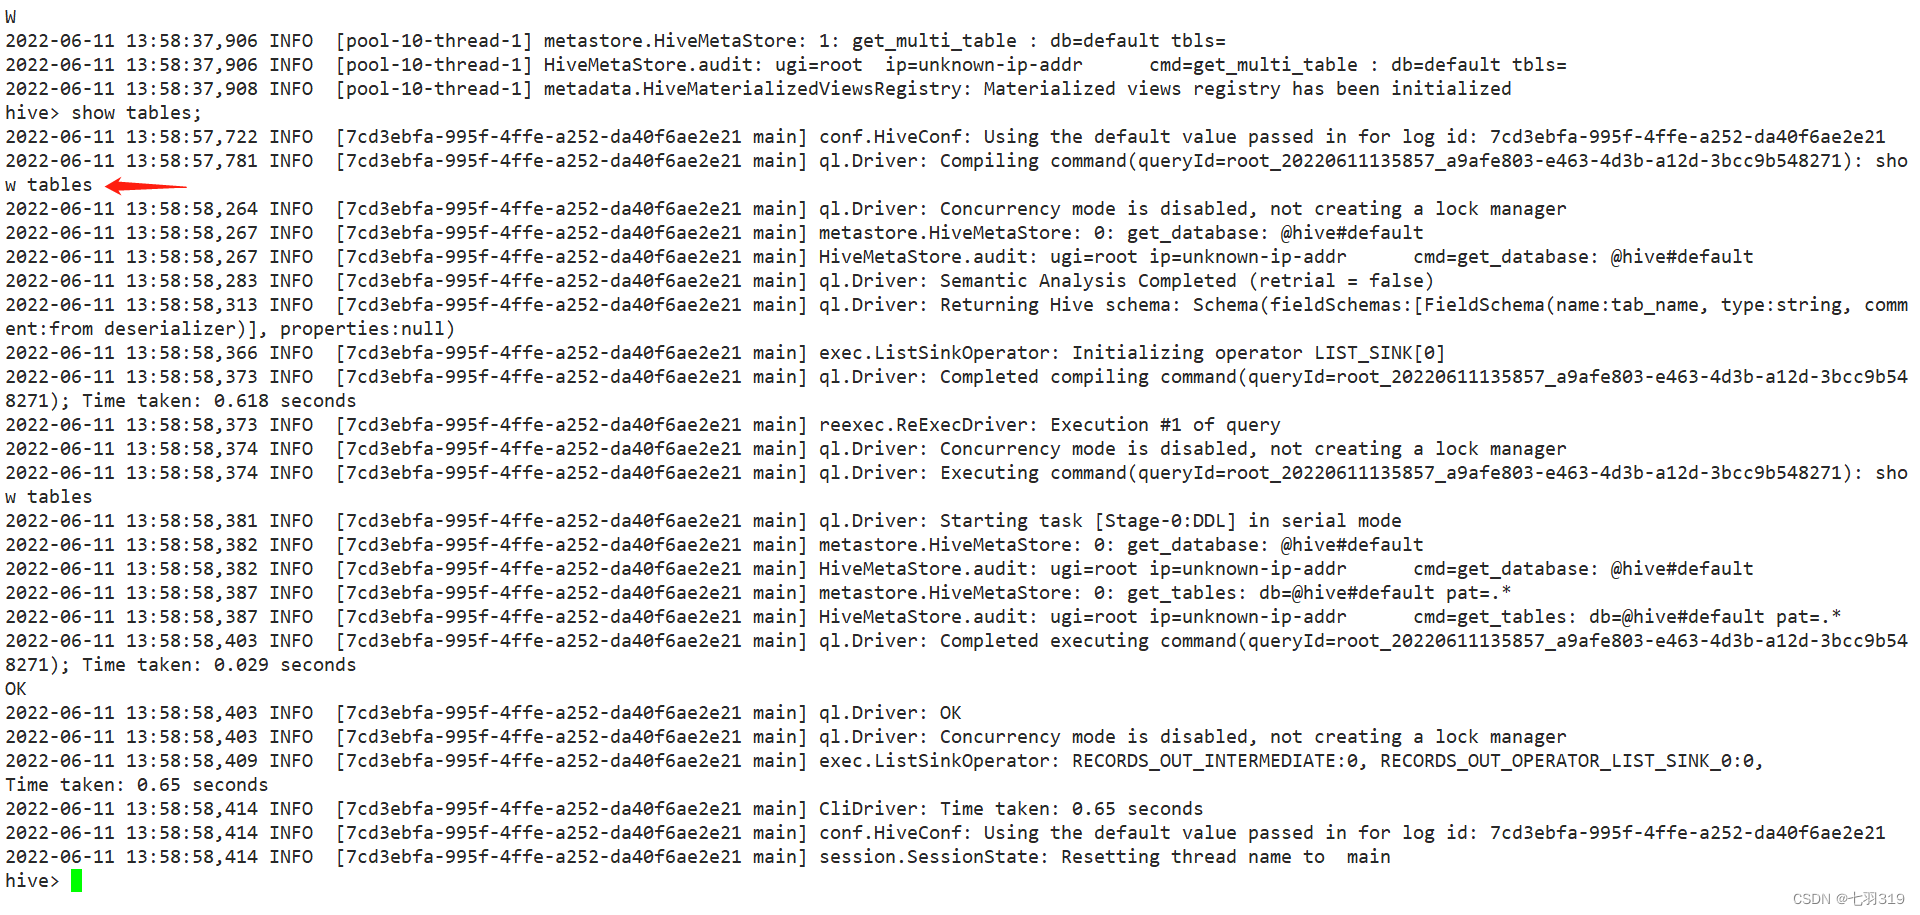
4.数据库初始化和验证
初始化hive数据库:
schematool -dbType mysql -initSchema
执行hive命令:
hive
查看表信息:
三、hive的使用
1.Hive CLI客户端命令行工具
类似于mysql的命令行工具,但是只能操作本地的Hive服务,无法通过JDBC连接远程服务,且sql执行结果没有格式化,看起来不是很直观(后续将会被新的命令行工具Beeline取代)
打开Hive CLI很简单,执行hive命令即可:
hive
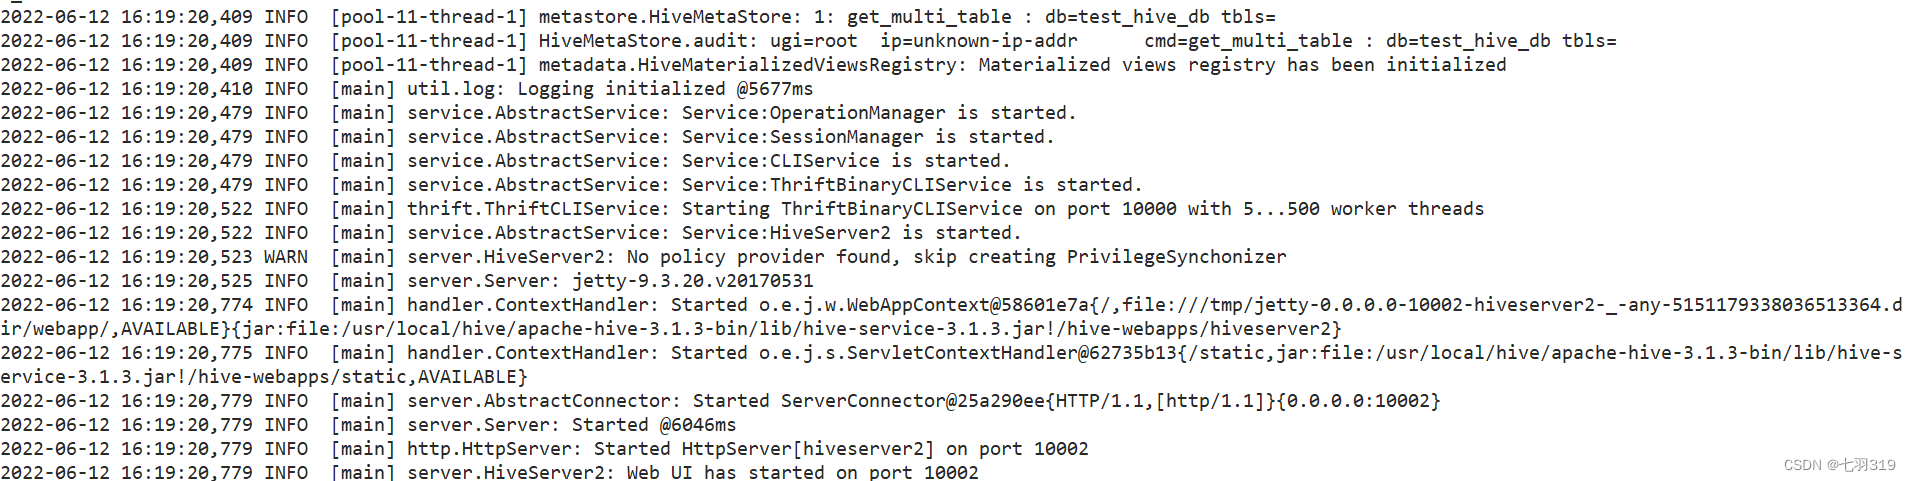
创建test_hive_db数据库测试一下:
hive> create database test_hive_db;
查看日志输出信息,数据库被创建在hdfs://hadoop0:9000/user/hive/warehouse/test_hive_db.db:
2022-06-12 15:02:51,733 INFO  [16c97e57-0bd1-4ba7-96cd-1e543b1af737 main] metastore.HiveMetaStore: 0: create_database: Database(name:test_hive_db, description:null, locationUri:hdfs://hadoop0:9000/user/hive/warehouse/test_hive_db.db, parameters:null, ownerName:root, ownerType:USER, catalogName:hive)
2022-06-12 15:02:51,733 INFO  [16c97e57-0bd1-4ba7-96cd-1e543b1af737 main] HiveMetaStore.audit: ugi=root	ip=unknown-ip-addr	cmd=create_database: Database(name:test_hive_db, description:null, locationUri:hdfs://hadoop0:9000/user/hive/warehouse/test_hive_db.db, parameters:null, ownerName:root, ownerType:USER, catalogName:hive)
2022-06-12 15:02:51,735 WARN  [16c97e57-0bd1-4ba7-96cd-1e543b1af737 main] metastore.ObjectStore: Failed to get database hive.test_hive_db, returning NoSuchObjectException
2022-06-12 15:02:51,764 INFO  [16c97e57-0bd1-4ba7-96cd-1e543b1af737 main] utils.FileUtils: Creating directory if it doesn't exist: hdfs://hadoop0:9000/user/hive/warehouse/test_hive_db.db
2022-06-12 15:02:51,845 INFO  [16c97e57-0bd1-4ba7-96cd-1e543b1af737 main] ql.Driver: Completed executing command(queryId=root_20220612150251_543172ad-5d22-4d36-85fd-d8b1d4438bda); Time taken: 0.159 seconds
OK
2022-06-12 15:02:51,846 INFO  [16c97e57-0bd1-4ba7-96cd-1e543b1af737 main] ql.Driver: OK
2022-06-12 15:02:51,846 INFO  [16c97e57-0bd1-4ba7-96cd-1e543b1af737 main] ql.Driver: Concurrency mode is disabled, not creating a lock manager
Time taken: 0.182 seconds
2022-06-12 15:02:51,846 INFO  [16c97e57-0bd1-4ba7-96cd-1e543b1af737 main] CliDriver: Time taken: 0.182 seconds
2022-06-12 15:02:51,846 INFO  [16c97e57-0bd1-4ba7-96cd-1e543b1af737 main] conf.HiveConf: Using the default value passed in for log id: 16c97e57-0bd1-4ba7-96cd-1e543b1af737
2022-06-12 15:02:51,846 INFO  [16c97e57-0bd1-4ba7-96cd-1e543b1af737 main] session.SessionState: Resetting thread name to  main
查看数据库的信息(无法查看当前的数据库):
hive> desc database test_hive_db;
2022-06-12 15:03:53,133 INFO  [main] conf.HiveConf: Using the default value passed in for log id: 16c97e57-0bd1-4ba7-96cd-1e543b1af737
2022-06-12 15:03:53,133 INFO  [main] session.SessionState: Updating thread name to 16c97e57-0bd1-4ba7-96cd-1e543b1af737 main
2022-06-12 15:03:53,135 INFO  [16c97e57-0bd1-4ba7-96cd-1e543b1af737 main] ql.Driver: Compiling command(queryId=root_20220612150353_a85bcba5-48f0-4665-895d-7cdd21b8f2f1): desc database test_hive_db
2022-06-12 15:03:53,147 INFO  [16c97e57-0bd1-4ba7-96cd-1e543b1af737 main] ql.Driver: Concurrency mode is disabled, not creating a lock manager
2022-06-12 15:03:53,150 INFO  [16c97e57-0bd1-4ba7-96cd-1e543b1af737 main] metastore.HiveMetaStore: 0: get_database: @hive#test_hive_db
2022-06-12 15:03:53,150 INFO  [16c97e57-0bd1-4ba7-96cd-1e543b1af737 main] HiveMetaStore.audit: ugi=root	ip=unknown-ip-addr	cmd=get_database: @hive#test_hive_db
2022-06-12 15:03:53,153 INFO  [16c97e57-0bd1-4ba7-96cd-1e543b1af737 main] ql.Driver: Semantic Analysis Completed (retrial = false)
2022-06-12 15:03:53,153 INFO  [16c97e57-0bd1-4ba7-96cd-1e543b1af737 main] ql.Driver: Returning Hive schema: Schema(fieldSchemas:[FieldSchema(name:db_name, type:string, comment:from deserializer), FieldSchema(name:comment, type:string, comment:from deserializer), FieldSchema(name:location, type:string, comment:from deserializer), FieldSchema(name:owner_name, type:string, comment:from deserializer), FieldSchema(name:owner_type, type:string, comment:from deserializer), FieldSchema(name:parameters, type:string, comment:from deserializer)], properties:null)
2022-06-12 15:03:53,154 INFO  [16c97e57-0bd1-4ba7-96cd-1e543b1af737 main] exec.ListSinkOperator: Initializing operator LIST_SINK[0]
2022-06-12 15:03:53,155 INFO  [16c97e57-0bd1-4ba7-96cd-1e543b1af737 main] ql.Driver: Completed compiling command(queryId=root_20220612150353_a85bcba5-48f0-4665-895d-7cdd21b8f2f1); Time taken: 0.019 seconds
2022-06-12 15:03:53,155 INFO  [16c97e57-0bd1-4ba7-96cd-1e543b1af737 main] reexec.ReExecDriver: Execution #1 of query
2022-06-12 15:03:53,155 INFO  [16c97e57-0bd1-4ba7-96cd-1e543b1af737 main] ql.Driver: Concurrency mode is disabled, not creating a lock manager
2022-06-12 15:03:53,155 INFO  [16c97e57-0bd1-4ba7-96cd-1e543b1af737 main] ql.Driver: Executing command(queryId=root_20220612150353_a85bcba5-48f0-4665-895d-7cdd21b8f2f1): desc database test_hive_db
2022-06-12 15:03:53,155 INFO  [16c97e57-0bd1-4ba7-96cd-1e543b1af737 main] ql.Driver: Starting task [Stage-0:DDL] in serial mode
2022-06-12 15:03:53,157 INFO  [16c97e57-0bd1-4ba7-96cd-1e543b1af737 main] metastore.HiveMetaStore: 0: get_database: @hive#test_hive_db
2022-06-12 15:03:53,157 INFO  [16c97e57-0bd1-4ba7-96cd-1e543b1af737 main] HiveMetaStore.audit: ugi=root	ip=unknown-ip-addr	cmd=get_database: @hive#test_hive_db
2022-06-12 15:03:53,159 INFO  [16c97e57-0bd1-4ba7-96cd-1e543b1af737 main] ql.Driver: Completed executing command(queryId=root_20220612150353_a85bcba5-48f0-4665-895d-7cdd21b8f2f1); Time taken: 0.004 seconds
OK
2022-06-12 15:03:53,159 INFO  [16c97e57-0bd1-4ba7-96cd-1e543b1af737 main] ql.Driver: OK
2022-06-12 15:03:53,160 INFO  [16c97e57-0bd1-4ba7-96cd-1e543b1af737 main] ql.Driver: Concurrency mode is disabled, not creating a lock manager
2022-06-12 15:03:53,161 INFO  [16c97e57-0bd1-4ba7-96cd-1e543b1af737 main] mapred.FileInputFormat: Total input files to process : 1
2022-06-12 15:03:53,164 INFO  [16c97e57-0bd1-4ba7-96cd-1e543b1af737 main] exec.ListSinkOperator: RECORDS_OUT_INTERMEDIATE:0, RECORDS_OUT_OPERATOR_LIST_SINK_0:1,
test_hive_db		hdfs://hadoop0:9000/user/hive/warehouse/test_hive_db.db	root	USER
Time taken: 0.025 seconds, Fetched: 1 row(s)
2022-06-12 15:03:53,164 INFO  [16c97e57-0bd1-4ba7-96cd-1e543b1af737 main] CliDriver: Time taken: 0.025 seconds, Fetched: 1 row(s)
2022-06-12 15:03:53,165 INFO  [16c97e57-0bd1-4ba7-96cd-1e543b1af737 main] conf.HiveConf: Using the default value passed in for log id: 16c97e57-0bd1-4ba7-96cd-1e543b1af737
2022-06-12 15:03:53,165 INFO  [16c97e57-0bd1-4ba7-96cd-1e543b1af737 main] session.SessionState: Resetting thread name to  main
Hive CLI 客户端命令全是日志输出,冗余信息太多,看起来不方便,下面看看新的Beeline客户端命令行的操作
2.Beeline客户端命令行工具
HiveServer2支持一个新的命令行Shell,称为:Beeline,后续将会使用Beeline替代Hive CLI。Beeline基于SQLLine CLI的JDBC客户端。Hive CLI和Beeline都属于命令行操作模式,主要区别是Hive CLI只能操作本地的Hive服务,而Beeline可以通过JDBC连接远程服务。
a.使用Beeline的前提条件-添加访问权限
Beeline基于Hive JDBC,在使用JDBC访问Hive时,可能会出现权限问题。所以需要在Hadoop的配置文件core-site.xml中添加以下配置,赋予代理用户的root访问权限。
在hadoop0上修改core-site.xml,在configuration标签中追加配置:
    <!--设置代理用户root访问的主机和组-->
    <property>
        <name>hadoop.proxyuser.root.hosts</name>
        <value>*</value>
    </property>
    <property>
        <name>hadoop.proxyuser.root.groups</name>
        <value>*</value>
    </property>
添加配置之后,需要重启hadoop,让配置生效:
[root@hadoop0 sbin]# stop-all.sh
Stopping namenodes on [hadoop0]
Last login: Sun Jun 12 11:12:19 CST 2022 from 192.168.147.1 on pts/0
Stopping datanodes
Last login: Sun Jun 12 15:51:50 CST 2022 on pts/0
Stopping secondary namenodes [hadoop0]
Last login: Sun Jun 12 15:51:51 CST 2022 on pts/0
Stopping nodemanagers
Last login: Sun Jun 12 15:51:54 CST 2022 on pts/0
Stopping resourcemanager
Last login: Sun Jun 12 15:51:57 CST 2022 on pts/0
[root@hadoop0 sbin]# start-all.sh
Starting namenodes on [hadoop0]
Last login: Sun Jun 12 15:52:00 CST 2022 on pts/0
Starting datanodes
Last login: Sun Jun 12 15:52:13 CST 2022 on pts/0
Starting secondary namenodes [hadoop0]
Last login: Sun Jun 12 15:52:16 CST 2022 on pts/0
Starting resourcemanager
Last login: Sun Jun 12 15:52:19 CST 2022 on pts/0
Starting nodemanagers
Last login: Sun Jun 12 15:52:23 CST 2022 on pts/0
[root@hadoop0 sbin]# jps
71909 HMaster
103703 NameNode
104519 NodeManager
71782 HQuorumPeer
72137 HRegionServer
51912 Master
104105 SecondaryNameNode
103852 DataNode
104876 Jps
104367 ResourceManager
b.使用Beeline的前提条件-开启HiveServer2
在主机hadoop0上面执行:
先创建hive日志目录:
[root@hadoop0 hive]# mkdir $HIVE_HOME/logs
启动方式一:
nohup hiveserver2 >>$HIVE_HOME/logs/hiveserver2.log 2>&1 &
启动方式二:
nohup hive --service hiveserver2 >>$HIVE_HOME/logs/hiveserver2.log 2>&1 &
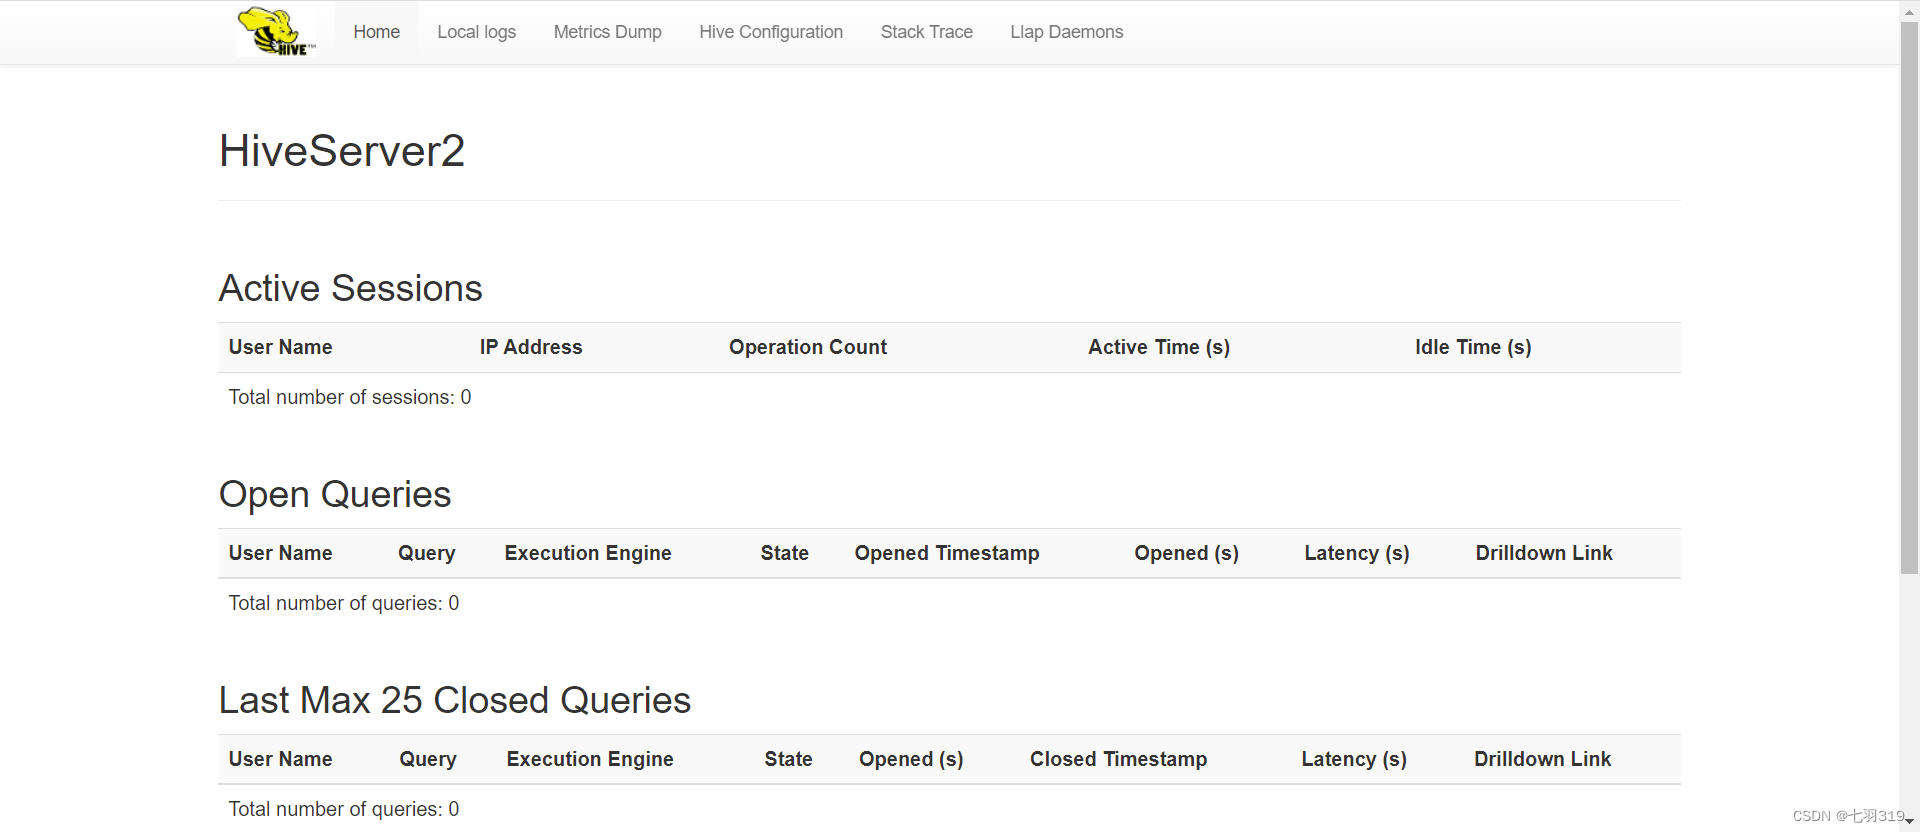
HiveServer2默认开启的端口为10000端口。可以通过日志,查看启动信息:
tail -200f $HIVE_HOME/logs/hiveserver2.log
为便于日志管理,可以将日志软连接到根目录的/logs目录下:
mkdir /logs
ln -s $HIVE_HOME/logs/hiveserver2.log /logs/hiveserver2.log
服务端端口:10000,web端口10002,浏览器输入:http://hadoop0:10002可以查看hiveserver2的信息:
3.Beeline使用-命令行
Beeline命令行连接参数:
-u:指定连接信息
-n:登录用户
-p:登录密码
-e:执行sql
其他命令可以通过:beeline --help查询
[root@hadoop0 apache-hive-3.1.3-bin]# beeline --help
Usage: java org.apache.hive.cli.beeline.BeeLine
   -u <database url>               the JDBC URL to connect to
   -r                              reconnect to last saved connect url (in conjunction with !save)
   -n <username>                   the username to connect as
   -p <password>                   the password to connect as
   -d <driver class>               the driver class to use
   -i <init file>                  script file for initialization
   -e <query>                      query that should be executed
   -f <exec file>                  script file that should be executed
   -w (or) --password-file <password file>  the password file to read password from
   --hiveconf property=value       Use value for given property
   --hivevar name=value            hive variable name and value
                                   This is Hive specific settings in which variables
                                   can be set at session level and referenced in Hive
                                   commands or queries.
   --property-file=<property-file> the file to read connection properties (url, driver, user, password) from
   --color=[true/false]            control whether color is used for display
   --showHeader=[true/false]       show column names in query results
   --headerInterval=ROWS;          the interval between which heades are displayed
   --fastConnect=[true/false]      skip building table/column list for tab-completion
   --autoCommit=[true/false]       enable/disable automatic transaction commit
   --verbose=[true/false]          show verbose error messages and debug info
   --showWarnings=[true/false]     display connection warnings
   --showDbInPrompt=[true/false]   display the current database name in the prompt
   --showNestedErrs=[true/false]   display nested errors
   --numberFormat=[pattern]        format numbers using DecimalFormat pattern
   --force=[true/false]            continue running script even after errors
   --maxWidth=MAXWIDTH             the maximum width of the terminal
   --maxColumnWidth=MAXCOLWIDTH    the maximum width to use when displaying columns
   --silent=[true/false]           be more silent
   --autosave=[true/false]         automatically save preferences
   --outputformat=[table/vertical/csv2/tsv2/dsv/csv/tsv]  format mode for result display
                                   Note that csv, and tsv are deprecated - use csv2, tsv2 instead
   --incremental=[true/false]      Defaults to false. When set to false, the entire result set
                                   is fetched and buffered before being displayed, yielding optimal
                                   display column sizing. When set to true, result rows are displayed
                                   immediately as they are fetched, yielding lower latency and
                                   memory usage at the price of extra display column padding.
                                   Setting --incremental=true is recommended if you encounter an OutOfMemory
                                   on the client side (due to the fetched result set size being large).
                                   Only applicable if --outputformat=table.
   --incrementalBufferRows=NUMROWS the number of rows to buffer when printing rows on stdout,
                                   defaults to 1000; only applicable if --incremental=true
                                   and --outputformat=table
   --truncateTable=[true/false]    truncate table column when it exceeds length
   --delimiterForDSV=DELIMITER     specify the delimiter for delimiter-separated values output format (default: |)
   --isolation=LEVEL               set the transaction isolation level
   --nullemptystring=[true/false]  set to true to get historic behavior of printing null as empty string
   --maxHistoryRows=MAXHISTORYROWS The maximum number of rows to store beeline history.
   --help                          display this message

   Example:
    1. Connect using simple authentication to HiveServer2 on localhost:10000
    $ beeline -u jdbc:hive2://localhost:10000 username password

    2. Connect using simple authentication to HiveServer2 on hs.local:10000 using -n for username and -p for password
    $ beeline -n username -p password -u jdbc:hive2://hs2.local:10012

    3. Connect using Kerberos authentication with hive/localhost@mydomain.com as HiveServer2 principal
    $ beeline -u "jdbc:hive2://hs2.local:10013/default;principal=hive/localhost@mydomain.com"

    4. Connect using SSL connection to HiveServer2 on localhost at 10000
    $ beeline "jdbc:hive2://localhost:10000/default;ssl=true;sslTrustStore=/usr/local/truststore;trustStorePassword=mytruststorepassword"

    5. Connect using LDAP authentication
    $ beeline -u jdbc:hive2://hs2.local:10013/default <ldap-username> <ldap-password>
Beeline管理命令:
进入Beeline之后,执行sql的命令和mysql基本一致,但是一些命令不一样,比如进行连接、中断、退出等,执行Beeline命令需要在命令的前面加上"!"并且不需要终止符(如;分号)。
常用的有:
!exit:退出Shell
!connect url:连接不同的Hive2服务器
!verbose:显示查询追加的明显
!help:显示全部管理命令列表
可以通过!help查询其他管理命令:
0: jdbc:hive2://hadoop0:10000/default> !help
!addlocaldriverjar  Add driver jar file in the beeline client side.
!addlocaldrivername Add driver name that needs to be supported in the beeline
                    client side.
!all                Execute the specified SQL against all the current connections
!autocommit         Set autocommit mode on or off
!batch              Start or execute a batch of statements
!brief              Set verbose mode off
!call               Execute a callable statement
!close              Close the current connection to the database
!closeall           Close all current open connections
!columns            List all the columns for the specified table
!commit             Commit the current transaction (if autocommit is off)
!connect            Open a new connection to the database.
!dbinfo             Give metadata information about the database
!describe           Describe a table
!dropall            Drop all tables in the current database
!exportedkeys       List all the exported keys for the specified table
!go                 Select the current connection
!help               Print a summary of command usage
!history            Display the command history
!importedkeys       List all the imported keys for the specified table
!indexes            List all the indexes for the specified table
!isolation          Set the transaction isolation for this connection
!list               List the current connections
!manual             Display the BeeLine manual
!metadata           Obtain metadata information
!nativesql          Show the native SQL for the specified statement
!nullemptystring    Set to true to get historic behavior of printing null as
                    empty string. Default is false.
!outputformat       Set the output format for displaying results
                    (table,vertical,csv2,dsv,tsv2,xmlattrs,xmlelements, and
                    deprecated formats(csv, tsv))
!primarykeys        List all the primary keys for the specified table
!procedures         List all the procedures
!properties         Connect to the database specified in the properties file(s)
!quit               Exits the program
!reconnect          Reconnect to the database
!record             Record all output to the specified file
!rehash             Fetch table and column names for command completion
!rollback           Roll back the current transaction (if autocommit is off)
!run                Run a script from the specified file
!save               Save the current variabes and aliases
!scan               Scan for installed JDBC drivers
!script             Start saving a script to a file
!set                Set a beeline variable
!sh                 Execute a shell command
!sql                Execute a SQL command
!tables             List all the tables in the database
!typeinfo           Display the type map for the current connection
!verbose            Set verbose mode on
登录并查询数据库:
[root@hadoop0 apache-hive-3.1.3-bin]# beeline -u jdbc:hive2://hadoop0:10000/default -n hive -p
Connecting to jdbc:hive2://hadoop0:10000/default;user=hive
Enter password for jdbc:hive2://hadoop0:10000/default: ***********
2022-06-12 16:59:58,559 INFO jdbc.Utils: Supplied authorities: hadoop0:10000
2022-06-12 16:59:58,560 INFO jdbc.Utils: Resolved authority: hadoop0:10000
Connected to: Apache Hive (version 3.1.3)
Driver: Hive JDBC (version 2.3.9)
Transaction isolation: TRANSACTION_REPEATABLE_READ
Beeline version 2.3.9 by Apache Hive
0: jdbc:hive2://hadoop0:10000/default> show databases;
+----------------+
| database_name  |
+----------------+
| default        |
| test_hive_db   |
+----------------+
2 rows selected (1.12 seconds)
0: jdbc:hive2://hadoop0:10000/default>
可以看到beeline的命令操作已经和mysql基本一致了,结果展示简约美观。
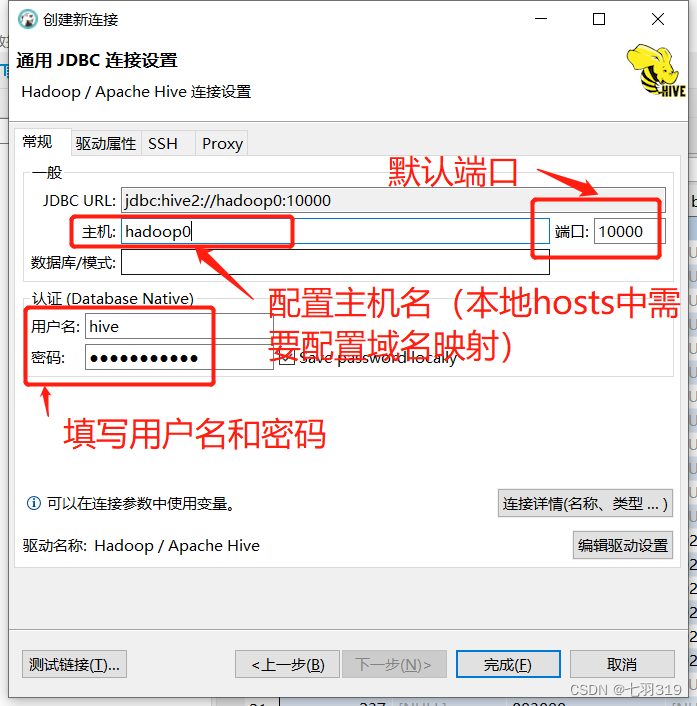
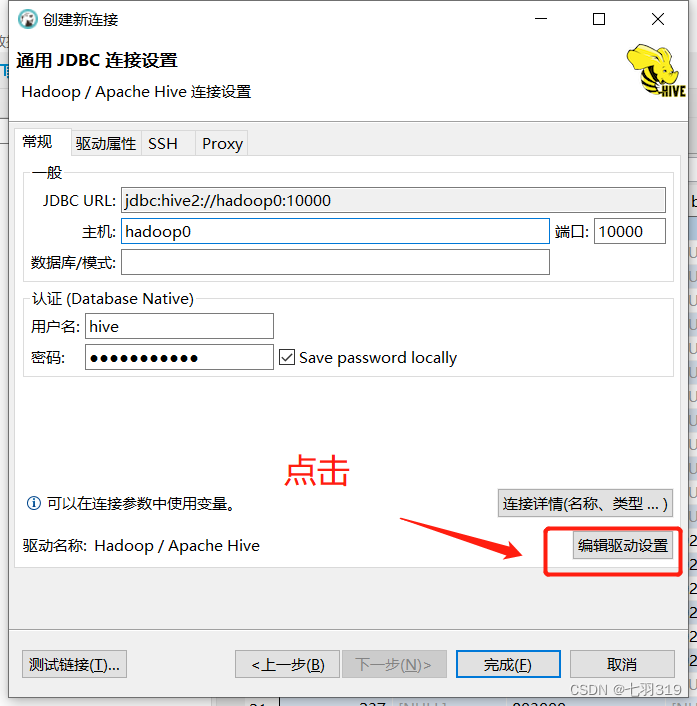
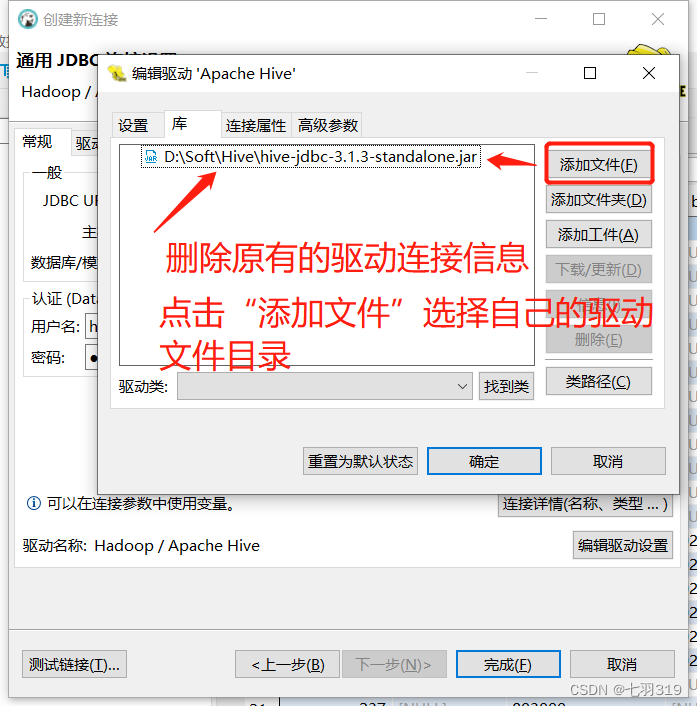
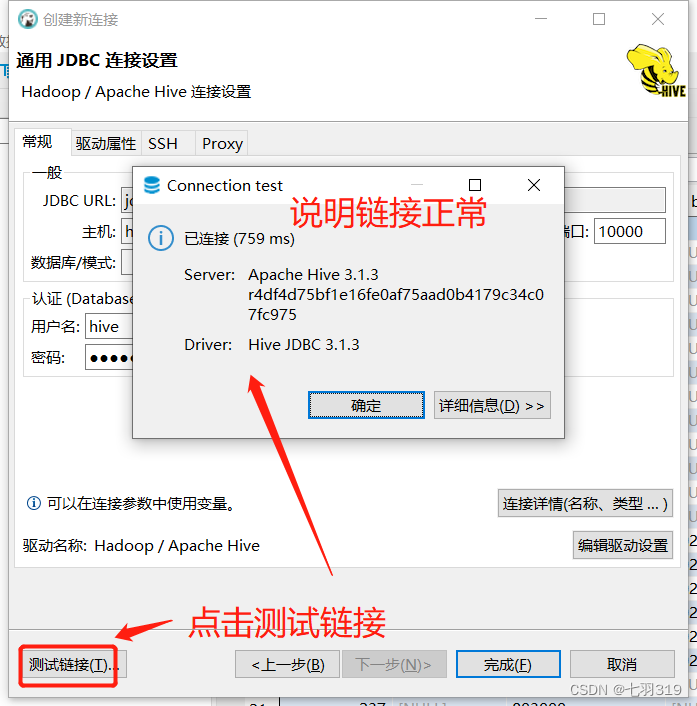
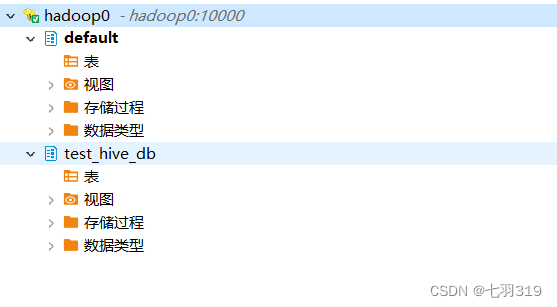
4.使用dbeaver远程连接hive
远程连接需要连接驱动jar包,可以从$HIVE_HOME/jdbc目录下拷贝一份,可以使用FileZilla Client连接服务进入目录拷贝,也可以使用sz命令传输到本地的指定目录(sz 命令安装:yum install -y lrzsz)
cd $HIVE_HOME/jdbc
sz hive-jdbc-3.1.3-standalone.jar
我的放在了D:\Soft\Hive\hive-jdbc-3.1.3-standalone.jar


 1677
1677

 被折叠的 条评论
为什么被折叠?
被折叠的 条评论
为什么被折叠?
 到【灌水乐园】发言


