


1.执行以下代码,准备数据库表
-- 创建数据库
create database big_event;

-- 使用数据库
use big_event;

-- 用户表
create table user (
                      id int unsigned primary key auto_increment comment 'ID',
                      username varchar(20) not null unique comment '用户名',
                      password varchar(32)  comment '密码',
                      nickname varchar(10)  default '' comment '昵称',
                      email varchar(128) default '' comment '邮箱',
                      user_pic varchar(128) default '' comment '头像',
                      create_time datetime not null comment '创建时间',
                      update_time datetime not null comment '修改时间'
) comment '用户表';

-- 分类表
create table category(
                         id int unsigned primary key auto_increment comment 'ID',
                         category_name varchar(32) not null comment '分类名称',
                         category_alias varchar(32) not null comment '分类别名',
                         create_user int unsigned not null comment '创建人ID',
                         create_time datetime not null comment '创建时间',
                         update_time datetime not null comment '修改时间',
                         constraint fk_category_user foreign key (create_user) references user(id) -- 外键约束
);

-- 文章表
create table article(
                        id int unsigned primary key auto_increment comment 'ID',
                        title varchar(30) not null comment '文章标题',
                        content varchar(10000) not null comment '文章内容',
                        cover_img varchar(128) not null  comment '文章封面',
                        state varchar(3) default '草稿' comment '文章状态: 只能是[已发布] 或者 [草稿]',
                        category_id int unsigned comment '文章分类ID',
                        create_user int unsigned not null comment '创建人ID',
                        create_time datetime not null comment '创建时间',
                        update_time datetime not null comment '修改时间',
                        constraint fk_article_category foreign key (category_id) references category(id),-- 外键约束
                        constraint fk_article_user foreign key (create_user) references user(id) -- 外键约束
)
2.创建springboot工程,引入对应依赖(web,mybatis,mysql)
上面引入父项
<parent>
	<groupId>org.springframework.boot</groupId>
    <artifactId>spring-boot-starter-parent</artifactId>
    <version>3.1.3</version>
</parent>
<dependency>
      <groupId>org.springframework.boot</groupId>
      <artifactId>spring-boot-starter-web</artifactId>
      <version>3.4.4</version>
    </dependency>
    <dependency>
      <groupId>org.mybatis.spring.boot</groupId>
      <artifactId>mybatis-spring-boot-starter</artifactId>
      <version>3.0.0</version>
    </dependency>
    <dependency>
      <groupId>com.mysql</groupId>
      <artifactId>mysql-connector-j</artifactId>
      <version>9.1.0</version>
    </dependency>
3.配置文件application.yml中引入mybatis的配置信息
spring:
  datasource:
    driver-class-name: com.mysql.cj.jdbc.Driver
    url: jdbc:mysql://localhost:3306/big_event
    username: root
    password: 123456
4.创建包结构,并准备实体类
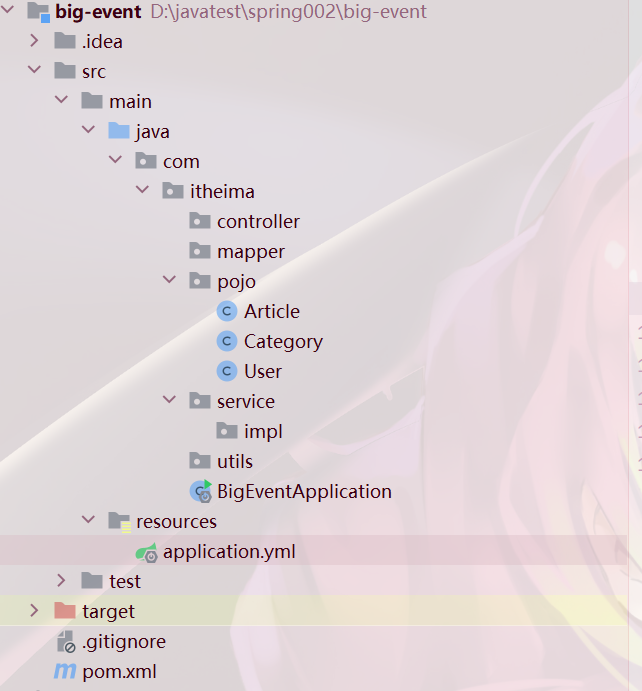
按照图中创建好包结构
Article代码如下:
package com.itheima.pojo;


import java.time.LocalDateTime;

public class Article {
    private Integer id;//主键ID
    private String title;//文章标题
    private String content;//文章内容
    private String coverImg;//封面图像
    private String state;//发布状态 已发布|草稿
    private Integer categoryId;//文章分类id
    private Integer createUser;//创建人ID
    private LocalDateTime createTime;//创建时间
    private LocalDateTime updateTime;//更新时间
}
category代码如下:
package com.itheima.pojo;

import java.time.LocalDateTime;

public class Category {
    private Integer id;//主键ID
    private String categoryName;//分类名称
    private String categoryAlias;//分类别名
    private Integer createUser;//创建人ID
    private LocalDateTime createTime;//创建时间
    private LocalDateTime updateTime;//更新时间
}
user代码如下:
package com.itheima.pojo;


import java.time.LocalDateTime;

public class User {
    private Integer id;//主键ID
    private String username;//用户名
    private String password;//密码
    private String nickname;//昵称
    private String email;//邮箱
    private String userPic;//用户头像地址
    private LocalDateTime createTime;//创建时间
    private LocalDateTime updateTime;//更新时间
}
启动类代码如下:
package com.itheima;

import org.springframework.boot.SpringApplication;
import org.springframework.boot.autoconfigure.SpringBootApplication;

@SpringBootApplication
public class BigEventApplication
{
    public static void main( String[] args )
    {
        SpringApplication.run(BigEventApplication.class, args);
    }
}
以上就搭建好了环境,可以进行下一步的注册接口了。


 被折叠的 条评论
为什么被折叠?
被折叠的 条评论
为什么被折叠?
 到【灌水乐园】发言


