


个人项目记录
主题
订餐系统
技术
使用的语言是java
使用的数据库是mysql
使用的框架是springboot + mybatis
目的
- 巩固java知识,增强代码能力
- 实践springboot框架和mybatis框架
部分代码
- dao层:
mapper文件:
  <!-- 注册时向user表插入数据 -->
 <insert id="insertUser" parameterType="com.example.demo.entity.User">
 	insert into user(TelNumber,password,realName,email) VALUES(#{TelNumber},#{password},#{realName},#{email})
 </insert>
  <!-- 登录时查找用户的账号密码 -->
 <select id="selectUserByTelNumberAndPassword" resultType="com.example.demo.entity.User" parameterType="com.example.demo.entity.User">
   select * from user where TelNumber=#{TelNumber} and password=#{password}
 </select>
   <!-- 根据TelNumber和id删除cart表的某个dish -->
 <delete id="deleteCartByTelNumberAndId" parameterType="com.example.demo.entity.CartDish">
   delete from cart where TelNumber=#{TelNumber} and id=#{id}
 </delete>
- service层:
//校验前台传入的账号和密码
@Override
	public User LoginService(User user) {
		User userFound = um.selectUserByTelNumberAndPassword(user);
		User userLogin = null;
		System.out.println(userFound==null);// ture 是空值
		if(userFound!=null) {
			userLogin = new User();
			userLogin.setTelNumber(userFound.getTelNumber());
			userLogin.setPassword(userFound.getPassword());
		}else {
			System.err.println("用户名或密码错误;或未注册!");
		}
		return userLogin;
	}
- controller层:
//注册功能:获取前台register页面传入的用户信息,封装到一个user类中,调用service层的方法,将数据加入数据库,弹框提示并跳转到登录页面
   @ResponseBody
   @RequestMapping("/insertUser")
   public String submit(@RequestParam("name") String TelNumber,
   				   @RequestParam("password") int password,
   				   @RequestParam("email") String email,
   				   @RequestParam("realName") String realName,
   				   HttpServletResponse response) {
   	response.setCharacterEncoding("UTF-8");
   	User u = new User();
   	u.setTelNumber(TelNumber);
   	u.setPassword(password);
   	u.setEmail(email);
   	u.setRealName(realName);

   	usi.RegisterService(u);

   	try {
   		response.getWriter().write("<script>alert('注册成功!');</script>");
   	} catch (IOException e) {
   		e.printStackTrace();
   	}
   	return "login.html";
   }


//登录功能:收到login页面传入的账号信息TelNumber和密码password,同样封装进user类中,调用service层的校验方法。
如果有信息返回说明查询到该用户,应该登录成功,否则失败
   @RequestMapping("/check")
   public String login(@RequestParam("TelNumber") String TelNumber,
   				    @RequestParam("password") int password,
   				    Model model) {

   	User user = new User(); //传入
   	user.setTelNumber(TelNumber);
   	user.setPassword(password);

   	User user2 = usi.LoginService(user);  //传出
   	System.out.println(user2);
   	System.out.println(user2==null);
   	if(user2!=null) {
   		//登录成功  则将用户的TelNumber放入request
   		model.addAttribute("TelNumber", user2.getTelNumber());
   		return "home.html";
   	}else {
   		model.addAttribute("err", "账号或密码错误!");
   		return "login.html";
   	}
   }
//加入购物车功能:通过session获取用户的账号信息;点击按钮后会获取对应菜品的id,通过调用service的方法从数据库中获取对应id的菜的信息,封装进dish类,传入数据库的cart表
   @RequestMapping("/addCart")
   public String add(@RequestParam("id") int id,HttpSession session,HttpServletResponse response) {
   	response.setCharacterEncoding("UTF-8");
   	String TelNumber = (String)session.getAttribute("TelNumber");
   	CartDish cd = new CartDish();
   	Dish d = usi.selectDish(id);
   	cd.setTelNumber(TelNumber);
   	cd.setId(id);
   	cd.setName(d.getName());
   	cd.setPictureURL(d.getPictureURL());
   	cd.setIntroduction(d.getIntroduction());
   	cd.setPrice(d.getPrice());
   	usi.AddCart(cd);
   	try {
   		response.getWriter().write("<script>alert('添加成功!');</script>");//通过response添加js代码,谈警告框提示成功
   	} catch (IOException e) {
   		e.printStackTrace();
   	}
   	return "home.html";
   }
- 前台:
Myorder页面:
<!-- 通过th:each标签遍历dishlist,(dishlist是在控制器中通过model传入),从而显示数据库中购物车表的所有内容 -->
<tr th:each="dish : ${dishList}">
   			<td><img src="" th:src="${dish.pictureURL}" width="90px" height="70px" /></td>
   			<td th:text="${dish.name}"></td>
   			<td th:text="${dish.introduction}"></td>
   			<td th:text="${dish.price}"></td>
   			<td id="button1">
   				<form action="#" th:action="@{/deleteDish}" method="get">
   					<input type="hidden" name="id" value="" th:value="${dish.id}" />
   					<input type="submit" value="删除" />
   				</form>
   			</td>
</tr>

historyorder页面:
<!-- 历史订单页面,同上-->
<tr th:each="dish : ${lhodList}">
   			<td th:text="${dish.submitTime}"></td>
   			<td><img src="" th:src="${dish.pictureURL}" width="90px" height="70px" /></td>
   			<td th:text="${dish.id}"></td>
   			<td th:text="${dish.name}"></td>
   			<td th:text="${dish.introduction}"></td>
</tr>
效果图
登录页面

不登录访问订单页面

首页

历史订单页面

问题(收获)
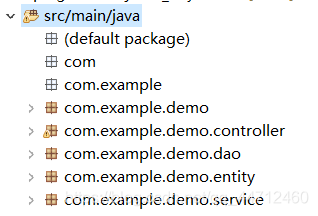
- controller、entity、dao等包都应该放在主包com.example.demo下层而不是同层(eclipse中通过点号分层)
- mapper.xml文件一般放在resource目录下,不与mapper.java文件放一起。因此要注意application.properties的路径配置不要写错:mybatis.mapper-locations=classpath:mapping/*.xml
- springboot搭建的后台同样可以使用session、request和response;只要在形参中HttpServletResponse response并导入包即可
- 后台获取前台数据的方法之一是通过注解@RequestParam(“xxx”),后面紧跟着对应类型的形参
- 注意编码(通过response.setCharacterEncoding(“UTF-8”);设置)
- 通过model/map/ModelAndView在网页之间传递数据
- mapper类前、service类前分别添加注解@Mapper和@Service,作用是将类加入ioc,后边可以通过@Autowire自动装配
- mapper类的接口返回类型、参数个数和类型都要与mapper.xml文件保持一致
- Serviceimpl.java中通过@Autowire自动注入dao层的对象,最好在全局变量的位置
- 10.在application.properties中配置数据库信息

总结
这次对所学的知识如springboot、mybatis、springmvc进行了简单的实践;强化了之前学过的java和SQL。不足之处是这次的练习比较简单,只是知道了如何使用,不理解其中的源码和原理等。后应加强源码理解。


 874
874

 被折叠的 条评论
为什么被折叠?
被折叠的 条评论
为什么被折叠?
 到【灌水乐园】发言


