


一、简介
学习目标:
(一)SpringMVC概述

SpringMVC是一种基于Java实现MVC模型的轻量级Web框架(比Servlet更简洁轻便)。
(二)快速入门
- 导入坐标(版本与spring版本保持一致)
        <!-- SpringMVC -->
        <dependency>
            <groupId>org.springframework</groupId>
            <artifactId>spring-webmvc</artifactId>
            <version>5.2.10.RELEASE</version>
        </dependency>

        <!-- Servlet-->
        <dependency>
            <groupId>javax.servlet</groupId>
            <artifactId>javax.servlet-api</artifactId>
            <version>3.1.0</version>
            <scope>provided</scope>
        </dependency>
- 创建表现层类(SpringMVC控制器类=Servlet的功能),如
UserController
//定义Bean
@Controller
public class UserController {
    //设置当前请求的访问路径
    @RequestMapping("/save")
    //当前操作的返回值类型
    @ResponseBody
    public String save() {
        System.out.println("user controller save...");
        return "{'module': 'SpringMVC'}";
    }
}
- 创建一个SpringMvcConfig配置类,去加载表现层的MVC类
@Configuration
//加载MVC的Bean
@ComponentScan({("com.fn.controller")})
public class SpringMvcConfig {
}
- 初始化Servlet容器,让TomCat能加载到SpringMVC环境,
//该类用于启动servlet容器的配置类,加载spring的配置
//tomcat启动时会加载这个类,然后这个类再去加载springMVC
public class ServletContainersInitConfig extends AbstractDispatcherServletInitializer {
    //用于加载SpringMVC容器配置
    @Override
    protected WebApplicationContext createServletApplicationContext() {
        AnnotationConfigWebApplicationContext ctx = new AnnotationConfigWebApplicationContext();
        ctx.register(SpringMvcConfig.class);
        return ctx;
    }

    //设置哪些请求归属SpringMVC处理
    @Override
    protected String[] getServletMappings() {
        //设置所有请求给MVC处理
        return new String[]{"/"};
    }

    //加载Spring容器配置
    @Override
    protected WebApplicationContext createRootApplicationContext() {
        return null;
    }
}
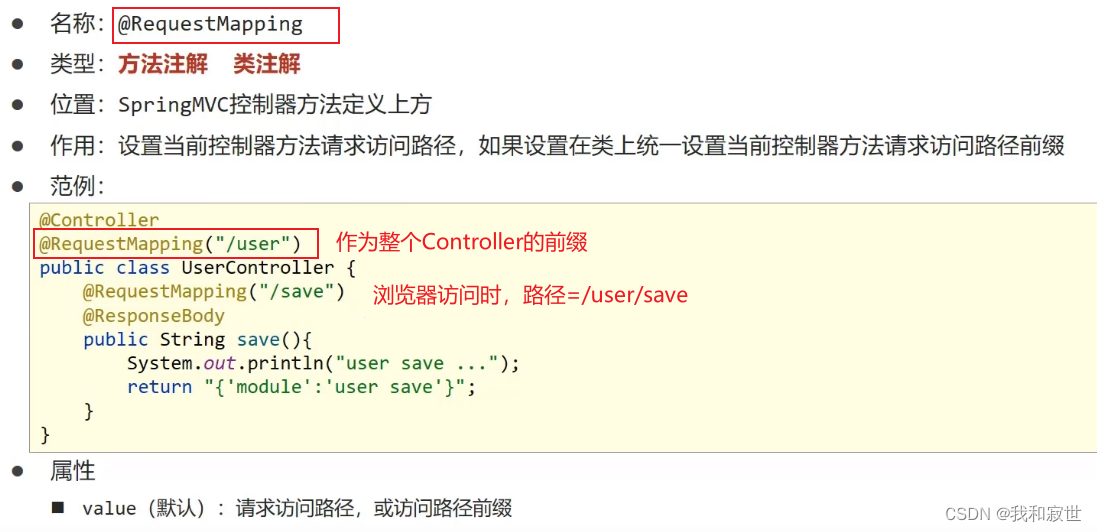
| 注解名 | 作用 |
|---|---|
| @RequestMapping(“/save”) | 设置当前控制器方法的请求访问路径 |
| @ResponseBody | 设置当前控制器方法的响应内容为当前返回值(将方法的返回值,以特定的格式写入到response的body区域,进而将数据返回给客户端) |
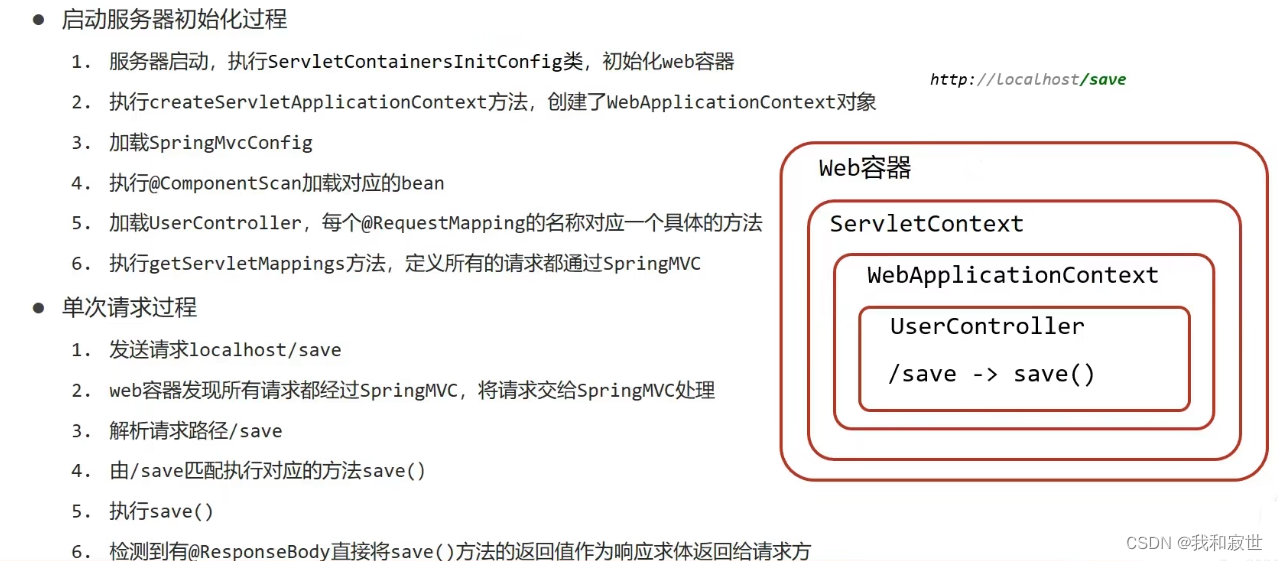
(三)快速入门工作流程分析
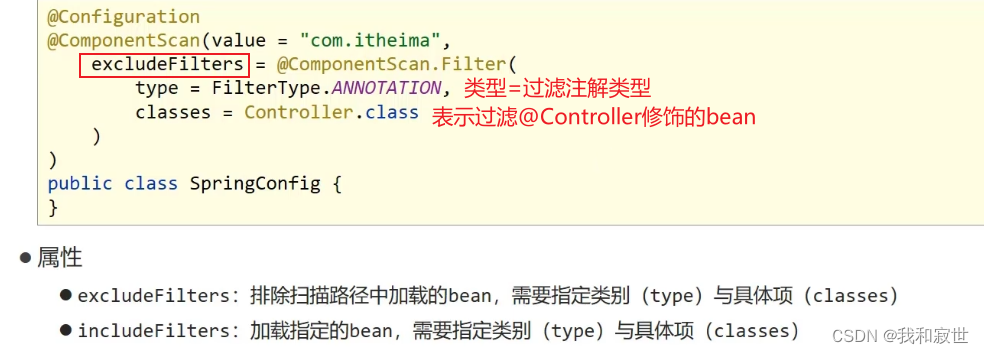
(四)Controller加载控制
因为功能不同,如何避免Spring错误加载到SpringMVC的Bean?
-
Spring加载的bean设定扫描范围为com.fn,排除掉Controller包的bean。
-
Spring加载的bean设定扫描范围为精准范围,路径细化到service包、dao包等。
@Configuration
@ComponentScan({"com.fn.dao", "com.fn.service"})
public class SpringConfig {
}
其他:
在createRootApplicationContext()让tomcat能加载到spring的容器配置。
public class ServletContainersInitConfig extends AbstractDispatcherServletInitializer {
    //用于加载SpringMVC容器配置
    @Override
    protected WebApplicationContext createServletApplicationContext() {
        AnnotationConfigWebApplicationContext ctx = new AnnotationConfigWebApplicationContext();
        ctx.register(SpringMvcConfig.class);
        return ctx;
    }

    //设置哪些请求归属SpringMVC处理
    @Override
    protected String[] getServletMappings() {
        //设置所有请求给MVC处理
        return new String[]{"/"};
    }

    //加载Spring容器配置
    @Override
    protected WebApplicationContext createRootApplicationContext() {
        AnnotationConfigWebApplicationContext ctx = new AnnotationConfigWebApplicationContext();
        ctx.register(SpringConfig.class);
        return ctx;
    }
}
对于上面的,还有一种简化方式,在AbstractDispatcherServletInitializer下有一个子类AbstractAnnotationConfigDispatcherServletInitializer做了功能简化
public class ServletContainersInitConfig extends AbstractAnnotationConfigDispatcherServletInitializer {
    //加载Spring容器配置
    @Override
    protected Class<?>[] getRootConfigClasses() {
        return new Class[]{SpringConfig.class};
    }

    //用于加载SpringMVC容器配置
    @Override
    protected Class<?>[] getServletConfigClasses() {
        return new Class[]{SpringMvcConfig.class};
    }

    //设置哪些请求归属SpringMVC处理
    @Override
    protected String[] getServletMappings() {
        return new String[]{"/"};
    }
}
(五)PostMan
PostMan(邮差)是一个网页调试和发送网页HTTP请求的Chrome插件。
简单来说,就是模拟网页发各种请求(比如POST请求,传统做法要写一个表单再模拟,PostMan则可以直接模拟发送Post请求)
二、请求与响应(重点 )
(一)请求映射路径
(二)请求参数(普通传递)
总览:
处理中文乱码,在tomcat加载spring的配置类中(ServletContainersInitConfig),重写下面的方法(alt+ins快速选择)
    //过滤器处理乱码
    @Override
    protected Filter[] getServletFilters() {
        CharacterEncodingFilter filter = new CharacterEncodingFilter();
        filter.setEncoding("UTF-8");
        return new Filter[]{filter};
    }
使用@RequestParam("name"),可以改变后面的形参名。
(1)GET(普通参数)
获取网页传递的参数:在方法里定义形参接收,就可以收到参数。
//定义Bean
@Controller
public class UserController {
    //设置当前请求的访问路径
    @RequestMapping("/commonParam")

    //当前操作的返回值类型
    @ResponseBody
    //注意!!!浏览器的键值对是name=XXX,age=XXX,这里的String name和int age形参名也要一致,不一致就找不到对应的值。
    //如果要将String name改名,就要使用@RequestParam("name") String username来改名
    public String commonParam(String name ,int age) {
        System.out.println("name" + ":" + name);
        System.out.println("age" + ":" + age);
        return "{'module': 'common param'}";
    }
}
(2)POST(普通参数)
Post请求和Get请求获取参数的格式相同,参考上面
(3)POJO参数传递
传递参数名,要和POJO里的成员变量名的名称相同。
    @RequestMapping("/pojoParam")
    @ResponseBody
    public String commonParam(User user) {
        System.out.println("User" + ":" + user);
        return "{'module': 'POJO param'}";
    }
(4)POJO嵌套参数传递
在User类中包含一个Address类的成员变量,这时怎么传参
网页端:
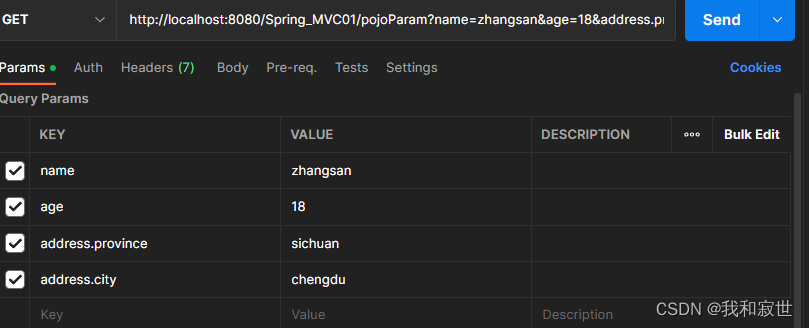
服务端不变,用一个User接收
    //POJO参数
    @RequestMapping("/pojoContainPojoParam")
    @ResponseBody
    public String pojoContainPojoParam(User user) {
        System.out.println("User" + ":" + user);
        return "{'module': 'POJO param'}";
    }
(5)数组参数传递
网页端:
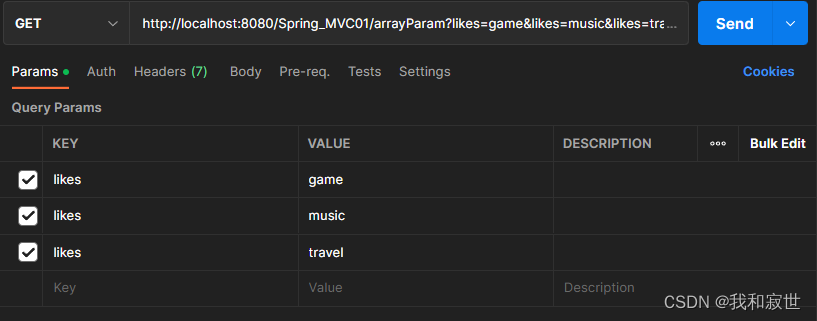
服务端:
    //数组参数
    @RequestMapping("/arrayParam")
    @ResponseBody
    public String arrayParam(String[] likes) {
        System.out.println("likes[]" + ":" + Arrays.toString(likes));
        return "{'module': 'array param'}";
    }
(6)集合参数传递
集合参数传递,方法的形参必须用@RequestParam修饰,不然Spring会将集合误认为是一个POJO类,然后报错。
网页端:
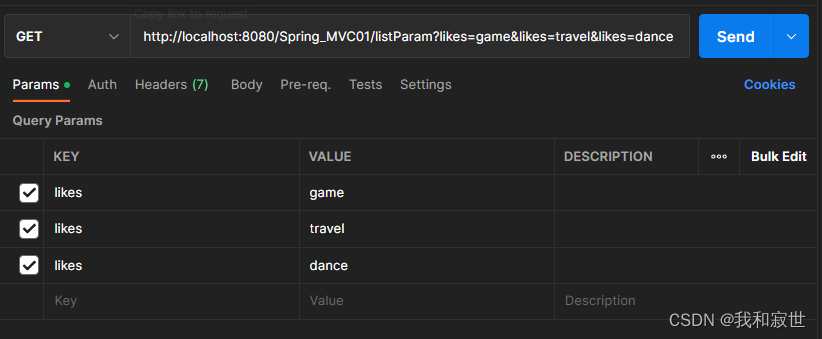
服务端:
    //集合参数
    @RequestMapping("/listParam")
    @ResponseBody
    public String listParam(@RequestParam List<String> likes) {
        System.out.println("likesList" + ":" + likes);
        return "{'module': 'list param'}";
    }
(三)请求参数(Json传递,重点)
前置条件:
- 导入坐标
        <!-- JSON -->
        <dependency>
            <groupId>com.fasterxml.jackson.core</groupId>
            <artifactId>jackson-databind</artifactId>
            <version>2.9.4</version>
        </dependency>
		<!-- 也可以用faskjson -->
- SpringMvcConfig开启json—>java对象的转换
@EnableWebMvc - 再进行如下的内容(注:行参都用
@RequestBody修饰)
(1)json集合
使用@RequestBody修饰形参。
网页端:
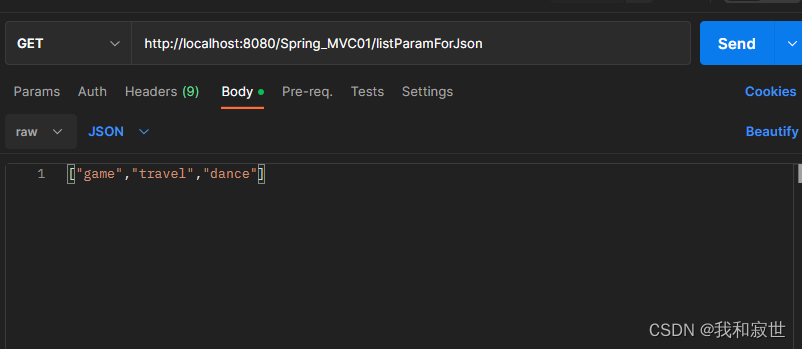
服务端:
    //集合参数(json)
    @RequestMapping("/listParamForJson")
    @ResponseBody
    public String listParamForJson(@RequestBody List<String> likes) {
        System.out.println("likesList" + ":" + likes);
        return "{'module': 'list for json param'}";
    }
(2)json对象(POJO)
网页端:

服务端:
    //POJO参数(json)
    @RequestMapping("/pojoParamForJson")
    @ResponseBody
    public String pojoParamForJson(@RequestBody User user) {
        System.out.println("User" + ":" + user);
        return "{'module': 'pojo for json param'}";
    }
(3)json集合(POJO)
集合中保存了多个对象,对象用json从网页端传过来
网页端:
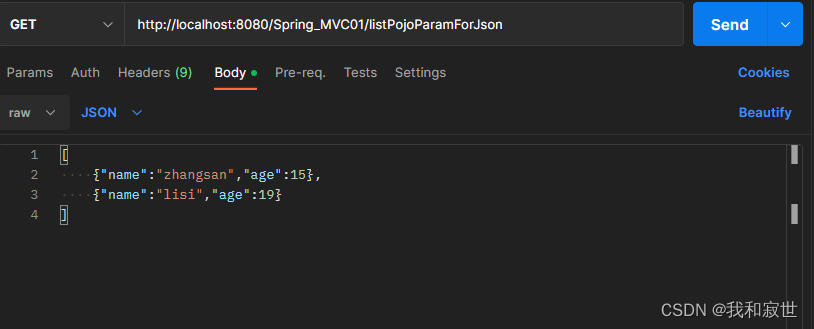
服务端:
    //集合POJO参数(json)
    @RequestMapping("/listPojoParamForJson")
    @ResponseBody
    public String listPojoParamForJson(@RequestBody List<User> userList) {
        System.out.println("User" + ":" + userList);
        return "{'module': 'listPojo for json param'}";
    }
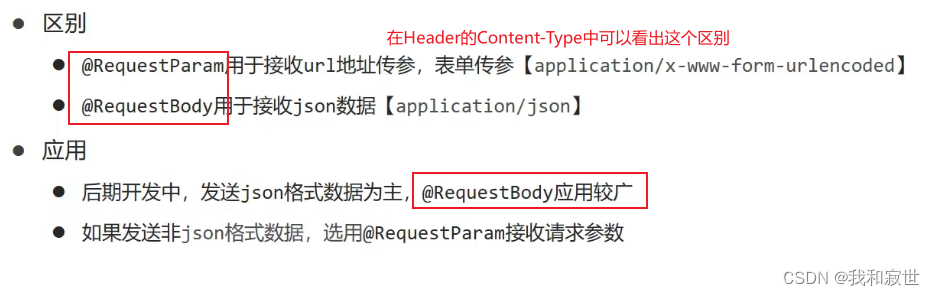
最后:
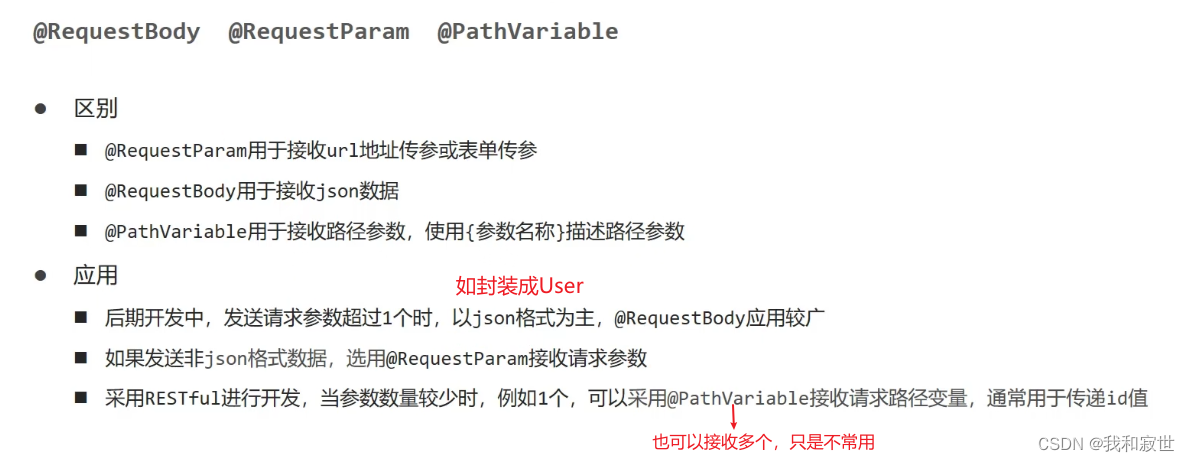
@RequestParam和@RequestBody的区别
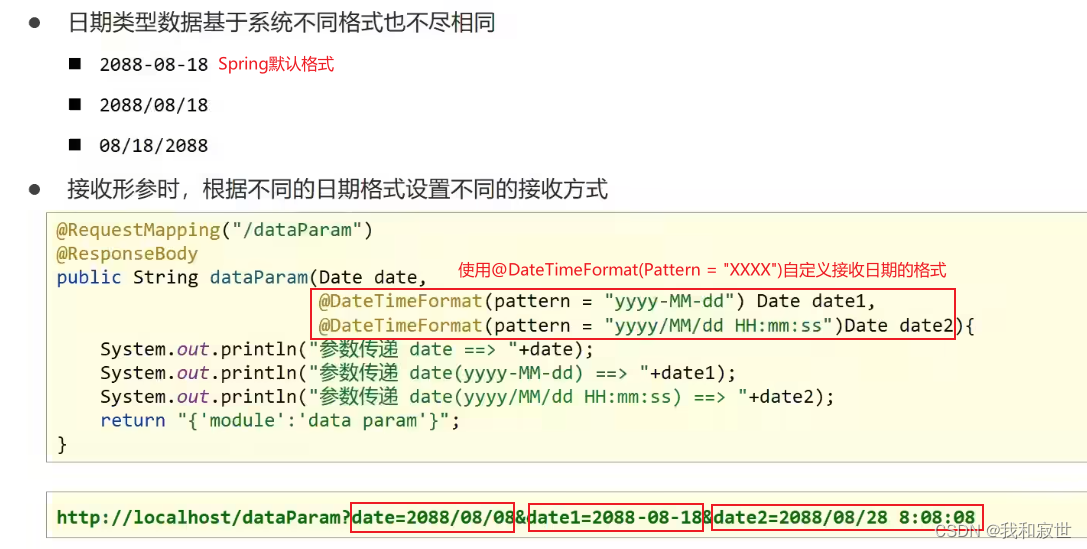
(四)日期类型参数传递
@DateTimeFormat注释
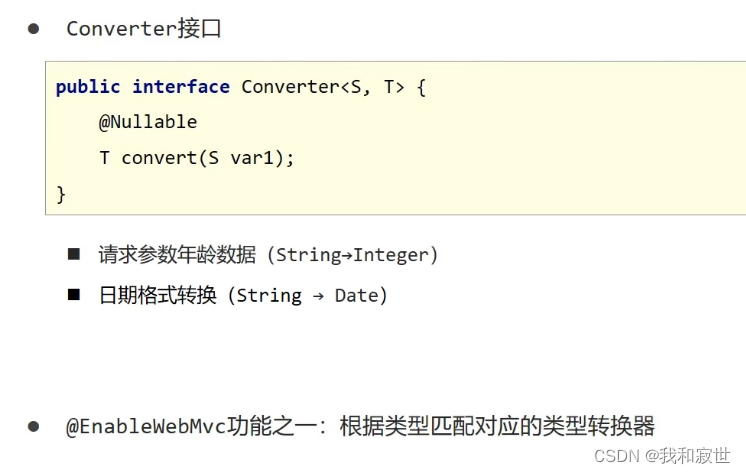
上面的实现原理:使用的是一个函数式接口,该接口有许多实现类
(五)响应json数据(重点)
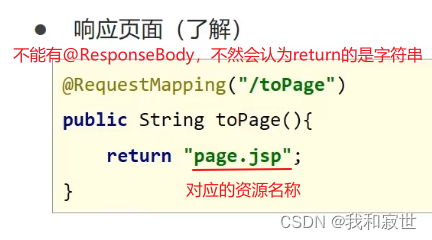
(1)页面跳转(响应页面)
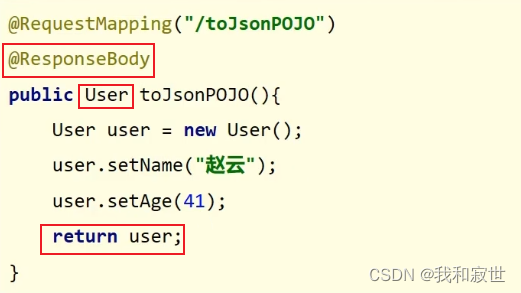
(2)响应json数据(对象转json,前提导了坐标)
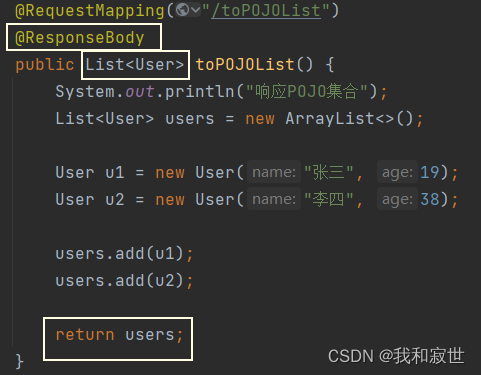
(3)响应json数据(对象集合转json)
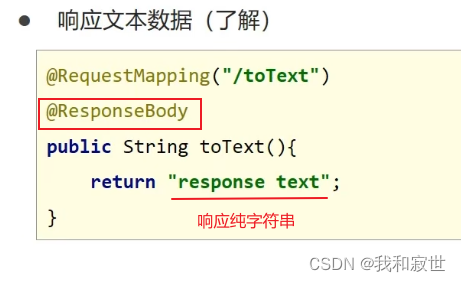
(4)ResponseBody的作用
ResponseBody详解1
ResponseBody详解2
三、REST风格(重点)
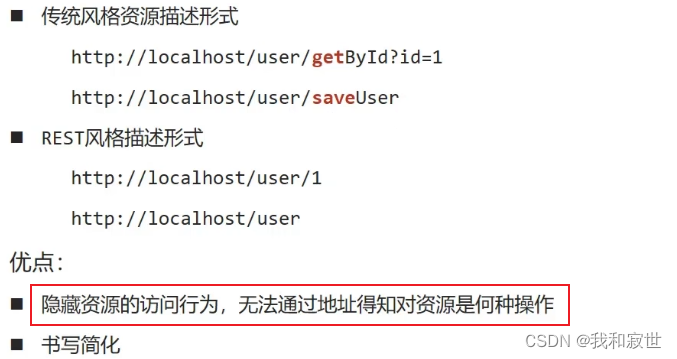
(一)简介
REST(Representational State Transfer)表现形式状态转换,简单说就是访问网络资源的格式。
RESTful:按照REST风格来访问网络资源。
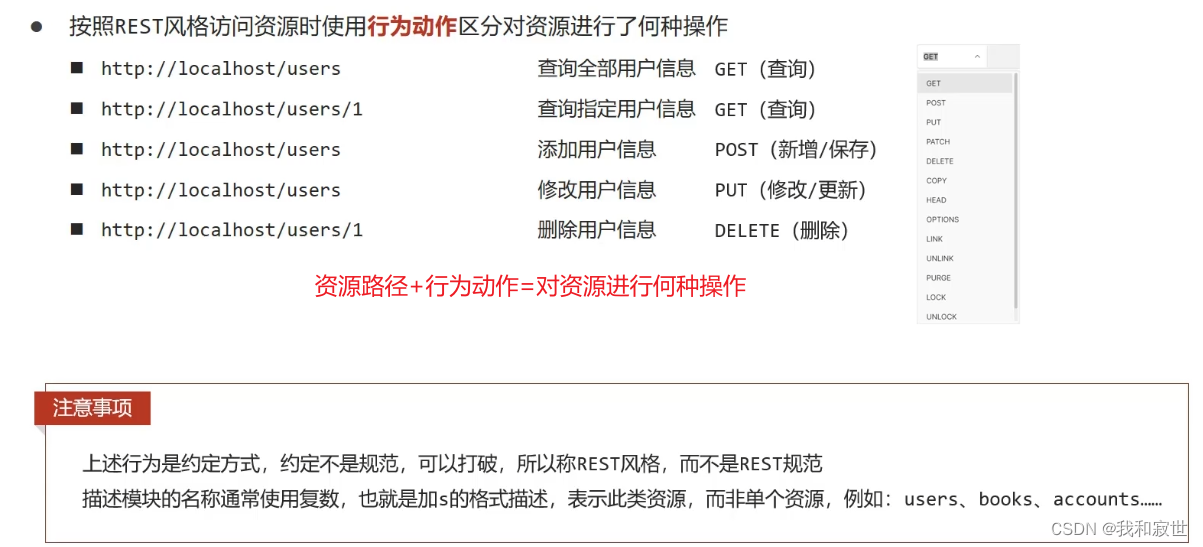
(二)快速入门
@RequestMapping(method=RequestMethod.XXX)来区分不同的请求。
(三)案例
@RestController:如果要求方法返回的是json格式数据,而不是跳转页面,可以直接在类上标注@RestController,而不用在每个方法中标注@ResponseBody,简化了开发过程。(@RestController=@ResponseBody+@Controller)
简化开发:
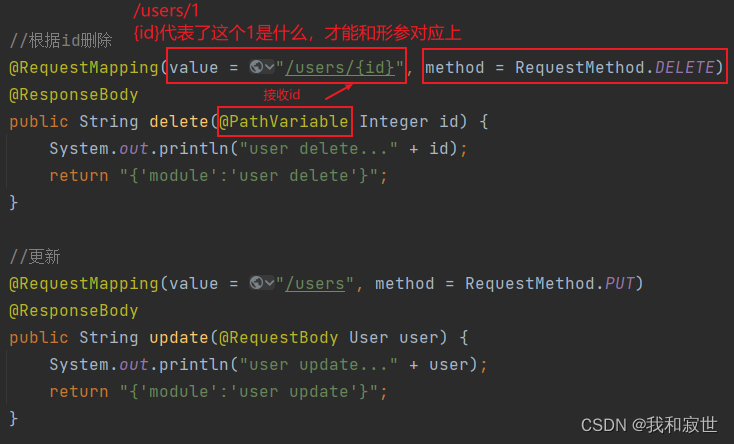
    //根据id删除
    @RequestMapping(value = "/users/{id}", method = RequestMethod.DELETE)
    //@DeleteMapping作用和上面这句作用一样,简化了开发
    @DeleteMapping("/{id}")
    public String delete(@PathVariable Integer id) {
        System.out.println("user delete..." + id);
        return "{'module':'user delete'}";
    }
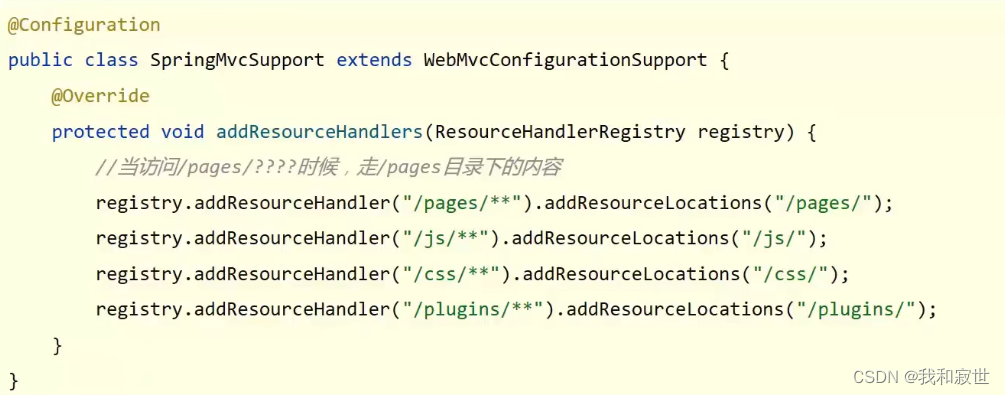
设置对静态资源的访问放行,新建一个config.SpringMvcSupport,然后在SpringMvcConfig中扫描这个文件所在的包@ComponentScan
视频详解
四、SSM整合(重点)
(一)表现层与前端数据传输协议定义
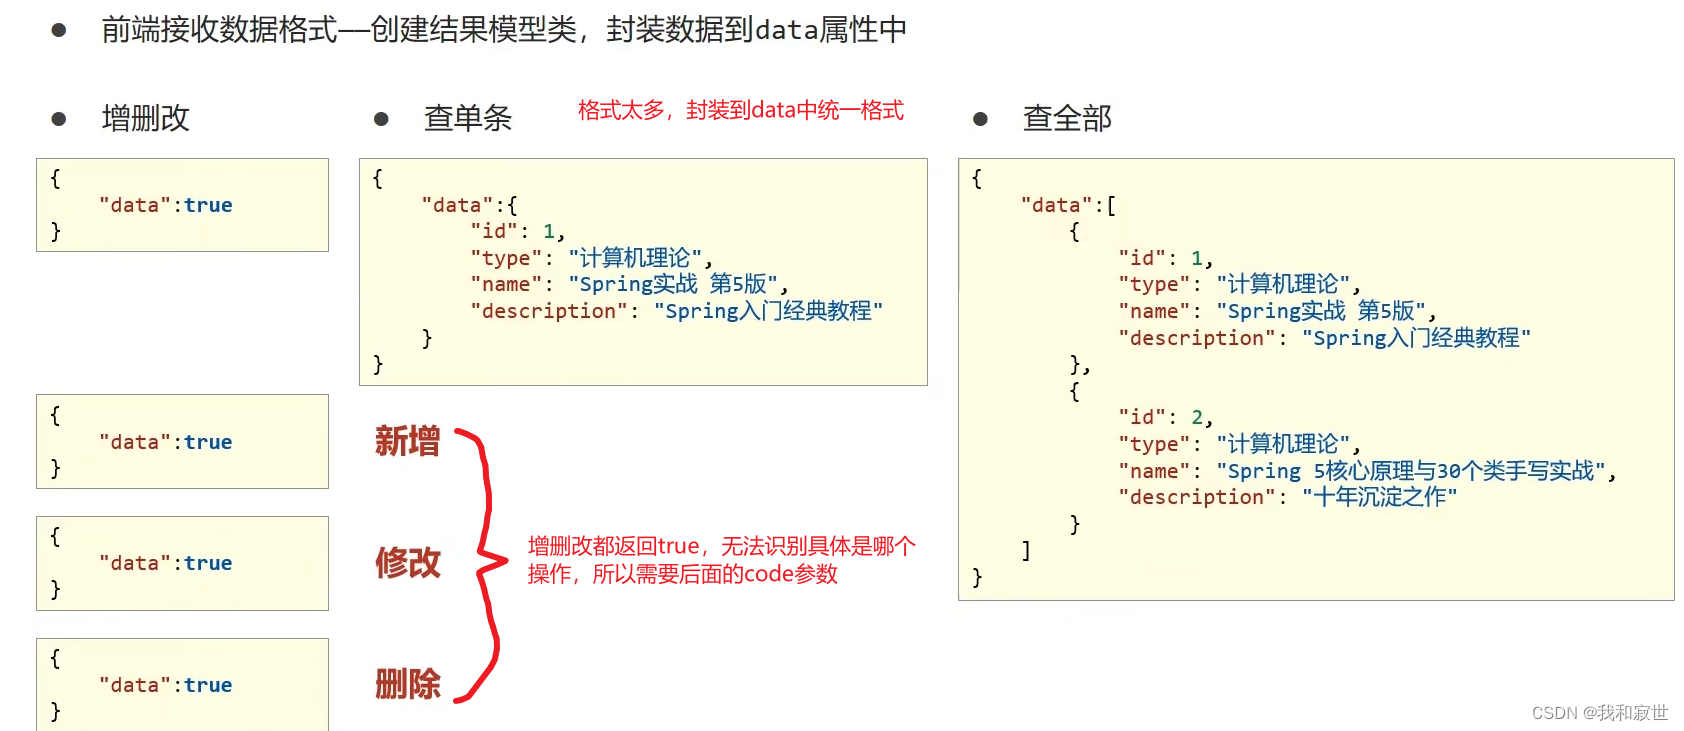
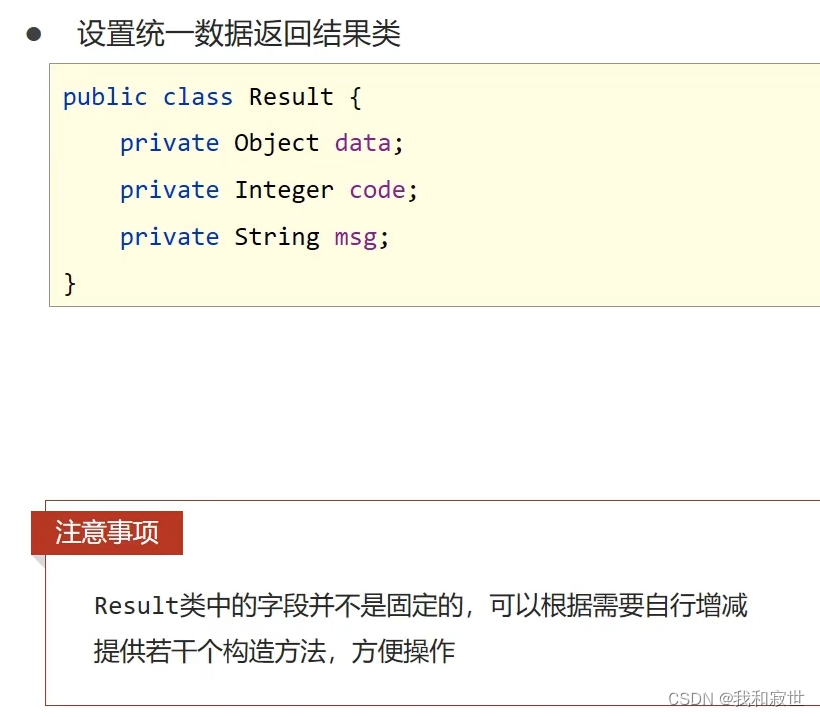
最后总结,设置统一数据返回结果类
(二)前端数据传输协议实现案例
- 在controller下新建
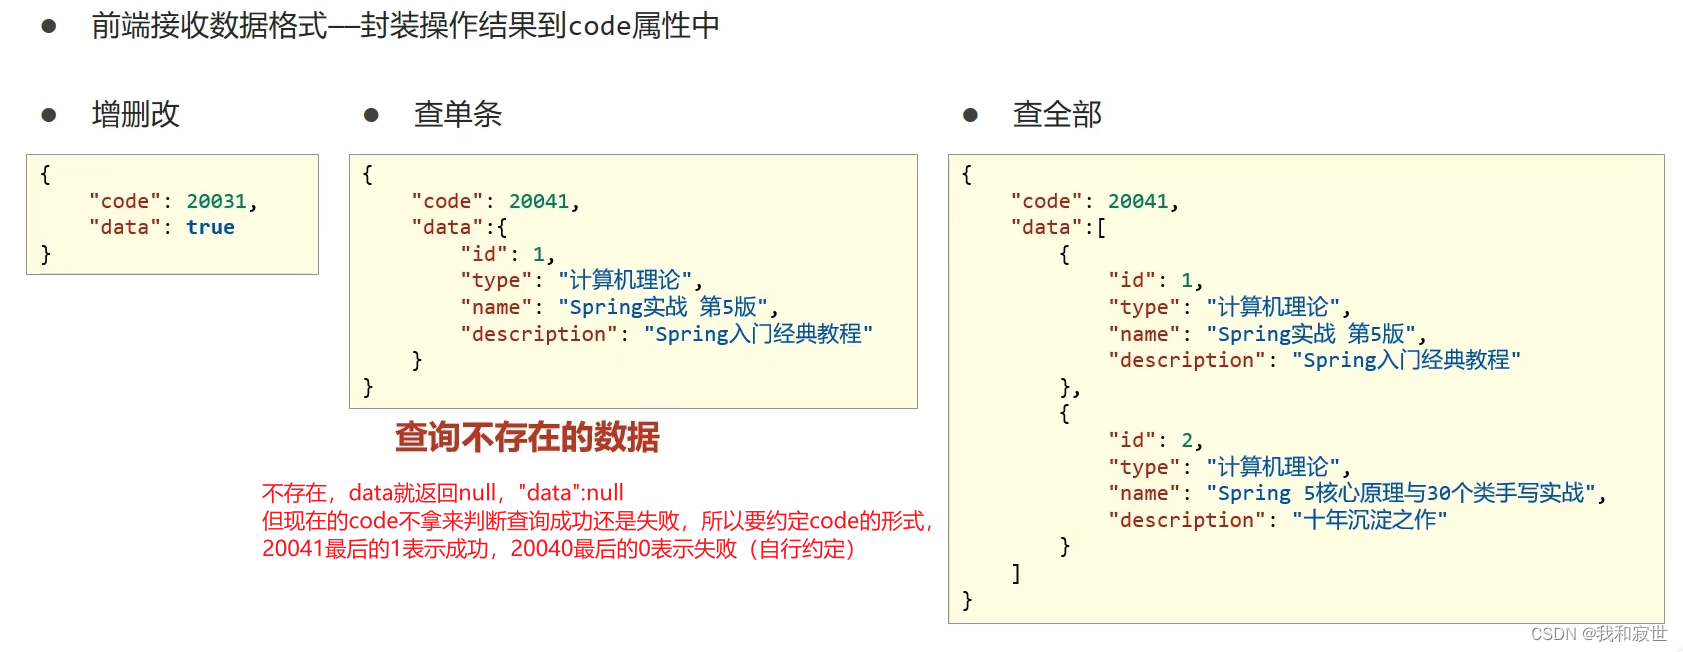
Code.java和Result.java,前者用于封装状态代码,后者用于封装code、data、mes等信息返回给前端。
Code:
public class Code {
    public static final Integer SAVE_OK = 20011;
    public static final Integer DELETE_OK = 20021;
    public static final Integer UPDATE_OK = 20031;
    public static final Integer GET_OK = 20041;

    public static final Integer SAVE_ERR = 20010;
    public static final Integer DELETE_ERR = 20020;
    public static final Integer UPDATE_ERR = 20030;
    public static final Integer GET_ERR = 20040;
}
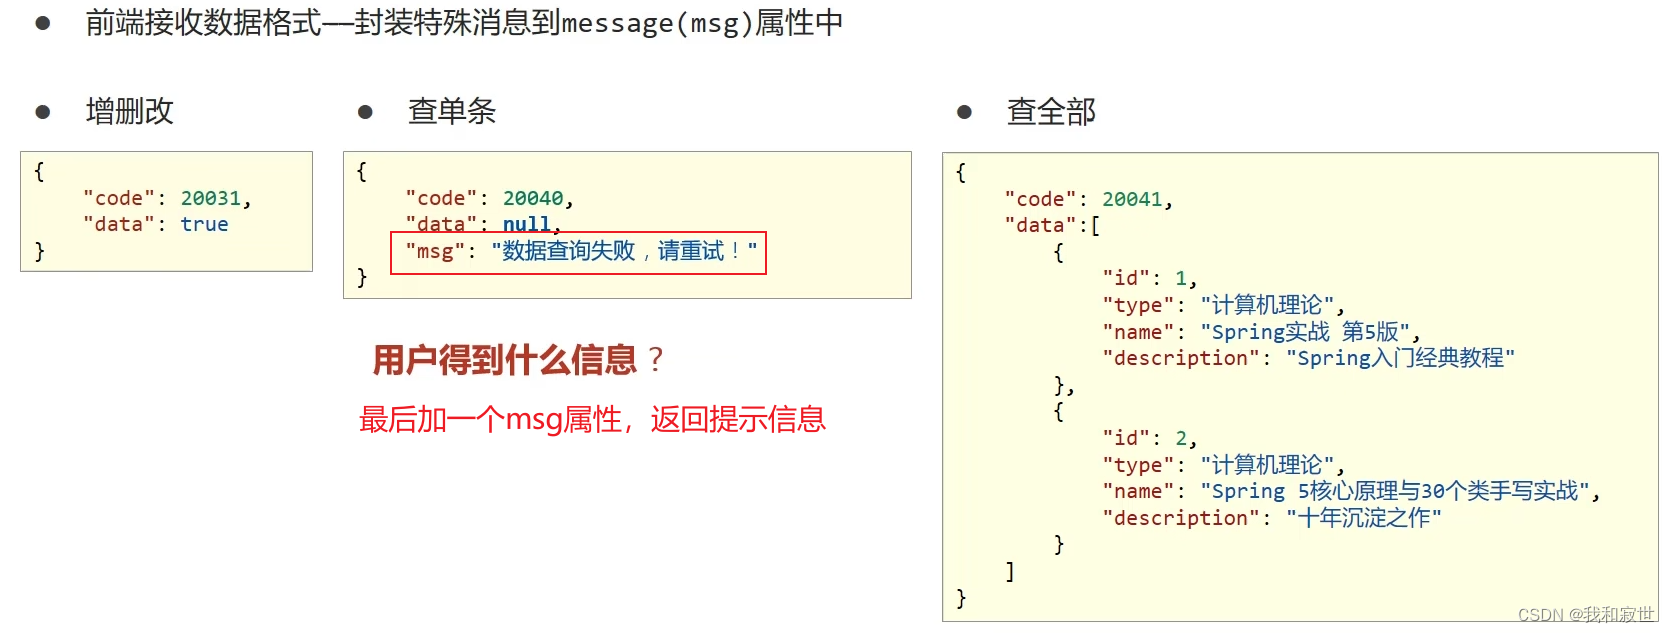
Result:
public class Result {
    private Integer code;
    private Object data;
    private String mes;

    public Result() {
    }

    public Result(Integer code, Object data) {
        this.code = code;
        this.data = data;
    }

    public Result(Integer code, Object data, String mes) {
        this.code = code;
        this.data = data;
        this.mes = mes;
    }

    public Integer getCode() {
        return code;
    }

    public void setCode(Integer code) {
        this.code = code;
    }

    public Object getData() {
        return data;
    }

    public void setData(Object data) {
        this.data = data;
    }

    public String getMes() {
        return mes;
    }

    public void setMes(String mes) {
        this.mes = mes;
    }
}
更改业务层BookController下的内容:
原BookController:
@RestController
@RequestMapping("/books")
public class BookController {
    @Autowired
    private BookService bookService;


    @PostMapping
    public boolean save(@RequestBody Book book) {
        return bookService.save(book);
    }

    @PutMapping
    public boolean update(@RequestBody Book book) {
        return bookService.update(book);
    }

    @GetMapping("/{id}")
    public Book selectById(@PathVariable Integer id) {
        Book book = bookService.selectById(id);
        return book;
    }

    @GetMapping
    public List<Book> selectAll() {
        List<Book> bookList = bookService.selectAll();
        return bookList;
    }

    @DeleteMapping("/{id}")
    public boolean deleteById(@PathVariable Integer id) {
        return bookService.deleteById(id);
    }
}
更改后BookController:
@RestController
@RequestMapping("/books")
public class BookController {
    @Autowired
    private BookService bookService;

    @PostMapping
    //用三目运算符做判断简单点,save?true的内容:false的内容
    public Result save(@RequestBody Book book) {
        boolean save = bookService.save(book);
        return new Result(save ? Code.SAVE_OK : Code.SAVE_ERR, save);
    }

    @PutMapping
    public Result update(@RequestBody Book book) {
        boolean update = bookService.update(book);
        return new Result(update ? Code.UPDATE_OK : Code.UPDATE_ERR, update);
    }

    @DeleteMapping("/{id}")
    public Result deleteById(@PathVariable Integer id) {
        boolean delete = bookService.deleteById(id);
        return new Result(delete ? Code.DELETE_OK : Code.DELETE_ERR, delete);
    }
    @GetMapping("/{id}")
    //在判断对象时,不能用!=""来判断,因为有可能查到了只是没有内容;而null则表示对象是否存在
    public Result selectById(@PathVariable Integer id) {
        Book book = bookService.selectById(id);
        Integer code = book != null ? Code.GET_OK : Code.GET_ERR;
        String msg = book != null ? "" : "查询失败,未找到目标数据";
        return new Result(code, book, msg);
    }

    @GetMapping
    public Result selectAll() {
        List<Book> bookList = bookService.selectAll();
        Integer code = bookList != null ? Code.GET_OK : Code.GET_ERR;
        String msg = bookList != null ? "" : "查询失败,未找到目标数据";
        return new Result(code, bookList, msg);
    }
}
(三)异常处理器
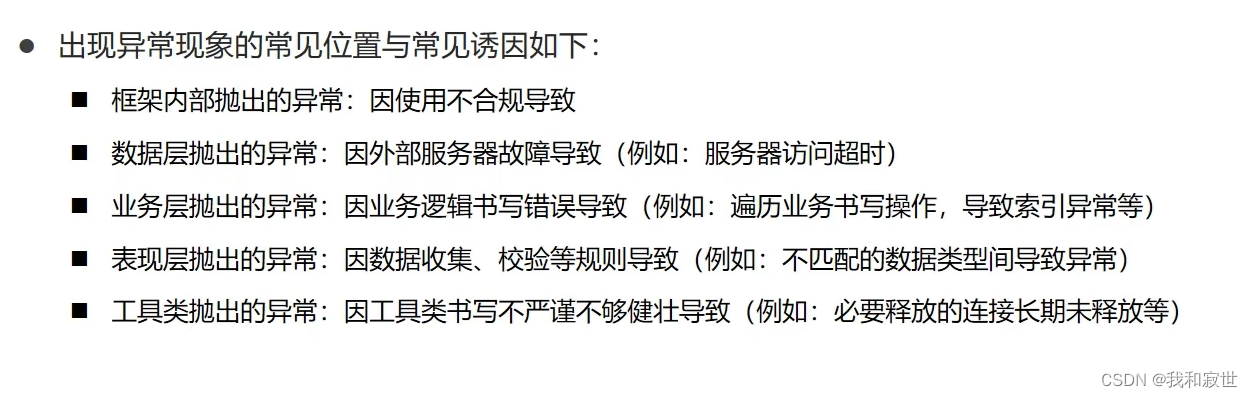
问题:
- 各个层级有不同的异常,那异常处理代码写在哪一层?
答:一层一层往上抛,统一在表现层进行处理。 - 在表现层处理异常,每个异常都需要分类处理,如果每个方法里面都写一遍分类,那么代码量将非常巨大且没有意义,如何解决?
答:用AOP的思想去解决。
异常处理器格式如下:
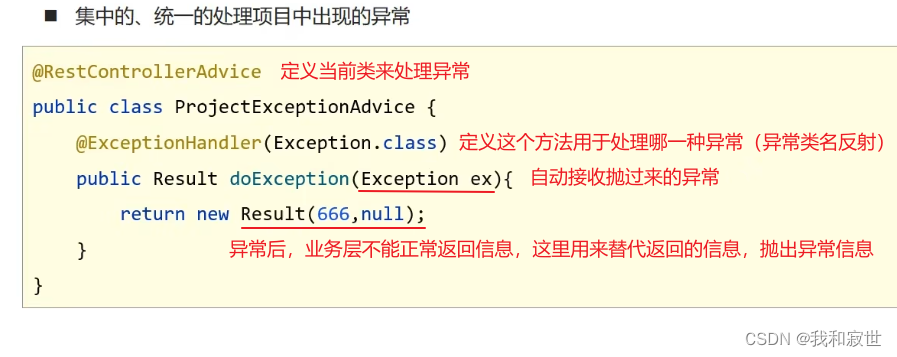
(四)对项目中的异常处理
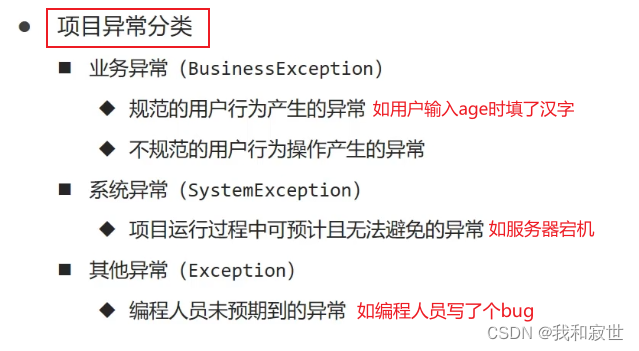
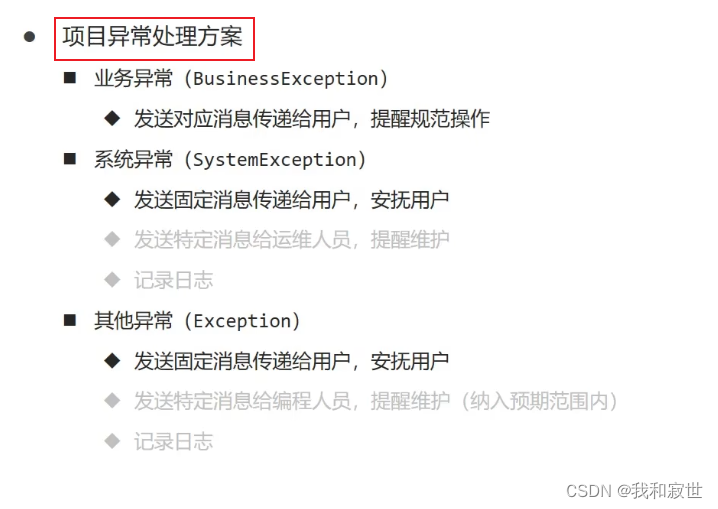
(1)处理步骤
- 自定义项目系统级/业务级异常
exception.SystemException和exception.BusinessException
public class SystemException extends RuntimeException {
    private Integer code;

    public SystemException(Integer code, String message) {
        super(message);
        this.code = code;
    }

    public SystemException(Integer code, String message, Throwable cause) {
        super(message, cause);
        this.code = code;
    }

    public Integer getCode() {
        return code;
    }

    public void setCode(Integer code) {
        this.code = code;
    }
}
public class BusinessException extends RuntimeException {
    private Integer code;

    public BusinessException(Integer code, String message) {
        super(message);
        this.code = code;
    }

    public BusinessException(Integer code, String message, Throwable cause) {
        super(message, cause);
        this.code = code;
    }

    public Integer getCode() {
        return code;
    }

    public void setCode(Integer code) {
        this.code = code;
    }
}
- 自定义异常编码(Code)
public class Code {
    public static final Integer SAVE_OK=20011;
    public static final Integer DELETE_OK=20021;
    public static final Integer UPDATE_OK=20031;
    public static final Integer SELECT_OK=20041;

    public static final Integer SAVE_ERR=20010;
    public static final Integer DELETE_ERR=20020;
    public static final Integer UPDATE_ERR=20030;
    public static final Integer SELECT_ERR=20040;

    public static final Integer SYSTEM_UNKNOWN_ERR=50001;
    public static final Integer SYSTEM_TIMEOUT_ERR=50002;

    public static final Integer PROJECT_VALIDATE_ERR=60001;
    public static final Integer PROJECT_BUSINESS_ERR=60002;
}
- 在需要的地方触发自定义异常(如Service中)。
这里可以使用AOP来包装SystemException系统异常,只在Service中写BusinessException业务异常。
	//以selectById()方法为例(实际上里面的每个方法都要考虑有什么异常)
    @Override
    public Book selectById(Integer id) {
        //模拟一个业务异常
        if (id < 0) {
            throw new BusinessException(Code.PROJECT_BUSINESS_ERR, "非法输入!请重试");
        }

        //模拟一个系统异常
        try {
            int i = 1 / 0;
        } catch (Exception se) {
            throw new SystemException(Code.SYSTEM_TIMEOUT_ERR, "服务器访问超时,请重试");
        }
        Book book = bookDao.selectById(id);
        return book;
    }
- 拦截并处理异常(在
controller.ProjectExceptionAdvice中)
@RestControllerAdvice
public class ProjectExceptionAdvice {
    @ExceptionHandler(BusinessException.class)
    public Result doBusinessException(BusinessException be) {
        return new Result(be.getCode(), null, be.getMessage());
    }

    @ExceptionHandler(SystemException.class)
    public Result doSystemException(SystemException se) {
        //记录日志(错误堆栈)
        //发送邮件给开发人员,ex对象发送给开发人员
        //发送短信给运维人员
        return new Result(se.getCode(), null, se.getMessage());
    }

    @ExceptionHandler(Exception.class)
    public Result doException(Exception exception) {
        //记录日志(错误堆栈)
        //发送邮件给开发人员,exception对象发送给开发人员
        //发送短信给运维人员
        exception.printStackTrace();
        return new Result(Code.SYSTEM_UNKNOWN_ERR, null, "系统繁忙,请稍后再试");
    }
}
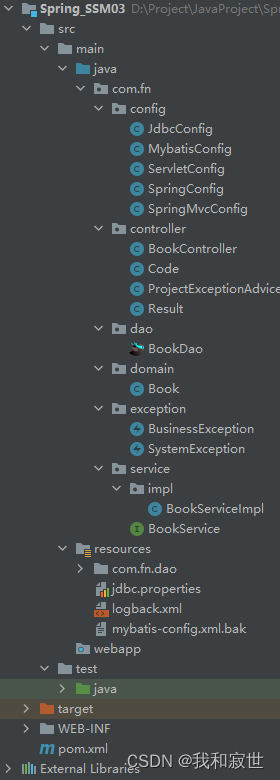
整个项目结构如下
(2)修改Service和Dao,判断增删改是否成功
BookDao中
@Repository
public interface BookDao {
	//返回值从void改为int
	//如果操作成功,会返回影响行数,这时用int接收被影响的行数
    int save(Book book);

    int delete(Integer id);

    int update(Book book);

    Book selectById(Integer id);

    List<Book> selectAll();
}
BookService中
    @Override
    public Boolean save(Book book) {
    	//对于增删改,当bookDao传过来int值后,int>0表示有被影响的行数,即操作成功;
    	//如果int <= 0 ,表示查询失败,没有被影响的行数
        return bookDao.save(book) > 0;
    }

    @Override
    public Boolean delete(Integer id) {
        return bookDao.delete(id) > 0;
    }

    @Override
    public Boolean update(Book book) {
        return bookDao.update(book) > 0;
    }
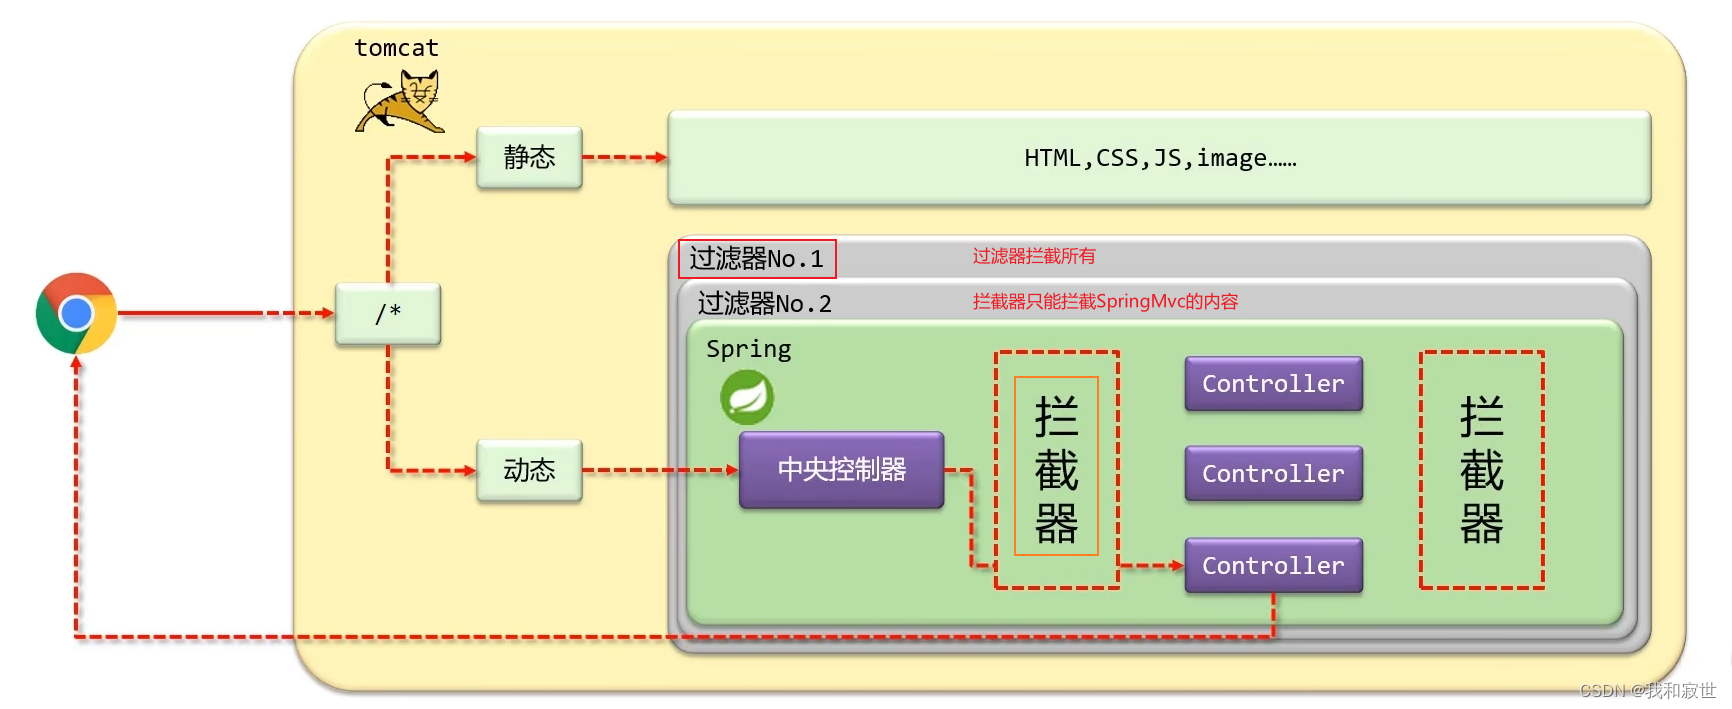
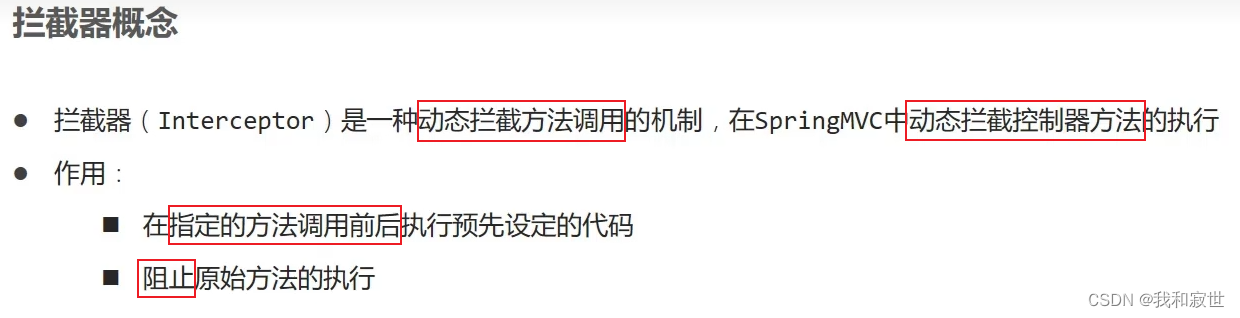
五、拦截器(Interceptor)
(一)简介
- 过滤器针对所有访问
- 拦截器针对Controller进行拦截
- AOP针对Service进行处理
- 这三个的底层原理其实都是AOP思想。
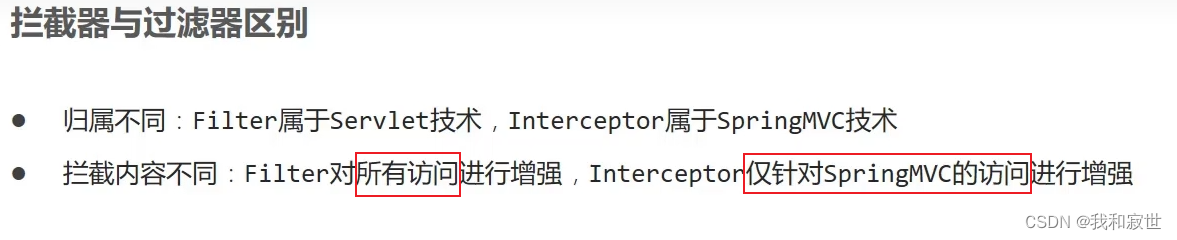
过滤器、拦截器、AOP三者的区别:
拦截器与AOP
过滤器、拦截器、AOP
(二)快速入门
- controller下新建
interceptor.ProjectInterceptor,用于定义拦截器的各个功能。
//使用注释,让Mvc扫描到该类
@Component
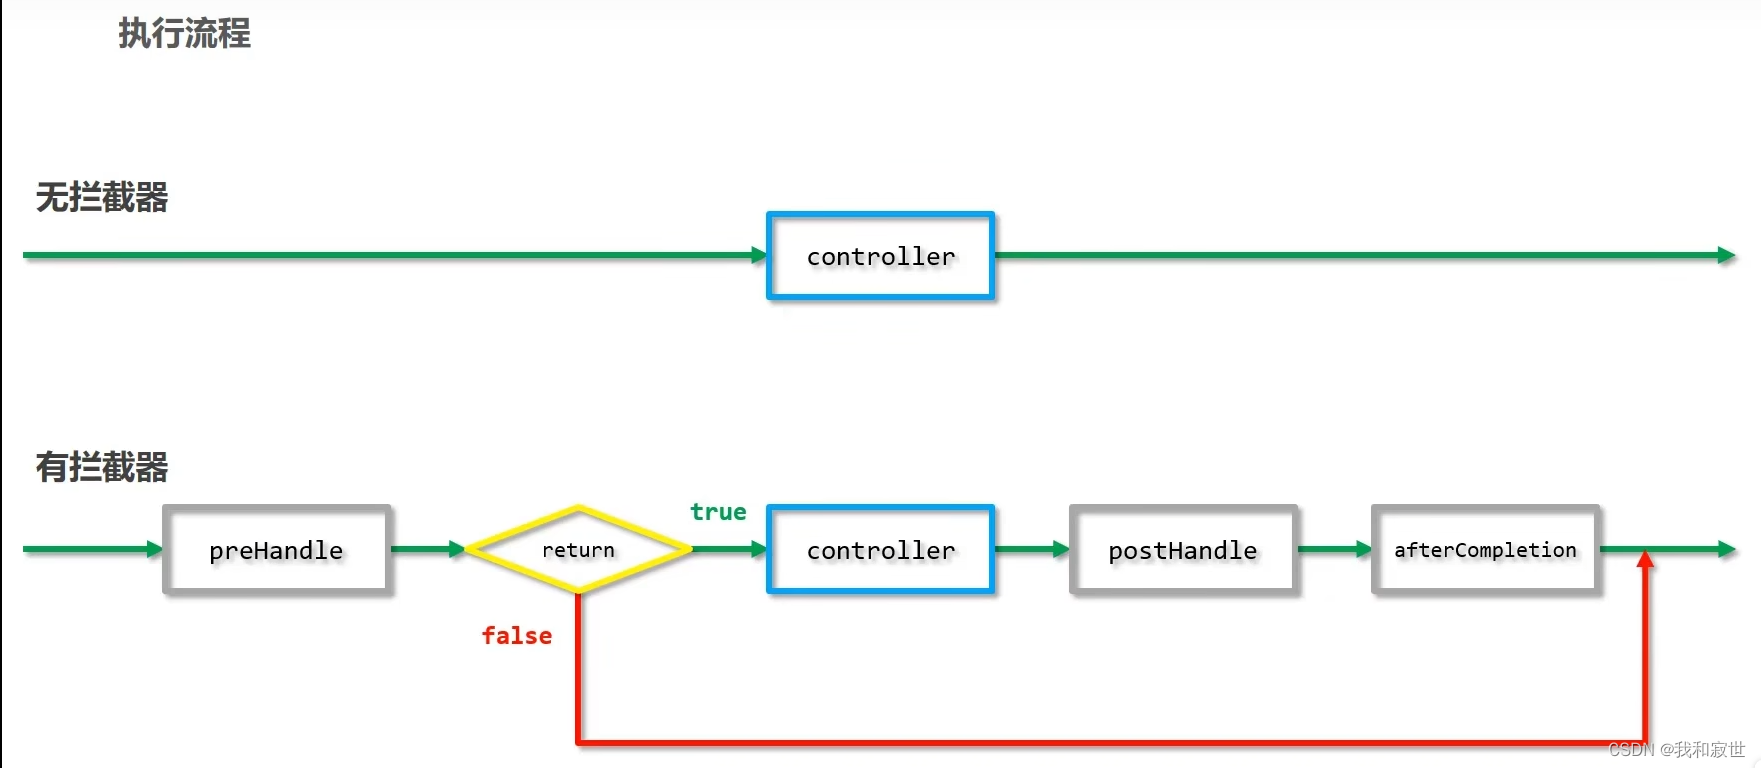
//重写HandlerInterceptor下的三个方法
public class ProjectInterceptor implements HandlerInterceptor {
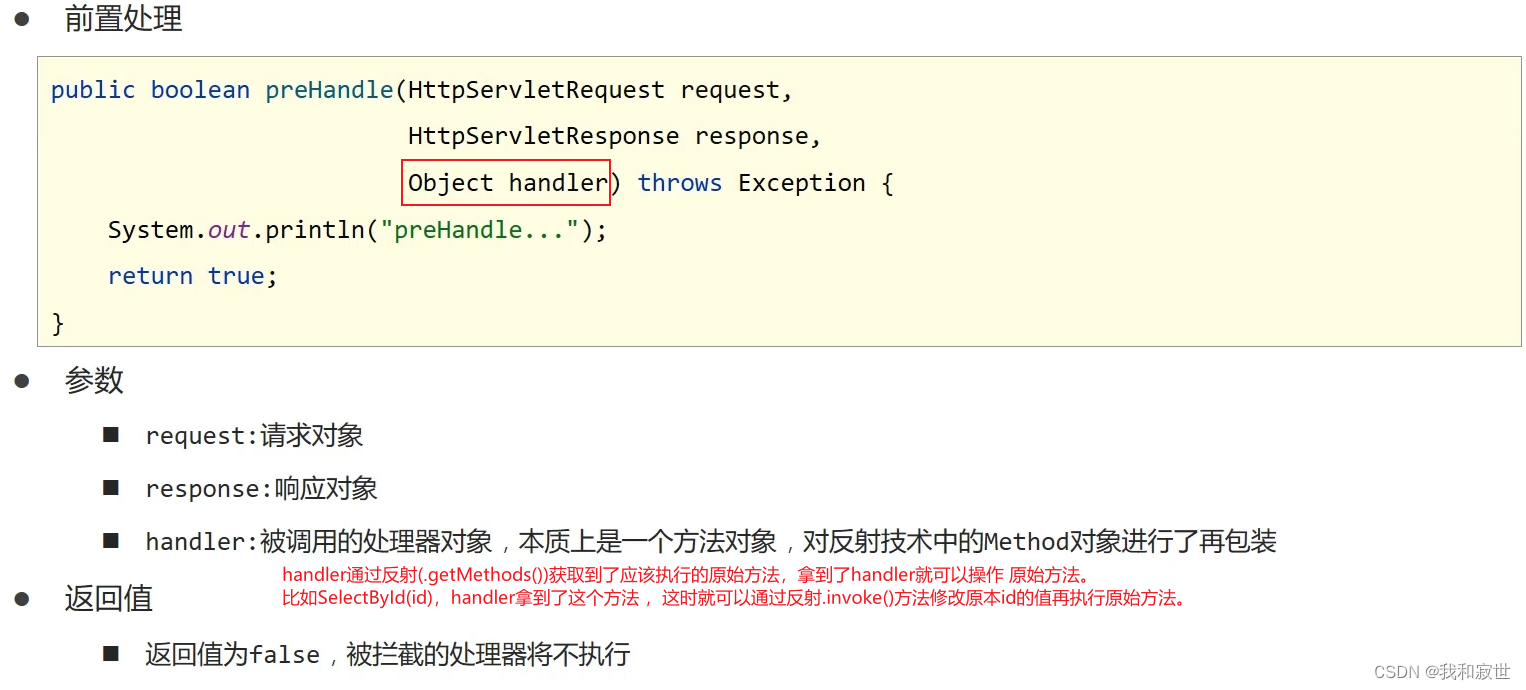
@Override
//pre:原始方法触发之前
public boolean preHandle(HttpServletRequest request, HttpServletResponse response, Object handler) throws Exception {
System.out.println("preHandle...");
//return true表示通过拦截,下一步执行原始方法;如果为false,则终止原始方法的执行(即不执行)。
//这里可以用作权限校验等,判断成功后才return true
return true;
}
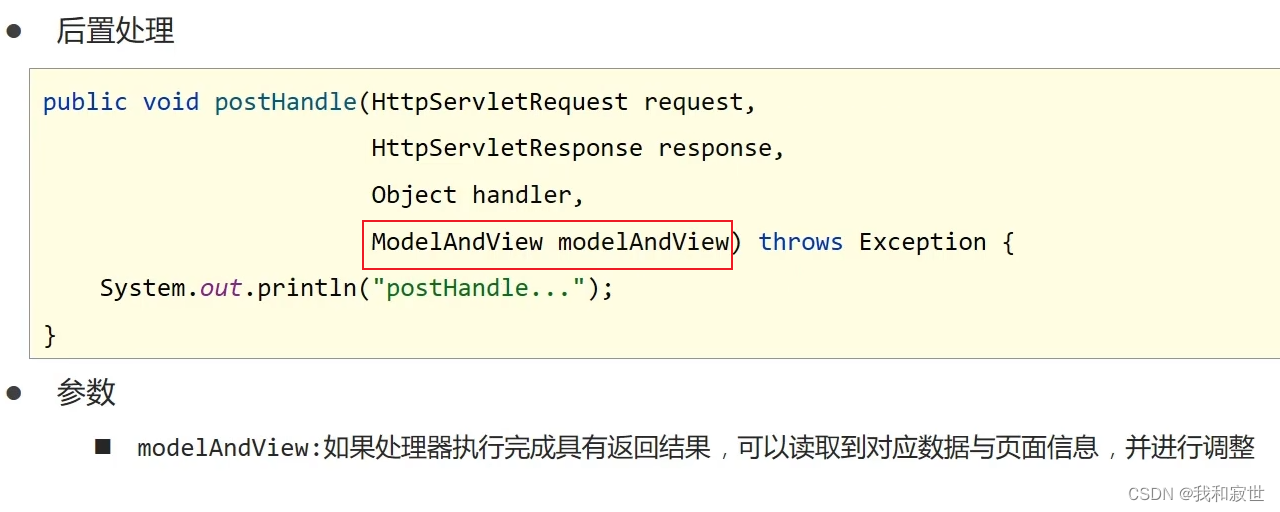
@Override
//post:原始方法触发之后
public void postHandle(HttpServletRequest request, HttpServletResponse response, Object handler, ModelAndView modelAndView) throws Exception {
System.out.println("postHandle...");
}
@Override
//after:在post触发之后
public void afterCompletion(HttpServletRequest request, HttpServletResponse response, Object handler, Exception ex) throws Exception {
System.out.println("afterCompletion...");
}
}
执行了SelectAll(),拦截效果如下:

SpringMvcSupport中,重写addInterceptors()方法。
对于SpringBoot,放在static里的静态资源boot帮忙自动放行了,所以在boot中不需要配置addResourceHandlers()方法;
如果放在其他文件夹下,则需要配置addResourceHandlers()。
@Configuration
public class SpringMvcSupport extends WebMvcConfigurationSupport {
    @Autowired
    //自动装配拦截器
    private ProjectInterceptor projectInterceptor;

    @Override
    protected void addResourceHandlers(ResourceHandlerRegistry registry) {
        registry.addResourceHandler("/pages/**").addResourceLocations("/pages/");
        registry.addResourceHandler("/css/**").addResourceLocations("/css/");
        registry.addResourceHandler("/js/**").addResourceLocations("/js/");
        registry.addResourceHandler("/plugins/**").addResourceLocations("/plugins/");
    }

    @Override
    protected void addInterceptors(InterceptorRegistry registry) {
    	//registry.addInterceptor(拦截器对象,用于注册拦截器).addPathPatterns("当访问什么路径时,触发拦截器", "*用于指代如/books/id这种情况");
        registry.addInterceptor(projectInterceptor).addPathPatterns("/books", "/books/*");
    }
}
- 对于
SpringMvcSupport类有一种简便写法,可以将内容写在配置类中;在SpringMvcConfig配置类中,实现WebMvcConfigurer接口,重写方法就可以替代SpringMvcSupport的功能(但侵入性较强)
@Configuration
@ComponentScan({"com.fn.controller", "com.fn.config"})
@EnableWebMvc
//实现接口,替代SpringMvcSupport功能(内容一模一样,只是方法用public修饰而不用protected)
public class SpringMvcConfig implements WebMvcConfigurer {
    @Autowired
    private ProjectInterceptor projectInterceptor;

    @Override
    public void addResourceHandlers(ResourceHandlerRegistry registry) {
        registry.addResourceHandler("/pages/**").addResourceLocations("/pages/");
        registry.addResourceHandler("/css/**").addResourceLocations("/css/");
        registry.addResourceHandler("/js/**").addResourceLocations("/js/");
        registry.addResourceHandler("/plugins/**").addResourceLocations("/plugins/");
    }

    @Override
    public void addInterceptors(InterceptorRegistry registry) {
        registry.addInterceptor(projectInterceptor).addPathPatterns("/books", "/books/*");
    }
}
(三)参数

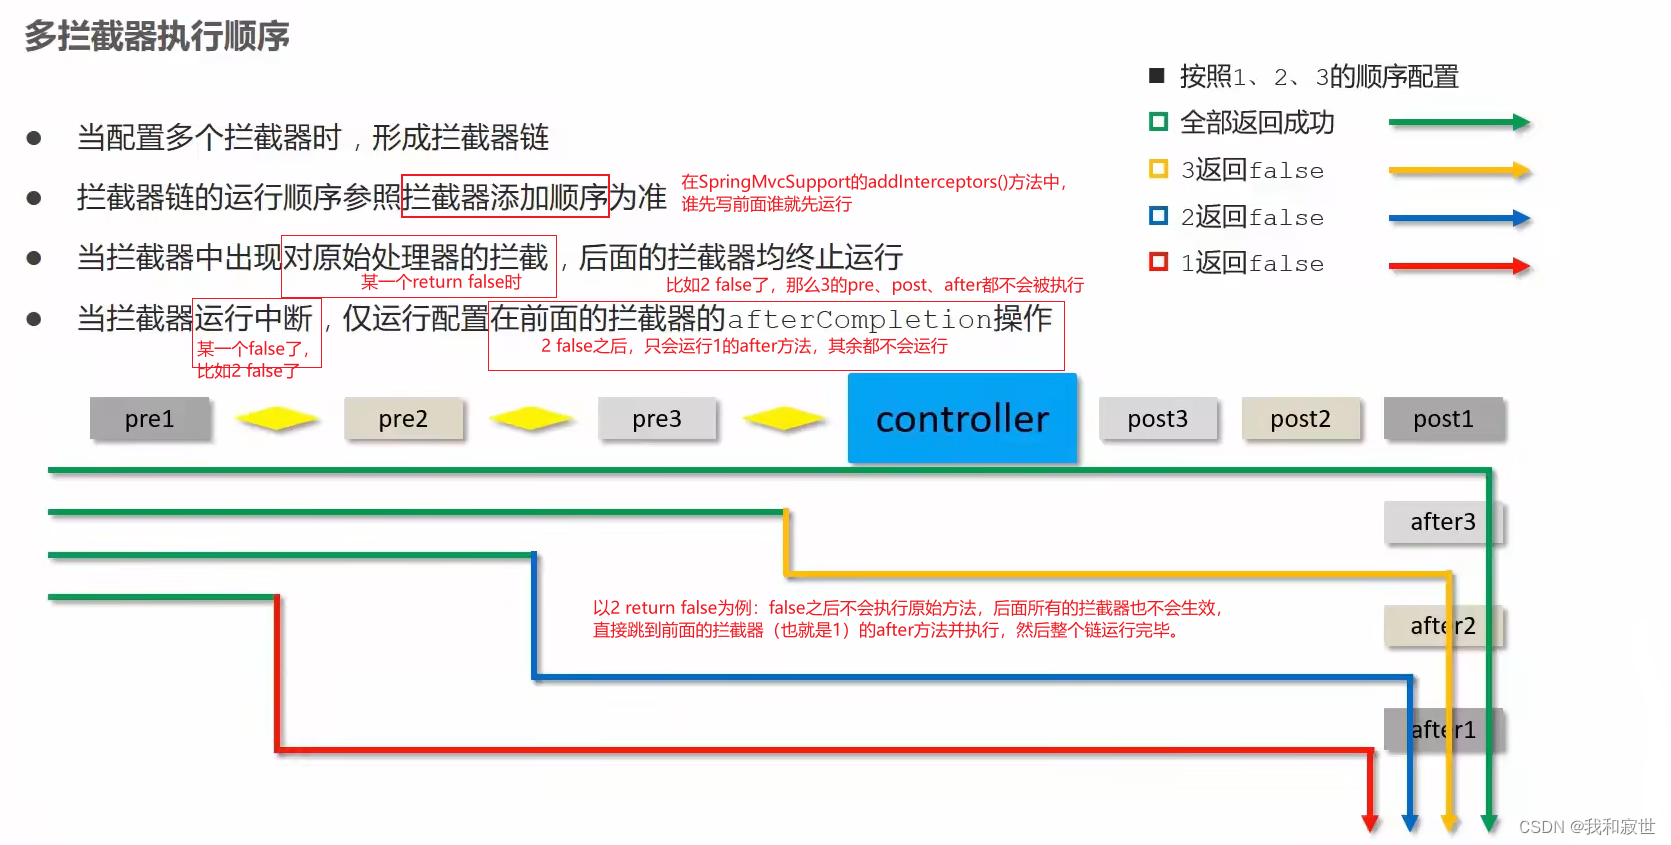
(四)拦截器链配置


 1534
1534

 被折叠的 条评论
为什么被折叠?
被折叠的 条评论
为什么被折叠?
 到【灌水乐园】发言


