


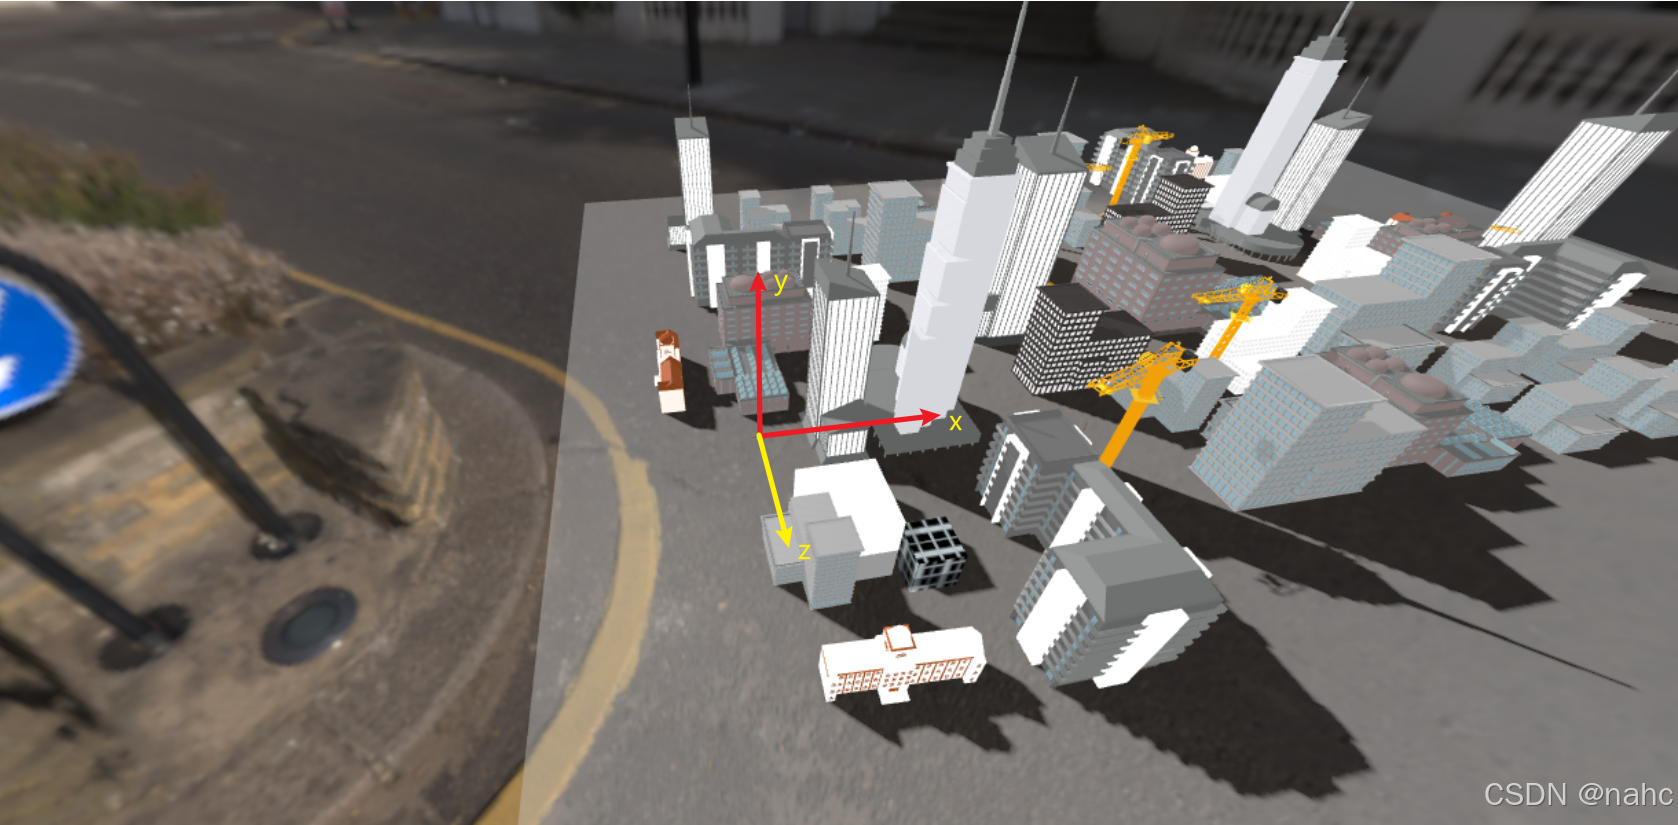
react使用threejs加载3d模型,并添加影子。并且添加点击展示信息
1 加载模型
1.1 引入threejs
下载
npm install three
使用
import * as THREE from "three";
1.2 添加场景
const width = containerRef.current.offsetWidth;
const height = containerRef.current.offsetHeight;
//场景
const scene = new THREE.Scene();
1.3 添加相机
//相机
const camera = new THREE.PerspectiveCamera(
  75, // 视野角度
  width / height, //宽高比
  0.1, // 近裁剪面
  1000 // 远裁剪面
);
camera.position.set(-50, 70, 100);//相机位置
camera.lookAt(100, 0, 0);// 相机看向哪
1.4 渲染器
// 生成渲染器return (
    <div
      ref={containerRef}
      id="container"
      style={{ height: "100vh", width: "100vw" }}
    />
  );
const renderer = new THREE.WebGLRenderer({
   antialias: true, // 抗锯齿
   alpha: true, // 启用透明度
   physicallyCorrectLights: true,
 });
 renderer.setSize(width, height);
1.5 加入dom
react 文件
return (
  <div
    ref={containerRef}
    id="container"
    style={{ height: "100vh", width: "100vw" }}
  />
);
//加入dom
containerRef.current.appendChild(renderer.domElement);
1.6 引入模型
引入加载器和控制器
import { GLTFLoader } from "three/examples/jsm/Addons.js";
import { OrbitControls } from "three/addons/controls/OrbitControls.js";
//控制器
const controls = new OrbitControls(camera, renderer.domElement);
controls.update();
3d模型网站 sketchfab
我用的模型 https://skfb.ly/p7Wwv
//加载模型
 const loader = new GLTFLoader();
 loader.load(
   "public/distant_city/scene.gltf",
   (gltf) => {
     const model = gltf.scene;
     model.castShadow = true; //投射阴影
     model.receiveShadow = true; //接受阴影
     model.scale.set(0.5, 0.5, 0.5);
     scene.add(model);
     //动画
     const animate = () => {
       renderer.render(scene, camera);
       controls.update();
       requestAnimationFrame(animate);
     };
     animate();
   },
   function (xhr) {
     console.log((xhr.loaded / xhr.total) * 100 + "% loaded");
   },
   function (error) {
     console.log(error, "An error happened");
   }
 );
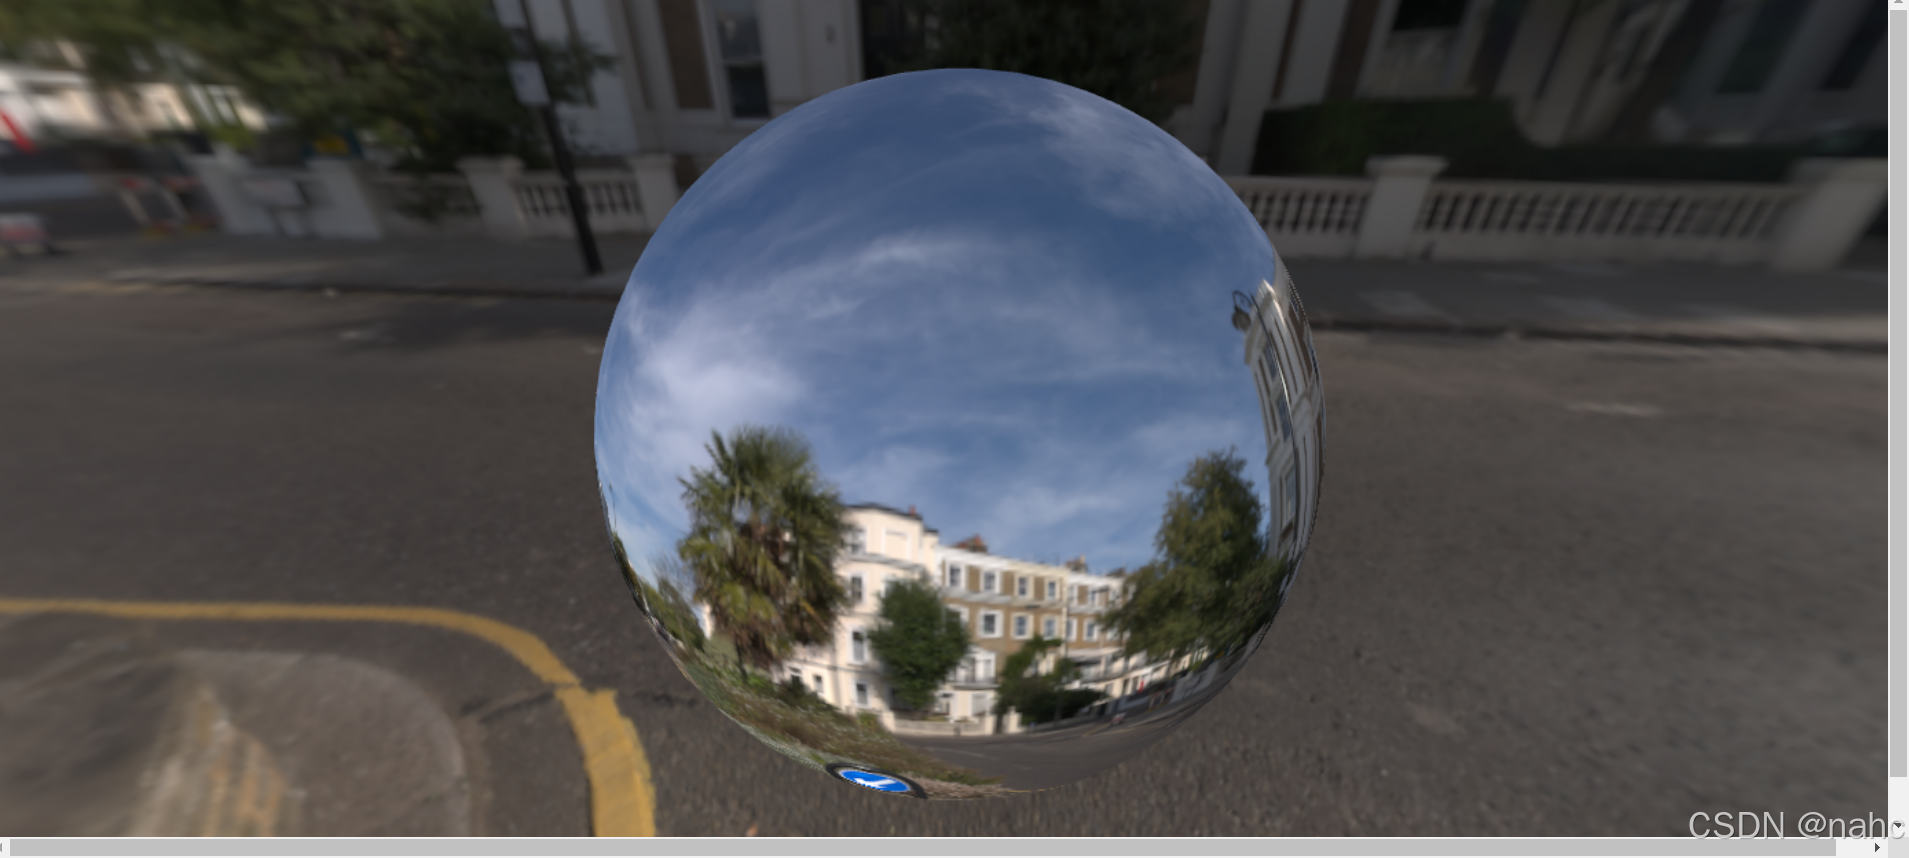
2 添加全景背景
2.1 引入加载器
import { RGBELoader } from "three/examples/jsm/loaders/RGBELoader.js";
2.2 添加全景
在网站上找个全景模型下载到public文件夹里边
Poly Haven网站
//引入背景
const rgbeLoader = new RGBELoader();
rgbeLoader.load("public/london_city_sunny_street_1k.hdr", (texture) => {
  texture.mapping = THREE.EquirectangularReflectionMapping;
  // 创建背景
  scene.background = texture;
  // 创建用于环境映射的球体,就是当无限缩小模型之后,最后会出现一个球体
  const sphereGeometry = new THREE.SphereGeometry(500, 60, 40);
  const sphereMaterial = new THREE.MeshBasicMaterial({ map: texture });
  const sphere = new THREE.Mesh(sphereGeometry, sphereMaterial);
  scene.add(sphere);
});
3 添加阴影
两个关键点,1 模型需要可以投射阴影和接受阴影,我的模型是一块建筑物,影子可能会投到相邻的建筑物上。2 需要有个平面能接受阴影。
3.1 添加灯光
灯光位置要远,范围也要广,才能照射到所有模型。
//平行光
// 创建光源并设置能投射阴影
const directionalLight = new THREE.DirectionalLight(0xffffff, 5);
directionalLight.position.set(-500, 500, -500);
directionalLight.castShadow = true;
directionalLight.shadow.mapSize.width = 4000; // 清晰度,数值越大,影子越光滑
directionalLight.shadow.mapSize.height = 4000;
directionalLight.shadow.camera.near = 0.5; //离灯光多近产生阴影
directionalLight.shadow.camera.far = 5000; // 离灯光多远产生阴影
directionalLight.shadow.camera.left = -500; // 决定了阴影的产生范围
directionalLight.shadow.camera.right = 500;
directionalLight.shadow.camera.top = 500;
directionalLight.shadow.camera.bottom = -500;
scene.add(directionalLight);
3.2 添加阴影接受平面
plane.receiveShadow = true;
// 创建平面几何体
 const planeGeometry = new THREE.PlaneGeometry(400, 300);
 // 创建平面材质,设置接收阴影
 const planeMaterial = new THREE.MeshStandardMaterial({
   color: 0xd3d3d3,
   opacity: 0.4, // 透明度,取值范围 0(完全透明)到 1(完全不透明)
   transparent: true, // 启用透明度
 });
 // 创建平面网格
 const plane = new THREE.Mesh(planeGeometry, planeMaterial);
 plane.receiveShadow = true;
 // 旋转平面使其水平
 plane.rotation.x = -Math.PI / 2;
 // 调整平面位置使其在模型下方
 plane.position.y = 0;
 plane.position.z = -20;
 plane.position.x = 150;
 // 将平面添加到场景
 scene.add(plane);
3.3 渲染器设置阴影
渲染器
// 阴影设置
renderer.shadowMap.enabled = true;
renderer.shadowMap.type = THREE.PCFSoftShadowMap; // 阴影类型,可根据需要选择
3.4 模型添加阴影
 (gltf) => {
 const model = gltf.scene;
 model.castShadow = true; //投射阴影
 model.receiveShadow = true; //接受阴影
 model.scale.set(0.5, 0.5, 0.5);
 scene.add(model);
//遍历一下子模型
 model.traverse(function (child) {
   if (child.isMesh) {
     child.castShadow = true; //模型投射阴影
     child.receiveShadow = true; // 接受阴影
     child.material.emissive = child.material.color;
     child.material.emissiveMap = child.material.map;
   }
 });
 }
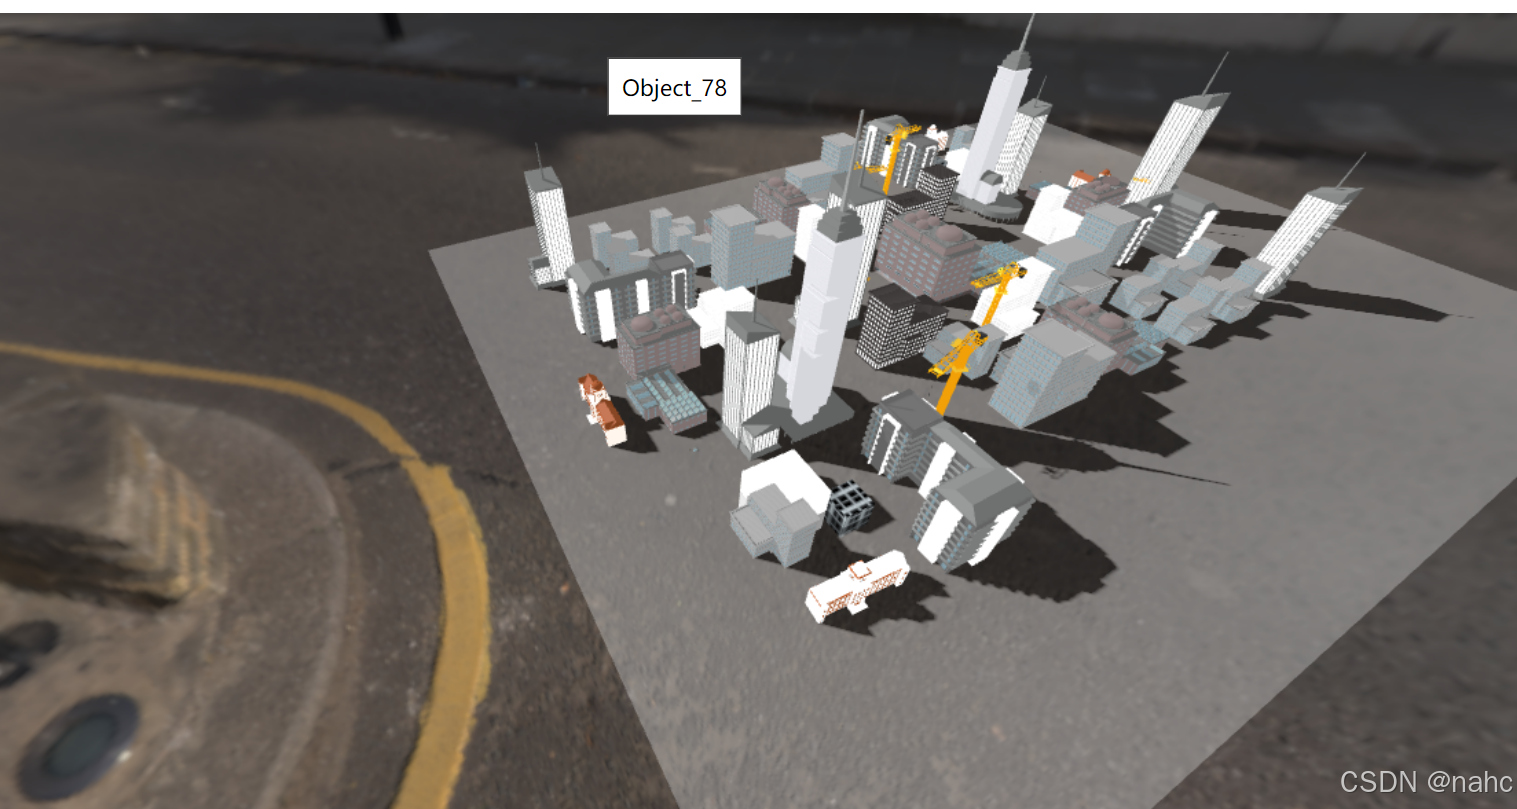
4 添加点击事件
//鼠标点击
  const onMouseDown = (event) => {
  const mouse = new THREE.Vector2();
  mouse.x = (event.clientX / window.innerWidth) * 2 - 1;
  mouse.y = -(event.clientY / window.innerHeight) * 2 + 1;
  console.log("x,y", mouse.x, mouse.y);

  const raycaster = new THREE.Raycaster();
  raycaster.setFromCamera(mouse, camera);

  const intersects = raycaster.intersectObjects(scene.children);

  if (intersects.length > 0) {
    const object = intersects[0].object;
    console.log(object.name, "112");
    showInfo(object.name);
  }
};
document.addEventListener("mousedown", onMouseDown, false);
//展示信息
const showInfo = (message) => {
  const infoBox = document.createElement("div");
  infoBox.innerHTML = message;
  infoBox.style.position = "absolute";
  infoBox.style.top = "10%";
  infoBox.style.left = "50%";
  infoBox.style.transform = "translate(-50%, -50%)";
  infoBox.style.backgroundColor = "white";
  infoBox.style.padding = "10px";
  infoBox.style.border = "1px solid black";

  document.body.appendChild(infoBox);

  // 一段时间后隐藏信息框
  setTimeout(() => {
    document.body.removeChild(infoBox);
  }, 1000);
};
效果:
5 全部代码
import * as dat from "dat.gui";
import { useEffect, useRef } from "react";
import * as THREE from "three";
import { OrbitControls } from "three/addons/controls/OrbitControls.js";
import { GLTFLoader } from "three/examples/jsm/Addons.js";
import { RGBELoader } from "three/examples/jsm/loaders/RGBELoader.js";
function ThreeContainer() {
  const isContainerRunning = useRef(false);
  const containerRef = useRef(null);

  useEffect(() => {
    if (isContainerRunning.current == false && containerRef.current) {
      isContainerRunning.current = true;
      const width = containerRef.current.offsetWidth;
      const height = containerRef.current.offsetHeight;
      //场景
      const scene = new THREE.Scene();
      //相机
      const camera = new THREE.PerspectiveCamera(
        75, // 视野角度
        width / height, //宽高比
        0.1, // 近裁剪面
        1000 // 远裁剪面
      );
      camera.position.set(-50, 70, 100);
      camera.lookAt(100, 0, 0);
      // 生成渲染器
      const renderer = new THREE.WebGLRenderer({
        antialias: true, // 抗锯齿
        alpha: true, // 启用透明度
        physicallyCorrectLights: true,
      });
      renderer.setSize(width, height);
      // 阴影设置
      renderer.shadowMap.enabled = true;
      renderer.shadowMap.type = THREE.PCFSoftShadowMap; // 阴影类型,可根据需要选择

      //控制器
      const controls = new OrbitControls(camera, renderer.domElement);
      controls.update();
      //加入dom
      containerRef.current.appendChild(renderer.domElement);
      //引入背景
      const rgbeLoader = new RGBELoader();
      rgbeLoader.load("public/london_city_sunny_street_1k.hdr", (texture) => {
        texture.mapping = THREE.EquirectangularReflectionMapping;
        // 创建背景
        scene.background = texture;
        // 创建用于环境映射的球体
        const sphereGeometry = new THREE.SphereGeometry(500, 60, 40);
        const sphereMaterial = new THREE.MeshBasicMaterial({ map: texture });
        const sphere = new THREE.Mesh(sphereGeometry, sphereMaterial);
        scene.add(sphere);
      });
      //加载模型
      const loader = new GLTFLoader();
      loader.load(
        "public/distant_city/scene.gltf",
        (gltf) => {
          const model = gltf.scene;
          model.castShadow = true; //投射阴影
          model.receiveShadow = true; //接受阴影
          model.scale.set(0.5, 0.5, 0.5);
          scene.add(model);

          model.traverse(function (child) {
            if (child.isMesh) {
              child.castShadow = true; //模型投射阴影
              child.receiveShadow = true;
              child.material.emissive = child.material.color;
              child.material.emissiveMap = child.material.map;
            }
          });
          //动画
          const animate = () => {
            renderer.render(scene, camera);
            controls.update();
            requestAnimationFrame(animate);
          };
          animate();
        },
        function (xhr) {
          console.log((xhr.loaded / xhr.total) * 100 + "% loaded");
        },
        function (error) {
          console.log(error, "An error happened");
        }
      );
      //平行光
      // 创建光源并设置能投射阴影
      const directionalLight = new THREE.DirectionalLight(0xffffff, 5);
      directionalLight.position.set(-500, 500, -500);
      directionalLight.castShadow = true;
      directionalLight.shadow.mapSize.width = 4000; // 清晰度,数值越大,影子越光滑
      directionalLight.shadow.mapSize.height = 4000;
      directionalLight.shadow.camera.near = 0.5; //离灯光多近产生阴影
      directionalLight.shadow.camera.far = 5000; // 离灯光多远产生阴影
      directionalLight.shadow.camera.left = -500; // 决定了阴影的产生范围
      directionalLight.shadow.camera.right = 500;
      directionalLight.shadow.camera.top = 500;
      directionalLight.shadow.camera.bottom = -500;
      scene.add(directionalLight);
      // 创建平面几何体
      const planeGeometry = new THREE.PlaneGeometry(400, 300);
      // 创建平面材质,设置接收阴影
      const planeMaterial = new THREE.MeshStandardMaterial({
        color: 0xd3d3d3,
        opacity: 0.4, // 透明度,取值范围 0(完全透明)到 1(完全不透明)
        transparent: true, // 启用透明度
      });
      // 创建平面网格
      const plane = new THREE.Mesh(planeGeometry, planeMaterial);
      plane.receiveShadow = true;
      // 旋转平面使其水平
      plane.rotation.x = -Math.PI / 2;
      // 调整平面位置使其在模型下方
      plane.position.y = 0;
      plane.position.z = -20;
      plane.position.x = 150;
      // 将平面添加到场景
      scene.add(plane);
      //鼠标点击
      const onMouseDown = (event) => {
        const mouse = new THREE.Vector2();
        mouse.x = (event.clientX / window.innerWidth) * 2 - 1;
        mouse.y = -(event.clientY / window.innerHeight) * 2 + 1;
        console.log("x,y", mouse.x, mouse.y);

        const raycaster = new THREE.Raycaster();
        raycaster.setFromCamera(mouse, camera);
        //console.log("raycaster", raycaster);

        const intersects = raycaster.intersectObjects(scene.children);
        //console.log("intersects", intersects);

        if (intersects.length > 0) {
          const object = intersects[0].object;
          console.log(object.name, "112");
          showInfo(object.name);
        }
      };
      document.addEventListener("mousedown", onMouseDown, false);
      //展示信息
      const showInfo = (message) => {
        const infoBox = document.createElement("div");
        infoBox.innerHTML = message;
        infoBox.style.position = "absolute";
        infoBox.style.top = "10%";
        infoBox.style.left = "50%";
        infoBox.style.transform = "translate(-50%, -50%)";
        infoBox.style.backgroundColor = "white";
        infoBox.style.padding = "10px";
        infoBox.style.border = "1px solid black";

        document.body.appendChild(infoBox);

        // 一段时间后隐藏信息框
        setTimeout(() => {
          document.body.removeChild(infoBox);
        }, 1000);
      };
      /*
      // 创建一个 dat.GUI 对象
      const gui = new dat.GUI();
      // 模型位置
      const ModelPosition = gui.addFolder("模型位置");
      ModelPosition.add(scene.position, "x", -3, 3).name("x轴");
      ModelPosition.add(scene.position, "y", -3, 3).name("y轴");
      ModelPosition.add(scene.position, "z", -3, 3).name("z轴");
      //缩放
      const ModelScale = gui.addFolder("模型缩放");
      ModelScale.add(scene.scale, "x", 1, 2).name("缩放");
      //旋转
      const ModelRotation = gui.addFolder("旋转");
      ModelRotation.add(scene.rotation, "y", -2 * Math.PI, 2 * Math.PI).name(
        "y轴旋转"
      );
      */
      // 为点光源的亮度创建控制器
      // const lightFolder = gui.addFolder("灯光");
      //lightFolder.add(pointLight, "intensity", 0, 500).name("点光源"); // 亮度范围从 0 到 5 可调节
      //lightFolder.add(directionalLight, "intensity", 0, 10).name("平行光");
    }
  }, []);

  return (
    <div
      ref={containerRef}
      id="container"
      style={{ height: "100vh", width: "100vw" }}
    />
  );
}

export default ThreeContainer;


 1670
1670

 被折叠的 条评论
为什么被折叠?
被折叠的 条评论
为什么被折叠?
 到【灌水乐园】发言


