


 本文详细介绍了RabbitMQ的安装步骤,包括Erlang语言和RabbitMQ服务器的安装配置,以及如何通过浏览器访问RabbitMQ管理界面。此外,还提供了Spring Boot项目中整合RabbitMQ的方法,包括pom.xml依赖添加、application.yml配置、队列与转发器的创建绑定,以及生产者和消费者的实现。
windows安装:安装rabbitMQ前我们需要准备以下两个软件:
下载地址:rabbitMQ下载地
一、首先已管理员身份安装 otp_win64_19.3.exe erlang语言


一直**Next>**到最后一步,安装成功!!!
二、配置环境变量
1.新建一个环境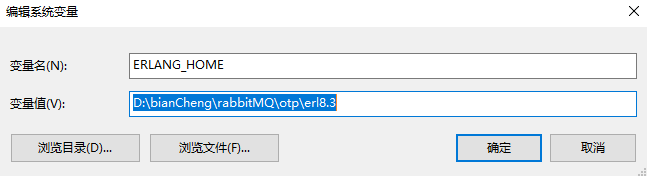
2.编辑path,新增一个
3.执行cmd命令 输入:erl -version 
出现以上情况代表安装成功!!!
三、安装 rabbitmq-server-3.7.7.exe

同样 Next> 到最后一步,安装成功!!!
四、配置RabbitMQ
在命令行CMD中,进入rabbitmq安装目录的sbin
C:\Program Files (x86)\RabbitMQ Server\rabbitmq_server-3.6.10\sbin
执行以下命令:
rabbitmq-plugins enable rabbitmq_management
执行成功如下:

然后打开浏览器,输入:localhost:15672

到此,rabbitmq_management管理界面启动就完毕了,通过该管理界面,可以管理rabbitmq的队列,虚拟机,交换器等。
默认账户: guest
默认密码: guest
RabbitMQ简介
MQ全称为Message Queue, 消息队列(MQ)是一种应用程序对应用程序的通信方法。应用程序通过读写出入队列的消息(针对应用程序的数据)来通信,而无需专用连接来链接它们。消息传递指的是程序之间通过在消息中发送数据进行通信,而不是通过直接调用彼此来通信,直接调用通常是用于诸如远程过程调用的技术。排队指的是应用程序通过 队列来通信。队列的使用除去了接收和发送应用程序同时执行的要求。
1、MQ特点: MQ是消费-生产者模型的一个典型的代表,一端往消息队列中不断写入消息,而另一端则可以读取或者订阅队列中的消息。MQ和JMS类似,但不同的是JMS是SUN JAVA消息中间件服务的一个标准和API定义,而MQ则是遵循了AMQP协议的具体实现和产品。
2、含义:RabbitMQ是一个在AMQP基础上完成的,可复用的企业消息系统。他遵循Mozilla Public License开源协议。
3、概念:RabbitMQ是流行的开源消息队列系统,用erlang语言开发。RabbitMQ是AMQP(高级消息队列协议)的标准实现。如果不熟悉AMQP,直接看RabbitMQ的文档会比较困难。不过它也只有几个关键概念,这里简单介绍。
Broker:简单来说就是消息队列服务器实体。
- Exchange:消息交换机,它指定消息按什么规则,路由到哪个队列。
- Queue:消息队列载体,每个消息都会被投入到一个或多个队列。
- Binding:绑定,它的作用就是把exchange和queue按照路由规则绑定起来。
- Routing Key:路由关键字,exchange根据这个关键字进行消息投递。
- vhost:虚拟主机,一个broker里可以开设多个vhost,用作不同用户的权限分离。
- producer:消息生产者,就是投递消息的程序。
- consumer:消息消费者,就是接受消息的程序。
- channel:消息通道,在客户端的每个连接里,可建立多个channel,每个channel代表一个会话任务。
消息队列的使用过程大概如下:
-
客户端连接到消息队列服务器,打开一个channel。
-
客户端声明一个exchange,并设置相关属性。
-
客户端声明一个queue,并设置相关属性。
-
客户端使用routing key,在exchange和queue之间建立好绑定关系。
-
客户端投递消息到exchange。
exchange接收到消息后,就根据消息的key和已经设置的binding,进行消息路由,将消息投递到一个或多个队列里。
Springboot整合RabbitMQ
1、添加pom.xml依赖
<?xml version="1.0" encoding="UTF-8"?>
<project xmlns="http://maven.apache.org/POM/4.0.0" xmlns:xsi="http://www.w3.org/2001/XMLSchema-instance"
         xsi:schemaLocation="http://maven.apache.org/POM/4.0.0 https://maven.apache.org/xsd/maven-4.0.0.xsd">
    <modelVersion>4.0.0</modelVersion>
    <parent>
        <groupId>org.springframework.boot</groupId>
        <artifactId>spring-boot-starter-parent</artifactId>
        <version>2.2.2.RELEASE</version>
        <relativePath/> <!-- lookup parent from repository -->
    </parent>
    <groupId>com.example</groupId>
    <artifactId>rabbitmq01</artifactId>
    <version>0.0.1-SNAPSHOT</version>
    <name>rabbitmq01</name>
    <description>Demo project for Spring Boot</description>

    <properties>
        <java.version>1.8</java.version>
    </properties>

    <dependencies>
        <dependency>
            <groupId>org.springframework.boot</groupId>
            <artifactId>spring-boot-starter-web</artifactId>
        </dependency>
        <dependency>
            <groupId>org.springframework.boot</groupId>
            <artifactId>spring-boot-starter</artifactId>
        </dependency>

        <dependency>

            <groupId>org.projectlombok</groupId>
            <artifactId>lombok</artifactId>
            <optional>true</optional>
        </dependency>
        <dependency>
            <groupId>org.springframework.boot</groupId>
            <artifactId>spring-boot-starter-test</artifactId>
            <scope>test</scope>
            <exclusions>
                <exclusion>
                    <groupId>org.junit.vintage</groupId>
                    <artifactId>junit-vintage-engine</artifactId>
                </exclusion>
            </exclusions>
        </dependency>
        <dependency>
            <groupId>org.springframework.boot</groupId>
            <artifactId>spring-boot-starter-amqp</artifactId>
        </dependency>

    </dependencies>

    <build>
        <plugins>
            <plugin>
                <groupId>org.springframework.boot</groupId>
                <artifactId>spring-boot-maven-plugin</artifactId>
            </plugin>
        </plugins>
    </build>

</project>
2、application.yml配置文件主要是对rabbimq的配置信息
server:
  port: 8081

spring:
  application:
    name: rabbitmq01   //springBoot 模块名
  rabbitmq:
    host: localhost  //本机地址
    port: 5672
    username: guest
    password: guest
3、初始化创建队列、转发器,并把队列绑定到转发器(RabbitConfig.java)
package com.example.rabbitmq01.config;
import org.springframework.amqp.core.*;
import org.springframework.boot.SpringApplication;
import org.springframework.context.annotation.Bean;
import org.springframework.context.annotation.Configuration;

@Configuration
public class RabbitConfig {

    @Bean
    public Queue helloQueue() {
        return new Queue("hello");
    }

    @Bean
    public Queue userQueue() {
        return new Queue("user");
    }

    //===============以下是验证topic Exchange的队列==========
    @Bean
    public Queue queueMessage() {
        return new Queue("topic.message");
    }

    @Bean
    public Queue queueMessages() {
        return new Queue("topic.messages");
    }
    //===============以上是验证topic Exchange的队列==========


    //===============以下是验证Fanout Exchange的队列==========
    @Bean
    public Queue AMessage() {
        return new Queue("fanout.A");
    }

    @Bean
    public Queue BMessage() {
        return new Queue("fanout.B");
    }

    @Bean
    public Queue CMessage() {
        return new Queue("fanout.C");
    }
    //===============以上是验证Fanout Exchange的队列==========


    @Bean
    TopicExchange exchange() {
        return new TopicExchange("exchange");
    }

    @Bean
    FanoutExchange fanoutExchange() {
        return new FanoutExchange("fanoutExchange");
    }

    /**
     * 将队列topic.message与exchange绑定,binding_key为topic.message,就是完全匹配
     *
     * @param queueMessage
     * @param exchange
     * @return
     */
    @Bean
    Binding bindingExchangeMessage(Queue queueMessage, TopicExchange exchange) {
        return BindingBuilder.bind(queueMessage).to(exchange).with("topic.message");
    }

    /**
     * 将队列topic.messages与exchange绑定,binding_key为topic.#,模糊匹配
     *
     * @param queueMessage
     * @param exchange
     * @return
     */
    @Bean
    Binding bindingExchangeMessages(Queue queueMessages, TopicExchange exchange) {
        return BindingBuilder.bind(queueMessages).to(exchange).with("topic.#");
    }

    @Bean
    Binding bindingExchangeA(Queue AMessage, FanoutExchange fanoutExchange) {
        return BindingBuilder.bind(AMessage).to(fanoutExchange);
    }

    @Bean
    Binding bindingExchangeB(Queue BMessage, FanoutExchange fanoutExchange) {
        return BindingBuilder.bind(BMessage).to(fanoutExchange);
    }

    @Bean
    Binding bindingExchangeC(Queue CMessage, FanoutExchange fanoutExchange) {
        return BindingBuilder.bind(CMessage).to(fanoutExchange);
    }
}
4、最简单的hello生产和消费实现(单生产者和单消费者)
生产者:
package com.example.rabbitmq01.hello;

import org.slf4j.Logger;
import org.slf4j.LoggerFactory;
import org.springframework.amqp.core.AmqpTemplate;
import org.springframework.beans.factory.annotation.Autowired;
import org.springframework.stereotype.Component;

import java.util.Date;

@Component
public class HelloSender {

    private static final Logger log = LoggerFactory.getLogger(HelloSender.class);

    @Autowired
    public AmqpTemplate amqpTemplate;

    public void send(){
        String context = "hello " + new Date();
        log.info("Sender:" + context);
        this.amqpTemplate.convertAndSend("hello",context);
        amqpTemplate.convertAndSend("testEx", "hello2", "C罗进球数后来居上,皇马在欧冠差点被尤文翻盘,悬啊");
    }
}
消费者:
package com.example.rabbitmq01.hello;

import org.slf4j.Logger;
import org.slf4j.LoggerFactory;
import org.springframework.amqp.rabbit.annotation.RabbitListener;
import org.springframework.stereotype.Component;

@Component
public class HelloReceiver {

    private static final Logger log = LoggerFactory.getLogger(HelloReceiver.class);

    //监听器监听指定的Queue
    @RabbitListener(queues="hello")
    public void process(String hello){
        log.info("Receiver:"+hello);

    }

}
controller测试:
package com.example.rabbitmq01.controller;

import com.example.rabbitmq01.hello.HelloSender;
import org.springframework.beans.factory.annotation.Autowired;
import org.springframework.web.bind.annotation.RequestMapping;
import org.springframework.web.bind.annotation.RestController;

@RestController
public class RabbitOneToOneTest {

    @Autowired
    private HelloSender helloSender;

    @RequestMapping("/hello")
    public void hello(){
        helloSender.send();
    }
}
启动程序,执行:
http://localhost:8081/hello
结果如下:


 1048
1048

 被折叠的 条评论
为什么被折叠?
被折叠的 条评论
为什么被折叠?
 到【灌水乐园】发言


