手写一个函数式弹窗挂载点

一、思路来源

来源网站
这个作者在掘金写了一篇文章介绍他/她的思路,我觉得有点意思,就去他的demo网站看看,很好玩,于是决定自己写一个试试。
不想写的,可以直接引用他/她的代码。

二、代码

这段时间正在搞用jsx写vue3,就用jsx写了

import {defineComponent, Teleport, ref, computed, provide,} from "vue";
import {NButton, NIcon,} from "naive-ui"
import {CloseOutlined,} from "@vicons/antd"
import {MdRefresh, MdClose,} from "@vicons/ionicons4"
import {FullscreenTwotone, ArrowBackRound,} from "@vicons/material"
import {nanoid} from 'nanoid'

/*
* 思路来源:http://admin-react-antd.eluxjs.com/
* 多个弹窗,只显示最后一个的内容,支持后退和全屏
* */

interface modelItemType {
    id: string,  // 代表数据的唯一ID
    title: Function | String,   // 标题可以是文字,也可以是函数返回jsx
    content: Function,   // 内容必须是函数,返回jsx
    footer?: Function | undefined,   // 底部操作区,可以是函数返回jsx,或者没有
    onOK?: Function | undefined,      // 点击确定按钮
    onCancel?: Function | undefined,        // 点击取消按钮
    okText?: String | undefined,  // 确认按钮文字
    cancelText?: String | undefined,    // 取消文字
    loading?: boolean,  // 加载状态
    refreshFunc?:Function | undefined,   // 刷新方法
}

export default defineComponent({
    name: "mymodel",
    setup(_p, {slots}) {

        const isfullscreen = ref(false)
        const defaultItem: modelItemType = {
            id: "",
            title: "",
            content: () => {
            },
            loading: false,
            okText: "确 定",
            cancelText: "取 消",
        }
        const modelList = ref<Array<modelItemType>>([])   // 所有弹窗的列表
        const lastmodel = computed(() => {
            if (modelList.value.length > 0) {
                return modelList.value[modelList.value.length - 1]
            } else {
                return null
            }
        })
        // 删除最后一个弹窗元素
        const removeLastModel = () => {
            if (modelList.value.length === 1) {
                modelList.value = []
                 isfullscreen.value = false
            } else {
                modelList.value.splice(modelList.value.length - 1, 1)
            }
        }
        // 清空列表
        const clearmodellist=()=>{
            modelList.value = []
             isfullscreen.value = false
        }
        // 点击确定按钮
        const handleClick1 = () => {
            const result = lastmodel.value?.onOK && lastmodel.value?.onOK()
            if (result === undefined || result === null || result) {
                removeLastModel()
            }
        }
        // 点击取消按钮
        const handleClick2 = () => {
            const result = lastmodel.value?.onCancel && lastmodel.value?.onCancel()
            if (result === undefined || result === null || result) {
                removeLastModel()
            }
        }
        // 点击全屏
        const setFullscreen=()=>{
            isfullscreen.value = !isfullscreen.value
        }
        // 点击刷新
        const  shauxin=()=>{
            lastmodel.value?.refreshFunc && lastmodel.value?.refreshFunc()
        }

        // 向列表添加新的弹窗,生成唯一ID,删除的时候根据唯一ID删除
        const addModelItem = (Item: modelItemType): modelItemType => {
            const itemid = nanoid()
            const item = {
                ...defaultItem, ...Item, id: itemid, destroy: () => {
                    modelList.value.forEach((item, index) => {
                        if (item.id === itemid) {
                            modelList.value.splice(index, 1)
                        }
                    })
                }
            }
            modelList.value.push(item)
            // 将完整的实例返回
            return modelList.value[modelList.value.length - 1]
        }

        // 将添加方法注入到所有子元素当中
        provide("addModelItem", addModelItem)
        return () => (
            <div class="w-full h-full">
                {slots.default ? slots.default() : null}
                {lastmodel.value ? <Teleport to="body">
                    <div class={[isfullscreen.value ? "" : "juzhong1","fixed inset-0 z-1000 bg-gray-400 bg-opacity-80"]}>
                        <div
                            class={[isfullscreen.value ? "absolute left-0 top-0 w-screen h-screen z-2000" : "min-w-600px w-1/2 max-h-9/10 rounded-2xl" ,  " flex flex-col relative bg-white border-2 border-black border-opacity-50  overflow-hidden"]}>
                            <div class="w-full bg-white flex relative border-b border-gray-400">
                                <div class="flex-1 h-10 text-left leading-10 pl-10px text-lg font-semibold">
                                    {typeof lastmodel.value.title === "function" ? lastmodel.value.title() :
                                        <span>{lastmodel.value.title}</span>}
                                </div>
                                <div class="h-10">
                                    <NIcon size={25} class="text-white hover:text-blue-500 bg-black cursor-pointer" onClick={removeLastModel}>
                                        <ArrowBackRound/>
                                    </NIcon>
                                    <NIcon size={25} class="text-white hover:text-blue-500 bg-black cursor-pointer" onClick={shauxin}>
                                        <MdRefresh/>
                                    </NIcon>
                                    <NIcon size={25} class="text-white hover:text-blue-500 bg-black cursor-pointer" onClick={setFullscreen}>
                                        <FullscreenTwotone/>
                                    </NIcon>
                                    <NIcon size={25} class="text-white hover:text-blue-500 bg-black cursor-pointer" onClick={clearmodellist}>
                                        <MdClose />
                                    </NIcon>
                                </div>
                            </div>
                            <div class={[isfullscreen.value ? "flex-1" : "" , "w-full py-2 px-10px overflow-y-auto"]}>
                                {lastmodel.value.content()}
                            </div>
                            <div class="w-full border-t border-gray-400 p-10px">
                                {lastmodel.value.footer ? lastmodel.value.footer() :
                                    <div class="w-full flex justify-end items-center">
                                        <NButton onclick={handleClick1}
                                                 class="mx-5px">{lastmodel.value?.cancelText || "取 消"}</NButton>
                                        <NButton onclick={handleClick2} type={"primary"}
                                                 class="mx-5px">{lastmodel.value?.okText || "确 认"}</NButton>
                                    </div>}
                            </div>
                            {lastmodel.value?.loading ?<div class="absolute inset-0 bg-gray-400 bg-opacity-30 juzhong1">
                                    <span>loading</span>
                                </div> : null}
                        </div>
                    </div>
                </Teleport> : null}
            </div>

        )
    },
})

三、使用

1.首先将这个组件挂载到顶级组件上面,我挂载到App.tsx

其他外层标签
<MyModelList>
其他内层标签
<router-view></router-view>
其他内层标签
</MyModelList>
其他外层标签

2.写一个hook函数

import {inject} from "vue";

export default function ():Function {
    return inject("addModelItem")!
}

3.在需要的组件内引入hook,

 setup() {
 		// getModelAction这个就是hook函数,也可以直接写inject,
        const modelAction = getModelAction()
        // 第二个弹窗
        const additem=(num:number)=>{
            modelAction({
                id: "",
                title: "测试标题" + num,
                content: () => (
                    <div>
                        <div>主要内容</div>
                        <div>主要内容</div>
                        <div>主要内容</div>
                        <div>主要内容</div>
                        <div>主要内容</div>
                        <div>主要内容</div>
                        <div>主要内容</div>
                        <div>主要内容</div>
                        <div>主要内容</div>
                        <div>主要内容</div>
                        <div>主要内容</div>
                        <div>主要内容</div>
                        <div>主要内容</div>
                        <div>主要内容</div>
                        <div>主要内容</div>
                        <div>主要内容</div>
                        <div>主要内容</div>
                        <div>主要内容</div>
                        <div>主要内容</div>
                        <div>主要内容</div>
                        <div>主要内容</div>
                        <div>主要内容</div>
                        <div>主要内容</div>
                        <div>主要内容</div>
                        <div>主要内容</div>
                        <div>主要内容</div>
                        <div>主要内容</div>
                        <div>主要内容</div>
                        <div>主要内容</div>
                        <div>主要内容</div>
                        <div>主要内容</div>
                        <div>主要内容</div>
                        <div>主要内容</div>
                        <div>主要内容</div>
                        <div>主要内容</div>
                        <div>主要内容</div>
                        <div>主要内容</div>
                        <div>主要内容</div>
                        <div>主要内容</div>
                        <div>主要内容</div>
                        <div>主要内容</div>
                        <div>主要内容</div>
                        <div>主要内容</div>
                        <div>主要内容</div>
                        <div>主要内容</div>
                        <div>主要内容</div>
                        <div>主要内容</div>
                        <div>主要内容</div>
                    </div>
                ),
            })
        }
        // 第一个弹窗,将这个函数挂载到某个按钮上就行了
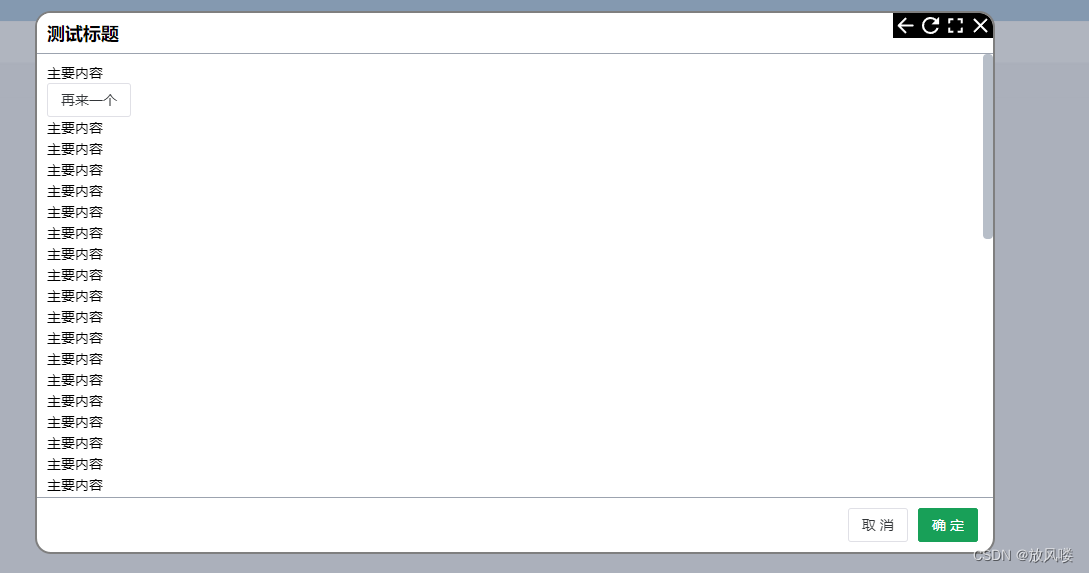
        const handleClick = () => {
            console.log("点击测试")
            const a = modelAction({
                id: "",
                title: "测试标题",
                content: () => (
                    <div>
                        <div>主要内容</div>
                        <div>
                            <NButton onClick={() => additem(5)}>再来一个</NButton>
                        </div>
                        <div>主要内容</div>
                        <div>主要内容</div>
                        <div>主要内容</div>
                        <div>主要内容</div>
                        <div>主要内容</div>
                        <div>主要内容</div>
                        <div>主要内容</div>
                        <div>主要内容</div>
                        <div>主要内容</div>
                        <div>主要内容</div>
                        <div>主要内容</div>
                        <div>主要内容</div>
                        <div>主要内容</div>
                        <div>主要内容</div>
                        <div>主要内容</div>
                        <div>主要内容</div>
                        <div>主要内容</div>
                        <div>主要内容</div>
                        <div>主要内容</div>
                        <div>主要内容</div>
                        <div>主要内容</div>
                        <div>主要内容</div>
                        <div>主要内容</div>
                        <div>主要内容</div>
                        <div>主要内容</div>
                        <div>主要内容</div>
                        <div>主要内容</div>
                        <div>主要内容</div>
                        <div>主要内容</div>
                        <div>主要内容</div>
                        <div>主要内容</div>
                        <div>主要内容</div>
                        <div>主要内容</div>
                        <div>主要内容</div>
                        <div>主要内容</div>
                        <div>主要内容</div>
                        <div>主要内容</div>
                        <div>主要内容</div>
                        <div>主要内容</div>
                        <div>主要内容</div>
                        <div>主要内容</div>
                        <div>主要内容</div>
                        <div>主要内容</div>
                        <div>主要内容</div>
                        <div>主要内容</div>
                        <div>主要内容</div>
                        <div>主要内容</div>
                    </div>
                ),
            })
        }

jsx的写法方便写内容,

四、图片

在这里插入图片描述
在这里插入图片描述

好的,我可以帮你手写一个基于Vue3的弹窗拖拽组件示例代码。 首先,你需要安装Vue3: ``` npm install vue@next ``` 然后,创建一个Draggable.vue组件,代码如下: ```vue <template> <div class="draggable" :style="{ left: left + 'px', top: top + 'px' }"> <div class="title" @mousedown="dragStart"> {{ title }} </div> <div class="content"> <slot /> </div> </div> </template> <script> import { ref } from 'vue'; export default { props: { title: { type: String, default: '', }, }, setup(props, { emit }) { const left = ref(0); const top = ref(0); let startX, startY, offsetX, offsetY; function dragStart(e) { startX = e.clientX; startY = e.clientY; offsetX = left.value; offsetY = top.value; document.addEventListener('mousemove', drag); document.addEventListener('mouseup', dragEnd); } function drag(e) { const moveX = e.clientX - startX; const moveY = e.clientY - startY; left.value = offsetX + moveX; top.value = offsetY + moveY; } function dragEnd() { document.removeEventListener('mousemove', drag); document.removeEventListener('mouseup', dragEnd); } return { left, top, dragStart, }; }, }; </script> <style scoped> .draggable { position: absolute; width: 300px; height: 200px; background-color: #fff; border: 1px solid #ccc; box-shadow: 1px 1px 5px #ccc; } .title { cursor: move; padding: 10px; background-color: #eee; border-bottom: 1px solid #ccc; } .content { padding: 10px; } </style> ``` 在上面的代码中,我们使用了Vue3的Composition API来实现拖拽功能,使用了ref来定义left和top变量,使用了setup函数来定义组件逻辑。在dragStart函数中,我们记录了鼠标按下时的坐标和弹窗的偏移量,在drag函数中计算出弹窗的新位置,最后在dragEnd函数中移除了鼠标移动事件。 使用这个组件非常简单,只需要在父组件中引入Draggable组件,然后使用类似于普通的HTML标签的方式来使用它,例如: ```vue <template> <div> <button @click="showDialog = true">打开弹窗</button> <draggable v-if="showDialog" title="弹窗标题"> <p>这是弹窗内容</p> <button @click="showDialog = false">关闭弹窗</button> </draggable> </div> </template> <script> import Draggable from './Draggable.vue'; export default { components: { Draggable, }, data() { return { showDialog: false, }; }, }; </script> ``` 在上面的代码中,我们在父组件中引入了Draggable组件,并在父组件的data对象中定义了一个showDialog变量来控制弹窗的显示和隐藏。当击打开弹窗按钮时,showDialog变量会被设置为true,从而显示弹窗;当弹窗内的关闭按钮时,showDialog变量会被设置为false,从而隐藏弹窗。 希望这个示例可以帮助你手写一个基于Vue3的弹窗拖拽组件!
评论 1
成就一亿技术人!
拼手气红包6.0元
还能输入1000个字符
 
红包 添加红包
表情包 插入表情
 条评论被折叠 查看
添加红包

请填写红包祝福语或标题

红包个数最小为10个

红包金额最低5元

当前余额3.43前往充值 >
需支付:10.00
成就一亿技术人!
领取后你会自动成为博主和红包主的粉丝 规则
hope_wisdom
发出的红包
实付
使用余额支付
点击重新获取
扫码支付
钱包余额 0

抵扣说明:

1.余额是钱包充值的虚拟货币,按照1:1的比例进行支付金额的抵扣。
2.余额无法直接购买下载,可以购买VIP、付费专栏及课程。

余额充值