


1.基础了解
Redis事务的本质是一组命令的集合。
事务支持一次性执行多个命令,一个事务中所有命令都会被序列化。
在事务执行过程,会按照顺序串行化执行队列中的命令,其他客户端提交的命令请求不会插入到事务执行命令序列中。
总结说:redis事务就是一次性、顺序性、排他性的执行一个队列中的一系列命令。
Redis事务是没有隔离级别的概念的:
批量操作在发送 EXEC 命令前被放入队列缓存,并不会被实际执行,事务内可以查询到数据事务外则不行
Redis事务不保证原子性:
Redis中,单条命令是原子性执行的,但事务不保证原子性,且没有回滚。事务中任意命令执行失败,其余的命令仍会被执行。
Redis事务的三个阶段:
开始事务
命令入队
执行事务
Redis事务相关命令:
watch key1 key2 … : 监视一或多个key,如果在事务执行之前,被监视的key被其他命令改动,则事务被打断 ( 类似乐观锁 )
multi : 标记一个事务块的开始( queued )
exec : 执行所有事务块的命令 ( 一旦执行exec后,之前加的监控锁都会被取消掉 )
discard : 取消事务,放弃事务块中的所有命令
unwatch : 取消watch对所有key的监控
2.环境
        <!-- RedisTemplate -->
        <dependency>
            <groupId>org.springframework.boot</groupId>
            <artifactId>spring-boot-starter-data-redis</artifactId>
        </dependency>
spring:
  redis:
    host: 192.168.8.128
    port: 6379
    password: 1234
    database: 0
    timeout: 3000
    jedis:
      pool:
        max-wait: -1
        max-active: -1
        max-idle: 20
        min-idle: 10

3.Redis配置
package com.yzm.redis03.config;

import com.fasterxml.jackson.annotation.JsonAutoDetect;
import com.fasterxml.jackson.annotation.JsonInclude;
import com.fasterxml.jackson.annotation.JsonTypeInfo;
import com.fasterxml.jackson.annotation.PropertyAccessor;
import com.fasterxml.jackson.core.JsonGenerator;
import com.fasterxml.jackson.core.JsonParser;
import com.fasterxml.jackson.databind.*;
import com.fasterxml.jackson.datatype.jsr310.JavaTimeModule;
import org.springframework.context.annotation.Bean;
import org.springframework.context.annotation.Configuration;

import java.io.IOException;
import java.text.SimpleDateFormat;
import java.time.LocalDateTime;
import java.time.format.DateTimeFormatter;

@Configuration
public class ObjectMapperConfig {

    private static final String PATTERN = "yyyy-MM-dd HH:mm:ss";

    @Bean(name = "myObjectMapper")
    public ObjectMapper objectMapper() {
        JavaTimeModule javaTimeModule = new JavaTimeModule();
        javaTimeModule.addSerializer(LocalDateTime.class, new LocalDateTimeSerializer());
        javaTimeModule.addDeserializer(LocalDateTime.class, new LocalDateTimeDeserializer());
        return new ObjectMapper()
                // 转换为格式化的json(控制台打印时,自动格式化规范)
                //.enable(SerializationFeature.INDENT_OUTPUT)
                // Include.ALWAYS  是序列化对像所有属性(默认)
                // Include.NON_NULL 只有不为null的字段才被序列化,属性为NULL 不序列化
                // Include.NON_EMPTY 如果为null或者 空字符串和空集合都不会被序列化
                // Include.NON_DEFAULT 属性为默认值不序列化
                .setSerializationInclusion(JsonInclude.Include.NON_NULL)
                // 如果是空对象的时候,不抛异常
                .configure(SerializationFeature.FAIL_ON_EMPTY_BEANS, false)
                // 反序列化的时候如果多了其他属性,不抛出异常
                .configure(DeserializationFeature.FAIL_ON_UNKNOWN_PROPERTIES, false)
                // 取消时间的转化格式,默认是时间戳,可以取消,同时需要设置要表现的时间格式
                .configure(SerializationFeature.WRITE_DATES_AS_TIMESTAMPS, false)
                .setDateFormat(new SimpleDateFormat(PATTERN))
                // 对LocalDateTime序列化跟反序列化
                .registerModule(javaTimeModule)

                .setVisibility(PropertyAccessor.ALL, JsonAutoDetect.Visibility.ANY)
                // 此项必须配置,否则会报java.lang.ClassCastException: java.util.LinkedHashMap cannot be cast to XXX
                .enableDefaultTyping(ObjectMapper.DefaultTyping.NON_FINAL, JsonTypeInfo.As.PROPERTY)
                ;
    }

    static class LocalDateTimeSerializer extends JsonSerializer<LocalDateTime> {
        @Override
        public void serialize(LocalDateTime value, JsonGenerator gen, SerializerProvider serializers) throws IOException {
            gen.writeString(value.format(DateTimeFormatter.ofPattern(PATTERN)));
        }
    }

    static class LocalDateTimeDeserializer extends JsonDeserializer<LocalDateTime> {
        @Override
        public LocalDateTime deserialize(JsonParser p, DeserializationContext deserializationContext) throws IOException {
            return LocalDateTime.parse(p.getValueAsString(), DateTimeFormatter.ofPattern(PATTERN));
        }
    }
}
package com.yzm.redis03.config;

import com.fasterxml.jackson.databind.ObjectMapper;
import org.springframework.cache.CacheManager;
import org.springframework.context.annotation.Bean;
import org.springframework.context.annotation.Configuration;
import org.springframework.data.redis.cache.RedisCacheConfiguration;
import org.springframework.data.redis.cache.RedisCacheManager;
import org.springframework.data.redis.cache.RedisCacheWriter;
import org.springframework.data.redis.connection.RedisConnectionFactory;
import org.springframework.data.redis.core.*;
import org.springframework.data.redis.serializer.Jackson2JsonRedisSerializer;
import org.springframework.data.redis.serializer.RedisSerializationContext;
import org.springframework.data.redis.serializer.StringRedisSerializer;

import javax.annotation.Resource;
import java.time.Duration;

@Configuration
public class RedisConfig {

    @Resource(name = "myObjectMapper")
    private ObjectMapper objectMapper;

    /**
     * redisTemplate配置
     */
    @Bean
    public RedisTemplate<String, Object> redisTemplate(RedisConnectionFactory factory) {
        RedisTemplate<String, Object> template = new RedisTemplate<>();
        // 配置连接工厂
        template.setConnectionFactory(factory);

        Jackson2JsonRedisSerializer<Object> jacksonSerializer = jackson2JsonRedisSerializer();
        StringRedisSerializer stringRedisSerializer = new StringRedisSerializer();

        // 使用StringRedisSerializer来序列化和反序列化redis的key,value采用json序列化
        template.setKeySerializer(stringRedisSerializer);
        template.setValueSerializer(jacksonSerializer);

        // 设置hash key 和value序列化模式
        template.setHashKeySerializer(stringRedisSerializer);
        template.setHashValueSerializer(jacksonSerializer);
        template.afterPropertiesSet();

        //支持事务
        //template.setEnableTransactionSupport(true);

        return template;
    }

    private Jackson2JsonRedisSerializer<Object> jackson2JsonRedisSerializer() {
        //使用Jackson2JsonRedisSerializer来序列化和反序列化redis的value值(默认使用JDK的序列化方式)
        Jackson2JsonRedisSerializer<Object> jacksonSerializer = new Jackson2JsonRedisSerializer<>(Object.class);
        jacksonSerializer.setObjectMapper(objectMapper);
        return jacksonSerializer;
    }
}
4.事务支持
首先看下开启事务支持的示例
    public void test01() {
    	// 开启事务支持
        redisTemplate.setEnableTransactionSupport(true);
        redisTemplate.multi();
        redisTemplate.opsForValue().set("k1", "v1");
        redisTemplate.opsForValue().set("k2", "v2");
        redisTemplate.opsForValue().get("k2");
        redisTemplate.opsForValue().set("k3", "v3");
        List<Object> exec = redisTemplate.exec();
        System.out.println("exec = " + exec);
    }
    @GetMapping("/test01")
    public void test01() {
        transactionUtils.test01();
    }
http://localhost:8080/test01
直接报错:ERR EXEC without MULTI
意思是说,没有启动事务,但这里启动了的redisTemplate.multi();
问题也就在redisTemplate.multi();这个方法上,通过底层源码可以发现该方法在最后会释放连接
导致multi()方法跟exec()方法不在同一连接上。
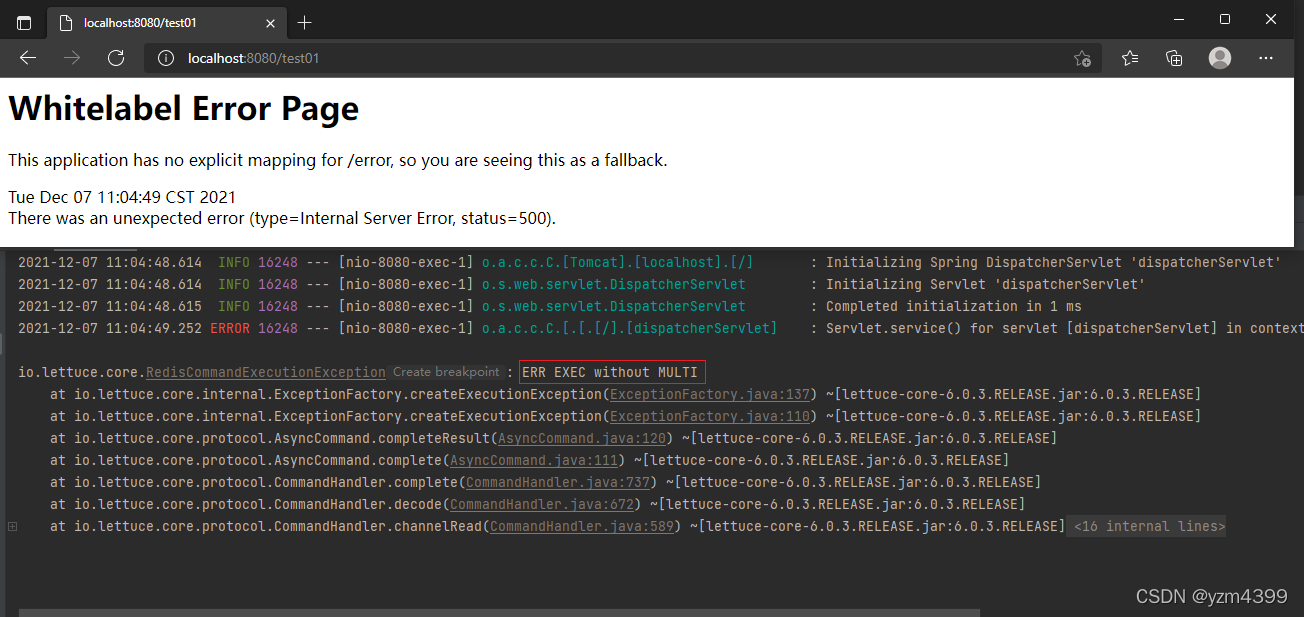
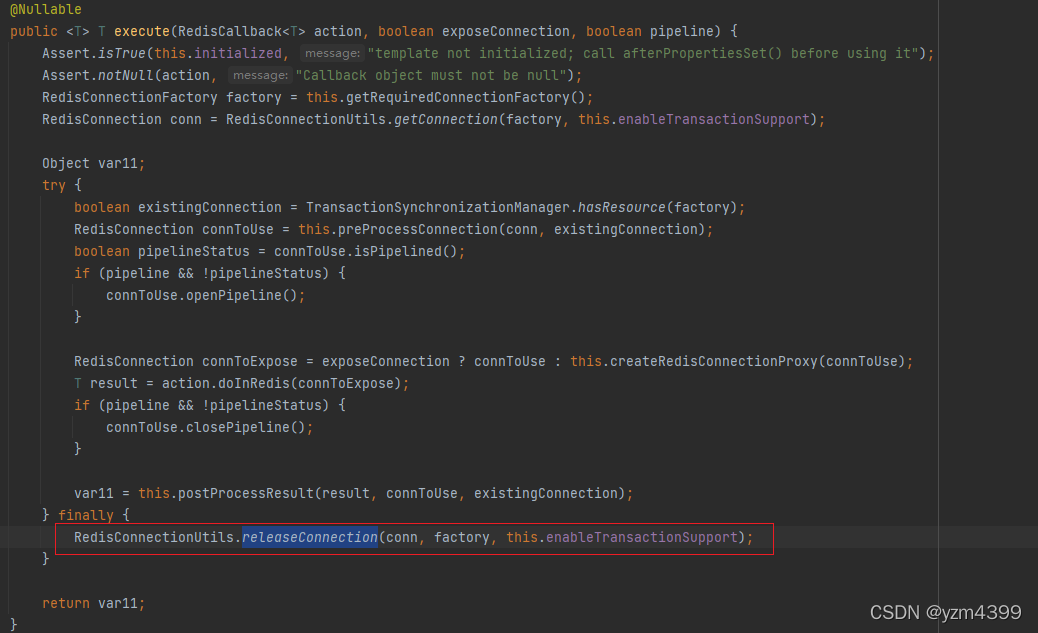
要想执行事务命令,必须在同一个连接上才行。
SessionCallback & RedisCallback 的作用是:让RedisTemplate进行回调,通过它们可以在同一条连接下执行多个Redis命令。
这里的Redis事务支持是基于SessionCallback实现的,RedisCallback这里不作演示。
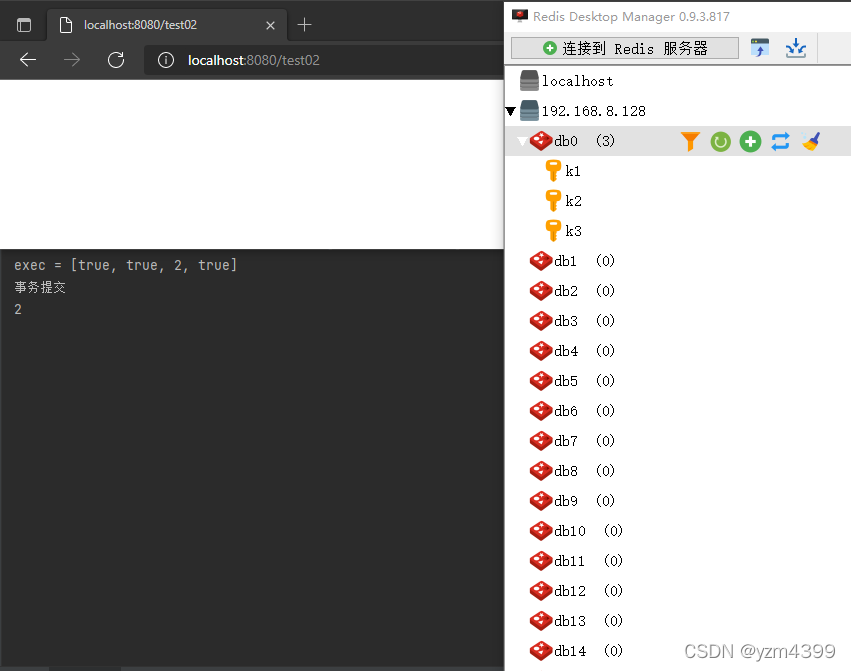
5.事务提交
    /**
     * 事务提交
     */
    public void test02() {
        SessionCallback<Object> callback = new SessionCallback<Object>() {
            @Override
            public Object execute(RedisOperations operations) throws DataAccessException {
                operations.multi();
                operations.opsForValue().set("k1", 1);
                operations.opsForValue().set("k2", 2);
                operations.opsForValue().get("k2");
                operations.opsForValue().set("k3", 3);
                List exec = operations.exec();
                System.out.println("exec = " + exec);
                return "事务提交";
            }
        };
        System.out.println(redisTemplate.execute(callback));
        System.out.println(redisTemplate.opsForValue().get("k2"));
    }
    @GetMapping("/test02")
    public void test02() {
        transactionUtils.test02();
    }
http://localhost:8080/test02
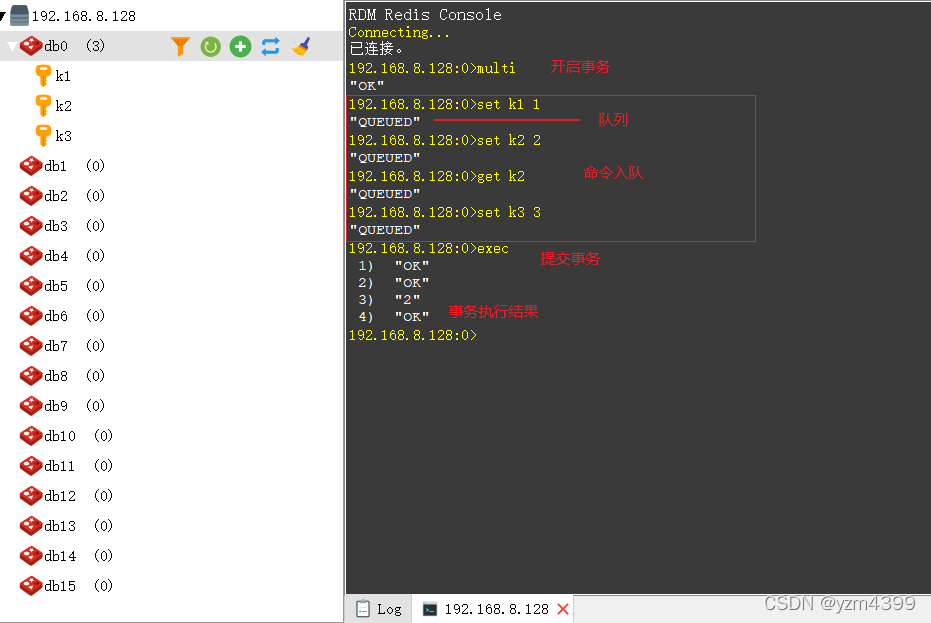
对应的redis操作
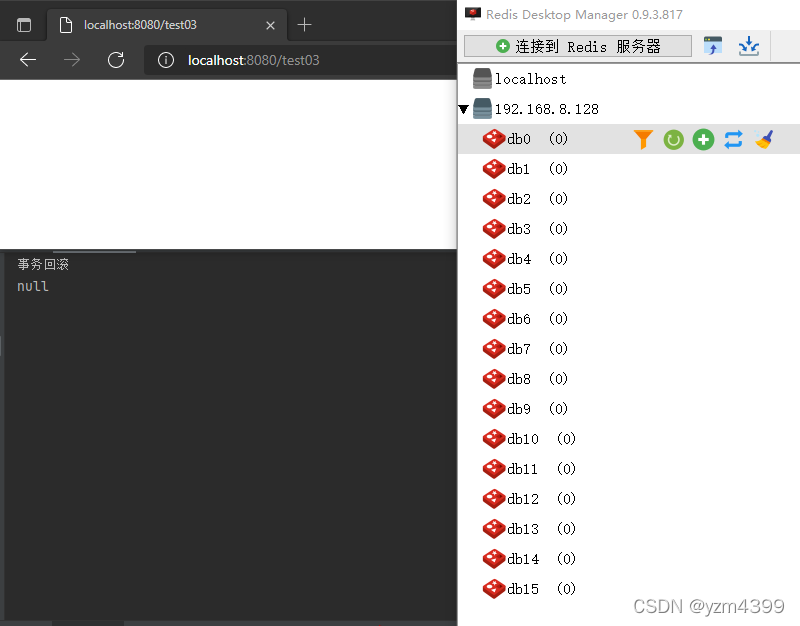
6.事务回滚
    /**
     * 事务回滚
     */
    public void test03() {
        SessionCallback<Object> callback = new SessionCallback<Object>() {
            @Override
            public Object execute(RedisOperations operations) throws DataAccessException {
                operations.multi();
                operations.opsForValue().set("k4", 4);
                operations.opsForValue().set("k5", 5);
                operations.discard();
                return "事务回滚";
            }
        };
        System.out.println(redisTemplate.execute(callback));
        System.out.println(redisTemplate.opsForValue().get("k4"));
    }
http://localhost:8080/test03
redis操作
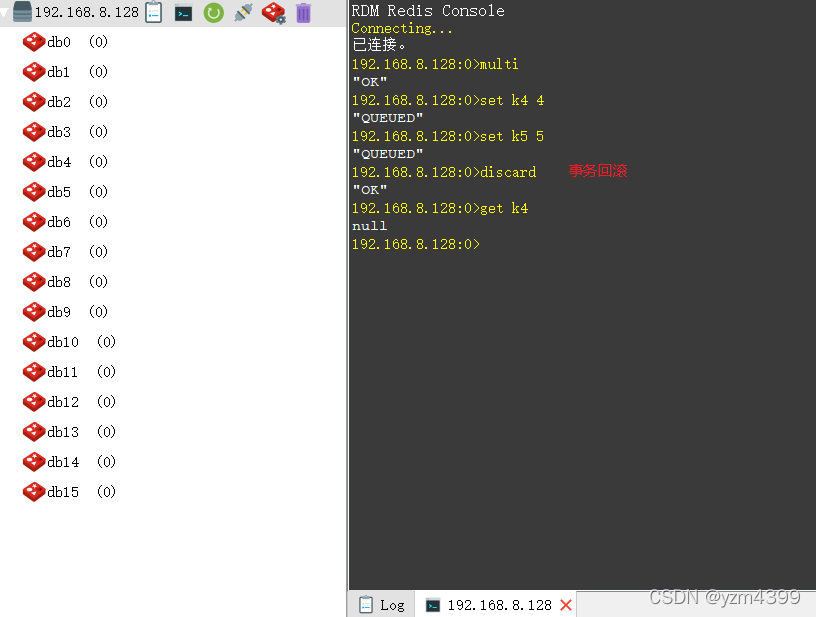
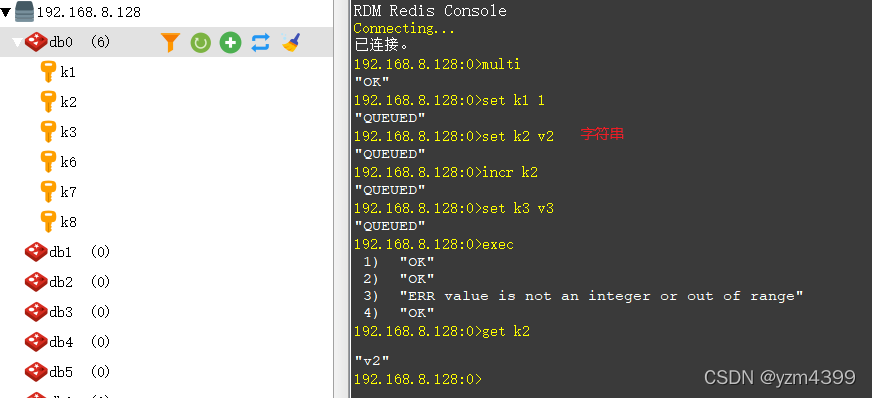
7.命令性事务回滚
错误的redis命令,导致事务回滚
在整合springboot中不会出现这样的错误,仅作了解即可
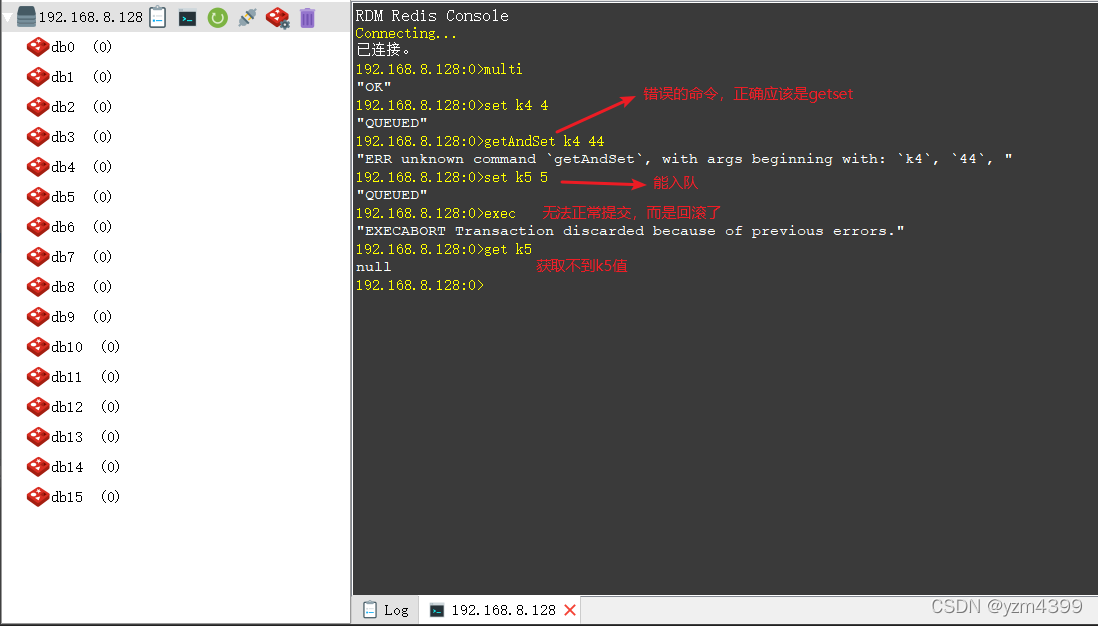
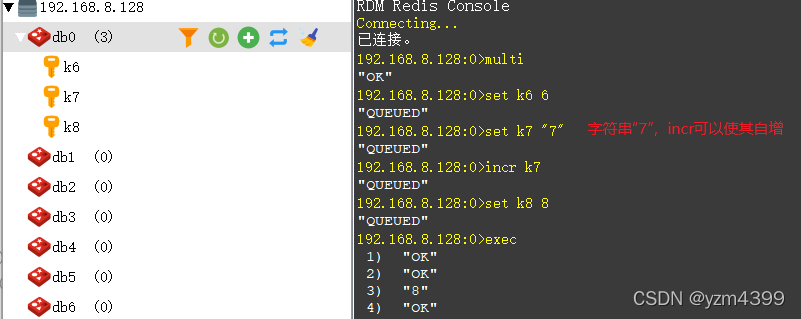
8.语法性事务提交
    /**
     * 语法错误
     */
    public void test04() {
        SessionCallback<Object> callback = new SessionCallback<Object>() {
            @Override
            public Object execute(RedisOperations operations) throws DataAccessException {
                operations.multi();
                operations.opsForValue().set("k6", 6);
                operations.opsForValue().set("k7", "7");
                // 字符串不能自增
                operations.opsForValue().increment("k7");
                operations.opsForValue().set("k8", 8);
                List exec = operations.exec();
                System.out.println("exec = " + exec);
                return "语法错误";
            }
        };
        System.out.println(redisTemplate.execute(callback));
        System.out.println(redisTemplate.opsForValue().get("k6"));
    }
http://localhost:8080/test04
语法性的错误并不会导致事务回滚,只是对应的命令不会执行而已,k7的值仍是"7"
redis操作
发现incr命令对数字字符串有效
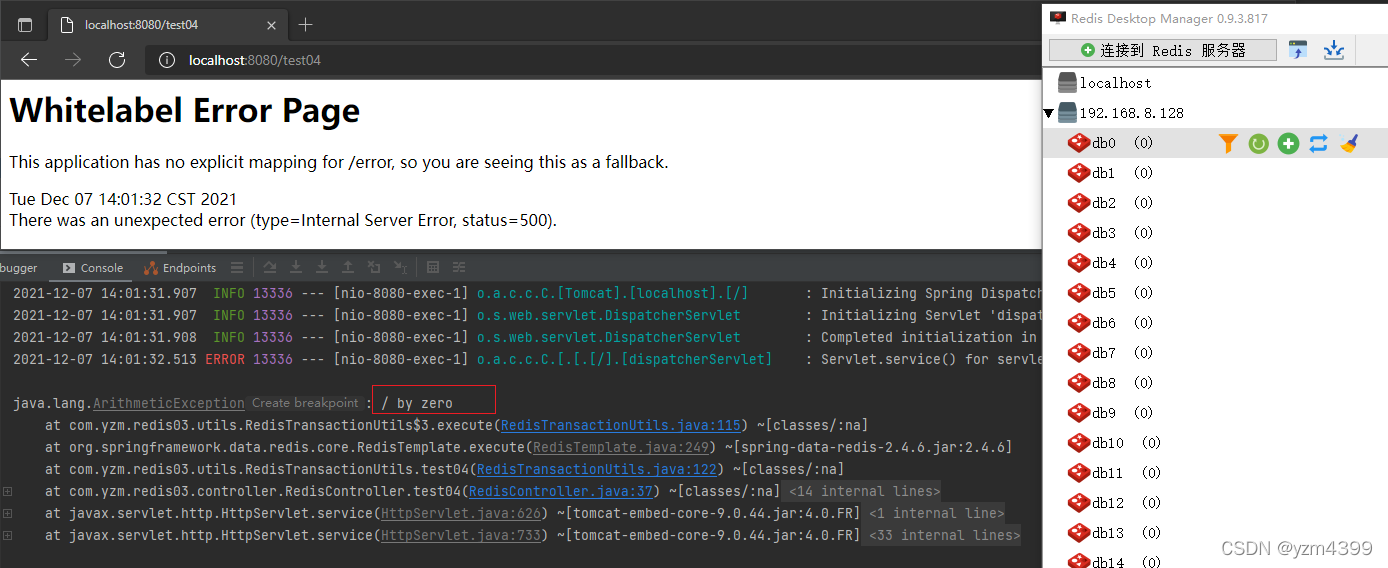
9.程序异常事务回滚
    public void test04() {
        SessionCallback<Object> callback = new SessionCallback<Object>() {
            @Override
            public Object execute(RedisOperations operations) throws DataAccessException {
                operations.multi();
                operations.opsForValue().set("k6", 6);
                operations.opsForValue().set("k7", "7");
//                operations.opsForValue().increment("k7");
                int i = 1 / 0;
                operations.opsForValue().set("k8", 8);
                List exec = operations.exec();
                System.out.println("exec = " + exec);
                return "语法错误";
            }
        };
        System.out.println(redisTemplate.execute(callback));
        System.out.println(redisTemplate.opsForValue().get("k6"));
    }
http://localhost:8080/test04
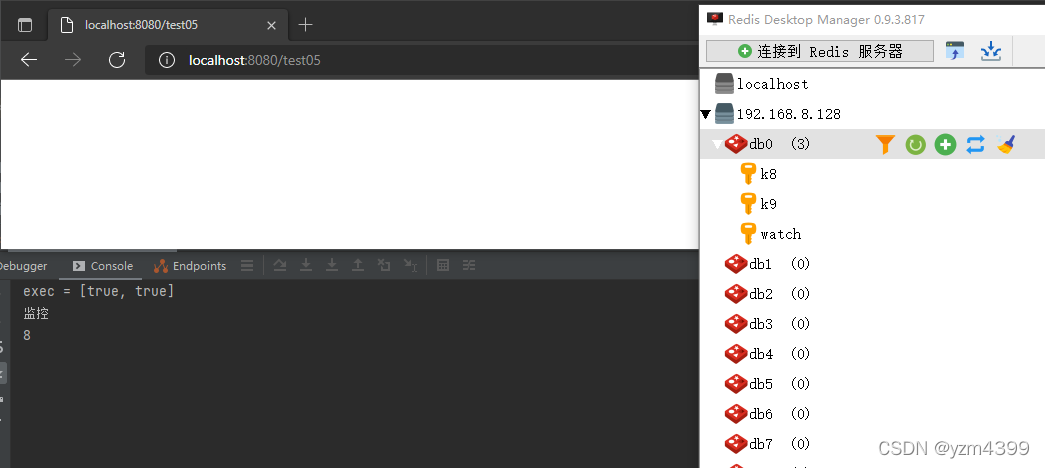
10.watch监控
正常事务提交
    public void test05() {
        redisTemplate.opsForValue().set("watch", "ok");
        SessionCallback<Object> callback = new SessionCallback<Object>() {
            @Override
            public Object execute(RedisOperations operations) throws DataAccessException {
                operations.watch("watch");
                operations.multi();
                operations.opsForValue().set("k8", 8);
                operations.opsForValue().set("k9", 9);
                List exec = operations.exec();
                System.out.println("exec = " + exec);
                return "监控";
            }
        };
        System.out.println(redisTemplate.execute(callback));
        System.out.println(redisTemplate.opsForValue().get("k8"));
    }
http://localhost:8080/test05
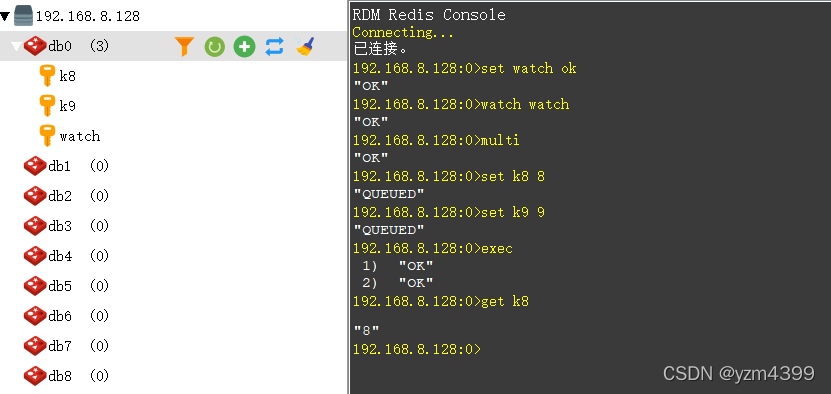
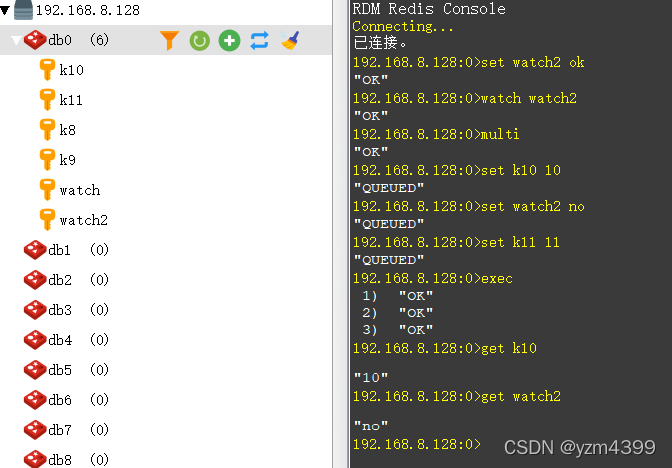
同一连接修改监控数据也能事务提交
    public void test06() {
        redisTemplate.opsForValue().set("watch2", "ok");
        SessionCallback<Object> callback = new SessionCallback<Object>() {
            @Override
            public Object execute(RedisOperations operations) throws DataAccessException {
                operations.watch("watch2");
                operations.multi();
                operations.opsForValue().set("k10", 10);
                // 修改
                operations.opsForValue().set("watch2", "no");
                operations.opsForValue().set("k11", 11);
                List exec = operations.exec();
                System.out.println("exec = " + exec);
                return "监控";
            }
        };
        System.out.println(redisTemplate.execute(callback));
        System.out.println(redisTemplate.opsForValue().get("k10"));
    }
http://localhost:8080/test06
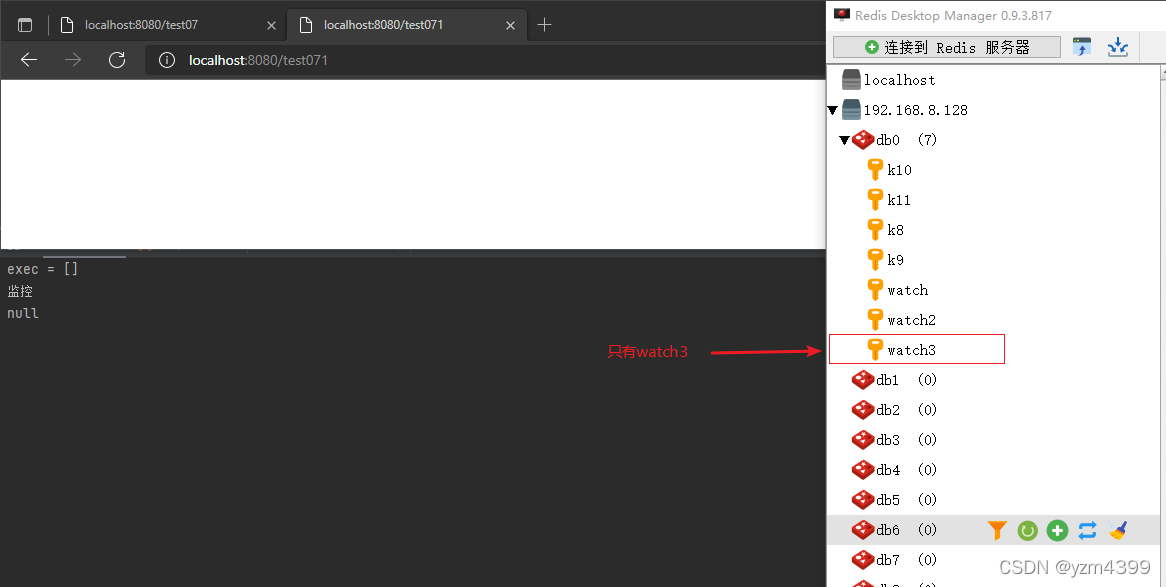
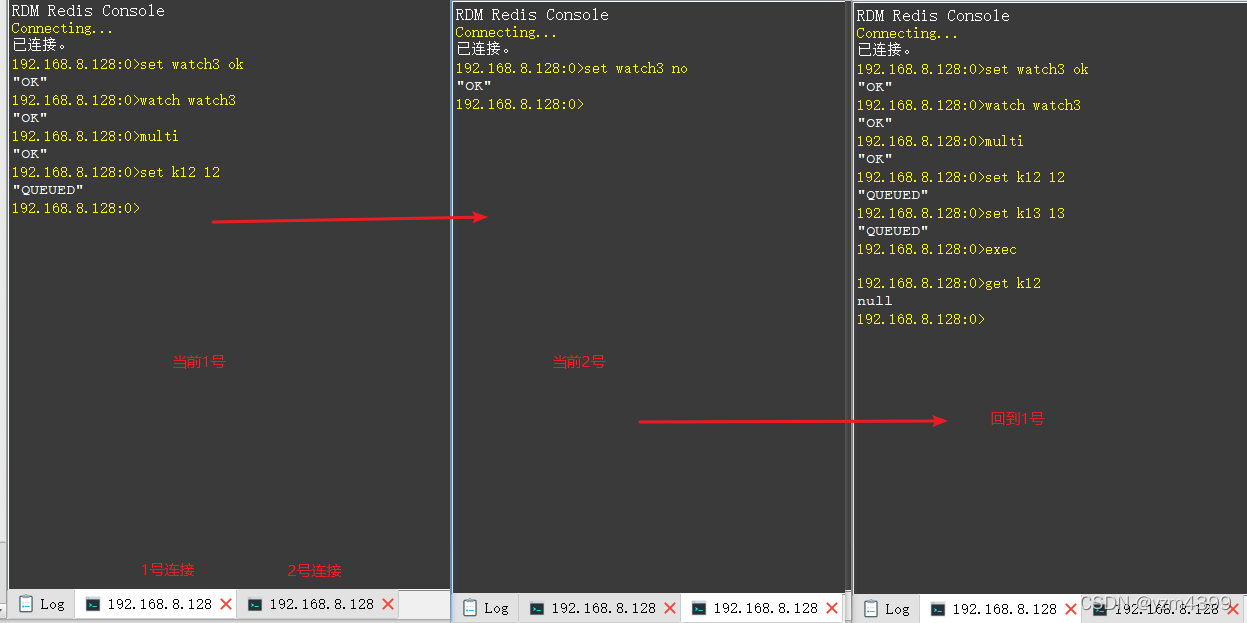
其他连接修改监控数据导致事务回滚
    public void test07() {
        redisTemplate.opsForValue().set("watch3", "ok");
        SessionCallback<Object> callback = new SessionCallback<Object>() {
            @Override
            public Object execute(RedisOperations operations) throws DataAccessException {
                operations.watch("watch3");
                operations.multi();
                operations.opsForValue().set("k12", 10);
				// 休眠10s,让其他连接来修改watch3值
                try {
                    Thread.sleep(10 * 1000);
                } catch (InterruptedException e) {
                    e.printStackTrace();
                }

                operations.opsForValue().set("k13", 11);
                List exec = operations.exec();
                System.out.println("exec = " + exec);
                return "监控";
            }
        };
        System.out.println(redisTemplate.execute(callback));
        System.out.println(redisTemplate.opsForValue().get("k12"));
    }
    @GetMapping("/test07")
    public void test07() {
        transactionUtils.test07();
    }

    @GetMapping("/test071")
    public void test071() {
    	// 修改watch3值
        redisTemplate.opsForValue().set("watch3", "no");
    }
先访问
http://localhost:8080/test07
10s访问
http://localhost:8080/test071


 1715
1715

 被折叠的 条评论
为什么被折叠?
被折叠的 条评论
为什么被折叠?
 到【灌水乐园】发言


