


 本文详细介绍了如何将Spring框架与JDBC、Mybatis以及Servlet进行整合。从创建项目环境开始,逐步讲解了配置Spring、使用JdbcTemplate、Spring与Mybatis的三种整合方法,以及Spring整合Servlet的相关步骤,旨在帮助开发者实现高效的数据访问和Web应用开发。
Spring 整合持久层技术
Spring 整合 JDBC
JDBCTemplate模板对象是Spring框架提供了的一个可以操作数据库的对象,封装了JDBC技术。在尽可能保留灵活性的情况下, 将数据库存取的工作量降到最低。
实例项目
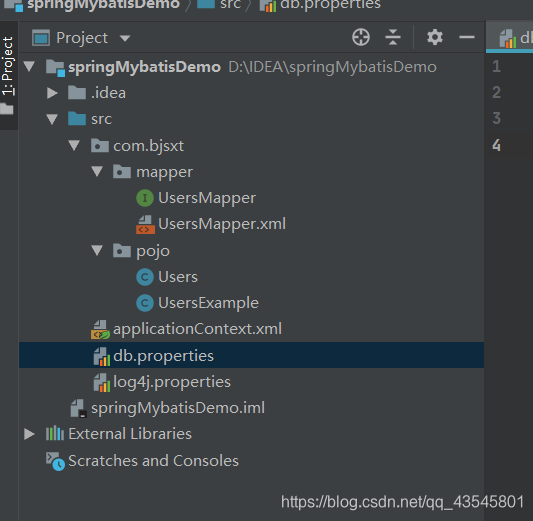
创建项目和环境
创建项目,导入jar包

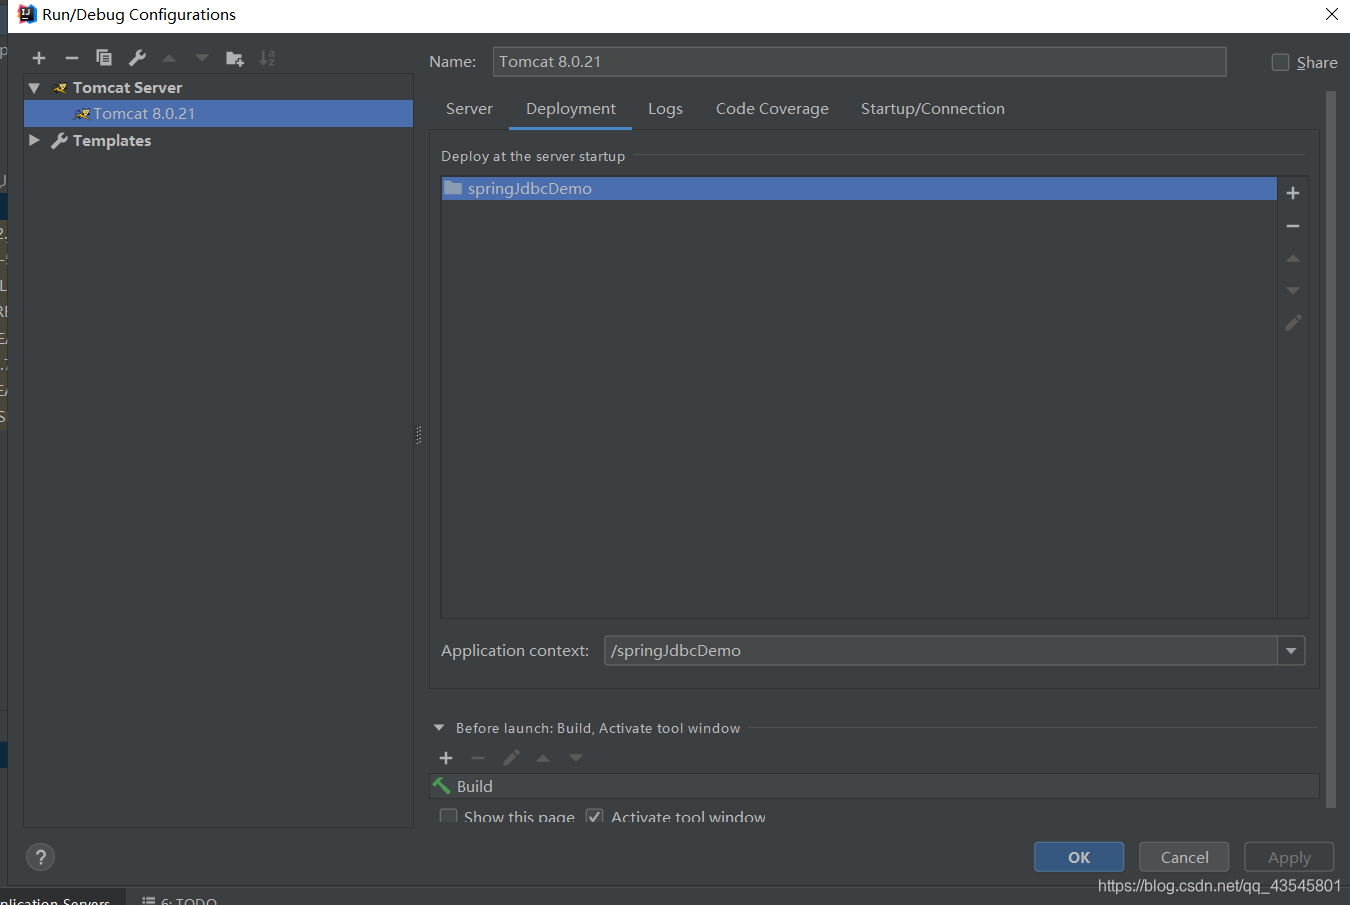
配置好tomcat
创建配置文件
applicationContext.xml
<?xml version="1.0" encoding="UTF-8"?>
<beans xmlns="http://www.springframework.org/schema/beans"
       xmlns:xsi="http://www.w3.org/2001/XMLSchema-instance"
       xsi:schemaLocation="http://www.springframework.org/schema/beans http://www.springframework.org/schema/beans/spring-beans.xsd">

</beans>
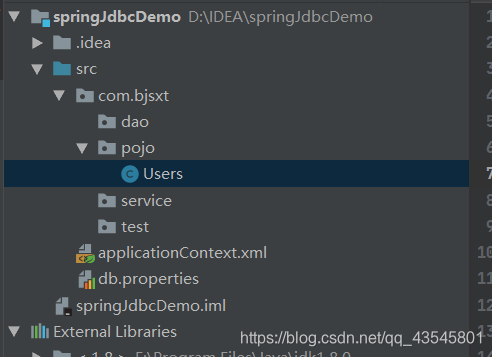
搭建基本的文件夹格式
创建users实体类
package com.bjsxt.pojo;

public class Users {
    private int userid;
    private String username;
    private String usersex;

    public int getUserid() {
        return userid;
    }

    public void setUserid(int userid) {
        this.userid = userid;
    }

    public String getUsername() {
        return username;
    }

    public void setUsername(String username) {
        this.username = username;
    }

    public String getUsersex() {
        return usersex;
    }

    public void setUsersex(String usersex) {
        this.usersex = usersex;
    }

    @Override
    public String toString() {
        return "Users{" +
                "userid=" + userid +
                ", username='" + username + '\'' +
                ", usersex='" + usersex + '\'' +
                '}';
    }
}
创建持久层
package com.bjsxt.dao;

public interface UsersDao {
}
接口实现类
package com.bjsxt.dao.impl;

import com.bjsxt.dao.UsersDao;

public class UsersDaoImpl implements UsersDao {
}
创建业务层
package com.bjsxt.service;

public interface UsersService {
}
package com.bjsxt.service.impl;

import com.bjsxt.dao.UsersDao;
import com.bjsxt.service.UsersService;

public class UsersServiceImpl implements UsersService {
    private UsersDao usersDao;

    public UsersDao getUsersDao() {
        return usersDao;
    }

    public void setUsersDao(UsersDao usersDao) {
        this.usersDao = usersDao;
    }
}
配置 Spring
一:配置解析 properties 文件
db.properties
jdbc.driver=com.mysql.jdbc.Driver
jdbc.url=jdbc:mysql://localhost:3307/sys?useSSL=false
jdbc.username=root
jdbc.password=1234567
二:修改 Spring 配置文件
-
添加命名空间
-
添加< context:property-placeholder/ >
<?xml version="1.0" encoding="UTF-8"?>
<beans xmlns="http://www.springframework.org/schema/beans"
       xmlns:xsi="http://www.w3.org/2001/XMLSchema-instance"
       xmlns:context="http://www.springframework.org/schema/context"
       xsi:schemaLocation="http://www.springframework.org/schema/beans http://www.springframework.org/schema/beans/spring-beans.xsd
http://www.springframework.org/schema/context http://www.springframework.org/schema/context/spring-context.xsd">

    <!--配置解析 properties 配置文件的工具类-->
    <context:property-placeholder location="db.properties"/>
</beans>
三:配置数据源
1. 什么是数据源?
JDBC2.0 提供了 javax.sql.DataSource 接口,数据源的作用是负责建立与数据库的连接,当在应用程序中访问数据库时不必编写数据库连 接代码,直接引用 DataSource 获取操作数据库的 Connection 对象即可。
2. 添加数据源配置
    <!--配置数据源-->
    <bean id="dataSource" class="org.springframework.jdbc.datasource.DriverManagerDataSource">
        <property name="driverClassName" value="${jdbc.driver}"/>
        <property name="url" value="${jdbc.url}"/>
        <property name="username" value="${jdbc.username}"/>
        <property name="password" value="${jdbc.password}"/>
    </bean>
3. 配置 JdbcTemplate
    <!--配置JdbcTemplate-->
    <bean id="jdbcTemplate" class="org.springframework.jdbc.core.JdbcTemplate">
        <property name="dataSource" ref="dataSource"/>
    </bean>
4. 配置其他 Bean 对象的依赖注入
4.1 配置持久层依赖注入
- 修改 UsersDaoImpl 接口实现类:
    private JdbcTemplate jdbcTemplate;

    public JdbcTemplate getJdbcTemplate() {
        return jdbcTemplate;
    }

    public void setJdbcTemplate(JdbcTemplate jdbcTemplate) {
        this.jdbcTemplate = jdbcTemplate;
    }
- 修改 Spring 配置文件
    <!--配置UsersDao-->
    <bean id="usersDao" class="com.bjsxt.dao.impl.UsersDaoImpl">
        <property name="jdbcTemplate" ref="jdbcTemplate"/>
    </bean>
4.2 配置业务层依赖注入
   <!-- 配置UsersService-->
    <bean id="usersService" class="com.bjsxt.service.impl.UsersServiceImpl">
        <property name="usersDao" ref="usersDao"/>
    </bean>
JdbcTemplate 的使用
在SpringJDBC内,JdbcTemplate 的使用方式有两种:一种是直接注入,一种是继承一个超类去实现,继承时需要注入一个dataSource
方法一:直接注入演示
一:执行单条 DML 语句
单条的 insert、delete、update。
修改持久层
public interface UsersDao {
    int insertUsers(Users users);
}
接口实现类:
    /**
     * 添加用户
     * @param users
     * @return
     */
    @Override
    public int insertUsers(Users users) {
        String sql ="insert into users values(default,?,?)";
        Object[] params = new Object[]{users.getUsername(),users.getUsersex()};
        //使用jdbcTemplate去简化对于数据库操作的代码
        return this.jdbcTemplate.update(sql,params);
    }
修改业务层
public interface UsersService {
    int addUsers(Users users);
}
接口实现类
    /**
     * 添加用户
     * @param users
     * @return
     */
    @Override
    public int addUsers(Users users) {
        //直接通过注入的持久层对象进行调用就可以
        return this.usersDao.insertUsers(users);
    }
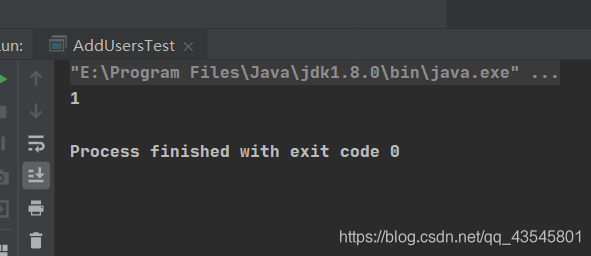
创建测试类
package com.bjsxt.test;
import com.bjsxt.pojo.Users;
import com.bjsxt.service.UsersService;
import org.springframework.context.ApplicationContext;
import org.springframework.context.support.ClassPathXmlApplicationContext;
public class AddUsersTest {
public static void main(String[] args) {
ApplicationContext applicationContext =new ClassPathXmlApplicationContext("applicationContext.xml");
UsersService usersService = (UsersService)applicationContext.getBean("usersService");
Users users = new Users();
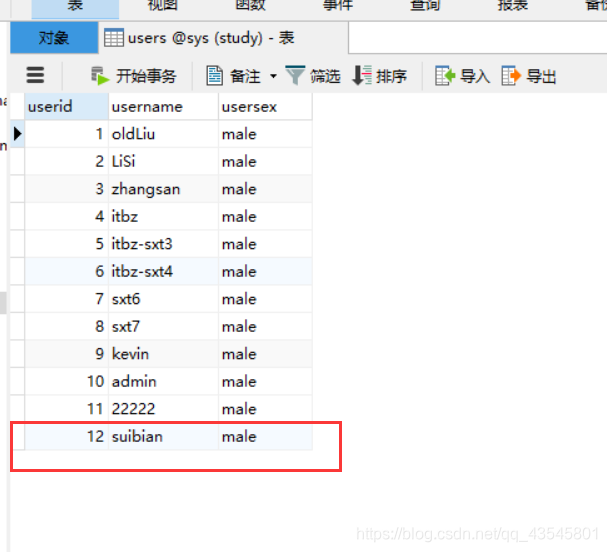
users.setUsername("suibian");
users.setUsersex("male");
int i = usersService.addUsers(users);
System.out.println(i);
}
}
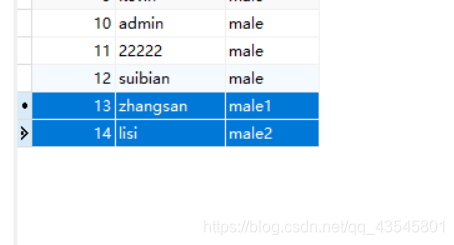
二:批量执行 DML 语句
修改持久层
 public interface UsersDao {

    int[] batchInsertUsers(List<Users> users);
}
接口实现类:
    /**
     * 批量添加用户
     * @param users
     * @return
     */
    @Override
    public int[] batchInsertUsers(List<Users> users) {
        String sql ="insert into users values(default,?,?)";
        BatchPreparedStatementSetter setter = new BatchPreparedStatementSetter() {
            @Override
            public void setValues(PreparedStatement preparedStatement, int i) throws SQLException {
                Users temp = users.get(i);
                preparedStatement.setString(1,temp.getUsername());
                preparedStatement.setString(2,temp.getUsersex());
            }

            @Override
            public int getBatchSize() {
                return users.size();
            }
        };
        return this.jdbcTemplate.batchUpdate(sql,setter);
    }
修改业务层
 public interface UsersService {
    int[] addUsers(List<Users> users);
}
接口实现类
    /**
     * 批量添加用户
     * @param users
     * @return
     */
    @Override
    public int[] addUsers(List<Users> users) {
        return this.usersDao.batchInsertUsers(users);
    }
创建测试类
package com.bjsxt.test;
import com.bjsxt.pojo.Users;
import com.bjsxt.service.UsersService;
import org.springframework.context.ApplicationContext;
import org.springframework.context.support.ClassPathXmlApplicationContext;
import java.util.ArrayList;
import java.util.List;
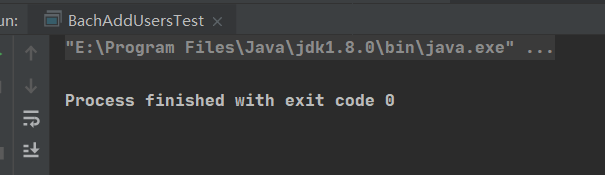
public class BachAddUsersTest {
public static void main(String[] args) {
ApplicationContext applicationContext =new ClassPathXmlApplicationContext("applicationContext.xml");
UsersService usersService = (UsersService)applicationContext.getBean("usersService");
Users users = new Users();
users.setUsername("zhangsan");
users.setUsersex("male1");
Users users1 = new Users();
users1.setUsername("lisi");
users1.setUsersex("male2");
List<Users> list = new ArrayList<>();
list.add(users);
list.add(users1);
usersService.addUsers(list);
}
}
三:查询返回单条数据
修改持久层
Users selectUsersById(int userid);
    /**
     * 根据ID查询用户
     * @param userid
     * @return
     */
    @Override
    public Users selectUsersById(int userid) {
        String sql = "select * from users where userid = ?";
        Object[] params = new Object[]{userid};
        Users users = new Users();
        this.jdbcTemplate.query(sql, params, new RowCallbackHandler() {
            @Override
            public void processRow(ResultSet resultSet) throws SQLException {
                users.setUserid(resultSet.getInt("userid"));
                users.setUsername(resultSet.getString("username"));
                users.setUsersex(resultSet.getString("usersex"));
            }
        });
        return users;
    }
修改业务层
Users findUsersById(int userid);
    @Override
    public Users findUsersById(int userid) {
        return this.usersDao.selectUsersById(userid);
    }
创建测试类
package com.bjsxt.test;
import com.bjsxt.pojo.Users;
import com.bjsxt.service.UsersService;
import org.springframework.context.ApplicationContext;
import org.springframework.context.support.ClassPathXmlApplicationContext;
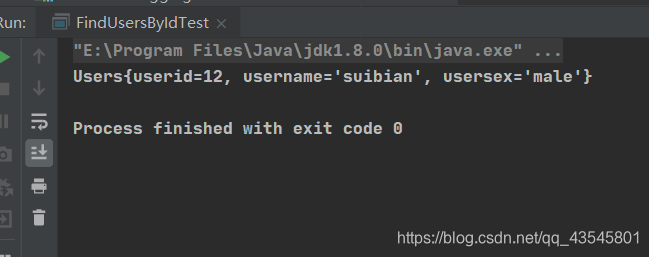
public class FindUsersByIdTest {
public static void main(String[] args) {
ApplicationContext applicationContext =new ClassPathXmlApplicationContext("applicationContext.xml");
UsersService usersService = (UsersService)applicationContext.getBean("usersService");
Users users = usersService.findUsersById(12);
System.out.println(users);
}
}
四:查询返回多条数据
修改持久层
List<Users> selectUsersByName(String username);
    /**
     * 查询用户返回多条数据
     * @param username
     * @return
     */
    @Override
    public List<Users> selectUsersByName(String username) {
        String sql = "select * from users where username = ?";
        Object[] param = new Object[]{username};
        return this.jdbcTemplate.query(sql, param, new RowMapper<Users>() {
            @Override
            public Users mapRow(ResultSet resultSet, int i) throws SQLException {
                Users users = new Users();
                users.setUserid(resultSet.getInt("userid"));
                users.setUsername(resultSet.getString("username"));
                users.setUsersex(resultSet.getString("usersex"));
                return users;
            }
        });
    }
修改业务层
List<Users> findUsersByName(String username);
    @Override
    public List<Users> findUsersByName(String username) {
        return this.usersDao.selectUsersByName(username);
    }
创建测试类
package com.bjsxt.test;
import com.bjsxt.pojo.Users;
import com.bjsxt.service.UsersService;
import org.springframework.context.ApplicationContext;
import org.springframework.context.support.ClassPathXmlApplicationContext;
import java.util.List;
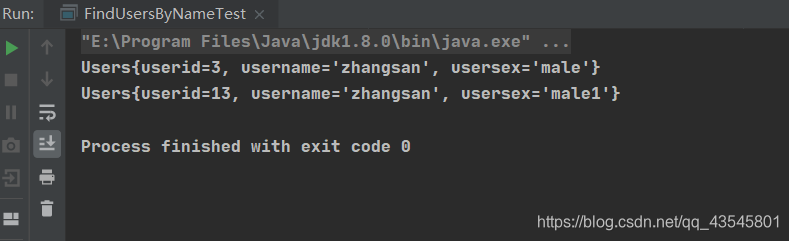
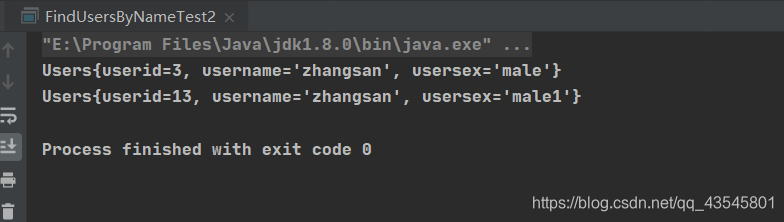
public class FindUsersByNameTest {
public static void main(String[] args) {
ApplicationContext applicationContext =new ClassPathXmlApplicationContext("applicationContext.xml");
UsersService usersService = (UsersService)applicationContext.getBean("usersService");
List<Users> list = usersService.findUsersByName("zhangsan");
list.forEach(System.out::println);
}
}
五:查询多条数据简化版
通过 BeanPropertyRowMapper 完成对象的映射处理
修改持久层
List<Users> selectUsersByName2(String username);
    @Override
    public List<Users> selectUsersByName2(String username) {
        String sql = "select * from users where username = ?";
        Object[] param = new Object[]{username};
        return this.jdbcTemplate.query(sql,param,new BeanPropertyRowMapper<>(Users.class));
    }
修改业务层
List<Users> findUsersByName2(String username);
    @Override
    public List<Users> findUsersByName2(String username) {
        return this.usersDao.selectUsersByName2(username);
    }
创建测试类
package com.bjsxt.test;
import com.bjsxt.pojo.Users;
import com.bjsxt.service.UsersService;
import org.springframework.context.ApplicationContext;
import org.springframework.context.support.ClassPathXmlApplicationContext;
import java.util.List;
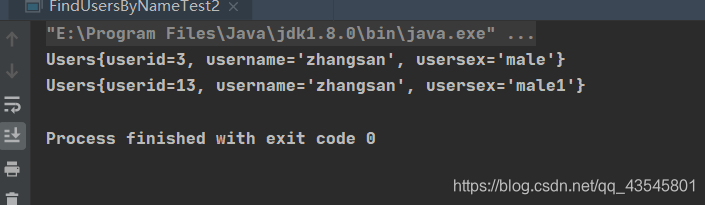
public class FindUsersByNameTest2 {
public static void main(String[] args) {
ApplicationContext applicationContext =new ClassPathXmlApplicationContext("applicationContext.xml");
UsersService usersService = (UsersService)applicationContext.getBean("usersService");
List<Users> list = usersService.findUsersByName2("zhangsan");
list.forEach(System.out::println);
}
}
方法二:继承一个超类去实现
JdbcDaoSupport 的使用
JdbcDaoSupport 是JDBC的一个支持类,使用JdbcDaoSupport去获取jdbctemplate。
目前我们是依靠注入的方式将jdbctemplate注入到持久层,之后再使用注入的jdbctemplate对数据库完成操作。
创建持久层
package com.bjsxt.dao.impl;

import com.bjsxt.dao.UsersDao;
import com.bjsxt.pojo.Users;
import org.springframework.jdbc.core.BeanPropertyRowMapper;
import org.springframework.jdbc.core.support.JdbcDaoSupport;

import java.util.List;

public class UsersDaoImplSupport extends JdbcDaoSupport implements UsersDao {

    @Override
    public List<Users> selectUsersByName2(String username) {
        String sql = "select * from users where username = ?";
        Object[] param = new Object[]{username};
        return this.getJdbcTemplate().query(sql,param,new BeanPropertyRowMapper<>(Users.class));
    }
}
修改配置文件
    <bean id="usersDaoSupport" class="com.bjsxt.dao.impl.UsersDaoImplSupport">
        <property name="dataSource" ref="dataSource"/>
    </bean>
   <!-- 配置UsersService-->
   <!-- 注入usersDaoSupport进行测试 -->
    <bean id="usersService" class="com.bjsxt.service.impl.UsersServiceImpl">
        <property name="usersDao" ref="usersDaoSupport"/>
    </bean>
Spring 整合 Mybatis
jar 包介绍
Mybatis的jar包:
mybatis-3.5.5.jar
asm-7.1.jar
cglib-3.3.0.jar
commons-logging-1.2.jar
javassist-3.27.0-GA.jar
log4j-1.2.17.jar
log4j-api-2.13.3.jar
log4j-core-2.13.3.jar
ognl-3.2.14.jar
slf4j-api-1.7.30.jar
slf4j-log4j12-1.7.30.jar
Mybatis 整合 Spring 的 jar 包:
mybatis-spring-2.0.4.jar
Spring 的 jar 包:
spring-beans-5.2.7.RELEASE.jar
spring-context-5.2.7.RELEASE.jar
spring-core-5.2.7.RELEASE.jar
spring-expression-5.2.7.RELEASE.jar
spring-jdbc-5.2.7.RELEASE.jar
spring-tx-5.2.7.RELEASE.jar
spring-aop-5.2.7.RELEASE.jar
数据库驱动 jar 包:
mysql-connector-java-5.1.48.jar
搭建环境
创建文件,添加对应的jar包

创建配置文件
applicationContext.xml
<?xml version="1.0" encoding="UTF-8"?>
<beans xmlns="http://www.springframework.org/schema/beans"
       xmlns:xsi="http://www.w3.org/2001/XMLSchema-instance"
       xsi:schemaLocation="http://www.springframework.org/schema/beans http://www.springframework.org/schema/beans/spring-beans.xsd">


</beans>
添加log4j配置文件
log4j.rootLogger=debug,console

### appender.console输出到控制台 ###
log4j.appender.console=org.apache.log4j.ConsoleAppender
log4j.appender.console.layout=org.apache.log4j.PatternLayout
log4j.appender.console.layout.ConversionPattern=<%d> %5p (%F:%L) [%t] (%c) - %m%n
log4j.appender.console.Target=System.out

### appender.logfile输出到日志文件 ###
log4j.appender.logfile=org.apache.log4j.RollingFileAppender
log4j.appender.logfile.File=SysLog.log
log4j.appender.logfile.MaxFileSize=500KB
log4j.appender.logfile.MaxBackupIndex=7
log4j.appender.logfile.layout=org.apache.log4j.PatternLayout
log4j.appender.logfile.layout.ConversionPattern=<%d> %p (%F:%L) [%t] %c - %m%n
创建映射配置文件与接口
根据之前讲解过的,使用工具根据数据库的表的情况去自动生成配置文件的方式,我们这里使用这个方法,并将产生的配置文件代码复制到本项目内。
创建业务层
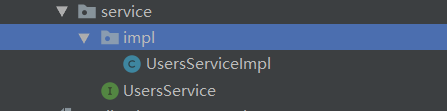
package com.bjsxt.service;

public interface UsersService {
}
package com.bjsxt.service.impl;

import com.bjsxt.service.UsersService;

public class UsersServiceImpl implements UsersService {
}
配置 Spring 与 Mybatis 整合
添加 db.properties 文件
jdbc.driver=com.mysql.jdbc.Driver
jdbc.url=jdbc:mysql://localhost:3307/sys?useSSL=false
jdbc.username=root
jdbc.password=1234567
**修改 Spring 配置文件 applicationContext.xml **
添加命名空间

添加< context:property-placeholder />
<?xml version="1.0" encoding="UTF-8"?>
<beans xmlns="http://www.springframework.org/schema/beans"
       xmlns:xsi="http://www.w3.org/2001/XMLSchema-instance"
       xmlns:context="http://www.springframework.org/schema/context"
       xsi:schemaLocation="http://www.springframework.org/schema/beans http://www.springframework.org/schema/beans/spring-beans.xsd
       http://www.springframework.org/schema/context http://www.springframework.org/schema/context/spring-context.xsd">

    <!--配置解析 Properties 工具类-->
    <context:property-placeholder location="db.properties"/>
</beans>
在spring配置文件内 配置数据源
    <!--配置数据源-->
    <bean id="dataSource" class="org.springframework.jdbc.datasource.DriverManagerDataSource">
        <property name="username" value="${jdbc.username}"/>
        <property name="password" value="${jdbc.password}"/>
        <property name="url" value="${jdbc.url}"/>
        <property name="driverClassName" value="${jdbc.driver}"/>
    </bean>
配置 SqlSessionFactoryBean
SqlSessionFactoryBean 是初始化 Mybatis 框架的 Bean 对象。
在 Spring 整合 Mybatis 中,我们可以不需要 Mybatis 的配置文件,在该 Bean 对象中可以完成对 Mybatis 框架的配置。
如果需要在 Mybatis 的配置文件中配置 Mybatis 框架时,仍然可以使用 Mybatis 的配置文件,但是需要在 SqlSessionFactoryBean 对象 的 configLocation 属性中指定 Mybatis 的配置文件的路径和名称。
    <!--配置SqlSessionFactoryBean-->
    <bean id="sqlSessionFactoryBean" class="org.mybatis.spring.SqlSessionFactoryBean">
        <property name="dataSource" ref="dataSource"/>
        <property name="typeAliasesPackage" value="com.bjsxt.pojo"/>
        <property name="mapperLocations" value="com/bjsxt/mapper/*.xml"/>
    </bean>
配置 SqlSessionTemplate
SqlSessionTemplate是MyBatis-Spring的核心。这个类负责管理MyBatis的SqlSession,调用MyBatis的SQL方法,翻译异常。
SqlSessionTemplate实现了SqlSession,这就是说要对MyBatis的SqlSession进行简易替换。
    <!--配置SqlSessionTemplate-->
    <bean id="sqlSessionTemplate" class="org.mybatis.spring.SqlSessionTemplate">
        <constructor-arg name="sqlSessionFactory" ref="sqlSessionFactoryBean"/>
    </bean>
配置业务层依赖
- 接口实现类
public class UsersServiceImpl implements UsersService {
    private SqlSessionTemplate sqlSessionTemplate;

    public SqlSessionTemplate getSqlSessionTemplate() {
        return sqlSessionTemplate;
    }

    public void setSqlSessionTemplate(SqlSessionTemplate sqlSessionTemplate) {
        this.sqlSessionTemplate = sqlSessionTemplate;
    }
}
- 配置文件
    <!--配置业务层 -->
    <bean id="usersService" class="com.bjsxt.service.impl.UsersServiceImpl">
        <property name="sqlSessionTemplate" ref="sqlSessionTemplate"/>
    </bean>
(整合方法一)SqlSessionTemplate 对象的使用
添加用户业务
修改业务层
public interface UsersService {
    void addUsers(Users users);

}
修改接口实现类:
    /**
     * 添加用户
     * @param users
     */
    @Override
    public void addUsers(Users users) {
        UsersMapper usersMapper =this.sqlSessionTemplate.getMapper(UsersMapper.class);
        usersMapper.insertSelective(users);
    }
创建测试类:
package com.bjsxt.test;
import com.bjsxt.pojo.Users;
import com.bjsxt.service.UsersService;
import org.springframework.context.ApplicationContext;
import org.springframework.context.support.ClassPathXmlApplicationContext;
public class AddUsersTest {
public static void main(String[] args) {
ApplicationContext applicationContext = new ClassPathXmlApplicationContext("applicationContext.xml");
UsersService usersService = (UsersService) applicationContext.getBean("usersService");
Users users = new Users();
users.setUsersex("male");
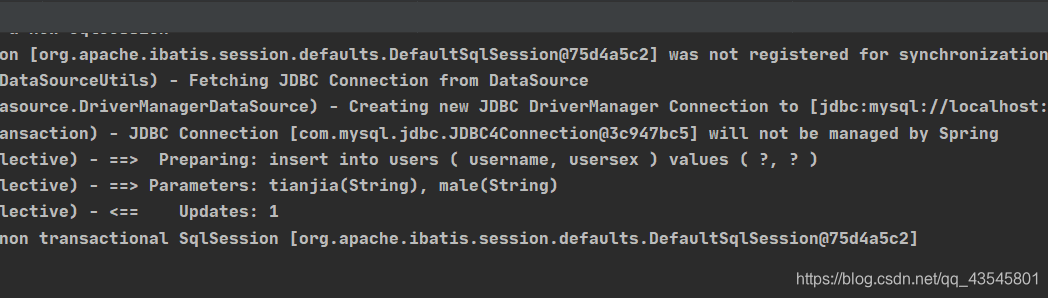
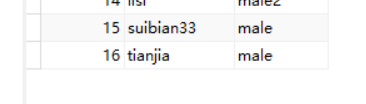
users.setUsername("tianjia");
usersService.addUsers(users);
}
}
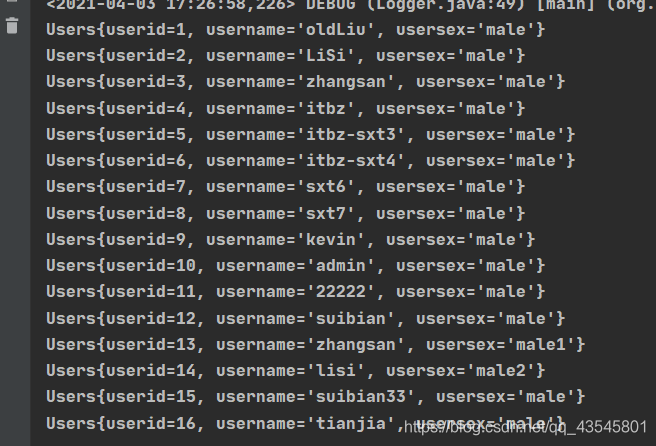
查询所有用户的信息
修改业务层
List<Users> findUsersAll();
/**
* 查询所有用户
* @return
*/
@Override
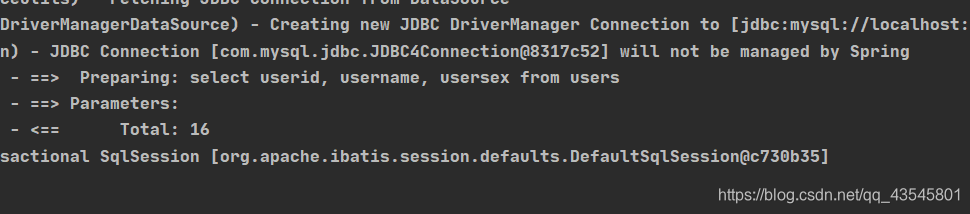
public List<Users> findUsersAll() {
UsersMapper usersMapper = this.sqlSessionTemplate.getMapper(UsersMapper.class);
UsersExample usersExample = new UsersExample();
return usersMapper.selectByExample(usersExample);
}
创建测试类
package com.bjsxt.test;
import com.bjsxt.pojo.Users;
import com.bjsxt.service.UsersService;
import org.springframework.context.ApplicationContext;
import org.springframework.context.support.ClassPathXmlApplicationContext;
import java.util.List;
public class FindUsersAllTest {
public static void main(String[] args) {
ApplicationContext applicationContext = new ClassPathXmlApplicationContext("applicationContext.xml");
UsersService usersService = (UsersService)applicationContext.getBean("usersService");
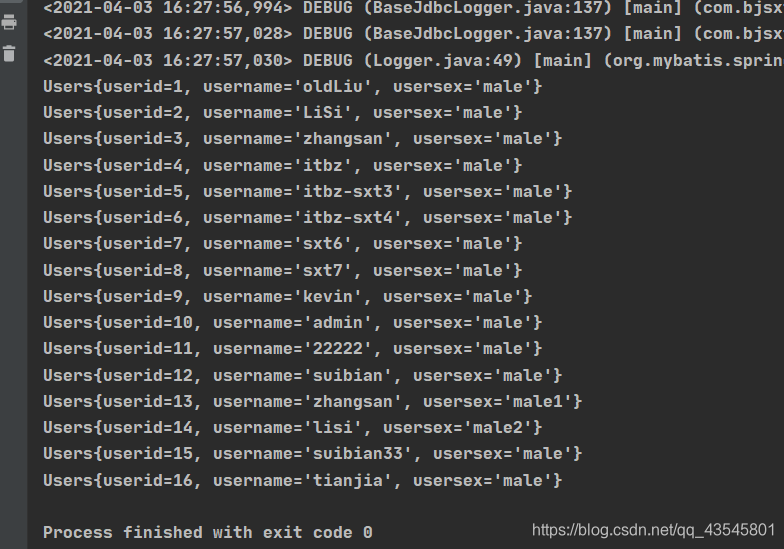
List<Users> list = usersService.findUsersAll();
list.forEach(System.out::println);
}
}
根据id查询用户的信息
根据UsersMapper.xml文件,可以知道我们已经生成了根据id数据查询用户信息的注解代码。
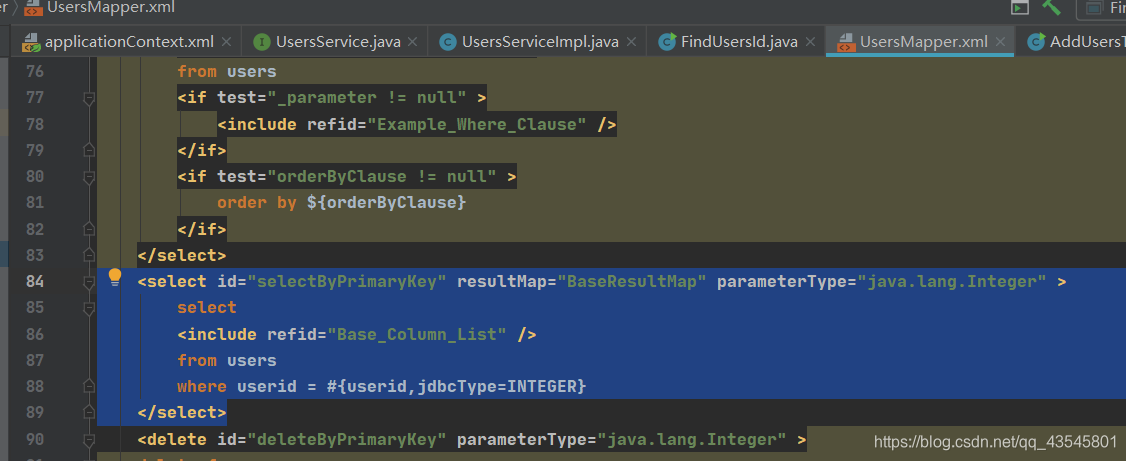
修改接口
Users findUsers(int id);
修改接口的实现类
    @Override
    public Users findUsers(int id) {
        UsersMapper usersMapper =this.sqlSessionTemplate.getMapper(UsersMapper.class);
           Users users  =  usersMapper.selectByPrimaryKey(id);
        return users;
    }
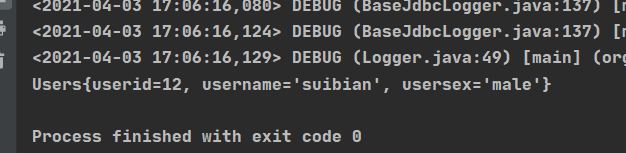
创建测试类
package com.bjsxt.test;

import com.bjsxt.pojo.Users;
import com.bjsxt.service.UsersService;
import org.springframework.context.ApplicationContext;
import org.springframework.context.support.ClassPathXmlApplicationContext;

public class FindUsersId {
    public static void main(String[] args){
        ApplicationContext applicationContext = new ClassPathXmlApplicationContext("applicationContext.xml");
        UsersService usersService = (UsersService) applicationContext.getBean("usersService");
        Integer id = 12;
       Users users =  usersService.findUsers(id);
        System.out.println(users.toString());
    }
}
(整合方法二)SqlSessionDaoSupport 的使用
创建业务层
public class UsersServiceImpl2 extends SqlSessionDaoSupport implements UsersService {

    @Override
    public List<Users> findUsersAll() {
        UsersMapper usersMapper = this.getSqlSessionTemplate().getMapper(UsersMapper.class);
        UsersExample usersExample = new UsersExample();
        return usersMapper.selectByExample(usersExample);
    }

    @Override
    public void addUsers(Users users) { }

    @Override
    public Users findUsers(int id) {
        return null;
    }
}
修改配置文件
    <bean id="usersService2" class="com.bjsxt.service.impl.UsersServiceImpl2">
        <property name="sqlSessionFactory" ref="sqlSessionFactoryBean"/>
    </bean>
创建测试类
public class FindUsersAllTest2 {
    public static void main(String[] args){
        ApplicationContext applicationContext = new ClassPathXmlApplicationContext("applicationContext.xml");
        UsersService usersService = (UsersService)applicationContext.getBean("usersService2");
        List<Users> list = usersService.findUsersAll();
        list.forEach(System.out::println);
    }
}
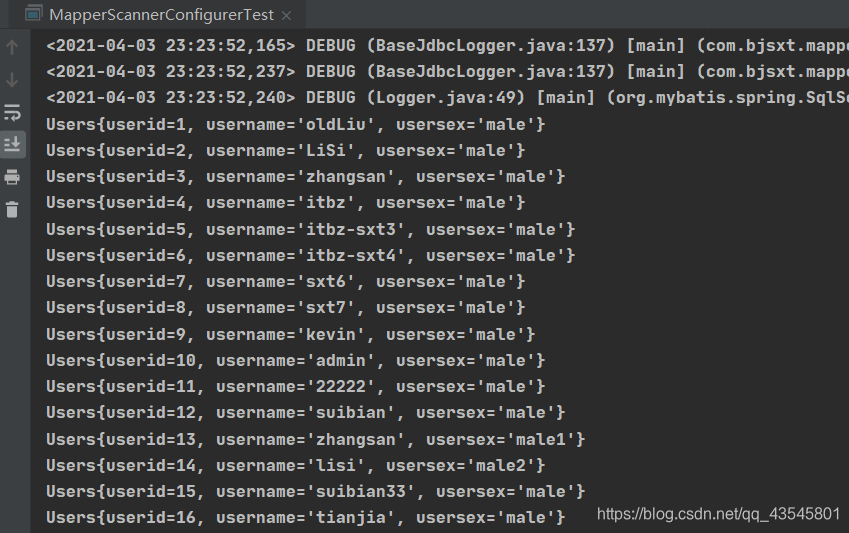
(整合方法三)MapperScannerConfigurer 对象的使用(spring整合mybatis中最常用的一种方式)
这个对象由Mybatis提供,用于以自动扫描形式来配置 MyBatis 中映射器对象,可以通过配置包路径来自动扫描包接口生成映射器对象。
创建业务层
package com.bjsxt.service.impl;

import com.bjsxt.mapper.UsersMapper;
import com.bjsxt.pojo.Users;
import com.bjsxt.pojo.UsersExample;
import com.bjsxt.service.UsersService;

import java.util.List;
public class UsersServiceImpl3 implements UsersService {
    private UsersMapper usersMapper;

    public void setUsersMapper(UsersMapper usersMapper) {
        this.usersMapper = usersMapper;
    }

    @Override
    public List<Users> findUsersAll() {
        UsersExample usersExample = new UsersExample();
        //通过注入的usersMapper对象直接进行调用selectByExample
        return this.usersMapper.selectByExample(usersExample);
    }

    @Override
    public void addUsers(Users users) {

    }

    @Override
    public Users findUsers(int id) {
        return null;
    }

}
创建新的配置文件(演示用)
<?xml version="1.0" encoding="UTF-8"?>
<beans xmlns="http://www.springframework.org/schema/beans"
       xmlns:xsi="http://www.w3.org/2001/XMLSchema-instance"
       xmlns:context="http://www.springframework.org/schema/context"
       xsi:schemaLocation="http://www.springframework.org/schema/beans http://www.springframework.org/schema/beans/spring-beans.xsd
       http://www.springframework.org/schema/context http://www.springframework.org/schema/context/spring-context.xsd">

    <!--配置解析 Properties 工具类-->
    <context:property-placeholder location="db.properties"/>

    <!--配置数据源-->
    <bean id="dataSource" class="org.springframework.jdbc.datasource.DriverManagerDataSource">
        <property name="username" value="${jdbc.username}"/>
        <property name="password" value="${jdbc.password}"/>
        <property name="url" value="${jdbc.url}"/>
        <property name="driverClassName" value="${jdbc.driver}"/>
    </bean>

    <!--配置SqlSessionFactoryBean  初始化 Mybatis 框架的 Bean 对象-->
    <bean id="sqlSessionFactoryBean" class="org.mybatis.spring.SqlSessionFactoryBean">
        <property name="dataSource" ref="dataSource"/>
        <property name="typeAliasesPackage" value="com.bjsxt.pojo"/>
        <!-- mapperLocations属性用于指定你的映射配置文件
             如果接口与映射配置文件在同一个包中,我们这里是UsersMapper接口和UsersMapper.xml映射配置文件在mapper文件夹下
             那么mapperLocations属性则不需要配置。
         -->
        <!--<property name="mapperLocations" value="com/bjsxt/mapper/*.xml"/>-->
    </bean>

    <!--配置MapperScannerConfigurer-->
    <bean id="mapperScannerConfigurer" class="org.mybatis.spring.mapper.MapperScannerConfigurer">
        <property name="basePackage" value="com.bjsxt.mapper"/>
    </bean>
    <!-- 使用bean对象将usersMapper注入-->
    <bean id="usersService3" class="com.bjsxt.service.impl.UsersServiceImpl3">
        <property name="usersMapper" ref="usersMapper"/>
    </bean>
</beans>
创建测试类
public class MapperScannerConfigurerTest {
    public static void main(String[] args) {
        ApplicationContext applicationContext = new ClassPathXmlApplicationContext("applicationContext2.xml");

        UsersService usersService = (UsersService) applicationContext.getBean("usersService3");
        List<Users> list = usersService.findUsersAll();
        list.forEach(System.out::println);
    }
}


 被折叠的 条评论
为什么被折叠?
被折叠的 条评论
为什么被折叠?
 到【灌水乐园】发言


