


0、前提
使用Spring框架前需要引入spring-context依赖
<!-- 基于Maven依赖传递性,导入spring-context依赖即可导入当前所需所有jar包 -->
<dependency>
	<groupId>org.springframework</groupId>
	<artifactId>spring-context</artifactId>
	<version>5.3.1</version>
</dependency>
1、IOC - 控制反转
理解:将创建对象这件麻烦事交给Spring框架去做,不再由程序员手动new对象了。
一个形象的案例:原来是自己做饭(自己创建对象),现在是点外卖(饭被别人煮好了,对象被别人创建好了),你自己直接拿来吃就可以了(对象直接拿来用)。
依赖注入(DI):IOC容器在底层是通过反射调用无参构造器来创建对象的,所以对象的属性值默认为null;DI的作用就是给对象的属性值赋值。
2、基于XML管理bean
Step1 创建一个自定义组件类HelloWorld
Step2 创建Spring配置文件
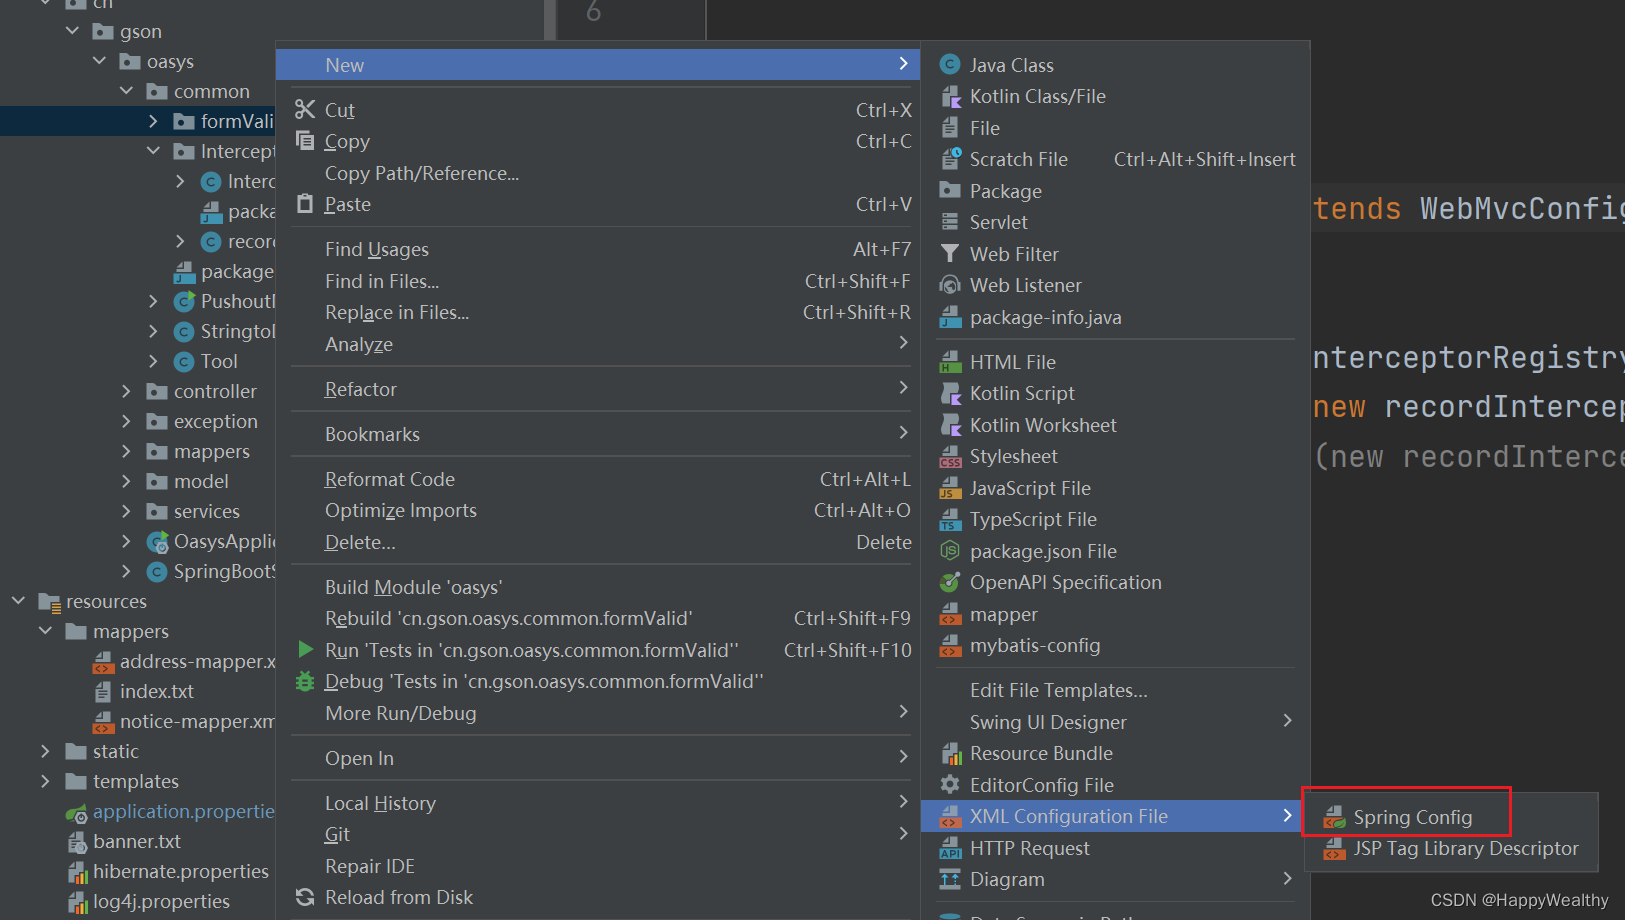 Step3 在配置文件中配置bean
<!--
配置HelloWorld所对应的bean,即将HelloWorld的对象交给Spring的IOC容器管理
通过bean标签配置IOC容器所管理的bean
属性:
id:设置bean的唯一标识
class:设置bean所对应类型的全类名
-->
<bean id="helloworld" class="com.atguigu.spring.bean.HelloWorld"></bean>
原理:
![[外链图片转存失败,源站可能有防盗链机制,建议将图片保存下来直接上传(img-lNuwNl2n-1674981327909)(C:\Users\zilvx\AppData\Roaming\Typora\typora-user-images\image-20230129091455779.png)]](https://i-blog.csdnimg.cn/blog_migrate/e70a4e21af813a503e1ce4606d49d63d.png)
注意:Spring 底层默认通过反射技术调用组件类的无参构造器来创建组件对象,如果自定义组件类缺失无参构造器,Spring会报错。
2.1、获取bean
方式一:根据bean的id来获取
ApplicationContext ac = new ClassPathXmlApplicationContext("applicationContext.xml");
HelloWorld helloworld = (HelloWorld) ac.getBean("helloworld");
方式二:根据bean的类型来获取
ApplicationContext ac = new
ClassPathXmlApplicationContext("applicationContext.xml");
HelloWorld helloworld = ac.getBean(HelloWorld.class);
方式三:根据bean的id和类型来获取
ApplicationContext ac = new
ClassPathXmlApplicationContext("applicationContext.xml");
HelloWorld helloworld = ac.getBean("helloworld", HelloWorld.class);
注意:根据类型获取bean时,要求IOC容器里面只能有一个该类型的bean
当IOC容器中有如下两个bean时
<bean id="helloworldOne" class="com.atguigu.spring.bean.HelloWorld"></bean>
<bean id="helloworldTwo" class="com.atguigu.spring.bean.HelloWorld"></bean>
根据类型获取bean抛异常:NoUniqueBeanDefinitionException
如果组件类实现了接口,根据接口类型可以获取bean吗?
可以,前提时bean唯一
如果一个接口类有多个实现类,这些实现类都配置了bean,根据接口类型可以获取bean吗?
不行,因为bean不唯一
结论:根据类型来获取bean时,在满足bean唯一性的前提下,其实只是看:『对象 instanceof 指定的类型』的返回结果,只要返回的是true就可以认定为和类型匹配,能够获取到。
2.2、依赖注入的方式
2.2.1、方式一:setter注入(常用)
<bean id="studentOne" class="com.atguigu.spring.bean.Student">
<!-- property标签:通过组件类的setXxx()方法给组件对象设置属性 -->
<!-- name属性:指定属性名(这个属性名是getXxx()、setXxx()方法定义的,和成员变量无关)
-->
	<!-- value属性:指定属性值 -->
	<property name="id" value="1001"></property>
	<property name="name" value="张三"></property>
	<property name="age" value="23"></property>
	<property name="sex" value="男"></property>
</bean>
2.2.2、方式二:构造器注入
组件类中有参构造器如下:
public Student(Integer id, String name, Integer age, String sex) {
	this.id = id;
	this.name = name;
	this.age = age;
	this.sex = sex;
}
配置bean
<bean id="studentTwo" class="com.atguigu.spring.bean.Student">
<constructor-arg value="1002"></constructor-arg>
<constructor-arg value="李四"></constructor-arg>
<constructor-arg value="33"></constructor-arg>
<constructor-arg value="女"></constructor-arg>
</bean>
2.2.3、特殊值处理
2.2.3.1、字面量赋值
<!-- 使用value属性给bean的属性赋值时,Spring会把value属性的值看做字面量 -->
<property name="name" value="张三"/>
2.2.3.2、null值
<property name="name">
<null />
</property>
注意:
<property name="name" value="null"></property>以上写法,为name所赋的值是字符串"null"
2.2.3.3、xml实体
<!-- 小于号在XML文档中用来定义标签的开始,不能随便使用 -->
<!-- 解决方案一:使用XML实体来代替 -->
<property name="expression" value="a < b"/>
<property name="expression">
<!-- 解决方案二:使用CDATA节 -->
<!-- CDATA中的C代表Character,是文本、字符的含义,CDATA就表示纯文本数据 -->
<!-- XML解析器看到CDATA节就知道这里是纯文本,就不会当作XML标签或属性来解析 -->
<!-- 所以CDATA节中写什么符号都随意 -->
<value><![CDATA[a < b]]></value>
</property>
2.2.3.4、为类属性赋值
Student类中有Clazz对象的属性
private Clazz clazz;
public Clazz getClazz() {
	return clazz;
}
public void setClazz(Clazz clazz) {
	this.clazz = clazz;
}
方式一:引用外部申明的bean来为Student中的clazz属性赋值
<bean id="clazzOne" class="com.atguigu.spring.bean.Clazz">
    <property name="clazzId" value="1111"></property>
    <property name="clazzName" value="财源滚滚班"></property>
</bean>

<bean id="studentFour" class="com.atguigu.spring.bean.Student">
    <property name="id" value="1004"></property>
    <property name="name" value="赵六"></property>
    <property name="age" value="26"></property>
    <property name="sex" value="女"></property>
    <!-- ref属性:引用IOC容器中某个bean的id,将所对应的bean为属性赋值 -->
    <property name="clazz" ref="clazzOne"></property>
</bean>
如果错把ref属性写成了value属性,会抛出异常: IllegalStateException
使用value属性时,Spring只把这个属性看做一个普通的字符串,不会认为这是一个bean的id,更不会根据它去找到bean来赋值
方式二:内部bean
<bean id="studentFour" class="com.atguigu.spring.bean.Student">
    <property name="id" value="1004"></property>
    <property name="name" value="赵六"></property>
    <property name="age" value="26"></property>
    <property name="sex" value="女"></property>
    <property name="clazz">
        <!-- 在一个bean中再声明一个bean就是内部bean -->
        <!-- 内部bean只能用于给属性赋值,不能在外部通过IOC容器获取,因此可以省略id属性 -->
        <bean id="clazzInner" class="com.atguigu.spring.bean.Clazz">
            <property name="clazzId" value="2222"></property>
            <property name="clazzName" value="远大前程班"></property>
        </bean>
    </property>
</bean>
方式三:级联属性赋值
<bean id="studentFour" class="com.atguigu.spring.bean.Student">
    <property name="id" value="1004"></property>
    <property name="name" value="赵六"></property>
    <property name="age" value="26"></property>
    <property name="sex" value="女"></property>
    <!-- 一定先引用某个bean为属性赋值,才可以使用级联方式更新属性 -->
    <property name="clazz" ref="clazzOne"></property>
    <property name="clazz.clazzId" value="3333"></property>
    <property name="clazz.clazzName" value="最强王者班"></property>
</bean>
2.2.3.5、为数组类型属性赋值
private String[] hobbies;
public String[] getHobbies() {
	return hobbies;
}
public void setHobbies(String[] hobbies) {
	this.hobbies = hobbies;
}
<bean id="studentFour" class="com.atguigu.spring.bean.Student">
    <property name="id" value="1004"></property>
    <property name="name" value="赵六"></property>
    <property name="age" value="26"></property>
    <property name="sex" value="女"></property>
    <!-- ref属性:引用IOC容器中某个bean的id,将所对应的bean为属性赋值 -->
    <property name="clazz" ref="clazzOne"></property>
    <property name="hobbies">
        <array>
            <value>抽烟</value>
            <value>喝酒</value>
            <value>烫头</value>
        </array>
    </property>
</bean>
2.2.3.6、为集合属性类型赋值
private List<Student> students;
public List<Student> getStudents() {
	return students;
}
public void setStudents(List<Student> students) {
	this.students = students;
}
<bean id="clazzTwo" class="com.atguigu.spring.bean.Clazz">
    <property name="clazzId" value="4444"></property>
    <property name="clazzName" value="Javaee0222"></property>
    <property name="students">
        <list>
            <ref bean="studentOne"></ref>
            <ref bean="studentTwo"></ref>
            <ref bean="studentThree"></ref>
        </list>
    </property>
</bean>
若为Set集合类型属性赋值,只需要将其中的list标签改为set标签即可
2.2.3.7、为Map集合类型属性赋值
private Map<String, Teacher> teacherMap;
public Map<String, Teacher> getTeacherMap() {
	return teacherMap;
}
public void setTeacherMap(Map<String, Teacher> teacherMap) {
	this.teacherMap = teacherMap;
}
<bean id="teacherOne" class="com.atguigu.spring.bean.Teacher">
    <property name="teacherId" value="10010"></property>
    <property name="teacherName" value="大宝"></property>
</bean>
<bean id="teacherTwo" class="com.atguigu.spring.bean.Teacher">
    <property name="teacherId" value="10086"></property>
    <property name="teacherName" value="二宝"></property>
</bean>
<bean id="studentFour" class="com.atguigu.spring.bean.Student">
	<property name="teacherMap">
		<map>
			<entry>
				<key>
    				<value>10010</value>
				</key>
				<ref bean="teacherOne"></ref>
			</entry>
			<entry>
				<key>
					<value>10086</value>
				</key>
				<ref bean="teacherTwo"></ref>
			</entry>
		</map>
	</property>
</bean>
2.2.3.8、引用集合类型的bean
<!--list集合类型的bean-->
<util:list id="students">
    <ref bean="studentOne"></ref>
    <ref bean="studentTwo"></ref>
    <ref bean="studentThree"></ref>
</util:list>
<!--map集合类型的bean-->
<util:map id="teacherMap">
    <entry>
        <key>
        	<value>10010</value>
        </key>
        <ref bean="teacherOne"></ref>
    </entry>
    <entry>
        <key>
        	<value>10086</value>
        </key>
        <ref bean="teacherTwo"></ref>
    </entry>
</util:map>
使用util:list、util:map标签必须引入相应的命名空间,可以通过idea的提示功能选择
2.3、bean的作用域
<!-- scope属性:取值singleton(默认值),bean在IOC容器中只有一个实例,IOC容器初始化时创建
对象 -->
<!-- scope属性:取值prototype,bean在IOC容器中可以有多个实例,getBean()时创建对象 -->
<bean class="com.atguigu.bean.User" scope="prototype"></bean>
2.4、bean的生命周期
bean的生命周期过程
| 过程 | 描述 |
|---|---|
| Step1 | IOC容器创建bean |
| Step2 | bean的依赖注入 |
| Step3 | bean对象初始化之前操作(由bean的后置处理器负责) |
| Step4 | bean对象初始化 |
| Step5 | bean对象初始化之后操作(由bean的后置处理器负责) |
| Step6 | bean对象准备就绪,可以使用了 |
| Step7 | bean对象被摧毁(需在配置bean时指定销毁方法) |
| Step8 | IOC容器关闭 |
配置bean时使用init-method属性指定初始化方法,使用destroy-method属性指定销毁方法。
<!-- 使用init-method属性指定初始化方法 -->
<!-- 使用destroy-method属性指定销毁方法 -->
<bean class="com.atguigu.bean.User" scope="prototype" init-method="initMethod"
destroy-method="destroyMethod">
    <property name="id" value="1001"></property>
    <property name="username" value="admin"></property>
    <property name="password" value="123456"></property>
    <property name="age" value="23"></property>
</bean>
bean的后置处理器会在bean的初始化前后添加额外的操作,需要实现BeanPostProcessor接口,且配置到IOC容器中,需要注意的是,bean后置处理器不是单独针对某一个bean生效,而是针对IOC容器中所有bean都会执行
创建bean的后置处理器:
package com.atguigu.spring.process;
import org.springframework.beans.BeansException;
import org.springframework.beans.factory.config.BeanPostProcessor;
public class MyBeanProcessor implements BeanPostProcessor {
@Override
public Object postProcessBeforeInitialization(Object bean, String beanName)
throws BeansException {
System.out.println("☆☆☆" + beanName + " = " + bean);
return bean;
}
@Override
public Object postProcessAfterInitialization(Object bean, String beanName)
throws BeansException {
System.out.println("★★★" + beanName + " = " + bean);
return bean;
}
}
<!-- bean的后置处理器要放入IOC容器才能生效 -->
<bean id="myBeanProcessor" class="com.atguigu.spring.process.MyBeanProcessor"/>
2.5、自动装配
概念:根据指定策略,在IOC容器中匹配某一个bean,自动为指定的bean中所依赖的类类型或接口类型属性赋值
配置bean:
使用bean标签的autowire属性设置自动装配效果
自动装配方式:byType
byType:根据类型匹配IOC容器中的某个兼容类型的bean,为属性自动赋值
若在IOC中,没有任何一个兼容类型的bean能够为属性赋值,则该属性不装配,即值为默认值
null
若在IOC中,有多个兼容类型的bean能够为属性赋值,则抛出异常
NoUniqueBeanDefinitionException
<bean id="userController"
class="com.atguigu.autowire.xml.controller.UserController" autowire="byType">
</bean>
<bean id="userService"
class="com.atguigu.autowire.xml.service.impl.UserServiceImpl" autowire="byType">
</bean>
<bean id="userDao" class="com.atguigu.autowire.xml.dao.impl.UserDaoImpl"></bean>
自动装配方式:byName
byName:将自动装配的属性的属性名,作为bean的id在IOC容器中匹配相对应的bean进行赋值
<bean id="userController"
class="com.atguigu.autowire.xml.controller.UserController" autowire="byName">
</bean>
<bean id="userService"
class="com.atguigu.autowire.xml.service.impl.UserServiceImpl" autowire="byName">
</bean>
<bean id="userServiceImpl"
class="com.atguigu.autowire.xml.service.impl.UserServiceImpl" autowire="byName">
</bean>
<bean id="userDao" class="com.atguigu.autowire.xml.dao.impl.UserDaoImpl"></bean>
<bean id="userDaoImpl" class="com.atguigu.autowire.xml.dao.impl.UserDaoImpl">
</bean>
3、基于注解管理bean
注解:注解的作用就是标记,框架扫描到注解标记的位置,然后根据注解标记的功能来执行更具体的操作。
标识组件的注解:
- @Component:将类标识为普通组件
- @Controller:将类标识为控制层组件
- @Service:将类标识为业务层组件
- @Repository:将类标识为持久层组件
组件的id:
默认类名的小驼峰。例如:UserController类对应的bean的id就是userController。
可以通过组件注解的value属性设置自定义的bean的id,例如:@Service(“userService”)
扫描组件:
情况一:最基本的扫描方式
<context:component-scan base-package="com.atguigu">
</context:component-scan>
情况二:指定要排除的组件 exclude-filter
<context:component-scan base-package="com.atguigu">
<!-- context:exclude-filter标签:指定排除规则 -->
<!--
type:设置排除或包含的依据
type="annotation",根据注解排除,expression中设置要排除的注解的全类名
type="assignable",根据类型排除,expression中设置要排除的类型的全类名
-->
<context:exclude-filter type="annotation"
expression="org.springframework.stereotype.Controller"/>
<!--<context:exclude-filter type="assignable"
expression="com.atguigu.controller.UserController"/>-->
</context:component-scan>
情况三:仅扫描指定组件 include-filter
<context:component-scan base-package="com.atguigu" use-default-filters="false">
<!-- context:include-filter标签:指定在原有扫描规则的基础上追加的规则 -->
<!-- use-default-filters属性:取值false表示关闭默认扫描规则 -->
<!-- 此时必须设置use-default-filters="false",因为默认规则即扫描指定包下所有类 -->
<!--
type:设置排除或包含的依据
type="annotation",根据注解排除,expression中设置要排除的注解的全类名
type="assignable",根据类型排除,expression中设置要排除的类型的全类名
-->
<context:include-filter type="annotation"
expression="org.springframework.stereotype.Controller"/>
<!--<context:include-filter type="assignable"
expression="com.atguigu.controller.UserController"/>-->
</context:component-scan>
3.1、基于注解的自动装配
在成员变量上直接标记@Autowired注解即可完成自动装配,不需要提供setXxx()方法。
@Controller
public class UserController {
@Autowired
private UserService userService;
public void saveUser(){
	userService.saveUser();
}
}
扩展:@Autowired注解可以标记在构造器和set方法上
工作流程:
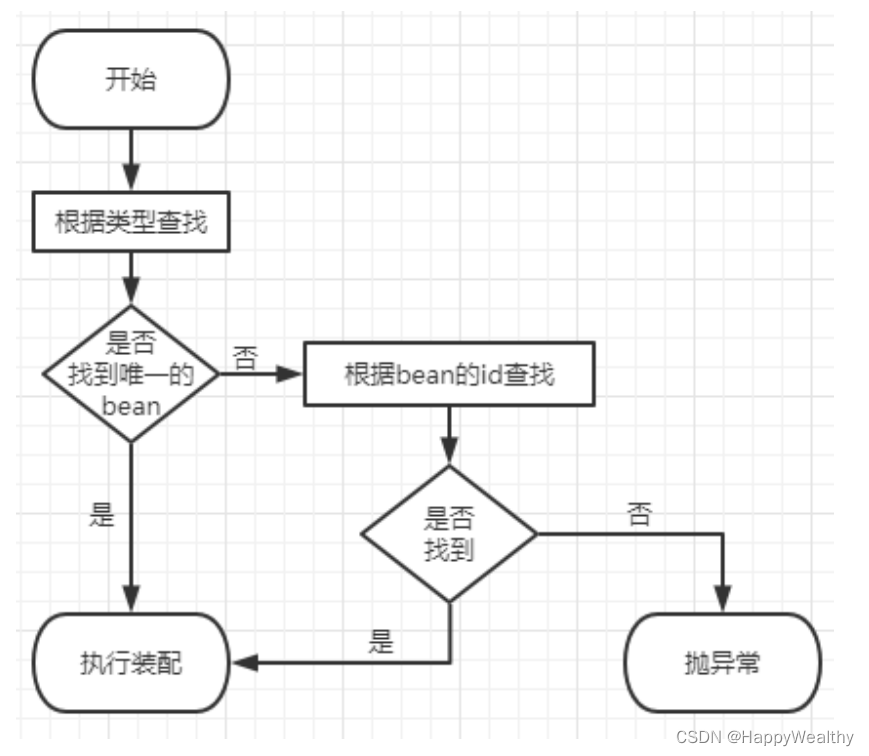
- 首先根据所需要的组件类型到IOC容器中查找
- 能够找到唯一的bean:直接执行装配
- 如果完全找不到匹配这个类型的bean:装配失败
- 所需类型匹配的bean不止一个
- 没有@Qualifier注解:根据@Autowired标记位置成员变量的变量名作为bean的id进行匹配
能够找到:执行装配
找不到:装配失败 - 使用@Qualifier注解:根据@Qualifier注解中指定的名称作为bean的id进行匹配
能够找到:执行装配
找不到:装配失败
- 没有@Qualifier注解:根据@Autowired标记位置成员变量的变量名作为bean的id进行匹配


 907
907

 被折叠的 条评论
为什么被折叠?
被折叠的 条评论
为什么被折叠?
 到【灌水乐园】发言


