


SSE实现 "下载压缩附件"-实时进度条
1. 引入依赖
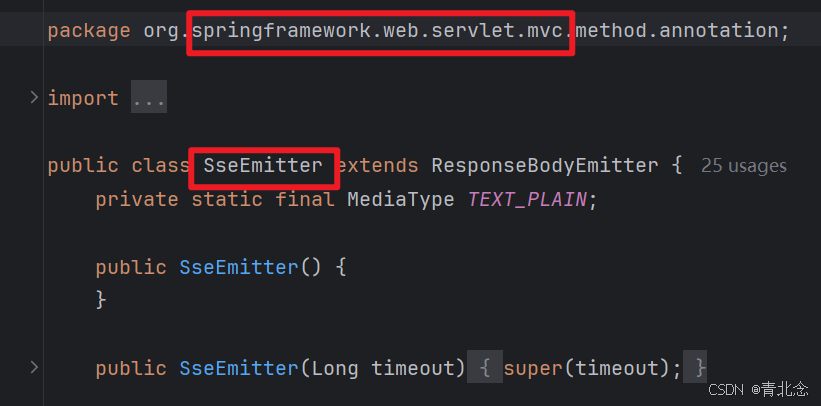
这里使用SpringMVC包下内置的SseEmitter类来实战,因此引入spring-boot-starter-web包即可。
    <properties>
        <maven.compiler.source>8</maven.compiler.source>
        <maven.compiler.target>8</maven.compiler.target>
        <project.build.sourceEncoding>UTF-8</project.build.sourceEncoding>
        <spring.boot.version>2.6.10</spring.boot.version>
    </properties>
    <dependencies>
    <dependency>
            <groupId>org.springframework.boot</groupId>
            <artifactId>spring-boot-starter</artifactId>
            <version>${spring.boot.version}</version>
        </dependency>
        <dependency>
            <groupId>org.springframework.boot</groupId>
            <artifactId>spring-boot-starter-web</artifactId>
            <version>${spring.boot.version}</version>
        </dependency>
   </dependencies>
2. 封装SSE连接发送关闭等操作
这里最初版本的代码是SSE的连接关闭都与业务写在一块,后续想做到连接并发数控制及解耦所以直接封装一个调用类做操作。
在下载附件中确认连接已经连接成功后进行后续操作,添加重试机制。
/**
 * @Author:zfz
 * @Description: SSEService
 * @DateTime: 2025/3/21 8:40
 **/
public interface SSEService {
    /**
     * SSE-用户连接
     */
    SseEmitter getConnection(String userCode);
    /**
     * SSE-推送给客户端消息
     */
    void sendMsg(String userCode,String msg,String progress) throws IOException;
    /**
     * SSE-关闭连接
     */
    void closeConnection(String userCode,String msg);
    /**
     * SSE-根据userCode获取连接
     */
    SseEmitter getEmitter(String userCode);

    /**
     * SSE-确认当前用户连接建立成功
     */
    boolean isConnectionReady(String userCode);
    /**
     * SSE-确认连接后再继续操作
     */
    void waitForConnection(String userCode, int maxRetries, long intervalMillis) throws InterruptedException;
}
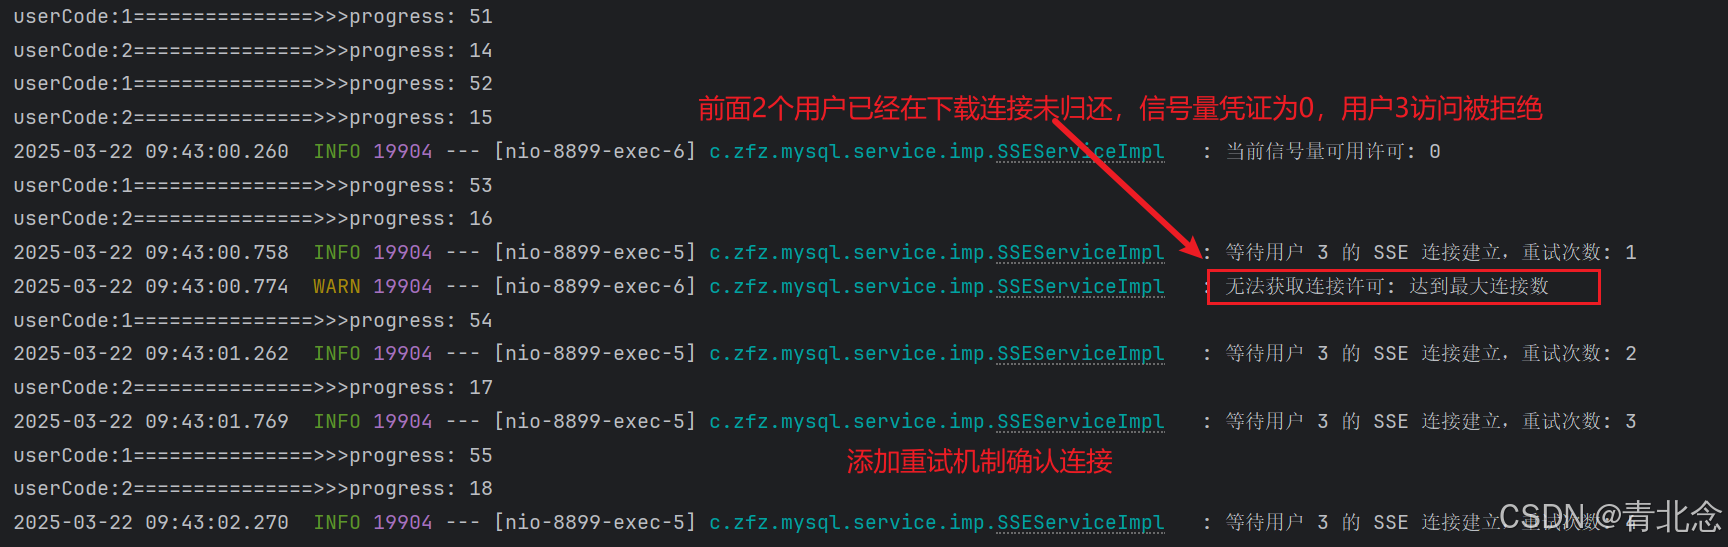
- 这里使用ConcurrentHashMap做并发场景下的多用户id记录,juc辅助类Semaphore控制同时仅有2个用户可以访问,如果2个用户中有用户完成可以继续进行连接,防止连接过多,大文件下载内存消耗问题等。
- 超时时间这里设置的是最大Long.MAX_VALUE,具体看实际业务情况。
package com.zfz.mysql.service.imp;
import com.zfz.mysql.service.SSEService;
import lombok.extern.slf4j.Slf4j;
import org.springframework.stereotype.Service;
import org.springframework.web.servlet.mvc.method.annotation.SseEmitter;
import java.io.IOException;
import java.util.Map;
import java.util.concurrent.ConcurrentHashMap;
import java.util.concurrent.Semaphore;
import java.util.concurrent.TimeUnit;
/**
* @Author:zfz
* @Description:
* @DateTime: 2025/3/20 17:42
**/
@Service
@Slf4j
public class SSEServiceImpl implements SSEService {
private static final Map<String, SseEmitter> SSE_CACHE_MAP = new ConcurrentHashMap<>();
//信号量,仅允许两个用户访问
private final Semaphore semaphore = new Semaphore(2, true);
@Override
public SseEmitter getConnection(String userCode) {
try {
log.info("当前信号量可用许可: {}", semaphore.availablePermits());
if (!semaphore.tryAcquire(500, TimeUnit.MILLISECONDS)) {
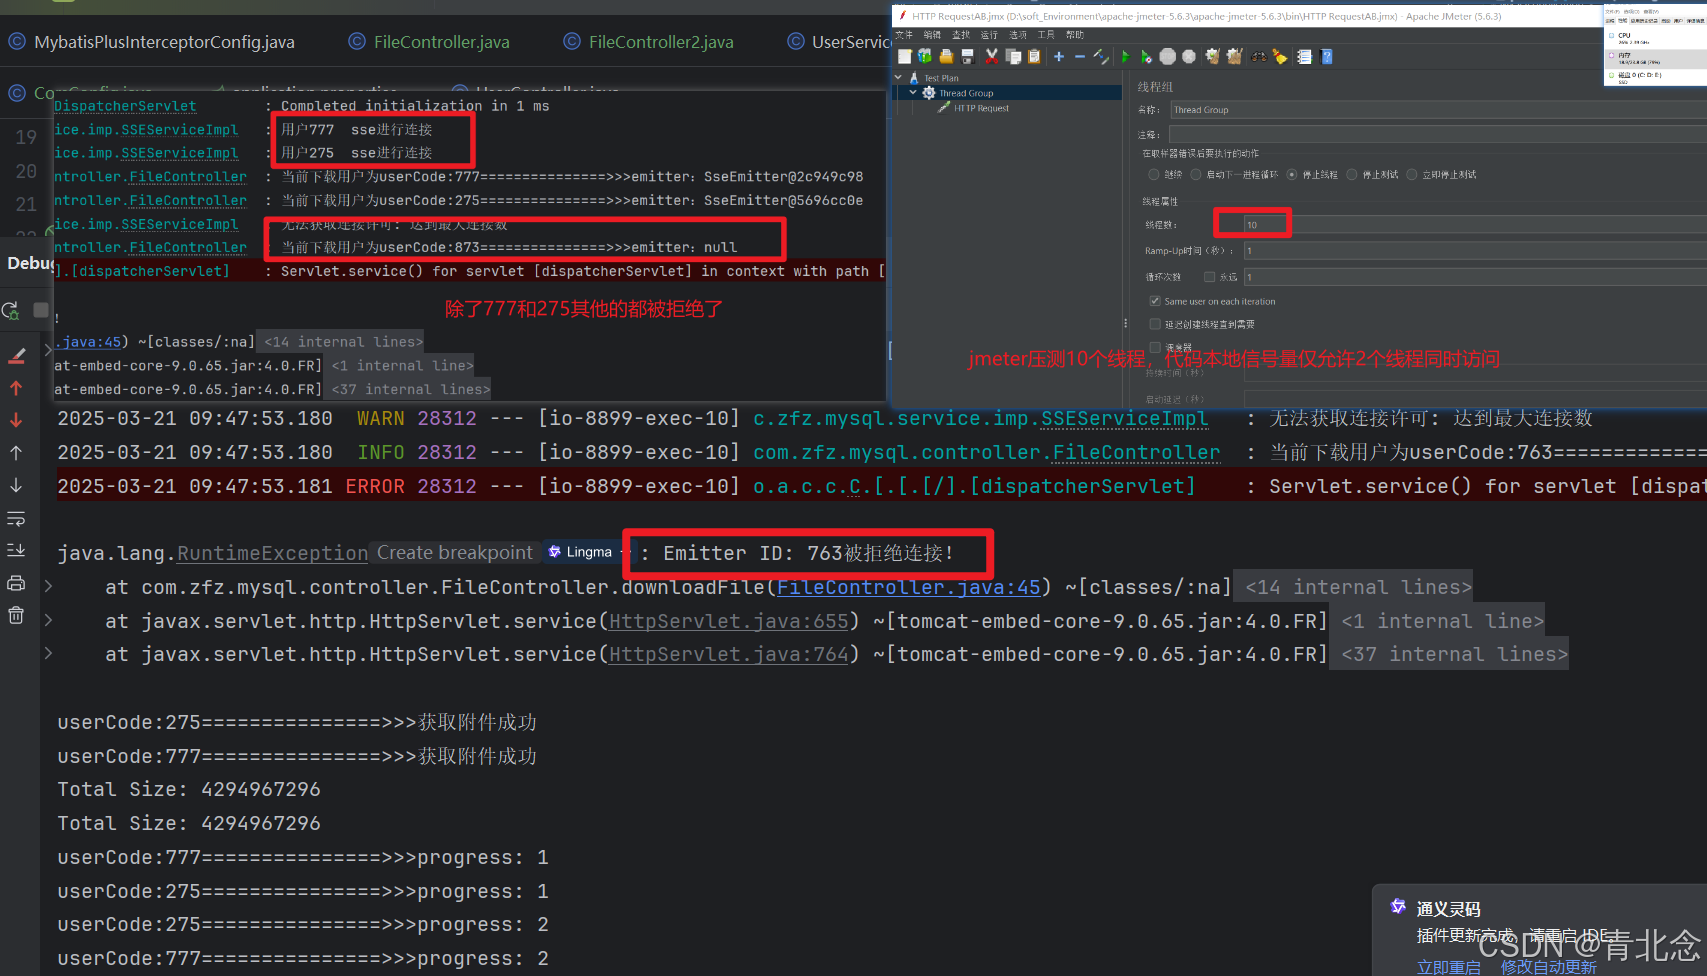
log.warn("无法获取连接许可: 达到最大连接数");
return null;
}
} catch (InterruptedException e) {
Thread.currentThread().interrupt();
log.error("线程中断", e);
return null;
}
final SseEmitter sseEmitter = SSE_CACHE_MAP.get(userCode);
if (sseEmitter != null) {
return sseEmitter;
}
final SseEmitter emitter = new SseEmitter(Long.MAX_VALUE);
emitter.onTimeout(() -> {
log.info("用户{} sse连接超时,准备关闭", userCode);
cleanup(userCode);
});
emitter.onCompletion(() -> {
log.info("用户{} sse连接已释放", userCode);
cleanup(userCode);
});
emitter.onError(throwable -> {
log.info("用户{} sse连接异常,准备关闭", userCode);
cleanup(userCode);
});
if (!SSE_CACHE_MAP.containsKey(userCode)) {
SSE_CACHE_MAP.put(userCode, emitter);
log.info("用户{} sse进行连接", userCode);
log.info("SSE_CACHE_MAP 当前实例:{}", SSE_CACHE_MAP);
}
return emitter;
}
private void cleanup(String userCode) {
semaphore.release(); // 连接结束时释放许可
SSE_CACHE_MAP.remove(userCode);
}
@Override
public void sendMsg(String userCode, String msg,String progress) throws IOException {
final SseEmitter emitter = SSE_CACHE_MAP.get(userCode);
//推送到客户端
emitter.send(SseEmitter.event().name(msg).data(String.valueOf(progress)));
}
@Override
public void closeConnection(String userCode, String msg) {
final SseEmitter emitter = SSE_CACHE_MAP.get(userCode);
if (emitter!=null){
emitter.complete();
cleanup(userCode);
}
}
@Override
public SseEmitter getEmitter(String userCode) {
System.out.println("SSE_CACHE_MAP = " + SSE_CACHE_MAP);
return SSE_CACHE_MAP.get(userCode);
}
@Override
public boolean isConnectionReady(String userCode) {
return SSE_CACHE_MAP.containsKey(userCode);
}
@Override
public void waitForConnection(String userCode, int maxRetries, long intervalMillis) throws InterruptedException {
int retryCount = 0;
while (!isConnectionReady(userCode) && retryCount < maxRetries) {
Thread.sleep(intervalMillis);
retryCount++;
log.info("等待用户 {} 的 SSE 连接建立,重试次数: {}", userCode, retryCount);
}
if (!isConnectionReady(userCode)) {
throw new RuntimeException("用户 " + userCode + " 的 SSE 连接未建立!");
}
}
}
3. 后端下载接口
3.1 思路1:由后端实时通过SSE进行返回给前端进行进度条展示(前端回显即可)
- 这个案例的真实场景应该是:用户需要下载一个大的压缩包,而后端需要将oss中多个小附件合并并压缩为一个大压缩包然后下载。 所以进度条时间应该是:“oss下载时间”+“多个文件压缩时间”+“写入response.getOutputStream()”的时间,这里下载的时间我做睡眠2s的模拟,多个文件直接压缩并写入response.OutputStream具体可以下载本地大文件再写入。但是现在的思路是直接有后端计算进度返回,故而直接做操作。
package com.zfz.mysql.controller;
import cn.hutool.db.Session;
import com.zfz.mysql.service.SSEService;
import com.zfz.mysql.service.imp.SSEServiceImpl;
import lombok.RequiredArgsConstructor;
import org.slf4j.Logger;
import org.slf4j.LoggerFactory;
import org.springframework.http.HttpHeaders;
import org.springframework.http.MediaType;
import org.springframework.web.bind.annotation.GetMapping;
import org.springframework.web.bind.annotation.RequestParam;
import org.springframework.web.bind.annotation.RestController;
import org.springframework.web.servlet.mvc.method.annotation.SseEmitter;
import javax.servlet.http.HttpServletResponse;
import java.io.File;
import java.io.FileInputStream;
import java.io.IOException;
import java.util.concurrent.ExecutorService;
import java.util.concurrent.Executors;
import java.util.concurrent.TimeUnit;
import java.util.zip.ZipEntry;
import java.util.zip.ZipOutputStream;
@RestController
@RequiredArgsConstructor
public class FileController {
private static final Logger log = LoggerFactory.getLogger(FileController.class);
private final ExecutorService executorService = Executors.newCachedThreadPool();
private final SSEService sseService;
@GetMapping(value = "/download/progress",produces = MediaType.TEXT_EVENT_STREAM_VALUE)
public SseEmitter downloadProgress(@RequestParam String userCode) {
final SseEmitter sseEmitter = sseService.getConnection(userCode);
return sseEmitter;
}
@GetMapping("/download/file")
public void downloadFile(@RequestParam String userCode,HttpServletResponse response) throws IOException, InterruptedException {
try {
sseService.waitForConnection(userCode, 10, 500); // 最多重试 10 次,每次间隔 500ms
} catch (InterruptedException e) {
Thread.currentThread().interrupt();
throw new RuntimeException("等待 SSE 连接时线程中断", e);
} catch (RuntimeException e) {
throw new RuntimeException("SSE 连接未建立: " + e.getMessage());
}
final SseEmitter emitter = sseService.getEmitter(userCode);
log.info("当前下载用户为userCode:"+userCode+"===============>>>emitter:"+emitter);
if (emitter == null) {
throw new RuntimeException("Emitter ID: " + userCode+"被拒绝连接!");
}
/**
* 睡眠2s模拟下载操作
*/
String[] filePaths = {"src/main/resources/a.bin", "src/main/resources/b.bin", "src/main/resources/c.bin", "src/main/resources/d.bin"};
TimeUnit.SECONDS.sleep(2);
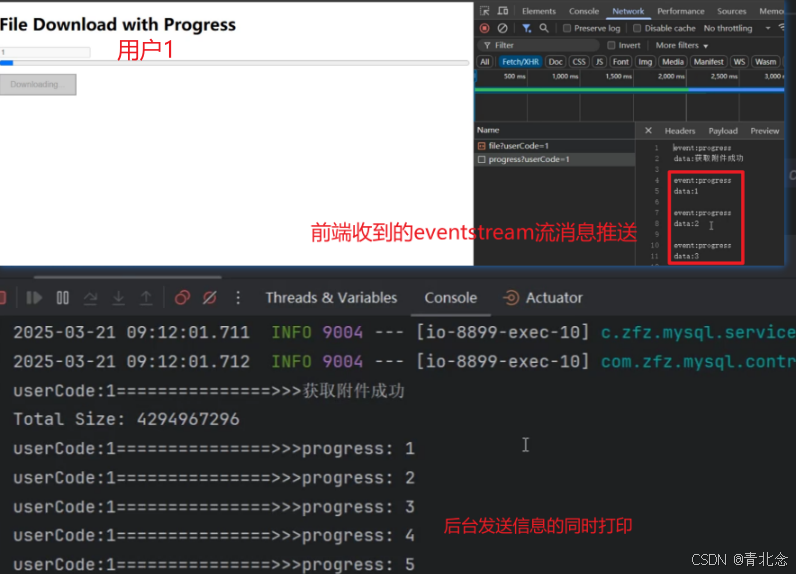
System.out.println("userCode:"+userCode+"===============>>>"+"获取附件成功");
sseService.sendMsg(userCode,"progress","获取附件成功");
response.setHeader(HttpHeaders.CONTENT_DISPOSITION, "attachment; filename=files.zip");
response.setContentType("application/zip");
long totalSize = 0; // 计算所有文件的总大小
for (String filePath : filePaths) {
File file = new File(filePath);
totalSize += file.length();
}
System.out.println("Total Size: " + totalSize);
int currentProgress = 0;
try (ZipOutputStream zipOut = new ZipOutputStream(response.getOutputStream())) {
long accumulatedSize = 0;
for (int i = 0; i < filePaths.length; i++) {
File file = new File(filePaths[i]);
ZipEntry zipEntry = new ZipEntry(file.getName());
zipOut.putNextEntry(zipEntry);
try (FileInputStream fis = new FileInputStream(file)) {
byte[] buffer = new byte[1024];
int bytesRead;
while ((bytesRead = fis.read(buffer)) != -1) {
zipOut.write(buffer, 0, bytesRead);
accumulatedSize += bytesRead;
// 更新当前进度:累计已处理文件大小除以总大小乘以100得到整体进度
int progress = (int) (((float) accumulatedSize / totalSize) * 100);
// 只有在进度增加时才发送更新
if (progress > currentProgress) {
sseService.sendMsg(userCode,"progress",progress+"");
System.out.println("userCode:"+userCode+"===============>>>"+"progress: " + progress);
// 更新为最新进度
currentProgress = progress;
}
}
}
zipOut.closeEntry();
}
if (emitter != null) {
sseService.sendMsg(userCode,"complete","Download complete");
sseService.closeConnection(userCode,"close");
}
} catch (Exception e) {
if (emitter != null) {
emitter.completeWithError(e);
}
// 记录错误日志
e.printStackTrace();
}
finally {
sseService.closeConnection(userCode,"close");
}
}
}
3.2 思路2:前端进行进度条计算,后端SSE压缩完成后直接返回total
这里直接在压缩完后本地获取到压缩包的size返回给前端,前端根据总total实时计算。
      executorService.submit(() -> {
            try {
                // 文件列表
                String[] filePaths = {
                        "src/main/resources/a.txt",
                        "src/main/resources/b.txt",
                        "src/main/resources/c.txt",
                        "src/main/resources/d.txt"
                };
                // 计算总大小
                long totalSize = calculateTotalSize(filePaths);
                long writtenSize = 0;
                // 临时文件路径
                String tempZipPath = "temp/files.zip";
                File tempZipFile = new File(tempZipPath);
                tempZipFile.getParentFile().mkdirs(); // 创建父目录
                // 创建 ZipOutputStream
                try (ZipOutputStream zipOut = new ZipOutputStream(new FileOutputStream(tempZipFile))) {
                    for (String filePath : filePaths) {
                        File file = new File(filePath);
                        ZipEntry zipEntry = new ZipEntry(file.getName());
                        zipOut.putNextEntry(zipEntry);
                        // 读取文件并写入 ZipOutputStream
                        try (FileInputStream fis = new FileInputStream(file)) {
                            Thread.sleep(1000); // 模拟延迟
                            byte[] buffer = new byte[1024];
                            int bytesRead;
                            while ((bytesRead = fis.read(buffer)) != -1) {
                                zipOut.write(buffer, 0, bytesRead);
                                writtenSize += bytesRead;
                                // 计算并推送压缩进度(压缩阶段占 50%)
                                int progress = (int) ((writtenSize * 50) / totalSize);
                                emitter.send(SseEmitter.event().name("progress").data(String.valueOf(progress)));
                                System.out.println("压缩进度:" + progress + "%");
                            }
                        }
                        zipOut.closeEntry();
                    }
                }
                // 设置响应头
                response.setHeader(HttpHeaders.CONTENT_DISPOSITION, "attachment; filename=" + tempZipFile.getName());
                response.setContentType("application/zip");
                response.setContentLength((int) tempZipFile.length());

                // 传输文件到客户端
                try (FileInputStream fis = new FileInputStream(tempZipFile)) {
                    byte[] buffer = new byte[1024];
                    int bytesRead;
                    long bytesTransferred = 0;
                    while ((bytesRead = fis.read(buffer)) != -1) {
                        response.getOutputStream().write(buffer, 0, bytesRead);
                        bytesTransferred += bytesRead;
                        // 计算并推送传输进度(传输阶段占 50%,加上之前的 50%)
                        int progress = (int) (50 + (bytesTransferred * 50) / tempZipFile.length());
                        emitter.send(SseEmitter.event().name("progress").data(String.valueOf(progress)));
                        System.out.println("传输进度:" + progress + "%");
                    }
                }
                // 推送完成事件
                emitter.send(SseEmitter.event().name("progress").data("100"));
                emitter.complete();
            } catch (Exception e) {
                emitter.completeWithError(e);
            }
        });
4. 前端代码对应思路1
4.1 前端使用blob下载代码
<template>
<div>
<h1>File Download with Progress</h1>
<!-- 输入框用于输入文件ID -->
<input v-model="downloadId" placeholder="Enter file userCode" :disabled="isDownloading">
<!-- 显示下载进度 -->
<progress v-if="isDownloading" :value="progress" max="100"></progress>
<!-- 下载按钮 -->
<button @click="startDownload(downloadId)" :disabled="isDownloading">
{{ isDownloading ? 'Downloading...' : 'Download' }}
</button>
</div>
</template>
<script lang="ts">
import { defineComponent, ref } from 'vue';
export default defineComponent({
name: 'App',
setup() {
const progress = ref(0); // 进度条初始值
const isDownloading = ref(false); // 是否正在下载
const downloadId = ref(''); // 用户输入的id值
const startDownload = (userCode: string) => {
if (!userCode) {
alert('Please enter a valid ID.');
return;
}
isDownloading.value = true;
progress.value = 0;
// 使用用户提供的id作为查询参数
const eventSourceUrl = `/api/download/progress?userCode=${encodeURIComponent(userCode)}`;
const eventSource = new EventSource(eventSourceUrl);
// 监听进度事件
eventSource.addEventListener('progress', (event) => {
const newProgress = parseInt(event.data);
if (!isNaN(newProgress)) {
progress.value = newProgress;
}
});
// 监听完成事件
eventSource.addEventListener('complete', () => {
eventSource.close();
isDownloading.value = false;
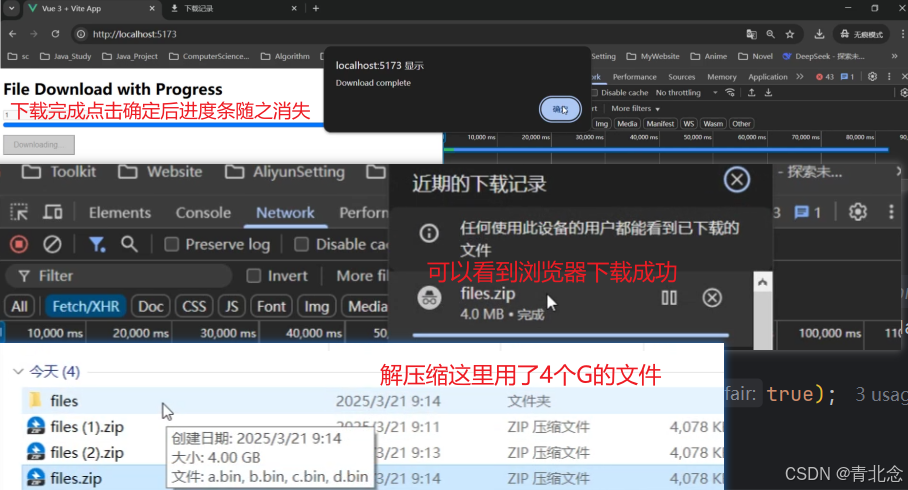
alert('Download complete');
});
// 监听错误事件
eventSource.onerror = () => {
console.error('EventSource error: Connection failed or closed.');
eventSource.close();
isDownloading.value = false;
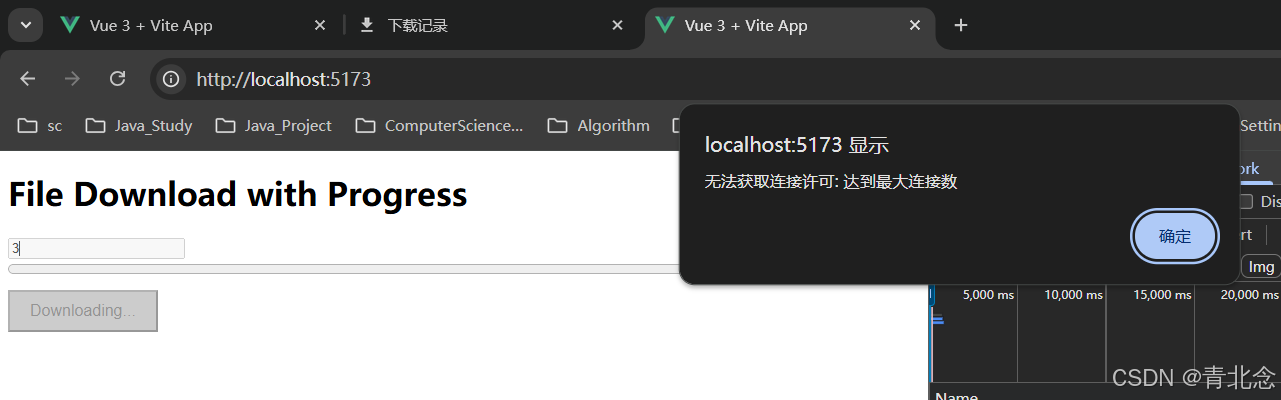
alert('无法获取连接许可: 达到最大连接数');
};
// 发起下载请求,并传递id参数
fetch(`/api/download/file?userCode=${encodeURIComponent(userCode)}`)
.then((response) => response.blob())
.then((blob) => {
// 创建下载链接
const url = window.URL.createObjectURL(blob);
const link = document.createElement('a');
link.href = url;
link.download = 'files.zip'; // 设置下载文件名
document.body.appendChild(link);
link.click();
document.body.removeChild(link);
window.URL.revokeObjectURL(url); // 释放 URL 对象
})
.catch((error) => {
console.error('File download failed:', error);
alert('File download failed.');
});
};
return {
progress,
isDownloading,
downloadId,
startDownload,
};
},
});
</script>
<style scoped>
progress {
width: 100%;
height: 20px;
}
button {
margin-top: 10px;
padding: 10px 20px;
font-size: 16px;
}
button:disabled {
background-color: #ccc;
cursor: not-allowed;
}
</style>
4.2 考虑到用blob可能会撑爆浏览器内存,因为可能文件极大,使用流式下载直接下载到本地磁盘,防止内存写入崩溃
File System Access API 技术实现
下面是使用该技术的一个案例
提供思路作者:vueer
export const fetchStream = async (downloadUrl, fileName, method = "POST", data = {}) => {
  let writer;
  try {
    writer = await window
      .showSaveFilePicker({
        suggestedName: fileName,
      })
      .then(fileHandle => fileHandle.createWritable());
    let getData = "";
    if (method === "GET") {
      for (const key in data) {
        const val = data[key];
        getData += `${key}=${val}&`;
      }
    }
    const url = baseURL + downloadUrl + (getData ? `?${getData}` : "");
    const headers = new Headers({
      Authorization: "Bearer your_token_here",
      "Content-Type": "application/json",
      ...getHeaders(downloadUrl, method, data),
    });
    const body = JSON.stringify(data);
    const response = await fetch(url, {
      method,
      headers,
      body: method === "POST" ? body : undefined,
    });
    if (!response.ok) {
      throw new Error(`网络错误: ${response.status} ${response.statusText}`);
    }
    const contentLength = response.headers.get("Content-Length");
    const totalSize = contentLength ? parseInt(contentLength, 10) : null;
    console.log(`Total size: ${totalSize} bytes`);
    console.log(contentLength);
    let downloadedSize = 0;

    const reader = response.body.getReader();
    while (true) {
      const { done, value } = await reader.read();
      if (done) break;
      downloadedSize += value.length;

      await writer.write(value);
      if (totalSize) {
        const progress = (downloadedSize / totalSize) * 100;
        console.log(`Download progress: ${progress.toFixed(2)}%`);
      }
    }

    await writer.close();
    console.log("Download completed");
  } catch (error) {
    console.error(`Error downloading file: ${error.message}`, error);
    await writer?.abort(); // 终止文件写入操作
  }
};
5. 效果展示
5.1 2个用户模拟下载
开两个用户测试,用户1和用户9
用户1
进度条消失下载完成关闭连接
关闭连接

5.2 重试与并发控制
设置的用户是2,这里是第3个直接拒绝!
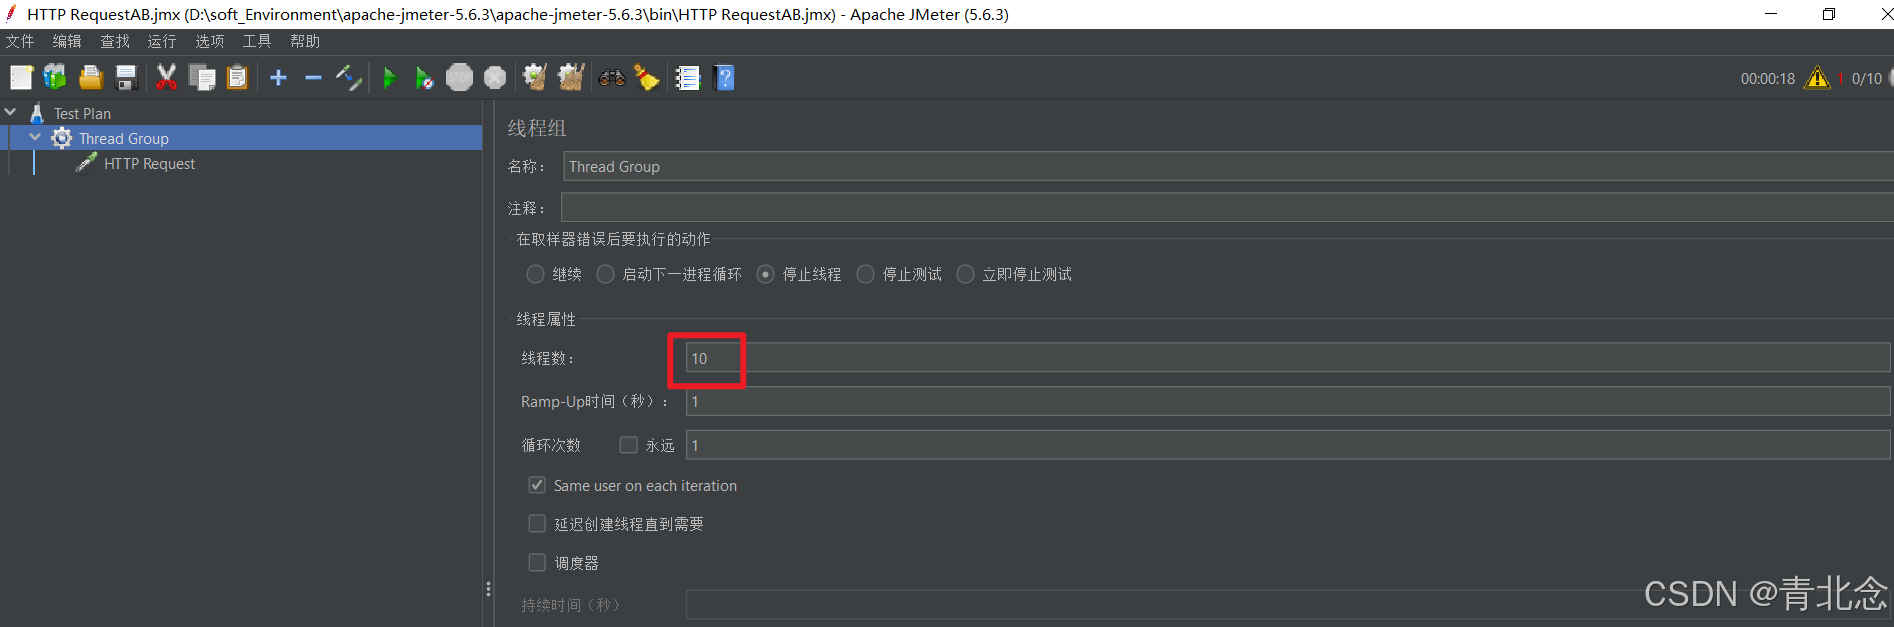
6. jmeter压测,目前仅允许2个用户同时下载
jmeter配置

结果:
7. 总结
和小伙伴wm讨论后,还有待思考的优化
- 进度条的做法:一种是后端做进度条计算,前端傻瓜式调用展示
- 进度条的做法:后端压缩文件后将总total, response.setContentLength((int) tempZipFile.length());返回给前端文件大小,前端下载时自己进行计算。这样的话sse的作用仅在时发送total。其他逻辑交给前端
- 内存:如果下载的文件非常大(例如超过浏览器或设备能够舒适处理的大小),这可能会导致较高的内存使用率,因为整个文件内容会以Blob对象的形式加载到内存中。非常消耗内存。 【wm伙伴提到可以将数据流写入硬盘而非先加载到内存(Blob)的方式,可以做优化,上文中已给出优化方法!】
- 思考:是否可用分块下载chunked download,分片下载,断点续传等功能继续优化业务需求
- 【至于目前的做法是不是玩具还有待测试】
此博客源于对SSE技术学习以及实际业务场景的简单想法。


 被折叠的 条评论
为什么被折叠?
被折叠的 条评论
为什么被折叠?
 到【灌水乐园】发言


