


一、JDBC 扩展
1.1 实体类和ROM
实体类代码:
package com.atguigu.advanced.pojo;

//类名就是数据库表的 t_ 后面的单词全写
public class Employee {

    private Integer empId;//emp_id

    private String empName;//emp_name

    private Double empSalary;//emp_salary

    private Integer empAge;//emp_age


    /**
     * 设置 无参、有参、get、set、toString 方法
     */
    public Employee() {
    }

    public Employee(Integer empId, String empName, Double empSalary, Integer empAge) {
        this.empId = empId;
        this.empName = empName;
        this.empSalary = empSalary;
        this.empAge = empAge;
    }

    public Integer getEmpId() {
        return empId;
    }

    public void setEmpId(Integer empId) {
        this.empId = empId;
    }

    public String getEmpName() {
        return empName;
    }

    public void setEmpName(String empName) {
        this.empName = empName;
    }

    public Double getEmpSalary() {
        return empSalary;
    }

    public void setEmpSalary(Double empSalary) {
        this.empSalary = empSalary;
    }

    public Integer getEmpAge() {
        return empAge;
    }

    public void setEmpAge(Integer empAge) {
        this.empAge = empAge;
    }

    @Override
    public String toString() {
        return "Employee{" +
                "empId=" + empId +
                ", empName='" + empName + '\'' +
                ", empSalary=" + empSalary +
                ", empAge=" + empAge +
                '}';
    }
}
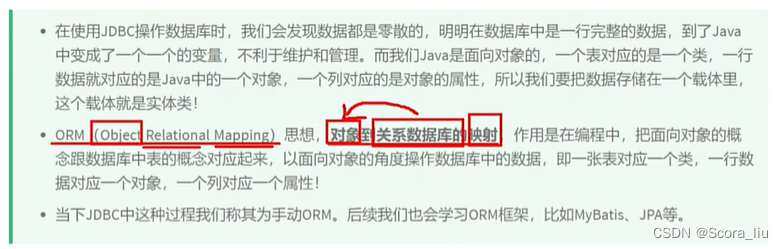
ORM:
ORM:
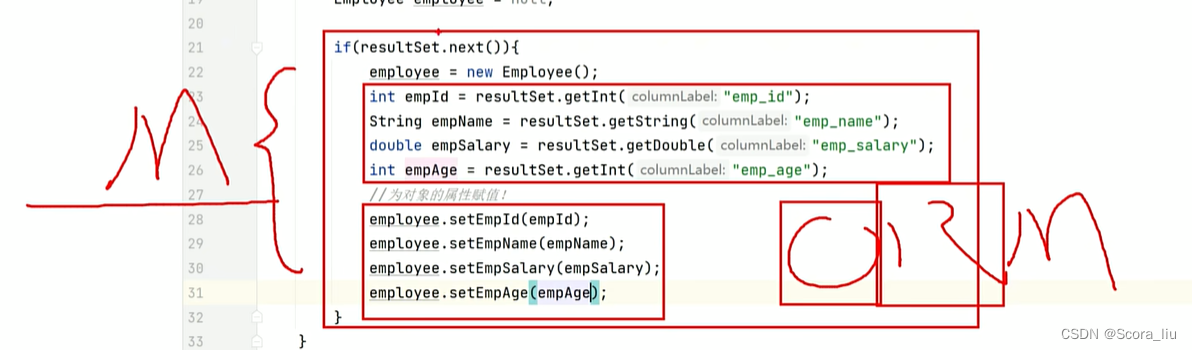
以面向对象的思想去操作数据库。
即:一张表对应一个类,一行数据对应一个对象,一个列对应一个属性
package com.atguigu.advanced;

import com.atguigu.advanced.pojo.Employee;
import org.junit.Test;

import java.sql.*;
import java.util.ArrayList;

public class JDBCAdvanced {

    /**
     * 什么是ORM
     * @throws Exception
     */
    @Test
    public void testORM() throws Exception {
        //1.注册驱动
        Class.forName("com.mysql.cj.jdbc.Driver");

        //2.创建连接对象
        Connection connection = DriverManager.getConnection("jdbc:mysql:///atguigu", "root", "123456");

        //3.获取PreparedStatement对象,执行SQL语句
        PreparedStatement preparedStatement = connection.prepareStatement("select * from t_emp where emp_id = ?");

        //4.为占位符赋值,然后执行并返回结果集
        preparedStatement.setInt(1,1);
        ResultSet resultSet = preparedStatement.executeQuery();

        //创建对象
        Employee employee = null;

        //5.处理结果,遍历resultSet
        if (resultSet.next()){
            employee = new Employee();
            int empId = resultSet.getInt("emp_id");
            String empName = resultSet.getString("emp_name");
            double empSalary = resultSet.getDouble("emp_salary");
            int empAge = resultSet.getInt("emp_age");
            //为对象的属性赋值
            employee.setEmpId(empId);
            employee.setEmpName(empName);
            employee.setEmpSalary(empSalary);
            employee.setEmpAge(empAge);

        }

        System.out.println(employee);

        //6.释放资源
        resultSet.close();
        preparedStatement.close();
        connection.close();


    }

    @Test
    public void testORMList() throws Exception {
        //1.注册驱动
        Class.forName("com.mysql.cj.jdbc.Driver");
        //2.获取连接对象
        Connection connection = DriverManager.getConnection("jdbc:mysql:///atguigu", "root", "123456");

        //3.执行SQL语句,获取PreparedStatement对象
        PreparedStatement preparedStatement = connection.prepareStatement("select * from t_emp");

        //4.执行并接收返回的,结果集
        ResultSet resultSet = preparedStatement.executeQuery();

        //对象的创建
        Employee employee = null;

        ArrayList<Employee> employeeList = new ArrayList<>();

        //5.处理结果集,遍历resultSet
        while (resultSet.next()){
            employee = new Employee();
            int empId = resultSet.getInt("emp_id");
            String empName = resultSet.getString("emp_name");
            double empSalary = resultSet.getDouble("emp_salary");
            int empAge = resultSet.getInt("emp_age");

            //为对象属性赋值
            employee.setEmpId(empId);
            employee.setEmpName(empName);
            employee.setEmpSalary(empSalary);
            employee.setEmpAge(empAge);
            //将每次循环封装的一行数据的对象存储在集合里
            employeeList.add(employee);
        }

        //处理结果:遍历集合
        for (Employee emp : employeeList){
            System.out.println(emp);
        }


        //6.释放资源
        resultSet.close();
        preparedStatement.close();
        connection.close();


    }
}
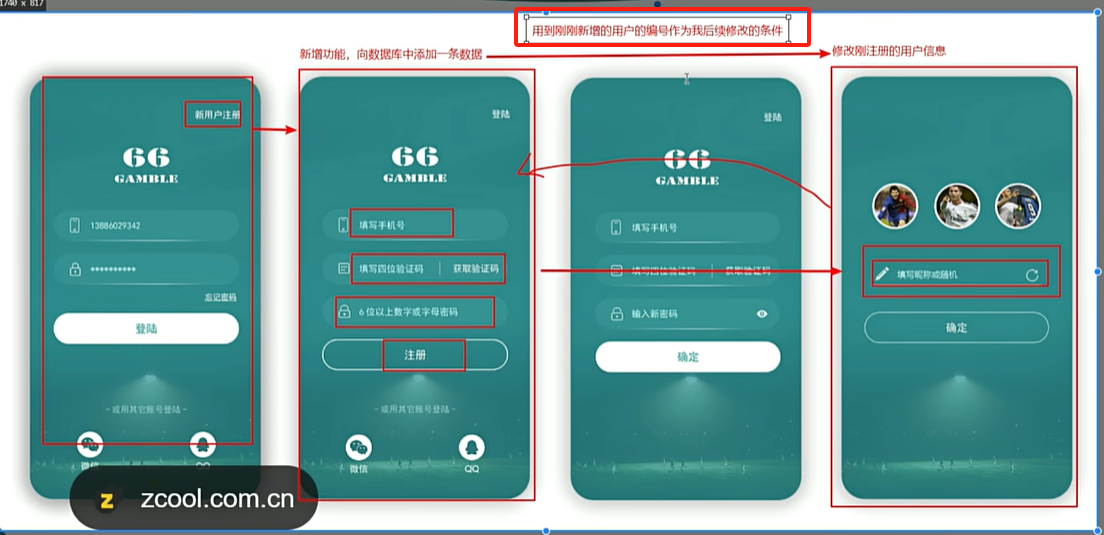
1.2 主键回显
主键回显:
在数据中,执行新增操作时,主键列为自动增长,可以在表中直观的看到,但是在Java程序中,我们执行完新增后,只能得到受影响的行数,无法得知当前新增数据的主键值。在Java程序中获取数据库中插入新数据后的主键值,并赋值给Java对象,此操作为主键回显(主键回填)。
/**
* 主键回显(主键回填)
* @throws Exception
*/
@Test
public void testKP() throws Exception {
//1.注册驱动
Class.forName("com.mysql.cj.jdbc.Driver");
//2.获取连接
Connection connection = DriverManager.getConnection("jdbc:mysql:///atguigu", "root", "123456");
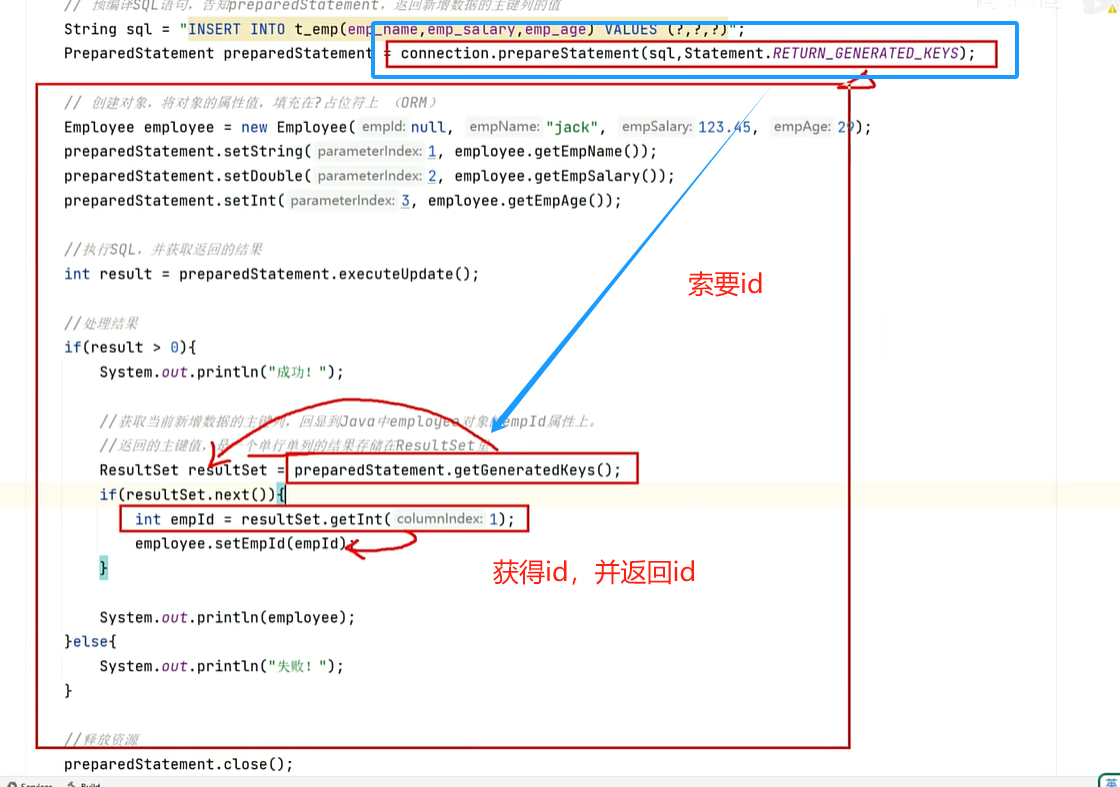
//3.预编译SQL语句,获取PreparedStatement对象;告知preparedStatement,返回新增数据的主键列的值
String sql = "INSERT INTO t_emp(emp_name,emp_salary,emp_age) VALUES (?,?,?)";
PreparedStatement preparedStatement = connection.prepareStatement(sql,Statement.RETURN_GENERATED_KEYS);
//创建对象,将对象的属性值,填充在?占位符上(ORM)
Employee employee = new Employee(null,"jack",123.45,29);
preparedStatement.setString(1, employee.getEmpName());
preparedStatement.setDouble(2,employee.getEmpSalary());
preparedStatement.setInt(3,employee.getEmpAge());
//4.执行SQL,并获取返回的结果
int result = preparedStatement.executeUpdate();
//5.处理结果
ResultSet resultSet = null;
if(result > 0){
System.out.println("成功!");
//获取当前新增数据的主键列,回显到Java中employee对象的empId属性上
//返回的结果值,是一个单行单例的结果存储在ResultSet里
resultSet = preparedStatement.getGeneratedKeys();
if (resultSet.next()){
int empId = resultSet.getInt(1);
employee.setEmpId(empId);
}
System.out.println(employee);
}else {
System.out.println("失败!");
}
//6.释放资源
//避免空指针异常
if (resultSet != null){
resultSet.close();
}
preparedStatement.close();
connection.close();
}1.3 批量操作
1、插入多条数据时,一条一条发送给数据库执行,效率低下
2、通过批量操作,可以提升多次操作效率
没有批量操作的代码
/**
     * 没有批量操作的代码
     * @throws Exception
     */
    @Test
    public void testMoreInsert() throws Exception{
        //1.注册驱动
        Class.forName("com.mysql.cj.jdbc.Driver");

        //2.获取连接
        Connection connection = DriverManager.getConnection("jdbc:mysql:///atguigu", "root", "123456");

        //3.编写SQL语句
        String sql  = "insert into t_emp (emp_name,emp_salary,emp_age) values (?,?,?)";

        //4.创建预编译的PreparedStatement,传入SQL语句
        PreparedStatement preparedStatement = connection.prepareStatement(sql);

        //获取当前代码执行的时间,毫秒值
        //开始的时间
        long start = System.currentTimeMillis();
        for (int i=0;i<10000;i++){
            //5.为占位符赋值
            preparedStatement.setString(1,"marry"+i);
            preparedStatement.setDouble(2,100.0+i);
            preparedStatement.setInt(3,20+i);

            preparedStatement.executeUpdate();
        }
        //获取当前代码执行结束的时间,毫秒值
        long end = System.currentTimeMillis();

        System.out.println("消耗时间:"+ (end - start));

        //6.释放资源
        preparedStatement.close();
        connection.close();
    }
有批量操作的代码
/**
* 有批量操作的代码
* @throws Exception
*/
@Test
public void testBatch() throws Exception{
//1.注册驱动
Class.forName("com.mysql.cj.jdbc.Driver");
//2.获取连接
Connection connection = DriverManager.getConnection("jdbc:mysql:///atguigu?rewriteBatchedStatements=true", "root", "123456");
//3.编写SQL语句
/*
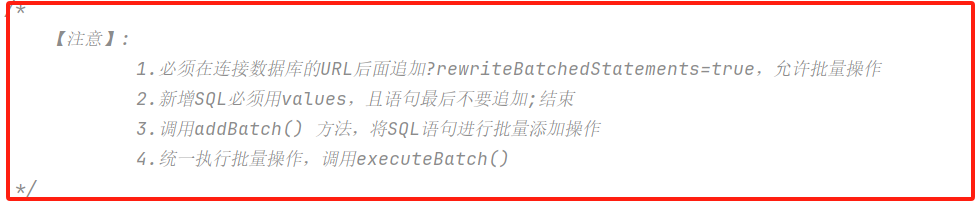
【注意】:
1.必须在连接数据库的URL后面追加?rewriteBatchedStatements=true,允许批量操作
2.新增SQL必须用values,且语句最后不要追加;结束
3.调用addBatch() 方法,将SQL语句进行批量添加操作
4.统一执行批量操作,调用executeBatch()
*/
String sql = "insert into t_emp (emp_name,emp_salary,emp_age) values (?,?,?)";
//4.创建预编译的PreparedStatement,传入SQL语句
PreparedStatement preparedStatement = connection.prepareStatement(sql);
//获取当前代码执行的时间,毫秒值
//开始的时间
long start = System.currentTimeMillis();
for (int i=0;i<10000;i++){
//5.为占位符赋值
preparedStatement.setString(1,"marry"+i);
preparedStatement.setDouble(2,100.0+i);
preparedStatement.setInt(3,20+i);
preparedStatement.addBatch();
}
//执行批量操作
preparedStatement.executeBatch();
//获取当前代码执行结束的时间,毫秒值
long end = System.currentTimeMillis();
System.out.println("消耗时间:"+ (end - start));
//6.释放资源
preparedStatement.close();
connection.close();
}二、连接池
2.1 现有问题

2.2 连接池

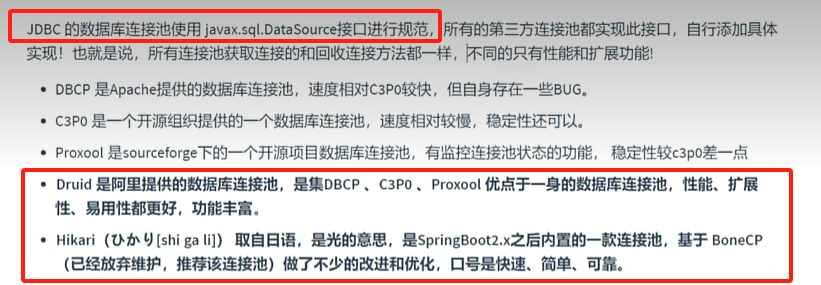
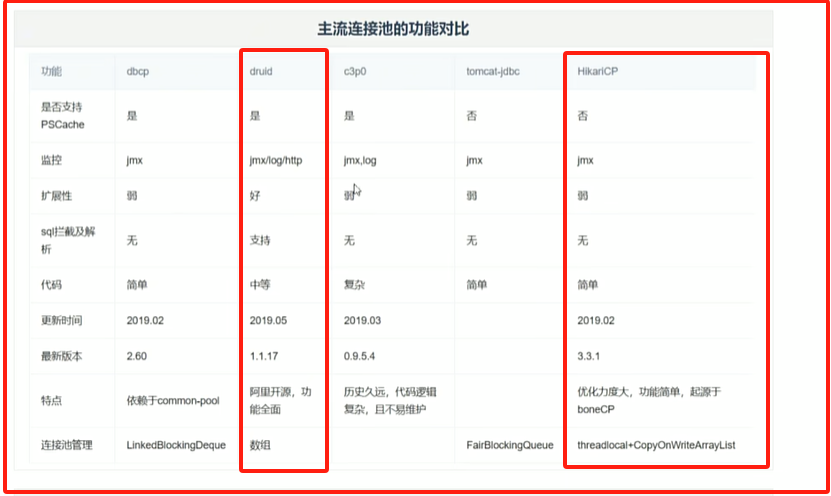
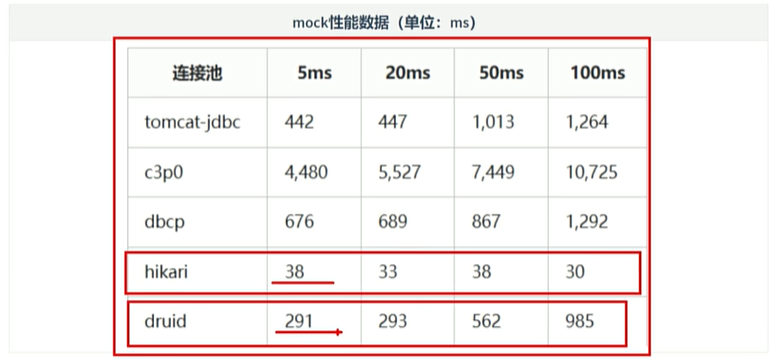
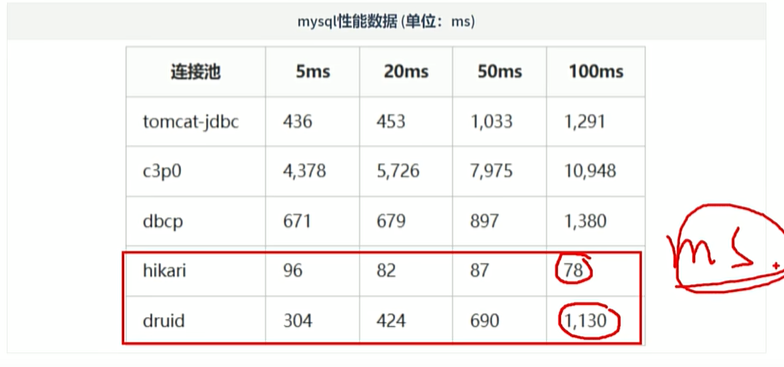
2.3 常见连接池
2.4 Druid 连接池使用
1、使用步骤
- 引入 jar 包
- 编码
2、代码实现 - 硬编码方式(了解)
把连接池的配置和Java代码耦合到一起,不利于更新(更改)、维护
/**
     * Druid 硬编码
     * @throws Exception
     */
    @Test
    public void testHardCodeDruid() throws Exception{
        /*
            硬编码:将连接池的配置信息和Java代码耦合在一起
                1.创建DruidDataSource连接池对象
                2.设置连接池的配置信息【必须 | 非必须】
                3.通过连接池获取连接对象
                4.回收连接【不是释放连接,而是将连接归还给连接池,给其他线程进行复用】
         */

        //1.创建DruidDataSource连接池对象
        DruidDataSource druidDataSource = new DruidDataSource();

        //2.设置连接池的配置信息【必须 | 非必须】
        //2.1 必须设置的配置
        druidDataSource.setDriverClassName("com.mysql.cj.jdbc.Driver");
        druidDataSource.setUrl("jdbc:mysql:///atguigu");
        druidDataSource.setUsername("root");
        druidDataSource.setPassword("123456");

        //2.2 非必须设置的配置
        druidDataSource.setInitialSize(10);
        druidDataSource.setMaxActive(20);

        //3.通过连接池获取连接对象
        //DruidPooledConnection extends PoolableWrapper implements PooledConnection, Connection
        DruidPooledConnection connection = druidDataSource.getConnection();

        //基于connection进行CRUD

        //4.归还连接(回收连接)
        connection.close();


    }
3、代码实现 - 软编码方式(推荐⭐)
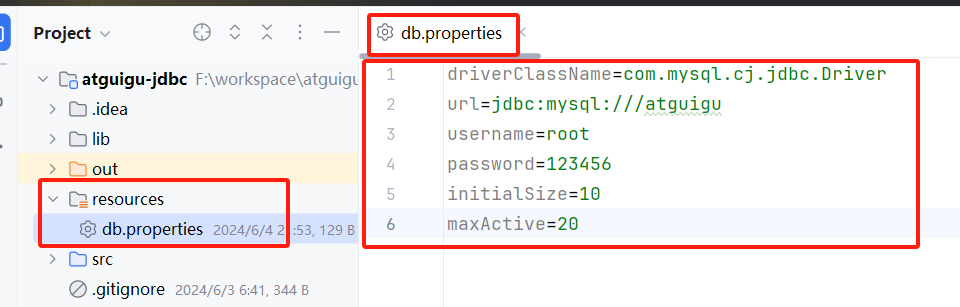
把连接池的配置提取出来放到配置文件里,把配置文件和 Java 代码解耦,好处是利于维护和更改。
在项目目录下创建resource文件夹,标识该文件夹为资源目录,创建db.properties配置文件,将连接信息定义在该文件中。
/**
     * 软编码
     * @throws Exception
     */
    @Test
    public void testResourcesDruid() throws Exception {
        //1.创建Properties集合,用于存储外部配置文件的key和value值
        Properties properties = new Properties();

        //2.读取外部配置文件,获取输入流,加载到Properties集合里
        //字节输入流
        InputStream inputStream = DruidTest.class.getClassLoader().getResourceAsStream("db.properties");
        properties.load(inputStream);

        //3.基于Properties集合构建DruidDataSource连接池
        DataSource dataSource = DruidDataSourceFactory.createDataSource(properties);

        //4.通过连接池获取连接对象
        Connection connection = dataSource.getConnection();
        System.out.println(connection);

        //5.开发CRUD

        //6.回收连接
        connection.close();
    }
2.5 HikariCP 连接池使用
1、硬编码
/**
* Hikari 硬编码
* @throws Exception
*/
@Test
public void testHardCodeHikari() throws Exception{
/*
硬编码:将连接池的配置信息和Java代码耦合在一起
1、创建HikariDataSource连接池对象
2、设置连接池的配置信息【必须 | 非必须】
3、通过连接池获取连接对象
4、回收连接
*/
//1.创建HikariDataSource连接池对象
HikariDataSource hikariDataSource = new HikariDataSource();
//2.设置连接池的配置信息【必须 | 非必须】
//2.1 必须设置的配置
hikariDataSource.setDriverClassName("com.mysql.cj.jdbc.Driver");
hikariDataSource.setJdbcUrl("jdbc:mysql:///atguigu");
hikariDataSource.setUsername("root");
hikariDataSource.setPassword("123456");
//2.2 非必须设置的配置
hikariDataSource.setMinimumIdle(10);
hikariDataSource.setMaximumPoolSize(20);
//3.通过连接池获取连接对象
Connection connection = hikariDataSource.getConnection();
System.out.println(connection);
//4.回收连接
connection.close();
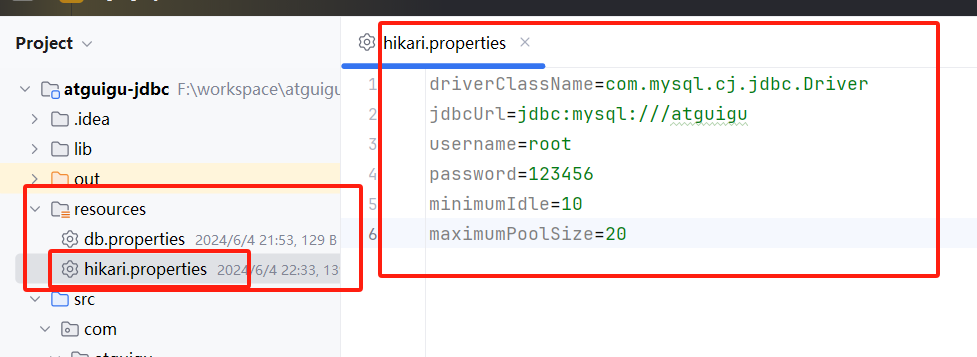
}2、软编码
/**
     * Hikari 软编码
     * @throws Exception
     */
    @Test
    public void testResourcesHikari() throws Exception{
        //1.创建Properties集合,用于存储外部配置文件的key和value值
        Properties properties = new Properties();

        //2.读取外部配置文件,获取输入流,加载到Properties集合里
        InputStream inputStream = HikariTest.class.getClassLoader().getResourceAsStream("hikari.properties");
        properties.load(inputStream);

        //3.创建HikariConfig连接池配置对象,将Properties集合传进去
        HikariConfig hikariConfig = new HikariConfig(properties);

        //4.基于HikariCofig连接池配置对象,构建HikariDataSource
        HikariDataSource hikariDataSource = new HikariDataSource(hikariConfig);

        //5.获取连接
        Connection connection = hikariDataSource.getConnection();
        System.out.println(connection);

        //6.回收连接
        connection.close();
    }


 被折叠的 条评论
为什么被折叠?
被折叠的 条评论
为什么被折叠?
 到【灌水乐园】发言


