 理解Android活动生命周期


一.活动的生命周期
1.活动状态
- 运行状态:一个活动处于返回栈的栈顶(系统最不愿意回收的活动,影响用户体验)
- 暂停状态:活动不处于栈顶,但仍然可见(系统不愿意回收的活动,影响用户体验,内存极低的情况会回收)
- 停止状态:活动不处于栈顶,并且完全不可见(系统会为活动保存相应的状态和成员变量,需要内存时会回收)
- 销毁状态:活动从返回栈移除后就变成了销毁状态(系统优先回收,保证手机内存充足)
2.活动的生存周期
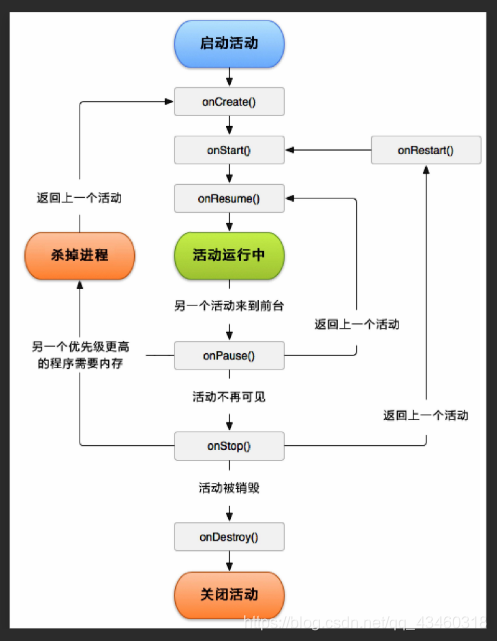
Activity类中定义了7个回调方法,以覆盖活动生命周期的每一个环节。
- onCreate() 用于完成活动的初始化操作:加载布局,绑定事件等。
- onStart() 在活动由不可见变为可见的时候调用。
- onResume() 在活动准备和用户进行交互时调用。此时的活动一定处于返回栈的栈顶,并处于运行状态。
- onPause() 在系统准备启动或者恢复另外一个活动时调用。我们会用这个方法将一些消耗CPU的资源释放掉,同时保存一些关键数据,但是这个方法的执行速度一定要快,否则会影响到新的栈顶活动的使用。
- onStop() 在活动完全不可见时调用。如果启动的新活动是对话框式的活动,那么onPause()方法会得到执行。而onStop()方法不会执行。
- onDestroy() 在活动被销毁前调用,之后活动的状态会变为销毁状态。
- onRestart() 在活动由停止状态变为运行状态前调用,即活动被重新启动了。
活动的三种生存周期:
- 完整生存期:即活动在onCreate()方法和onDestroy()方法之间所经历的。一般情况下,活动会在onCreate()方法中完成初始化操作,在onDestroy()方法中完成释放内存的操作。
- 可见生存周期:即活动在onStart()方法和onStop()方法之间所经历的。通过这两个方法来管理对用户可见的资源。比如,在onStart()方法中加载资源,在onStop()方法释放资源,从而保证停止状态的活动不会占用太多的内存。
- 前台生存周期:即活动在onResume()方法和onPause()方法之间所经历的。在前台生存周期内,活动处于运行状态,活动可与用户进行交互。
活动的生命周期流程图:
二.示例了解活动的生命周期
新建ActivityLifeCycleTest项目,新建DialogActivity和DialogActivity。
编辑normal_layout.xml:
<LinearLayout xmlns:android="http://schemas.android.com/apk/res/android"
  android:orientation="vertical"
    android:layout_width="match_parent"
    android:layout_height="match_parent">

    <TextView
        android:layout_width="match_parent"
        android:layout_height="wrap_content"
        android:text="This is normal activity"
        />

</LinearLayout>
编辑dialog_layout.xml:
<LinearLayout xmlns:android="http://schemas.android.com/apk/res/android"
    android:orientation="vertical"
    android:layout_width="match_parent"
    android:layout_height="match_parent">

    <TextView
        android:layout_width="match_parent"
        android:layout_height="wrap_content"
        android:text="This is dialog activity"
        />

</LinearLayout>
修改AndroidManifest.xml的< activtiy >标签的设置:
<activity android:name=".NormalActivity" />

        <!--
        android:theme用来指定主题,@style/Theme.
        AppCompat.Dialog用来让DialogActivtiy使用对话框式主题
        -->
        <activity android:name=".DialogActivity"
            android:theme="@style/Theme.AppCompat.Dialog">
        </activity>
修改activity_main.xml:
<LinearLayout xmlns:android="http://schemas.android.com/apk/res/android"
   android:orientation="vertical"
    android:layout_width="match_parent"
    android:layout_height="match_parent"
  >

    <Button
        android:id="@+id/start_normal_activtiy"
        android:layout_width="match_parent"
        android:layout_height="wrap_content"
        android:text="Start NormalActivity"
        />

    <Button
        android:id="@+id/start_dialog_activtiy"
        android:layout_width="match_parent"
        android:layout_height="wrap_content"
        android:text="Start DialogActivity"
        />

</LinearLayout>
修改MainActivtiy中的代码:
public class MainActivity extends AppCompatActivity {

    public static final String TAG = "MainActivity";

    @Override
    protected void onCreate(Bundle savedInstanceState) {
        super.onCreate(savedInstanceState);
        Log.d(TAG,"onCreate");
        setContentView(R.layout.activity_main);
        final Button startNormalActivtiy = (Button) findViewById(R.id.start_normal_activtiy);
        Button startDialogActivity = (Button) findViewById(R.id.start_dialog_activtiy);
        startNormalActivtiy.setOnClickListener(new View.OnClickListener() {
            @Override
            public void onClick(View v) {
                Intent intent = new Intent(MainActivity.this,NormalActivity.class);
                startActivity(intent);
            }
        });
        startDialogActivity.setOnClickListener(new View.OnClickListener() {
            @Override
            public void onClick(View v) {
                Intent intent = new Intent(MainActivity.this,DialogActivity.class);
                startActivity(intent);

            }
        });
    }

    protected void onStart(){
        super.onStart();
        Log.d(TAG,"onStart");
    }
    @Override
    protected void onResume() {
        super.onResume();
        Log.d(TAG,"onResume");
    }
    @Override
    protected void onStop() {
        super.onStop();
        Log.d(TAG,"onStop");
    }
    protected void onPause() {
        super.onPause();
        Log.d(TAG,"onPause");
    }
    protected void onDestroy() {
        super.onDestroy();
        Log.d(TAG,"onDestory");
    }
    protected void onRestart(){
        super.onRestart();
        Log.d(TAG,"onRestart");
    }

}
最后根据操作的不同,在打印日志里面会看到不同的打印信息:


小结:对活动的生命周期有了模糊的概念,会在以后的学习中越来越明晰。


 被折叠的 条评论
为什么被折叠?
被折叠的 条评论
为什么被折叠?
 到【灌水乐园】发言


