


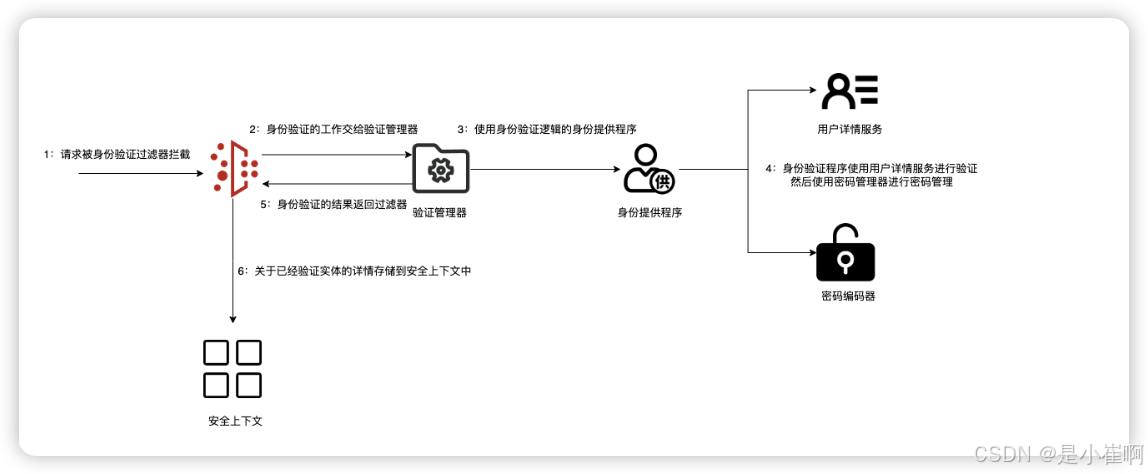
Spring Security各个组件详解
时刻对这个图有印象
一:重写默认配置
1:重写用户声明和密码编码
UserDetailsService我们可以选择创建自己的实现,或者使用Spring Security提供的预定义实现
本节并不打算详细介绍前两者,而是使用InMemoryUserDetailsManager的实现
InMemoryUserDetailsManager虽说这个实现稍稍超出了UserDetailsService本身,但目前我们只从UserDetailsService角度看待它,这个实现会将凭据存储在内存中,然后同之前,Spring Security可以使用这些凭据对请求进行身份验证
InMemoryUserDetailsManager并不适用于生产环境下使用,只适用于示例或概念证明:
建一个config包,在包下面创建ProjectConfig类,并使用@Bean将我们自己配置的UserDetailsService添加到Spring的上下文中
package com.example.webmodulehello.config;

import org.springframework.context.annotation.Bean;
import org.springframework.context.annotation.Configuration;
import org.springframework.security.core.userdetails.UserDetailsService;
import org.springframework.security.provisioning.InMemoryUserDetailsManager;

/**
 * @author cuihaida
 */
@Configuration
public class ProjectConfig {

    @Bean
    public UserDetailsService userDetailsService(){
        // 使用内存型用户详情管理器
        InMemoryUserDetailsManager userDetailsService = new InMemoryUserDetailsManager();
        return userDetailsService;
    }
}
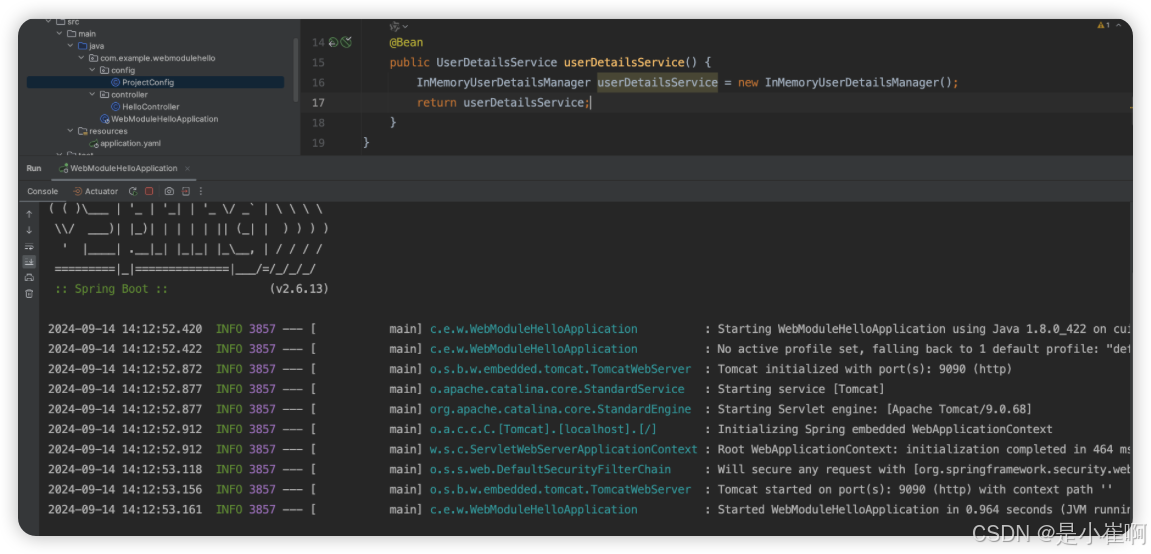
此时启动程序,可以发现之前放在控制台的密码此时已经没有了,这意味着Spring boot对我们关于UserDetailsService的预配置项已失效
但是我们此时发现我们此时并不能访问Controller,原因有如下两点:
- 目前我们还没有任何用户
- 还没有PasswordEncoder(自定义UserDetail必须自定义PasswordEncoder)
@Configuration
public class ProjectConfig {

    @Bean
    public UserDetailsService userDetailsService(){
        // 使用内存型用户详情管理器
        InMemoryUserDetailsManager userDetailsService = new InMemoryUserDetailsManager();
        // 给管理器添加user
        UserDetails user = User.withUsername("mbw")
                .password("123456")
                .authorities("read")
                .build();
        userDetailsService.createUser(user);
        return userDetailsService;
    }

    // 密码编码器
    @Bean
    public PasswordEncoder passwordEncoder(){
        // NoOpPasswordEncoder实例会将密码视为普通文本。它不会对密码进行加密或者哈希操作。
        // 为了进行匹配,它只会使用String类的底层equals(Object o)方法来比较字符串
        // 因此我们同样在生产环境不适合使用这类PasswordEncoder
        return NoOpPasswordEncoder.getInstance();
    }
}
2:重写端点授权配置
有了新的用户管理,现在就可以讨论端点的身份验证方法和配置。
我们现在指定,在使用默认配置时,所有端点都会假定有一个由应用程序管理的有效用户。
此外,在默认情况下,应用程序会使用HTTP Basic身份验证作为授权方法,但我们可以轻松的重写该配置。
其实之前我们也提到过,HTTP Basic身份验证并不适用于大多数应用程序架构,有时我们希望修改它以适配我们的应用程序。
同样,并非应用程序的所有端点都需要被保护,对于那些需要保护的端点,可能需要选择不同的授权规则。
要进行这样的更改,首先需要扩展WebSecurityConfigurerAdapter类。
扩展这个类使得我们可以重写configure(HttpSecurity http)方法。
继续使用之前的配置类ProjectConfig,我们在其基础上使其继承WebSecurityConfigurerAdapter类
@Configuration
public class ProjectConfig extends WebSecurityConfigurerAdapter {
    @Override
    protected void configure(HttpSecurity http) throws Exception {
        http.httpBasic();
        http.authorizeRequests()
                .anyRequest().authenticated(); //所有请求都需要身份验证
    }
}
package com.example.webmodulehello.config;

import org.springframework.context.annotation.Bean;
import org.springframework.context.annotation.Configuration;
import org.springframework.security.config.annotation.web.builders.HttpSecurity;
import org.springframework.security.config.annotation.web.configuration.WebSecurityConfigurerAdapter;
import org.springframework.security.core.userdetails.UserDetailsService;
import org.springframework.security.crypto.password.NoOpPasswordEncoder;
import org.springframework.security.crypto.password.PasswordEncoder;
import org.springframework.security.provisioning.InMemoryUserDetailsManager;

/**
 * @author cuihaida
 */
@Configuration
public class ProjectConfig extends WebSecurityConfigurerAdapter {

    @Bean
    @Override
    public UserDetailsService userDetailsService() {
        InMemoryUserDetailsManager userDetailsService = new InMemoryUserDetailsManager();
        userDetailsService.createUser(
                org.springframework.security.core.userdetails.User
                        .withUsername("user")
                        .password("12345")
                        .authorities("read")
                        .build());
        return userDetailsService;
    }

    @Override
    protected void configure(HttpSecurity http) throws Exception {
        http.httpBasic();
        http.authorizeRequests().anyRequest().authenticated(); // 配置所有请求需要认证
        http.authorizeRequests().anyRequest().permitAll(); // 所有请求都不需要身份验证
    }

    @Bean
    public PasswordEncoder passwordEncoder() {
        // 密码明文存储
        return NoOpPasswordEncoder.getInstance();
    }
}
现在来看另一种为它们配置的方法,我们可以通过configure(AuthenticationManagerBuilder auth)方法设置它们
仍需要从WebSecurityConfigurerAdapter类重写此方法,并使用AuthenticationManagerBuilder的参数来设置它们
@Configuration
public class ProjectConfig extends WebSecurityConfigurerAdapter {
    @Override
    protected void configure(HttpSecurity http) throws Exception {
        http.httpBasic();
        http.authorizeRequests()
                .anyRequest().authenticated(); //所有请求都需要身份验证
    }

    @Override
    protected void configure(AuthenticationManagerBuilder auth) throws Exception {
        //声明UserDetailsService,以便将用户存储在内存中
        InMemoryUserDetailsManager userDetailsService = new InMemoryUserDetailsManager();
        //定义具有所有详情的用户
        UserDetails user = User.withUsername("user")
                .password("12345")
                .authorities("read")
                .build();
        //添加该用户以便让UserDetailsService对其进行管理
        userDetailsService.createUser(user);
        auth.userDetailsService(userDetailsService)
                .passwordEncoder(NoOpPasswordEncoder.getInstance());
    }
}
可以看到和之前配置UserDetailsService和PasswordEncoder其实差不多,只不过我们在这儿是通过重写方法完成的,推荐上面这种方式进行配置。
还有一种推荐的方式:使用新的配置类单独处理UserDetail & PasswordEncode
@Configuration
public class UserManagementConfig{

    @Bean
    public UserDetailsService userDetailsService(){
        InMemoryUserDetailsManager userDetailsService = new InMemoryUserDetailsManager();
        UserDetails user = User.withUsername("mbw")
                .password("123456")
                .authorities("read")
                .build();
        userDetailsService.createUser(user);
        return userDetailsService;
    }

    @Bean
    public PasswordEncoder passwordEncoder(){
        return NoOpPasswordEncoder.getInstance();
    }
}
3:重写AuthenticationProvider实现
通过上面的学习,我们已经了解了UserDetailsService和PasswordEncoder在Spring Security架构中的用途以及配置它们的方法
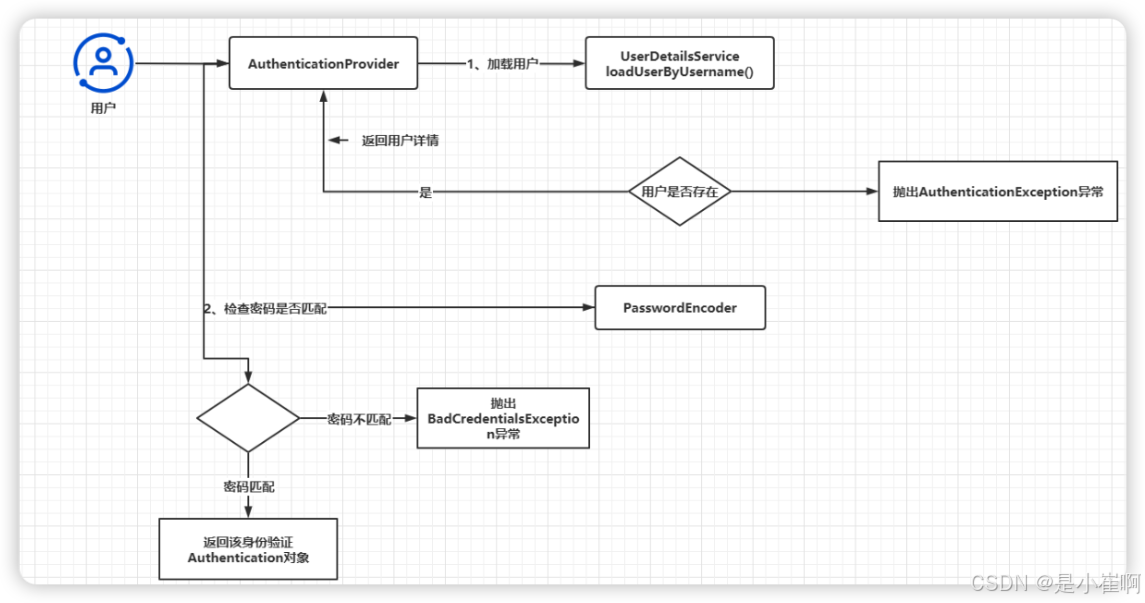
下面我们将介绍委托给上面这两个组件的组件进行自定义,即AuthenticationProvider。
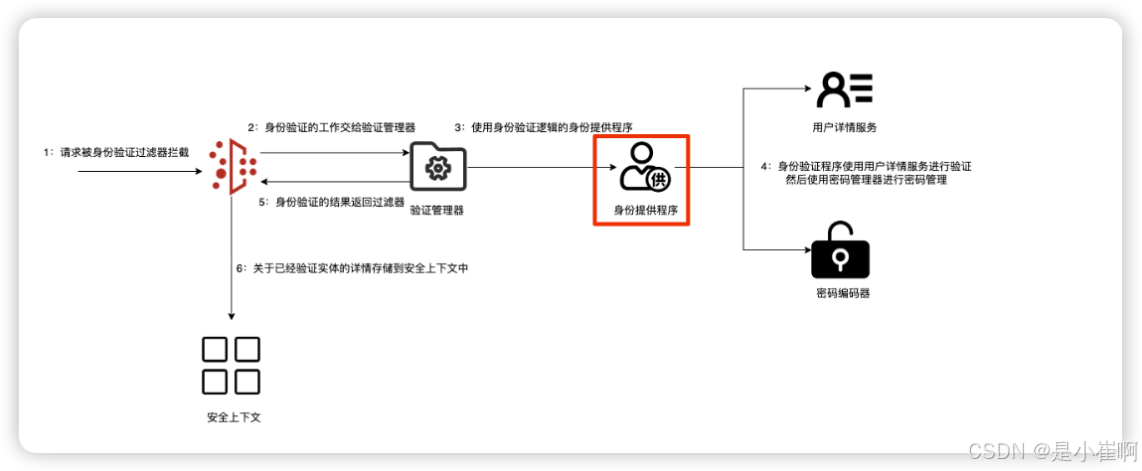
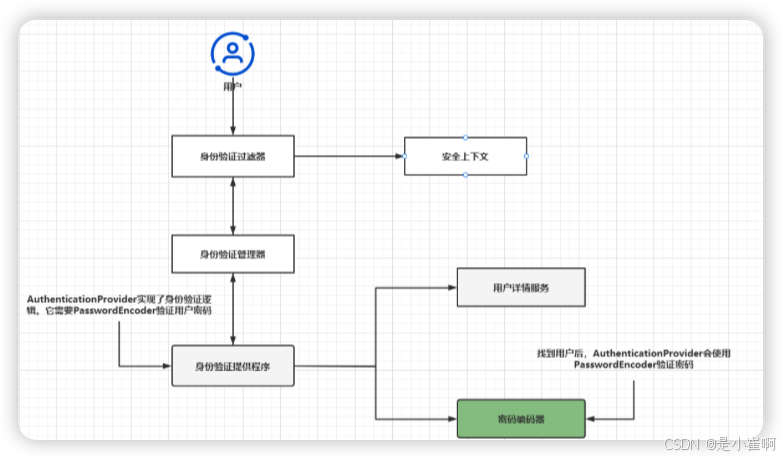
红框所示展示了AuthenticationProvider,它实现了身份验证逻辑并且委托给UserDetailsService和PasswordEncoder以便进行用户和密码管理
那么下面我们将进一步深入探讨身份验证和授权架构,以便了解如何使用AuthenticationProvider实现自定义身份验证逻辑
@Component
public class CustomAuthenticationProvider implements AuthenticationProvider {
    @Override
    public Authentication authenticate(Authentication authentication) throws AuthenticationException {
        //getName()方法被Authentication从Principal接口处继承
        String username = authentication.getName();
        String password = String.valueOf(authentication.getCredentials());
        //todo: 这个条件通常会调用UserDetailsService和PasswordEncoder用来调试用户名和密码
        if("mbw".equals(username) && "12345".equals(password)){
            return new UsernamePasswordAuthenticationToken(username,password, Arrays.asList());
        }else {
            throw new AuthenticationCredentialsNotFoundException("Error in authentication!");
        }
    }

    @Override
    public boolean supports(Class<?> authenticationType) {
        return UsernamePasswordAuthenticationToken.class.isAssignableFrom(authenticationType);
    }
}
如你所见,在此处if-else子句的条件替换了UserDetailsService和PasswordEncoder的职能
这里不需要使用这两个bean,但如果使用用户和密码进行身份验证,则强烈建议将它们的管理逻辑分开,即使在重写身份验证实现时,也要像Spring Security架构所设计的那样应用它
你可能会发现,通过实现我们自己的AuthenticationProvider来替换身份验证逻辑是很有用的,如果默认实现不能完全满足应用程序的需求,则可以选择实现自定义身份验证逻辑
然后我们可以在ProjectConfig配置类中注册我们刚刚配置的AuthenticationProvider:
package com.example.webmodulehello.config;

import com.example.webmodulehello.provider.CustomAuthenticationProvider;
import org.springframework.context.annotation.Configuration;
import org.springframework.security.config.annotation.authentication.builders.AuthenticationManagerBuilder;
import org.springframework.security.config.annotation.web.builders.HttpSecurity;
import org.springframework.security.config.annotation.web.configuration.WebSecurityConfigurerAdapter;

/**
 * @author cuihaida
 */
@Configuration
public class ProjectConfig extends WebSecurityConfigurerAdapter {

    private final CustomAuthenticationProvider customAuthenticationProvider;

    public ProjectConfig(CustomAuthenticationProvider customAuthenticationProvider) {
        this.customAuthenticationProvider = customAuthenticationProvider;
    }

    /**
     * 配置安全策略
     */
    @Override
    protected void configure(HttpSecurity http) throws Exception {
        http.httpBasic();
        http.authorizeRequests().anyRequest().authenticated(); // 配置所有请求需要认证
    }

    /**
     * 配置认证方式
     */
    @Override
    protected void configure(AuthenticationManagerBuilder auth) throws Exception {
        auth.authenticationProvider(customAuthenticationProvider);
    }
}
二:用户管理组件
先深入了解第一个核心组件 - userdetail
- UserDetails,它会描述Spring Security的用户
- GrantedAuthority,它允许我们定义用户可以执行的操作
- 如何通过MybatisPlus结合UserDetailsService进行用户认证
在之前的学习中,我们已经对UserDetails和PasswordEncoder在身份验证过程中的角色有大致的了解
但是其中仅讨论了如何插入所定义的实例,而不是使用SpringBoot配置的默认实例:
- Spring Security提供了哪些实现以及如何使用它们
- 如何为契约定义一个自定义实现以及何时需要这样做
- 真实应用程序中使用的实现接口的方式
- 使用这些接口的最佳实践
1:userDetail处理
上面的架构想必大家已经非常熟悉了,这个阴影框就是我们这次首先要处理的组件:UserDetailsService和PasswordEncoder。
这两个组件主要关注流程的部分,通常将其称为“用户管理部分”
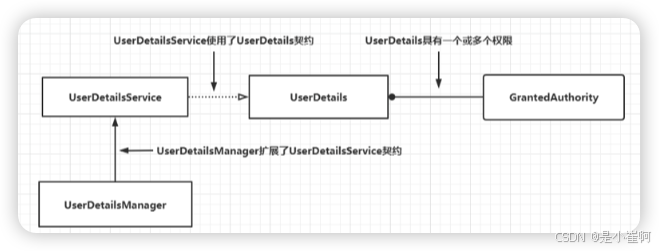
作为用户管理的一部分,我们使用了UserDetailsService和UserDetailsManager接口。
UserDetailsService只负责按用户名检索用户
public interface UserDetailsService {
	UserDetails loadUserByUsername(String username) throws UsernameNotFoundException;
}
此操作是框架完成身份验证所需的唯一操作。UserDetailsManager则在其基础上添加了对用户添加、修改、删除的行为,这是大多数应用程序中必需的功能
虽然我们完全也可以自己定义,UserDetailsManager接口扩展UserDetailsService接口是体现接口分离原则的一个很好的例子,分离接口可以提供更好的灵活性,因为框架不会强迫我们在应用程序不需要的时候实现行为,如果应用程序只需要验证用户,那么实现UserDetailsService契约就足以覆盖所需功能
我们可以在其基础上自己扩展管理用户的功能亦或者直接实现UserDetailsManager的接口
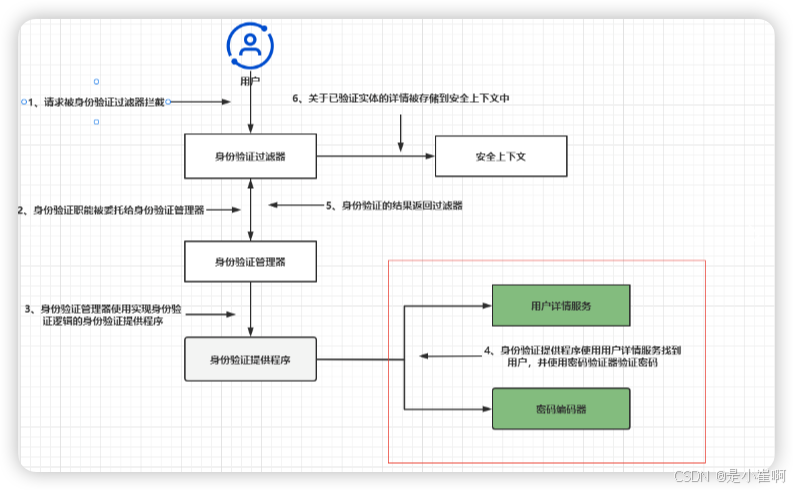
但是如果要管理用户,首先我们需要用户这样一个去描述它的接口(契约),Spring Security给我们提供了UserDetails,我们必须实现它以便使用框架理解的方式(UserDetailsService只识别它)去描述用户。而用户又拥有一组权限,Spring Security使用GrantedAuthority表示用户所具有的权限,下图就是用户管理部分组件之间的关系:
1.1:描述用户
理解Spring Security架构中这些对象之间的联系以及实现它们的方法,可以为我们处理应用程序时提供广泛的选项以供选择。
那么下面我们就从如何描述用户开始讲解
1.1.1:UserDetails接口
要与用户打交道,首先需要了解如何在应用程序中定义用户的原型,对于Spring Security,用户定义应该遵循UserDetails契约
UserDetails契约代表着Spring Security所理解的用户。描述用户的类必须实现该接口
public interface UserDetails extends Serializable {
	/**
	 * 将应用程序用户的权限返回成一个GrantedAuthority实例集合
	 */
	Collection<? extends GrantedAuthority> getAuthorities();

	/**
	 * 下面2个方法会返回用户凭据
	 */
	String getPassword();
	String getUsername();

	/**
	 * 出于不同的原因,这4个方法会启用或禁用账户
	 */
	boolean isAccountNonExpired();
	boolean isAccountNonLocked();
	boolean isCredentialsNonExpired();
	boolean isEnabled();
}
正如UserDetails所示,用户可以是的账户过期,锁定用户,使得凭据过期,禁用账户
如果选择在应用程序的逻辑中实现这些对用户的约束限制,则需要重写下面的方法。
1.1.2:GrantedAuthority
正如前一小节说的,授予用户的操作被称为权限。
要描述Spring Security的权限,可以使用GrantedAuthority接口,它表示授予用户的权限。
用户可以没有任何权限,也可以拥有任意数量的权限,通常他们至少有一个权限
public interface GrantedAuthority extends Serializable {
    String getAuthority();
}
要创建一个权限,只需要为该权限找到一个名称即可,我们后面会实现getAuthority()方法,以便以String形式返回权限名,GrantedAuthority接口只有一个抽象方法,我们后面将会通过lambada表达式的例子实现它亦或者通过它的实现类SimpleGrantedAuthority创建权限实例
SimpleGrantedAuthority类提供了一种创建GrantedAuthority类型的不可变实例的方法,在构建实例时需要提供权限名称
GrantedAuthority g1 = ()->"READ";
GrantedAuthority g2 =new SimpleGrantedAuthority("READ");
1.1.3:最小化实现
package com.mbw.pojo;

import org.springframework.security.core.GrantedAuthority;
import org.springframework.security.core.userdetails.UserDetails;

import java.util.ArrayList;
import java.util.Collection;


public class DummyUser implements UserDetails {
    @Override
    public Collection<? extends GrantedAuthority> getAuthorities() {
        ArrayList<GrantedAuthority> grantedAuthorities = new ArrayList<>();
        grantedAuthorities.add(()->"READ");
        return grantedAuthorities;
    }

    @Override
    public String getPassword() {
        return "12345";
    }

    @Override
    public String getUsername() {
        return "mbw";
    }

    @Override
    public boolean isAccountNonExpired() {
        return true;
    }

    @Override
    public boolean isAccountNonLocked() {
        return true;
    }

    @Override
    public boolean isCredentialsNonExpired() {
        return true;
    }

    @Override
    public boolean isEnabled() {
        return true;
    }
}
1.1.4:Mybatisplus实现
- 构造数据库
SET NAMES utf8mb4;
SET FOREIGN_KEY_CHECKS = 0;

-- ----------------------------
-- Table structure for authorities
-- ----------------------------
DROP TABLE IF EXISTS `authorities`;
CREATE TABLE `authorities`  (
  `id` bigint(20) NOT NULL,
  `authorityName` varchar(30) CHARACTER SET utf8mb4 COLLATE utf8mb4_general_ci NULL DEFAULT NULL,
  PRIMARY KEY (`id`) USING BTREE
) ENGINE = InnoDB CHARACTER SET = utf8mb4 COLLATE = utf8mb4_general_ci ROW_FORMAT = Dynamic;

-- ----------------------------
-- Records of authorities
-- ----------------------------
INSERT INTO `authorities` VALUES (2970710450550485029, 'read');
INSERT INTO `authorities` VALUES (2971247443118264330, 'write');

-- ----------------------------
-- Table structure for user_authority
-- ----------------------------
DROP TABLE IF EXISTS `user_authority`;
CREATE TABLE `user_authority`  (
  `id` bigint(20) NOT NULL,
  `userId` bigint(20) NOT NULL COMMENT '用户Id',
  `authorityId` bigint(20) NOT NULL COMMENT '权限Id',
  PRIMARY KEY (`id`) USING BTREE
) ENGINE = InnoDB CHARACTER SET = utf8mb4 COLLATE = utf8mb4_general_ci ROW_FORMAT = Dynamic;

-- ----------------------------
-- Records of user_authority
-- ----------------------------
INSERT INTO `user_authority` VALUES (2971669583307083780, 2999623538338967560, 2970710450550485029);
INSERT INTO `user_authority` VALUES (2972001087342129510, 2999623538338967560, 2971247443118264330);

-- ----------------------------
-- Table structure for users
-- ----------------------------
DROP TABLE IF EXISTS `users`;
CREATE TABLE `users`  (
  `id` bigint(20) NOT NULL,
  `username` varchar(45) CHARACTER SET utf8mb4 COLLATE utf8mb4_general_ci NULL DEFAULT NULL,
  `password` varchar(45) CHARACTER SET utf8mb4 COLLATE utf8mb4_general_ci NULL DEFAULT NULL,
  `mobile` varchar(11) CHARACTER SET utf8mb4 COLLATE utf8mb4_general_ci NULL DEFAULT NULL,
  `email` varchar(60) CHARACTER SET utf8mb4 COLLATE utf8mb4_general_ci NULL DEFAULT NULL,
  `enabled` tinyint(1) NULL DEFAULT NULL,
  PRIMARY KEY (`id`) USING BTREE
) ENGINE = InnoDB CHARACTER SET = utf8mb4 COLLATE = utf8mb4_general_ci ROW_FORMAT = Dynamic;

-- ----------------------------
-- Records of users
-- ----------------------------
INSERT INTO `users` VALUES (2999623538338967560, 'mbw', '123456', '18170075966', '1443792751@qq.com', 1);

SET FOREIGN_KEY_CHECKS = 1;
- 引入mysql & mybatis-plus的依赖和配置
<dependency>
    <groupId>com.baomidou</groupId>
    <artifactId>mybatis-plus-boot-starter</artifactId>
    <version>3.4.2</version>
</dependency>
<dependency>
    <groupId>mysql</groupId>
    <artifactId>mysql-connector-java</artifactId>
    <version>5.1.47</version>
</dependency>
server:
  port: 9090
spring:
  datasource:
    driver-class-name: com.mysql.jdbc.Driver
    username: root
    password: 换成你的密码
    url: jdbc:mysql://127.0.0.1:3306/换成你的数据库的名称?useUnicode=true&characterEncoding=UTF-8&useSSL=false&allowPublicKeyRetrieval=true&serverTimezone=Asia/Shanghai&nullCatalogMeansCurrent=true
mybatis-plus:
  mapper-locations: classpath*:/mapper/**/*.xml,classpath:/META-INF/modeler-mybatis-mappings/*.xml
  typeAliasesPackage: 换成你的pojo路径
  global-config:
    banner: false
  configuration:
    map-underscore-to-camel-case: true
    cache-enabled: false
    call-setters-on-nulls: true
    jdbc-type-for-null: 'null'
    log-impl: org.apache.ibatis.logging.stdout.StdOutImpl
- 实体类声明,注意继承UserDetail & GrantedAuthority
package com.mbw.pojo;

import com.baomidou.mybatisplus.annotation.IdType;
import com.baomidou.mybatisplus.annotation.TableField;
import com.baomidou.mybatisplus.annotation.TableId;
import com.baomidou.mybatisplus.annotation.TableName;
import lombok.AllArgsConstructor;
import lombok.Data;
import lombok.NoArgsConstructor;
import org.springframework.security.core.userdetails.UserDetails;

import java.io.Serializable;
import java.util.Set;

@TableName("users")
@Data
@AllArgsConstructor
@NoArgsConstructor
public class User implements Serializable, UserDetails {
    @TableId(type=IdType.ASSIGN_ID)
    private Long id;
    @TableField("username")
    private String username;
    @TableField("mobile")
    private String mobile;
    @TableField("password")
    private String password;
    @TableField("email")
    private String email;
    @TableField("enabled")
    private Boolean enabled;
    @TableField(exist = false)
    private Set<Authority> authorities;

    @Override
    public boolean isAccountNonExpired() {
        return true;
    }

    @Override
    public boolean isAccountNonLocked() {
        return true;
    }

    @Override
    public boolean isCredentialsNonExpired() {
        return true;
    }

    @Override
    public boolean isEnabled() {
        return this.enabled;
    }
}
// 然后就是Authority类,我们要让它实现GrantedAuthority接口
// 这样才能让前面的User类语法通过
// 因为UserDetails的getAuthorities需要返回泛型是GrantedAuthority的实现类才行
// 属性只需id和authorityName即可
// 然后是是实现getAuthority()只需返回authorityName即可
package com.mbw.pojo;

import com.baomidou.mybatisplus.annotation.IdType;
import com.baomidou.mybatisplus.annotation.TableId;
import com.baomidou.mybatisplus.annotation.TableName;
import lombok.AllArgsConstructor;
import lombok.Data;
import lombok.NoArgsConstructor;
import org.springframework.security.core.GrantedAuthority;

@TableName("authorities")
@Data
@AllArgsConstructor
@NoArgsConstructor
public class Authority implements GrantedAuthority {
    @TableId(type = IdType.ASSIGN_ID)
    private Long id;
    private String authorityName;

    // 实现这个方法,只需要返回authorityName
    @Override
    public String getAuthority() {
        return authorityName;
    }
}
// 中间表
package com.mbw.pojo;

import com.baomidou.mybatisplus.annotation.IdType;
import com.baomidou.mybatisplus.annotation.TableId;
import com.baomidou.mybatisplus.annotation.TableName;
import lombok.AllArgsConstructor;
import lombok.Data;
import lombok.NoArgsConstructor;

@TableName("user_authority")
@Data
@AllArgsConstructor
@NoArgsConstructor
public class UserAuthority {
    @TableId(type = IdType.ASSIGN_ID)
    private Long id;
    private Long userId;
    private Long authorityId;
}
1.2:Security管理用户
1.2.1:UserDetailsService
直接借助Mybatisplus结合UserDetailsService去管理用户
先理解其契约。UserDetailsService接口只包含一个方法
package org.springframework.security.core.userdetails;
public interface UserDetailsService {
	UserDetails loadUserByUsername(String username) throws UsernameNotFoundException;
}
身份验证实现调用loadUserByUsername(String username)方法通过指定的用户名获取用户的详细信息。用户名当然会被视作唯一的。此方法返回的用户是UserDetails契约的实现。
如果用户名不存在,则该方法将抛出一个UsernameNotFoundException异常。

UserMapper
<?xml version="1.0" encoding="UTF-8"?>
<!DOCTYPE mapper PUBLIC "-//mybatis.org//DTD Mapper 3.0//EN"
        "http://mybatis.org/dtd/mybatis-3-mapper.dtd">
<mapper namespace="com.mbw.mapper.UserMapper">
    <resultMap id="queryUserMap" type="com.mbw.pojo.User" autoMapping="true">
        <id column="id" property="id"/>
        <collection property="authorities" ofType="com.mbw.pojo.Authority" autoMapping="true" columnPrefix="a_">
            <id column="id" property="id"/>
            <result column="authorityName" property="authorityName"/>
        </collection>
    </resultMap>
    <select id="queryUserByUsername" resultMap="queryUserMap">
        SELECT u.*,
               a.id AS a_id,
               a.authorityName AS a_authorityName
               from users u
        LEFT JOIN user_authority ua
        ON u.id = ua.userId
        LEFT JOIN authorities a
        ON a.id = ua.authorityId
        WHERE u.username = #{username}
        AND u.enabled != 0
    </select>
</mapper>
package com.mbw.mapper;

import com.baomidou.mybatisplus.core.mapper.BaseMapper;
import com.mbw.pojo.User;
import org.apache.ibatis.annotations.Mapper;

import java.util.List;

@Mapper
public interface UserMapper extends BaseMapper<User> {
    List<User> queryUserByUsername(String username);
}
userService
package com.mbw.service;

import com.mbw.mapper.UserMapper;
import com.mbw.pojo.User;
import org.springframework.beans.factory.annotation.Autowired;
import org.springframework.security.core.userdetails.UserDetails;
import org.springframework.security.core.userdetails.UserDetailsService;
import org.springframework.security.core.userdetails.UsernameNotFoundException;
import org.springframework.stereotype.Service;

import java.util.List;

@Service
public class MybatisUserDetailsService implements UserDetailsService {

    @Autowired
    private UserMapper userMapper;

    @Override
    public UserDetails loadUserByUsername(String username) throws UsernameNotFoundException {
        // 拿到符合username条件的用户
        List<User> users = userMapper.queryUserByUsername(username);
        // 返回第一个或者抛出用户不存在的异常
        return users.stream().findFirst().orElseThrow(()->new UsernameNotFoundException("User Not Found"));
    }
}
1.2.2:认证配置调用
@Configuration
@RequiredArgsConstructor
public class ProjectConfig extends WebSecurityConfigurerAdapter {

    @Autowired
    private MybatisUserDetailsService userDetailsService;


    @Override
    protected void configure(HttpSecurity http) throws Exception {
        http.httpBasic();
        http.authorizeRequests()
                .anyRequest().authenticated(); //所有请求都需要身份验证
    }

    @Override
    protected void configure(AuthenticationManagerBuilder auth) throws Exception {
        // 声明认证使用的userDetailsService
        auth.userDetailsService(userDetailsService)
                .passwordEncoder(NoOpPasswordEncoder.getInstance());
    }
}
1.2.3:UserDetailsManager
其实此接口并没有什么,我们刚刚写的MybatisUserDetailsService同样也可以做到
其实它继承了UserDetailsService,在其基础上添加了更多方法:
package org.springframework.security.provisioning;

import org.springframework.security.core.userdetails.UserDetails;
import org.springframework.security.core.userdetails.UserDetailsService;
public interface UserDetailsManager extends UserDetailsService {
    void createUser(UserDetails user);
    void updateUser(UserDetails user);
    void deleteUser(String username);
    hangePassword(String oldPassword, String newPassword);
    userExists(String username);
}
即在其基础上能够添加新用户或删除现有用户,但是我们的MybatisPlus同样也可以做到这些功能,可以直接调用,所以这里我们就不对其过多讲解
2:密码处理
系统并不以明文形式管理密码,印此密码通常要经过某种转换,这使得读取和窃取密码变得较为困难
对于这一职责,Spring Security定义了一个单独的契约—PasswordEncoder
2.1:PasswordEncoder介绍
实现这个契约是为了告知Spring Security如何验证用户的密码。在身份验证过程中,PasswordEncoder会判定密码是否有效。每个系统都会存储以某种方式编码过的密码。最好把密码哈希话存储起来,这样别人就不会读到明文密码了
PasswordEncoder还可以对密码进行编码,接口声明的encode()和matches()方法实际上是其职责的定义。这两个方法都是同一契约的一部分,因为它们彼此紧密相连
应用程序对密码进行编码的方式与验证密码的方式相关,它们应该由同一个PasswordEncoder统一进行管理
public interface PasswordEncoder {
    // encode(CharSequence rawPassword)方法的目的是返回所提供字符串的转换。
    // 就Spring Security功能而言,它用于为指定密码提供加密或哈希化
	String encode(CharSequence rawPassword);
    // 检查已编码的字符串是否与原密码匹配
    // 可以在身份验证过程中使用matches()方法根据一组已知凭据来检验所提供的密码
	boolean matches(CharSequence rawPassword, String encodedPassword);
    // 如果重写它以返回true,那么为了获得更好的安全性,将重新对已编码的密码进行编码
	default boolean upgradeEncoding(String encodedPassword) {
		return false;
	}
}
该接口定义了两个抽象方法,其中一个具有默认实现。
在处理PasswordEncoder实现时,最常见的是抽象的encode()和matches()方法。
2.2:实现passwordEncoder契约
可以看到,matches()和encode()这两个方法具有很强的关联性。
如果重写他们,应该确保它们始终在功能方面有所对应:由encode()方法返回的字符串应该始终可以使用同一个PasswordEncoder的matches()进行验证
package com.mbw.password_encoder;

import org.springframework.security.crypto.password.PasswordEncoder;
import org.springframework.stereotype.Component;

@Component
public class PlainTextPasswordEncoder implements PasswordEncoder {
    @Override
    public String encode(CharSequence rawPassword) {
        //并没有变更密码,而是原样返回
        return rawPassword.toString();
    }

    @Override
    public boolean matches(CharSequence rawPassword, String encodedPassword) {
        //检查两个字符是否相等
        return rawPassword.equals(encodedPassword);
    }
}
下面的代码则是PasswordEncoder的一个使用SHA-512的哈希算法的简单实现:
package com.mbw.password_encoder;

import org.springframework.security.crypto.password.PasswordEncoder;
import org.springframework.stereotype.Component;

import java.security.MessageDigest;
import java.security.NoSuchAlgorithmException;

@Component
public class Sha512PasswordEncoder implements PasswordEncoder {
    @Override
    public String encode(CharSequence rawPassword) {
        return hashWithSHA512(rawPassword.toString());
    }

    private String hashWithSHA512(String input) {
        StringBuilder result = new StringBuilder();
        try{
            MessageDigest md = MessageDigest.getInstance("SHA-512");
            byte[] digested = md.digest(input.getBytes());
            for (byte b : digested) {
                result.append(Integer.toHexString(0xFF & b));
            }
        }catch (NoSuchAlgorithmException e){
            throw new RuntimeException("Bad algorithm");
        }
        return result.toString();
    }

    @Override
    public boolean matches(CharSequence rawPassword, String encodedPassword) {
        String hashPassword = encode(rawPassword);
        return encodedPassword.equals(hashPassword);
    }
}
2.3:已有实现中选择
- NoOpPasswordEncoder:不编码密码,而保持明文。我们仅将此实现用于示例。因为它不会对密码进行哈希化,所以永远不要在真实场景中使用它(单例 ->
NoOpPasswordEncoder.getInstance()) - StandardPasswordEncoder:使用SHA-256对密码进行哈希化。这个实现现在已经不推荐了,不应该在新的实现中使用它。不建议使用它的原因是,它使用了一种目前看来不够强大的哈希算法,但我们可能仍然会在现有的应用程序中发现这种实现。
- Pbkdf2PasswordEncoder:使用基于密码的密钥派生函数2(PBKDF2)
- BCryptPasswordEncoder:使用bcrypt强哈希函数对密码进行编码
- SCryptPasswordEncoder:使用scrypt强哈希函数对密码进行编码
让我们通过一些示例了解如何创建这些类型的PasswordEncoder实现的实例。
PasswordEncoder bCryptPasswordEncoder1 = new BCryptPasswordEncoder();
PasswordEncoder bCryptPasswordEncoder2 = new BCryptPasswordEncoder(4);
SecureRandom s = SecureRandom.getInstanceStrong();
BCryptPasswordEncoder bCryptPasswordEncoder3 = new BCryptPasswordEncoder(4, s);
在某些应用程序中,我们可能会发现使用各种密码编码器都很有用,并且会根据特定的配置进行选择。
从实际情况看,在生产环境应用程序中使用DelegatingPasswordEncoder的常见场景是当编码算法从应用程序的特定版本开始更改的时候。
假设有人在当前使用的算法中发现了一个漏洞,而我们想为新注册的用户更改该算法,但又不想更改现有凭据的算法。所以最终会有多种哈希算法。我们要如何应对这种情况?
虽然并非应对此场景的唯一方法,但一个好的选择是使用DelegatingPasswordEncoder对象
2.4:多类型选择分发
DelegatingPasswordEncoder具有一个它可以委托的PasswordEncoder实现的列表。
DelegatingPasswordEncoder会将每一个实例存储在一个映射中
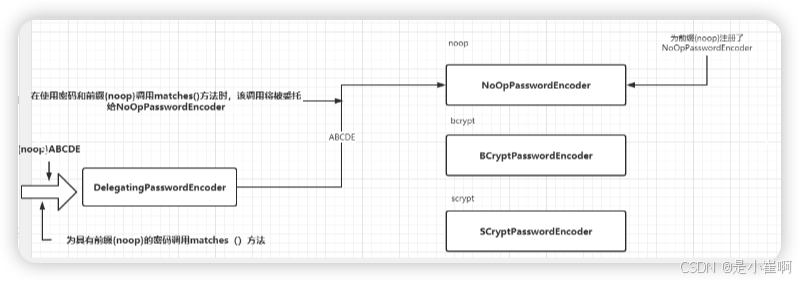
NoOpPasswordEncoder被分配的键是noop,而BCryptPasswordEncoder实现被分配的键是bcrypt
然后根据前缀将实现委托给对应的passwordEncoder实现
package com.mbw.config;

import com.mbw.password_encoder.PlainTextPasswordEncoder;
import com.mbw.password_encoder.Sha512PasswordEncoder;
import com.mbw.service.MybatisUserDetailsService;
import lombok.RequiredArgsConstructor;
import org.springframework.beans.factory.annotation.Autowired;
import org.springframework.context.annotation.Bean;
import org.springframework.context.annotation.Configuration;
import org.springframework.security.config.annotation.authentication.builders.AuthenticationManagerBuilder;
import org.springframework.security.config.annotation.web.builders.HttpSecurity;
import org.springframework.security.config.annotation.web.configuration.EnableWebSecurity;
import org.springframework.security.config.annotation.web.configuration.WebSecurityConfigurerAdapter;
import org.springframework.security.crypto.bcrypt.BCryptPasswordEncoder;
import org.springframework.security.crypto.password.DelegatingPasswordEncoder;
import org.springframework.security.crypto.password.NoOpPasswordEncoder;
import org.springframework.security.crypto.password.PasswordEncoder;
import org.springframework.security.crypto.scrypt.SCryptPasswordEncoder;

import java.util.HashMap;


@Configuration
@RequiredArgsConstructor
@EnableWebSecurity
public class ProjectConfig extends WebSecurityConfigurerAdapter {

    @Autowired
    private MybatisUserDetailsService userDetailsService;
    @Autowired
    private PlainTextPasswordEncoder passwordEncoder;
    @Autowired
    private Sha512PasswordEncoder sha512PasswordEncoder;


    @Override
    protected void configure(HttpSecurity http) throws Exception {
        http.httpBasic();
        http.csrf().disable().authorizeRequests()
                .antMatchers("/create").permitAll()
                .anyRequest().authenticated(); //所有请求都需要身份验证
    }

    @Override
    protected void configure(AuthenticationManagerBuilder auth) throws Exception {
        auth.userDetailsService(userDetailsService)
                .passwordEncoder(passwordEncoder());
    }

    @Bean
    public PasswordEncoder passwordEncoder() {
        HashMap<String, PasswordEncoder> encoders = new HashMap<>();
        encoders.put("noop", NoOpPasswordEncoder.getInstance());
        encoders.put("bcrypt", new BCryptPasswordEncoder());
        encoders.put("scrypt", new SCryptPasswordEncoder());
        return new DelegatingPasswordEncoder("bcrypt",encoders);
    }
}
接着在MybatisUserDetailsService我们需要写一个注册接口,并且将刚刚配置的PasswordEncoder注入
package com.mbw.service;

import com.baomidou.mybatisplus.extension.service.impl.ServiceImpl;
import com.mbw.mapper.AuthorityMapper;
import com.mbw.mapper.UserAuthorityMapper;
import com.mbw.mapper.UserMapper;
import com.mbw.password_encoder.Sha512PasswordEncoder;
import com.mbw.pojo.Authority;
import com.mbw.pojo.User;
import com.mbw.pojo.UserAuthority;
import lombok.extern.slf4j.Slf4j;
import org.springframework.beans.factory.annotation.Autowired;
import org.springframework.security.core.userdetails.UserDetails;
import org.springframework.security.core.userdetails.UserDetailsService;
import org.springframework.security.core.userdetails.UsernameNotFoundException;
import org.springframework.security.crypto.password.DelegatingPasswordEncoder;
import org.springframework.security.crypto.password.PasswordEncoder;
import org.springframework.stereotype.Service;
import org.springframework.transaction.annotation.Transactional;

import javax.annotation.Resource;
import java.util.List;
import java.util.Set;
import java.util.stream.Collectors;

@Service
@Slf4j
public class MybatisUserDetailsService extends ServiceImpl<UserMapper, User> implements UserDetailsService {

    @Autowired
    private UserMapper userMapper;
    @Autowired
    private AuthorityMapper authorityMapper;
    @Autowired
    private UserAuthorityMapper userAuthorityMapper;
    @Autowired
    private PasswordEncoder passwordEncoder;

    @Override
    public UserDetails loadUserByUsername(String username) throws UsernameNotFoundException {
        List<User> users = userMapper.queryUserByUsername(username);
        return users.stream().findFirst().orElseThrow(()->new UsernameNotFoundException("User Not Found"));
    }

    @Override
    @Transactional
    public boolean save(User user) {
        try {
            String passwordNotEncode = user.getPassword();
            String passwordEncoded = passwordEncoder.encode(passwordNotEncode);
            user.setPassword(passwordEncoded);
            userMapper.insert(user);
            Set<Authority> authorities = user.getAuthorities();
            Set<Long> authorityIds = authorities.stream().map(Authority::getId).collect(Collectors.toSet());
            authorityIds.forEach(id -> {
                Authority authority = authorityMapper.selectById(id);
                if(authority != null){
                    Long userId = user.getId();
                    UserAuthority userAuthority = new UserAuthority();
                    userAuthority.setUserId(userId);
                    userAuthority.setAuthorityId(id);
                    userAuthorityMapper.insert(userAuthority);
                }
            });
            return true;
        } catch (Exception e) {
            log.error(e.getMessage(),e);
            return false;
        }
    }
}
为方便起见,Spring Security提供了一种方法创建一个DelegatingPasswordEncoder
它有一个映射指向PasswordEncoder提供的所有标准实现。
PasswordEncoderFactories类提供了一个createDelegatingPasswordEncoder()的静态方法,该方法会返回使用bcrypt作为默认编码器的DelegatingPasswordEncoder的实现
@Bean
public PasswordEncoder passwordEncoder() {
    return PasswordEncoderFactories.createDelegatingPasswordEncoder();
}
二:AuthenticationProvider
之前了解了userDeatailsService和passwordEncoder,下面将介绍身份验证流程的其余部分
首先我们要讨论如何实现AuthenticationProvider接口
在身份验证成功之后,将探讨SpringContext接口以及Spring Security管理它的方式
为什么会有Provider
在企业级应用程序中,你可能会发现自己处于这样一种状况:基于用户名和密码的身份验证的默认实现并不适用。
另外,当涉及身份验证时,应用程序可能需要实现多个场景。
例如短信验证,秘钥验证,指纹验证。框架的目的是要足够灵活,以便允许我们实现这些所需场景中的任何一个。
框架通常会提供一组最常用的实现(用户名 + 密码),但它必然不能涵盖所有可能的选项。
就SpringSecurity而言,可以使用AuthenticationProvider接口来定义任何自定义的身份验证逻辑。(扩展性)
1:在身份验证期间表示请求
身份验证(Authentication)也是处理过程中涉及的其中一个必要接口的名称。
Authentication接口表示身份验证请求事件,并且会保存请求访问应用程序的实体的详细信息。
可以在身份验证过程期间和之后使用与身份验证请求事件相关的信息。
请求访问应用程序的用户被称为主体(principal),如果你有兴趣可以打印下认证后的authentication对象,你会发现Principal里封装的就是我们的UserDetails,这意味着我们可以对此进行强转化,方便后面的职责分离。
在Java Security API中,名为Principai的接口表示相同的概念。Spring Security的Authentication接口扩展了这个契约。
Spring Security中的Authentication契约不仅代表了一个主体,还添加了关于身份验证过程是否完成的信息以及权限集合
public interface Authentication extends Principal, Serializable {

	Collection<? extends GrantedAuthority> getAuthorities();
	Object getCredentials();
	Object getDetails();
	Object getPrincipal();
	boolean isAuthenticated();
	void setAuthenticated(boolean isAuthenticated) throws IllegalArgumentException;
}
- isAuthenticated():如果身份验证技术,则返回true;如果身份验证过程仍在进行,则返回false.
- getCredentials():返回身份验证过程中使用的密码或任何密钥。
- getAuthorities():返回身份验证请求的授权集合。
2:实现自定义身份验证逻辑
Spring Security中的AuthenticationProvider负责身份验证逻辑。AuthenticationProvider接口的默认实现会将查找系统用户的职责委托给UserDetailsService。它还使用PasswordEncoder在身份验证过程中进行密码管理
public interface AuthenticationProvider {

	Authentication authenticate(Authentication authentication)
			throws AuthenticationException;

	boolean supports(Class<?> authentication);
}
AuthenticationProvider的职责是与Authentication接口紧密耦合一起的。authenticate()方法会接收一个Authentication对象作为参数并返回一个Authentication对象,需要实现authenticate()方法来定义身份验证逻辑:
- 如果身份验证失败,则该方法应该抛出AuthenticationException异常。
- 如果该方法接收到的身份验证对象不被AuthenticationProvider实现所支持,那么该方法应该返回null。
- 该方法应该返回一个Authentication实例,该实例表示一个完全通过了身份验证的对象。对于这个实例,isAuthenticated()方法会返回true,并且它包含关于已验证实体的所有必要细节。通常,应用程序还会从实例中移除密码等敏感数据。因为保留这些数据可能会将它暴露给不希望看到的人
该接口的另一个方法是supports(Class<?> authentication)。
如果当前的AuthenticationProvider支持作为Authentication对象而提供的类型,则可以实现此方法以返回true
- 声明一个实现AuthenticationProvider接口的类,确定新的AuthenticationProvider支持哪种类型的Authentication对象:
- 重写supports(Class<?>authentication)方法以指定所定义的AuthenticationProvider支持哪种类型的身份验证。
- 重写 authenticate(Authentication authentication)方法以实现身份验证逻辑
@Component
public class CustomAuthenticationProvider implements AuthenticationProvider {

    @Autowired
    private MybatisUserDetailsService userDetailsService;

    @Autowired
    private PasswordEncoder passwordEncoder;

    @Override
    public Authentication authenticate(Authentication authentication) {
        String username = authentication.getName();
        String password = authentication.getCredentials().toString();

        UserDetails u = userDetailsService.loadUserByUsername(username);
        if (passwordEncoder.matches(password, u.getPassword())) {
            //如果密码匹配,则返回Authentication接口的实现以及必要的详细信息
            return new UsernamePasswordAuthenticationToken(username, password, u.getAuthorities());
        } else {	//密码不匹配,抛出异常
            throw new BadCredentialsException("Something went wrong!");
        }
    }

    @Override
    public boolean supports(Class<?> authenticationType) {
        return authenticationType.equals(UsernamePasswordAuthenticationToken.class);
    }
}
要插入AuthenticationProvider的新实现
需要在项目的配置类中重写WebSecurityConfigurerAdapter类的configure(AuthenticationManagerBuilder auth)方法
@Configuration
public class ProjectConfig extends WebSecurityConfigurerAdapter {

    @Autowired
    private AuthenticationProvider authenticationProvider;

    @Override
    protected void configure(HttpSecurity http) throws Exception {
        http.httpBasic();
        http.csrf().disable().authorizeRequests()
                .antMatchers("/create").permitAll()
                .anyRequest().authenticated(); //所有请求都需要身份验证
    }

    @Bean
    public PasswordEncoder passwordEncoder() {
        HashMap<String, PasswordEncoder> encoders = new HashMap<>();
        encoders.put("noop", NoOpPasswordEncoder.getInstance());
        encoders.put("bcrypt", new BCryptPasswordEncoder());
        encoders.put("scrypt", new SCryptPasswordEncoder());
        return new DelegatingPasswordEncoder("bcrypt",encoders);
    }

    @Override
    protected void configure(AuthenticationManagerBuilder auth) {
        auth.authenticationProvider(authenticationProvider);
    }
}
源码分析 -> 有兴趣的可以看看 - https://blog.youkuaiyun.com/qq_42682745/article/details/120713818
三:SecurityContext安全上下文
一般来说,我们为了让后续程序能够使用验证通过人员的信息,都会使用到它,比如编写一个SecurityUtils用来获取用户信息是经常用到的,那么学习它后,你就可以使用安全上下文存储关于已验证用户的详细信息了
1:SecurityContext接口
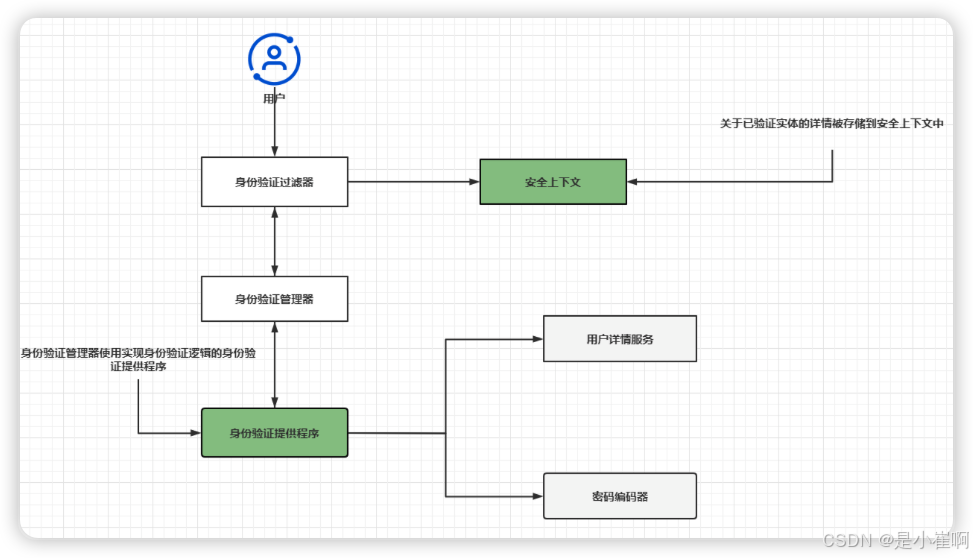
上文学习了AuthenticationProvider对身份验证的整个流程
一旦AuthenticationManager成功完成身份验证,它将为请求的其余部分存储Authentication实例,这个实例就被称为安全上下文
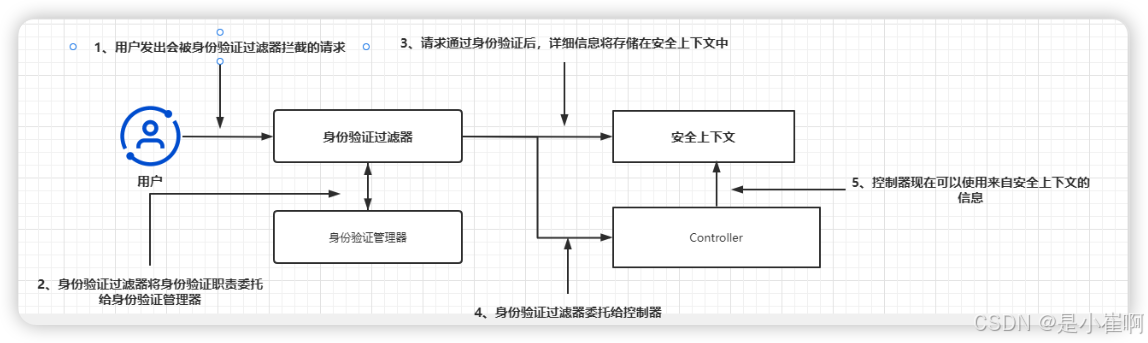
Spring Security的安全上下文是由SpringContext接口描述的。接口代码如下:
public interface SecurityContext extends Serializable {
	Authentication getAuthentication();
	void setAuthentication(Authentication authentication);
}
从接口定义中观察到,SecurityContext的主要职责是存储身份验证对象。
但是SecurityContext本身是如何被管理的呢?Spring Security提供了3中策略来管理Spring Context
其中都用到了一个对象来扮演管理器的角色。该对象被命名为SecurityContextHolder
- MODE_THREADLOCAL——允许每个线程在安全上下文中存储自己的详细信息。在每个请求一个线程的Web应用程序中,这是一种常见的方法,因为每个请求都有一个单独的线程。但若是该接口是需要异步的,那么此种策略便不再适用
- MODE_INHERITABLETHREADLOCAL——类似于MODE_THREADLOCAL,但还会指示Spring Security在异步方法的情况下将安全上下文复制到下一个线程。这样,就可以说运行@Async方法的新线程继承了该安全上下文。
- MODE_GLOBAL——使应用程序的所有线程看到相同的安全上下文实例
除了Spring Security提供的这3种管理安全上下文策略外,我们还将讨论当Spring不知道我们自己的线程会发生什么的情况时,我们需要显式地将详细信息从安全上下文复制到新线程
Spring Security不能自动管理不在Spring上下文中的对象,但是它为此提供了一些很好用的实用工具类
2:将策略用于安全上下文
2.1:MODE_THREADLOCAL
首先我们将学习通过MODE_THREADLOCAL策略管理安全上下文,这个策略也是Spring Security用于管理安全上下文的默认策略
使用这种策略,Spring Security就可以使用ThreadLocal管理上下文
我们都知道ThreadLocal确保应用程序每个线程只能看到自己线程中的ThreadLocal中的数据,其他线程是访问不到的
作为管理安全上下文的默认策略,此过程不需要显式配置。
在身份验证过程结束后,只要在需要的地方使用静态getContext()方法从持有者请求安全上下文即可
从安全上下文中,可以进一步获得Authentication对象,该对象存储着有关已验证实体的详细信息
@GetMapping("/hello")
public String hello(){
    // 获取安全上下文
    SecurityContext context = SecurityContextHolder.getContext();
    // 从上下文中获取到auth对象
    Authentication authentication = context.getAuthentication();
    // 然后就可以使用auth对象了
    return "Hello," + authentication.getName() + "!";
}
使用管理安全上下文的默认策略很容易,在很多情况下,这种策略也足够使用了
2.2:MODE_INHERITABLETHREADLOCAL
MODE_THREADLOCAL提供了为每个线程隔离安全上下文的能力,它是安全上下文更容易理解和管理。但是有些情况下,这并不适用
如果必须处理每个请求的多个线程,情况就会变得更加复杂。
看看如果让端点异步化会发生什么。即执行该方法的线程将不再是服务该请求的线程
@GetMapping("/hello")
@Async
public String hello(){
    SecurityContext context = SecurityContextHolder.getContext();
    Authentication authentication = context.getAuthentication();
    return "Hello," + authentication.getName() + "!";
}
对于上面的程序,如果再次运行,我们会出现NPE异常
String username = context.getAuthentication().getName()
这是因为该方法现在在另一个不继承安全上下文的线程上执行。因此,Authorization对象为null,最终导致NPR异常。
在这种情况下,我们就可以使用MODE_INHERITABLETHREADLOCAL策略来解决这个问题。
我们可以通过调用SecurityContextHolder.setStrategyName()方法或使用系统属性 spring.security.strategy来设置这个策略,框架就会知道要将请求的原始线程的详情复制到异步方法新创建的线程
@Bean
public InitializingBean initializingBean(){
    return ()-> SecurityContextHolder.setStrategyName(SecurityContextHolder.MODE_INHERITABLETHREADLOCAL);
}
如上代码,我们使用IntializingBean设置了SecurityContextHolder模式,调用端点时,我们将看到安全上下文已被Spring正确地传播到下一线程。此时,Authentication不再为null了。
不过,只有在框架本身创建线程时(例如我们之前使用的@Async),这种策略才有效,如果是通过代码直接创建线程,也会遇到同样的问题。这是因为,框架并不识别代码所创建的线程。后面我们会有对应的解决方案。
2.3:MODE_GLOBAL
而第三种策略MODE_GLOBAL则是由应用程序的所有线程共享安全上下文
这种策略并不建议使用,因为它不符合程序的总体情况,它只适用于独立应用程序。
3:转发安全上下文
DelegatingSecurityContext(Runn/Call)able转发安全上下文
之前的学习中我们已经了解了3种管理安全上下文的策略,但是他们有自己的弊端,就是框架只会确保为请求的线程提供安全上下文,并且该安全上下文仅可由该线程访问
但是框架并不关心新创建的线程(例如,异步方法所创建的线程)。所以我们必须为安全上下文的管理显式地设置另一种模式
当代码在框架不知道的情况下启动新线程时会发生什么?有时我们将这些线程称为自管理线程
SpringContextHolder的无指定策略为我们提供了一个自管理线程的解决方案。在这种情况下,我们需要处理安全上下文转播。用于此目的的一种解决方案是使用
DelegatingSecurityContext(Runn/Call)able装饰想要在单独线程上执行的任务。通过类的名字不难猜出它扩展了Runnable/Callable,区别只是一个不存在返回值一个存在返回值
这两个类都代表异步执行的任务,就像其他任何Runnable和Callable一样,它们会确保为执行任务的线程复制到当前安全上下文
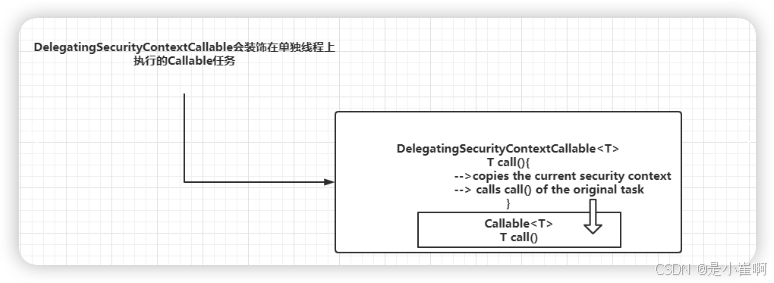
DelegatingSecurityContextCallable被设计成Callable对象的装饰器。
在构建此类对象时,需要提供应用程序异步执行的可调用任务,并将安全上下文复制到新线程,然后执行任务。
@GetMapping("/giao")
public String giao() throws ExecutionException, InterruptedException {
    //创建Callable任务,并将其作为任务在单独线程上执行
    Callable<String> task = () ->{
        SecurityContext context = SecurityContextHolder.getContext();
        return context.getAuthentication().getName();
    };
    ExecutorService e = Executors.newCachedThreadPool();
    try{
        DelegatingSecurityContextCallable<String> contextTask = new DelegatingSecurityContextCallable<>(task);
        return "giao, " + e.submit(contextTask).get() + "!";
    }finally {
        e.shutdown();
    }
}
从代码中可以看到DelegatingSecurityContextCallable装饰了任务,它会将安全上下文提供给新线程。现在调用端点,可以看到Spring将安全上下文传播到执行任务的线程
DelegatingSecurityContextExecuorService转发安全上下文
还有第二个选项处理安全上下文,这就是从线程池而不是任务本身管理传播,这个处理方案就是DelegatingSecurityContextExecuorService
它的实现装饰了ExecutorService。DelegatingSecurityContextExecuorService还负责安全上下文的传播

@GetMapping("/miao")
public String miao() throws ExecutionException, InterruptedException {
    Callable<String> task = () ->{
        SecurityContext context = SecurityContextHolder.getContext();
        return context.getAuthentication().getName();
    };
    ExecutorService e = Executors.newCachedThreadPool();
    //通过DelegatingSecurityContextExecutorService装饰线程池
    e = new DelegatingSecurityContextExecutorService(e);
    try{
        //在提交任务前DelegatingSecurityContextExecutorService会将安全上下文传播到执行此任务的线程
        return "miao, " + e.submit(task).get() + "!";
    }finally {
        e.shutdown();
    }
}
其实SpringSecurity提供了很多这样的对象管理安全上下文,具体如下表:
| 类 | 描述 |
|---|---|
| DelegatingSecurityContextExecutor | 实现Executor接口,并被设计用来装饰Executor对象 |
| DelegatingSecurityContextExecutorService | 实现ExecutorService接口,并被设计用来装饰ExecutorService对象 |
| DelegatingSecurityContextScheduledExecutorService | 实现ScheduledExecutorService接口 |
| DelegatingSecurityContextRunnable | 实现Runnable接口,表示在另一个线程上执行而不返回响应的任务 |
| DelegatingSecurityContextCallable | 实现Callable接口,表示在另一个线程上执行并最终返回响应的任务 |
可以发现,对于DelegatingSecurityContextXXX,没有装饰Spring自带的ThreadPoolTaskExecutor
? = new DelegatingSecurityContextExecutor(new ThreadPoolTaskExecutor();
我们平时工作用的做多的反而是Spring自带的线程池,我现在就是想用ThreadPoolTaskExecutor,那么该怎么解决呢?
if (this.taskDecorator != null) {
    executor = new ThreadPoolExecutor(
            this.corePoolSize, this.maxPoolSize, this.keepAliveSeconds, TimeUnit.SECONDS,
            queue, threadFactory, rejectedExecutionHandler) {

        // TaskDecorator使用了装饰器模式,在初始化线程池的时候复写了线程池的execute方法。
        @Override
        public void execute(Runnable command) {
            Runnable decorated = taskDecorator.decorate(command);
            if (decorated != command) {
                decoratedTaskMap.put(decorated, command);
            }
            super.execute(decorated);
        }
    };
}
所以我们可以新建一个TaskDecorator类,复写decorate方法,设置安全上下文,这样就可以通过ThreadPoolTaskExecutor将安全上下文信息共享给其他线程
我们创建一个配置类,并且配置类中通过内部类形式配置好TaskDecorator,并将安全上下文放进去
!!!记得最后一定要clearContext
package com.mbw.security.config;

import org.springframework.context.annotation.Bean;
import org.springframework.context.annotation.Configuration;
import org.springframework.scheduling.concurrent.ThreadPoolTaskExecutor;
import org.springframework.security.core.context.SecurityContext;
import org.springframework.security.core.context.SecurityContextHolder;

import java.util.concurrent.ThreadPoolExecutor;

@Configuration
public class ThreadPoolTaskConfig {
	/** 核心线程数(默认线程数) */
	private static final int CORE_POOL_SIZE = 20;
	/** 最大线程数 */
	private static final int MAX_POOL_SIZE = 100;
	/** 允许线程空闲时间(单位:默认为秒) */
	private static final int KEEP_ALIVE_TIME = 10;
	/** 缓冲队列大小 */
	private static final int QUEUE_CAPACITY = 200;
	/** 线程池名前缀 */
	private static final String THREAD_NAME_PREFIX = "mbw-Async-";
	@Bean("taskExecutor") // bean的名称,默认为首字母小写的方法名
	public ThreadPoolTaskExecutor taskExecutor(){
		ThreadPoolTaskExecutor executor = new ThreadPoolTaskExecutor();
		executor.setCorePoolSize(CORE_POOL_SIZE);
		executor.setMaxPoolSize(MAX_POOL_SIZE);
		executor.setQueueCapacity(QUEUE_CAPACITY);
		executor.setKeepAliveSeconds(KEEP_ALIVE_TIME);
		executor.setThreadNamePrefix(THREAD_NAME_PREFIX);
		// 注意这里
        executor.setTaskDecorator(runnable -> {
			SecurityContext securityContext = SecurityContextHolder.getContext();
			return () -> {
				try {
					SecurityContextHolder.setContext(securityContext);
					runnable.run();
				} finally {
                    // 注意这里不能忘记。。。。
					SecurityContextHolder.clearContext();
				}
			};
		});

		// 线程池对拒绝任务的处理策略
		// CallerRunsPolicy:由调用线程(提交任务的线程)处理该任务
		executor.setRejectedExecutionHandler(new ThreadPoolExecutor.CallerRunsPolicy());
		// 初始化
		executor.initialize();
		return executor;
	}
}
然后直接使用就可以啦
@Resource
private ThreadPoolTaskExecutor taskExecutor;

@GetMapping("/miao")
public String miao() throws ExecutionException, InterruptedException {
    Callable<String> task = () ->{
        SecurityContext context = SecurityContextHolder.getContext();
        return context.getAuthentication().getName();
    };
    try{
        //在提交任务前DelegatingSecurityContextExecutorService会将安全上下文传播到执行此任务的线程
        return "miao, " + taskExecutor.submit(task).get() + "!";
    }finally {
        taskExecutor.shutdown();
    }
}


 被折叠的 条评论
为什么被折叠?
被折叠的 条评论
为什么被折叠?
 到【灌水乐园】发言


