


自定义启动器Starter
Starter相当于模块,它能将所需的依赖整合起来,并对模块内的Bean进行自动配置
功能类开发 -> 自动配置类 -> 测试工程开发 -> 拦截器进行功能完善 -> 添加配置项
一:功能类开发
输出客户端(IP区分)的访问次数
<dependency>
    <groupId>javax.servlet</groupId>
    <artifactId>javax.servlet-api</artifactId>
    <version>4.0.1</version> <!-- 请根据需要选择合适的版本 -->
    <scope>provided</scope> <!-- 通常服务器已经提供该依赖 -->
</dependency>

<dependency>
    <groupId>org.springframework.boot</groupId>
    <artifactId>spring-boot-starter-web</artifactId>
</dependency>
package com.cui.ipcounterstarter.service.impl;

import com.cui.ipcounterstarter.service.IpCounterService;
import org.springframework.beans.factory.annotation.Autowired;
import org.springframework.stereotype.Service;

import javax.servlet.http.HttpServletRequest;
import java.util.HashMap;
import java.util.Map;
import java.util.Objects;

/**
 * 功能方法 - 统计IP的出现次数
 * @author cui haida
 * 2025/3/30
 */
@Service
public class IpCounterServiceImpl implements IpCounterService {

    @Autowired
    private HttpServletRequest request;

    // 统计次数
    private final Map<String, Integer> ipCountMap = new HashMap<>();

    @Override
    public void record() {
        // 获取当前访问的ip
        String ip = request.getRemoteAddr();
        // 统计次数,封装到Map
        Integer count = ipCountMap.get(ip);
        count = Objects.isNull(count) ? 1 : count + 1;
        ipCountMap.put(ip, count);

        System.out.println("ip:" + ip + ",count:" + count);
    }
}
二:自动配置类
将刚才的功能类进行实例化
package com.cui.ipcounterstarter.configure;

import com.cui.ipcounterstarter.service.IpCounterService;
import com.cui.ipcounterstarter.service.impl.IpCounterServiceImpl;
import org.springframework.context.annotation.Bean;
import org.springframework.context.annotation.Configuration;

/**
 * 自动配置类,实例化功能类
 * @author cui haida
 * 2025/3/30
 */
@Configuration
public class IpAutoConfiguration {
    @Bean
    public IpCounterService ipCounterService(){
        return new IpCounterServiceImpl();
    }
}
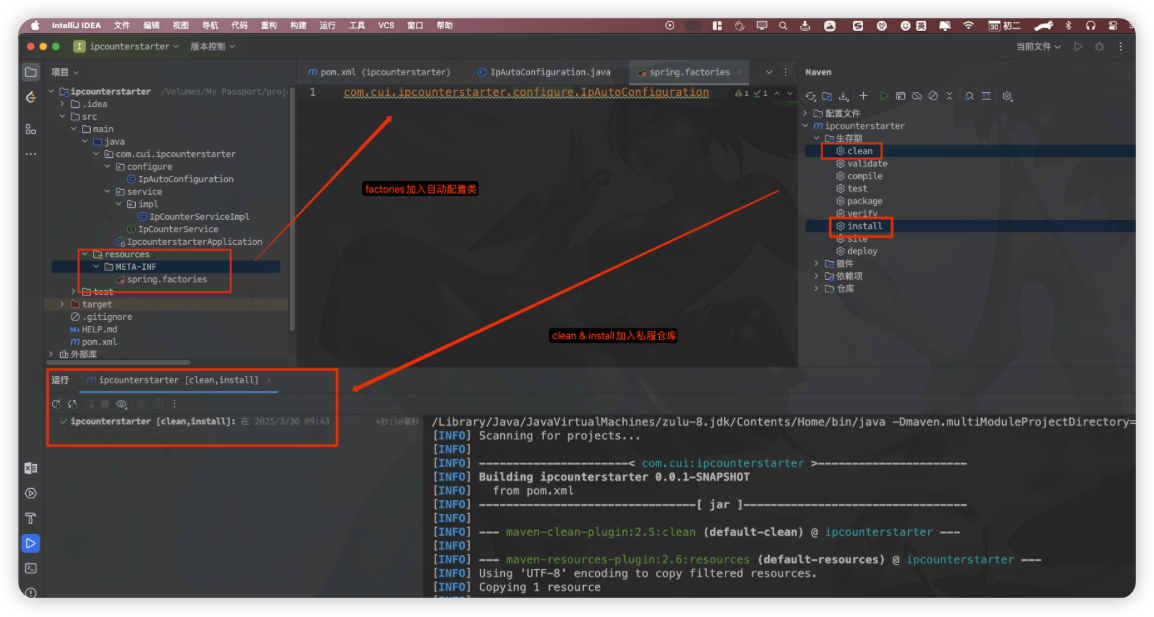
SpringBoot 2.7废止,SpringBoot 3 全面移除
META-INF -> spring.factories
SpringBoot 2.7+用这个
META-INF -> spring -> org.springframework.boot. autoconfigure.AutoConfiguration.imports
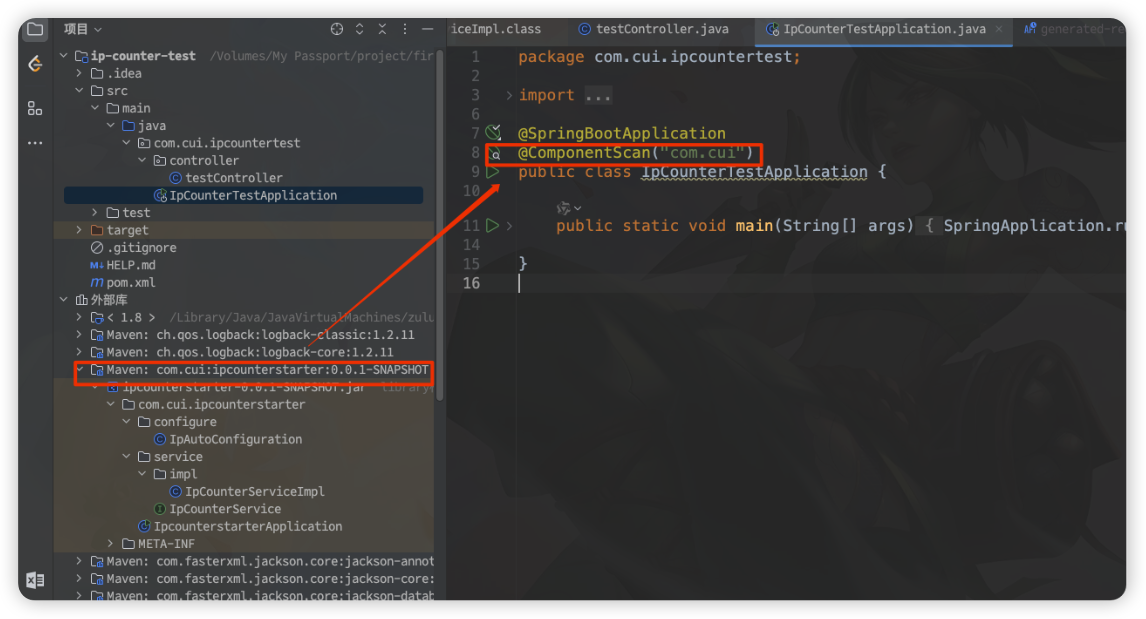
三:编写测试项目进行测试
<dependency>
    <groupId>org.springframework.boot</groupId>
    <artifactId>spring-boot-starter-web</artifactId>
</dependency>

<!-- 引入刚才写好的starter -->
<dependency>
    <groupId>com.cui</groupId>
    <artifactId>ipcounterstarter</artifactId>
    <version>0.0.1-SNAPSHOT</version>
</dependency>
package com.cui.ipcountertest.controller;

import com.cui.ipcounterstarter.service.IpCounterService;
import org.springframework.web.bind.annotation.GetMapping;
import org.springframework.web.bind.annotation.RestController;

import javax.annotation.Resource;

/**
 * @author cui haida
 * 2025/3/30
 */
@RestController
public class testController {

    @Resource
    private IpCounterService ipCounterService;

    @GetMapping("/record")
    public void record(){
        ipCounterService.record();
    }
}
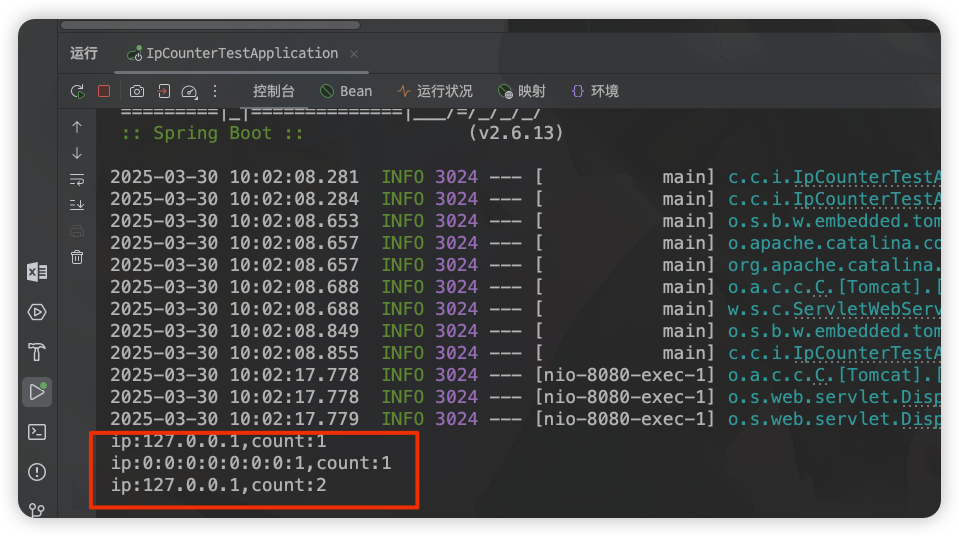
调用之后看到如下日志,说明基础功能实现完成
四:启动器中增加拦截器
为了避免在测试工程中手动书写注入,需要在启动器中增加拦截器保证自动运行
package com.cui.ipcounterstarter.interceptor;

import com.cui.ipcounterstarter.service.IpCounterService;
import org.springframework.beans.factory.annotation.Autowired;
import org.springframework.web.servlet.HandlerInterceptor;

import javax.servlet.http.HttpServletRequest;
import javax.servlet.http.HttpServletResponse;

/**
 * 拦截器
 * @author cui haida
 * 2025/3/30
 */
public class IpCountInterceptor implements HandlerInterceptor {

    @Autowired
    private IpCounterService ipCounterService;

    /**
     * 拦截器 - pre是在请求处理之前执行,如果返回false,则请求中断,如果返回true,执行下一个拦截器,如果无拦截器,执行controller
     * 将实现的功能放在这里,这样就不用再测试工程的controller中描述了
     * @param request 请求
     * @param response 响应
     * @param handler 处理器
     * @return 如果返回false,则请求中断,如果返回true,执行下一个拦截器
     * @throws Exception 异常
     */
    @Override
    public boolean preHandle(HttpServletRequest request, HttpServletResponse response, Object handler) throws Exception {
        ipCounterService.record();
        return true;
    }
}
拦截器加入到Spring MVC中
package com.cui.ipcounterstarter.config;

import com.cui.ipcounterstarter.interceptor.IpCountInterceptor;
import org.springframework.context.annotation.Bean;
import org.springframework.context.annotation.Configuration;
import org.springframework.web.servlet.config.annotation.InterceptorRegistry;
import org.springframework.web.servlet.config.annotation.WebMvcConfigurer;

/**
 * @author cui haida
 * 2025/3/30
 */
@Configuration
public class SpringMvcConfigure implements WebMvcConfigurer {
    @Override
    public void addInterceptors(InterceptorRegistry registry) {
        registry.addInterceptor(new IpCountInterceptor()).addPathPatterns("/**");
    }

    @Bean
    public IpCountInterceptor ipCountInterceptor() {
        return new IpCountInterceptor();
    }
}
此时测试工程将不再用手动引入bean和调用
五:配置文件设置
如果支持测试工程在配置文件进行个性化设置,可以在启动器工程规定好前缀,然后启动器工程编写对应的ipProperties
package com.cui.ipcounterstarter.property;

import lombok.Data;
import org.springframework.boot.context.properties.ConfigurationProperties;
import org.springframework.stereotype.Component;

/**
 * 支持配置文件的修改
 * @author cui haida
 * 2025/3/30
 */
@Data
@Component
@ConfigurationProperties(prefix = "tools.ip") // 读取配置文件
public class IpCounterProperties {
    private String display = Display.SIMPLE.getValue();

    /**
     * 显示方式
     */
    public enum Display {
        SIMPLE("simple"),
        DETAIL("detail");

        private String value;

        Display(String value) {
            this.value = value;
        }

        public String getValue() {
            return value;
        }
    }
}
响应的功能实现类也要修改
package com.cui.ipcounterstarter.service.impl;

import com.cui.ipcounterstarter.property.IpCounterProperties;
import com.cui.ipcounterstarter.service.IpCounterService;
import org.springframework.beans.factory.annotation.Autowired;
import org.springframework.stereotype.Component;
import org.springframework.stereotype.Service;

import javax.servlet.http.HttpServletRequest;
import java.util.HashMap;
import java.util.Map;
import java.util.Objects;

/**
 * 功能方法 - 统计IP的出现次数
 * @author cui haida
 * 2025/3/30
 */
@Component
public class IpCounterServiceImpl implements IpCounterService {

    @Autowired
    private HttpServletRequest request;

    @Autowired
    private IpCounterProperties properties;

    // 统计次数
    private final Map<String, Integer> ipCountMap = new HashMap<>();

    @Override
    public void record() {
        // 获取当前访问的ip
        String ip = request.getRemoteAddr();
        // 统计次数,封装到Map
        Integer count = ipCountMap.get(ip);
        count = Objects.isNull(count) ? 1 : count + 1;
        ipCountMap.put(ip, count);

        if (properties.getDisplay().equals(IpCounterProperties.Display.DETAIL.getValue())) {
            System.out.println("\t\t\tIP访问监控\t\t\t");
            System.out.println("+---------ip----------+--------count--------+");
            ipCountMap.forEach((key, value) -> {
                System.out.println("|\t\t" + key + "\t\t|\t\t" + value + "\t\t|");
            });
            System.out.println("+-------------------------------------------+");
        } else {
            ipCountMap.forEach((key, value) -> {
                System.out.println("ip: " + key + "\tcount: " + value);
            });
        }
    }
}
最后在测试工程的配置文件中设置对应的值即可
tools:
	ip:
		display: "detail"


 被折叠的 条评论
为什么被折叠?
被折叠的 条评论
为什么被折叠?
 到【灌水乐园】发言


