


由来:
众所周知,一个项目越大,项目模块越多,用到的配置文件也就越多,如果这些配置文件都是放在项目中,不仅产生冗余,修改起来也并不方便,所以就有了Config模块。
概述:
Config分为server服务端和client客户端,我们需要服务端从远程工具上(GitHub,SVN,码云)下载配置,然后通过客户端获取这些配置,使用配置
例子:
下面是使用的远程客户端码云进行演示:
1.在码云中编写配置文件config-dev.yml,一个普通的配置文件,与你提供者中的application.yml一致:
server:
  port: 8071
spring:
  application:
    name: provoider
  datasource:
    driver-class-name: com.mysql.jdbc.Driver
    url: jdbc:mysql://127.0.0.1:3306/springcloud?useUnicode=true&characterEncoding=utf-8&useSSL=false
    password: root
    username: root
mybatis:
  type-aliases-package: com.jbit.entity
  mapper-locations: classes:com.jbt.dao/*.xml
  configuration:
    log-impl: org.apache.ibatis.logging.stdout.StdOutImpl
eureka:
  client:
    service-url:
      defaultZone: http://root:root@localhost:7776/eureka/
2. 新建一个项目config-server,用来读取码云上的配置文件,jar包依赖如下:
 <dependencies>
        <dependency>
            <groupId>org.springframework.boot</groupId>
            <artifactId>spring-boot-starter</artifactId>
        </dependency>

        <dependency>
            <groupId>org.springframework.boot</groupId>
            <artifactId>spring-boot-starter-test</artifactId>
            <scope>test</scope>
        </dependency>

        <dependency>
            <groupId>org.springframework.cloud</groupId>
            <artifactId>spring-cloud-starter-eureka</artifactId>
            <version>1.3.5.RELEASE</version>
        </dependency>

        <!--config组件-->
        <!-- https://mvnrepository.com/artifact/org.springframework.cloud/spring-cloud-config-server -->
        <dependency>
            <groupId>org.springframework.cloud</groupId>
            <artifactId>spring-cloud-config-server</artifactId>
            <version>1.4.7.RELEASE</version>
        </dependency>

    </dependencies>
3.配置文件application.yml
server:
  port: 7000
spring:
  application:
    name: config-server
  cloud:
    config:
      server:
        git:
          uri:  https://gitee.com/Neverland-Traceoff/config-server.git	#文件的仓库地址
          #如果是公开的项目就可以不配置用户名和密码
          username: #码云的用户名
          password: #码云的密码
eureka:
  client:
    service-url:
      defaultZone: http://root:root@localhost:7776/eureka/
4.启动类
package com.jbit;

import org.springframework.boot.SpringApplication;
import org.springframework.boot.autoconfigure.SpringBootApplication;
import org.springframework.boot.autoconfigure.jdbc.DataSourceAutoConfiguration;
import org.springframework.cloud.config.server.EnableConfigServer;
import org.springframework.cloud.netflix.eureka.EnableEurekaClient;

@SpringBootApplication
@EnableEurekaClient
@EnableConfigServer
public class ConfigServerApplication {
    public static void main(String[] args) {
        SpringApplication.run(ConfigServerApplication.class,args);
    }
}
先启动eureka项目后启动新建的项目config-server
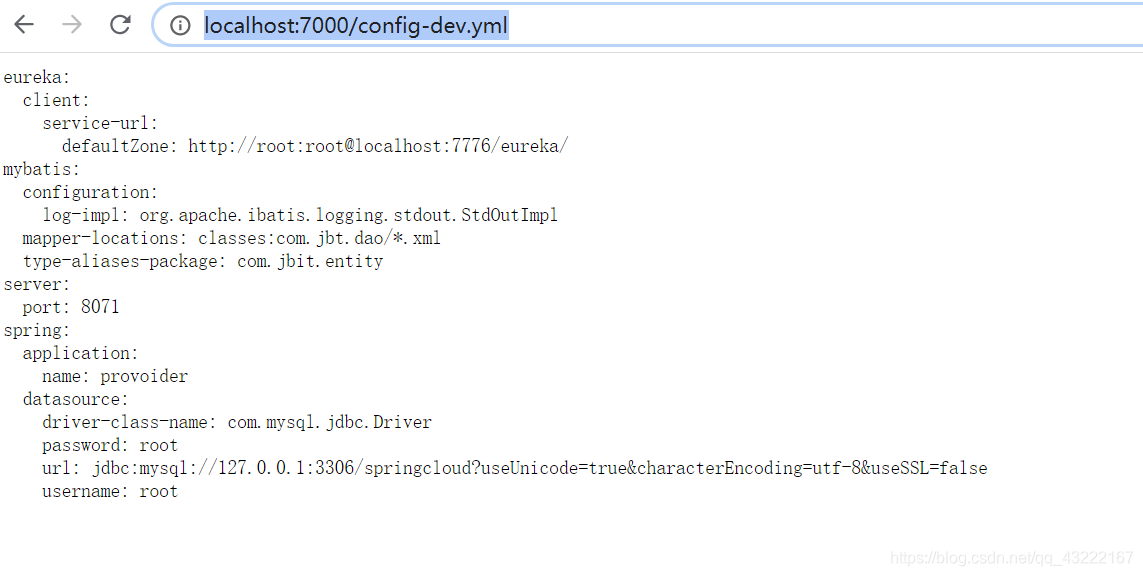
启动后访问http://localhost:7000/加码云里面的文件名(指仓库名之后的路径)
例:http://localhost:7000/config-dev.yml
访问成功后出现配置文件消息则成功
也可以使用本地的
server:
  port: 7000
spring:
  application:
    name: config-server
  cloud:
    config:
      server:
        native:
          search-locations: classpath:/shared
  profiles:
    active: native

eureka:
  client:
    service-url:
      defaultZone: http://root:root@localhost:7776/eureka/
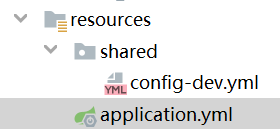
项目结构如下:
5.在你需要这个配置文件的项目里面添加依赖,我这里使用的是项目提供者:
<!-- https://mvnrepository.com/artifact/org.springframework.cloud/spring-cloud-starter-config -->
        <dependency>
            <groupId>org.springframework.cloud</groupId>
            <artifactId>spring-cloud-starter-config</artifactId>
            <version>1.3.4.RELEASE</version>
        </dependency>
在resources目录下创建bootstrap.yml文件,并且将application.yml里面的文件清空
注意name的值和profile的值就是在Git中配置文件的名称
我的配置文件名是config-dev,所以下面的name值是config,profile的值是dev
spring:
  application:
    name: config
  cloud:
    config:
      uri: http://localhost:7000/
      profile: dev
然后依次启用eureka,config-server,provider,customer项目,访问结果如下图


 1530
1530

 被折叠的 条评论
为什么被折叠?
被折叠的 条评论
为什么被折叠?
 到【灌水乐园】发言


