


 本文详细介绍了事务管理在转账案例中的应用,通过ThreadLocal确保数据一致性,使用动态代理(JDK与CGLIB)增强业务逻辑,实现事务的开启、提交、回滚和资源释放。
事务
转账案例

这只是表面的现象:
如果中途出现异常,真实的数据就会紊乱。例如:
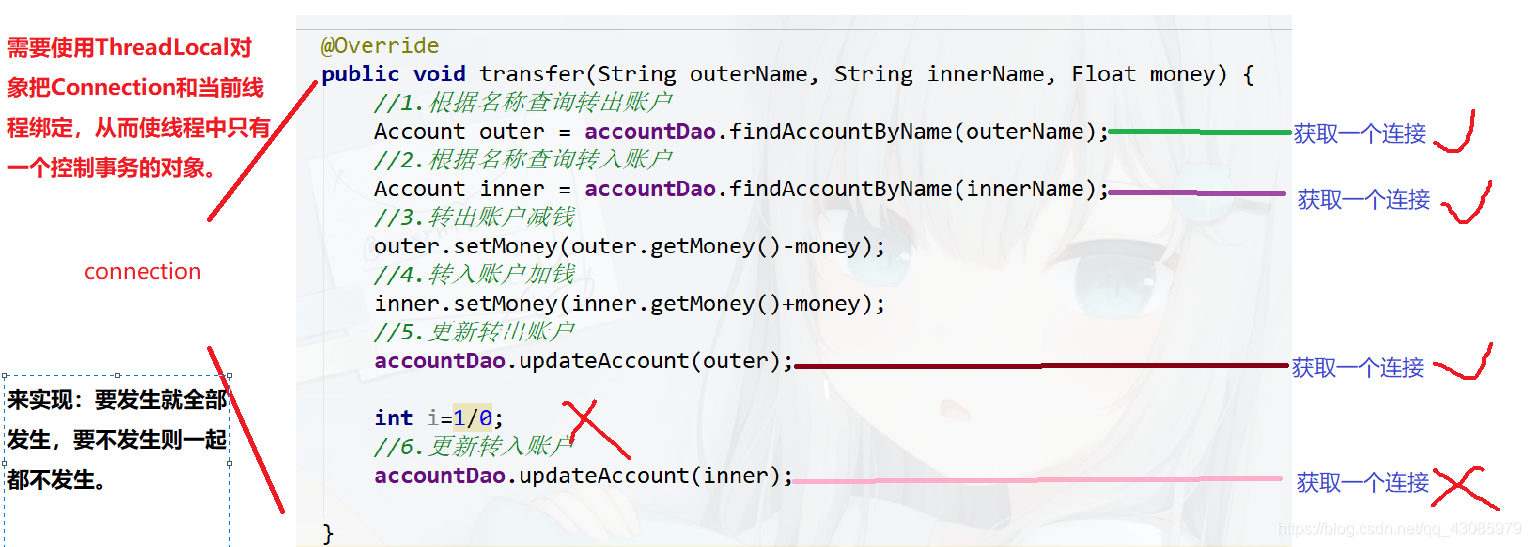
事务的数据不一致解决办法:
使用ThreadLocal创建一个本地线程对象,
通过这个对象去获取本地线程上的数据源连接,如果有就直接返回得到的这个连接,如果没有就从数据源中获取这个连接然后放到本地线程中。最终返回该连接。
接下来开始控制事务:
Connection首先把自动提交改成手动提交(setautoCommit=false),然后再通过commit和rollback方法来对事务进行提交。
细节:我们写的连接都使用了连接池,连接池的好处是把消耗时间获取连接的这一部分放到应用加载的一开始,在web工程中当我们启动tomcat时加载应用时创建一些连接,从而在后续项目运行阶段不需要从数据库中获取连接,保证了使用connection时的执行效率。
服务器也有一个技术叫线程池,他的特点是当tomcat已启动时初始化很多线程放到容器中。以后接下来的访问都是从线程池中拿出线程。然后线程池中的线程和我们的连接池的连接一样,调用close()方法并不是关闭而是使用完再次放入了连接池/线程池。,,,其实这样线程池是有一个连接的.close()表示该连接已经被关闭了。
当我们下次再获取这个线程判断上面有没有连接时,得到的结果一定是有的,但是该连接已经不能用了,因为你早已经close()掉了加回到池里去了。所以从这点上来看,我们应该在整个线程用完之后,把线程和连接进行一个解绑的操作。
java工程是不涉及这个问题的,但是javaEE开发(web)开发设及。
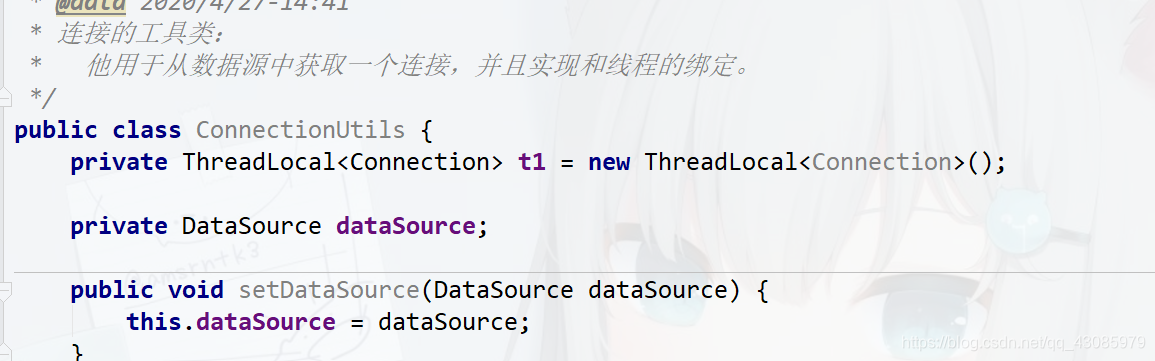
创建获取本地连接的工具类代码如下:
/**
* 连接的工具类:
* 他用于从数据源中获取一个连接,并且实现和线程的绑定。
*/
public class ConnectionUtils {
private ThreadLocal<Connection> t1 = new ThreadLocal<Connection>();
private DataSource dataSource;
public void setDataSource(DataSource dataSource) {
this.dataSource = dataSource;
}
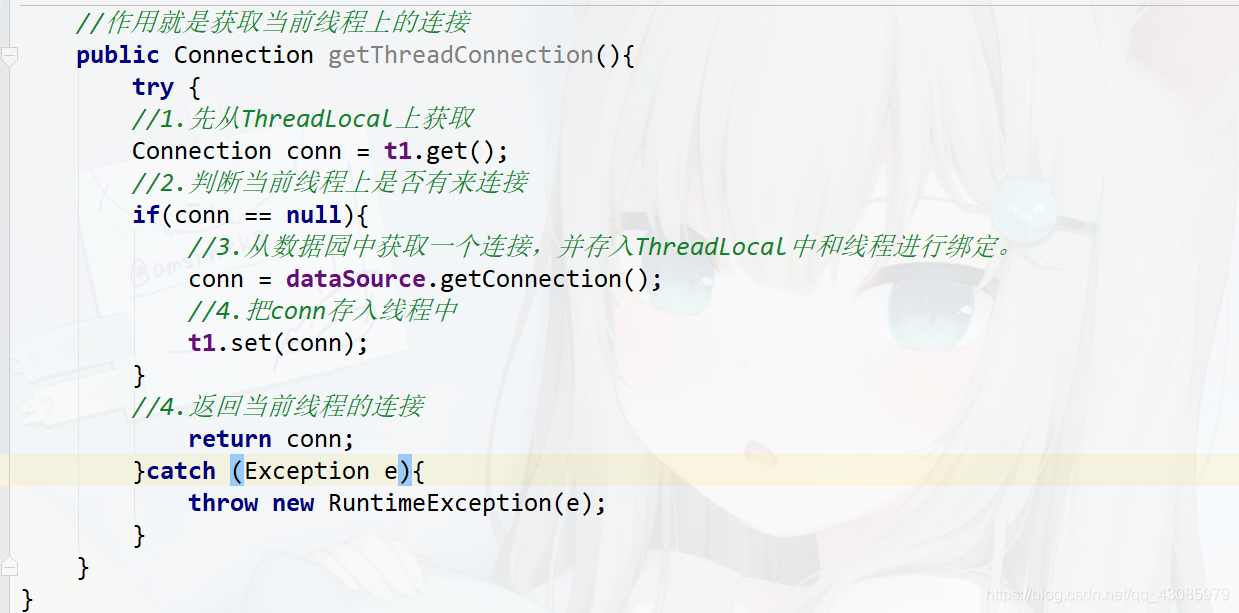
//作用就是获取当前线程上的连接
public Connection getThreadConnection(){
try {
//1.先从ThreadLocal上获取
Connection conn = t1.get();
//2.判断当前线程上是否有连接
if(conn == null){
//3.从数据园中获取一个连接,并存入ThreadLocal中和线程进行绑定。
conn = dataSource.getConnection();
//4.把conn存入线程中
t1.set(conn);
}
//4.返回当前线程的连接
return conn;
}catch (Exception e){
throw new RuntimeException(e);
}
}
//作用就是把连接和线程解绑。
public void removeConnection(){
t1.remove();
}
}
控制事务管理工具类:
/*
* 和事务管理相关的工具类,它包括:开启事务,提交事务,回滚事务,和释放连接*/
public class TransactionManager {
    private ConnectionUtils connectionUtils;
    public void setConnectionUtils(ConnectionUtils connectionUtils) {
        this.connectionUtils = connectionUtils;
    }
    /*
    * 开启事务*/
    public void beginTransaction(){
        try {
            connectionUtils.getThreadConnection().setAutoCommit(false);
        } catch (SQLException e) {
            e.printStackTrace();
        }
    }

    /*
     * 提交事务*/
    public void commit(){
        try {
            connectionUtils.getThreadConnection().commit();
        } catch (SQLException e) {
            e.printStackTrace();
        }
    }
    /*
     * 回滚事务*/
    public void rollback(){
        try {
       connectionUtils.getThreadConnection().rollback();
        } catch (SQLException e) {
            e.printStackTrace();
        }
    }
    /*
     * 释放连接*/
    public void release(){
        try {
          connectionUtils.getThreadConnection().close();
            //解绑
            connectionUtils.removeConnection();
        } catch (SQLException e) {
            e.printStackTrace();
        }
    }
}
配置文件:
<beans xmlns="http://www.springframework.org/schema/beans"
       xmlns:xsi="http://www.w3.org/2001/XMLSchema-instance"
       xsi:schemaLocation="http://www.springframework.org/schema/beans
       				   http://www.springframework.org/schema/beans/spring-beans.xsd
       					  ">
    <bean id="accountService" class="com.selan.service.impl.AccountService">
        <!--注入dao对象(set方法注入)-->
        <property name="accountDao" ref="accountDaoId"></property>
        <!--注入事务管理器-->
        <property name="txManager" ref="txManager"></property>
    </bean>
    <bean id="accountDaoId" class="com.selan.dao.impl.AccountDaoImpl">
        <!--注入Query Runner-->
        <property name="runner" ref="queryRunner"></property>
        <!--注入connectionUtil-->
        <property name="connectionUtils" ref="connectionUtil"></property>
    </bean>
    <bean id="queryRunner" class="org.apache.commons.dbutils.QueryRunner" scope="prototype">
    </bean>

    <!--配置数据源-->
    <bean id="dataSource" class="com.mchange.v2.c3p0.ComboPooledDataSource">
        <property name="driverClass" value="com.mysql.jdbc.Driver"></property>
        <property name="jdbcUrl" value="jdbc:mysql://localhost:3307/spring"></property>
        <property name="user" value="root"></property>
        <property name="password" value="123"></property>
    </bean>
    <!--配置connection的工具类ConnectionUtile-->
    <bean id="connectionUtil" class="com.selan.util.ConnectionUtils">
        <!--注入数据源-->
        <property name="dataSource" ref="dataSource"></property>
    </bean>
    <!--配置事务管理器-->
    <bean id="txManager" class="com.selan.util.TransactionManager">
        <!--注入connectionUtils-->
        <property name="connectionUtils" ref="connectionUtil"></property>
    </bean>
</beans>
业务层修改:
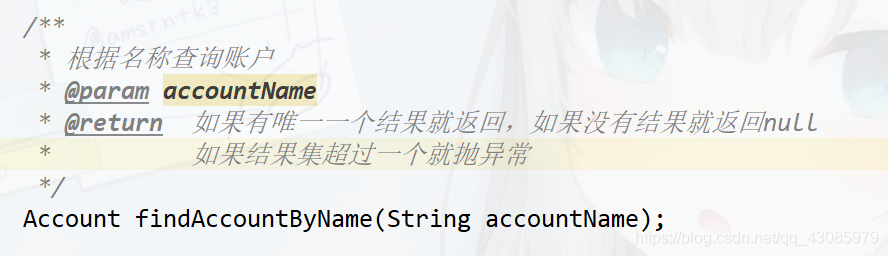
/**
* 事物的控制都应该是在业务层的
*/
public class AccountService_02 implements IAccountService {
private IAccountDao accountDao;
private TransactionManager txManager;
public void setTxManager(TransactionManager txManager) {
this.txManager = txManager;
}
public void setAccountDao(IAccountDao accountDao) {
this.accountDao = accountDao;
}
@Override
public List<Account> findAll() {
try {
//1.开启事务
txManager.beginTransaction();
//2.执行操作
List<Account> accounts = accountDao.findAll();
//3.提交事务
txManager.commit();
//4.返回结果
return accounts;
}catch (Exception e){
//5.回滚操作
txManager.rollback();
throw new RuntimeException(e);
}finally {
//6.释放资源
txManager.release();
}
}
@Override
public Account findAccountById(int id) {
try {
//1.开启事务
txManager.beginTransaction();
//2.执行操作
Account account = accountDao.findAccountById(id);;
//3.提交事务
txManager.commit();
//4.返回结果
return account;
}catch (Exception e){
//5.回滚操作
txManager.rollback();
throw new RuntimeException(e);
}finally {
//6.释放资源
txManager.release();
}
}
@Override
public void addAccount(Account account) {
try {
//1.开启事务
txManager.beginTransaction();
//2.执行操作
accountDao.addAccount(account);
//3.提交事务
txManager.commit();
}catch (Exception e){
//5.回滚操作
txManager.rollback();
}finally {
//6.释放资源
txManager.release();
}
}
@Override
public void updateAccount(Account account) {
try {
//1.开启事务
txManager.beginTransaction();
//2.执行操作
accountDao.updateAccount(account);
//3.提交事务
txManager.commit();
}catch (Exception e){
//5.回滚操作
txManager.rollback();
}finally {
//6.释放资源
txManager.release();
}
}
@Override
public void deleteAccount(int accountid) {
try {
//1.开启事务
txManager.beginTransaction();
//2.执行操作
accountDao.deleteAccount(accountid);
//3.提交事务
txManager.commit();
}catch (Exception e){
//5.回滚操作
txManager.rollback();
}finally {
//6.释放资源
txManager.release();
}
}
@Override
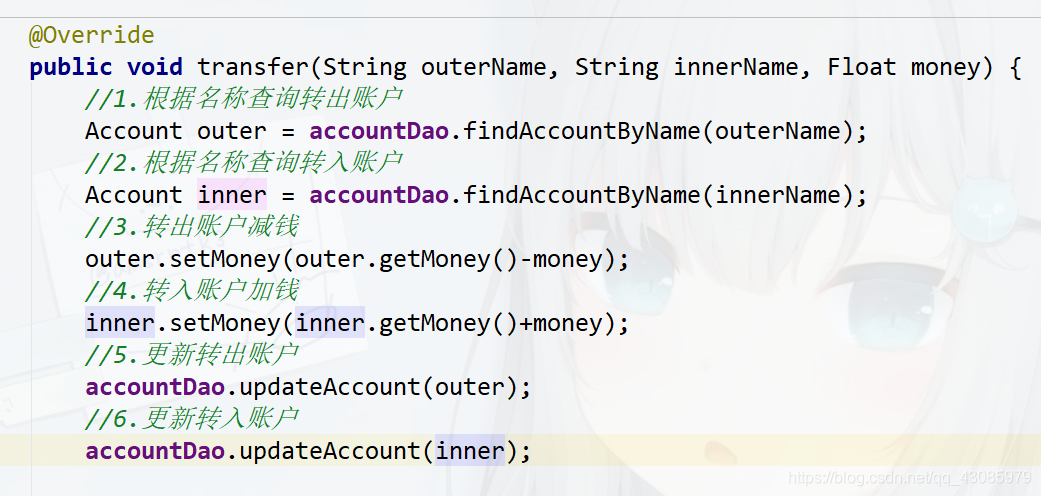
public void transfer(String outerName, String innerName, Float money) {
try {
//1.开启事务
txManager.beginTransaction();
//2.执行操作
//2.1.根据名称查询转出账户
Account outer = accountDao.findAccountByName(outerName);
//2.2.根据名称查询转入账户
Account inner = accountDao.findAccountByName(innerName);
//2.3.转出账户减钱
outer.setMoney(outer.getMoney()-money);
//2.4.转入账户加钱
inner.setMoney(inner.getMoney()+money);
//2.5.更新转出账户
accountDao.updateAccount(outer);
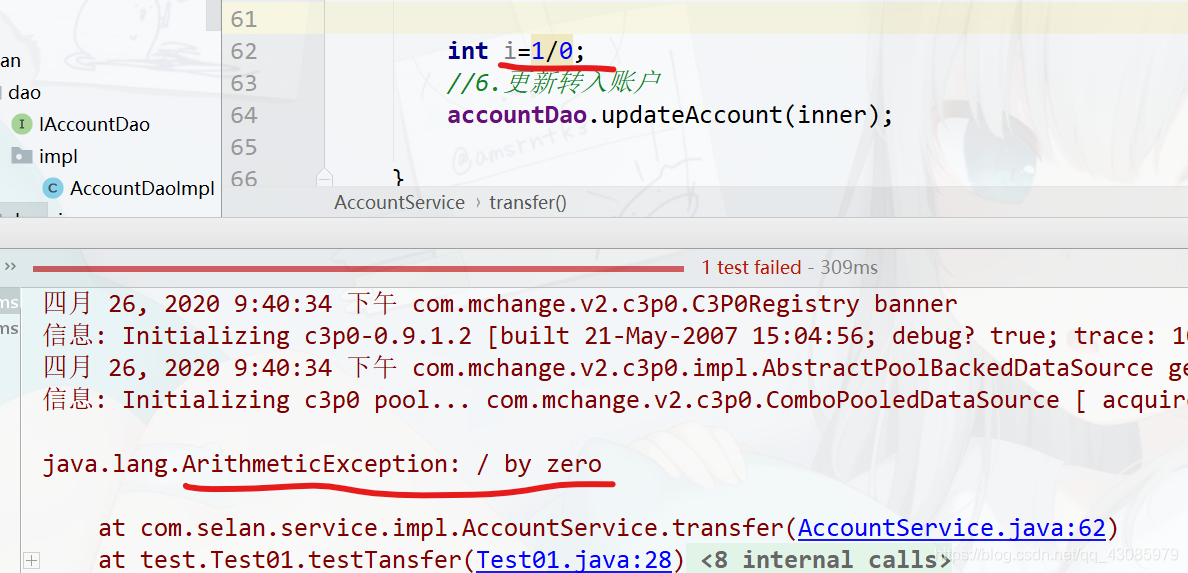
int i=1/0;
//2.6.更新转入账户
accountDao.updateAccount(inner);
//3.提交事务
txManager.commit();
}catch (Exception e){
//5.回滚操作
txManager.rollback();
e.printStackTrace();
}finally {
//6.释放资源
txManager.release();
}
}
}
最终我们放开int i =1/0,数据库信息没有发生改变,验证了事务的原子性特点,由上可以看出业务层代码过于繁琐,所以我们想到了代理类。
我们用一个项目先来演示一下代理模式的应用
具体的代理模式原理,可以借鉴一下博客JDK的动态代理
动态代理的特点:字节码随用随创建,随用随加载,它与静态代理的区别也在于此,因为静态代理是一上来就创建好的,并完成了加载,装饰着模式就是静态代理的一种体现,
以生产者和代理者为例,具体代码如下:
1.需要代理对象的接口IProducer
 * 对生产厂家要求的接口
 */
public interface IProducer {
    /*
     * 销售*/
    public void saleProduct(float money);

    /*
     * 售后*/
    public void afterService(float money);
}
2.需要代理的实际对象
//生产者
public class Producer implements IProducer{
    /*
    * 销售*/
    public void saleProduct(float money){
        System.out.println("销售产品,并拿到钱:"+money);
    }
    /*
    * 售后*/
    public void afterService(float money){
        System.out.println("售后服务,并拿到钱:"+money);
    }
}
3.测试模拟消费者 Client类
/**
 * @author Selan
 * @data 2020/4/28-14:56
 * 模拟一个消费者
 */
public class Client {
    public static void main(String[] args) {
        //匿名内部类访问外部成员时,外部成员要求是final修饰
        final Producer producer = new Producer();

        /*
        * 动态代理:
        *   特点:字节码随用随创建
        *   作用:在不修改源码的基础上对方法进行增强
        *   分类:基于接口的动态代理
        *        基于子类的动态代理
        *   基于接口的动态代理:
        *         涉及的类:Proxy
        *         提供者:JDK官方
        *   如何创建代理对象:
        *         使用proxy中的newProxyInstance方法
        *   创建代理对象的要求:
        *         被代理类最少实现一个接口,如果没有则不能使用
        *   newProxyInstance方法的参数:
        *         ClassLocaler:类加载器
        *              它是用于加载代理对象字节码的,写的是被代理对象的类加载器。和被代理对象的使用相同的类加载器。
        *         Class[]数组:
        *              他是用于让代理对象和被代理对象有相同的方法,固定写法
        *         InvocationHander:用于提供增强的代码
        *              它让我们写如何代理。一般都是一个该接口的实现类,通常情况下都是匿名内部类,但不是必须的。
        *              此接口的实现类都是谁用谁写。
        *         */
        //getClassLoader(),返回类的类加载器
        IProducer proxyProducer = (IProducer) Proxy.newProxyInstance(producer.getClass().getClassLoader(),
                producer.getClass().getInterfaces(),
                new InvocationHandler() {
                    /**
                     * 作用:执行被代理对象的任何接口方法都会经过该方法(该方法具有)
                     * 参数的含义:
                     * @param proxy :代理对象的引用
                     * @param method:当前执行的方法
                     * @param args  :当前执行的方法所需的参数
                     * @return      :和被代理对象的方法有相同的返回值
                     * @throws Throwable
                     */
                    @Override
                    public Object invoke(Object proxy, Method method, Object[] args) throws Throwable {
                        //提供增强的代码:
                        Object returnValue = null;
                        //1.获取方法执行参数
                        Float money =(Float)args[0];
                        //2.判断当前方法是不是销售
                        if("saleProduct".equals(method.getName())){
                            //生产者只能拿到其中的0.8,其他的0.2代理者
                            returnValue =method.invoke(producer,money*0.8f);
                        }
                        return  returnValue;

                    }
                });
        proxyProducer.saleProduct(10000f);
    }
}
基于接口的动态代理!
如果我们的类没有基于接口则就会报代理异常。
接下来我们编写基于子类的动态代理cglib
1.要求有第三方jar包的支持
在maven仓库中下载
<dependency>
            <groupId>cglib</groupId>
            <artifactId>cglib</artifactId>
            <version>2.1_3</version>
        </dependency>
2.修改Client类,使用基于子类的动态代理
public class Client {
    public static void main(String[] args) {
        //匿名内部类访问外部成员时,外部成员要求是final修饰
        final Producer producer = new Producer();

        /*
        * 动态代理:
        *   特点:字节码随用随创建
        *   作用:在不修改源码的基础上对方法进行增强
        *   分类:基于接口的动态代理
        *        基于子类的动态代理
        *   基于子类的动态代理:
        *         涉及的类:Enhaner
        *         提供者:第三方
        *   如何创建代理对象:
        *         使用Enhaner类中的create方法
        *   创建代理对象的要求:
        *         被代理类不能是最终类,因为如果是最终类他就不能创建子类了,之后也就没法创建代理对象了
        *   create方法的参数:
        *         Class:字节码
        *              它是用于指定被代理对象的字节码
        *         Callback:用于提供增强的代码
        *              它让我们写如何代理。一般都是一个该接口的实现类,通常情况下都是匿名内部类,但不是必须的。
        *              此接口的实现类都是谁用谁写
        *              我们一般写的都是该接口的子接口实现类:MethodInterceptor:方法拦截
        *         */
        Producer cglibProducer =(Producer)Enhancer.create(producer.getClass(), new MethodInterceptor() {
            /**
             * 执行被代理对象的任何方法都会经过该方法
             * @param proxy :代理对象的引用
             * @param method:当前执行的方法
             * @param args  :当前执行方法所需要的参数
             * @param methodProxy:当前执行方法的代理对象
             * @return      :和被代理对象的方法有相同返回值
             * @throws Throwable
             */
            @Override
            public Object intercept(Object proxy, Method method, Object[] args, MethodProxy methodProxy) throws Throwable {
                //提供增强的代码
                Object returnValue = null;
                //1.获取改方法的执行参数
                Float money = (Float) args[0];
                //2.判断当前方法是不是销售
                if("saleProduct" .equals(method.getName())){
                   returnValue = method.invoke(producer,money*0.9f);
                }
                return returnValue;
            }
        });

        cglibProducer.saleProduct(90000f);
    }
}
PS:匿名内部类访问外部成员时,外部成员要求是final修饰
这两种动态代理的方式的共同点可以对我们已经写好的方法进行一个增强(也就是稍微做一点改变),
代理也就是将被代理对象以set方法或者是构造函数形式,将被代理对象进行注入或者是传参。代理模式用两种,一种是基于接口的动态代理-JDK动态代理,使用的是Proxy类里面的newProxyInstance方法来创建代理对象,另一种是基于子类的动态代理-cglib动态代理,使用第三方jar包的Enhaner类中的create方法来创建代理对象。代理对象接管了被代理对象的方法,并且能够对方法进行增强(做一些修改),并且在增强的过程中提供一些我们需要实现的功能,不用修改源代码。 以后的操作都是针对代理对象来进行的。
动态代理中invoke()方法具有拦截的功能,拦截被代理对象中的所有方法。然后进行事务的支持(开启、执行、提交、返回、回滚、释放).
连接池的应用:close()在关闭的时候不能真正的关闭,而是要换回池中。可以使用动态代理的方式对connection的close()方法进行增强,把它加回到池里去。
第二个就是解决全站中文乱码的request对象的方法增强…。
接下来我们继续改善我们转账案例:改动的代码如下
创建使用工厂代理类BeanFactory:
/**
 *   用于创建Service的代理对象的工厂
 */
public class BeanFactory {
    //spring为我们注入
    private IAccountService accountService;

    private TransactionManager txManager;

    public final void setTxManager(TransactionManager txManager) {
        this.txManager = txManager;
    }

    public void setAccountService(IAccountService accountService) {
        this.accountService = accountService;
    }

    /**
     * 获取Servcie代理对象
     *
     * @return
     */
    public IAccountService getAccountService() {
     IAccountService proxyService =(IAccountService) Proxy.newProxyInstance(accountService.getClass().getClassLoader(),
                accountService.getClass().getInterfaces(),
                new InvocationHandler() {
                    /**
                     * 添加事务的支持
                     * @param proxy
                     * @param method
                     * @param args
                     * @return
                     * @throws Throwable
                     */
                    @Override
                    public Object invoke(Object proxy, Method method, Object[] args) throws Throwable {
                        Object rtValue = null;
                        try {
                            //1.开启事务
                            txManager.beginTransaction();
                            //2.执行操作
                            rtValue = method.invoke(accountService, args);
                            //3.提交事务
                            txManager.commit();
                            //4.返回结果
                            return rtValue;
                        }catch (Exception e){
                            //5.回滚操作
                            txManager.rollback();
                            throw new RuntimeException(e);
                        }finally {
                            //6.释放资源
                            txManager.release();
                        }
                    }
                });
        return proxyService;
    }
}
AccountService:
/**
 * 事务都应该在业务层的
 */
public class AccountService implements IAccountService {

    private IAccountDao accountDao;

    public void setAccountDao(IAccountDao accountDao) {
        this.accountDao = accountDao;
    }

    @Override
    public List<Account> findAll() {
        return accountDao.findAll();
    }

    @Override
    public Account findAccountById(int id) {
        return accountDao.findAccountById(id);
    }

    @Override
    public void addAccount(Account account) {
        accountDao.addAccount(account);

    }
    @Override
    public void updateAccount(Account account) {
        accountDao.updateAccount(account);

    }
    @Override
    public void deleteAccount(int accountid) {
        accountDao.deleteAccount(accountid);

    }
    @Override
    public void transfer(String outerName, String innerName, Float money) {
        System.out.println("transfer....开始执行");
                //2.1.根据名称查询转出账户
                Account outer = accountDao.findAccountByName(outerName);
                //2.2.根据名称查询转入账户
                Account inner = accountDao.findAccountByName(innerName);
                //2.3.转出账户减钱
                outer.setMoney(outer.getMoney()-money);
                //2.4.转入账户加钱
                inner.setMoney(inner.getMoney()+money);
                //2.5.更新转出账户
                accountDao.updateAccount(outer);

                int i=1/0;
                //2.6.更新转入账户
                accountDao.updateAccount(inner);
    }
}
bean配置文件:
<beans xmlns="http://www.springframework.org/schema/beans"
       xmlns:xsi="http://www.w3.org/2001/XMLSchema-instance"
       xsi:schemaLocation="http://www.springframework.org/schema/beans
       				   http://www.springframework.org/schema/beans/spring-beans.xsd
       					  ">

    <!--配置代理的Service-->
    <bean id="proxyAccountService" factory-bean="beanFactory" factory-method="getAccountService"></bean>

    <!--配置beanfactoy-->
    <bean id="beanFactory" class ="com.selan.factory.BeanFactory">
        <property name="accountService" ref="accountService"></property>
        <property name="txManager" ref="txManager"></property>
    </bean>

    <!--配置Service-->
    <bean id="accountService" class="com.selan.service.impl.AccountService">
        <!--注入dao对象(set方法注入)-->
        <property name="accountDao" ref="accountDaoId"></property>
    </bean>
    <bean id="accountDaoId" class="com.selan.dao.impl.AccountDaoImpl">
        <!--注入Query Runner-->
        <property name="runner" ref="queryRunner"></property>
        <!--注入connectionUtil-->
        <property name="connectionUtils" ref="connectionUtil"></property>
    </bean>
    <bean id="queryRunner" class="org.apache.commons.dbutils.QueryRunner" scope="prototype">
    </bean>

    <!--配置数据源-->
    <bean id="dataSource" class="com.mchange.v2.c3p0.ComboPooledDataSource">
        <property name="driverClass" value="com.mysql.jdbc.Driver"></property>
        <property name="jdbcUrl" value="jdbc:mysql://localhost:3307/spring"></property>
        <property name="user" value="root"></property>
        <property name="password" value="123"></property>
    </bean>
    <!--配置connection的工具类ConnectionUtile-->
    <bean id="connectionUtil" class="com.selan.util.ConnectionUtils">
        <!--注入数据源-->
        <property name="dataSource" ref="dataSource"></property>
    </bean>
    <!--配置事务管理器-->
    <bean id="txManager" class="com.selan.util.TransactionManager">
        <!--注入connectionUtils-->
        <property name="connectionUtils" ref="connectionUtil"></property>
    </bean>
</beans>
测试类:
@RunWith(SpringJUnit4ClassRunner.class)
@ContextConfiguration(locations = "classpath:bean.xml")
public class Test01 {
    @Autowired
    @Qualifier("proxyAccountService")
    private IAccountService accountService;

    @Test
    public void testTransfer(){
        accountService.transfer("hh","aa",100f);
    }
}


 3860
3860

 被折叠的 条评论
为什么被折叠?
被折叠的 条评论
为什么被折叠?
 到【灌水乐园】发言


