


 本文概述了VisionTransformer(ViT)的关键组件,如网络结构图中的MLP、TransformerEncoder、LinearProjection等,重点讲解了patchembedding、位置编码以及TransformerEncoder和MLP的工作原理。
Vision Transformer
今天分享一下自己阅读ViT论文总结的相关知识点
论文:VIT
1. 网络结构图
首先我们来着眼于vit的网络结构图,从图中可以看出框架的主体主要由**MLP、Tranformer_Encoder、Linear Projection…**构成。
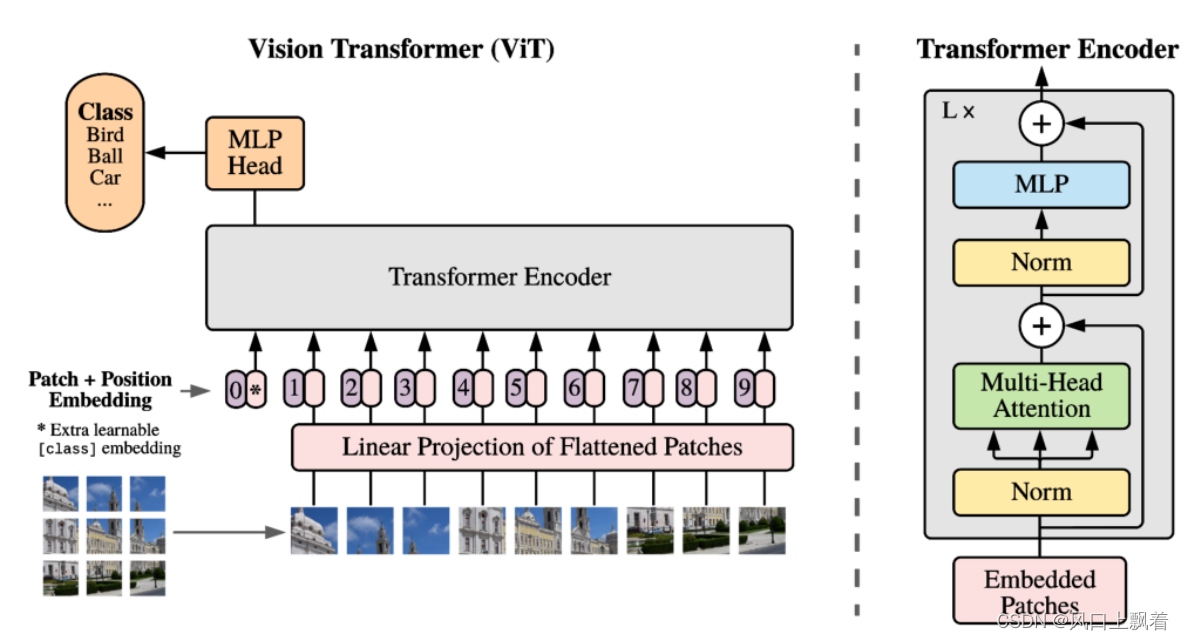
VIT的流程:
- 将图片切分为相同大小的patch(16x16x3)
- 通过Linear Projection将patch序列化,flatten成1维,得到patch embedding
- 添加位置编码position embedding ,其长度与patch序列化后的长度一致
- 输入到transformer encode中进行特征提取
- 通过MLP得到序列class token
2. Linear Projection of Flattened Patches
该部分被简称为patch embedding,其实就是将切成patch的小图片,经过与patch大小一致的卷积核卷积过后得到1x1大小,(16x16x3)通道数的token.
class PatchEmbedding(nn.Module):
    def __init__(self, in_channels: int = 3, patch_size: int = 16, emb_size: int = 768):
        self.patch_size = patch_size
        super().__init__()
        self.projection = nn.Sequential(
            nn.Conv2d(in_channels, emb_size, kernel_size=patch_size, stride=patch_size),
            Rearrange('b e (h) (w) -> b (h w) e'),
        ) # this breaks down the image in s1xs2 patches, and then flat them

        self.cls_token = nn.Parameter(torch.randn(1,1, emb_size))
        self.positions = nn.Parameter(torch.randn((img_size // patch_size) **2 + 1, emb_size))

    def forward(self, x: Tensor) -> Tensor:
        b, _, _, _ = x.shape
        x = self.projection(x)
        cls_tokens = repeat(self.cls_token, '() n e -> b n e', b=b)
        x = torch.cat([cls_tokens, x], dim=1) #prepending the cls token
        x += self.positions
        return x
3. Position embedding
在vision transformer中的位置编码使用的是标准可学习的一维位置编码.
文章中测试了2维和相对位置编码,结果都差不多。一维的意思就是把展平后的图片看成一个序列,第二维的14 * 14 =196看成NLP里token的长度,只考虑这个长度。ViT的位置编码也可以理解为一种可以训练的绝对位置编码(因为取的是embedding中前196+1个,然后对应位置和x相加)。
# 位置编码
self.pos_embedding = nn.Parameter(torch.randn(1, num_patches + 1, dim))
# patch embedding后的token
self.cls_token = nn.Parameter(torch.randn(1, 1, dim))
self.dropout = nn.Dropout(emb_dropout)

# forward:
b, n, _ = x.shape
# 1 x 1 x 768的CLS token重复至 batch x 1 x 768
cls_tokens = repeat(self.cls_token, '() n d -> b n d', b = b)
x = torch.cat((cls_tokens, x), dim=1)
x += self.pos_embedding[:, :(n + 1)]  # 因为多了个CLS token所以要n+1
x = self.dropout(x)
# x.shape -> (batch, 196 + 1, 768)
4. Transformer Encoder
注意:Vit的特征提取部分没有Decoder部分,Encoder就是多头注意力+全连接函数组合成的每一层,然后resnet去跳跃连接
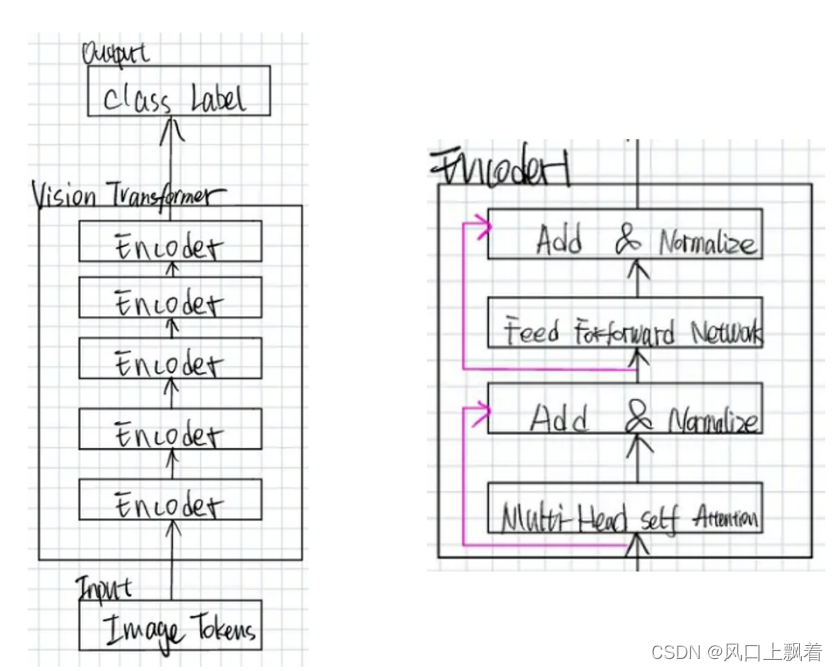
具体代码实现就是 多头注意力机制+LN+2个Linear+short-cut(残差)
5. MLP
Multi-Layer Perception多层感知机流程如下所示:
全连接层–>GELU激活函数–>Dropout–>全连接层–>Dropout
class Mlp(nn.Layer):
    def __init__(self, embed_dim, mlp_ratio=4.0, dropout=0.):
        super().__init__()
        self.fc1 = nn.Linear(embed_dim, int(embed_dim*mlp_ratio))
        self.fc2 = nn.Linear(int(embed_dim*mlp_ratio), embed_dim)
        self.act = nn.GELU()
        self.dropout = nn.Dropout(dropout)

    def forward(self, x):
        x = self.fc1(x)
        x = self.act(x)
        x = self.dropout(x)
        x = self.fc2(x)
        x = self.dropout(x)
        return x


 被折叠的 条评论
为什么被折叠?
被折叠的 条评论
为什么被折叠?
 到【灌水乐园】发言


