


 本文以button组件封装为例,深入解析Vue.js中子组件与父组件的通信机制,演示了如何通过props传递数据及使用$emit触发父组件事件。
无论是在哪个项目中,都会将常用的功能单一的组件进行封装,便于之后的使用的快捷
这里以button的封装为例,理解组件间的父子通信
子组件button
    <template>
        <button
            :disabled="disabled"
            @click.prevent="handleClick"
        >
            <slot></slot><!--slot 用于显示使用此组件的时候,中间写入的文字-->
        </button>
    </template>
    <script>
    export default {
        name:'cm-btn',
        // 任何想要拿到从父组件传递过来的数据,都需要用props进行接收,不然获取不到
        props:{
            disabled:'',
            href:'',
        },
        methods:{
            handleClick(){
            	//在子组件的内部,子组件获取到的从父组件的数据,使用的时候直接用this.XXX进行使用
                if(this.href){
                    this.$router.push(this.href)
                }
                //this.$emit("function",param); function是父组件进行实际绑定的时候@后面的名字,
                //param是触发父组件的事件后,传递给父组件的数据,在父组件中,通过参数进行接收
                this.$emit('wwww','555555')//返回的param有多个的时候,用,隔开
                //this.$emit('wwww','555555','787897')
            }
        },
    }
    </script>
    <style lang="scss" scoped></style>
父组件
<template>
  <div id="app">
    <img src="./assets/logo.png">
    <!-- <router-view/> -->
    <cm-btn  @wwww="handlecmmclick">我是组件btn</cm-btn><!-- 此时已经全局注册过此组件,所以可以直接使用 -->
  </div>
</template>
<script>
export default {
  name: 'App',
  methods:{
    handlecmmclick(val){
    //通过参数,接收子组件触发事件后,传递回来的数据
      console.log(val)
    }
      // handlecmmclick(val,value){
	    //   console.log(val,value)
	  // }
  }
}
</script>
<style></style>
在使用子组件的时候,如果想要绑定在子组件的方法生效,那么一定要使用触发父组件事件的方式。如果没有使用这种方式,在父组件本身的方法里面去书写这个方法的处理,是不会有用的
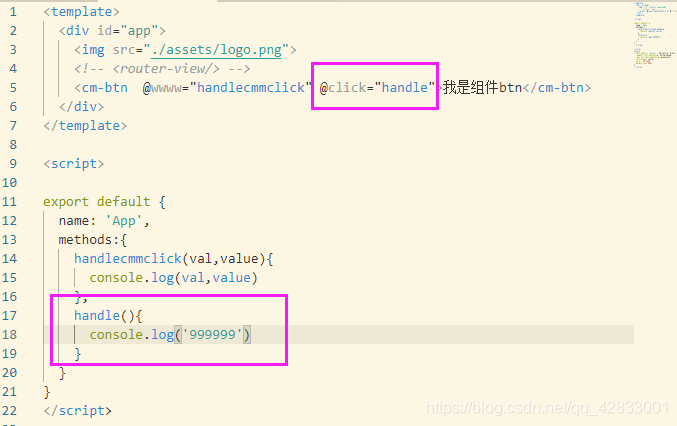
上图中的999999的打印并不会有。

在子组件的本身也是需要绑定一个事件去触发父组件的事件


 1058
1058

 被折叠的 条评论
为什么被折叠?
被折叠的 条评论
为什么被折叠?
 到【灌水乐园】发言


