


 本文详细介绍了SpringBoot中的注解原理,如何通过@EnableAutoConfiguration实现自动化配置,以及Starter的使用与自定义过程。重点讲解了Starter在SpringBoot项目中的核心作用和配置文件的管理。
Spring Boot两大核心原理
注解
在谈 Spring Boot 之前,不妨先了解一下注解的作用,因为这在 Spring 以及 Spring Boot 中实在太常见了。
注解本身是没有任何作用的,它就像是一个标记,当我们为某个类或者是某个方法加了注解,在使用反射之类的机制执行代码时,我们就可以进行相应的判断,比如说:有xxx注解的类该怎么进行处理,没有xxx注解的类又该怎么处理?
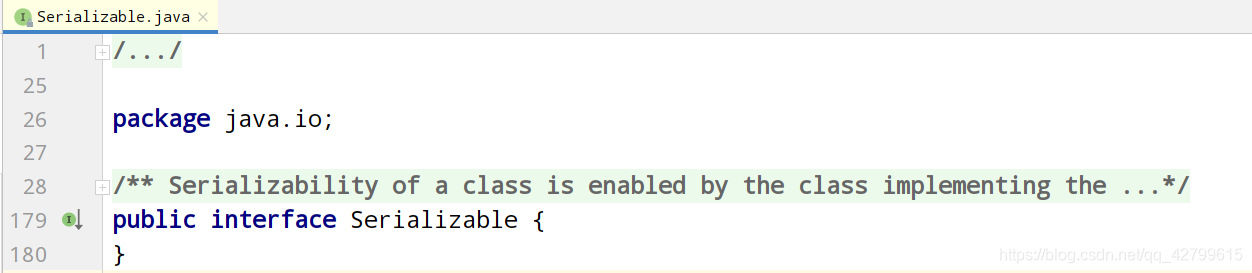
在Java早期,没有注解的时候(Java1.5开始才有注解),使用空接口的方式来进行标记。按理说,一个空接口是没有任何实际意义的,但是某个类继承了一个空接口,虽然这个空接口没有为这个类增添任何能力,但是却为这个类增加了一个标识。
比如我们常见到的 Serializable 接口,它里面是没有任何方法的,一个类继承一个什么方法都没有的接口是没有什么作用的,但是很多类都继承了这个 Serializable 接口,就是为了增加一个标识。
这就像过马路时,看到红灯这个标识,我们就要停止,看到绿灯,我们才可以继续往前走。Java执行代码时也一样,根据不同的标识采取不同的执行的策略。
自动化配置
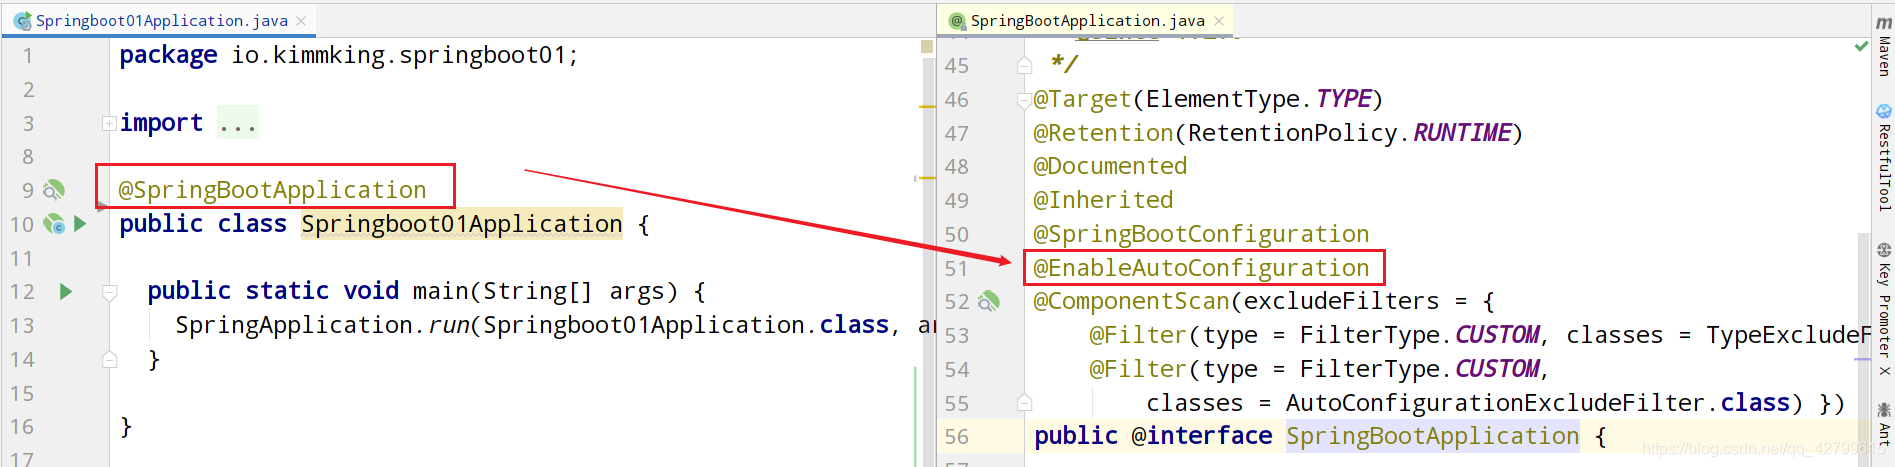
在 Spring Boot 的启动类上,有 @SpringBootApplication 这个注解,而 @SpringBootApplication是一个组合注解,里面包含了 @EnableAutoConfiguration这个注解。开启了自动配置以后,Spring Boot就会去自动加载带有xxxAutoConfiguration的类。
Spring Boot 怎么知道该加载哪些自动配置类呢?
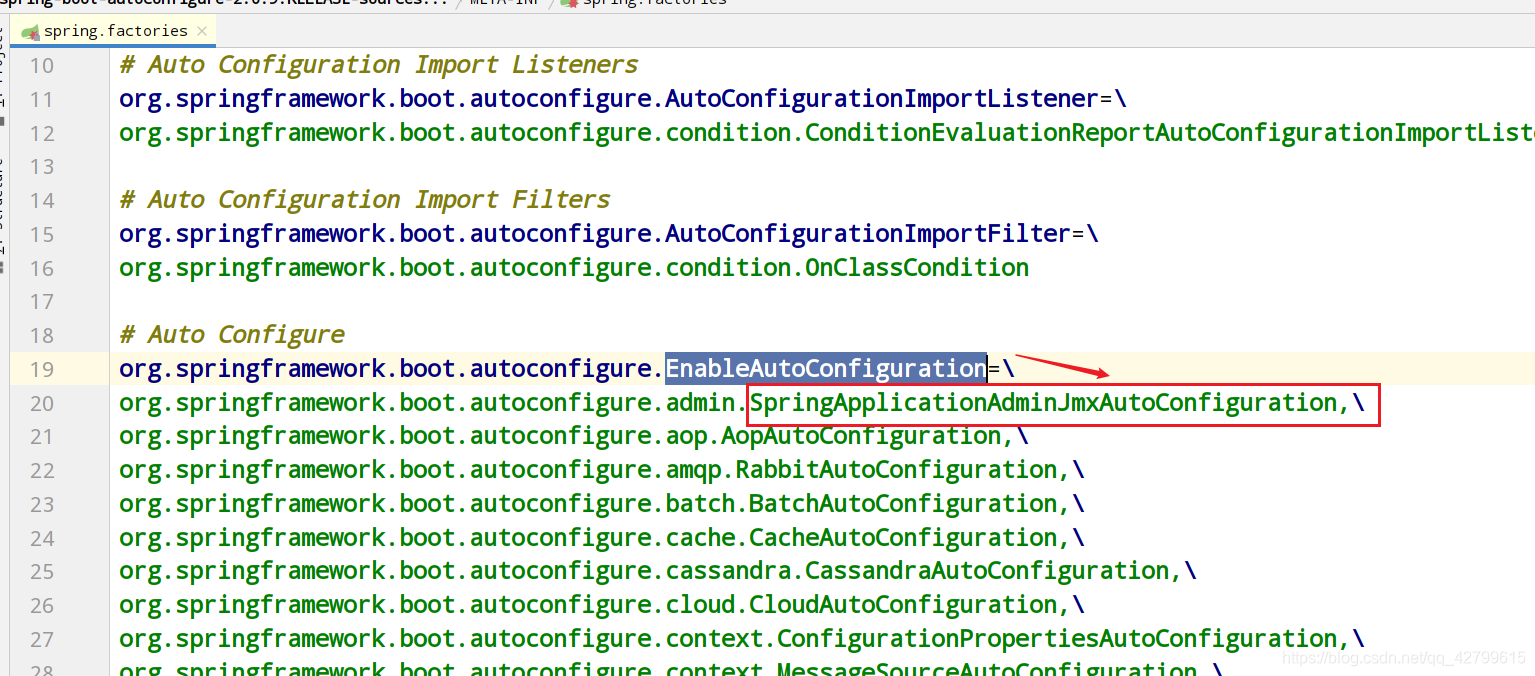
在 spring.factories 这个文件里指定了需要通过自动配置拉起来的配置类。spring.factories 中记录了需要进行自动配置的类,相当于自动配置的一个入口点。
接着看一下 spring.factories 中的内容,我打开的是 spring-boot-autoconfigure 中的 spring.factories 文件。里面的以 key-value 的形式记录了很多内容。如下所示:
EnableAutoConfiguration 相当于是 key,对应的是 EnableAutoConfiguration 这个注解。value 就是对应的配置类。
org.springframework.boot.autoconfigure.EnableAutoConfiguration=\
org.springframework.boot.autoconfigure.admin.SpringApplicationAdminJmxAutoConfiguration,\
当我们开启了 EnableAutoConfiguration 以后,Spring Boot 在运行时会加载当前类路径下所有 META-INF/spring.factories 文件,在里面查找 EnableAutoConfiguration 这个 key 所对应的配置类,并将对应的类添加的 Spring 容器中。当我使用了 @EnableAutoConfiguration 这个注解时,就好像打开了阀门开关, 所有以 org.springframework.boot.autoconfigure.EnableAutoConfiguration 为 key 的配置类都会被实例化并添加到Spring 容器中,等待被使用。

然后我们再看看对应的配置类中都有些什么内容。
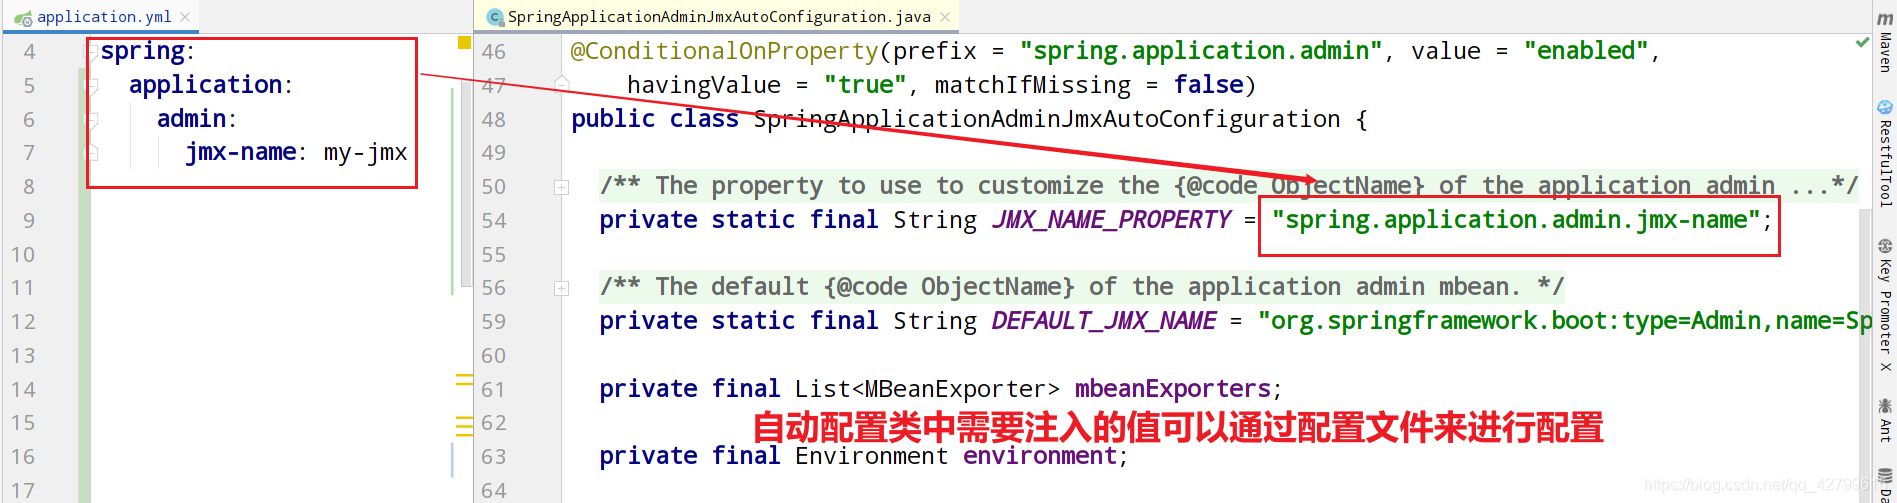
以 SpringApplicationAdminJmxAutoConfiguration 为例,会发现里面配置了一些Bean。
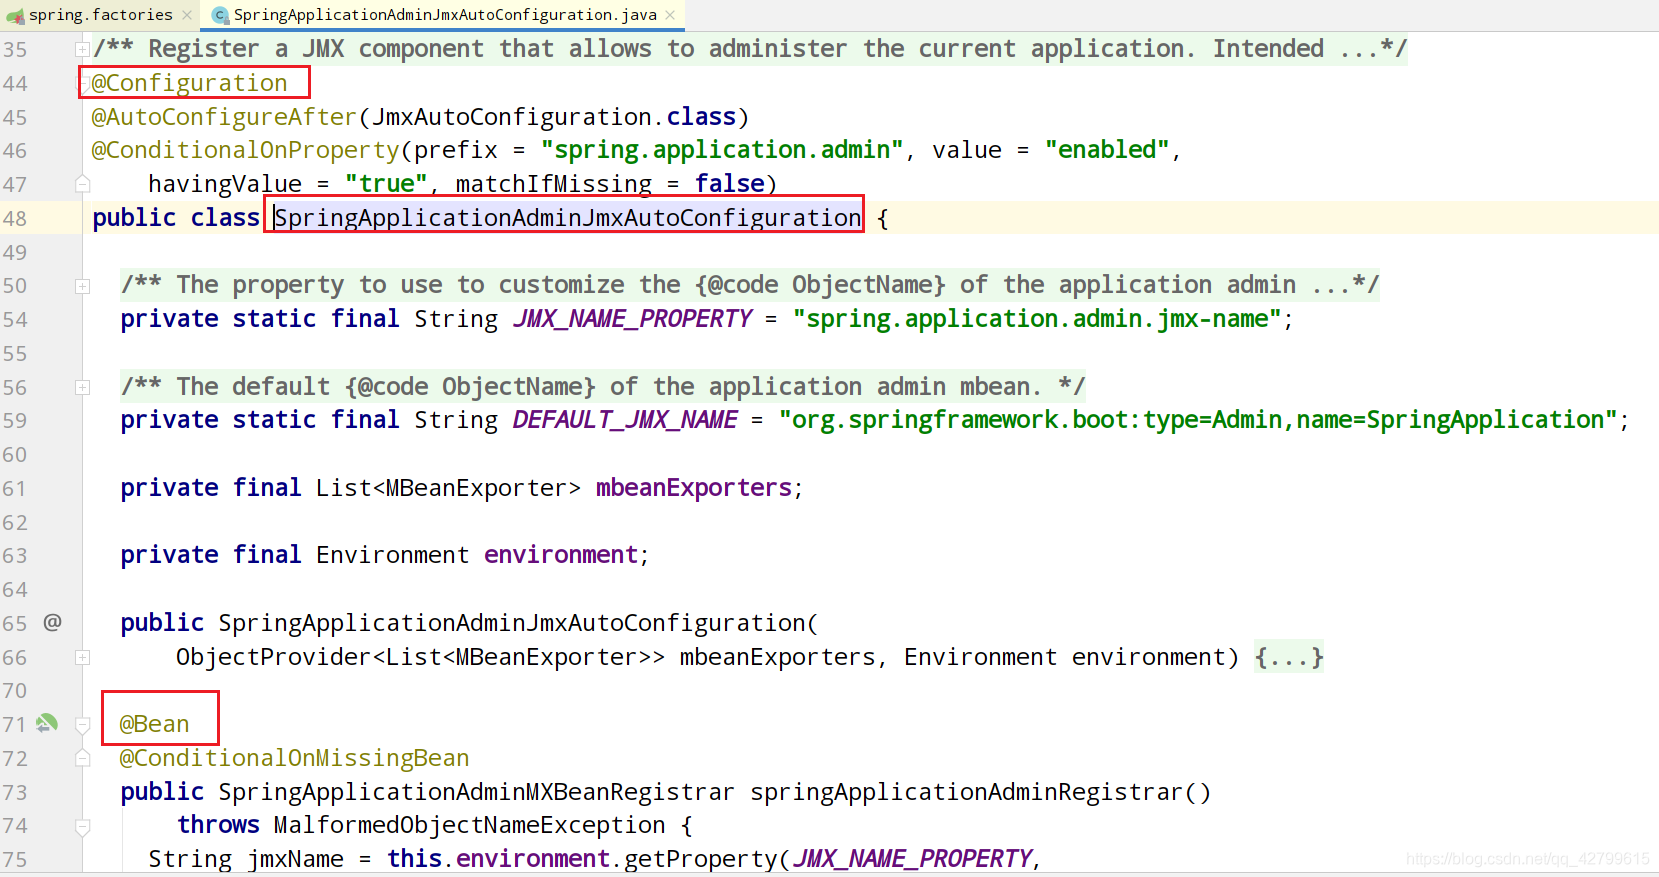
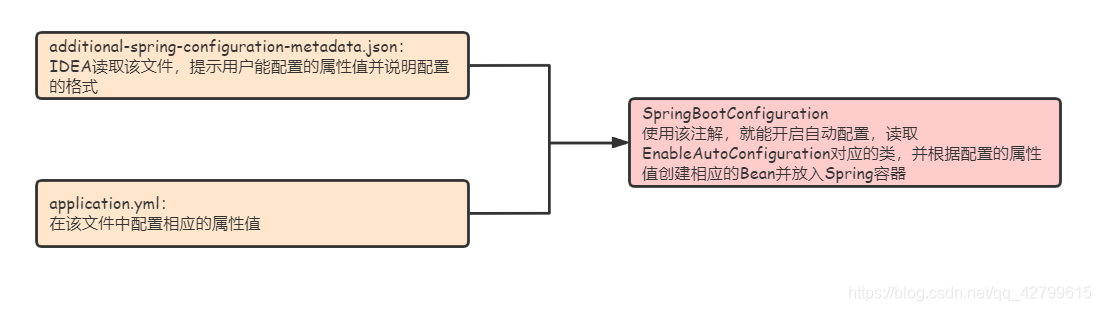
配置类所定义的 Bean 对应的属性值则可以通过application.yml 这样的配置文件的来进行设置。
使用 @EnableAutoConfiguration这个注解的时候,Spring Boo t会把所有的自动配置类都进行配置,但是我们会发现,里面包含了大量我们不需要的自动配置,比如我现在使用的数据源是 MySQL,我的项目里压根就没有用到比如 MongoDB 之类的数据库,如果将 MongoDB之类的自动配置都加载进我的项目,我的项目不是会非常臃肿吗。那如何排除掉我们的项目中不需要使用的自动配置呢?就得靠 Spring Boot 的条件注解了。
比如下面的注解,便属于条件注解。
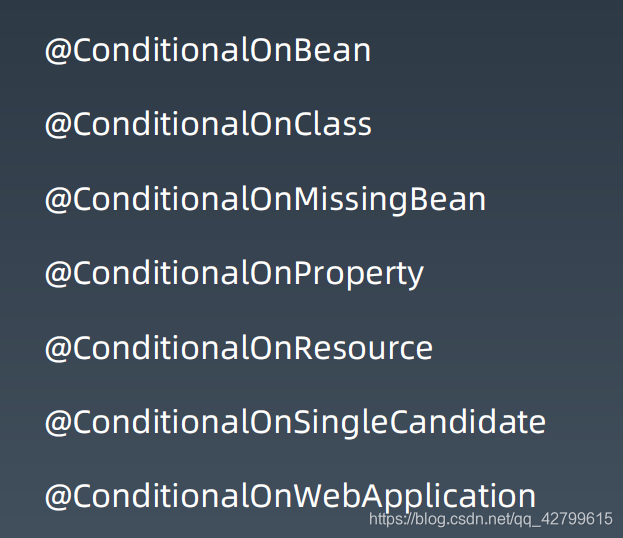
以 @ConditionalOnBean为例,表示当前的类只有当项目中存在某个Bean的时候才会进行配置。
总结:通过自动配置 + 条件注解,Spring Boot就能自动地为我们完成绝大部分的配置工作。
然后,我们可以看一下AutoConfigurationImportSelector中的selectImports方法。该类在使用 @EnableAutoConfiguration注解后会被启用。
//该类实现了很多xxxAware之类的方法,表示Selector是在Bean已经装配后再开始执行的。
//在进行Select时,某个类所需的资源已经配置好了
public class AutoConfigurationImportSelector
		implements DeferredImportSelector, BeanClassLoaderAware, ResourceLoaderAware,
		BeanFactoryAware, EnvironmentAware, Ordered {
	//......省略其它内容
	@Override
	public String[] selectImports(AnnotationMetadata annotationMetadata) {
		if (!isEnabled(annotationMetadata)) {
			return NO_IMPORTS;
		}

		//1.加载META-INF/additional-spring-configuration-metadata.json文件
		AutoConfigurationMetadata autoConfigurationMetadata = AutoConfigurationMetadataLoader
				.loadMetadata(this.beanClassLoader);

		//2.获取@EnableAutoConfiguration注解对应的属性值
		AnnotationAttributes attributes = getAttributes(annotationMetadata);

		//3.在classpath下所有的META-INF/spring.factories中查找
		//org.springframework.boot.autoconfigure.EnableAutoConfiguration对应的类
		List<String> configurations = getCandidateConfigurations(annotationMetadata,
				attributes);

		//4.对获取到的属性值(也就是上一步获取到的需要自动配置的类)进行去重,排序
		configurations = removeDuplicates(configurations);
		//5.根据第2步获取到的属性值排除掉一些特定类
		Set<String> exclusions = getExclusions(annotationMetadata, attributes);
		//6.根据条件注解来过滤掉不需要的自动配置,并将不需要的配置从configurations集合中删除
		checkExcludedClasses(configurations, exclusions);
		configurations.removeAll(exclusions);
		configurations = filter(configurations, autoConfigurationMetadata);
		fireAutoConfigurationImportEvents(configurations, exclusions);
		return StringUtils.toStringArray(configurations);
	}
}
Starter
查看开源项目中的Starter
Starter又叫做起步依赖,所谓的起步依赖也就是说你运行一个项目至少所需要的依赖。
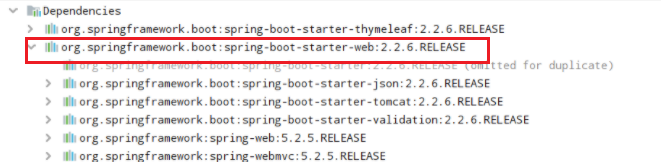
比如一个web项目中常引入的spring-boot-starter-web依赖,里面包括了spring mvc的依赖以及一个嵌入式的tomcat,凭借这个starter,我们就能开发一个最基础的web应用。
我们常说Spring Boot是一个开发的脚手架,所谓的脚手架,就是给你搭建好了最基础的东西,你只需要在这个基础上添加与自己的应用相关的功能就行,这一切的核心靠的就是Starter。
而一个Starter里面都有些什么呢?
以开源项目shardingsphere中的一个starter为例。
shardingsphere-jdbc-core-spring-boot-starter。里面所具有的内容:
- 与配置相关的类
- additional-spring-configuration-metadata.json文件
- spring.factories 文件
- spring.provides文件
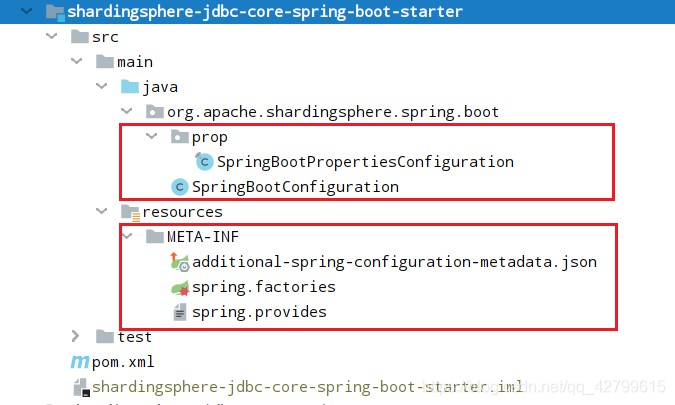
我们再来详细看看里面的文件
- SpringBootConfiguration
里面配置了一些Bean,并设置了当前配置类生效的条件,同时在这个配置类中还导入了其它的配置类。
package org.apache.shardingsphere.spring.boot.prop;
...
@Configuration
@ComponentScan("org.apache.shardingsphere.spring.boot.converter")
@EnableConfigurationProperties(SpringBootPropertiesConfiguration.class)
//该注解表明:当配置类中spring.shardingsphere.enabled的值为true时,该配置类才会生效。当没有设置这个属性时,默认为true
@ConditionalOnProperty(prefix = "spring.shardingsphere", name = "enabled", havingValue = "true", matchIfMissing = true)
@AutoConfigureBefore(DataSourceAutoConfiguration.class)
@RequiredArgsConstructor
public class SpringBootConfiguration implements EnvironmentAware {

    private final SpringBootPropertiesConfiguration props;

    private final Map<String, DataSource> dataSourceMap = new LinkedHashMap<>();

    @Bean
    @Autowired(required = false)
    public DataSource shardingSphereDataSource(final ObjectProvider<List<RuleConfiguration>> rules) throws SQLException {
        Collection<RuleConfiguration> ruleConfigurations = Optional.ofNullable(rules.getIfAvailable()).orElse(Collections.emptyList());
        return ShardingSphereDataSourceFactory.createDataSource(dataSourceMap, ruleConfigurations, props.getProps());
    }

    @Bean
    public ShardingTransactionTypeScanner shardingTransactionTypeScanner() {
        return new ShardingTransactionTypeScanner();
    }

    @Override
    public final void setEnvironment(final Environment environment) {
        dataSourceMap.putAll(DataSourceMapSetter.getDataSourceMap(environment));
    }
}
SpringBootPropertiesConfiguration
Properties props可以通过配置文件来进行配置:在application.properties 中通过这样的格式来进行配置: spring.shardingsphere.props=xxx
package org.apache.shardingsphere.spring.boot.prop;
...
import java.util.Properties;

/**
 * Spring boot properties configuration.
 */
@ConfigurationProperties(prefix = "spring.shardingsphere")
@Getter
@Setter
public final class SpringBootPropertiesConfiguration {

    private Properties props = new Properties();
}
- additional-spring-configuration-metadata.json
至于在配置文件中我们究竟能配置什么属性,就可以查看additional-spring-configuration-metadata.json这个文件了。
我们在进行配置的时候,在IDEA中会出现很多提示,靠的就是additional-spring-configuration-metadata.json这个文件。IDEA读取这个文件中的内容,当我们进行配置时就能做出相应的提示。
比如下面的提示:
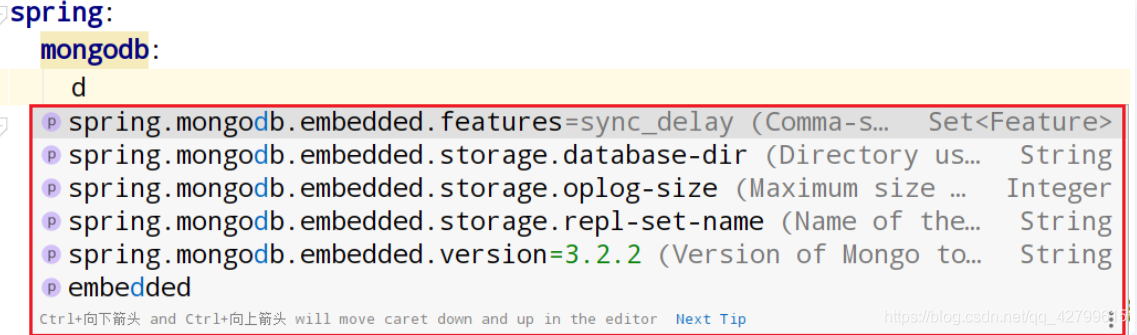
以additional-spring-configuration-metadata.json中的部分内容为例,里面是spring.shardingsphere有关配置项的一些简单说明,这样当我们在application.yml这样的配置文件中进行配置时,IDEA就会根据这个文件做出相应的提示。
{
	 "properties": [
    {
      "name": "spring.shardingsphere.enabled",
      "type": "java.lang.Boolean",
      "description": "Whether enable shardingsphere or not.",
      "defaultValue": true
    },
    {
      "name": "spring.shardingsphere.props",
      "type": "java.util.Properties",
      "sourceType": "org.apache.shardingsphere.spring.boot.prop.SpringBootPropertiesConfiguration",
      "description": "Customize shardingsphere properties."
    }
    ......
  ]
}
- spring.factories
factory 的意思是工厂,你可以想象这么一个场景,一打开工厂大门,一大堆工人便涌入厂房,开始工作。
当开启自动配置时,当前路径下 spring.factories 这个文件会被 Spring Boot 扫描到。 Spring Boot 会自动将所有以 EnableAutoConfiguration 为 key 的类加载到Spring 容器中。
如果像下面这样配置:org.apache.shardingsphere.spring.boot.SpringBootConfiguration 这个配置类就自动会被 Spring Boot 扫描到,并将其添加到 Spring 容器,并为其注册相应的Bean。
org.springframework.boot.autoconfigure.EnableAutoConfiguration=\
org.apache.shardingsphere.spring.boot.SpringBootConfiguration
- spring.provides
spring.provides中定义的是starter的名字。与 pom.xml 中的 artifactId 保持一致。顾名思义,就是该 starter 对外的名字。
provides: shardingsphere-jdbc-spring-boot-starter
自定义Starter
开发时,为了达到代码复用的目的,我们也常常会自定义 Starter。下面就让我们看看该如何自定义一个Starter。
首先创建一个空的 Spring Boot 项目。删除里面的主启动类。
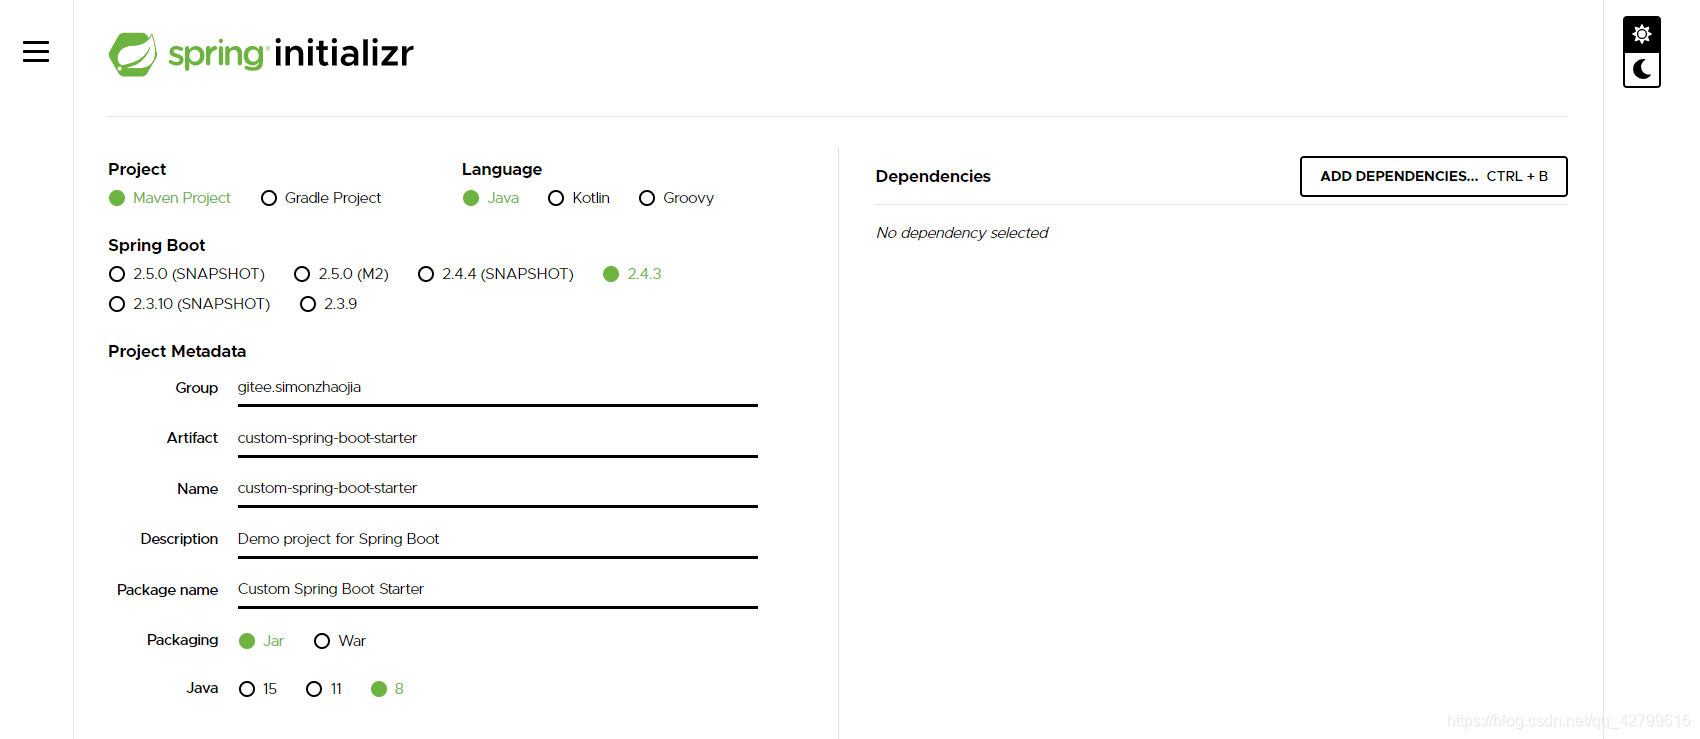
pom.xml中的内容定义如下
<?xml version="1.0" encoding="UTF-8"?>
<project xmlns="http://maven.apache.org/POM/4.0.0" xmlns:xsi="http://www.w3.org/2001/XMLSchema-instance"
         xsi:schemaLocation="http://maven.apache.org/POM/4.0.0 https://maven.apache.org/xsd/maven-4.0.0.xsd">

    <modelVersion>4.0.0</modelVersion>

    <parent>
        <groupId>org.springframework.boot</groupId>
        <artifactId>spring-boot-starter-parent</artifactId>
        <version>2.4.3</version>
        <relativePath/> <!-- lookup parent from repository -->
    </parent>

    <groupId>gitee.simonzhaojia</groupId>
    <artifactId>custom-spring-boot-starter</artifactId>
    <version>0.0.1-SNAPSHOT</version>
    <name>mystarter</name>
    <description>Custom Spring Boot Starter</description>

    <properties>
        <project.build.sourceEncoding>UTF-8</project.build.sourceEncoding>
        <project.reporting.outputEncoding>UTF-8</project.reporting.outputEncoding>
        <java.version>1.8</java.version>
    </properties>

    <dependencies>
        <!-- 一个starter必须要有的依赖 -->
        <dependency>
            <groupId>org.springframework.boot</groupId>
            <artifactId>spring-boot-starter</artifactId>
        </dependency>

        <!--  用于读取additional-spring-configuration-metadata.json中的提示 -->
        <dependency>
            <groupId>org.springframework.boot</groupId>
            <artifactId>spring-boot-configuration-processor</artifactId>
            <optional>true</optional>
        </dependency>

        <!-- lombok插件 -->
        <dependency>
            <groupId>org.projectlombok</groupId>
            <artifactId>lombok</artifactId>
            <optional>true</optional>
        </dependency>

        <dependency>
            <groupId>org.springframework.boot</groupId>
            <artifactId>spring-boot-starter-test</artifactId>
            <scope>test</scope>
        </dependency>
    </dependencies>
</project>
参照上面 shardingsphere 中的starter,我们也可以按照如下格式进行组织
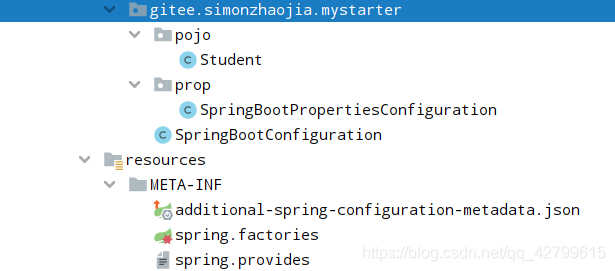
自定义了一个 Student 类,引入了我们自定义的starter,就自动将其注册到Spring 容器中。
package gitee.simonzhaojia.mystarter.pojo;


import lombok.AllArgsConstructor;
import lombok.Data;
import lombok.ToString;
import lombok.extern.slf4j.Slf4j;

import java.io.Serializable;

@Data
@AllArgsConstructor
@ToString
@Slf4j
public class Student implements Serializable {

    private String id;

    private String name;

}
SpringBootPropertiesConfiguration 类用来设置 Student 对象的属性值。
package gitee.simonzhaojia.mystarter.prop;

import lombok.Data;
import lombok.Getter;
import lombok.Setter;
import org.springframework.boot.context.properties.ConfigurationProperties;

@ConfigurationProperties(prefix = "mystarter.student")
@Getter
@Setter
@Data
public class SpringBootPropertiesConfiguration {

  private String id;
  private String name;

}
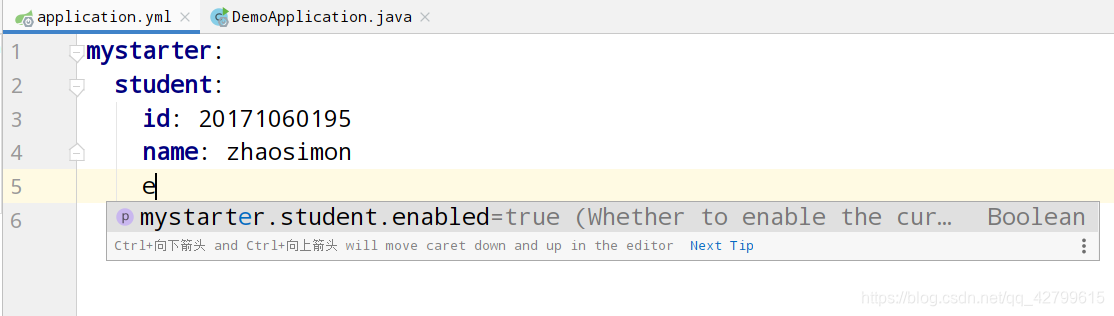
像如下这样进行配置,我们就可以在配置文件中设置 Student 对象的属性值。
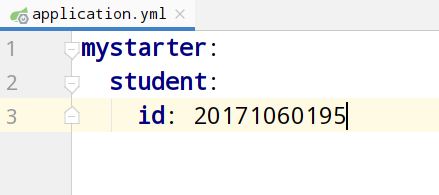
在 SpringBootConfiguration 类中,我们将 SpringBootPropertiesConfiguration 作为配置来添加进来,同时注册一个 Student 类型的 Bean 到 Spring 容器中。
package gitee.simonzhaojia.mystarter;


import gitee.simonzhaojia.mystarter.pojo.Student;
import gitee.simonzhaojia.mystarter.prop.SpringBootPropertiesConfiguration;
import lombok.extern.slf4j.Slf4j;
import org.springframework.beans.factory.annotation.Autowired;
import org.springframework.boot.autoconfigure.condition.ConditionalOnProperty;
import org.springframework.boot.context.properties.EnableConfigurationProperties;
import org.springframework.context.annotation.Bean;
import org.springframework.context.annotation.ComponentScan;
import org.springframework.context.annotation.Configuration;

@Configuration
@EnableConfigurationProperties(SpringBootPropertiesConfiguration.class)
@ConditionalOnProperty(prefix = "mystarter.student", name = "enabled", havingValue = "true", matchIfMissing = true)
@Slf4j
public class SpringBootConfiguration {

  @Autowired
  public SpringBootPropertiesConfiguration props;

  @Bean
  public Student student() {
    log.info("Student id : " + props.getId());
    log.info("Student name : " + props.getName());
    return new Student(props.getId(), props.getName());
  }
}
接着就是 resources/META-INF 文件夹的内容了。
首先是 additional-spring-configuration-metadata.json
{
  "properties": [
    {
      "name": "mystarter.student.name",
      "type": "java.lang.String",
      "description": "Define the name of the student.",
      "defaultValue": null
    },
    {
      "name": "mystarter.student.id",
      "type": "java.lang.String",
      "description": "Define the student's id of the student.",
      "defaultValue": null
    },
    {
      "name": "mystarter.student.enabled",
      "type": "java.lang.Boolean",
      "description": "Whether to enable the current configuration.",
      "defaultValue": true
    }
  ]
}
然后 spring.factories 中可以这样定义,当开启自动配置时(Spring Boot默认就开启自动配置的),我们的配置类就会生效。
org.springframework.boot.autoconfigure.EnableAutoConfiguration=\
gitee.simonzhaojia.mystarter.SpringBootConfiguration
spring.provides中写上我们Starter的名字就行,与 pom.xml 中的 artifactId 保持一致即可。
provides: custom-spring-boot-starter
然后在当前项目的路径下执行 mvn clean install ,执行成功以后,该 starter 就被 install 到 maven 的本地仓库里了。
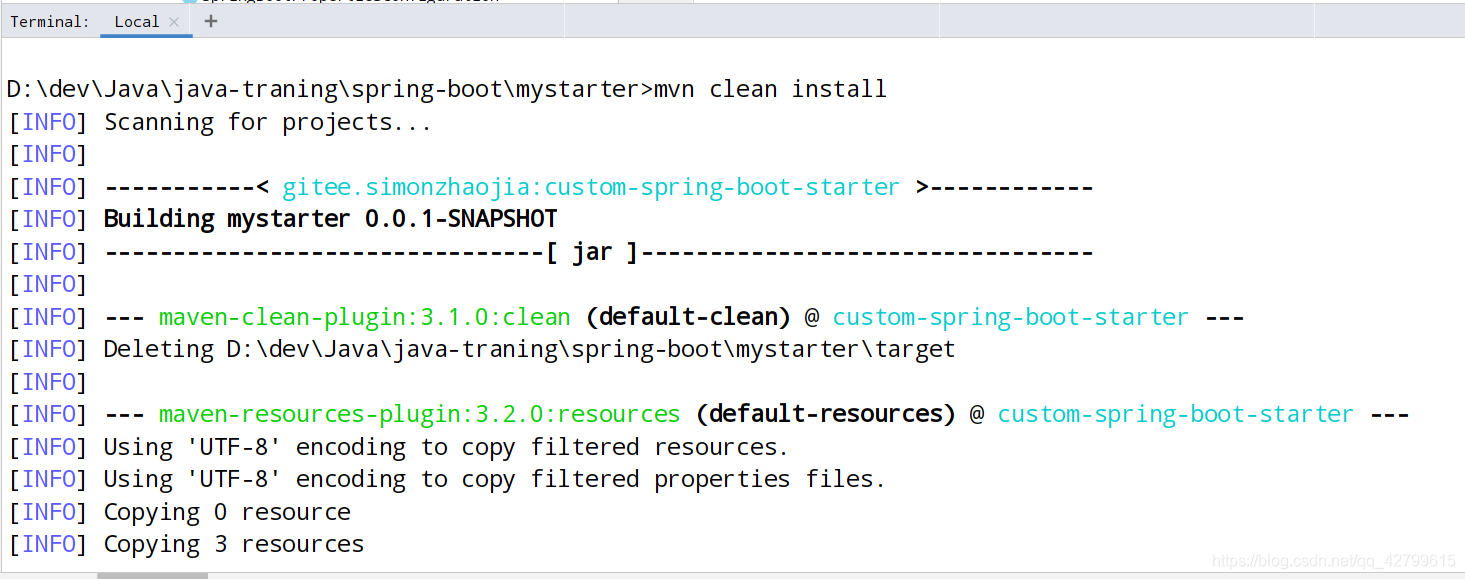
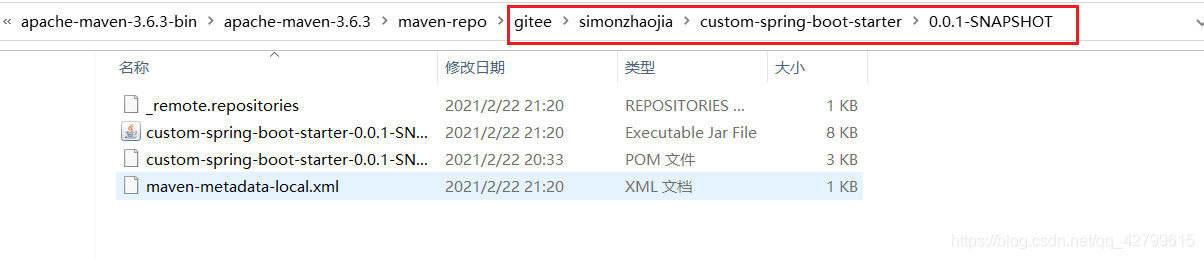
在 maven 的本地仓库中的确能找到自定义的starter。
需要注意的是,在 pom.xml 中不能定义 spring-boot-maven-plugin
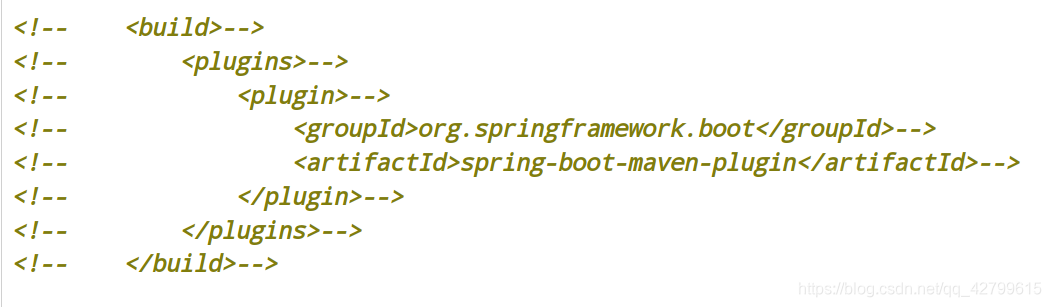
不然在执行 mvn clean install 时,会报错,提示没有主类。因为我们把主启动类给删掉了。如果当前项目中有上面那段代码,把上面那段代码注释掉以后再执行 mvn clean install 就不会报错了。

测试自定义的Starter
重新新建一个Spring Boot项目,在pom文件中导入自定义的starter,看自动配置是否生效。
由于我使用了lombok的 @Slf4j 注解,因此我还导入了 lombok 的依赖。
<dependency>
    <groupId>gitee.simonzhaojia</groupId>
    <artifactId>custom-spring-boot-starter</artifactId>
    <version>0.0.1-SNAPSHOT</version>
</dependency>

<!-- lombok依赖 -->
<dependency>
    <groupId>org.projectlombok</groupId>
    <artifactId>lombok</artifactId>
    <optional>true</optional>
</dependency>
我在 application.yml 中进行配置时也有相应的提示,说明 自定义Starter 中 additional-spring-configuration-metadata.json 文件生效了。
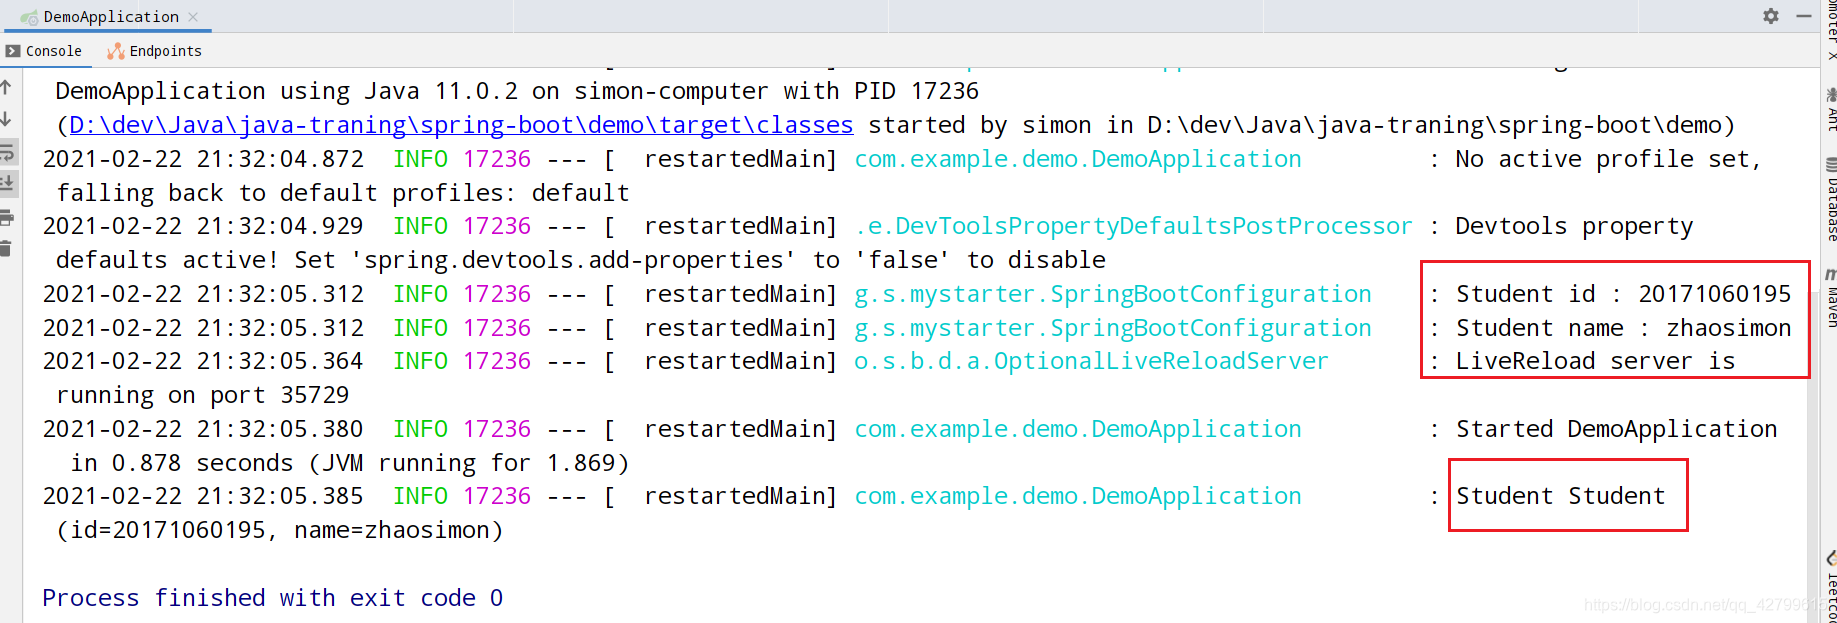
在主启动类我尝试从当前的 Spring 容器中取出 gitee.simonzhaojia.mystarter.pojo.Student 类型的 Bean
package com.example.demo;

import gitee.simonzhaojia.mystarter.pojo.Student;
import lombok.extern.slf4j.Slf4j;
import org.springframework.beans.factory.BeanFactory;
import org.springframework.boot.SpringApplication;
import org.springframework.boot.autoconfigure.SpringBootApplication;
import org.springframework.context.ConfigurableApplicationContext;

@SpringBootApplication
@Slf4j
public class DemoApplication {

  public static void main(String[] args){
    ConfigurableApplicationContext context = SpringApplication.run(DemoApplication.class, args);
    BeanFactory factory = context.getBeanFactory();
    Student student = factory.getBean(gitee.simonzhaojia.mystarter.pojo.Student.class);
    log.info("Student {}", student.toString());
  }
}
当我没有配置 mystarter.student.enabled 这个属性时,自定义 starter 的配置就默认是开启的,或者是配置 mystarter.student.enabled 的值为 true 时,自定义的 starter 的配置也是开启的状态,所以会有如下输出。
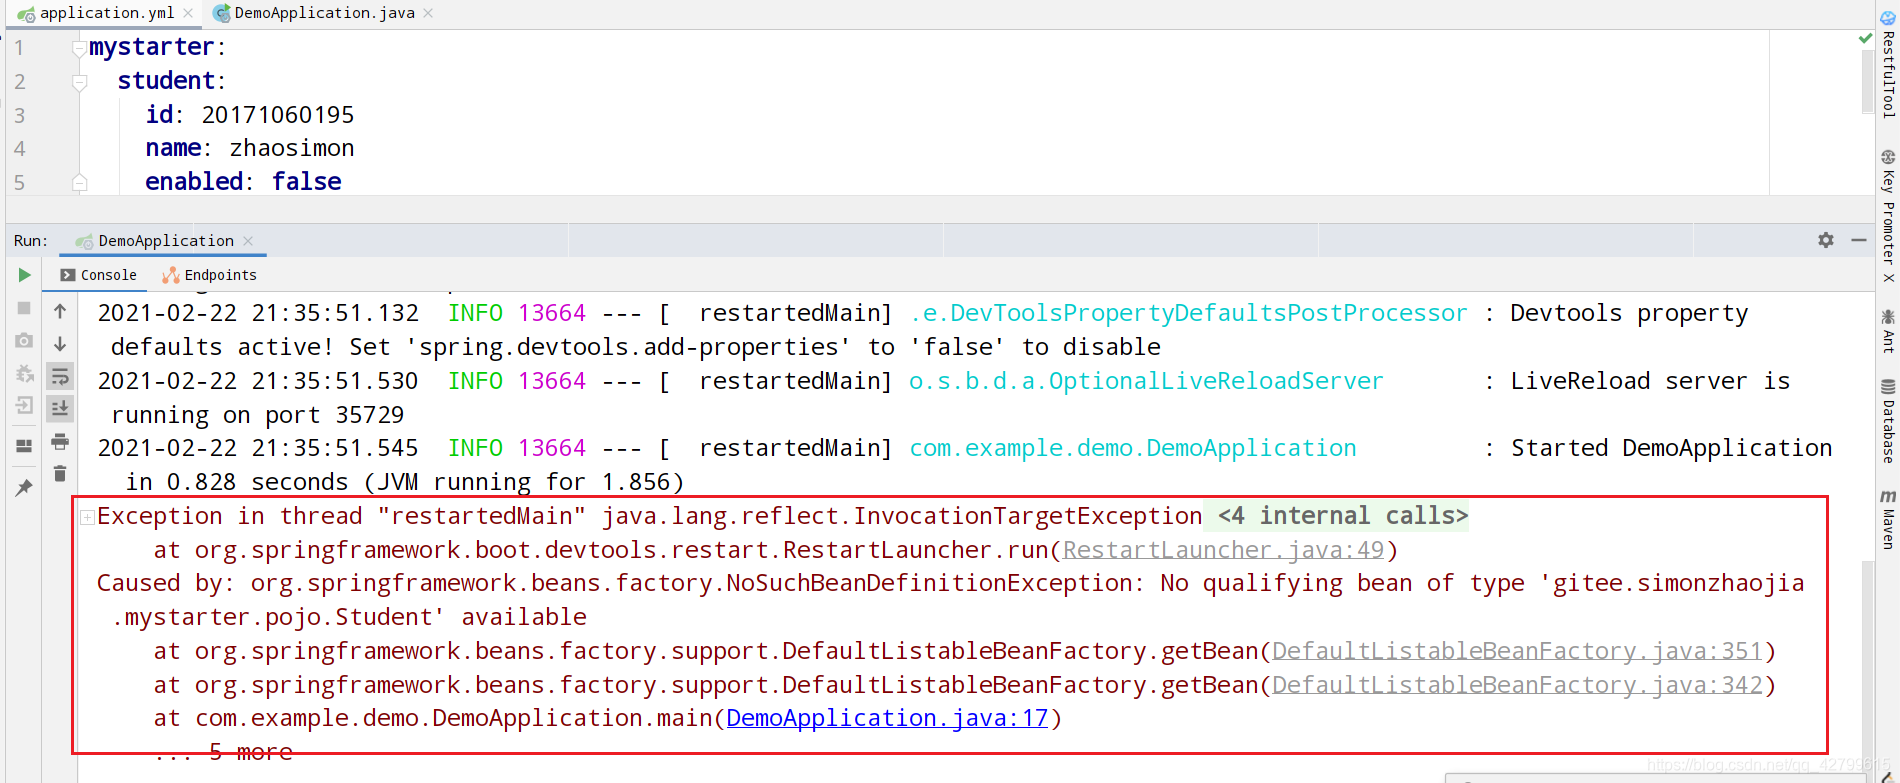
但是当 mystarter.student.enabled 的值为 false 时,自定义 starter 的配置将会关闭,也就是说自定义starter中的配置不会生效。自然,在 Spring 容器中取不到 gitee.simonzhaojia.mystarter.pojo.Student.class 类型的 Bean,执行其 toString 方法自然会报错。也没有输出 Student id 和 Student name。


 被折叠的 条评论
为什么被折叠?
被折叠的 条评论
为什么被折叠?
 到【灌水乐园】发言


