


 本文详细介绍了SpringCloud的三大核心组件:断路器Hystrix,服务网关Zuul以及分布式配置中心的实现。Hystrix通过熔断、降级策略保护系统;Zuul作为微服务架构的网关,负责合法性和权限验证;分布式配置中心简化了配置管理,全局与局部配置灵活搭配。
SpringCloud有五大神兽,包括:服务中心(即注册中心)、负载均衡、断路器、服务网关、分布式配置中心
在https://mp.youkuaiyun.com/mdeditor/89673212# 此博客内已经描述了注册中心和负载均衡的实现,此处就不在赘述,此文对断路器、服务网关和分布式配置中心的实现进行详细描述。
(一)断路器(Hystrix)
断路器类似于我们生活中的保险丝,在系统中使用断路器通过隔离限流、熔断、降级等策略,避免一个服务访问出现延迟时,导致所有请求阻塞,造成的系统崩掉。
- 服务提供端导入依赖包
User_service_hystrix_8002的pom.xml
  <!--hystrix断路器支持-->
        <dependency>
            <groupId>org.springframework.cloud</groupId>
            <artifactId>spring-cloud-starter-netflix-hystrix</artifactId>
        </dependency>
- 服务提供端提供托底函数
UserController
package cn.itsource.springcloud.controller;

import cn.itsource.springcloud.client.UserClient;
import cn.itsource.springcloud.domain.User;
import com.netflix.hystrix.contrib.javanica.annotation.HystrixCommand;
import org.springframework.web.bind.annotation.PathVariable;
import org.springframework.web.bind.annotation.RequestMapping;
import org.springframework.web.bind.annotation.RestController;

@RestController
@RequestMapping("/provider")
public class UserController implements UserClient {

    @HystrixCommand(fallbackMethod = "getUserFailBack") //出现短路(超时,异常,多次访问都失败),托底数据访问(通过方法调用获取的)
    @RequestMapping("/user/{id}")
//    @Override
    public User getUser(@PathVariable("id") Long id) {
        //模拟异常,当用户输入的id为2时,抛出异常,启用托底函数
        if (id==2){
            throw new RuntimeException("用户不存在!");
        }
        return new User(id,"zs");
    }

    //托底函数,出现异常时,返回此数据给用户
    public User getUserFailBack(Long id){
        return  new User(id,"出异常了,请联系管理员");
    }
}
服务的入口启动断路器
package cn.itsource.springcloud;

import org.springframework.boot.SpringApplication;
import org.springframework.boot.autoconfigure.SpringBootApplication;
import org.springframework.cloud.netflix.eureka.EnableEurekaClient;
import org.springframework.cloud.netflix.hystrix.EnableHystrix;

@SpringBootApplication
@EnableEurekaClient
@EnableHystrix //启动豪猪断路器
public class UserServiceAppliction_8002 {
    public static void main(String[] args) {
        SpringApplication.run(UserServiceAppliction_8002.class);
    }
}
- 消费端 需要开启熔断支持
feign:
   hystrix:
       enabled: true #开启熔断支持
   client:
    config:
      remote-service:           #服务名,填写default为所有服务
        connectTimeout: 3000
        readTimeout: 3000
hystrix:
  command:
      default:
        execution:
          isolation:
            thread:
              timeoutInMilliseconds: 3000
此时就实现了模拟熔断的操作,启动注册中心7001、服务提供端8002、消费端9003,输入http://localhost:9003/consumer/user/2 就会调用托底函数,返回给用户信息
(二)服务网关
在我们的微服务架构体系中,会有很多服务。为了使调用简单,会封装一层“网关层”,可以实现来源合法性检测,权限校验,反爬虫等等
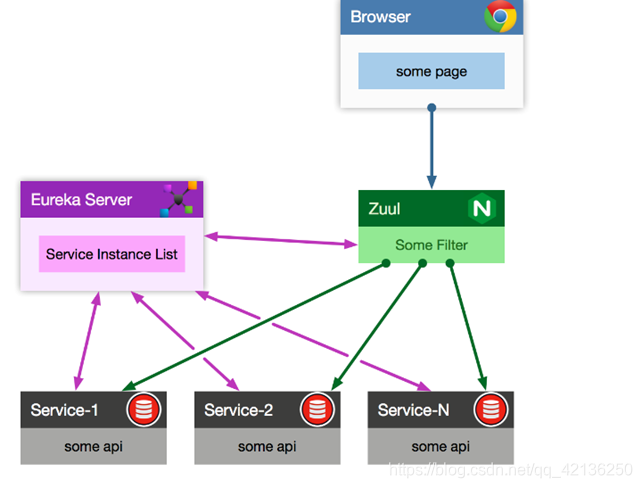
将Zuul注册为Eureka注册中心下的应用,以后访问微服务都是通过Zuul跳转后获得
- 导入依赖项
新建一个服务,pom.xml导入
<!--网关支持-->
        <dependency>
            <groupId>org.springframework.cloud</groupId>
            <artifactId>spring-cloud-starter-netflix-zuul</artifactId>
        </dependency>
- application.yml配置
server:
  port: 9527
spring:
  application:
    name: MICROSERVICE-ZUUL-GATEWAY
eureka:
  client:
    service-url:
      defaultZone: http://localhost:7001/eureka
  instance:
    instance-id: gateway-9527.com #Eureka状态那一列显示显示的名字
    prefer-ip-address: true
zuul:
  routes:
     myUser.serviceId: user-provider
     myUser.path: /user/**  #以/user/开头的所有路径都转发给user-provider
  ignored-services:  "*" #可以一个一个配置,但是很麻烦,用*来通配。忽略掉服务名访问方式 使用上面/user的方式来访问
  prefix: "/services" #加上统一前缀
- 服务入口ZuulGatewayApplication_9527
package cn.itsource.springcloud;

import org.springframework.boot.SpringApplication;
import org.springframework.boot.autoconfigure.SpringBootApplication;
import org.springframework.cloud.netflix.zuul.EnableZuulProxy;

@SpringBootApplication
@EnableZuulProxy //启用网关
public class ZuulGatewayApplication_9527 {
    public static void main(String[] args) {
        SpringApplication.run(ZuulGatewayApplication_9527.class);
    }
}
到此输入http://localhost:9527/services/user/provider/user/1 ,便可以测试通过网关对数据进行访问
(三)分布式配置中心
作用:

- 新建服务,导入依赖项
 <!--配置中心支持-->
        <dependency>
            <groupId>org.springframework.cloud</groupId>
            <artifactId>spring-cloud-starter-config</artifactId>
        </dependency>
- application.yml配置
server:
  port: 6666
eureka:
  client:
    service-url:
      defaultZone: http://localhost:7001/eureka
  instance:
    prefer-ip-address: true
spring:
  application:
    name: spring-cloud-config-server
  cloud:
    config:
      server:
        git:
          uri: https://github.com/hpyao/microservice-config.git
          username: hpyao
          password: ------(此处密码就不透露了)
- 全局的yml,bootstrap.yml
spring:
  cloud:
    config:
      name: application-user #github上面名称
      profile: test #环境
      label: master #分支
      uri: http://localhost:6666 #配置服务器
eureka:
  client:
    service-url:
      defaultZone: http://localhost:7001/eureka  #告诉服务提供者要把服务注册到哪儿 #单机环境
  instance:
    prefer-ip-address: true #显示客户端真实ip
其实配置了全局yml,局部的yml可以不需要了
- 启动类
@SpringBootApplication
@EnableEurekaClient //加入注册中心
@EnableConfigServer //启用配置服务端
public class ConfigServerApplication_6666{
public static void main(String[] args) {
        SpringApplication.run(ConfigServerApplication_6666.class);
    }
}
- 测试
http://localhost:6666/application-user/test
http://localhost:6666 /application-user/dev
测试 localhost:7001
看控制台端口, Eureka上面的名称 就会从github里面拉取下来注册到里面


 1098
1098

 被折叠的 条评论
为什么被折叠?
被折叠的 条评论
为什么被折叠?
 到【灌水乐园】发言


