


一.配置文件介绍
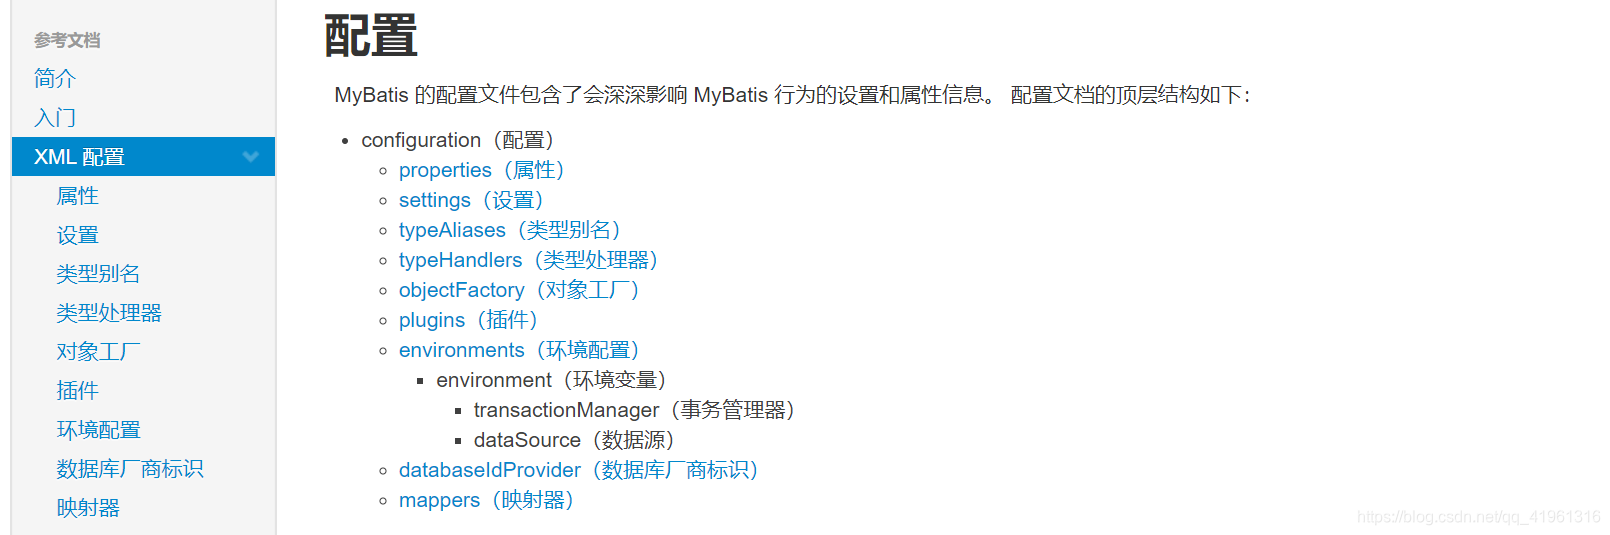
官网描述:MyBatis 的配置文件会深深影响 MyBatis 行为的设置和属性信息
配置文件基本结构
二.配置文件解析流程
String resource = "org/mybatis/example/mybatis-config.xml";
//将 配置文件路径转为输入流
InputStream inputStream = Resources.getResourceAsStream(resource);
//根据输入流 创建SqlSessionFactory
SqlSessionFactory sqlSessionFactory = new SqlSessionFactoryBuilder().build(inputStream);
配置文件路径转为输入流,这一步很简单,最终调用 ClassLoader.getResourceAsStream(String name) 得到输入流,重点关注 SqlSessionFactoryBuilder().build(inputStream)
SqlSessionFactoryBuilder:
public SqlSessionFactory build(InputStream inputStream) {
  return build(inputStream, null, null);
}
public SqlSessionFactory build(InputStream inputStream, String environment, Properties properties) { try { //这一步其实是将输入流转为 Document对象封装在 XMLConfigBuilder,之后利用得到的Document获取配置文件中的相关信息 XMLConfigBuilder parser = new XMLConfigBuilder(inputStream, environment, properties); //解析document中的内容 return build(parser.parse()); } catch (Exception e) { throw ExceptionFactory.wrapException("Error building SqlSession.", e); } finally { ErrorContext.instance().reset(); try { inputStream.close(); } catch (IOException e) { // Intentionally ignore. Prefer previous error. } } }//看看bulid方法
public SqlSessionFactory build(Configuration config) {
//直接返回DefaultSqlSessionFactory,也就是我们要的最终结果SqlSessionFactory
  return new DefaultSqlSessionFactory(config);
}
这里稍微看一下将输入流解析成Document流程
XMLConfigBuilder:
public XMLConfigBuilder(InputStream inputStream, String environment, Properties props) {
  //创建XPathParser,在这个构造函数里面解析Xml,然后创建XMLConfigBuilder
  this(new XPathParser(inputStream, true, props, new XMLMapperEntityResolver()), environment, props);
}
private XMLConfigBuilder(XPathParser parser, String environment, Properties props) { super(new Configuration()); ErrorContext.instance().resource("SQL Mapper Configuration"); this.configuration.setVariables(props); this.parsed = false; this.environment = environment; this.parser = parser; }XPathParser:public XPathParser(InputStream inputStream, boolean validation, Properties variables, EntityResolver entityResolver) { commonConstructor(validation, variables, entityResolver); //创建 Document this.document = createDocument(new InputSource(inputStream)); }private Document createDocument(InputSource inputSource) { // important: this must only be called AFTER common constructor try { DocumentBuilderFactory factory = DocumentBuilderFactory.newInstance(); factory.setFeature(XMLConstants.FEATURE_SECURE_PROCESSING, true); factory.setValidating(validation); factory.setNamespaceAware(false); factory.setIgnoringComments(true); factory.setIgnoringElementContentWhitespace(false); factory.setCoalescing(false); factory.setExpandEntityReferences(true); DocumentBuilder builder = factory.newDocumentBuilder(); builder.setEntityResolver(entityResolver); builder.setErrorHandler(new ErrorHandler() { @Override public void error(SAXParseException exception) throws SAXException { throw exception; } @Override public void fatalError(SAXParseException exception) throws SAXException { throw exception; } @Override public void warning(SAXParseException exception) throws SAXException { // NOP } }); //解析成Document对象 return builder.parse(inputSource); } catch (Exception e) { throw new BuilderException("Error creating document instance. Cause: " + e, e); } }
Document对象拿到了,那么需要将里面的东西取出来细分,不然怎么说是面向对象。接下来分析 XMLConfigBuilder是如何解析Document对象的。
XMLConfigBuilder:
public Configuration parse() {
  if (parsed) {
    throw new BuilderException("Each XMLConfigBuilder can only be used once.");
  }
  parsed = true;
  /**
   * 这个configuration就是配置文件的标签
   * <configuration>
   *   <environments default="development">
   *     <environment id="development">
   *       <transactionManager type="JDBC"/>
   *       <dataSource type="POOLED">
   *         <property name="driver" value="${driver}"/>
   *         <property name="url" value="${url}"/>
   *         <property name="username" value="${username}"/>
   *         <property name="password" value="${password}"/>
   *       </dataSource>
   *     </environment>
   *   </environments>
   *   <mappers>
   *     <mapper resource="org/mybatis/example/BlogMapper.xml"/>
   *   </mappers>
   * </configuration>
   */
  parseConfiguration(parser.evalNode("/configuration"));
  return configuration;
}
private void parseConfiguration(XNode root) { try { //issue #117 read properties first //解析properties标签 propertiesElement(root.evalNode("properties")); //解析setting配置,并转换为properties Properties settings = settingsAsProperties(root.evalNode("settings")); //加载vfs? loadCustomVfs(settings); loadCustomLogImpl(settings); // 解析 typeAliases 配置 typeAliasesElement(root.evalNode("typeAliases")); // 解析 plugins 配置 pluginElement(root.evalNode("plugins")); // 解析 objectFactory 配置 objectFactoryElement(root.evalNode("objectFactory")); // 解析 objectWrapperFactory 配置 objectWrapperFactoryElement(root.evalNode("objectWrapperFactory")); // 解析 reflectorFactory 配置 reflectorFactoryElement(root.evalNode("reflectorFactory")); // settings 中的信息设置到 Configuration 对象中 settingsElement(settings); // read it after objectFactory and objectWrapperFactory issue #631 // 解析 environments 配置 environmentsElement(root.evalNode("environments")); // 解析 databaseIdProvider,获取并设置 databaseId 到 Configuration 对象 databaseIdProviderElement(root.evalNode("databaseIdProvider")); // 解析 typeHandlers 配置 typeHandlerElement(root.evalNode("typeHandlers")); // 解析 mappers 配置 mapperElement(root.evalNode("mappers")); } catch (Exception e) { throw new BuilderException("Error parsing SQL Mapper Configuration. Cause: " + e, e); } }
大家可以看到,将configuration标签传进来后,parseConfiguration内的一些列方法基本是按官网给出的配置文件属性进行解析的。接下来,会分析properties,settings,typeAliases,environments标签,至于其它的标签暂不分析(其实都差不多,只是变量名称不一样。。)
1. properties
<properties resource="org/mybatis/example/config.properties">
  <property name="username" value="dev_user"/>
  <property name="password" value="F2Fa3!33TYyg"/>
</properties>
/**
 * 解析properties标签,先解析子节点property内容,
 * 再解析resource或者url内容,可能导致 后面属性覆盖property
 * @param context
 * @throws Exception
 */
private void propertiesElement(XNode context) throws Exception {
  if (context != null) {
    /**
     * <properties resource="jdbc.properties">
     * <property name="jdbc.username" value="coolblog"/>
     * <property name="hello" value="world"/>
     * </properties>
     */
    //解析子节点 property
    Properties defaults = context.getChildrenAsProperties();
    String resource = context.getStringAttribute("resource");
    String url = context.getStringAttribute("url");
    //properties 标签中的url和resource属性不可共存
    if (resource != null && url != null) {
      throw new BuilderException("The properties element cannot specify both a URL and a resource based property file reference.  Please specify one or the other.");
    }
    if (resource != null) {//解析property文件
      defaults.putAll(Resources.getResourceAsProperties(resource));
    } else if (url != null) {//解析url资源文件
      defaults.putAll(Resources.getUrlAsProperties(url));
    }
    Properties vars = configuration.getVariables();
    if (vars != null) {
      defaults.putAll(vars);
    }
    parser.setVariables(defaults);
    //设置到 configuration,可以供其他标签使用
    configuration.setVariables(defaults);
  }
}
//解析 property子标签
public Properties getChildrenAsProperties() {
  Properties properties = new Properties();
  for (XNode child : getChildren()) {//遍历子节点
    String name = child.getStringAttribute("name");
    String value = child.getStringAttribute("value");
    if (name != null && value != null) {
      properties.setProperty(name, value);
    }
  }
  return properties;
}
2.settings
这是 MyBatis 中极为重要的调整设置,它们会改变 MyBatis 的运行时行为,详见官网:https://mybatis.org/mybatis-3/zh/configuration.html
这个标签总体来说是简单的,一起看看吧
private Properties settingsAsProperties(XNode context) {
  if (context == null) {
    return new Properties();
  }
  /**
   * <settings>
   * <setting name="cacheEnabled" value="true"/>
   * <setting name="lazyLoadingEnabled" value="true"/>
   * <setting name="autoMappingBehavior" value="PARTIAL"/>
   * </settings>
   */
//解析 子标签
  Properties props = context.getChildrenAsProperties();
  // Check that all settings are known to the configuration class
  //创建 Configuration 类的“元信息”对象,用于校验
  MetaClass metaConfig = MetaClass.forClass(Configuration.class, localReflectorFactory);
  for (Object key : props.keySet()) {
    // 检测 Configuration 中是否存在相关属性,不存在则抛出异常
    if (!metaConfig.hasSetter(String.valueOf(key))) {
      throw new BuilderException("The setting " + key + " is not known.  Make sure you spelled it correctly (case sensitive).");
    }
  }
  return props;
}
子标签解析没什么好说的,关键看看
MetaClass metaConfig = MetaClass.forClass(Configuration.class, localReflectorFactory);
MetaClass里面封装了Configuration类的基本信息,如构造函数,get,set方法
根据Configuration里面的字段,校验配置文件里面的信息,防止出现配置错误,先看看Configuration类的基本字段:
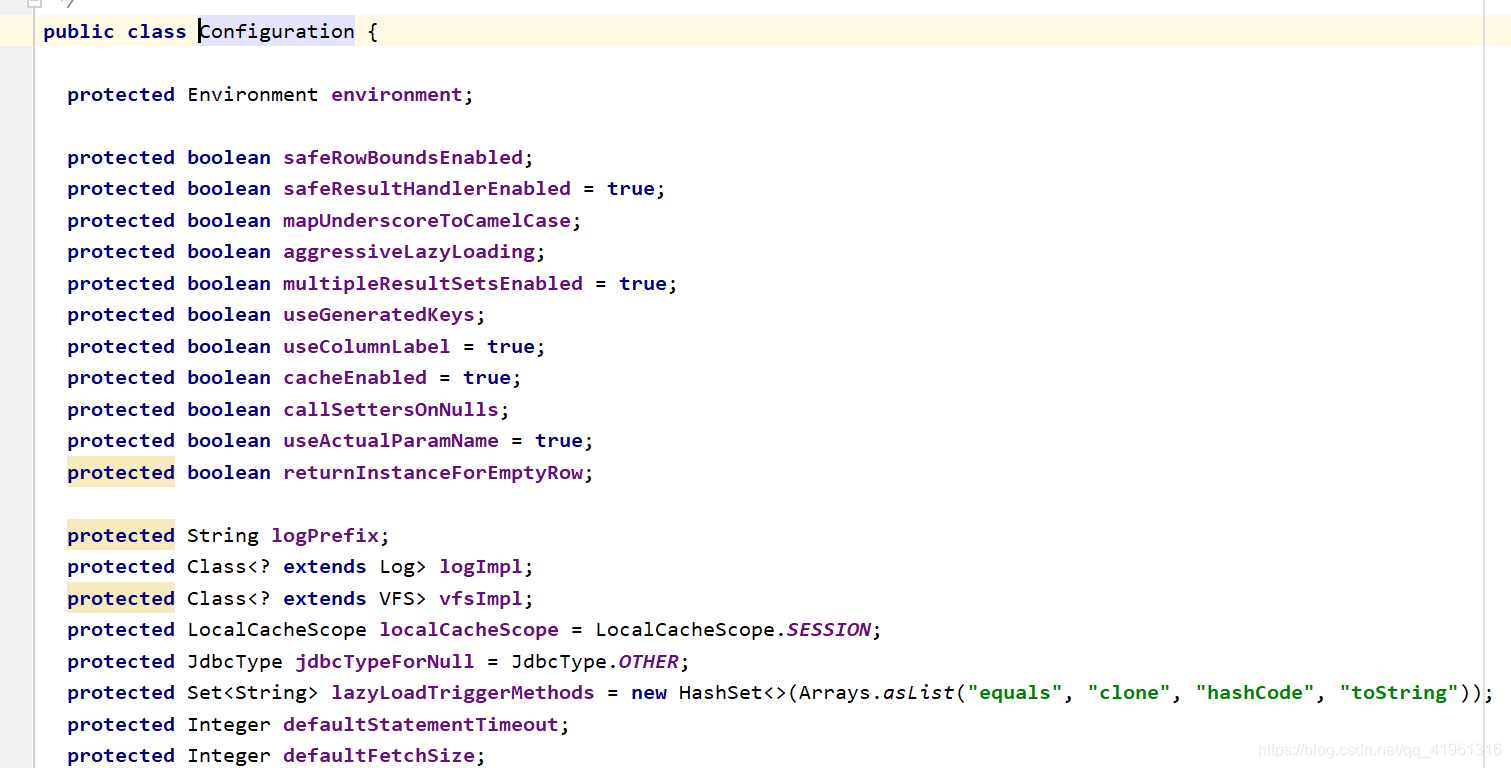
这些字段和官网提供的settings基本对的上,看看是如何将Configuration这个类封装成 MetaClass
MetaClass:
private MetaClass(Class<?> type, ReflectorFactory reflectorFactory) {
  this.reflectorFactory = reflectorFactory;
  //通过反射获取 Class的各种信息,封装到 Reflector 类中
  this.reflector = reflectorFactory.findForClass(type);
}

public static MetaClass forClass(Class<?> type, ReflectorFactory reflectorFactory) {
  return new MetaClass(type, reflectorFactory);
}
DefaultReflectorFactory:@Override public Reflector findForClass(Class<?> type) { if (classCacheEnabled) { // synchronized (type) removed see issue #461,创建Reflector对象 return reflectorMap.computeIfAbsent(type, Reflector::new); } else { return new Reflector(type); } }Reflector:
public Reflector(Class<?> clazz) {
  type = clazz;
  //封装默认构造函数
  addDefaultConstructor(clazz);
  //封装 get(is)方法
  addGetMethods(clazz);
  //封装set方法
  addSetMethods(clazz);
  //添加所有字段
  addFields(clazz);
  readablePropertyNames = getMethods.keySet().toArray(new String[0]);
  writablePropertyNames = setMethods.keySet().toArray(new String[0]);
  for (String propName : readablePropertyNames) {
    caseInsensitivePropertyMap.put(propName.toUpperCase(Locale.ENGLISH), propName);
  }
  for (String propName : writablePropertyNames) {
    caseInsensitivePropertyMap.put(propName.toUpperCase(Locale.ENGLISH), propName);
  }
}
//这里分析一下 get方法的封装流程
private void addGetMethods(Class<?> clazz) {
  Map<String, List<Method>> conflictingGetters = new HashMap<>();
  //获取所有方法和父类方法
  Method[] methods = getClassMethods(clazz);
  //条件:入参个数为0 且 是 get方法, 加入 conflictingGetters
  Arrays.stream(methods).filter(m -> m.getParameterTypes().length == 0 && PropertyNamer.isGetter(m.getName()))
    .forEach(m -> addMethodConflict(conflictingGetters, PropertyNamer.methodToProperty(m.getName()), m));
  //解决get冲突, 如 getXXX 和 isXXX。根据返回类型判断
  resolveGetterConflicts(conflictingGetters);
}
private Method[] getClassMethods(Class<?> clazz) {
  Map<String, Method> uniqueMethods = new HashMap<>();
  Class<?> currentClass = clazz;
  while (currentClass != null && currentClass != Object.class) {
    //获取当前类的所有方法,公有,私有,默认,保存在uniqueMethods中
    addUniqueMethods(uniqueMethods, currentClass.getDeclaredMethods());

    // we also need to look for interface methods -
    // because the class may be abstract
    //获取接口的所有方法
    Class<?>[] interfaces = currentClass.getInterfaces();
    for (Class<?> anInterface : interfaces) {
      addUniqueMethods(uniqueMethods, anInterface.getMethods());
    }
    //父类
    currentClass = currentClass.getSuperclass();
  }

  Collection<Method> methods = uniqueMethods.values();

  return methods.toArray(new Method[0]);
}
private void addUniqueMethods(Map<String, Method> uniqueMethods, Method[] methods) { for (Method currentMethod : methods) { if (!currentMethod.isBridge()) { //获取方法名称:返回类型 + “#” +方法名+参数类型名 String signature = getSignature(currentMethod); // check to see if the method is already known // if it is known, then an extended class must have // overridden a method if (!uniqueMethods.containsKey(signature)) { uniqueMethods.put(signature, currentMethod); } } } }PropertyNamer:public static boolean isGetter(String name) { //对于 以get开头或者以 is开头的方法名都算get方法 return (name.startsWith("get") && name.length() > 3) || (name.startsWith("is") && name.length() > 2); }// 如果存在 getAge()和 isAge()方法,会产生冲突,因为都是用Age作为Map的key保存在 conflictingGetters变量中
public static String methodToProperty(String name) {
  if (name.startsWith("is")) {
    name = name.substring(2);
  } else if (name.startsWith("get") || name.startsWith("set")) {
    name = name.substring(3);
  } else {
    throw new ReflectionException("Error parsing property name '" + name + "'.  Didn't start with 'is', 'get' or 'set'.");
  }

  if (name.length() == 1 || (name.length() > 1 && !Character.isUpperCase(name.charAt(1)))) {
    name = name.substring(0, 1).toLowerCase(Locale.ENGLISH) + name.substring(1);
  }

  return name;
}
//解决 get 冲突
private void resolveGetterConflicts(Map<String, List<Method>> conflictingGetters) {
  for (Entry<String, List<Method>> entry : conflictingGetters.entrySet()) {
    Method winner = null;
    String propName = entry.getKey();
    boolean isAmbiguous = false;
    for (Method candidate : entry.getValue()) {
      if (winner == null) {
        winner = candidate;
        continue;
      }
      //获取返回值类型
      Class<?> winnerType = winner.getReturnType();
      Class<?> candidateType = candidate.getReturnType();
      /*
       * 两个方法的返回值类型一致,若两个方法返回值类型均为 boolean,
       * 则选取 isXXX 方法为 winner。否则无法决定哪个方法更为合适,  只能抛出异常,isAmbiguous为true表示抛异常
       */
      if (candidateType.equals(winnerType)) {
        if (!boolean.class.equals(candidateType)) {
          //返回类型相同,但都是非boolean类型,抛异常
          isAmbiguous = true;
          break;
        } else if (candidate.getName().startsWith("is")) {
          winner = candidate;
        }
      } else if (candidateType.isAssignableFrom(winnerType)) {//父子关系,选择子类合适
        // OK getter type is descendant
      } else if (winnerType.isAssignableFrom(candidateType)) {
        winner = candidate;
      } else {
        isAmbiguous = true;
        break;
      }
    }
    addGetMethod(propName, winner, isAmbiguous);
  }
}
private void addGetMethod(String name, Method method, boolean isAmbiguous) {
  //isAmbiguous,异常标志位
  MethodInvoker invoker = isAmbiguous
      ? new AmbiguousMethodInvoker(method, MessageFormat.format(
          "Illegal overloaded getter method with ambiguous type for property ''{0}'' in class ''{1}''. This breaks the JavaBeans specification and can cause unpredictable results.",
          name, method.getDeclaringClass().getName()))
      : new MethodInvoker(method);
  getMethods.put(name, invoker);
  Type returnType = TypeParameterResolver.resolveReturnType(method, type);
  getTypes.put(name, typeToClass(returnType));
}
获取到 Configuration的所有方法后,对 get方法进行过滤,这里的get有些特殊,是指以get或者 is 开头的方法;对于其他set方法,构造函数,都是利用反射获取相关信息,自行分析
3.typeAliases
类型别名可为 Java 类型设置一个缩写名字。 它仅用于 XML 配置,意在降低冗余的全限定类名书写
常见配置:
<typeAliases>
 <package name="xyz.coolblog.chapter2.model1"/>
 <package name="xyz.coolblog.chapter2.model2"/>
 <typeAlias alias="author" type="xyz.coolblog.chapter2.model.Author" />
</typeAliases>
Configuration默认注册的别名
public Configuration() {
  typeAliasRegistry.registerAlias("JDBC", JdbcTransactionFactory.class);
  typeAliasRegistry.registerAlias("MANAGED", ManagedTransactionFactory.class);

  typeAliasRegistry.registerAlias("JNDI", JndiDataSourceFactory.class);
  typeAliasRegistry.registerAlias("POOLED", PooledDataSourceFactory.class);
  typeAliasRegistry.registerAlias("UNPOOLED", UnpooledDataSourceFactory.class);

  typeAliasRegistry.registerAlias("PERPETUAL", PerpetualCache.class);
  typeAliasRegistry.registerAlias("FIFO", FifoCache.class);
  typeAliasRegistry.registerAlias("LRU", LruCache.class);
  typeAliasRegistry.registerAlias("SOFT", SoftCache.class);
  typeAliasRegistry.registerAlias("WEAK", WeakCache.class);

  typeAliasRegistry.registerAlias("DB_VENDOR", VendorDatabaseIdProvider.class);

  typeAliasRegistry.registerAlias("XML", XMLLanguageDriver.class);
  typeAliasRegistry.registerAlias("RAW", RawLanguageDriver.class);

  typeAliasRegistry.registerAlias("SLF4J", Slf4jImpl.class);
  typeAliasRegistry.registerAlias("COMMONS_LOGGING", JakartaCommonsLoggingImpl.class);
  typeAliasRegistry.registerAlias("LOG4J", Log4jImpl.class);
  typeAliasRegistry.registerAlias("LOG4J2", Log4j2Impl.class);
  typeAliasRegistry.registerAlias("JDK_LOGGING", Jdk14LoggingImpl.class);
  typeAliasRegistry.registerAlias("STDOUT_LOGGING", StdOutImpl.class);
  typeAliasRegistry.registerAlias("NO_LOGGING", NoLoggingImpl.class);

  typeAliasRegistry.registerAlias("CGLIB", CglibProxyFactory.class);
  typeAliasRegistry.registerAlias("JAVASSIST", JavassistProxyFactory.class);

  languageRegistry.setDefaultDriverClass(XMLLanguageDriver.class);
  languageRegistry.register(RawLanguageDriver.class);
}
通过配置包名,或者 直接指定具体类型和别名
XMLConfigBuilder:private void typeAliasesElement(XNode parent) { if (parent != null) { for (XNode child : parent.getChildren()) { /** * <typeAliases> * <package name="xyz.coolblog.chapter2.model1"/> * </typeAliases> */ if ("package".equals(child.getName())) {//扫描包 String typeAliasPackage = child.getStringAttribute("name"); configuration.getTypeAliasRegistry().registerAliases(typeAliasPackage); } else {//直接指定具体类型和别名 /** * <typeAliases> * <typeAlias alias="article" type="xyz.coolblog.chapter2.model.Article" /> * </typeAliases> */ String alias = child.getStringAttribute("alias"); String type = child.getStringAttribute("type"); try { Class<?> clazz = Resources.classForName(type); if (alias == null) { //没有配置别名,默认以类名为别名,尝试获取@Alias注解的值 typeAliasRegistry.registerAlias(clazz); } else { //注册别名 typeAliasRegistry.registerAlias(alias, clazz); } } catch (ClassNotFoundException e) { throw new BuilderException("Error registering typeAlias for '" + alias + "'. Cause: " + e, e); } } } } }看看包扫描过程
TypeAliasRegistry:public void registerAliases(String packageName) { registerAliases(packageName, Object.class); } public void registerAliases(String packageName, Class<?> superType) { ResolverUtil<Class<?>> resolverUtil = new ResolverUtil<>(); // 查找某个包下的父类为 superType 的类。从调用栈来看,这里的 // superType = Object.class,所以 ResolverUtil 将查找所有的类。 // 查找完成后,查找结果将会被缓存到内部集合中。这里面用到了 VFS,虚拟文件系统 resolverUtil.find(new ResolverUtil.IsA(superType), packageName); //获取到包下的所有类 Set<Class<? extends Class<?>>> typeSet = resolverUtil.getClasses(); for (Class<?> type : typeSet) { // Ignore inner classes and interfaces (including package-info.java) // Skip also inner classes. See issue #6 if (!type.isAnonymousClass() && !type.isInterface() && !type.isMemberClass()) { //有Alias注解直接用注解,没有用class的getSimpleName当别名 registerAlias(type); } } }ResolverUtil:public ResolverUtil<T> find(Test test, String packageName) { String path = getPackagePath(packageName); try {//获取包路径下所有类(全限定类名),虚拟文件系统,默认使用DefaultVFS 扫描包下的所有类 List<String> children = VFS.getInstance().list(path); for (String child : children) { if (child.endsWith(".class")) {//判断是否以.class结尾 //添加到set集合 addIfMatching(test, child); } } } catch (IOException ioe) { log.error("Could not read package: " + packageName, ioe); } return this; }
protected void addIfMatching(Test test, String fqn) {
  try {
    //将 全限定类名中的 / 替换成 .
    String externalName = fqn.substring(0, fqn.indexOf('.')).replace('/', '.');
    ClassLoader loader = getClassLoader();
    if (log.isDebugEnabled()) {
      log.debug("Checking to see if class " + externalName + " matches criteria [" + test + "]");
    }
    //加载class
    Class<?> type = loader.loadClass(externalName);
    //判断是否是Object.class的子类。。return type != null && parent.isAssignableFrom(type);
    if (test.matches(type)) {
      matches.add((Class<T>) type);
    }
  } catch (Throwable t) {
    log.warn("Could not examine class '" + fqn + "'" + " due to a " +
        t.getClass().getName() + " with message: " + t.getMessage());
  }
}
对于DefaultVFS 里面具体实现逻辑这里不分析,只需要知道通过该类可以扫描包下面的所有文件对应的路径名称.对此感兴趣的可以私聊我或者底下评论。。。
4.environments
常见配置:
<!--default 代表选择哪个 environment(id) -->
<environments default="development">
  <environment id="development">
    <transactionManager type="JDBC">
      <property name="" value=""/>
    </transactionManager>
    <dataSource type="POOLED">
      <property name="driver" value="${driver}"/>
      <property name="url" value="${url}"/>
      <property name="username" value="${username}"/>
      <property name="password" value="${password}"/>
    </dataSource>
  </environment>
</environments>
- 默认使用的环境 ID(比如:default="development")。
- 每个 environment 元素定义的环境 ID(比如:id="development")。
- 事务管理器的配置(比如:type="JDBC")。
- 数据源的配置(比如:type="POOLED")。
XMLConfigBuilder:
private void environmentsElement(XNode context) throws Exception {
  if (context != null) {
    if (environment == null) {
      //代表当前环境
      environment = context.getStringAttribute("default");
    }
    for (XNode child : context.getChildren()) {
      //id代表environment环境,用于生产,测试切换
      String id = child.getStringAttribute("id");
      // 检测当前 environment 节点的 id 与其父节点 environments 的
      // 属性 default 内容是否一致,一致则返回 true,否则返回 false
      if (isSpecifiedEnvironment(id)) {
        //事务管理器,分两种
        /**
         * (1)使用JDBC的事务管理机制,就是利用java.sql.Connection对象完成对事务的提交
         * (2)使用MANAGED的事务管理机制,这种机制mybatis自身不会去实现事务管理,而是让程序的容器自定义实现
         */
        TransactionFactory txFactory = transactionManagerElement(child.evalNode("transactionManager"));
        DataSourceFactory dsFactory = dataSourceElement(child.evalNode("dataSource"));
        DataSource dataSource = dsFactory.getDataSource();
        Environment.Builder environmentBuilder = new Environment.Builder(id)
            .transactionFactory(txFactory)
            .dataSource(dataSource);
        configuration.setEnvironment(environmentBuilder.build());
      }
    }
  }
}
//解析事务管理器
private TransactionFactory transactionManagerElement(XNode context) throws Exception {
  if (context != null) {
    String type = context.getStringAttribute("type");
    //获取属性值
    Properties props = context.getChildrenAsProperties();
    //反射创建对象
    TransactionFactory factory = (TransactionFactory) resolveClass(type).getDeclaredConstructor().newInstance();
    //设置属性
    factory.setProperties(props);
    return factory;
  }
  throw new BuilderException("Environment declaration requires a TransactionFactory.");
}
解析数据源:
private DataSourceFactory dataSourceElement(XNode context) throws Exception {
  if (context != null) {
    //POOLED,UNPOOLED,JNDI 三种类型
    String type = context.getStringAttribute("type");
    //获取属性,这一步会将 value="${driver}" 这类表达式转为真实的值
    Properties props = context.getChildrenAsProperties();
    //反射创建对象,先从别名集合中查找type对应的真实类名
    DataSourceFactory factory = (DataSourceFactory) resolveClass(type).getDeclaredConstructor().newInstance();
    factory.setProperties(props);
    return factory;
  }
  throw new BuilderException("Environment declaration requires a DataSourceFactory.");
}
下面来看看如何将 value="${driver}"转为真实值步骤,其实最终会到 <properties/>标签解析后,保存的变量中寻找值
public Properties getChildrenAsProperties() {
  Properties properties = new Properties();
  for (XNode child : getChildren()) {//遍历子节点,getChildren会转换${}这类表达式为真实值
    String name = child.getStringAttribute("name");
    String value = child.getStringAttribute("value");
    if (name != null && value != null) {
      properties.setProperty(name, value);
    }
  }
  return properties;
}
public List<XNode> getChildren() { List<XNode> children = new ArrayList<>(); NodeList nodeList = node.getChildNodes(); if (nodeList != null) { for (int i = 0, n = nodeList.getLength(); i < n; i++) { Node node = nodeList.item(i); if (node.getNodeType() == Node.ELEMENT_NODE) { //在XNode构造函数中完成 ${}表达式的解析,variables存储properties标签的结果 children.add(new XNode(xpathParser, node, variables)); } } } return children; }public XNode(XPathParser xpathParser, Node node, Properties variables) { this.xpathParser = xpathParser; this.node = node; this.name = node.getNodeName(); this.variables = variables; //属性解析 this.attributes = parseAttributes(node); this.body = parseBody(node); }private Properties parseAttributes(Node n) { Properties attributes = new Properties(); NamedNodeMap attributeNodes = n.getAttributes(); if (attributeNodes != null) { for (int i = 0; i < attributeNodes.getLength(); i++) { Node attribute = attributeNodes.item(i); //解析特殊表达式 ${} String value = PropertyParser.parse(attribute.getNodeValue(), variables); attributes.put(attribute.getNodeName(), value); } } return attributes; }PropertyParser:public static String parse(String string, Properties variables) { VariableTokenHandler handler = new VariableTokenHandler(variables); //构建表达式解析器 GenericTokenParser parser = new GenericTokenParser("${", "}", handler); //解析 return parser.parse(string); }// 这个方法的基本思路:根据 表达式,确定表达式的起始位置("${"), 结束位置("}"), 由此 确定真实表达式内容的始末位置
public String parse(String text) {
  if (text == null || text.isEmpty()) {
    return "";
  }
  // search open token
  int start = text.indexOf(openToken);
  if (start == -1) {
    return text;
  }
  char[] src = text.toCharArray();
  int offset = 0;
  final StringBuilder builder = new StringBuilder();
  StringBuilder expression = null;
  while (start > -1) {
    if (start > 0 && src[start - 1] == '\\') {
      // this open token is escaped. remove the backslash and continue.
      builder.append(src, offset, start - offset - 1).append(openToken);
      offset = start + openToken.length();
    } else {
      // found open token. let's search close token.
      if (expression == null) {
        expression = new StringBuilder();
      } else {
        expression.setLength(0);
      }
      builder.append(src, offset, start - offset);
      offset = start + openToken.length();
      int end = text.indexOf(closeToken, offset);
      while (end > -1) {
        if (end > offset && src[end - 1] == '\\') {
          // this close token is escaped. remove the backslash and continue.
          expression.append(src, offset, end - offset - 1).append(closeToken);
          offset = end + closeToken.length();
          end = text.indexOf(closeToken, offset);
        } else {//获取真实表达式, 如${abc} ,expression = "abc"
          expression.append(src, offset, end - offset);
          break;
        }
      }
      if (end == -1) {
        // close token was not found.
        builder.append(src, start, src.length - start);
        offset = src.length;
      } else {//这一步将表达式 转为?,或者真实值,看具体实现类,同时保存 参数相关信息
        builder.append(handler.handleToken(expression.toString()));
        offset = end + closeToken.length();
      }
    }
    start = text.indexOf(openToken, offset);
  }
  if (offset < src.length) {
    builder.append(src, offset, src.length - offset);
  }
  return builder.toString();
}
VariableTokenHandler:
@Override
public String handleToken(String content) {
  if (variables != null) {
    String key = content;
    if (enableDefaultValue) {//默认false
      final int separatorIndex = content.indexOf(defaultValueSeparator);
      String defaultValue = null;
      if (separatorIndex >= 0) {
        key = content.substring(0, separatorIndex);
        defaultValue = content.substring(separatorIndex + defaultValueSeparator.length());
      }
      if (defaultValue != null) {
        return variables.getProperty(key, defaultValue);
      }
    }
    if (variables.containsKey(key)) {
      //从已经解析好的 Properties标签中获取对应的值,总算逮住你了,嘿嘿,还跑吗
      return variables.getProperty(key);
    }
  }
  return "${" + content + "}";
}
Environment结束,当然,其中数据源还是有点东西值得细究一下
UNPOOLED– 这个数据源的实现会每次请求时打开和关闭连接。
POOLED– 这种数据源的实现利用“池”的概念将 JDBC 连接对象组织起来,避免了创建新的连接实例时所必需的初始化和认证时间。
这个放后面,在sql执行,获取数据库连接的时候讲更合适。
三.小结
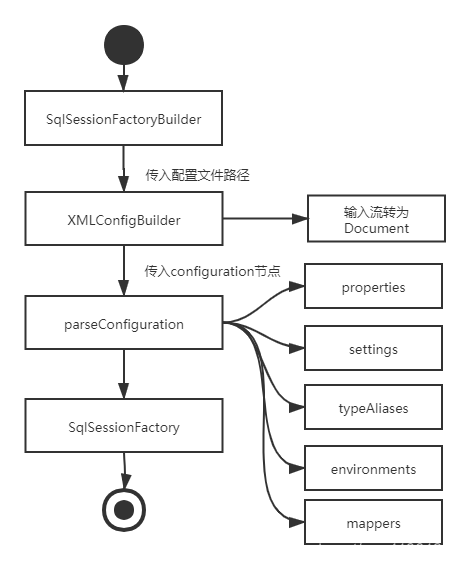
配置文件的解析流程已经快结束,不过还有最重要的一块:映射文件的解析,这一块的代码有点难读,结果映射,尤其是动态SQL,各种标签,以及和接口绑定步骤,放在下一章分析。
最后来一张流程图:
结语:万事开头难


 被折叠的 条评论
为什么被折叠?
被折叠的 条评论
为什么被折叠?
 到【灌水乐园】发言


