


 本文详细介绍AOP配置步骤,包括配置专业名词解释、示例代码及测试过程。
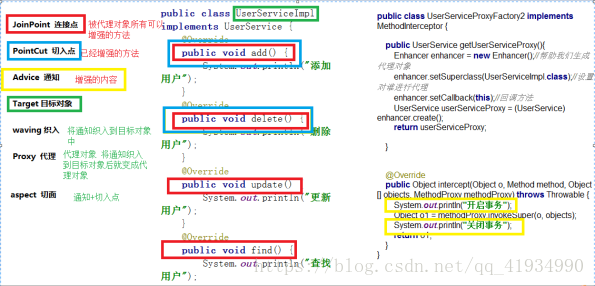
AOP配置专业名词有三个分别是
JoinPoint(连接点)被代理对象所有的可以增强的方法
PointCut(切入点)已经增强过的方法
Advice(通知)增强的内容
Target(目标对象)
Waving(织入)将通知织入目标对象中
Proxy(代理)代理对象,将通知织入到目标对象后就变成代理对象
Aspect(通知加切入点)
比如下面图中的标注
现在开始配置
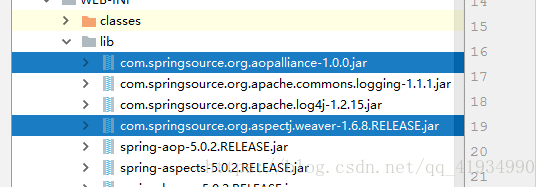
1导包(需要导入aop,aspect两个jar包还有他们的依赖包)

2.准备目标对象
这是我的目标对象UserServiceImpl
|
3.准备通知
|
4,。配置applicationContext.xml文件
(1)导入约束,直接书写<aop:conf>如果有提示,直接回车,系统会自动帮你导入约束
(2)没有提示,手动导入约束
applicationContext.xml中写入下面约束
xmlns:aop="http://www.springframework.org/schema/aop" http://www.springframework.org/schema/aop |
配置切入
<aop:config> |
配置点切入
<aop:pointcut id="pc" expression="execution(* cn.hd.springProxy..impl.*ServiceImpl.*(..))"></aop:pointcut> |
配置切面:将通知织入对应的切入点
<aop:aspect ref="myAdvice"> |
pointcut-ref对应切入点
切入方式
<aop:before method="before" pointcut-ref="pc"></aop:before> |
多中切入方式
①在目标对象方法前调用
<aop:before method="before" pointcut-ref="pc"></aop:before> |
②在目标对象方法后调用(没有异常的情况下)
<aop:after method="after" pointcut-ref="pc"></aop:after> |
③在目标对象方法后(不论有没有异常)
<aop:after-returning method="afterReturning" pointcut-ref="pc"></aop:after-returning> |
④在目标对象方法前后调用代码(特殊的,在通知的方法proceedJionPoint参数)如果有异常方法后不调用
<aop:around method="around" pointcut-ref="pc"></aop:around> |
⑤在目标对象方法出现异常时调用
<aop:after-throwing method="throwException" pointcut-ref="pc"></aop:after-throwing> |
5.测试
|
下面是完成代码
StudentService抽象类
public interface StudentService {
    void add();
    void delete();
    void update();
    void find();
}
StudentService的实现类StudentServiceImpl
public class StudentServiceImpl implements StudentService {
    @Override
    public void add() {
        System.out.println("添加学生信息");
    }

    @Override
    public void delete() {
        System.out.println("删除学生信息");
    }

    @Override
    public void update() {
        System.out.println("修改学生信息");
    }

    @Override
    public void find() {
        System.out.println("查找学生信息");
    }
}
MyAdvice通知类
public class MyAdvice {
    public void before(){
        System.out.println("在目标对象方法执行前调用");
    }

    public void afterReturning(){
        System.out.println("如果目标对象没有异常就会执行");
    }

    public Object around(ProceedingJoinPoint proceedingJoinPoint) throws Throwable {
        System.out.println("环绕前在目标对象前调用");
        Object proceed = proceedingJoinPoint.proceed();
        System.out.println("环绕后在目标对象后调用");
        return proceed;
    }

    public void after(){
        System.out.println("目标方法后调用,不管有没有异常");
    }

    public void throwException(){
        System.out.println("目标对象出现异常调用调用该方法");
    }
}
applicationContext.xml配置文件
<?xml version="1.0" encoding="UTF-8"?>
<beans xmlns="http://www.springframework.org/schema/beans"
       xmlns:xsi="http://www.w3.org/2001/XMLSchema-instance"
       xmlns:context="http://www.springframework.org/schema/context"
       xmlns:aop="http://www.springframework.org/schema/aop"
       xsi:schemaLocation="http://www.springframework.org/schema/beans
       http://www.springframework.org/schema/beans/spring-beans.xsd
       http://www.springframework.org/schema/context
       http://www.springframework.org/schema/context/spring-context.xsd
       http://www.springframework.org/schema/aop
       http://www.springframework.org/schema/aop/spring-aop.xsd">

    <bean name="myAdvice" class="cn.hd.springProxy.MyAdvice"></bean>

    <bean name="studentService" class="cn.hd.springProxy.impl.StudentServiceImpl"></bean>

    <!--配置aop切入-->
    <aop:config>
        <!--配置切入点-->
        <!--public void cn.hd.springProxy.impl.UserServiceImpl.add()-->
        <!-- * cn.hd.springProxy.impl.UserServiceImpl.add(), public 可以省略 返回值可以用*
        * cn.hd.springProxy.impl.*ServiceImpl.*(..)    //所有方法可以用*,所有参数可以用..   所有Service可以用*Service代替
        * cn.hd.springProxy..impl.*ServiceImpl.*(..)
        -->
        <aop:pointcut id="pc" expression="execution(* cn.hd.springProxy..impl.*ServiceImpl.*(..))"></aop:pointcut>

        <!--配置切面,织入通知
        <aop:aspect ref="myAdvice">
            method里的内容是Advice里面的before方法,也就是增强的内容
        -->
        <aop:aspect ref="myAdvice">
            <aop:before method="before" pointcut-ref="pc"></aop:before>

            <aop:after method="after" pointcut-ref="pc"></aop:after>

            <!--如果出现异常则不调用,不出现异常就会调用-->
            <aop:after-returning method="afterReturning" pointcut-ref="pc"></aop:after-returning>

            <!--调用有参数的方法,其他会出错
                如果有异常则不执行方法后调用
            -->
            <aop:around method="around" pointcut-ref="pc"></aop:around>

            <!--不出现异常不掉用该方法,如果出现异常则会调用该方法-->
            <aop:after-throwing method="throwException" pointcut-ref="pc"></aop:after-throwing>

        </aop:aspect>
    </aop:config>

</beans>
测试代码
@RunWith(SpringJUnit4ClassRunner.class)
@ContextConfiguration("classpath:")
public class Demo {
    @Resource(name = "studentService")
    private StudentService studentService;
    @Test
    public void fun(){
        studentService.add();
        studentService.delete();
        studentService.find();
        studentService.update();
    }
}
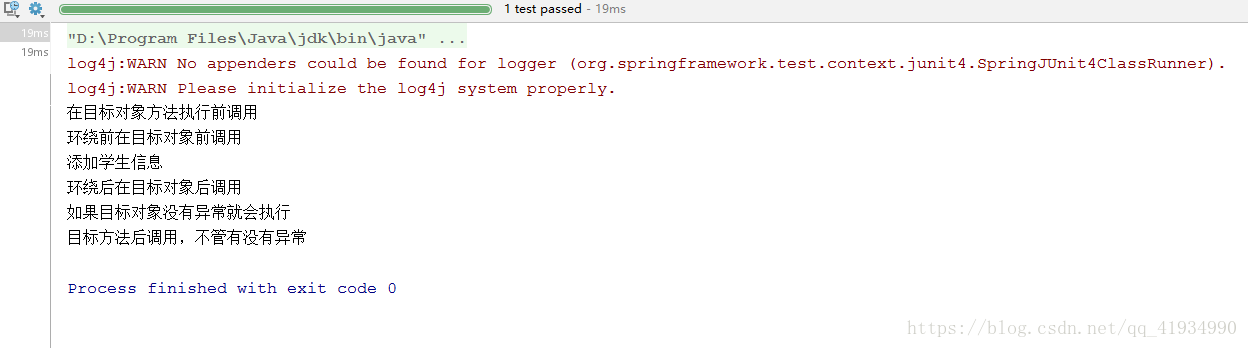
测试结果


 被折叠的 条评论
为什么被折叠?
被折叠的 条评论
为什么被折叠?
 到【灌水乐园】发言


