


目录
1. 通过集成Thread类,并重写run方法来完成线程的创建
3. 使用Callable和Future创建线程,具有线程返回值
一. 多线程创建简介
简介:以下三种方式实现线程均为基础实现方式,实际开发过程中需要手动创建线程池的方式创建线程为最好。
启动线程的方法是start不是run
1. 通过集成Thread类,并重写run方法来完成线程的创建
public class TestThread1 extends Thread{
    @Override
    public void run() {
        for (int i = 0; i < 20; i++) {
            System.out.println("this is thread " + i);
        }
    }
    public static void main(String[] args) {
        //创建集成了thread类的对象,并执行start方法,run方法是运行内容,start方法是实际启动一个线程
        TestThread1 testThread1 = new TestThread1();
        testThread1.start();
        //main方法与start方法同时进行
        for (int i = 0; i < 200; i++) {
            System.out.println("this is main " + i);
        }
    }
}

OR


public class TestThread2{
    public static void main(String[] args) {
        new Thread() {
            @Override
            public void run() {
                for (int i = 0; i < 200; i++) {
                    System.out.println("this is new thread " + i);
                }
            }
        }.start();
        //main方法与start方法同时进行
        for (int i = 0; i < 200; i++) {
            System.out.println("this is main " + i);
        }
    }
}
2. 实现runnable接口
public class TestThread2 implements Runnable{
    @Override
    public void run() {
        for (int i = 0; i < 20; i++) {
            System.out.println("this is thread " + i);
        }
    }
    public static void main(String[] args) {
        //创建实现了runnable对象,并通过thread的代理对象,将该对象通过构造方法传入,并调用start方法执行线程
        TestThread2 testThread1 = new TestThread2();
        new Thread(testThread1).start();
        //main方法与start方法同时进行
        for (int i = 0; i < 200; i++) {
            System.out.println("this is main " + i);
        }
    }
}
3. 使用Callable和Future创建线程,具有线程返回值
该方式可以获取返回值
public class TestCallable implements Callable<Boolean> {
    private String name;
    public TestCallable(String name) {
        this.name = name;
    }
    //执行方法,并根据逻辑判断返回指定的值
    @Override
    public Boolean call() throws Exception {
        for (int i = 0; i < 200; i++) {
            System.out.println("this is thread " + i);
        }
        if("兔子".equals(name)) {
            return true;
        }else {
            return false;
        }
    }
    public static void main(String[] args) throws ExecutionException, InterruptedException {
        TestCallable callable = new TestCallable("乌龟");
        TestCallable callable2 = new TestCallable("兔子");
        ExecutorService ser = Executors.newFixedThreadPool(2);
        //调用线程的submit方法执行实现了callable方法的对象,并返回一个furure对象获取线程返回结果。
        Future<Boolean> submit = ser.submit(callable);
        Future<Boolean> submit1 = ser.submit(callable2);
        System.out.println(submit.get());//false
        System.out.println(submit1.get());//true
    }
}
4. lambda表达简介
public class TestLambda {
    public static void main(String[] args) {
        //1. 通过创建局部内部类方式,创建ilove接口对象
        class Love implements ILove{
            @Override
            public void add() {
                System.out.println("这是一个局部内部类");
            }
        }
        //2. 通过创建匿名内部类的方式,创建Ilove接口对象,并重写add方法。
        ILove iLove = new ILove() {
            @Override
            public void add() {
                System.out.println("this is 匿名内部类");
            }
        };
        //3. 通过lambda表达式完成该接口的实现,并调用方法。
        iLove = () -> System.out.println("这是一个lambda表达式");
        iLove.add();
    }
}
//函数式接口,只有一个抽象方法时,可以通过简化匿名内部类的方式转移为lambda表达式
interface ILove{
    void add();
}
二. 线程的生命周期以及相应方法
五个状态:
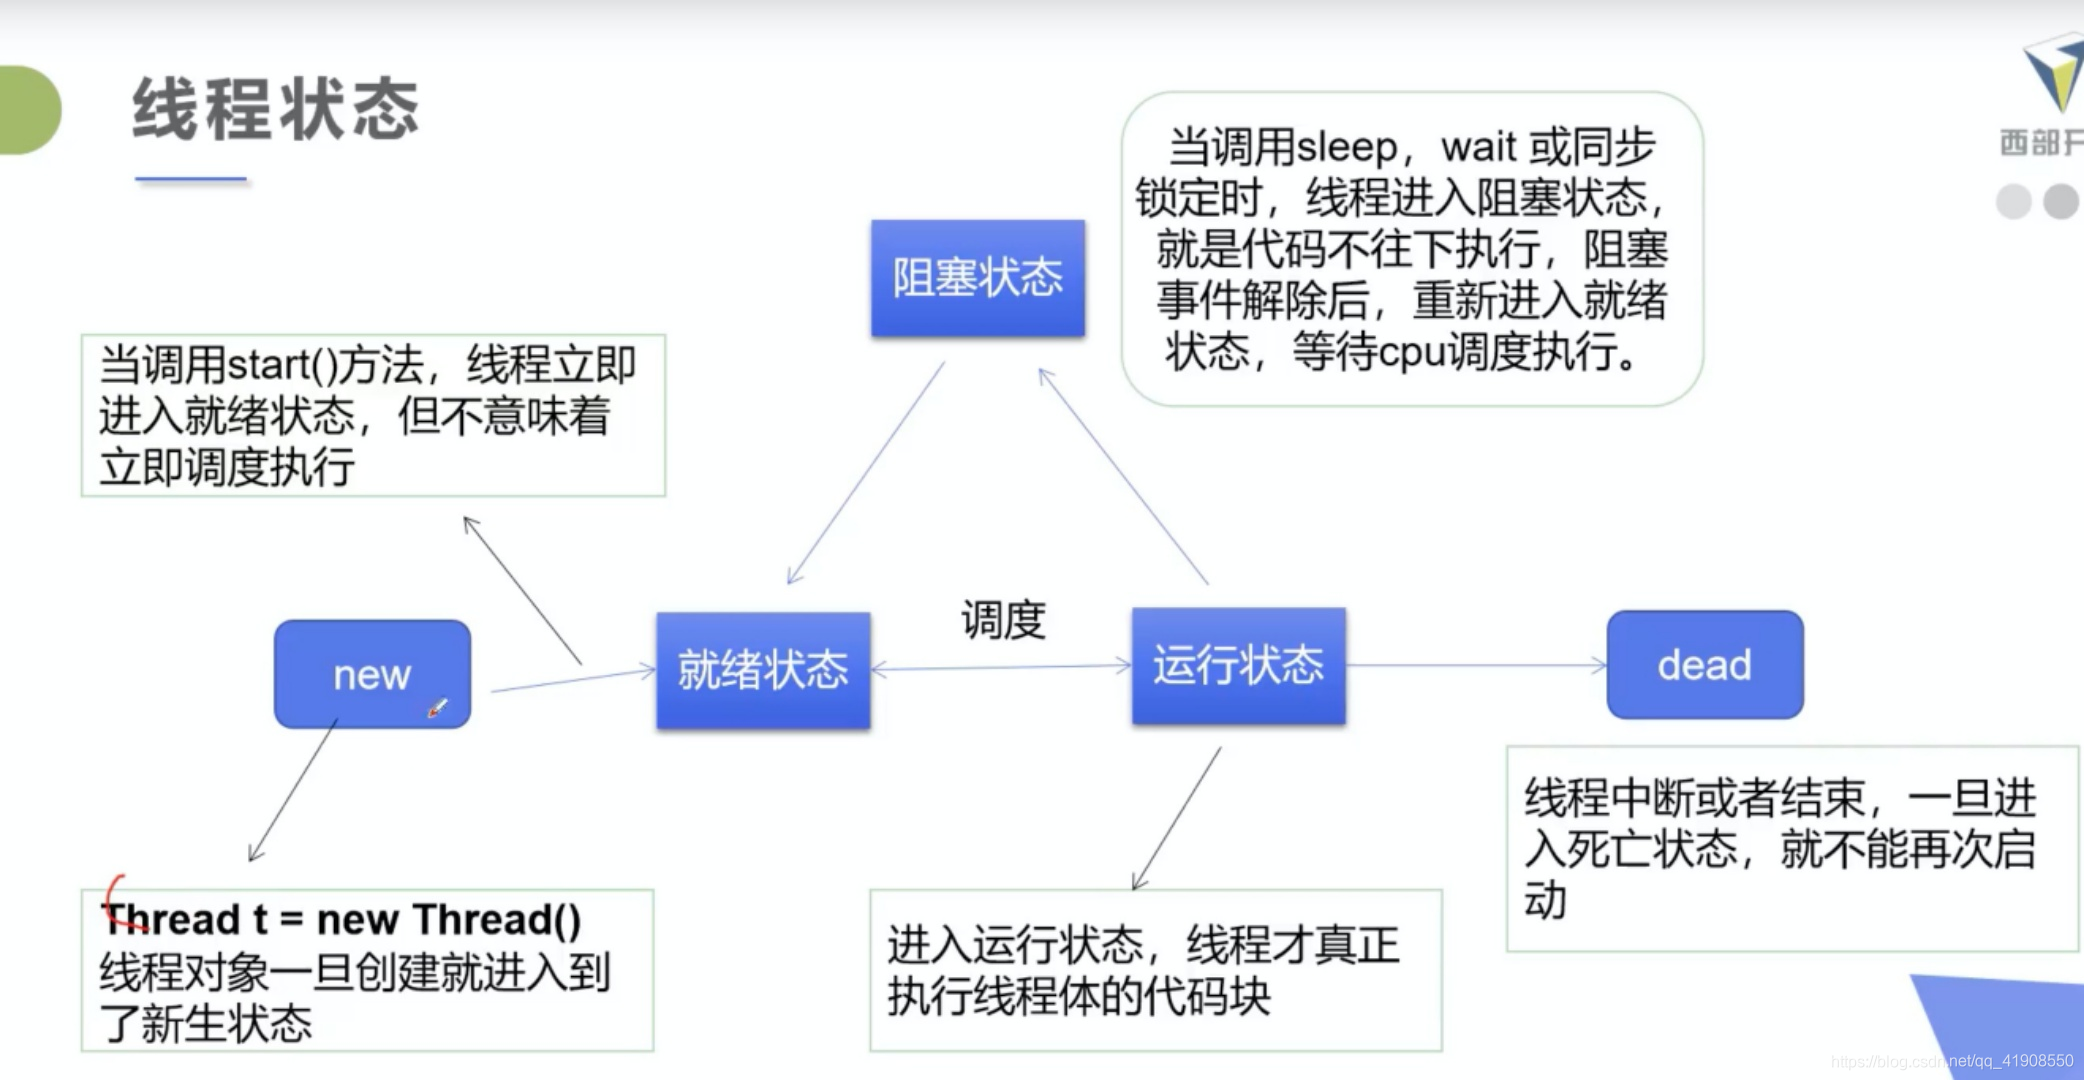
1. 终止线程
thread提供了stop/destory方法可以使线程停止运行。但是是强制停止,不建议使用。
我们可以通过外部变量状态的方式,让线程自己终止,在实际的业务场景中,如果需要在符合某一业务判断时终止执行线程,可以通过全局变量或者局部变量或者对象状态来实现。
public class TestThread3 {
    public static void main(String[] args) {
        Thread1 thread1 = new Thread1();
        new Thread(thread1).start();
        for (int i = 0; i < 200; i++) {
            System.out.println(i);
            //当符合某一业务判断时,终止线程的执行
            if(i == 150) {
                thread1.stop(false);
            }
        }
    }
}
class Thread1 implements Runnable{
    private boolean flag = true;
    @Override
    public void run() {
        while (flag) {
            System.out.println("run.........");
        }
    }
    //通过变更flag的值,让线程中的方法停止运行
    public void stop(boolean flags) {
        this.flag = flags;
    }
}
2. sleep、yield、join、status
sleep: 线程休眠,是线程进入阻塞状态,并且不会释放锁。可以倒计时,模拟延迟等操作。
yield: 线程礼让,当前线程被CPU调动进入运行状态,调用yield方法后,该线程退出CPU资源,返回就绪状态重新接受CPU调度,不属于 阻塞。当再次被调度时,则会继续运行(不会重新开始运行),Thead.yield(),在线程中调用该方法即可实现。
join : 线程插队,某个线程调用join方法时,可以让该线程优先执行,并对当前线程造成阻塞,需等join线程执行完成后,再执行当前线程
public class TestThread3 {
    public static void main(String[] args) throws InterruptedException {
        Thread1 thread1 = new Thread1();
        Thread thread = new Thread(thread1);
        thread.start();
        for (int i = 0; i < 200; i++) {
            if(i == 20) {
                //当前线程被thread对象线程抢占插队,进入阻塞状态,并等待执行完成
                thread.join();
            }
            System.out.println("this is main " + i);
        }
    }
}
class Thread1 implements Runnable{
    @Override
    public void run() {
        for (int i = 0; i < 200; i++) {
            System.out.println("this is VIP thread" + i);
        }
    }
}status: 查询线程的状态,线程只能被运行一次,终止后不可重复启动。
NEW(创建)、RUNNABLE(运行中)、BLOCKED(锁定中)、WAITING/TIMED_WAITING(阻塞中)、TERMINATED(终止)
3. 线程的优先级priority
有限制的设置并不一定就会按照优先级大小执行,只是分配给该线程抢占CPU的几率变大了,范围在 0<=priority<=10之间
public class TestThread3 {
    public static void main(String[] args) throws InterruptedException {
        Thread1 thread1 = new Thread1();
        Thread t1 = new Thread(thread1);
        Thread t2 = new Thread(thread1);
        t1.setPriority(1);
        t1.start();
        t2.setPriority(10);
        t2.start();
    }
}
class Thread1 implements Runnable{
    @Override
    public void run() {
        System.out.println(Thread.currentThread().getName() + "——————" + Thread.currentThread().getPriority());
    }
}
4. 守护线程 daemon
所有默认创建的线程都是用户线程,虚拟机会等到所有用户线程终止后停止。
守护线程是用来守护用户线程正常执行的,虚拟机无需等待守护线程结束。也就是说,守护线程是辅助的作用。
public class TestThread3 {
    public static void main(String[] args) throws InterruptedException {
        Thread t1 = new Thread(() -> {
            for (int i = 0; i < 200; i++) {
                System.out.println("我是用户线程" + i);
            }
        });
        Thread t2 = new Thread(() -> {
            while (true) {
                System.out.println("我是守护线程");
            }
        });
        t1.start();
        //默认创建的项目都是false,非守护线程即用户线程
        t2.setDaemon(true);
        t2.start();
    }
}
三. 线程同步
当多线程同时操作一个对象时,就会存在数据并发不安全的情况。此时线程就需要队列+锁完成保证数据的安全性。
线程是执行在自己的内存区间内的,当有多线程同时操作一个对象时,该对象都会以同一个值进入到对应线程的内存空间去执行,从而导致数据紊乱。
测试list是否是线程安全:
public class TestThread3 {
    public static void main(String[] args) throws InterruptedException {
//        List<String> list = new ArrayList<String>();
        //通过collections的方法可以让list转换为线程安全的,但是会消耗性能
        List<String> list = Collections.synchronizedList(new ArrayList<String>());
        for (int i = 0; i < 10000; i++) {
            new Thread(() -> list.add(Thread.currentThread().getName())).start();
        }
        Thread.sleep(3000);
        System.out.println(String.format("当前list的大小为%s", list.size()));
    }
}
1. synchronized同步锁
synchronized同步锁控制对象时,每个对象都有一把锁,每个加了该修饰的方法必须获得该对象的锁才能获取到该对象执行,否则线程就会阻塞,方法一旦执行,就独占锁,其他县城就会等待锁的释放,从而再独占该锁继续操作。保证了对象在同一时刻只能被一个方法操作。
但是会造成大量阻塞,影响效率。
public class TestSyn {
    private Integer num;
    //添加synchronized,使获取对象的方法加同步锁,每次只能有一个线程获取到该对象,默认是this(TestSyn)对象。
    public synchronized Integer getNum() {
        return num;
    }
    //添加同步锁代码块,执行方法前,针对某个对象进行加锁,然后执行方法,效果原理与同步锁方法一致。
    public void setNum(Integer num) {
        synchronized (num){
            this.num = num;
        }
    }
}
//list例子用synchronized实现同步锁线程安全
public static void main(String[] args) throws InterruptedException {
        List<String> list = new ArrayList<String>();
        for (int i = 0; i < 10000; i++) {
            new Thread(() -> {
                synchronized (list) {
                    list.add(Thread.currentThread().getName());
                }
            }).start();
        }
        Thread.sleep(3000);
        System.out.println(String.format("当前list的大小为%s", list.size()));
    }
2. 死锁
线程之间相互持有对方想要的锁,两个线程互相等待对方释放相应的资源锁,从而形成了僵持,导致程序死锁。
不要同时占用多个对象的同步锁,可避免大多数的死锁产生
        A a = new A();
        A b = new A();
        Thread a1 = new Thread(() -> {
            synchronized (a) {
                System.out.println("我获取到了a");
                Thread.sleep(1000);
                synchronized (b){
                    System.out.println("我获取到了b");
                }
            }
        });
        Thread b1 = new Thread(() -> {
            synchronized (b) {
                b.getName();
                System.out.println("我获取到了b");
                Thread.sleep(1000);
                synchronized (a) {
                    System.out.println("我获取到了a");
                }
            }
        });
        a1.start();
        b1.start();
3. LOCK
可重入性锁,是concurrent包GUI中的LOCK同步锁,是显式的指定要锁的代码。
    public static void main(String[] args) throws Exception{
        A a = new A();
        new Thread(() -> {
            ReentrantLock lock = new ReentrantLock();
            try {
                lock.lock();
                a.setName("123");
            }catch (Exception e) {
                e.printStackTrace();
            }finally {
                lock.unlock();
            }
        }).start();
    }
4. synchronized与lock的区别
---以下截图来自网络
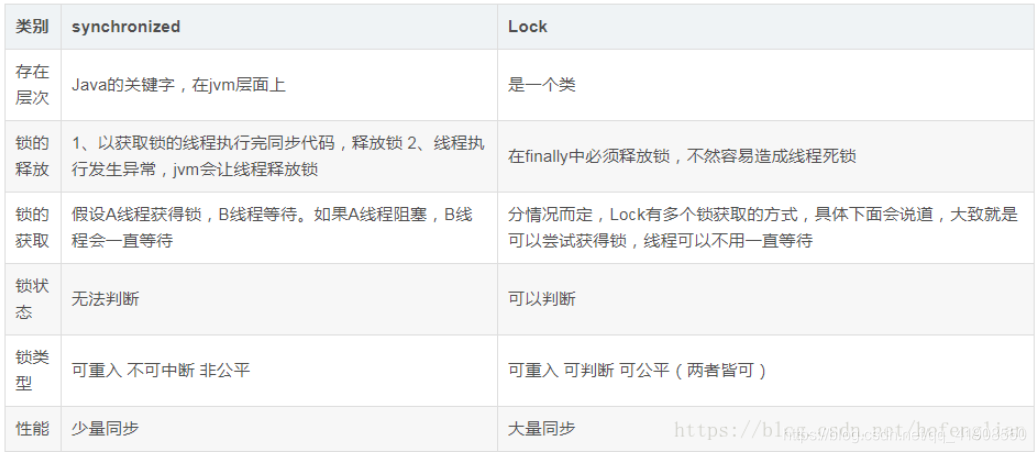
①. synchronized是java的关键字,是基于JVM层面的,lock是一个类,在synchronized中,程序执行完成或者抛出异常后,持有的锁会自动释放,避免死锁。但是LOCK必须要手动执行UNLOCK才会释放锁。所以一般lock使用时,在finally中执行unlock方法。
②synchronized适用于并发量小,lock适用于并发量大。
synchronized与lock的区别:参考博客:https://blog.youkuaiyun.com/hefenglian/article/details/82383569
5. 线程之间的协作通信
wait与notify
生产者生产数据,将数据存放至缓冲区,消费者从缓冲区获取数据,完成线程间的通讯。
当线程不满足业务逻辑条件时,可以调用wait方法,使当前线程进去等待状态,当其他线程满足等待现成的条件后,调用notify方法,唤醒当前等待的线程。从而完成协作。
流行的方法学: 管程法、信号灯法
四. 线程池
提前创建好多个线程,放入线程池,使用时直接获取。使用完成后,再放回线程池。重复利用。避免了频繁的创建销毁。
便于线程的管理。
创建:
线程池通过创建ExecutorService服务,来调用Executors类中的不同的静态方法,返回不同类型的线程池,完成线程池的创建。
ExecutorService ser = Executors.newFixedThreadPool(2);E1:执行runnable线程池
ser.execute();E2:创建callable线程池
ser.submit(callable);shutDown:关联线程池连接
springboot中创建线程池的封装子类方法(实现原理还是基于executors实现的),注册一个线程池bean,使用时直接注入,并调用executor.execute调用runnable线程
@Bean(name = "asyncService")
    public Executor asyncServiceExecutor() {
        GwsLogger.info("异步 线程池启动成功!asyncServiceExecutor is start");
        ThreadPoolTaskExecutor executor = new ThreadPoolTaskExecutor();
        //配置核心线程数
        executor.setCorePoolSize(5);
        //配置最大线程数
        executor.setMaxPoolSize(20);
        //配置队列大小
        executor.setQueueCapacity(99999);
        //配置线程池中的线程的名称前缀
        executor.setThreadNamePrefix("async-service-");

        // rejection-policy:当pool已经达到max size的时候,如何处理新任务
        // CALLER_RUNS:不在新线程中执行任务,而是有调用者所在的线程来执行
        executor.setRejectedExecutionHandler(new ThreadPoolExecutor.CallerRunsPolicy());
        //执行初始化
        executor.initialize();
        return executor;
    }


 被折叠的 条评论
为什么被折叠?
被折叠的 条评论
为什么被折叠?
 到【灌水乐园】发言


