


镜像
#中科大镜像源安装
conda config --add channels https://mirrors.ustc.edu.cn/anaconda/pkgs/main/
conda config --add channels https://mirrors.ustc.edu.cn/anaconda/pkgs/free/
conda config --add channels https://mirrors.ustc.edu.cn/anaconda/cloud/conda-forge/
conda config --add channels https://mirrors.ustc.edu.cn/anaconda/cloud/msys2/
conda config --add channels https://mirrors.ustc.edu.cn/anaconda/cloud/bioconda/
conda config --add channels https://mirrors.ustc.edu.cn/anaconda/cloud/menpo/
conda config --set show_channel_urls yes
#清华镜像源安装
conda config --add channels https://mirrors.tuna.tsinghua.edu.cn/anaconda/pkgs/free/
conda config --add channels https://mirrors.tuna.tsinghua.edu.cn/anaconda/pkgs/main/
conda config --set show_channel_urls yes
查看当前镜像源
conda config --show
移除当前镜像源
conda config --remove-key channels
pip清华镜像源:
pip config set globa.index-url https://mirrors.aliyun.com/pypi/simple
CMD指令
查所有配置:pip list
进环境:conda activate 环境名
查看当前环境配置:conda list
查看anaconda所有环境:conda info --envs
查cuda版本:nvcc --version
安装库:pip install 库名
卸载库:pip uninstall 库名
创建环境并安装python:conda create -n 环境名 python=版本号
激活环境:conda activate 环境名
退出当前环境
conda deactivate
查看conda版本:conda --version
查看python版本:进环境python -V
指定位置安装:pip install 包名 --target=路径名
退出python:exit()
进路径:cd /d 路径
查路径文件:dir
终止p处理操作:Ctrl+C
安装失败重新安装,或者换镜像
python直接编译:ipython
pthon编译:Ctrl+r替换
查看能安装tensorflow的所有版本:anaconda search -t conda tensorflow
anaconda show 版本名称
####
可忽略
安装:pip install torch==1.2.0+cu92 torchvision==0.4.0+cu92 -f https://download.pytorch.org/whl/torch_stable.html
安装spacy最新版本:conda install -c conda-forge spacy
安装:pip install 安装库 -i http://pypi.douban.com/simple --trusted-host pypi.douban.com安装:conda install pytorch==1.2.0 torchvision==0.4.0 cudatoolkit=9.2 -c pytorch
####
安装cuda各个版本
查看cuda版本:nvcc -V
网址:CUDA Toolkit Archive | NVIDIA Developer https://developer.nvidia.com/cuda-toolkit-archive
cuda10.1安装路径:D:\Anaconda3\cuda10.1
验证当前cuda是否安装成功
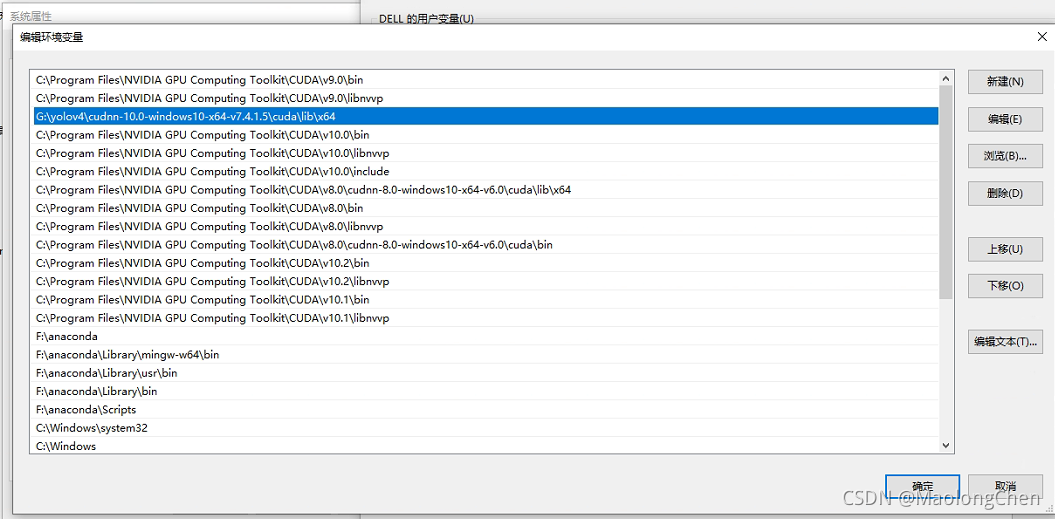
安装cudnn(看好对应版本的cuda还有系统)
各个版本地址:cuDNN Archive | NVIDIA Developerhttps://developer.nvidia.com/rdp/cudnn-archive#a-collapse712-9
参考下图v10.0的安装,四个统一置顶
安装python
python个版本安装地址https://www.python.org/downloads/windows/https://www.python.org/downloads/windows/

cd/d python
pip install setup.py
或者安装Python:conda install Python==版本号
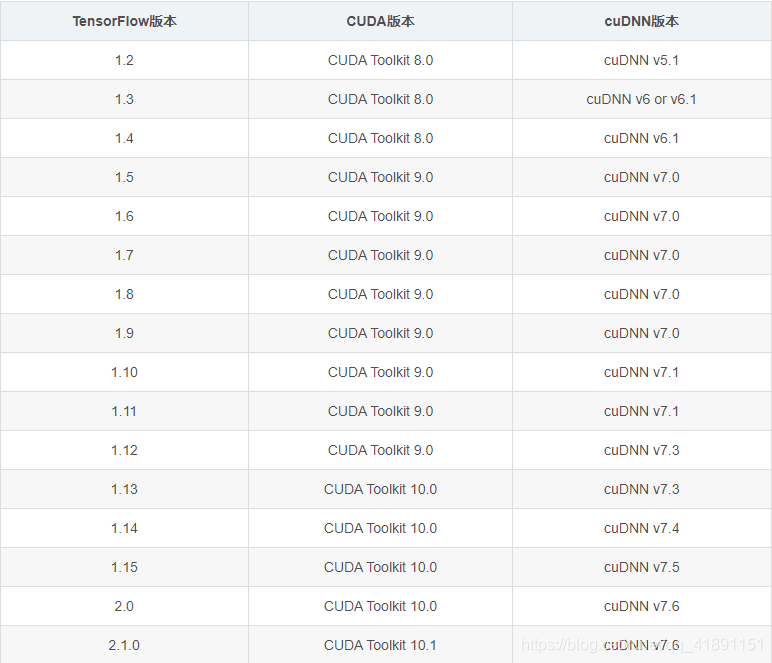
安装TensorFlow
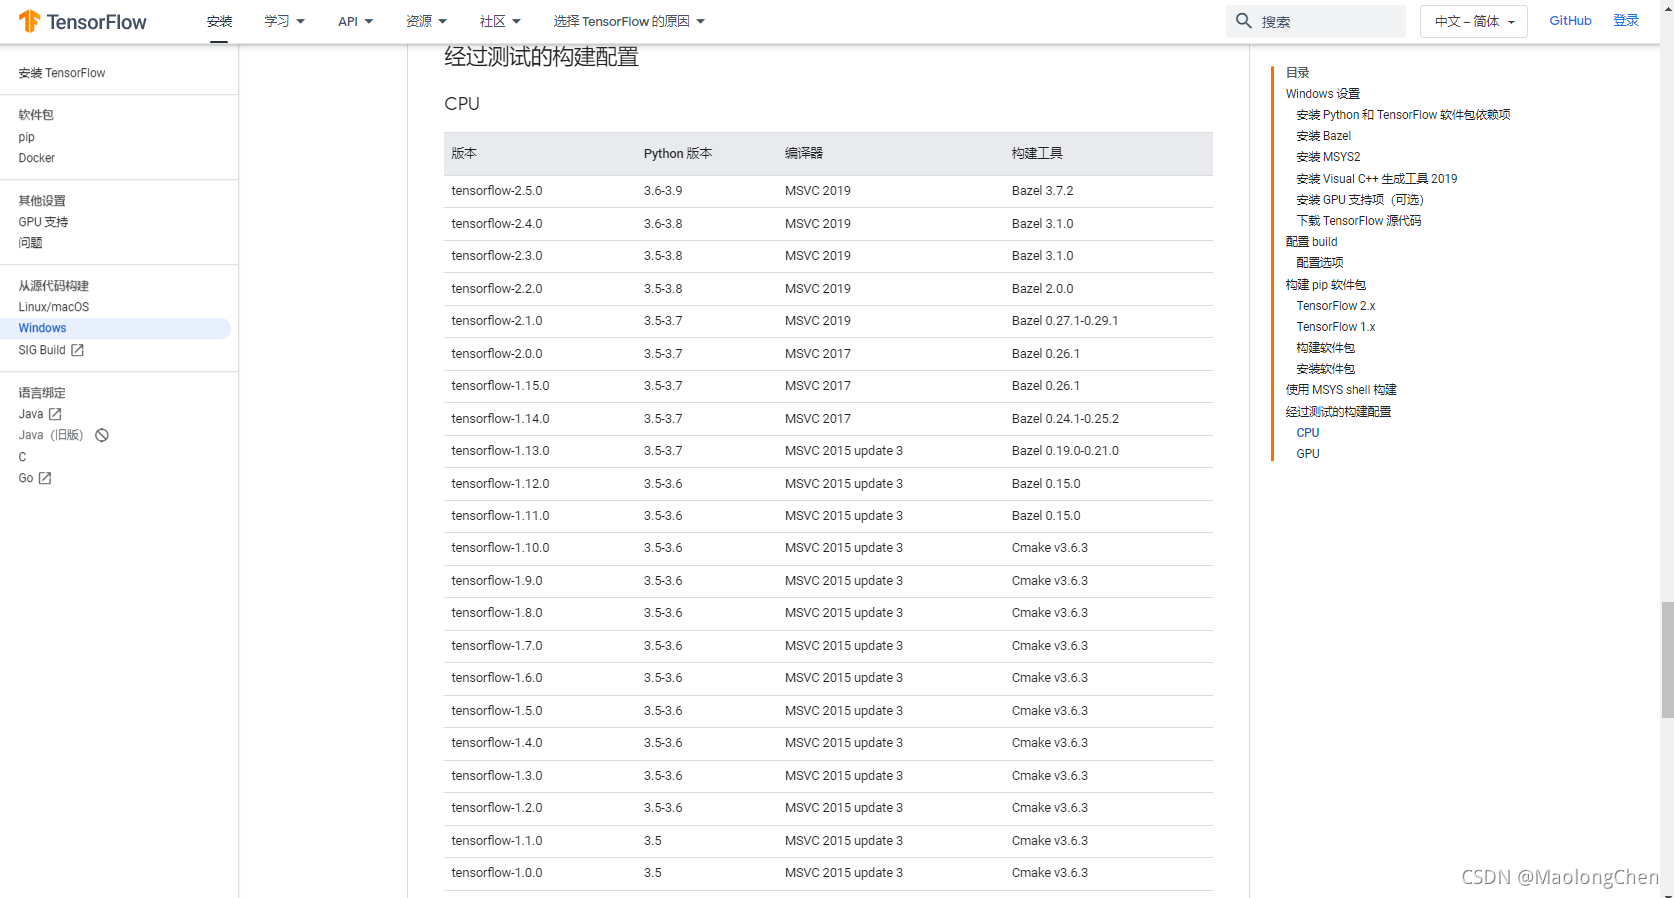
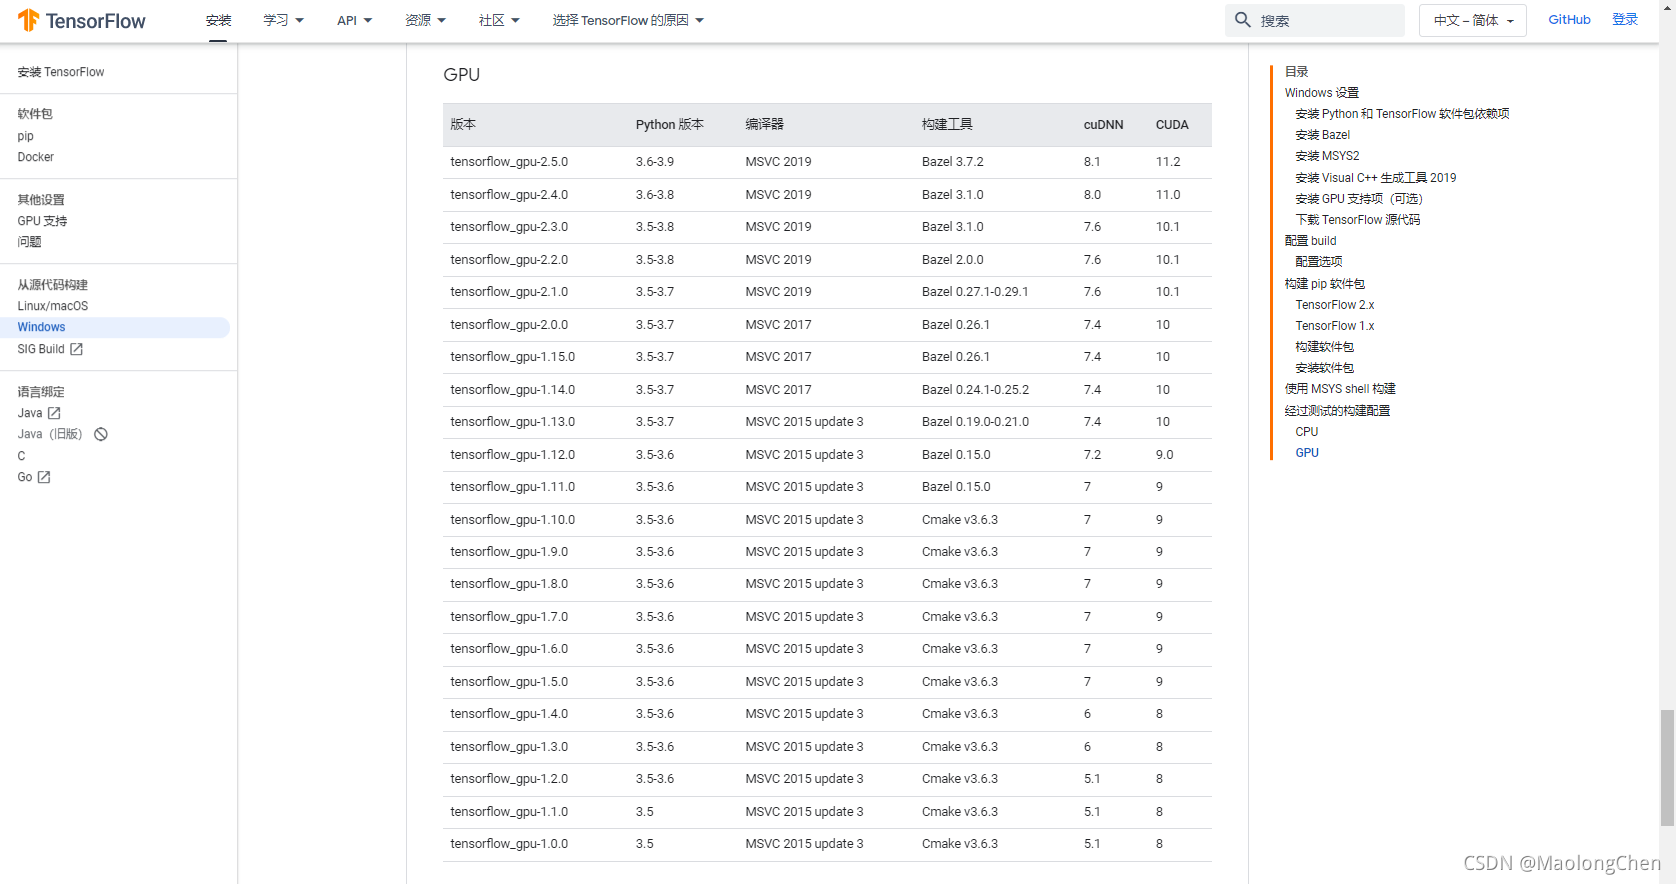
查看tensorflow对应cuda、cudnn、python版本:https://www.tensorflow.org/install/source#gpu
tenforflow安装参考博客:TensorFlow2.1.0安装教程_YFCodeDream的博客-优快云博客_tensorflow2.1https://blog.youkuaiyun.com/weixin_44170512/article/details/103990592
安装tf2.0:pip install tensorflow==2.0.0 -i https://pypi.tuna.tsinghua.edu.cn/simple
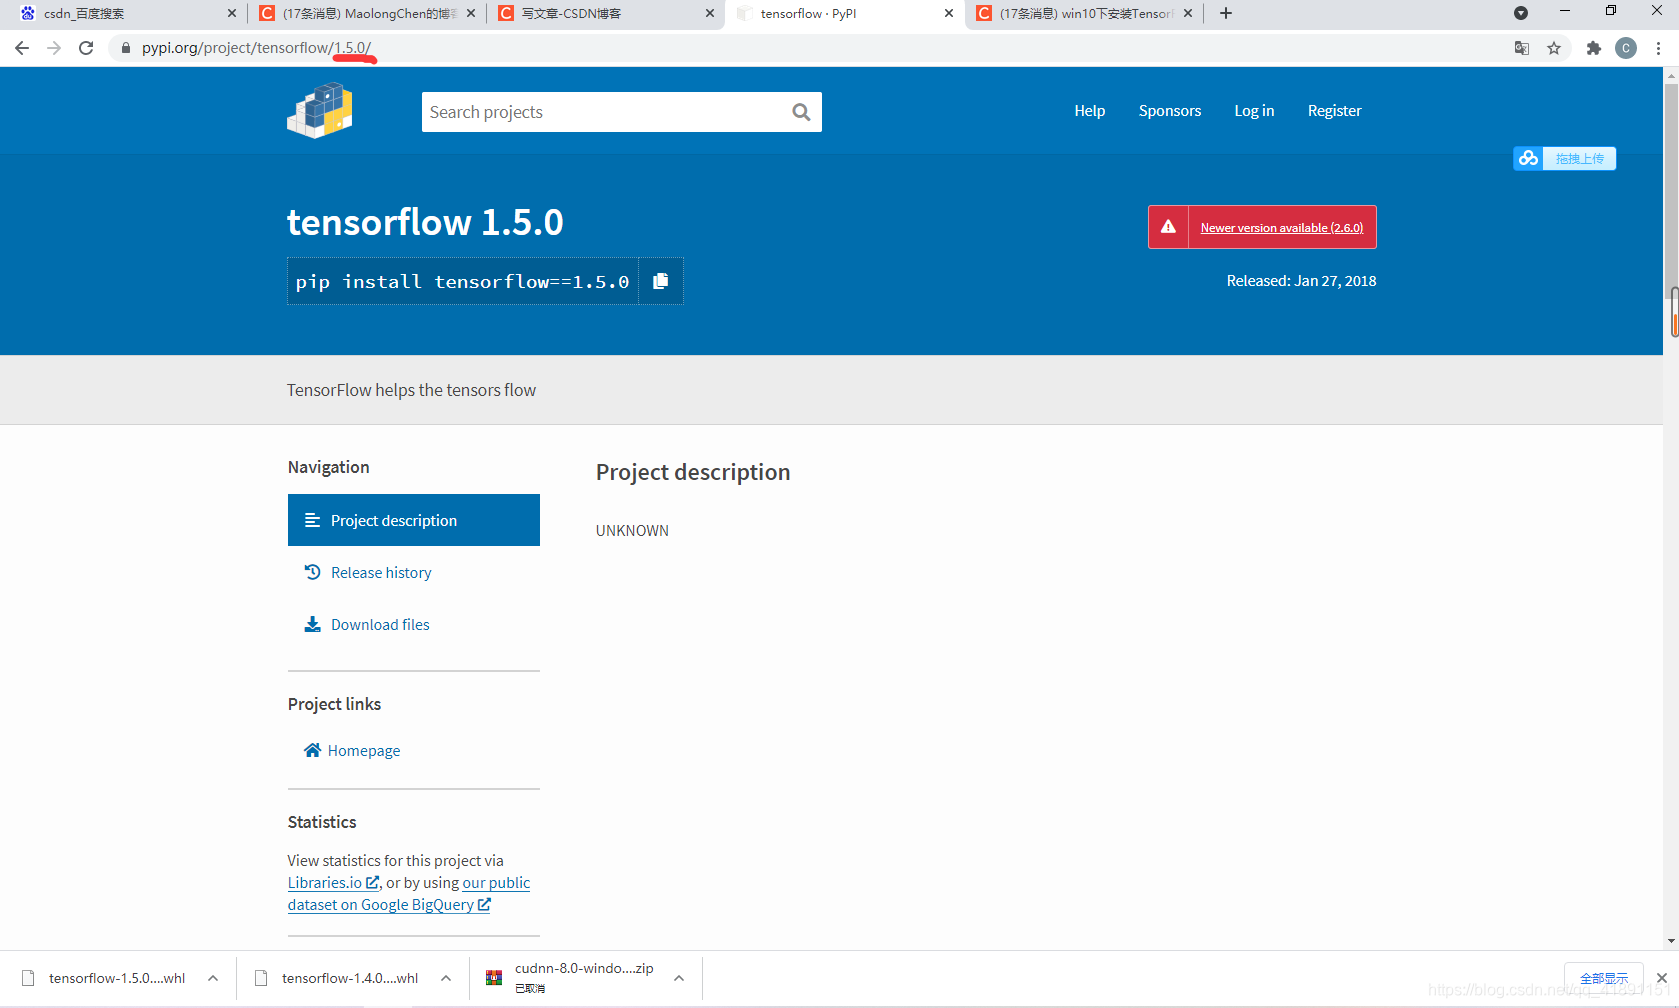
tensorflow各版本安装包网址:1、tensorflow · PyPIhttps://pypi.org/project/tensorflow/1.5.0/
2、将网址中1.5.0改成你需要更换的版本型号打开网址即可
3、下载该安装包复制到环境文件夹中用pip安装或者激活环境pip install 轮子路径
tensorflow+python+cuda+cudnn(cpu+gpu)
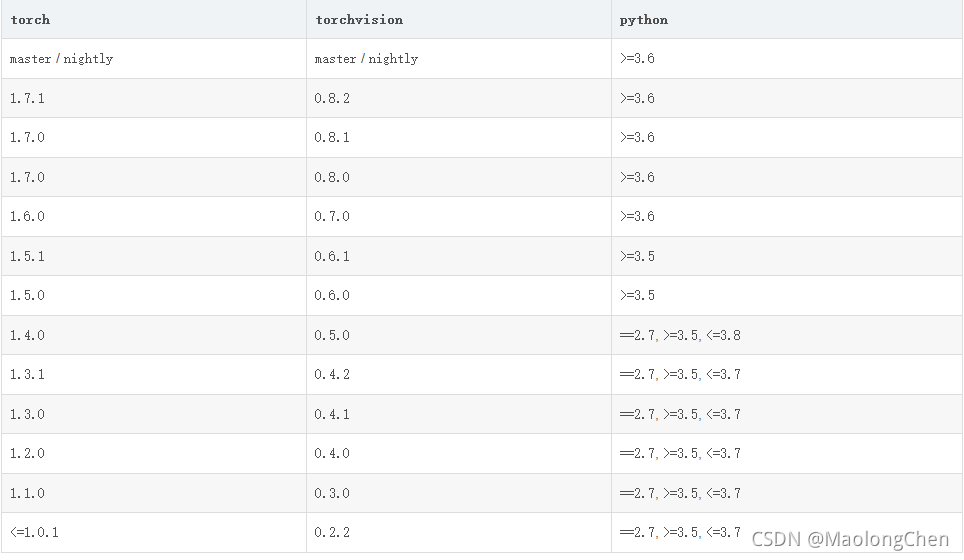
安装pytorch
pytorch以前版本安装地址:https://download.pytorch.org/whl/torch_stable.html
目前,Windows 上的 PyTorch 仅支持 Python 3.x;不支持 Python 2.x。
pytorch+torchvision+python+cuda对应版本
官网对应版本cuda+cudnn
Previous PyTorch Versions | PyTorchhttps://pytorch.org/get-started/previous-versions/

jupyter
1.在 conda 环境中运行 Jupyter 服务器和内核
conda create -n my-conda-env   # creates new virtual env
conda activate my-conda-env    # activate environment in terminal
conda install jupyter     # install jupyter + notebook
jupyter notebook       # start server + kernel
2 引入一个环境
方法1
conda activate my-conda-env
conda install nb_conda
ipython kernel install --user --name=my-conda-env
jupyter notebook
启动jupyter notebook后,点击右上角的下拉菜单New,可以看见notebook的选项增加了
方法2
conda create -n my-conda-env    # creates new virtual env
conda activate my-conda-env     # activate environment in terminal
conda install ipykernel      # install Python kernel in new conda env
ipython kernel install --user --name=my-conda-env-kernel  # configure Jupyter to use Python kernel
jupyter notebook      # run jupyter from system
3 使用 nb_conda_kernels 添加所有环境
conda activate my-conda-env    # this is the environment for your project and code
conda install ipykernel
conda deactivate

conda activate base      # could be also some other environment
conda install nb_conda_kernels
jupyter notebook-
可以下面命令删除 Kernel
jupyter kernelspec remove stm32 -
jupyter中运行pip install [moduleName] 命令时候需要在前面加一个‘!’!pip install imblearn


 927
927

 被折叠的 条评论
为什么被折叠?
被折叠的 条评论
为什么被折叠?
 到【灌水乐园】发言


