


 这篇博客详细介绍了Android Studio中的五大布局——线性布局、相对布局、帧布局、绝对布局和表格布局。线性布局支持水平和垂直排列,相对布局允许视图相对于父布局或兄弟视图定位,帧布局允许子视图叠加,绝对布局通过坐标定位已过时,表格布局则采用行列形式管理控件。
今天我们来使用一下
安卓五大布局
安卓五大布局分别是 线性布局 相对布局 绝对布局 表格布局 帧布局
1.LinearLayout 线性布局:
属性1:水平或者垂直排列
属性2:子视图不可能重叠
线性布局有一个特有的方法oritation来设置它的方向
oritation 有两种方向 垂直方向vertical和水平方向horizontal
还有一个来分配剩余空间的方法 weight
下面我们来使用一下
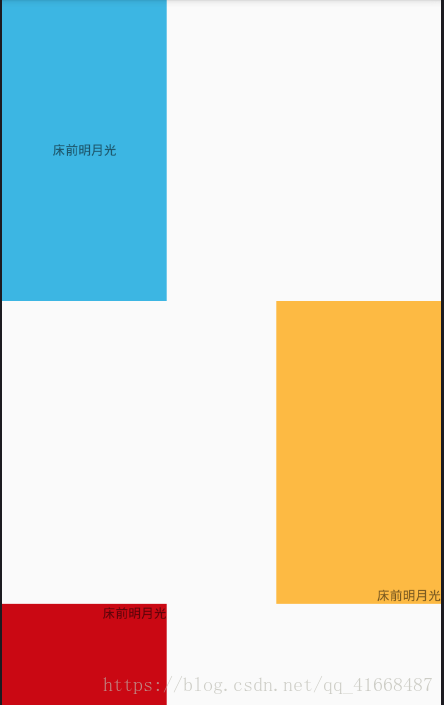
<?xml version="1.0" encoding="utf-8"?>
<LinearLayout xmlns:android="http://schemas.android.com/apk/res/android"
    xmlns:tools="http://schemas.android.com/tools"
    android:id="@+id/activity_main"
    android:layout_width="match_parent"
    android:orientation="vertical"
    android:layout_height="match_parent"
    tools:context="com.example.day1.MainActivity">

    <TextView
        android:layout_width="180dp"
        android:layout_height="0dp"
        android:background="#3CB6E3"
        android:text="床前明月光"
        android:gravity="center"
        android:layout_weight="3"/>
    <TextView
        android:layout_width="180dp"
        android:layout_height="0dp"
        android:text="床前明月光"
        android:background="#FDBA43"
        android:gravity="right|bottom"
        android:layout_gravity="right"
        android:layout_weight="3"/>
    <TextView
        android:layout_width="180dp"
        android:layout_height="0dp"
        android:text="床前明月光"
        android:background="#CA0813"
        android:gravity="right|top"
        android:layout_weight="1"/>
</LinearLayout>
案例效果:
同时我们还要会熟练的运用线性布局的嵌套:
<?xml version="1.0" encoding="utf-8"?>
<LinearLayout xmlns:android="http://schemas.android.com/apk/res/android"
    xmlns:tools="http://schemas.android.com/tools"
    android:id="@+id/activity_main2"
    android:layout_width="match_parent"
    android:layout_height="match_parent"
    android:orientation="vertical"
    tools:context="com.example.day1.Main2Activity">
    <LinearLayout
        android:layout_width="match_parent"
        android:layout_height="0dp"
        android:layout_weight="1">
        <Button
            android:text="点我"
            android:layout_width="0dp"
            android:layout_height="wrap_content"
            android:layout_weight="1"/>
        <Button
            android:text="点我"
            android:layout_width="0dp"
            android:layout_height="wrap_content"
            android:layout_weight="1"/>
        <Button
            android:text="点我"
            android:layout_width="0dp"
            android:layout_height="wrap_content"
            android:layout_weight="1"/>
        <Button
            android:text="点我"
            android:layout_width="0dp"
            android:layout_height="wrap_content"
            android:layout_weight="1"/>
    </LinearLayout>
    <TextView
        android:background="#CA0813"
        android:layout_width="match_parent"
        android:layout_height="0dp"
        android:text="布局的嵌套使用"
        android:textSize="20sp"
        android:gravity="center"
        android:layout_weight="10"/>
    <LinearLayout

        android:layout_width="match_parent"
        android:layout_height="0dp"
        android:layout_weight="1">
        <Button
            android:text="点我"
            android:layout_width="0dp"
            android:layout_height="wrap_content"
            android:layout_weight="1"/>
        <Button
            android:text="点我"
            android:layout_width="0dp"
            android:layout_height="wrap_content"
            android:layout_weight="1"/>
        <Button
            android:text="点我"
            android:layout_width="0dp"
            android:layout_height="wrap_content"
            android:layout_weight="1"/>
    </LinearLayout>
</LinearLayout>
案例效果:

2.RelativeLayout 相对布局:
当它的参照物是父布局的时候 有以下方法可以使用
1.android:layout_alignParentLeft=true 相对于父布局在父布局的左侧对齐
2.android:layout_alignParentTop=true相对于父布局 在父布局的上侧对齐
3.android:layout_alignParentButtom=true相对于父布局 在父布局的下侧对齐
4.android:layout_alignParentRight=true相对于父布局 在父布局的右侧对齐
5.android:layout_centerInParent=true 相对于父布局居中
6.android:layout_centerVertical=true 相对于父布局垂直居中
7.android:layout_centerHorizontal=true 相对于父布局水平居中
当它的参照物是兄弟控件的时候 可以使用下列方法
1.android:layout_alignLeft=“@id/button” 参数是参照物视图的id 作用于 参照物视图左边对齐
2android:layout_alignRight=“@id/button” 参数是参照物视图的id 作用于 参照物视图右边对齐
2.android:layout_alignTop=“@id/button” 参数是参照物视图的id 作用于 参照物视图上边对齐
3.android:layout_alignButtom=“@id/button” 参数是参照物视图的id 作用于 参照物视图下边对齐
4.android:layout_toLeftof=“@id/button” 在参照物视图的 左侧
5.android:layout_toRightof=“@id/button” 在参照物视图的右侧
6.android:layout_above=“@id/button” 在参照物视图的上侧
7.android:layout_below=“@id/button”在参照物视图的下侧
我们来简单使用一下它的方法
<?xml version="1.0" encoding="utf-8"?>
<RelativeLayout xmlns:android="http://schemas.android.com/apk/res/android"
    xmlns:tools="http://schemas.android.com/tools"
    android:id="@+id/activity_main"
    android:layout_width="match_parent"
    android:layout_height="match_parent"
    tools:context="com.example.myapplication.MainActivity">

   <Button
       android:id="@+id/btn1"
       android:layout_centerInParent="true"
       android:text="居中"
       android:layout_width="wrap_content"
       android:layout_height="wrap_content" />
    <Button
        android:layout_toLeftOf="@id/btn1"
        android:layout_alignBottom="@id/btn1"
        android:text="左侧"
        android:layout_width="wrap_content"
        android:layout_height="wrap_content" />
    <Button
        android:layout_toRightOf="@id/btn1"
        android:layout_alignBottom="@id/btn1"
        android:text="右侧"
        android:layout_width="wrap_content"
        android:layout_height="wrap_content" />
    <Button
        android:layout_alignRight="@id/btn1"
        android:layout_above="@id/btn1"
        android:text="上侧"
        android:layout_width="wrap_content"
        android:layout_height="wrap_content" />
    <Button
        android:layout_alignRight="@id/btn1"
        android:layout_below="@id/btn1"
        android:text="下侧"
        android:layout_width="wrap_content"
        android:layout_height="wrap_content" />
</RelativeLayout>
效果图:

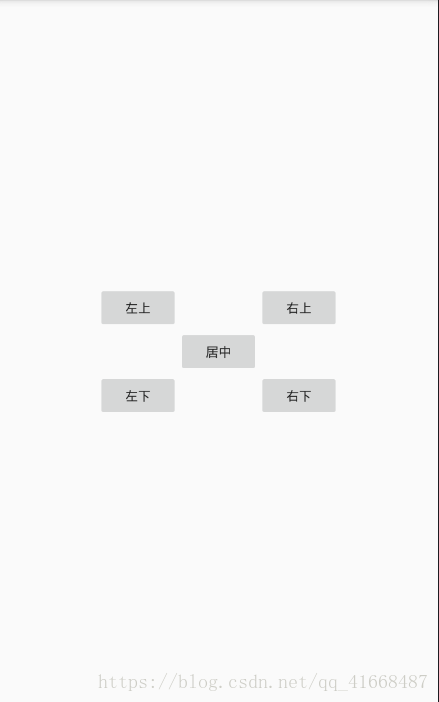
<?xml version="1.0" encoding="utf-8"?>
<RelativeLayout xmlns:android="http://schemas.android.com/apk/res/android"
    xmlns:tools="http://schemas.android.com/tools"
    android:id="@+id/activity_main"
    android:layout_width="match_parent"
    android:layout_height="match_parent"
    tools:context="com.example.myapplication.MainActivity">

   <Button
       android:id="@+id/btn1"
       android:layout_centerInParent="true"
       android:text="居中"
       android:layout_width="wrap_content"
       android:layout_height="wrap_content" />
    <Button
        android:layout_below="@id/btn1"
        android:layout_toLeftOf="@id/btn1"
        android:text="左下"
        android:layout_width="wrap_content"
        android:layout_height="wrap_content" />
    <Button
        android:layout_above="@id/btn1"
        android:layout_toLeftOf="@id/btn1"
        android:text="左上"
        android:layout_width="wrap_content"
        android:layout_height="wrap_content" />
    <Button
        android:layout_below="@id/btn1"
        android:layout_toRightOf="@id/btn1"
        android:text="右下"
        android:layout_width="wrap_content"
        android:layout_height="wrap_content" />
    <Button
        android:layout_above="@id/btn1"
        android:layout_toRightOf="@id/btn1"
        android:text="右上"
        android:layout_width="wrap_content"
        android:layout_height="wrap_content" />
</RelativeLayout>
效果图:
3.FrameLayout 帧布局:
帧布局 布局子视图可以叠加 每一个子视图都是一帧
帧布局的位置摆放只能通过layout_gravity来设置
帧布局是Android系统加载最快的布局
然后我们来简单使用一下帧布局:
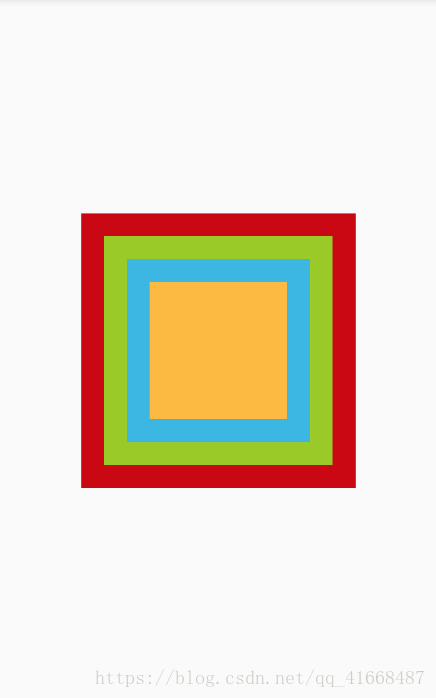
<?xml version="1.0" encoding="utf-8"?>
<FrameLayout xmlns:android="http://schemas.android.com/apk/res/android"
    xmlns:tools="http://schemas.android.com/tools"
    android:id="@+id/activity_main"
    android:layout_width="match_parent"
    android:layout_height="match_parent"
    tools:context="com.example.myapplication.MainActivity">
    <View
        android:layout_width="300dp"
        android:background="#CA0813"
        android:layout_gravity="center"
        android:layout_height="300dp"></View>
    <View
        android:layout_width="250dp"
        android:background="#9ACA27"
        android:layout_gravity="center"
        android:layout_height="250dp"></View>
    <View
        android:layout_width="200dp"
        android:layout_height="200dp"
        android:layout_gravity="center"
        android:background="#3CB6E3"
        ></View>
    <View
        android:layout_width="150dp"
        android:layout_height="150dp"
        android:layout_gravity="center"
        android:background="#FDBA43"></View>
</FrameLayout>
效果图:
4.AbsolutLayout绝对布局:
开发过程中绝布局是不推荐使用的 它是一种已经过时的布局
子视图通过属性android:layout_x android:layout_y 来确定当前视图在屏幕上的位置
x,y就是坐标点 x轴的值和y轴的值
然后我们来简单使用一下
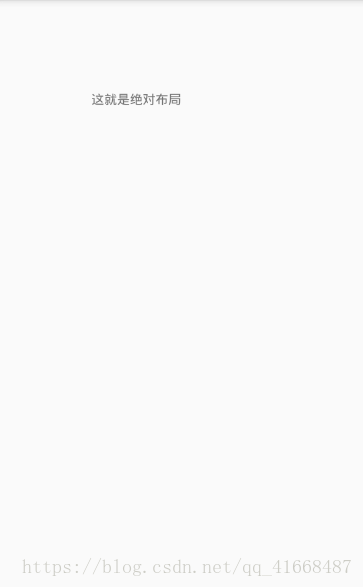
<?xml version="1.0" encoding="utf-8"?>
<AbsoluteLayout xmlns:android="http://schemas.android.com/apk/res/android"
    xmlns:tools="http://schemas.android.com/tools"
    android:id="@+id/activity_main"
    android:layout_width="match_parent"
    android:layout_height="match_parent"
    tools:context="com.example.myapplication.MainActivity">

    <TextView
        android:layout_width="wrap_content"
        android:text="这就是绝对布局"
        android:layout_x="100dp"
        android:layout_y="100dp"
        android:layout_height="wrap_content" />
</AbsoluteLayout>
这就是我们通过layout_X和layout_Y来设置他的位置
效果图:
5.TableLayout 表格布局
表格布局类似行和列的形式对控件进行管理
当为TableRow对象时,可在TableRow下添加子控件,默认情况下,每个子控件占据一行.当为View时,该View将独占一行.
TableLayout的行数由开发人员直接指定,即有多少个TableRow对象(或View控件),就有多少行。等于含有最多子控件的TableRow的列数。如第一TableRow含2个子控件,第二个TableRow含3个,第三个TableRow含4个,那么该TableLayout的列数为4.
她的三个列属性是:
android:stretchColumns 设置可伸展的列。该列可以向行方向伸展,最多可占据一整行。
android:shrinkColumns 设置可收缩的列。当该列子控件的内容太多,已经挤满所在行,那么该子控件的内容将往列方向显示。
android:collapseColumns 设置要隐藏的列
我们来简单使用一下
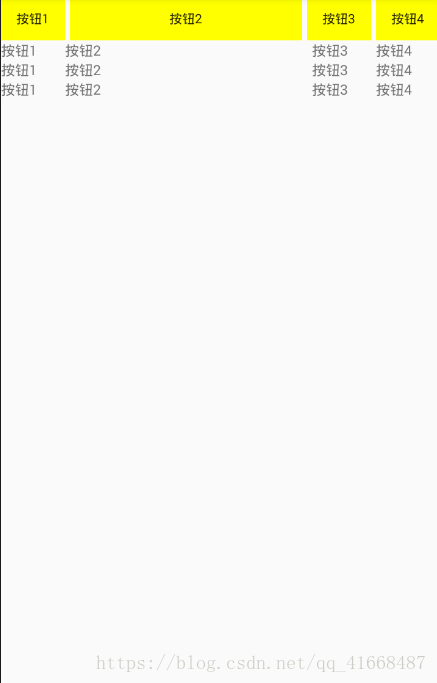
<?xml version="1.0" encoding="utf-8"?>
<LinearLayout
    xmlns:android="http://schemas.android.com/apk/res/android"
    xmlns:tools="http://schemas.android.com/tools"
    android:id="@+id/activity_main"
    android:layout_width="match_parent"
    android:layout_height="match_parent"
    android:orientation="vertical"
    tools:context="com.example.myapplication.MainActivity">


    <TableLayout
        android:stretchColumns="1"
        android:layout_width="wrap_content"
        android:layout_height="wrap_content">
    <TableRow>
        <Button
            android:background="#FFFF00"
            android:layout_width="70dp"
            android:layout_height="wrap_content"
            android:text="按钮1"
            />

        <Button
            android:layout_marginLeft="5dp"
            android:background="#FFFF00"
            android:layout_width="70dp"
            android:layout_height="wrap_content"
            android:text="按钮2"
            />

        <Button
            android:layout_marginLeft="5dp"
            android:background="#FFFF00"
            android:layout_width="70dp"
            android:layout_height="wrap_content"
            android:text="按钮3" />

        <Button
            android:layout_marginLeft="5dp"
            android:background="#FFFF00"
            android:layout_width="70dp"
            android:layout_height="wrap_content"
            android:text="按钮4"
            />

    </TableRow>
    </TableLayout>

    <TableLayout
        android:stretchColumns="1"
        android:layout_width="wrap_content"
        android:layout_height="wrap_content">
        <TableRow>
            <TextView
                android:layout_width="70dp"
                android:layout_height="wrap_content"
                android:text="按钮1"
                android:textSize="15sp"
                />
            <TextView
                android:layout_width="70dp"
                android:layout_height="wrap_content"
                android:text="按钮2"
                android:textSize="15sp"
                />

            <TextView
                android:layout_width="70dp"
                android:layout_height="wrap_content"
                android:text="按钮3"
                android:textSize="15sp"
                android:id="@+id/button" />

            <TextView
                android:layout_width="70dp"
                android:layout_height="wrap_content"
                android:text="按钮4"
                android:textSize="15sp"
                />

        </TableRow>
    </TableLayout>
    <TableLayout
        android:stretchColumns="1"
        android:layout_width="wrap_content"
        android:layout_height="wrap_content">
        <TableRow>
            <TextView
                android:layout_width="70dp"
                android:layout_height="wrap_content"
                android:text="按钮1"
                android:textSize="15sp"
                />

            <TextView
                android:layout_width="70dp"
                android:layout_height="wrap_content"
                android:text="按钮2"
                android:textSize="15sp"
                />

            <TextView
                android:layout_width="70dp"
                android:textSize="15sp"
                android:layout_height="wrap_content"
                android:text="按钮3" />

            <TextView
                android:layout_width="70dp"
                android:textSize="15sp"
                android:layout_height="wrap_content"
                android:text="按钮4"
                />

        </TableRow>
    </TableLayout>
    <TableLayout
        android:stretchColumns="1"
        android:layout_width="wrap_content"
        android:layout_height="wrap_content">
        <TableRow>
            <TextView
                android:textSize="15sp"
                android:layout_width="70dp"
                android:layout_height="wrap_content"
                android:text="按钮1"
                />
            <TextView
                android:textSize="15sp"
                android:layout_width="70dp"
                android:layout_height="wrap_content"
                android:text="按钮2"
                />

            <TextView
                android:textSize="15sp"
                android:layout_width="70dp"
                android:layout_height="wrap_content"
                android:text="按钮3" />

            <TextView
                android:textSize="15sp"
                android:layout_width="70dp"
                android:layout_height="wrap_content"
                android:text="按钮4"
                />

        </TableRow>
    </TableLayout>
</LinearLayout>
效果图:
以上就是五大布局


 2131
2131

 被折叠的 条评论
为什么被折叠?
被折叠的 条评论
为什么被折叠?
 到【灌水乐园】发言


