


一、简介
https://blog.youkuaiyun.com/weiyuefei/article/details/78214182
二、安装
server1:172.25.22.1 管理服务器 managing server (master)
server2:172.25.22.2 数据存储服务器 data servers (chunkservers)
server3:172.25.22.3 数据存储服务器 data servers (chunkservers)
server4:172.25.22.4 元数据日志服务器 Metalogger server(Metalogger)
172.25.22.250 用户端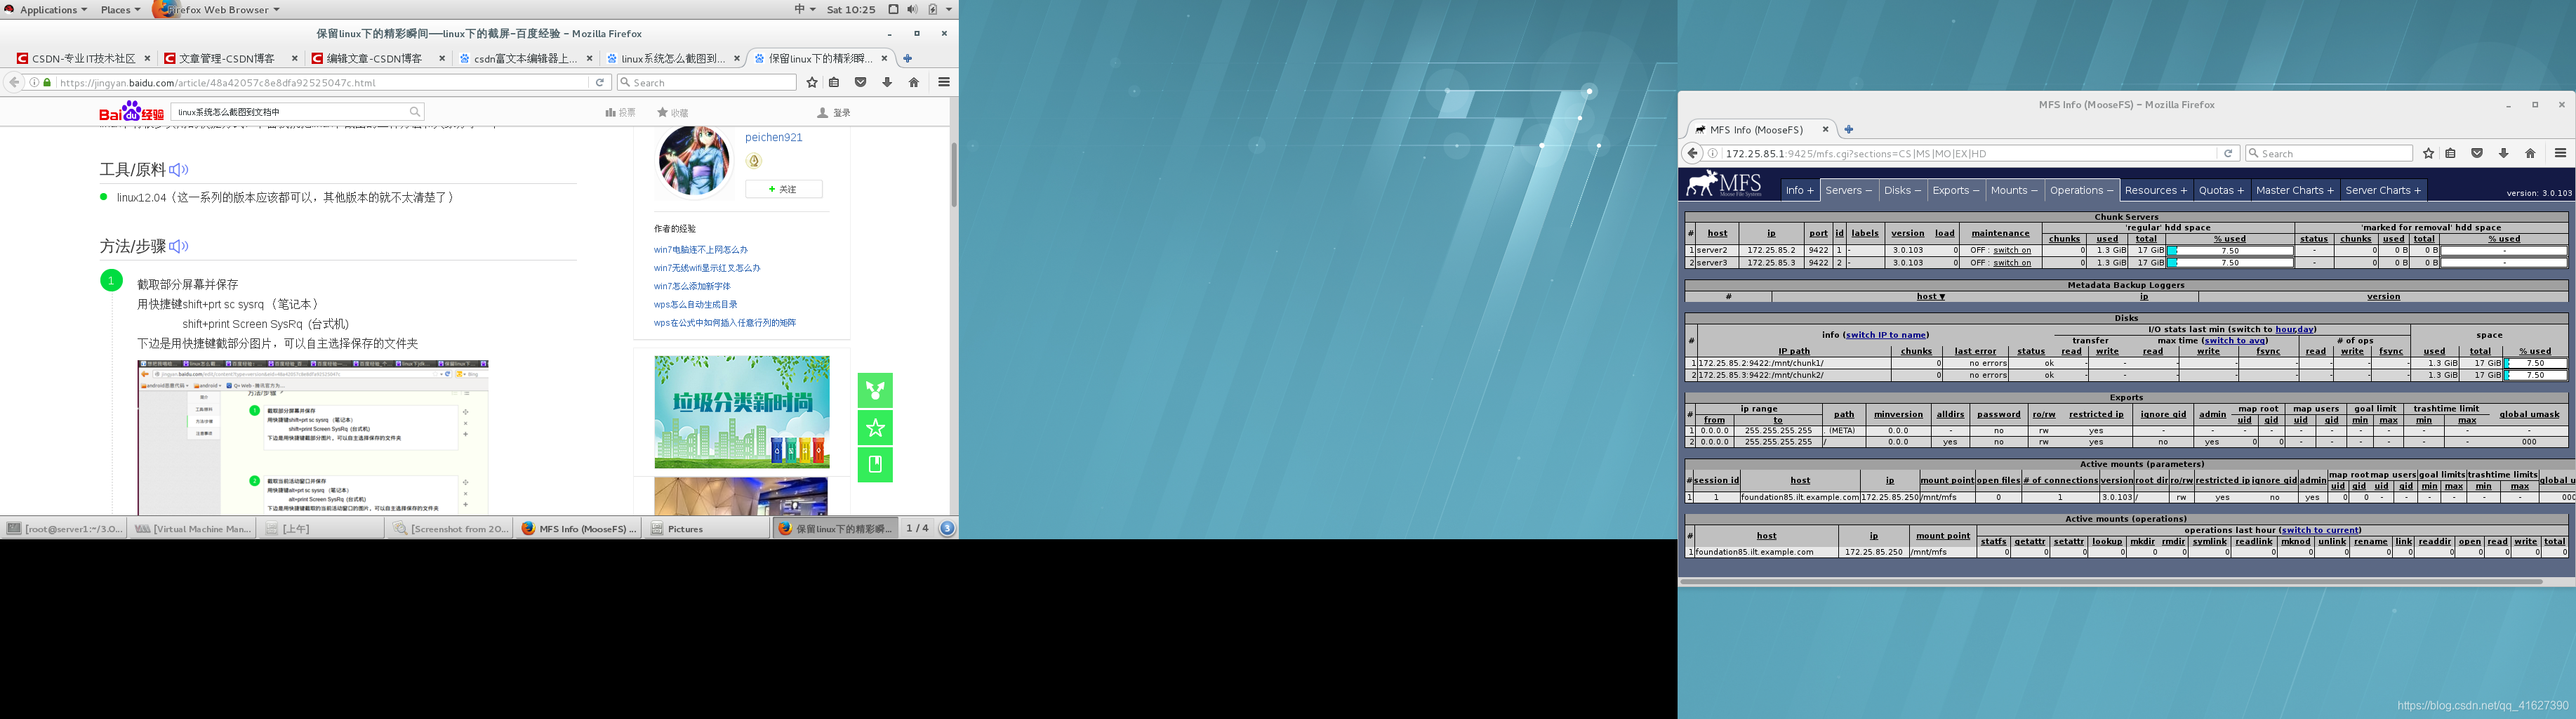
1)server1安装
1、安装
[root@server1 3.0.103]# ls
moosefs-cgi-3.0.103-1.rhsystemd.x86_64.rpm
moosefs-cgiserv-3.0.103-1.rhsystemd.x86_64.rpm
moosefs-chunkserver-3.0.103-1.rhsystemd.x86_64.rpm
moosefs-cli-3.0.103-1.rhsystemd.x86_64.rpm
moosefs-client-3.0.103-1.rhsystemd.x86_64.rpm
moosefs-master-3.0.103-1.rhsystemd.x86_64.rpm
moosefs-metalogger-3.0.103-1.rhsystemd.x86_64.rpm
[root@server1 3.0.103]# yum install -y moosefs-cgi-3.0.103-1.rhsystemd.x86_64.rpm moosefs-cgiserv-3.0.103-1.rhsystemd.x86_64.rpm moosefs-cli-3.0.103-1.rhsystemd.x86_64.rpm moosefs-master-3.0.103-1.rhsystemd.x86_64.rpm
2、启动,查看端口
[root@server1 3.0.103]# cd /etc/mfs/
[root@server1 mfs]# ls
mfsexports.cfg mfsmaster.cfg mfstopology.cfg
mfsexports.cfg.sample mfsmaster.cfg.sample mfstopology.cfg.sample
[root@server1 mfs]# systemctl start moosefs-master
[root@server1 mfs]# netstat -antlp ##看到三个端口,分别对应chunkserver(数据存储服务器),cgi(监控界面)和client(客户端)
Active Internet connections (servers and established)
Proto Recv-Q Send-Q Local Address Foreign Address State PID/Program name
tcp 0 0 0.0.0.0:9419 0.0.0.0:* LISTEN 11642/mfsmaster
tcp 0 0 0.0.0.0:9420 0.0.0.0:* LISTEN 11642/mfsmaster
tcp 0 0 0.0.0.0:9421 0.0.0.0:* LISTEN 11642/mfsmaster
tcp 0 0 0.0.0.0:22 0.0.0.0:* LISTEN 874/sshd
tcp 0 0 127.0.0.1:25 0.0.0.0:* LISTEN 1169/master
tcp 0 0 172.25.22.1:22 172.25.22.250:41882 ESTABLISHED 2075/sshd: root@pts
tcp6 0 0 :::22 :::* LISTEN 874/sshd
tcp6 0 0 ::1:25 :::* LISTEN 1169/master
[root@server1 mfs]# cd /var/lib/mfs/
[root@server1 mfs]# ls
changelog.0.mfs metadata.mfs.back metadata.mfs.empty
[root@server1 mfs]# ls
changelog.0.mfs metadata.mfs.back metadata.mfs.empty
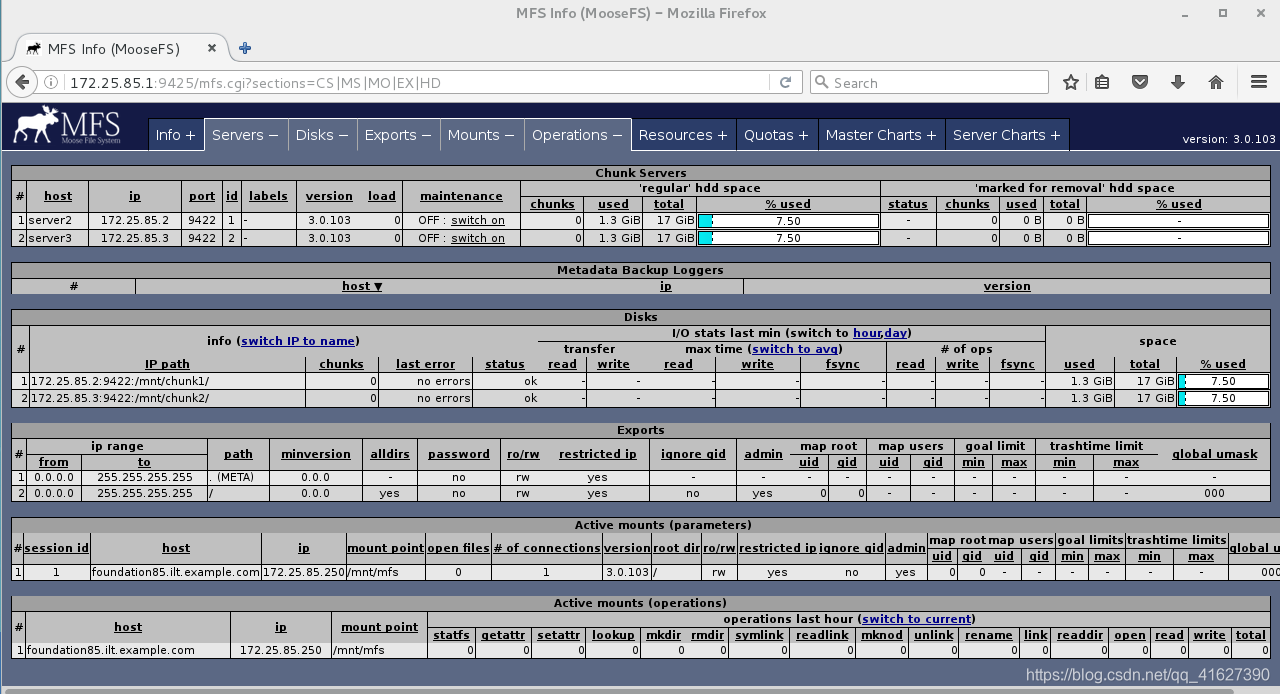
[root@server1 mfs]# systemctl start moosefs-cgiserv.service ##用户监控界面
测试:访问172.25.22.1:9425
2)server2安装
1、安装
[root@server2 3.0.103]# ls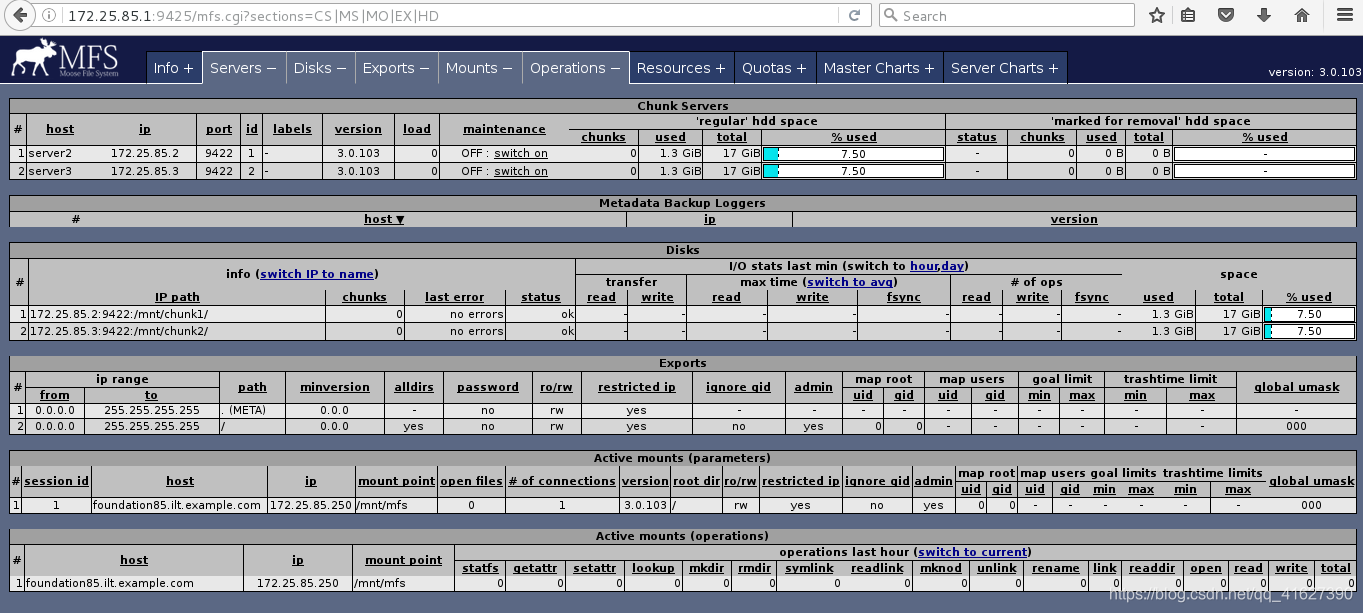
moosefs-cgi-3.0.103-1.rhsystemd.x86_64.rpm
moosefs-cgiserv-3.0.103-1.rhsystemd.x86_64.rpm
moosefs-chunkserver-3.0.103-1.rhsystemd.x86_64.rpm
moosefs-cli-3.0.103-1.rhsystemd.x86_64.rpm
moosefs-client-3.0.103-1.rhsystemd.x86_64.rpm
moosefs-master-3.0.103-1.rhsystemd.x86_64.rpm
moosefs-metalogger-3.0.103-1.rhsystemd.x86_64.rpm
[root@server2 3.0.103]# rpm -ivh moosefs-chunkserver-3.0.103-1.rhsystemd.x86_64.rpm
warning: moosefs-chunkserver-3.0.103-1.rhsystemd.x86_64.rpm: Header V4 RSA/SHA512 Signature, key ID cf82adba: NOKEY
Preparing... ################################# [100%]
Updating / installing...
1:moosefs-chunkserver-3.0.103-1.rhs################################# [100%]
注意:修改本地解析:所有server1为mfsmaster
[root@server1 3.0.103]# vim /etc/hosts
[root@server1 3.0.103]# ping mfsmaster
PING server1 (172.25.85.1) 56(84) bytes of data.
64 bytes from server1 (172.25.85.1): icmp_seq=1 ttl=64 time=0.015 ms
64 bytes from server1 (172.25.85.1): icmp_seq=2 ttl=64 time=0.026 ms
2、建立目录,修改权限
[root@server2 3.0.103]# mkdir /mnt/chunk1
[root@server2 3.0.103]# chown mfs.mfs /mnt/chunk1/
3、修改配置文件
[root@server2 3.0.103]# cd /etc/mfs/
[root@server2 mfs]# vim mfshdd.cfg
/mnt/chunk1
4、启动服务,查看端口
[root@server2 mfs]# systemctl start moosefs-chunkserver
[root@server2 mfs]# netstat -antlp
Active Internet connections (servers and established)
Proto Recv-Q Send-Q Local Address Foreign Address State PID/Program name
tcp 0 0 0.0.0.0:9422 0.0.0.0:* LISTEN 11557/mfschunkserve
tcp 0 0 0.0.0.0:22 0.0.0.0:* LISTEN 872/sshd
tcp 0 0 127.0.0.1:25 0.0.0.0:* LISTEN 1192/master
tcp 0 0 172.25.22.2:38594 172.25.22.1:9420 ESTABLISHED 11557/mfschunkserve
tcp 0 0 172.25.22.2:22 172.25.22.250:35314 ESTABLISHED 11414/sshd: root@pt
tcp6 0 0 :::22 :::* LISTEN 872/sshd
tcp6 0 0 ::1:25 :::* LISTEN 1192/master
5、查看文件,文件被分为256个目录存储。
[root@server2 mfs]# cd /mnt/chunk1/
[root@server2 chunk1]# ls
00 0D 1A 27 34 41 4E 5B 68 75 82 8F 9C A9 B6 C3 D0 DD EA F7
01 0E 1B 28 35 42 4F 5C 69 76 83 90 9D AA B7 C4 D1 DE EB F8
02 0F 1C 29 36 43 50 5D 6A 77 84 91 9E AB B8 C5 D2 DF EC F9
03 10 1D 2A 37 44 51 5E 6B 78 85 92 9F AC B9 C6 D3 E0 ED FA
04 11 1E 2B 38 45 52 5F 6C 79 86 93 A0 AD BA C7 D4 E1 EE FB
05 12 1F 2C 39 46 53 60 6D 7A 87 94 A1 AE BB C8 D5 E2 EF FC
06 13 20 2D 3A 47 54 61 6E 7B 88 95 A2 AF BC C9 D6 E3 F0 FD
07 14 21 2E 3B 48 55 62 6F 7C 89 96 A3 B0 BD CA D7 E4 F1 FE
08 15 22 2F 3C 49 56 63 70 7D 8A 97 A4 B1 BE CB D8 E5 F2 FF
09 16 23 30 3D 4A 57 64 71 7E 8B 98 A5 B2 BF CC D9 E6 F3
0A 17 24 31 3E 4B 58 65 72 7F 8C 99 A6 B3 C0 CD DA E7 F4
0B 18 25 32 3F 4C 59 66 73 80 8D 9A A7 B4 C1 CE DB E8 F5
0C 19 26 33 40 4D 5A 67 74 81 8E 9B A8 B5 C2 CF DC E9 F6
[root@server2 chunk1]# ls | wc -l #查看当前目录有多少文件
256
3)server3,与server2一样
[root@server3 3.0.103]# ls
moosefs-cgi-3.0.103-1.rhsystemd.x86_64.rpm
moosefs-cgiserv-3.0.103-1.rhsystemd.x86_64.rpm
moosefs-chunkserver-3.0.103-1.rhsystemd.x86_64.rpm
moosefs-cli-3.0.103-1.rhsystemd.x86_64.rpm
moosefs-client-3.0.103-1.rhsystemd.x86_64.rpm
moosefs-master-3.0.103-1.rhsystemd.x86_64.rpm
moosefs-metalogger-3.0.103-1.rhsystemd.x86_64.rpm
[root@server3 3.0.103]# rpm -ivh moosefs-chunkserver-3.0.103-1.rhsystemd.x86_64.rpm
warning: moosefs-chunkserver-3.0.103-1.rhsystemd.x86_64.rpm: Header V4 RSA/SHA512 Signature, key ID cf82adba: NOKEY
Preparing... ################################# [100%]
Updating / installing...
1:moosefs-chunkserver-3.0.103-1.rhs################################# [100%]
[root@server3 3.0.103]# mkdir /mnt/chunk2
[root@server3 3.0.103]# chown mfs.mfs /mnt/chunk2/
[root@server3 3.0.103]# cd /etc/mfs/
[root@server3 mfs]# vim mfshdd.cfg
[root@server3 mfs]# systemctl start moosefs-chunkserver
[root@server3 mfs]# netstat -antlp
Active Internet connections (servers and established)
Proto Recv-Q Send-Q Local Address Foreign Address State PID/Program name
tcp 0 0 0.0.0.0:9422 0.0.0.0:* LISTEN 11548/mfschunkserve
tcp 0 0 0.0.0.0:22 0.0.0.0:* LISTEN 884/sshd
tcp 0 0 127.0.0.1:25 0.0.0.0:* LISTEN 1197/master
tcp 0 0 172.25.22.3:22 172.25.22.250:48820 ESTABLISHED 2072/sshd: root@pts
tcp 0 0 172.25.22.3:47144 172.25.22.1:9420 ESTABLISHED 11548/mfschunkserve
tcp6 0 0 :::22 :::* LISTEN 884/sshd
tcp6 0 0 ::1:25 :::* LISTEN 1197/master
4)client端
1、安装
[root@foundation22 3.0.103]# rpm -ivh moosefs-client-3.0.103-1.rhsystemd.x86_64.rpm
BDB2053 Freeing read locks for locker 0xd7: 4531/140290413094976
BDB2053 Freeing read locks for locker 0xd9: 4531/140290413094976
BDB2053 Freeing read locks for locker 0xda: 4531/140290413094976
BDB2053 Freeing read locks for locker 0xdb: 4531/140290413094976
warning: moosefs-client-3.0.103-1.rhsystemd.x86_64.rpm: Header V4 RSA/SHA512 Signature, key ID cf82adba: NOKEY
Preparing... ################################# [100%]
Updating / installing...
1:moosefs-client-3.0.103-1.rhsystem################################# [100%]
2、编辑本地解析
[root@foundation22 Desktop]# vim /etc/hosts
172.25.22.1 server1 mfsmaster ##server1-3也要修改
3、创建目录
[root@foundation22 mfs]# mkdir /mnt/mfs
4、修改配置文件
[root@foundation22 Desktop]# cd /etc/mfs/
[root@foundation22 mfs]# ls
mfsmount.cfg mfsmount.cfg.sample
[root@foundation22 mfs]# vim mfsmount.cfg
/mnt/mfs
5、挂载
[root@foundation22 mfs]# cd /mnt/mfs/
[root@foundation22 mfs]# ls
[root@foundation22 mfs]# mfsmount
mfsmaster accepted connection with parameters: read-write,restricted_ip,admin ; root mapped to root:root
发现
[root@foundation22 mfs]# df
Filesystem 1K-blocks Used Available Use% Mounted on
/dev/mapper/rhel_foundation2-root 229460512 8901904 220558608 4% /
devtmpfs 3932872 0 3932872 0% /dev
tmpfs 3946212 488 3945724 1% /dev/shm
tmpfs 3946212 9100 3937112 1% /run
tmpfs 3946212 0 3946212 0% /sys/fs/cgroup
/dev/sda1 1038336 143396 894940 14% /boot
tmpfs 789244 24 789220 1% /run/user/1000
/dev/loop0 3704296 3704296 0 100% /var/www/html/7.3yumpak
mfsmaster:9421 35622912 2666944 32955968 8% /mnt/mfs
测试:
1、创建传送的目录
[root@foundation22 mfs]# mkdir dir1
[root@foundation22 mfs]# mkdir dir2
[root@foundation22 mfs]# ls
dir1 dir2
2、传送目录
[root@foundation22 mfs]# mfsgetgoal dir1/
dir1/: 2 ##2代表拷贝两份
[root@foundation22 mfs]# mfsgetgoal dir2/
dir2/: 2
[root@foundation22 mfs]# mfssetgoal -r 1 dir1/ ##dir1修改为复制1份
dir1/:
inodes with goal changed: 1
inodes with goal not changed: 0
inodes with permission denied: 0
[root@foundation22 mfs]# mfsgetgoal dir1/
dir1/: 1
3、传送文件,并查看
[root@foundation22 mfs]# cp /etc/passwd dir1/
[root@foundation22 mfs]# cp /etc/fstab dir2/
[root@foundation22 mfs]# cd dir1/
[root@foundation22 dir1]# ls
passwd
查看信息
[root@foundation22 dir1]# mfsfileinfo passwd
passwd:
chunk 0: 0000000000000001_00000001 / (id:1 ver:1)
copy 1: 172.25.22.3:9422 (status:VALID) ##只拷贝1份,一个数据单元为64M
传送100M文件
[root@foundation22 dir1]# dd if=/dev/zero of=bigfile bs=1M count=100
100+0 records in
100+0 records out
104857600 bytes (105 MB) copied, 0.494356 s, 212 MB/s
发现有两个数据单元
[root@foundation22 dir1]# mfsfileinfo bigfile
bigfile:
chunk 0: 0000000000000003_00000001 / (id:3 ver:1)
copy 1: 172.25.22.2:9422 (status:VALID)
chunk 1: 0000000000000004_00000001 / (id:4 ver:1)
copy 1: 172.25.22.3:9422 (status:VALID)
查看dir2有两份数据
[root@foundation22 dir1]# cd ../dir2/
[root@foundation22 dir2]# mfsfileinfo fstab
fstab:
chunk 0: 0000000000000002_00000001 / (id:2 ver:1)
copy 1: 172.25.22.2:9422 (status:VALID)
copy 2: 172.25.22.3:9422 (status:VALID)
查看数据
[root@foundation22 dir2]# cat fstab
#
# /etc/fstab
# Created by anaconda on Tue Apr 2 05:54:05 2019
#
# Accessible filesystems, by reference, are maintained under '/dev/disk'
# See man pages fstab(5), findfs(8), mount(8) and/or blkid(8) for more info
#
/dev/mapper/rhel_foundation2-root / xfs defaults 0 0
UUID=25575ffd-5d37-4aac-846a-522258ece588 /boot xfs defaults 0 0
/dev/mapper/rhel_foundation2-swap swap swap defaults 0 0
/home/kiosk/Desktop/rhel-server-7.3-x86_64-dvd.iso /var/www/html/7.3yumpak iso9660 defaults 0 0
[root@foundation22 dir2]# ls
fstab
[root@foundation22 dir2]# mfsfileinfo fstab
fstab:
chunk 0: 0000000000000002_00000001 / (id:2 ver:1)
copy 1: 172.25.22.2:9422 (status:VALID)
copy 2: 172.25.22.3:9422 (status:VALID)
[root@foundation22 dir2]# cd ../dir1/
[root@foundation22 dir1]# cat passwd
root:x:0:0:root:/root:/bin/bash
bin:x:1:1:bin:/bin:/sbin/nologin
daemon:x:2:2:daemon:/sbin:/sbin/nologin
...
4、如果一个文件在两个数据库,但是挂了一个,那么数据是无法获取的
查看数据
[root@foundation22 dir1]# mfsfileinfo bigfile
bigfile:
chunk 0: 0000000000000003_00000001 / (id:3 ver:1)
copy 1: 172.25.22.2:9422 (status:VALID)
chunk 1: 0000000000000004_00000001 / (id:4 ver:1)
copy 1: 172.25.22.3:9422 (status:VALID)
挂掉一个数据库
[root@server3 mfs]# systemctl stop moosefs-chunkserver
再次查看
[root@foundation22 dir1]# mfsfileinfo bigfile
bigfile:
chunk 0: 0000000000000003_00000001 / (id:3 ver:1)
copy 1: 172.25.22.2:9422 (status:VALID)
chunk 1: 0000000000000004_00000001 / (id:4 ver:1)
no valid copies !!!
恢复数据库
[root@server3 mfs]# systemctl start moosefs-chunkserver
查看
[root@foundation22 dir1]# mfsfileinfo bigfile
bigfile:
chunk 0: 0000000000000003_00000001 / (id:3 ver:1)
copy 1: 172.25.22.2:9422 (status:VALID)
chunk 1: 0000000000000004_00000001 / (id:4 ver:1)
copy 1: 172.25.22.3:9422 (status:VALID)
~~~~~~~~~~~~~~~~~~~~~~~~~~~~~~~~~~~~~~~~~~~~~~~~~~~~~~~~~~~~~~~~~~~~~~~~~~~~~~~~~~~~~
三、数据恢复
1)删除数据
[root@foundation22 dir1]# rm -f passwd
[root@foundation22 dir1]# ls
bigfile
查看删除内容保存时间
[root@foundation22 dir1]# mfsgettrashtime . ##删除内容保存时间
.: 86400
2)恢复数据
[root@foundation22 dir1]# mkdir /mnt/mfsmeta ##创建回收站目录
[root@foundation22 dir1]# mfsmount -m /mnt/mfsmeta/ ##挂载回收站
mfsmaster accepted connection with parameters: read-write,restricted_ip
[root@foundation22 dir1]# cd /mnt/mfsmeta/ ##查看回收站
[root@foundation22 mfsmeta]# ls
sustained trash
[root@foundation22 mfsmeta]# cd trash/
[root@foundation22 trash]# ls
000 112 224 336 448 55A 66C 77E 890 9A2 AB4 BC6 CD8 DEA EFC
001 113 225 337 449 55B 66D 77F 891 9A3 AB5 BC7 CD9 DEB EFD
002 114 226 338 44A 55C 66E 780 892 9A4 AB6 BC8 CDA DEC EFE
003 115 227 339 44B 55D 66F 781 893 9A5 AB7 BC9 CDB DED EFF
......
[root@foundation22 trash]# find -name *passwd* ##寻找数据
./004/00000004|dir1|passwd
[root@foundation22 trash]# cd 004/
[root@foundation22 004]# ls
00000004|dir1|passwd undel
[root@foundation22 004]# mv 00000004\|dir1\|passwd undel/ ##恢复数据
3)查看数据
[root@foundation22 004]# cd /mnt/mfs/dir1/
[root@foundation22 dir1]# ls
bigfile passwd
[root@foundation22 dir1]# cat passwd
root:x:0:0:root:/root:/bin/bash
bin:x:1:1:bin:/bin:/sbin/nologin
.....
四、服务挂掉,会出现什么情况,应对策率
1)chunkservice挂掉
1、挂掉chunk
[root@server2 chunk1]# systemctl stop moosefs-chunkserver.service
查看
[root@foundation22 dir1]# mfsfileinfo passwd
passwd:
chunk 0: 0000000000000001_00000001 / (id:1 ver:1)
no valid copies !!!
此时,如果读取数据,会夯机
2、开启服务
[root@server2 chunk1]# systemctl start moosefs-chunkserver.service
查看,可以访问数据
[root@foundation22 dir1]# mfsfileinfo passwd
passwd:
chunk 0: 0000000000000001_00000001 / (id:1 ver:1)
copy 1: 172.25.22.2:9422 (status:VALID)
2)mastaer挂掉
如果直接关闭,直接打开就可以
如果使用kill,如下:
1、kill杀死
[root@server1 mfs]# ps -ax
11865 ? S< 0:00 /usr/sbin/mfsmaster start
11866 pts/0 R+ 0:00 ps -ax
[root@server1 mfs]# kill -9 11865
测试:client荡机
[root@foundation22 dir1]# ls
2、无法启动
[root@server1 mfs]# systemctl start moosefs-master
Job for moosefs-master.service failed because the control process exited with error code. See "systemctl status moosefs-master.service" and "journalctl -xe" for details.
3、使用 mfsmaster -a
[root@server1 mfs]# mfsmaster -a
open files limit has been set to: 16384
working directory: /var/lib/mfs
lockfile created and locked
initializing mfsmaster modules ...
exports file has been loaded
topology file has been loaded
loading metadata ...
loading sessions data ... ok (0.0000)
loading storage classes data ... ok (0.0000)
loading objects (files,directories,etc.) ... ok (0.0194)
loading names ... ok (0.0188)
loading deletion timestamps ... ok (0.0000)
loading quota definitions ... ok (0.0000)
loading xattr data ... ok (0.0000)
loading posix_acl data ... ok (0.0000)
loading open files data ... ok (0.0000)
loading flock_locks data ... ok (0.0000)
loading posix_locks data ... ok (0.0000)
loading chunkservers data ... ok (0.0000)
loading chunks data ... ok (0.0198)
checking filesystem consistency ... ok
connecting files and chunks ... ok
all inodes: 6
directory inodes: 3
file inodes: 3
chunks: 4
metadata file has been loaded
stats file has been loaded
master <-> metaloggers module: listen on *:9419
master <-> chunkservers module: listen on *:9420
main master server module: listen on *:9421
mfsmaster daemon initialized properly
[root@foundation22 dir1]# ls
bigfile passwd
也可以改启动项。
[root@server1 mfs]# vim /usr/lib/systemd/system/moosefs-master.service
ExecStart=/usr/sbin/mfsmaster -a
[root@server1 mfs]# systemctl daemon-reload
[root@server1 mfs]# systemctl start moosefs-master
~~~~~~~~~~~~~~~~~~~~~~~~~~~~~~~~~~~~~~~~~~~~~~~~~~~~
五、mfs的高可用
1)、server4配置
server4
[root@server4 ~]# ls
moosefs-master-3.0.103-1.rhsystemd.x86_64.rpm
[root@server4 ~]# rpm -ivh moosefs-master-3.0.103-1.rhsystemd.x86_64.rpm
warning: moosefs-master-3.0.103-1.rhsystemd.x86_64.rpm: Header V4 RSA/SHA512 Signature, key ID cf82adba: NOKEY
Preparing... ################################# [100%]
Updating / installing...
1:moosefs-master-3.0.103-1.rhsystem################################# [100%]
2)server1高可用配置
1、添加高可用的yum源
[root@server1 3.0.103]# vim /etc/yum.repos.d/yum.repo
[root@server1 3.0.103]# cat /etc/yum.repos.d/yum.repo
[dvd]
name=rhel7.3
baseurl=http://172.25.22.250/7.3yumpak
gpgcheck=0
[HighAvailability]
name=HighAvailability
baseurl=http://172.25.22.250/7.3yumpak/addons/HighAvailability
gpgcheck=0
[ResilientStorage]
name=ResilientStorage
baseurl=http://172.25.22.250/7.3yumpak/addons/ResilientStorage
gpgcheck=0
[root@server1 ~]# yum repolist
Loaded plugins: product-id, search-disabled-repos, subscription-manager
This system is not registered to Red Hat Subscription Management. You can use subscription-manager to register.
HighAvailability | 4.1 kB 00:00
ResilientStorage | 4.1 kB 00:00
dvd | 4.1 kB 00:00
(1/4): HighAvailability/group_gz | 3.4 kB 00:00
(2/4): HighAvailability/primary_db | 27 kB 00:00
(3/4): ResilientStorage/group_gz | 4.9 kB 00:00
(4/4): ResilientStorage/primary_db | 33 kB 00:00
repo id repo name status
HighAvailability HighAvailability 37
ResilientStorage ResilientStorage 42
dvd rhel7.3 4,751
repolist: 4,830
2、ssh免密码登陆
[root@server1 ~]# ssh-keygen
Generating public/private rsa key pair.
Enter file in which to save the key (/root/.ssh/id_rsa):
Enter passphrase (empty for no passphrase):
Enter same passphrase again:
Your identification has been saved in /root/.ssh/id_rsa.
Your public key has been saved in /root/.ssh/id_rsa.pub.
The key fingerprint is:
8c:f4:15:17:8e:c6:e5:e9:1e:12:94:87:10:5b:f1:a2 root@server1
The key's randomart image is:
+--[ RSA 2048]----+
| oo=++. |
| =oO.. |
| . . B.= |
| . + + + |
| . E . o |
| o . |
| . |
| |
| |
+-----------------+
[root@server1 ~]# ssh-copy-id root@server1
The authenticity of host 'server1 (172.25.22.1)' can't be established.
ECDSA key fingerprint is a7:ff:aa:90:21:a2:2f:67:9e:a5:80:32:d3:98:52:0a.
Are you sure you want to continue connecting (yes/no)? yes
/usr/bin/ssh-copy-id: INFO: attempting to log in with the new key(s), to filter out any that are already installed
/usr/bin/ssh-copy-id: INFO: 1 key(s) remain to be installed -- if you are prompted now it is to install the new keys
root@server1's password:
Number of key(s) added: 1
Now try logging into the machine, with: "ssh 'root@server1'"
and check to make sure that only the key(s) you wanted were added.
[root@server1 ~]# ssh-copy-id root@server4
The authenticity of host 'server4 (172.25.22.4)' can't be established.
ECDSA key fingerprint is ec:a2:b4:e7:be:30:54:07:7c:fe:7f:e6:a4:77:4f:da.
Are you sure you want to continue connecting (yes/no)? yes
/usr/bin/ssh-copy-id: INFO: attempting to log in with the new key(s), to filter out any that are already installed
/usr/bin/ssh-copy-id: INFO: 1 key(s) remain to be installed -- if you are prompted now it is to install the new keys
root@server4's password:
Number of key(s) added: 1
Now try logging into the machine, with: "ssh 'root@server4'"
and check to make sure that only the key(s) you wanted were added.
测试
[root@server1 ~]# ssh server4
Last login: Fri Apr 5 14:05:06 2019 from foundation22.ilt.example.com
[root@server4 ~]# exit
logout
Connection to server4 closed.
3、server4yum源添加高可用包
[root@server1 ~]# scp /etc/yum.repos.d/yum.repo root@server4:/etc/yum.repos.d/yum.repo
yum.repo 100% 304 0.3KB/s 00:00
4、安装高可用包
[root@server1 ~]# yum install -y corosync pacemaker
[root@server1 ~]# yum install -y pcs
5、启动高可用服务并开机启动
[root@server1 ~]# systemctl start pcsd
[root@server1 ~]# systemctl enable pcsd
Created symlink from /etc/systemd/system/multi-user.target.wants/pcsd.service to /usr/lib/systemd/system/pcsd.service.
6、修改密码
[root@server1 ~]# passwd hacluster
Changing password for user hacluster.
New password:
BAD PASSWORD: The password is shorter than 8 characters
Retype new password:
passwd: all authentication tokens updated successfully.
7、认证
[root@server1 ~]# pcs cluster auth server1 server4
Username: hacluster
Password:
server4: Authorized
server1: Authorized
8、初始化
[root@server1 ~]# pcs cluster setup --name mycluster server1 server4
Destroying cluster on nodes: server1, server4...
server1: Stopping Cluster (pacemaker)...
server4: Stopping Cluster (pacemaker)...
server1: Successfully destroyed cluster
server4: Successfully destroyed cluster
Sending cluster config files to the nodes...
server1: Succeeded
server4: Succeeded
Synchronizing pcsd certificates on nodes server1, server4...
server4: Success
server1: Success
Restarting pcsd on the nodes in order to reload the certificates...
server4: Success
server1: Success
[root@server1 ~]# corosync-cfgtool -s
Printing ring status.
Could not initialize corosync configuration API error 2
8、开启
[root@server1 ~]# pcs cluster start --all
server1: Starting Cluster...
server4: Starting Cluster...
9、查看各种状态
[root@server1 ~]# pcs status nodes
Pacemaker Nodes:
Online:
Standby:
Maintenance:
Offline: server1 server4
Pacemaker Remote Nodes:
Online:
Standby:
Maintenance:
Offline:
[root@server1 ~]# corosync-cfgtool -s
Printing ring status.
Local node ID 1
RING ID 0
id = 172.25.22.1
status = ring 0 active with no faults
[root@server1 ~]# pcs status corosync
Membership information
----------------------
Nodeid Votes Name
1 1 server1 (local)
2 1 server4
[root@server1 ~]# pcs status
Cluster name: mycluster
WARNING: no stonith devices and stonith-enabled is not false
Stack: corosync
Current DC: server1 (version 1.1.15-11.el7-e174ec8) - partition with quorum
Last updated: Fri Apr 5 14:55:38 2019 Last change: Fri Apr 5 14:34:33 2019 by hacluster via crmd on server1
2 nodes and 0 resources configured
Online: [ server1 server4 ]
No resources
Daemon Status:
corosync: active/disabled
pacemaker: active/disabled
pcsd: active/enabled
10、查看有没有错误
[root@server1 ~]# journalctl | grep -i error
Apr 05 14:34:33 server1 pengine[3013]: error: Resource start-up disabled since no STONITH resources have been defined
Apr 05 14:34:33 server1 pengine[3013]: error: Either configure some or disable STONITH with the stonith-enabled option
Apr 05 14:34:33 server1 pengine[3013]: error: NOTE: Clusters with shared data need STONITH to ensure data integrity
Apr 05 14:34:33 server1 pengine[3013]: notice: Configuration ERRORs found during PE processing. Please run "crm_verify -L" to identify issues.
Apr 05 14:49:33 server1 pengine[3013]: error: Resource start-up disabled since no STONITH resources have been defined
Apr 05 14:49:33 server1 pengine[3013]: error: Either configure some or disable STONITH with the stonith-enabled option
Apr 05 14:49:33 server1 pengine[3013]: error: NOTE: Clusters with shared data need STONITH to ensure data integrity
Apr 05 14:49:33 server1 pengine[3013]: notice: Configuration ERRORs found during PE processing. Please run "crm_verify -L" to identify issues.
11、排查错误
[root@server1 ~]# crm_verify -L -V
error: unpack_resources: Resource start-up disabled since no STONITH resources have been defined
error: unpack_resources: Either configure some or disable STONITH with the stonith-enabled option
error: unpack_resources: NOTE: Clusters with shared data need STONITH to ensure data integrity
Errors found during check: config not valid
[root@server1 ~]# pcs property set stonith-enabled=false
[root@server1 ~]# crm_verify -L -V
12、查看状态
[root@server1 ~]# pcs status
Cluster name: mycluster
Stack: corosync
Current DC: server1 (version 1.1.15-11.el7-e174ec8) - partition with quorum
Last updated: Fri Apr 5 14:57:49 2019 Last change: Fri Apr 5 14:57:26 2019 by root via cibadmin on server1
2 nodes and 0 resources configured
Online: [ server1 server4 ]
No resources
Daemon Status:
corosync: active/disabled
pacemaker: active/disabled
pcsd: active/enabled
13、创建虚拟ip
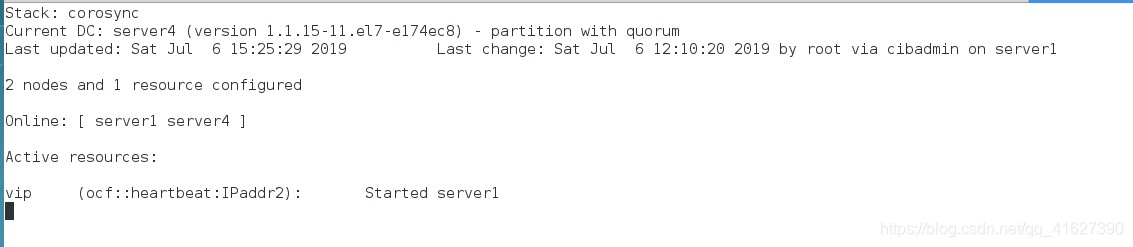
[root@server1 ~]# pcs resource create vip ocf:heartbeat:IPaddr2 ip=172.25.22.100 cidr_netmask=32 op monitor interval=30s
[root@server1 ~]# pcs resource
vip (ocf::heartbeat:IPaddr2): Started server1
14、查看虚拟ip
[root@server1 ~]# ip addr
1: lo: <LOOPBACK,UP,LOWER_UP> mtu 65536 qdisc noqueue state UNKNOWN qlen 1
link/loopback 00:00:00:00:00:00 brd 00:00:00:00:00:00
inet 127.0.0.1/8 scope host lo
valid_lft forever preferred_lft forever
inet6 ::1/128 scope host
valid_lft forever preferred_lft forever
2: eth0: <BROADCAST,MULTICAST,UP,LOWER_UP> mtu 1500 qdisc pfifo_fast state UP qlen 1000
link/ether 52:54:00:6e:79:6b brd ff:ff:ff:ff:ff:ff
inet 172.25.22.1/24 brd 172.25.22.255 scope global eth0
valid_lft forever preferred_lft forever
inet 172.25.22.100/32 brd 172.25.22.255 scope global eth0
valid_lft forever preferred_lft forever
inet6 fe80::5054:ff:fe6e:796b/64 scope link
valid_lft forever preferred_lft forever
测试:
1、在server4查看监控
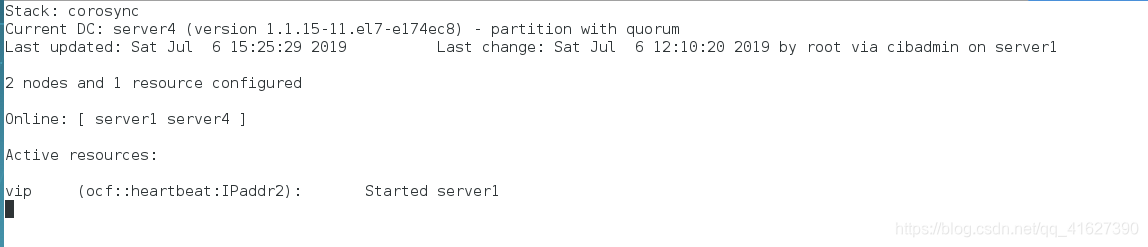
[root@server4 ~]# crm_mon ##实时监控命令
此时server1和server4都出于正常状态,且server1为主server4为辅,虚拟ip在server1
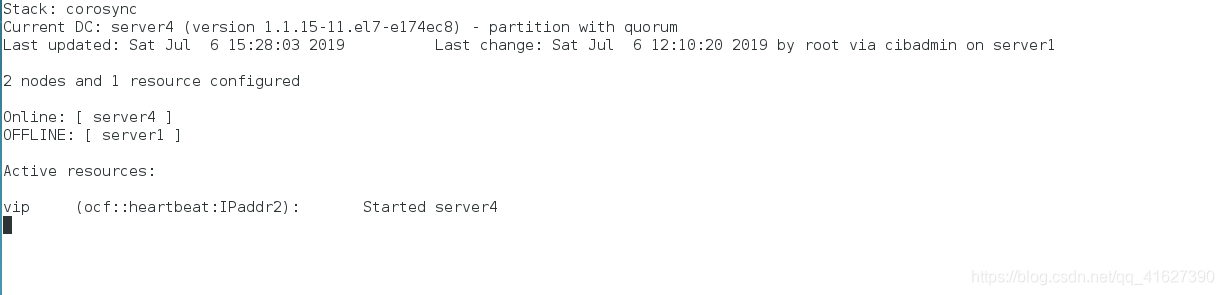
2、关闭server1的服务
[root@server1 ~]# pcs cluster stop
Stopping Cluster (pacemaker)...
Stopping Cluster (corosync)...
server1虚拟ip消失
[root@server1 ~]# ip addr
1: lo: <LOOPBACK,UP,LOWER_UP> mtu 65536 qdisc noqueue state UNKNOWN qlen 1
link/loopback 00:00:00:00:00:00 brd 00:00:00:00:00:00
inet 127.0.0.1/8 scope host lo
valid_lft forever preferred_lft forever
inet6 ::1/128 scope host
valid_lft forever preferred_lft forever
2: eth0: <BROADCAST,MULTICAST,UP,LOWER_UP> mtu 1500 qdisc pfifo_fast state UP qlen 1000
link/ether 52:54:00:6e:79:6b brd ff:ff:ff:ff:ff:ff
inet 172.25.22.1/24 brd 172.25.22.255 scope global eth0
valid_lft forever preferred_lft forever
inet6 fe80::5054:ff:fe6e:796b/64 scope link
valid_lft forever preferred_lft forever
server4替代server1
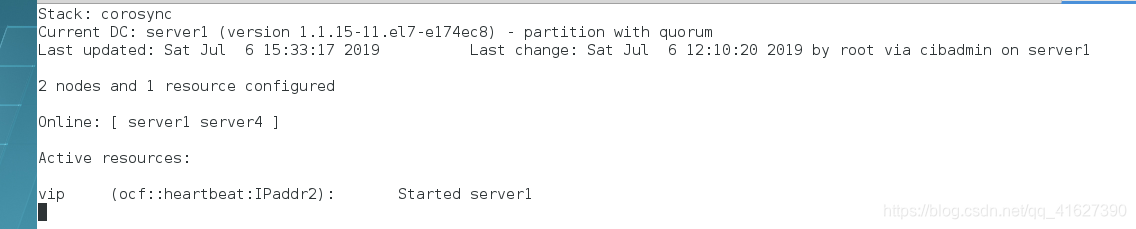
3、启动server1的服务,server1启动但是主节点还是server4
[root@server1 ~]# pcs cluster start server1
server1: Starting Cluster...
[root@server1 ~]# ip addr
1: lo: <LOOPBACK,UP,LOWER_UP> mtu 65536 qdisc noqueue state UNKNOWN qlen 1
link/loopback 00:00:00:00:00:00 brd 00:00:00:00:00:00
inet 127.0.0.1/8 scope host lo
valid_lft forever preferred_lft forever
inet6 ::1/128 scope host
valid_lft forever preferred_lft forever
2: eth0: <BROADCAST,MULTICAST,UP,LOWER_UP> mtu 1500 qdisc pfifo_fast state UP qlen 1000
link/ether 52:54:00:6e:79:6b brd ff:ff:ff:ff:ff:ff
inet 172.25.22.1/24 brd 172.25.22.255 scope global eth0
valid_lft forever preferred_lft forever
inet6 fe80::5054:ff:fe6e:796b/64 scope link
valid_lft forever preferred_lft forever

4、关闭server4,切换主节点到server1
[root@server1 ~]# pcs cluster stop server4
server4: Stopping Cluster (pacemaker)...
server4: Stopping Cluster (corosync)...
[root@server1 ~]# ip addr
1: lo: <LOOPBACK,UP,LOWER_UP> mtu 65536 qdisc noqueue state UNKNOWN qlen 1
link/loopback 00:00:00:00:00:00 brd 00:00:00:00:00:00
inet 127.0.0.1/8 scope host lo
valid_lft forever preferred_lft forever
inet6 ::1/128 scope host
valid_lft forever preferred_lft forever
2: eth0: <BROADCAST,MULTICAST,UP,LOWER_UP> mtu 1500 qdisc pfifo_fast state UP qlen 1000
link/ether 52:54:00:6e:79:6b brd ff:ff:ff:ff:ff:ff
inet 172.25.22.1/24 brd 172.25.22.255 scope global eth0
valid_lft forever preferred_lft forever
inet 172.25.22.100/32 brd 172.25.22.255 scope global eth0
valid_lft forever preferred_lft forever
inet6 fe80::5054:ff:fe6e:796b/64 scope link
valid_lft forever preferred_lft forever
[root@server1 ~]# pcs cluster start server4
server4: Starting Cluster...
3)实现高可用,同时两个高可用使用同一个存储设备
1、关变master端的服务,并修改所有主机的域名
[root@server1 ~]# systemctl stop moosefs-master.service
[root@server1 ~]# vim /etc/hosts
[root@server1 ~]# cat /etc/hosts
127.0.0.1 localhost localhost.localdomain localhost4 localhost4.localdomain4
::1 localhost localhost.localdomain localhost6 localhost6.localdomain6
172.25.85.250 foundation85.ilt.example.com
172.25.85.1 server1
172.25.85.2 server2
172.25.85.3 server3
172.25.85.4 server4
172.25.85.5 server5
172.25.85.6 server6
172.25.85.7 server7
172.25.85.100 mfsmaster ##master为虚拟ip
2、这个一个设备当作提供存储的设备为server1和server4提供存储空间,这里使用server2,使用的是iscsi。
1、安装target,并启动
[root@server2 chunk1]# yum install -y targetcli
[root@server2 chunk1]# systemctl start target
[root@server2 chunk1]# systemctl enable target
2、查看共享硬盘
[root@server2 chunk1]# fdisk -l
Disk /dev/sda: 21.5 GB, 21474836480 bytes, 41943040 sectors
Units = sectors of 1 * 512 = 512 bytes
Sector size (logical/physical): 512 bytes / 512 bytes
I/O size (minimum/optimal): 512 bytes / 512 bytes
Disk label type: dos
Disk identifier: 0x000e502f
Device Boot Start End Blocks Id System
/dev/sda1 * 2048 2099199 1048576 83 Linux
/dev/sda2 2099200 41943039 19921920 8e Linux LVM
Disk /dev/mapper/rhel-root: 18.2 GB, 18249416704 bytes, 35643392 sectors
Units = sectors of 1 * 512 = 512 bytes
Sector size (logical/physical): 512 bytes / 512 bytes
I/O size (minimum/optimal): 512 bytes / 512 bytes
Disk /dev/mapper/rhel-swap: 2147 MB, 2147483648 bytes, 4194304 sectors
Units = sectors of 1 * 512 = 512 bytes
Sector size (logical/physical): 512 bytes / 512 bytes
I/O size (minimum/optimal): 512 bytes / 512 bytes
Disk /dev/vda: 21.5 GB, 21474836480 bytes, 41943040 sectors
Units = sectors of 1 * 512 = 512 bytes
Sector size (logical/physical): 512 bytes / 512 bytes
I/O size (minimum/optimal): 512 bytes / 512 bytes
3、编写共享策略
[root@server2 chunk1]# targetcli
targetcli shell version 2.1.fb41
Copyright 2011-2013 by Datera, Inc and others.
For help on commands, type 'help'.
/> ls
o- / ......................................................................................................................... [...]
o- backstores .............................................................................................................. [...]
| o- block .................................................................................................. [Storage Objects: 0]
| o- fileio ................................................................................................. [Storage Objects: 0]
| o- pscsi .................................................................................................. [Storage Objects: 0]
| o- ramdisk ................................................................................................ [Storage Objects: 0]
o- iscsi ............................................................................................................ [Targets: 0]
o- loopback ......................................................................................................... [Targets: 0]
/> backstores/block create my_disk1 /dev/vda ##共享的硬盘
Created block storage object my_disk1 using /dev/vda.
/> iscsi/ create iqn.2019-04.com.example:server2 ##共享的名字
Created target iqn.2019-04.com.example:server2.
Created TPG 1.
Global pref auto_add_default_portal=true
Created default portal listening on all IPs (0.0.0.0), port 3260.
/> iscsi/iqn.2019-04.com.example:server2/tpg1/luns create /backstores/block/my_disk1 ##建立联系
Created LUN 0.
/> iscsi/iqn.2019-04.com.example:server2/tpg1/acls create iqn.2019-04.com.example:client ##密码
Created Node ACL for iqn.2019-04.com.example:client
Created mapped LUN 0.
/> iscsi/iqn.2019-04.com.example:server2/tpg1/portals create 172.25.85.2 ##共享端口失败
Using default IP port 3260
Could not create NetworkPortal in configFS
/> iscsi/iqn.2019-04.com.example:server2/tpg1/portals delete 0.0.0.0
3260 ip_port=
/> iscsi/iqn.2019-04.com.example:server2/tpg1/portals delete 0.0.0.0 3260 ##删除原来的端口
Deleted network portal 0.0.0.0:3260
/> ls
o- / ......................................................................................................................... [...]
o- backstores .............................................................................................................. [...]
| o- block .................................................................................................. [Storage Objects: 1]
| | o- my_disk1 ........................................................................ [/dev/vda (20.0GiB) write-thru activated]
| o- fileio ................................................................................................. [Storage Objects: 0]
| o- pscsi .................................................................................................. [Storage Objects: 0]
| o- ramdisk ................................................................................................ [Storage Objects: 0]
o- iscsi ............................................................................................................ [Targets: 1]
| o- iqn.2019-04.com.example:server2 ................................................................................... [TPGs: 1]
| o- tpg1 ............................................................................................... [no-gen-acls, no-auth]
| o- acls .......................................................................................................... [ACLs: 1]
| | o- iqn.2019-04.com.example:client ....................................................................... [Mapped LUNs: 1]
| | o- mapped_lun0 .............................................................................. [lun0 block/my_disk1 (rw)]
| o- luns .......................................................................................................... [LUNs: 1]
| | o- lun0 ...................................................................................... [block/my_disk1 (/dev/vda)]
| o- portals .................................................................................................... [Portals: 0]
o- loopback ......................................................................................................... [Targets: 0]
/> iscsi/iqn.2019-04.com.example:server2/tpg1/portals create 172.25.85.2 ##重新共享端口
Using default IP port 3260
Created network portal 172.25.85.2:3260.
/> exit
Global pref auto_save_on_exit=true
Last 10 configs saved in /etc/target/backup.
Configuration saved to /etc/target/saveconfig.json
3、server1接受设备
1、安装iscsi
[root@server1 ~]# yum install -y iscsi-*
2、发现设备
[root@server1 ~]# iscsiadm -m discovery -t st -p 172.25.85.2
172.25.85.2:3260,1 iqn.2019-04.com.example:server2
3、修改密码
[root@server1 ~]# vim /etc/iscsi/initiatorname.iscsi
[root@server1 ~]# cat /etc/iscsi/initiatorname.iscsi
InitiatorName=iqn.2019-04.com.example:client
4、重启服务,并挂载
[root@server1 ~]# systemctl restart iscsid
[root@server1 ~]# iscsiadm -m discovery -t st -p 172.25.85.2
172.25.85.2:3260,1 iqn.2019-04.com.example:server2
[root@server1 ~]# iscsiadm -m node -l
Logging in to [iface: default, target: iqn.2019-04.com.example:server2, portal: 172.25.85.2,3260] (multiple)
Login to [iface: default, target: iqn.2019-04.com.example:server2, portal: 172.25.85.2,3260] successful.
5、查看挂载设备
[root@server1 ~]# fdisk -l
Disk /dev/sda: 21.5 GB, 21474836480 bytes, 41943040 sectors
Units = sectors of 1 * 512 = 512 bytes
Sector size (logical/physical): 512 bytes / 512 bytes
I/O size (minimum/optimal): 512 bytes / 512 bytes
Disk label type: dos
Disk identifier: 0x000e502f
Device Boot Start End Blocks Id System
/dev/sda1 * 2048 2099199 1048576 83 Linux
/dev/sda2 2099200 41943039 19921920 8e Linux LVM
Disk /dev/mapper/rhel-root: 18.2 GB, 18249416704 bytes, 35643392 sectors
Units = sectors of 1 * 512 = 512 bytes
Sector size (logical/physical): 512 bytes / 512 bytes
I/O size (minimum/optimal): 512 bytes / 512 bytes
Disk /dev/mapper/rhel-swap: 2147 MB, 2147483648 bytes, 4194304 sectors
Units = sectors of 1 * 512 = 512 bytes
Sector size (logical/physical): 512 bytes / 512 bytes
I/O size (minimum/optimal): 512 bytes / 512 bytes
Disk /dev/sdb: 21.5 GB, 21474836480 bytes, 41943040 sectors
Units = sectors of 1 * 512 = 512 bytes
Sector size (logical/physical): 512 bytes / 512 bytes
I/O size (minimum/optimal): 512 bytes / 512 bytes
6、分区并铺设文件系统
只分一个区
[root@server1 ~]# fdisk /dev/sdb
Welcome to fdisk (util-linux 2.23.2).
Changes will remain in memory only, until you decide to write them.
Be careful before using the write command.
Device does not contain a recognized partition table
Building a new DOS disklabel with disk identifier 0x4d04f49f.
Command (m for help): n
Partition type:
p primary (0 primary, 0 extended, 4 free)
e extended
Select (default p):
Using default response p
Partition number (1-4, default 1):
First sector (2048-41943039, default 2048):
Using default value 2048
Last sector, +sectors or +size{K,M,G} (2048-41943039, default 41943039): 41943039
Partition 1 of type Linux and of size 20 GiB is set
Command (m for help): p
Disk /dev/sdb: 21.5 GB, 21474836480 bytes, 41943040 sectors
Units = sectors of 1 * 512 = 512 bytes
Sector size (logical/physical): 512 bytes / 512 bytes
I/O size (minimum/optimal): 512 bytes / 512 bytes
Disk label type: dos
Disk identifier: 0x4d04f49f
Device Boot Start End Blocks Id System
/dev/sdb1 2048 41943039 20970496 83 Linux
Command (m for help): wq
The partition table has been altered!
Calling ioctl() to re-read partition table.
Syncing disks.
同步分区表
[root@server1 ~]# partprobe
[root@server1 ~]# cat /proc/partitions
major minor #blocks name
8 0 20971520 sda
8 1 1048576 sda1
8 2 19921920 sda2
253 0 17821696 dm-0
253 1 2097152 dm-1
8 16 20971520 sdb
8 17 20970496 sdb1
铺设xfs文件系统
[root@server1 ~]# mkfs.xfs /dev/sdb1
meta-data=/dev/sdb1 isize=512 agcount=4, agsize=1310656 blks
= sectsz=512 attr=2, projid32bit=1
= crc=1 finobt=0, sparse=0
data = bsize=4096 blocks=5242624, imaxpct=25
= sunit=0 swidth=0 blks
naming =version 2 bsize=4096 ascii-ci=0 ftype=1
log =internal log bsize=4096 blocks=2560, version=2
= sectsz=512 sunit=0 blks, lazy-count=1
realtime =none extsz=4096 blocks=0, rtextents=0
挂载
[root@server1 ~]# mount /dev/sdb1 /mnt/
[root@server1 ~]# cd /media/
[root@server1 media]# ls
复制etc配置文件到磁盘中
[root@server1 media]# cp /etc/* /media/
cp: omitting directory ‘/etc/alternatives’
cp: omitting directory ‘/etc/audisp’
cp: omitting directory ‘/etc/audit’
。。。。。
~~~~~~~~~~~~~~~~~~~~~~~小知识~~~~~~~~~~~~~~~~~~~~~~~
如果磁盘分区表不见了怎么办
1、先卸载设备
[root@server1 mnt]# cd
[root@server1 ~]# umount /mnt/
[root@server1 ~]# df
Filesystem 1K-blocks Used Available Use% Mounted on
/dev/mapper/rhel-root 17811456 1161968 16649488 7% /
devtmpfs 497292 0 497292 0% /dev
tmpfs 508264 54624 453640 11% /dev/shm
tmpfs 508264 13084 495180 3% /run
tmpfs 508264 0 508264 0% /sys/fs/cgroup
/dev/sda1 1038336 141508 896828 14% /boot
tmpfs 101656 0 101656 0% /run/user/0
2、磁盘的前512字节为分区表,将他覆盖
[root@server1 ~]# dd if=/dev/zero of=/dev/sdb bs=512 count=1
1+0 records in
1+0 records out
512 bytes (512 B) copied, 0.00183342 s, 279 kB/s
3、无法挂载
[root@server1 ~]# mount /dev/sdb1 /media/
mount: special device /dev/sdb1 does not exist
4、重新分区
[root@server1 ~]# fdisk /dev/sdb
Welcome to fdisk (util-linux 2.23.2).
Changes will remain in memory only, until you decide to write them.
Be careful before using the write command.
Device does not contain a recognized partition table
Building a new DOS disklabel with disk identifier 0x5f20a099.
Command (m for help): p ##没有分区信息
Disk /dev/sdb: 21.5 GB, 21474836480 bytes, 41943040 sectors
Units = sectors of 1 * 512 = 512 bytes
Sector size (logical/physical): 512 bytes / 512 bytes
I/O size (minimum/optimal): 512 bytes / 512 bytes
Disk label type: dos
Disk identifier: 0x5f20a099
Device Boot Start End Blocks Id System
Command (m for help): n ##重新分区
Partition type:
p primary (0 primary, 0 extended, 4 free)
e extended
Select (default p):
Using default response p
Partition number (1-4, default 1):
First sector (2048-41943039, default 2048):
Using default value 2048
Last sector, +sectors or +size{K,M,G} (2048-41943039, default 41943039): 41943039
Partition 1 of type Linux and of size 20 GiB is set
Command (m for help): p
Disk /dev/sdb: 21.5 GB, 21474836480 bytes, 41943040 sectors
Units = sectors of 1 * 512 = 512 bytes
Sector size (logical/physical): 512 bytes / 512 bytes
I/O size (minimum/optimal): 512 bytes / 512 bytes
Disk label type: dos
Disk identifier: 0x5f20a099
Device Boot Start End Blocks Id System
/dev/sdb1 2048 41943039 20970496 83 Linux
Command (m for help): wq
The partition table has been altered!
Calling ioctl() to re-read partition table.
Syncing disks.
5、重新挂载,并查看原来的文件
[root@server1 ~]# mount /dev/sdb1 /media/
[root@server1 ~]# cd /media/
[root@server1 media]# ls
adjtime dnsmasq.conf grub2.cfg ld.so.cache motd redhat-release sudo.conf
aliases dracut.conf gshadow ld.so.conf mtab resolv.conf sudoers
aliases.db e2fsck.conf gshadow- lftp.conf my.cnf rpc sudo-ldap.conf
anacrontab environment host.conf libaudit.conf nanorc rsyslog.conf sysctl.conf
asound.conf ethertypes hostname libuser.conf networks rwtab system-release
bashrc exports hosts locale.conf nsswitch.conf securetty system-release-cpe
cron.deny favicon.png hosts.allow localtime nsswitch.conf.bak services tcsd.conf
crontab filesystems hosts.deny login.defs os-release sestatus.conf vconsole.conf
crypttab fstab inittab logrotate.conf passwd shadow vimrc
csh.cshrc GeoIP.conf inputrc machine-id passwd- shadow- virc
csh.login GeoIP.conf.default issue magic printcap shells yum.conf
DIR_COLORS GREP_COLORS issue.net makedumpfile.conf.sample profile statetab
DIR_COLORS.256color group kdump.conf man_db.conf protocols subgid
DIR_COLORS.lightbgcolor group- krb5.conf mke2fs.conf rc.local subuid
~~~~~~~~~~~~~~~~~~~~~~~~~~~~~~~~~~~~~~~~~~~~~~~~~~~
7、server1原数据备份
[root@server1 media]# rm -rf *
[root@server1 media]# cd
[root@server1 ~]# umount /media/
[root@server1 ~]# mount /dev/sdb1 /mnt/
[root@server1 ~]# cd /var/lib/mfs/
[root@server1 mfs]# ls
changelog.10.mfs changelog.12.mfs changelog.3.mfs changelog.5.mfs metadata.mfs metadata.mfs.empty
changelog.11.mfs changelog.2.mfs changelog.4.mfs metadata.crc metadata.mfs.back.1 stats.mfs
[root@server1 mfs]# cp -p * /mnt
[root@server1 mfs]# cd /mnt/
[root@server1 mnt]# ls
changelog.10.mfs changelog.12.mfs changelog.3.mfs changelog.5.mfs metadata.mfs metadata.mfs.empty
changelog.11.mfs changelog.2.mfs changelog.4.mfs metadata.crc metadata.mfs.back.1 stats.mfs
[root@server1 mnt]# chown mfs.mfs /mnt/
[root@server1 mnt]# umount /mnt/
umount: /mnt: target is busy.
(In some cases useful info about processes that use
the device is found by lsof(8) or fuser(1))
[root@server1 mnt]# cd
[root@server1 ~]# umount /mnt/
[root@server1 ~]# mount /dev/sdb1 /var/lib/mfs/
[root@server1 ~]# df
Filesystem 1K-blocks Used Available Use% Mounted on
/dev/mapper/rhel-root 17811456 1162076 16649380 7% /
devtmpfs 497292 0 497292 0% /dev
tmpfs 508264 54624 453640 11% /dev/shm
tmpfs 508264 13084 495180 3% /run
tmpfs 508264 0 508264 0% /sys/fs/cgroup
/dev/sda1 1038336 141508 896828 14% /boot
tmpfs 101656 0 101656 0% /run/user/0
/dev/sdb1 20960256 36576 20923680 1% /var/lib/mfs
[root@server1 ~]# systemctl restart moosefs-master
8、server4接受设备
[root@server4 3.0.103]# yum install -y iscsi-*
[root@server4 3.0.103]# vim /etc/iscsi/initiatorname.iscsi
[root@server4 3.0.103]# iscsiadm -m discovery -t st -p 172.25.85.2
172.25.85.2:3260,1 iqn.2019-04.com.example:server2
[root@server4 3.0.103]# iscsiadm -m node -l
Logging in to [iface: default, target: iqn.2019-04.com.example:server2, portal: 172.25.85.2,3260] (multiple)
Login to [iface: default, target: iqn.2019-04.com.example:server2, portal: 172.25.85.2,3260] successful.
[root@server4 3.0.103]# fdisk -l
Disk /dev/sda: 21.5 GB, 21474836480 bytes, 41943040 sectors
Units = sectors of 1 * 512 = 512 bytes
Sector size (logical/physical): 512 bytes / 512 bytes
I/O size (minimum/optimal): 512 bytes / 512 bytes
Disk label type: dos
Disk identifier: 0x000e502f
Device Boot Start End Blocks Id System
/dev/sda1 * 2048 2099199 1048576 83 Linux
/dev/sda2 2099200 41943039 19921920 8e Linux LVM
Disk /dev/mapper/rhel-root: 18.2 GB, 18249416704 bytes, 35643392 sectors
Units = sectors of 1 * 512 = 512 bytes
Sector size (logical/physical): 512 bytes / 512 bytes
I/O size (minimum/optimal): 512 bytes / 512 bytes
Disk /dev/mapper/rhel-swap: 2147 MB, 2147483648 bytes, 4194304 sectors
Units = sectors of 1 * 512 = 512 bytes
Sector size (logical/physical): 512 bytes / 512 bytes
I/O size (minimum/optimal): 512 bytes / 512 bytes
Disk /dev/sdb: 21.5 GB, 21474836480 bytes, 41943040 sectors
Units = sectors of 1 * 512 = 512 bytes
Sector size (logical/physical): 512 bytes / 512 bytes
I/O size (minimum/optimal): 512 bytes / 512 bytes
Disk label type: dos
Disk identifier: 0x5f20a099
Device Boot Start End Blocks Id System
/dev/sdb1 2048 41943039 20970496 83 Linux
[root@server4 3.0.103]# mount /dev/sdb1 /var/lib/mfs
[root@server4 3.0.103]# systemctl restart moosefs-master
9、server1添加共享文件策略
[root@server1 ~]# pcs resource create mfsdata ocf:heartbeat:Filesystem device=/dev/sdb1 directory=/var/lib/mfs fstype=xfs op monitor interval=30s
但是我们查看监控,发现vip和存储不在一个设备
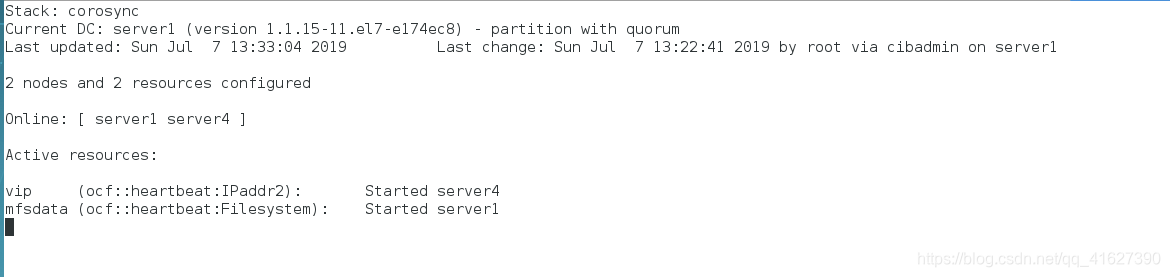
10、创建主节点
[root@server1 ~]# pcs resource create mfsd systemd:moosefs-master op monitor interval=1min
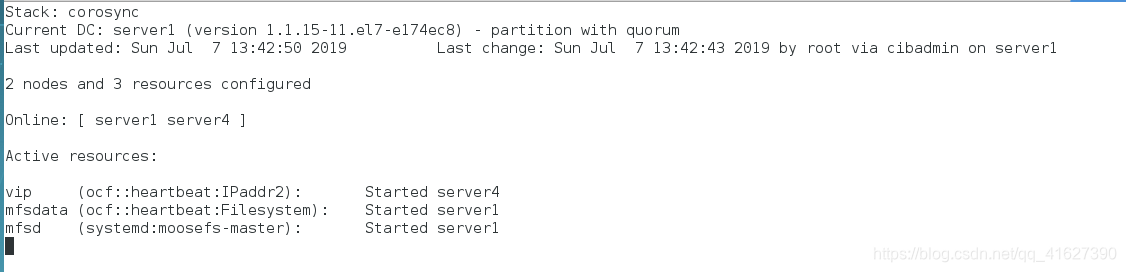
11、组绑定,使得数据和vip在一起
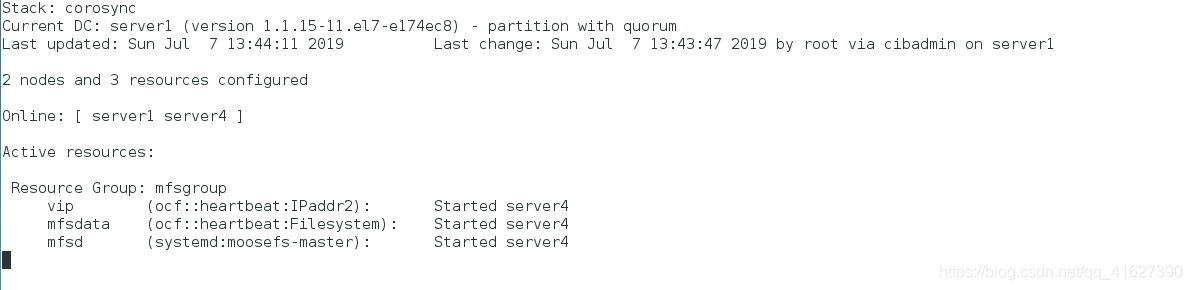
12、切换server4到server1
[root@server1 ~]# pcs cluster stop server4
server4: Stopping Cluster (pacemaker)...
server4: Stopping Cluster (corosync)...
[root@server1 ~]# pcs cluster start server4
server4: Starting Cluster...
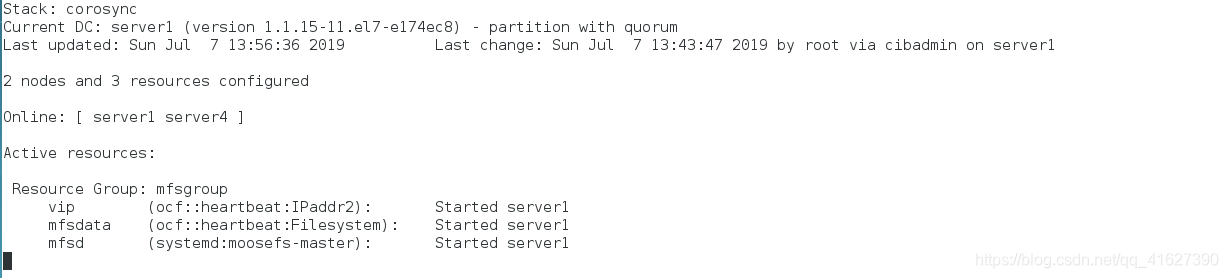
测试:是否实现高可用
~~~~~~~~~~~~~~~~~~~~~~~~~~~~~~~~~~~~~~~~~~~~~~~~~~~~~~~~~~~~~~~~~~~~~~~~``
磁盘分区
~~~~~~~~~~~~~~~~~~~~~~~~~~~~~~~~~~~~~~~~~~~~~~~~`
fence解决存储的脑裂问题


 1106
1106

 被折叠的 条评论
为什么被折叠?
被折叠的 条评论
为什么被折叠?
 到【灌水乐园】发言


