


 本文详细介绍Linux系统中如何利用信号进行进程间通信,包括捕捉信号、信号屏蔽、捕捉脚本退出等技巧。同时,介绍xargs命令的使用,演示如何通过跳板机实现安全的远程连接,并提供了一个自动维护系统黑名单的脚本示例。
linux通过信号来在运行在系统上的进程之间通信
也可以通过信号来控制shell脚本的运行
1、捕捉信号:trap命令
1)常用信号 ctrl+c(终止进程) ctrl+z(暂停进程)
实验:替换ctrl+c
[root@localhost mnt]# trap "echo redhat" 2 ###2代表ctrl+c
[root@localhost mnt]# ^Credhat
2)列出中断信号与键盘的关系
[root@localhost mnt]# stty -a ###^代表ctrl
speed 38400 baud; rows 24; columns 80; line = 0;
intr = ^C; quit = ^\; erase = ^?; kill = ^U; eof = ^D; eol = <undef>;
eol2 = <undef>; swtch = <undef>; start = ^Q; stop = ^S; susp = ^Z; rprnt = ^R;
werase = ^W; lnext = ^V; flush = ^O; min = 1; time = 0;
-parenb -parodd -cmspar cs8 -hupcl -cstopb cread -clocal -crtscts
-ignbrk -brkint -ignpar -parmrk -inpck -istrip -inlcr -igncr icrnl ixon -ixoff
-iuclc -ixany -imaxbel -iutf8
opost -olcuc -ocrnl onlcr -onocr -onlret -ofill -ofdel nl0 cr0 tab0 bs0 vt0 ff0
isig icanon iexten echo echoe echok -echonl -noflsh -xcase -tostop -echoprt
echoctl echoke
3)信号屏蔽
[root@localhost mnt]# trap "" 2 ##屏蔽信号2
[root@localhost mnt]# trap : 2 ##恢复信号2
[root@localhost mnt]# ^C
trap - 2 ##恢复信号2
实验:设计一个脚本测试的时候无法终止
[root@localhost mnt]# cat trap.sh
#!/bin/bash
trap "echo 'Sorry!I have trapped Ctrl+C'" 2
echo "This is a test script~"
count=1
while [ $count -le 10 ]
do
echo "Loop #$count"
sleep 1
count=$[ $count + 1 ]
done
echo "This is the end of the script~"
trap - 2
echo "I just removed the trap"
[root@localhost mnt]# sh trap.sh
This is a test script~
Loop #1
Loop #2
^CSorry!I have trapped Ctrl+C
Loop #3
Loop #4
^CSorry!I have trapped Ctrl+C
Loop #5
Loop #6
Loop #7
Loop #8
Loop #9
Loop #10
This is the end of the script~
I just removed the trap
[root@localhost mnt]# ^C
2、捕捉脚本的退出
退出命令为 trap "echo ByeBye~" EXIT
当执行结束,或者强制结束就会输出 ByeBye
实验:
[root@localhost mnt]# cat trap2.sh
#!/bin/bash
trap "echo ByeBye~" EXIT
count=1
while [ $count -le 5 ]
do
echo "Loop #$count"
sleep 1
count=$[ $count + 1 ]
done
[root@localhost mnt]# sh trap2.sh
Loop #1
Loop #2
Loop #3
Loop #4
Loop #5
ByeBye~
3.xargs命令
1)xargs的作用
xargs命令是用于给其他命令传递参数的一个过滤器,也是组合多个命令的一个工具。
它擅长于将标准输入数据转换成功命令行参数能够将管道或者标准输入里的数据转换成特定命令的命令行参数。
xargs也可以将单行或多行文本输入转换成其他格式,例如单行变多行,多行变单行。
xargs的默认命令是echo,空格是默认定界符。这意味着通过管道传递给xargs的输入会包含换行和空白。不过通过xargs的处理,换行和空白将被空格取代。意思就是说,将一段文本内容传给xargs时,xargs会将其中包含的换行和空白区域都替换成空格。这样的话,文件的内容就不再是多行而是一行。
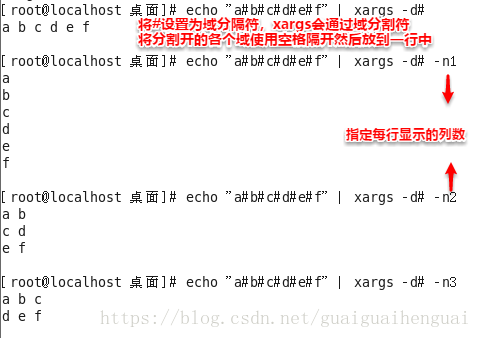
2)参数
-n选项,指定 输出时每行输出的列数。
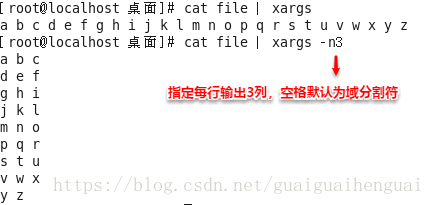
-d选项,自定义列分割符
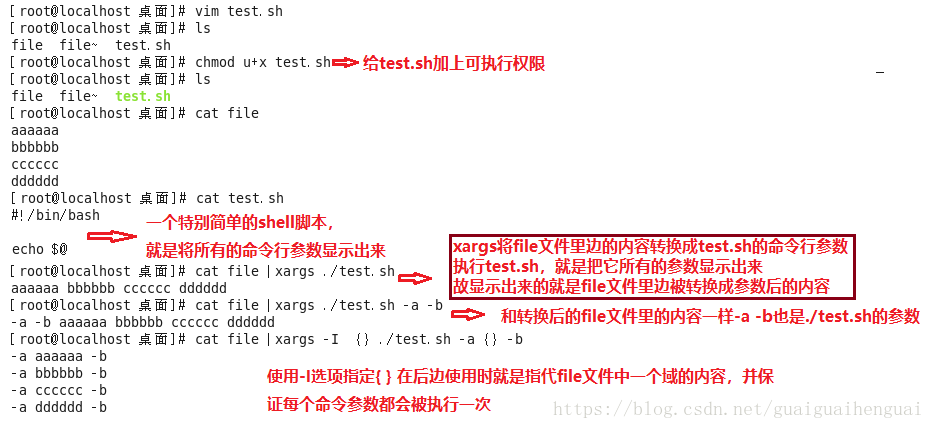
-I选项(大写的i),指定一个替换字符串{ },这个字符串在xargs扩展时会被替换掉,当-l与xargs结合使用,每一个参数命令都会被执行一次
实验:在/tmp目录下每两秒建立一个文件,westos_时间。按ctrl+c,删除所有这些文件并退出。
[root@localhost mnt]# cat xargs.sh
#!/bin/bash
trap "find /tmp -type f -name "westos_*" | xargs rm -f && exit " 2
while true
do
touch /tmp/westos_$(date +%F-%N-%M-%S)
sleep 2
ls -l /tmp/westos*
done
[root@localhost mnt]# sh xargs.sh
-rw-r--r--. 1 root root 0 Jan 5 22:45 /tmp/westos_2019-01-05-520243350-45-11
-rw-r--r--. 1 root root 0 Jan 5 22:45 /tmp/westos_2019-01-05-520243350-45-11
-rw-r--r--. 1 root root 0 Jan 5 22:45 /tmp/westos_2019-01-05-524319352-45-13
-rw-r--r--. 1 root root 0 Jan 5 22:45 /tmp/westos_2019-01-05-520243350-45-11
-rw-r--r--. 1 root root 0 Jan 5 22:45 /tmp/westos_2019-01-05-524319352-45-13
-rw-r--r--. 1 root root 0 Jan 5 22:45 /tmp/westos_2019-01-05-528388666-45-15
-rw-r--r--. 1 root root 0 Jan 5 22:45 /tmp/westos_2019-01-05-520243350-45-11
-rw-r--r--. 1 root root 0 Jan 5 22:45 /tmp/westos_2019-01-05-524319352-45-13
-rw-r--r--. 1 root root 0 Jan 5 22:45 /tmp/westos_2019-01-05-528388666-45-15
-rw-r--r--. 1 root root 0 Jan 5 22:45 /tmp/westos_2019-01-05-532857170-45-17
^C[root@localhost mnt]# ls /tmp/westos*
ls: cannot access /tmp/westos*: No such file or directory
4.跳板机
跳板机的目的:一般服务器的环境是不允许外界电脑直接登陆的,需要先经过一个机器(跳板机),再通过跳板机连接内部服务器。
实验环境:需要三台电脑
外部电脑 172.25.254.10
跳板机 172.25.254.11
内部电脑 172.25.254.85
目的:外部电脑通过跳板机连接内部电脑,如果外部电脑登陆的是root用户不限制,如果登陆的是其他用户,则只可以进行无密连接特定内部IP,或者退出(此时信号是屏蔽状态)。
/etc/profile.d/ ssh登陆这台机器后,会自动执行这里面的脚本
跳板机的实现过程
172.25.254.11
步骤一:实现student用户与172.25.254.85的无密连接
ssh-keygen ##生成密钥
cd /home/student/.ssh/
ls
ssh-copy-id -i id_rsa.pub root@172.25.254.85 ##分发密钥
步骤二:在/etc/profile.d/ 下编写执行的脚本
[root@localhost mnt]# cat /etc/profile.d/tiaoban.sh
#!/bin/bash
if [ $UID -ne 0 ];then ##如果不是root用户则,执行/mnt/tiaoban.sh脚本
sh /mnt/tiaoban.sh
exit
fi
步骤三:在/mnt下编写tiaoban.sh
[root@localhost mnt]# cat /mnt/tiaoban.sh
function trapper() {
trap "" INT EXIT TSTP TERM HUP ##屏蔽信号函数
}
function main() { ##主函数
while true
do
trapper ##运行屏蔽信号函数
clear
cat <<menu ##编写操作说明文本
1)host1-172.25.254.85
2)exit
menu
read -p "Please input a num:" num
case $num in
1)
echo "login in 172.25.254.85..."
ssh root@172.25.254.85
;;
2)
exit
;;
esac
done
}
main
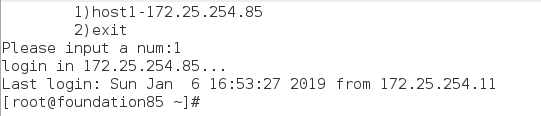
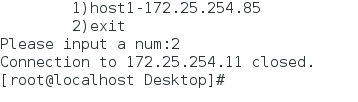
实验结果:
连接172.25.254.11的student用户
![]()
查看界面

连接 172.25.254.85的root用户,实现了免密连接
退出
训练:
#在/var/log/secure查找连接失败的主机,并统计次数
#累计连接失败超过3次,将此主机加入系统黑名单(/etc/hosts.deny)
实验:
[root@localhost mnt]# cat /etc/host.deny
sshd:172.25.254.10
[root@localhost mnt]# cat black.sh
#! /bin/bash
cat /var/log/secure | awk '/Failed/{print $(NF-3)}' | sort | uniq -c | awk '{print $2"="$1}' > /tmp/blacklist
MAXCOUNT="3"
for i in `cat /tmp/blacklist`
do
IP=`echo $i | awk -F= '{print $1}'`
NUM=`echo $i | awk -F= '{print $2}'`
if [ $NUM -gt $MAXCOUNT ]; then
grep $IP /etc/hosts.deny &> /dev/null
if [ $? -gt 0 ]; then
echo "sshd:$IP" >> /etc/hosts.deny
fi
fi
done
[root@localhost mnt]# sh black.sh
实验结果
[root@localhost ~]# ssh root@172.25.254.11
ssh_exchange_identification: read: Connection reset by peer


 233
233

 被折叠的 条评论
为什么被折叠?
被折叠的 条评论
为什么被折叠?
 到【灌水乐园】发言


