


 本文指导如何在国内下载和配置MSYS2,切换至清华大学源,以加快软件包更新速度。涉及安装工具chain、cmake,以及特定软件包的安装和Cherrytree的构建过程,包括手动编译cpputest模块。
构建cherrytree所需的软件包
MSYS2下载
下载最新版的64位exe文件
msys2-x86_64-20200903.exe
下载路径 E:\国外软件难以下载\cherrytree
MSYS2安装
安装路径 G:\msys64
配置源
下载太慢,需要更新为国内源,选择清华大学的源
- 进入安装路径 G:\msys64\etc\pacman.d
- 将三个文件修改为国内源,在三个文件最上面新添加
修改mirrorlist.mingw32
Server = https://mirrors.tuna.tsinghua.edu.cn/msys2/mingw/i686
修改mirrorlist.mingw64
Server = https://mirrors.tuna.tsinghua.edu.cn/msys2/mingw/x86_64
**修改mirrorlist.msys **
Server = https://mirrors.tuna.tsinghua.edu.cn/msys2/msys/$arch
MSYS2更新
点击mingw64进入操作界面
多次运行下行代码,直到没有更新 此为降级
pacman -Syuu
MSYS2命令
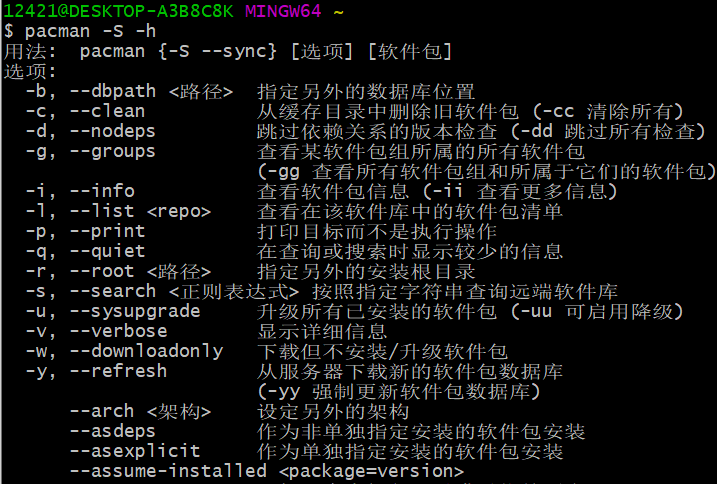
我们通过**-h获某项命令如何使用
例如pacman -h,如下图所示:
其命令特点:
其中<>代表必选操作 []代表可选
命令的第一个字母除了-h,其他的都是大写的
-h -V -D -F -Q -R -S -T -U

具体实例如下:
pacman -S xx 下载安装软件xx
但是这些还是不够的,还有更详细的帮助指令,如下
pacman -S -h
可以继续使用-h,原来查找pacman -S**的详细用法
常用指令
| 指令 | 作用 |
|---|---|
| pacman -S xx | 下载安装软件xx |
| pacman -Sy | 更新软件包数据 |
| pacman Syu | 更新所有 |
| pacman -Ss xx | 查询软件xx信息 |
安装软件包
下列命令含义:
-S 同步下载
–needed 不重新安装已是最新的软件包
–noconfirm 不询问确认
toolchain and cmake
pacman -S --needed --noconfirm mingw-w64-x86_64-toolchain
pacman -S --needed --noconfirm mingw-w64-x86_64-cmake
gtkmm3, gtksourceviewmm3, libxml++2.6, sqlite3, gspell, curl
pacman -S --needed --noconfirm mingw-w64-x86_64-gtkmm3
pacman -S --needed --noconfirm mingw-w64-x86_64-gtksourceviewmm3
pacman -S --needed --noconfirm mingw-w64-x86_64-libxml++2.6
pacman -S --needed --noconfirm mingw-w64-x86_64-sqlite3
pacman -S --needed --noconfirm mingw-w64-x86_64-gspell
pacman -S --needed --noconfirm mingw-w64-x86_64-curl
gettext, git, nano, meld3
pacman -S --needed --noconfirm mingw-w64-x86_64-gettext git nano mingw-w64-x86_64-meld3
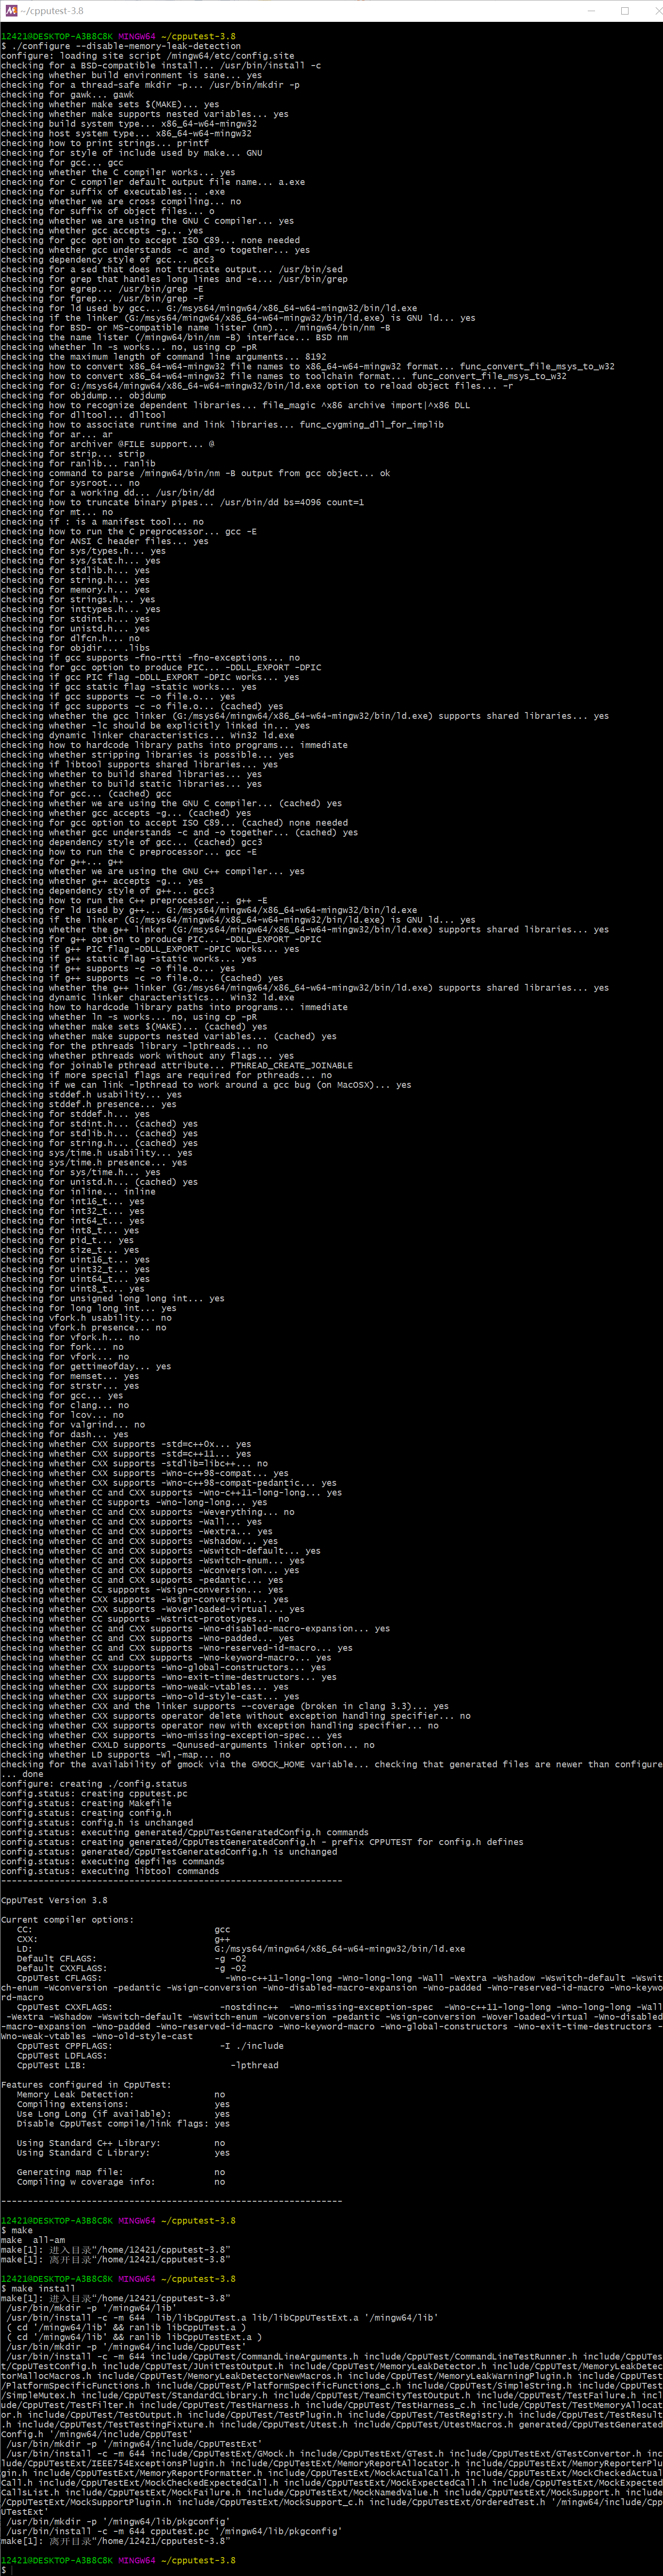
cpputest ( 缺少软件包,我们需要手动构建)
pacman -S --needed --noconfirm autoconf automake libtool make
wget https://github.com/cpputest/cpputest/releases/download/v3.8/cpputest-3.8.tar.gz
tar xf cpputest-3.8.tar.gz
cd cpputest-3.8
./autogen.sh
./configure --disable-memory-leak-detection
make
make install
其他配置
创建一个文件夹
mkdir /etc/get-3.0
nano /etc/get-3.0/settings.ini
将跳转到一个界面,在里面输入以下内容
[Settings]
get-theme-name=win32
如下图所示
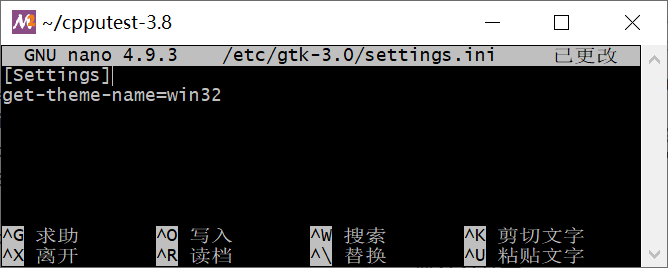
按esc——按o——按enter——按不知道如何退出ctrl+X
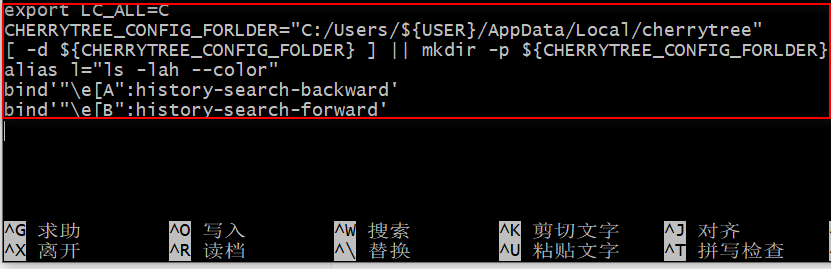
console settings
nano ~/.bashrc
在里面输入
export LC_ALL=C
CHERRYTREE_CONFIG_FOLDER="C:/Users/${USER}/AppData/Local/cherrytree"
[ -d ${CHERRYTREE_CONFIG_FOLDER} ] || mkdir -p ${CHERRYTREE_CONFIG_FOLDER}
alias l="ls -lah --color"
bind '"\e[A":history-search-backward'
bind '"\e[B":history-search-forward'
如下图所示:
下载cherrytree
git clone https://github.com/giuspen/cherrytree.git
cd cherrytree

# build Release(优化 build版本)
./build.sh Release
# build Debug(未优化,带有调试符号)
./build.sh Debug
# run cherrytree
./build/cherrytree.exe
# run unit tests
./build/tests/run_tests.exe
故障排除
- console settings输入有误
- 无法建立:请确保启动64位终端
- 无法建立:移除资料cherrytree/build夹,然后build.sh再次启动指令码
- 测试输出警告和错误:可以,最后应该是这样 OK (49 tests, 49 ran, 6243 checks, 0 ignored, 0 filtered out, 5758 ms)
- 无法启动cherrytree:您必须从msys2 mingw64终端运行cherrytree,或者将cherrytree_0.99.X_win64_portable文件
- (从站点下载)中的cherrytree复制并替换为新的cherrytree ,这样就可以满足依赖关系


 被折叠的 条评论
为什么被折叠?
被折叠的 条评论
为什么被折叠?
 到【灌水乐园】发言


