


目录
一,简介
1,什么是Spring Boot
springboot是spring快速开发脚手架,通过约定大于配置的方式,快速构建和启动spring项目
2,为什么要使用Spring Boot
spring的缺点:
1,复杂的配置
- 项目各种配置是开发时的损耗, 写配置挤占了写应用程序逻辑的时间。
2,混乱的依赖管理。
- 项目的依赖管理非常的繁琐。决定项目里要用哪些库就已经够让人头痛的了,还要知道这些库的哪个版本 和其他库不会有冲突,这是一个棘手的问题。并且,一旦选错了依赖的版本,随之而来的就是各种的不兼容 的bug。 spring boot 可以解决上面2个问题
3,Spring Boot 特点
官网地址Spring Boot
Spring Boot 特点:
- 快速开发spring应用的框架
- 内嵌tomcat和jetty容器,不需要单独安装容器,jar包直接发布一个web应用
- 简化maven配置,parent这种方式,一站式引入需要的各种依赖
- 基于注解的零配置思想
- 各种流行框架,spring web mvc,mybatis,spring cloud无缝整合
二,入门案例
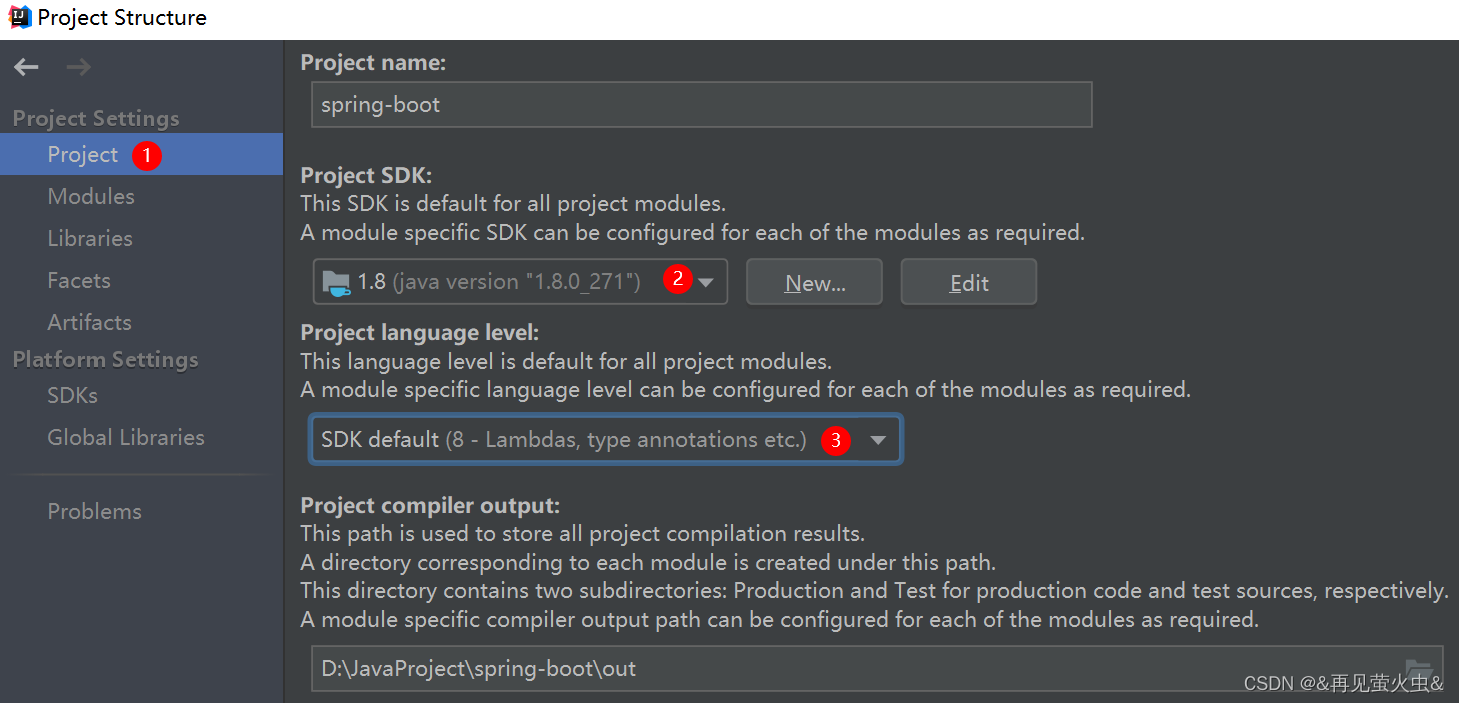
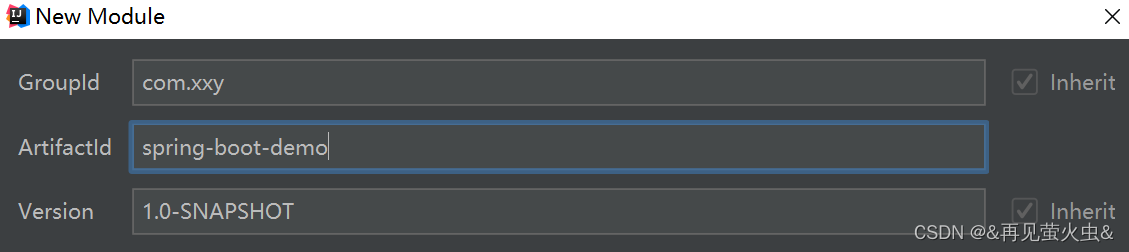
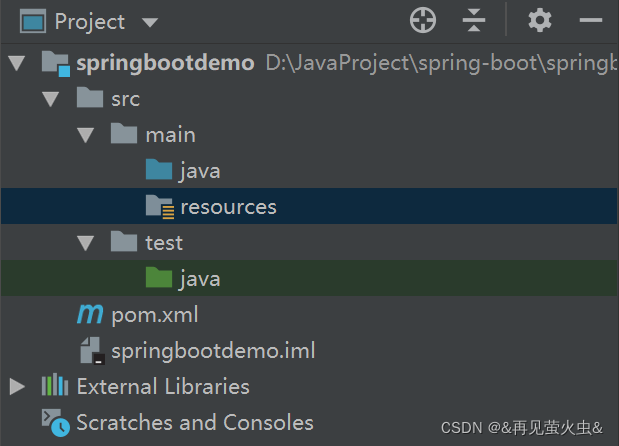
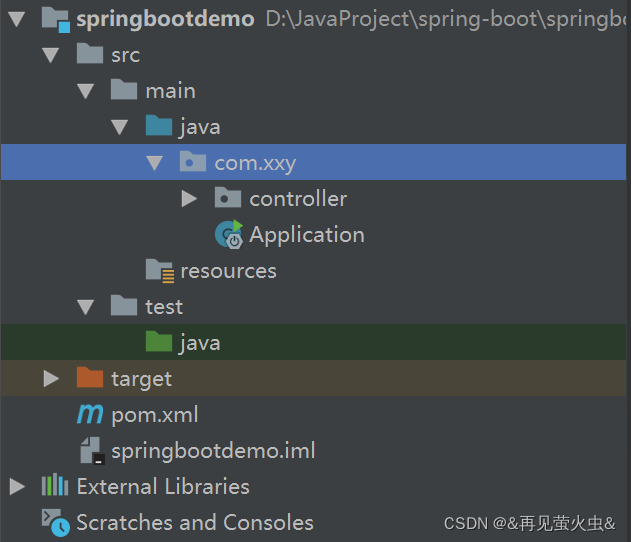
1,创建工程
1,创建新工程
2,创建新的module

2,添加依赖
SpringBoot提供了一个名为spring-boot-starter-parent的构件,里面已经对各种常用依赖(并非全部)的版本进 行了管理,我们的项目需要以这个项目为父工程,这样我们就不用关心依赖的版本问题了,需要什么依赖,直接引 入坐标即可!
1,添加父工程坐标
    <parent>
        <groupId>org.springframework.boot</groupId>
        <artifactId>spring-boot-starter-parent</artifactId>
        <version>2.0.0.RELEASE</version>
    </parent>
2,添加web启动器
为了让SpringBoot帮我们完成各种自动配置,我们必须引入SpringBoot提供的自动配置依赖,我们称为 启动器 。 因为我们是web项目,这里我们引入web启动器:
    <dependencies>
        <dependency>
            <groupId>org.springframework.boot</groupId>
            <artifactId>spring-boot-starter-web</artifactId>
        </dependency>
    </dependencies>
需要注意的是,我们并没有在这里指定版本信息。因为SpringBoot的父工程已经对版本进行了管理了。 这个时候,我们会发现项目中多出了大量的依赖:
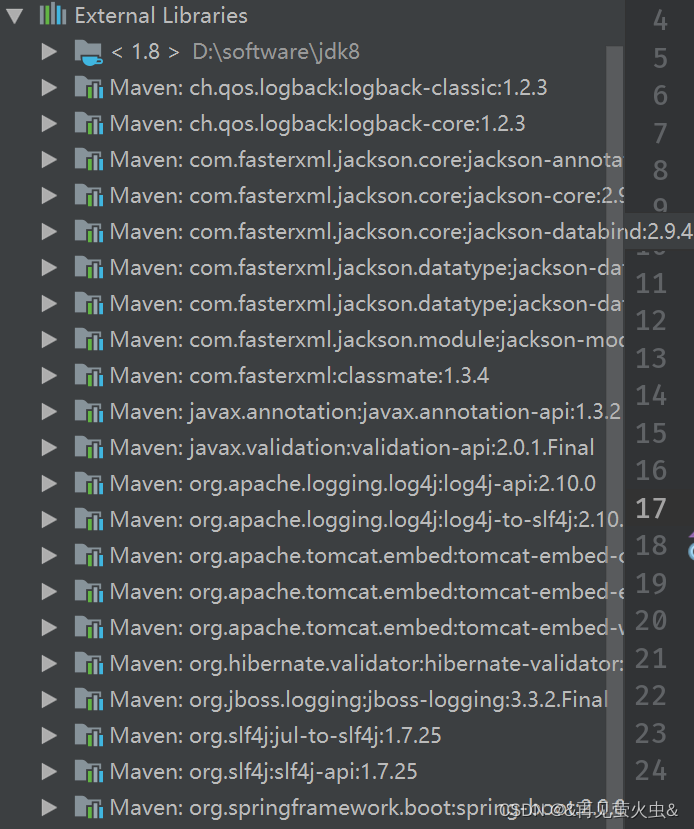
这些都是SpringBoot根据spring-boot-starter-web这个依赖自动引入的,而且所有的版本都已经管理好,不会出 现冲突。
3,管理jdk版本
默认情况下,maven工程的jdk版本是1.5,而我们开发使用的是1.8,因此这里我们需要修改jdk版本,只需要简单 的添加以下属性即可:
    <properties>
        <java.version>1.8</java.version>
    </properties>
4,完整的pom
<?xml version="1.0" encoding="UTF-8"?>
<project xmlns="http://maven.apache.org/POM/4.0.0"
         xmlns:xsi="http://www.w3.org/2001/XMLSchema-instance"
         xsi:schemaLocation="http://maven.apache.org/POM/4.0.0 http://maven.apache.org/xsd/maven-4.0.0.xsd">
    <modelVersion>4.0.0</modelVersion>

    <groupId>com.xxy</groupId>
    <artifactId>spring-boot-demo</artifactId>
    <version>1.0-SNAPSHOT</version>

    <properties>
        <java.version>1.8</java.version>
    </properties>


    <parent>
        <groupId>org.springframework.boot</groupId>
        <artifactId>spring-boot-starter-parent</artifactId>
        <version>2.0.0.RELEASE</version>
    </parent>

    <dependencies>
        <dependency>
            <groupId>org.springframework.boot</groupId>
            <artifactId>spring-boot-starter-web</artifactId>
        </dependency>
    </dependencies>

</project>
3,启动类
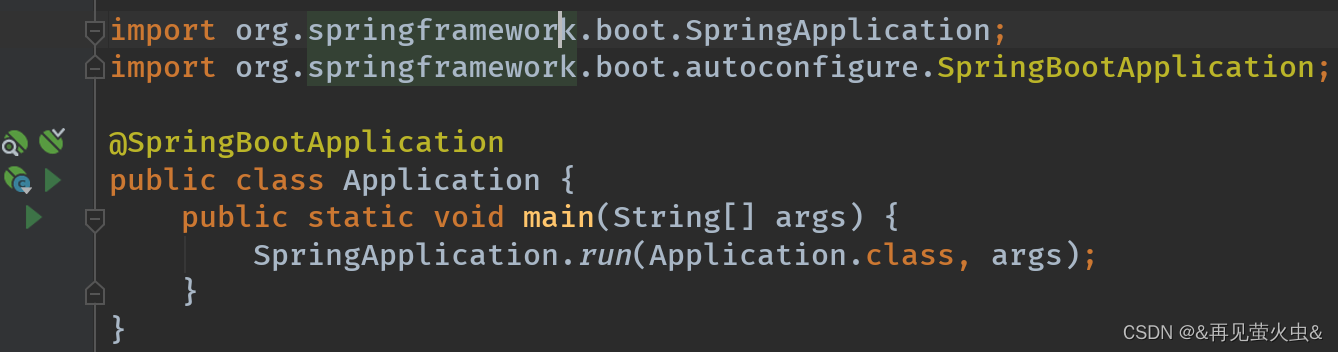
Spring Boot项目通过main函数即可启动,我们需要创建一个启动类Application:
编写main函数
package com.xxy;

import org.springframework.boot.SpringApplication;
import org.springframework.boot.autoconfigure.SpringBootApplication;

@SpringBootApplication
public class Application {
    public static void main(String[] args) {
        SpringApplication.run(Application.class, args);
    }
}
4,编写controller
接下来,我们就可以像以前那样开发SpringMVC的项目了!
1,编写controller(controller包需要和启动类在同一目录下)
package com.xxy.controller;
import org.springframework.web.bind.annotation.GetMapping;
import org.springframework.web.bind.annotation.RestController;
@RestController
public class HelloController {
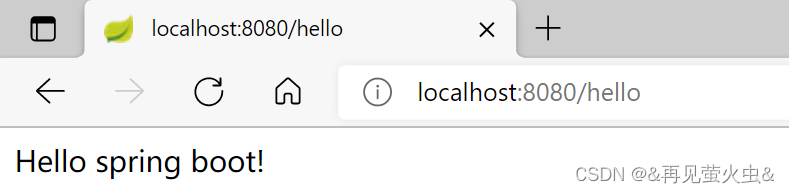
@GetMapping("/hello")
public String Hello() {
return "Hello spring boot!";
}
}
2,启动测试,运行main函数
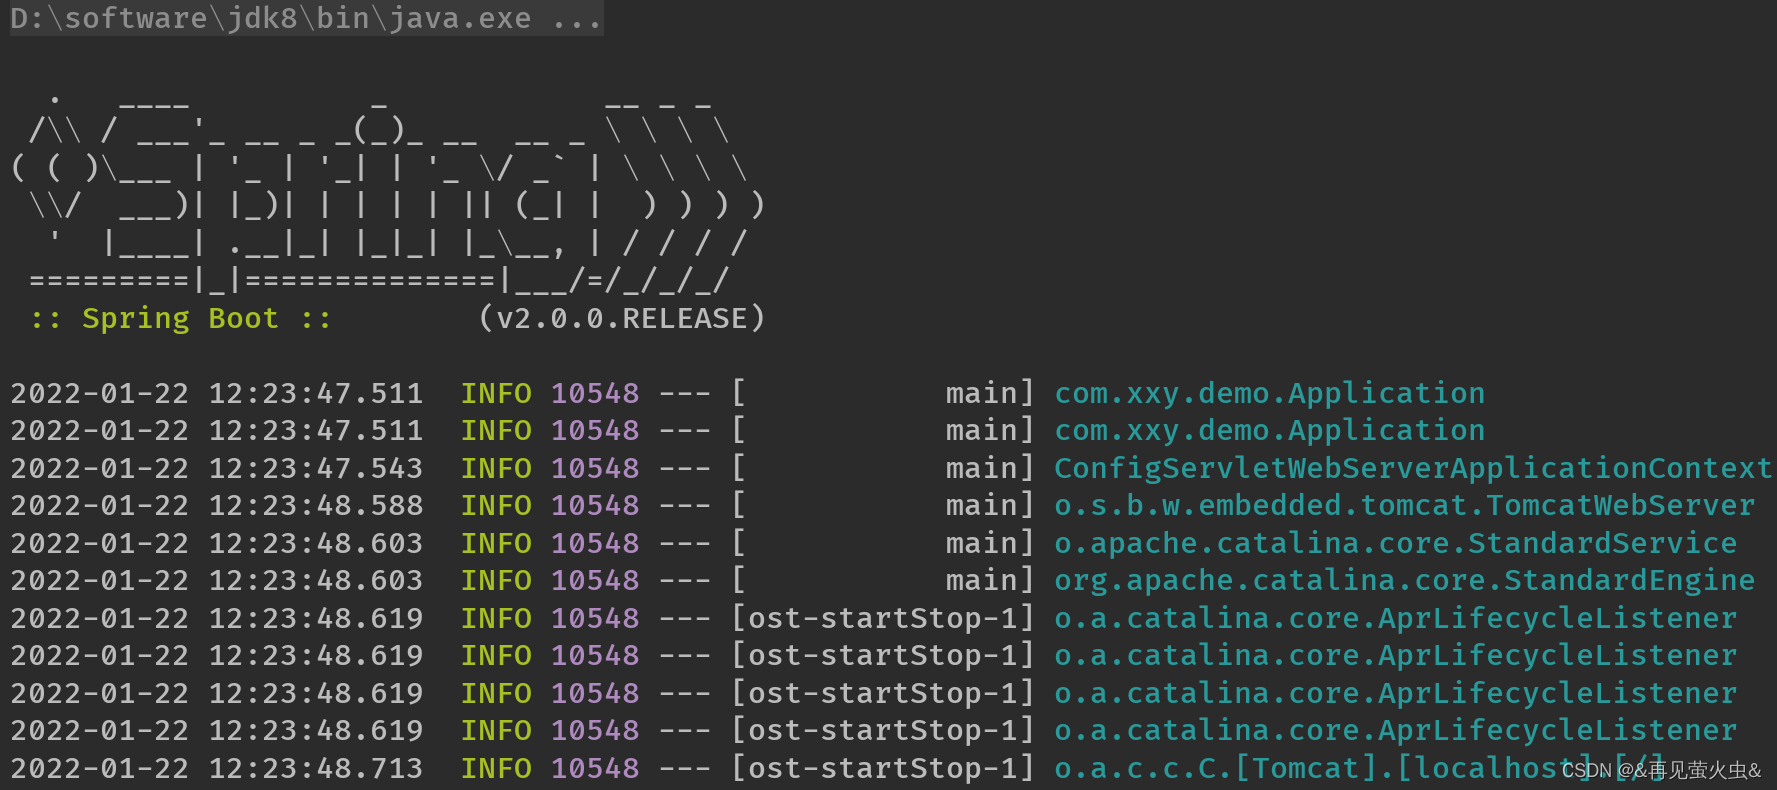
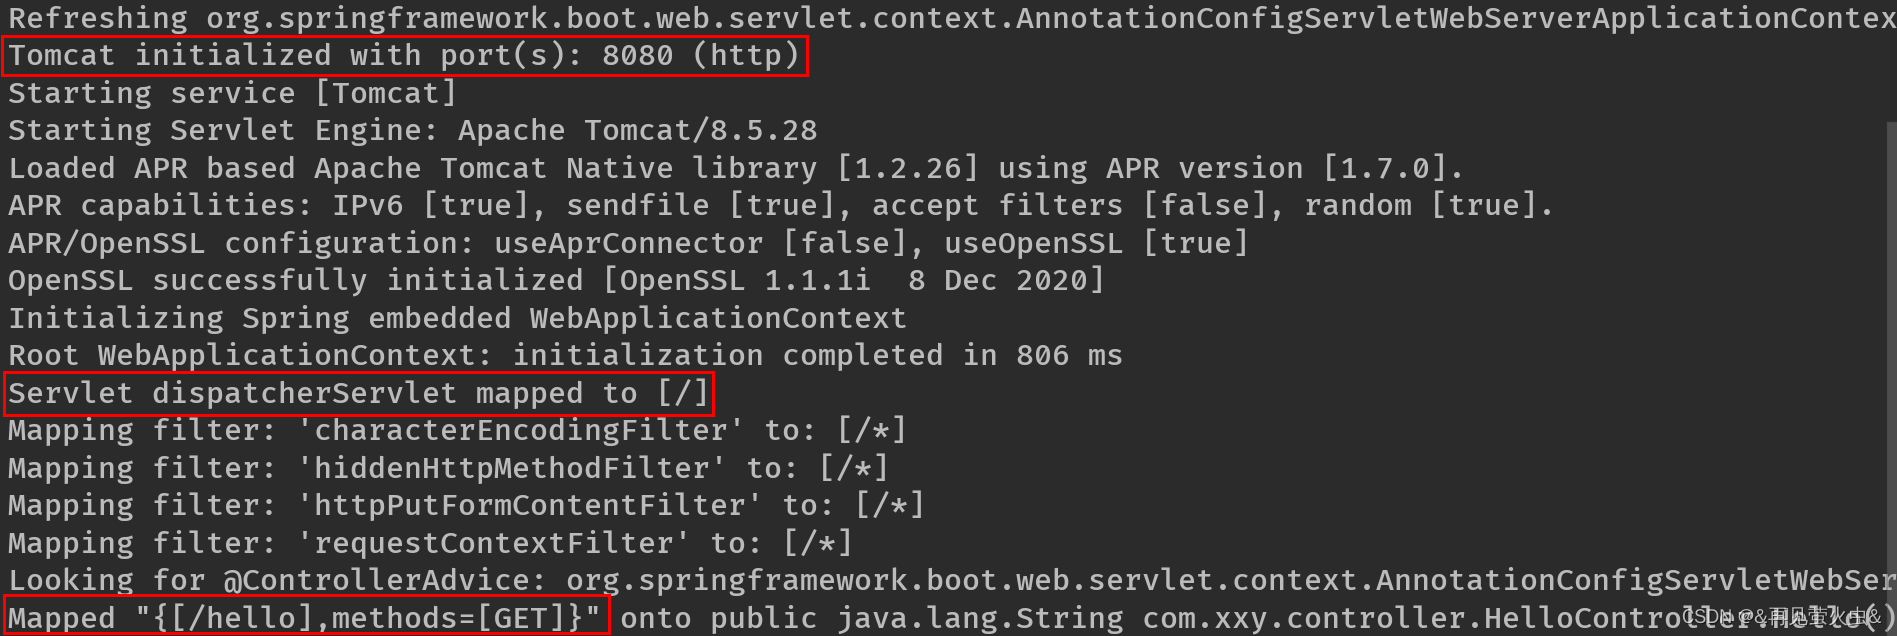
1)监听的端口是8080
2)SpringMVC的映射路径是:/
3)/hello 路径已经映射到了 HelloController 中的 Hello() 方法
三,Spring全注解配置
在入门案例中,我们没有任何的配置,就可以实现一个SpringMVC的项目了,快速、高效!
在Spring3.0开始,Spring官方就已经开始推荐使用java配置来代替传统的xml配置了,我们不妨来回顾一 下Spring的历史:
- Spring1.0时代 在此时因为jdk1.5刚刚出来,注解开发并未盛行,因此一切Spring配置都是xml格式,
- Spring2.0时代 Spring引入了注解开发,但是因为并不完善,因此并未完全替代xml,此时的程序员往往是把xml与注解进行 结合
- Spring3.0及以后 3.0以后Spring的注解已经非常完善了,因此Spring推荐大家使用完全的java配置来代替以前的xml,不过似乎 在国内并未推广盛行。然后当SpringBoot来临,人们才慢慢认识到java配置的优雅。
spring全注解配置主要靠java类和一些注解,比较常用的注解有:
- @Configuration :声明一个类作为配置类,代替xml文件
- @Bean :声明在方法上,将方法的返回值加入Bean容器,代替 <bean> 标签
- @value :属性注入
- @PropertySource :指定外部属性文件
接下来用java配置来尝试实现连接池配置:
1,首先引入Druid连接池依赖:
        <dependency>
            <groupId>com.alibaba</groupId>
            <artifactId>druid</artifactId>
            <version>1.2.3</version>
        </dependency>
2,创建一个jdbc.properties文件,编写jdbc属性
jdbc.driver=com.mysql.cj.jdbc.Driver
jdbc.url=jdbc:mysql://localhost:3306/ems?useUnicode=true&characterEncoding=utf-8&useSSL=false&serverTimezone=GMT
jdbc.username=root
jdbc.password=root
3,编写代码:
package com.xxy.config;

import com.alibaba.druid.pool.DruidDataSource;
import org.springframework.beans.factory.annotation.Value;
import org.springframework.context.annotation.Bean;
import org.springframework.context.annotation.Configuration;
import org.springframework.context.annotation.PropertySource;

import javax.sql.DataSource;

@Configuration
@PropertySource("classpath:jdbc.properties")
public class JdbcConfig {
    @Value("${jdbc.url}")
    String url;
    @Value("${jdbc.driver}")
    String driver;
    @Value("${jdbc.username}")
    String username;
    @Value("${jdbc.password}")
    String password;

    @Bean
    public DataSource dataSource() {
        DruidDataSource dataSource = new DruidDataSource();
        dataSource.setUrl(url);
        dataSource.setDriverClassName(driver);
        dataSource.setUsername(username);
        dataSource.setPassword(password);
        return dataSource;
    }
}
- @Configuration :声明我们 JdbcConfig 是一个配置类
- @PropertySource :指定属性文件的路径是: classpath:jdbc.properties
- @Value 为属性注入值
- @Bean将 dataSource() 方法声明为一个注册Bean的方法,Spring会自动调用该方法,将方法的返回值 加入Spring容器中。默认的对象名id=方法名,可以通过@Bean("自定义名字"),来指定新的对象名
然后我们就可以在任意位置通过 @Autowired 注入DataSource了!
4,在 HelloController 中测试
package com.xxy.controller;

import org.springframework.beans.factory.annotation.Autowired;
import org.springframework.web.bind.annotation.GetMapping;
import org.springframework.web.bind.annotation.RestController;

import javax.sql.DataSource;

@RestController
public class HelloController {
    @Autowired
    private DataSource dataSource;

    @GetMapping("/hello")
    public String Hello() {
        return "Hello spring boot!" + dataSource;
    }
}

四,Spring Boot的属性注入
在上面的案例中,我们实验了java配置方式。不过属性注入使用的是@Value注解。这种方式虽然可行,但是不够 强大,因为它只能注入基本类型值。
在SpringBoot中,提供了一种新的属性注入方式,支持各种java基本数据类型及复杂类型的注入。
1,注入流程
1,新建一个类,用来进行属性注入
package com.xxy.config;

import org.springframework.boot.context.properties.ConfigurationProperties;

@ConfigurationProperties(prefix = "jdbc")
public class JdbcProperties {
    private String url;
    private String driver;
    private String password;
    private String username;

    // 省略getter和setter方法
}
- 在类上通过@ConfigurationProperties注解声明当前类为属性读取类
- prefix="jdbc" 读取属性文件中,前缀为jdbc的值。
- 在类上定义各个属性,名称必须与属性文件中 jdbc. 后面部分一致
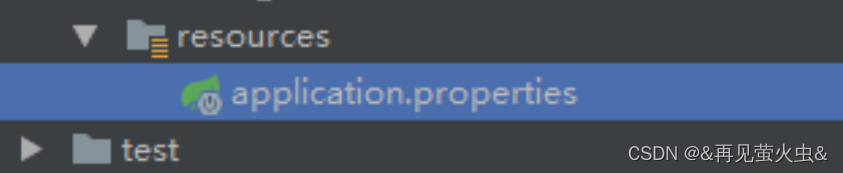
- 需要注意的是,这里我们并没有指定属性文件的地址,所以我们需要把jdbc.properties名称改为 application.properties,这是SpringBoot默认读取的属性文件名:
2,在JdbcConfig中使用这个属性
package com.xxy.config;

import com.alibaba.druid.pool.DruidDataSource;
import org.springframework.boot.context.properties.EnableConfigurationProperties;
import org.springframework.context.annotation.Bean;
import org.springframework.context.annotation.Configuration;

import javax.sql.DataSource;

@Configuration
@EnableConfigurationProperties(JdbcProperties.class)
public class JdbcConfig {

    @Bean
    public DataSource dataSource(JdbcProperties jdbc) {
        DruidDataSource dataSource = new DruidDataSource();
        dataSource.setUrl(jdbc.getUrl());
        dataSource.setDriverClassName(jdbc.getDriver());
        dataSource.setUsername(jdbc.getUsername());
        dataSource.setPassword(jdbc.getPassword());
        return dataSource;
    }
}
通过 @EnableConfigurationProperties(JdbcProperties.class) 来声明要使用 JdbcProperties 这个类的对象,然后可以通过以下方式注入JdbcProperties:
- 方法一:@Autowired注入
@Autowired
private JdbcProperties prop;- 方法二:构造函数注入
private JdbcProperties prop;
public JdbcConfig(Jdbcproperties prop){
    this.prop = prop;
}- 方法三:声明有@Bean的方法参数注入
@Bean
public Datasource dataSource(JdbcProperties prop){
    // ...
}
本例中,我们采用第三种方式。
大家会觉得这种方式似乎更麻烦了,事实上这种方式有更强大的功能,也是SpringBoot推荐的注入方式。两者对比 关系:

- Relaxed binding:松散绑定。不严格要求属性文件中的属性名与成员变量名一致。支持驼峰,中划线,下划线等等转换,甚至支持对 象引导。比如:user.friend.name:代表的是user对象中的friend属性中的name属性,显然friend也是 对象。@value注解就难以完成这样的注入方式。
- meta-data support:元数据支持,帮助IDE生成属性提示(写开源框架会用到)。
2,更优雅的注入
事实上,如果一段属性只有一个Bean需要使用,我们无需将其注入到一个类(JdbcProperties)中。而是直接在需 要的地方声明即可:
1,删除原先的JdbcProperties.java
2,修改application.properties中的driver属性名(要求必须和DataSource中的属性名称保持一致,这样才能正常使用setter方法)

3,修改JdbcConfig
package com.xxy.config;

import com.alibaba.druid.pool.DruidDataSource;
import org.springframework.boot.context.properties.ConfigurationProperties;
import org.springframework.context.annotation.Bean;
import org.springframework.context.annotation.Configuration;

import javax.sql.DataSource;

@Configuration
public class JdbcConfig {

    @Bean
    // 声明要注入的属性前缀,SpringBoot会自动把相关属性通过set方法注入到DataSource中
    @ConfigurationProperties(prefix = "jdbc")
    public DataSource dataSource() {
        DruidDataSource dataSource = new DruidDataSource();
        return dataSource;
    }
}
我们直接把 @ConfigurationProperties(prefix = "jdbc") 声明在需要使用的 @Bean 的方法上,然后SpringBoot 就会自动调用这个Bean(此处是DataSource)的set方法,然后完成注入。使用的前提是:该类必须有对应属性的 set方法!
五,自动配置原理
通过刚才的案例看到,一个整合了SpringMVC的WEB工程开发,变的无比简单,那些繁杂的配置都消失不见了,这 是如何做到的?
这些都是从springboot启动器开始的
我们重点关注@SpringBootApplication注解
1,@SpringBootApplication
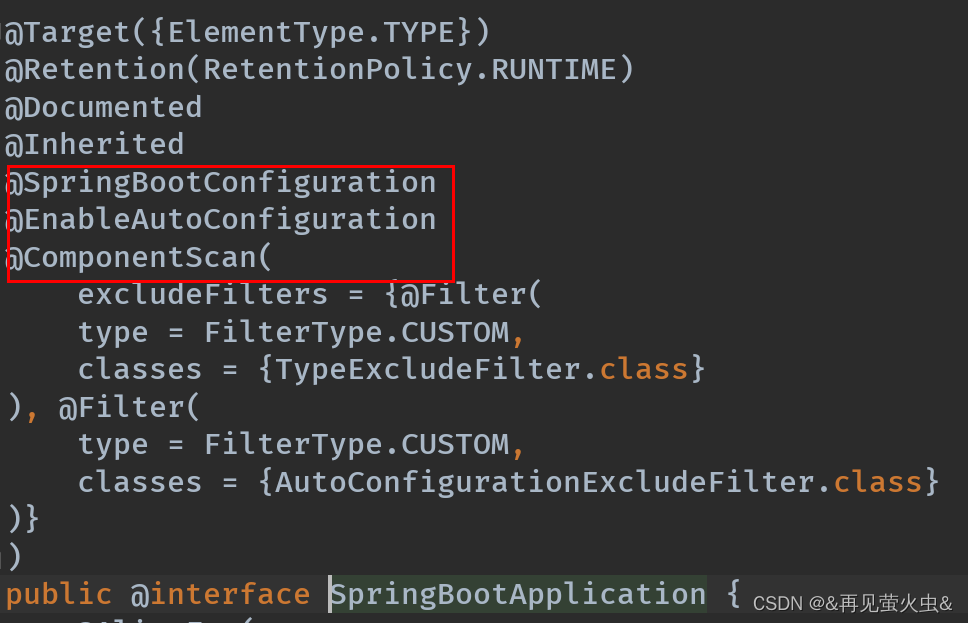
这里重点的注解有3个: @SpringBootConfiguration, @EnableAutoConfiguration, @ComponentScan
2,@SpringBootConfiguration
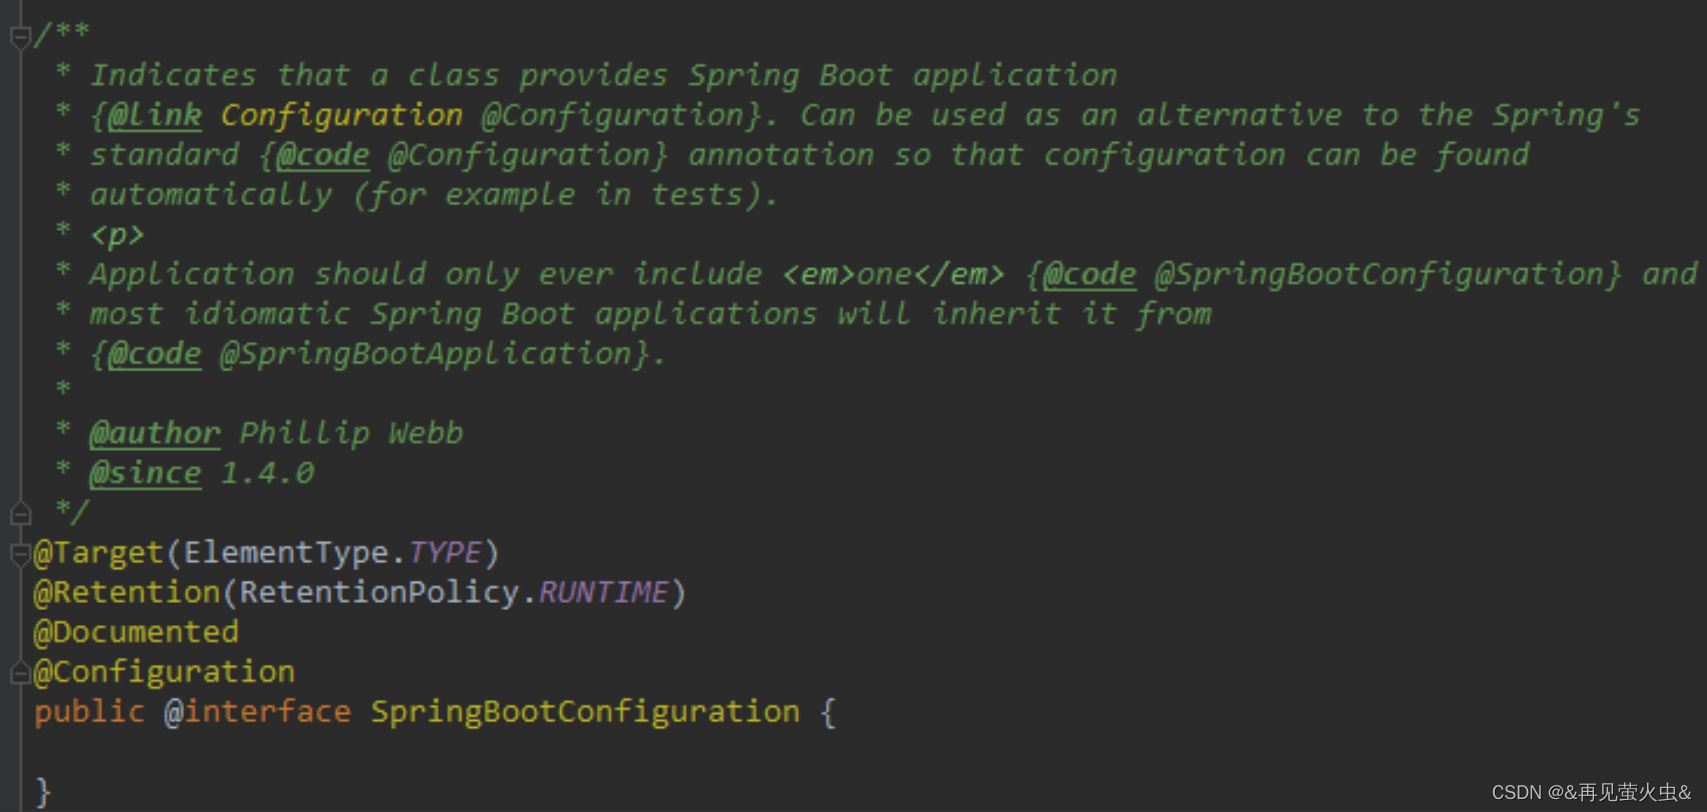
通过这段我们可以看出,在这个注解上面,又有一个 @Configuration 注解。这个注解的作用就是声明当前类是一 个配置类,然后Spring会自动扫描到添加了 @Configuration 的类,并且读取其中的配置信息。
3,@EnableAutoConfiguration
关于这个注解,官网上有一段说明:
The second class-level annotation is @EnableAutoConfiguration . This annotation tells Spring Boot to “guess” how you want to configure Spring, based on the jar dependencies that you have added. Since spring-boot-starter-web added Tomcat and Spring MVC, the auto-configuration assumes that you are developing a web application and sets up Spring accordingly.
简单翻译以下:
第二级的注解 @EnableAutoConfiguration ,告诉SpringBoot基于你所添加的依赖,去“猜测”你想要如何配置 Spring。比如我们引入了 spring-boot-starter-web ,而这个启动器中帮我们添加了 tomcat 、 SpringMVC 的 依赖。此时自动配置就知道你是要开发一个web应用,所以就帮你完成了web及SpringMVC的默认配置了!
总结,SpringBoot内部对大量的第三方库进行了默认配置,我们引入对应库所需的依赖,那么默认配置就会生效。
4,@ComponentScan
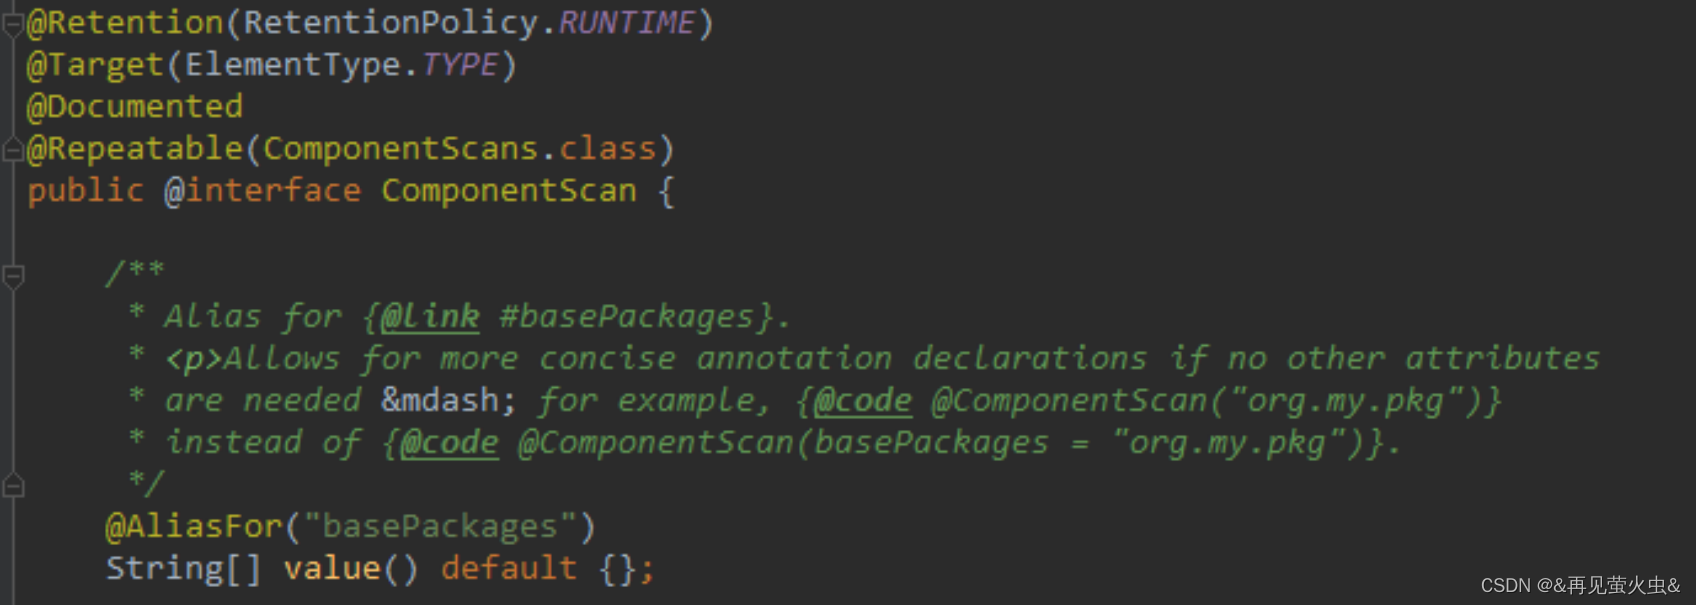
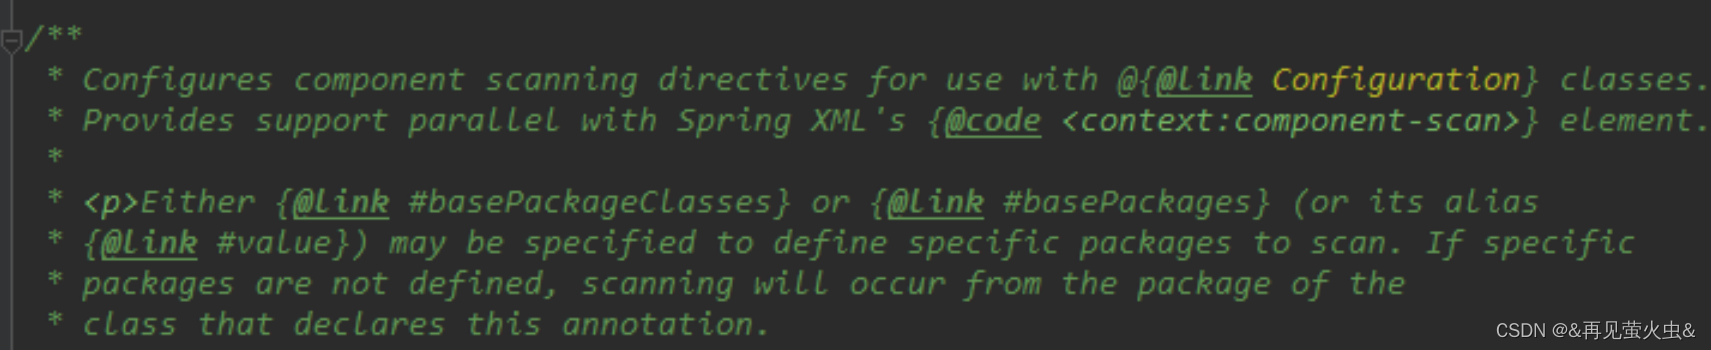
大概的意思:
配置组件扫描的指令。提供了类似与 <context:component-scan> 标签的作用 通过basePackageClasses或者basePackages属性来指定要扫描的包。如果没有指定这些属性,那么将从声明这个注解的类所在的包开始,扫描包及子包。
而我们的@SpringBootApplication注解声明的类就是main函数所在的启动类,因此扫描的包是该类所在包及其子 包。因此,一般启动类会放在一个比较前的包目录中。
5,默认配置原理
@EnableAutoConfiguration会开启SpringBoot的自动配置,并且根据你引入的依赖来生效对应的默认配置, springboot如何做到的?
其实在我们的项目中,已经引入了一个依赖:spring-boot-autoconfigure,其中定义了大量自动配置类
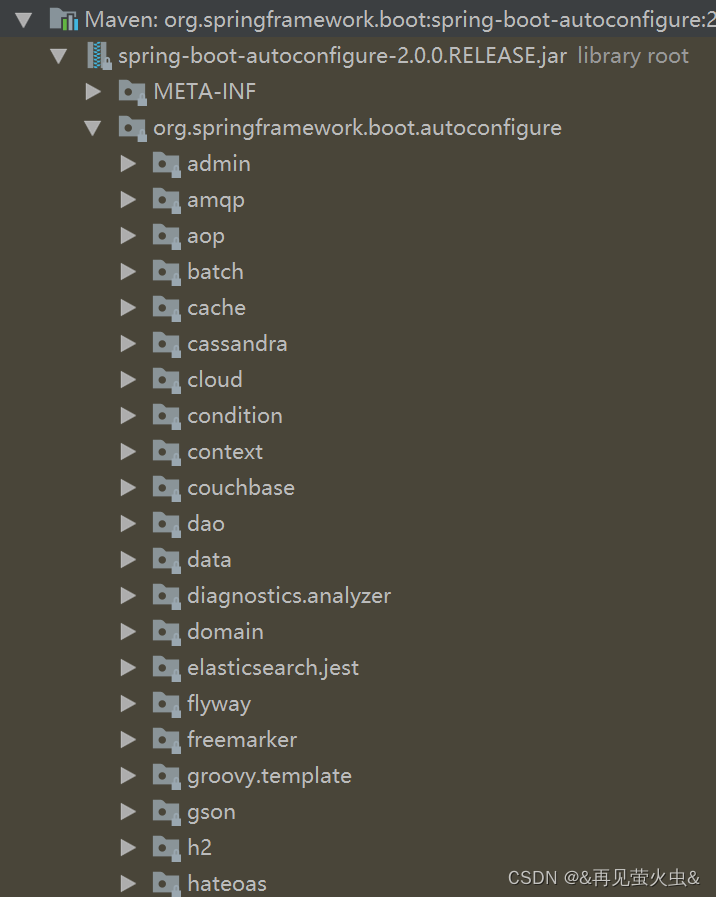
几乎涵盖了现在主流的开源框架,例如: redis、 jms、 amqp、 jdbc、 jackson、 mongodb、 jpa solr、 elasticsearch ... 等等
我们来看一个我们熟悉的,例如SpringMVC。
1,查看mvc 的自动配置类:
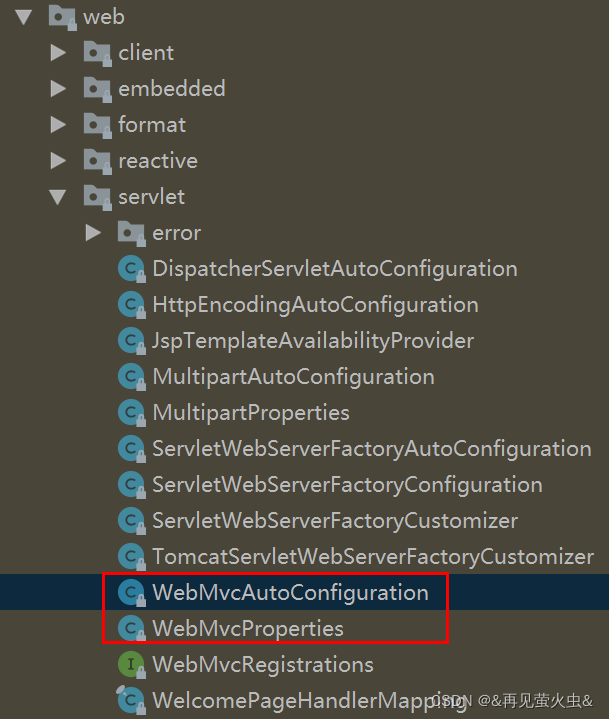
2,打开WebMvcAutoConfiguration:
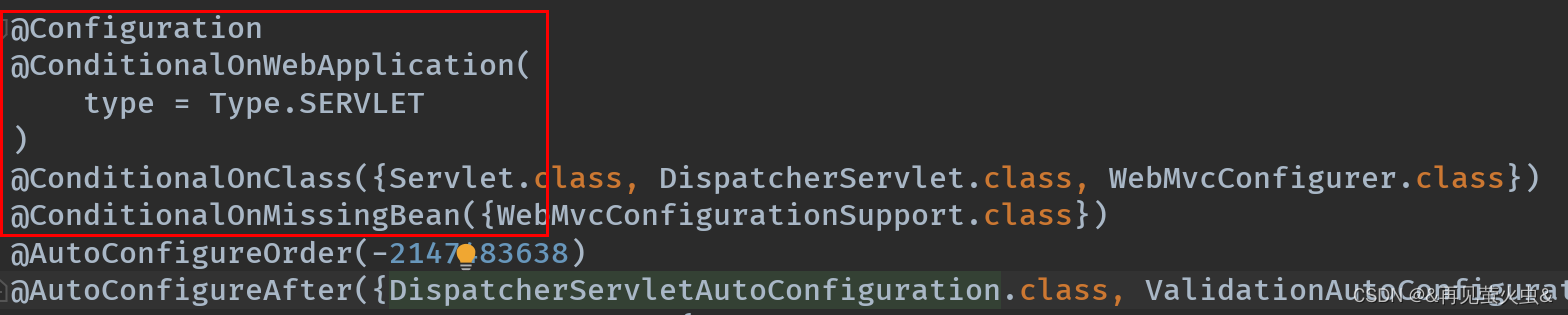
我们看到这个类上的4个注解:
- @Configuration :声明这个类是一个配置类
- @ConditionalOnClass({ Servlet.class, DispatcherServlet.class, WebMvcConfigurer.class }):这里的条件是OnClass,也就是满足以下类存在:Servlet、DispatcherServlet、WebMvcConfigurer,其中 Servlet只要引入了tomcat依赖自然会有,后两个需要引入SpringMVC才会有。这里就是判断你是否引入了相 关依赖,引入依赖后该条件成立,当前类的配置才会生效!
- @ConditionalOnMissingBean(WebMvcConfigurationSupport.class) :这个条件与上面不同,OnMissingBean,是说环境中没有指定的Bean这个才生效。其实这就是自定义配置的 入口,也就是说,如果我们自己配置了一个WebMVCConfigurationSupport的类,那么这个默认配置就会失 效!
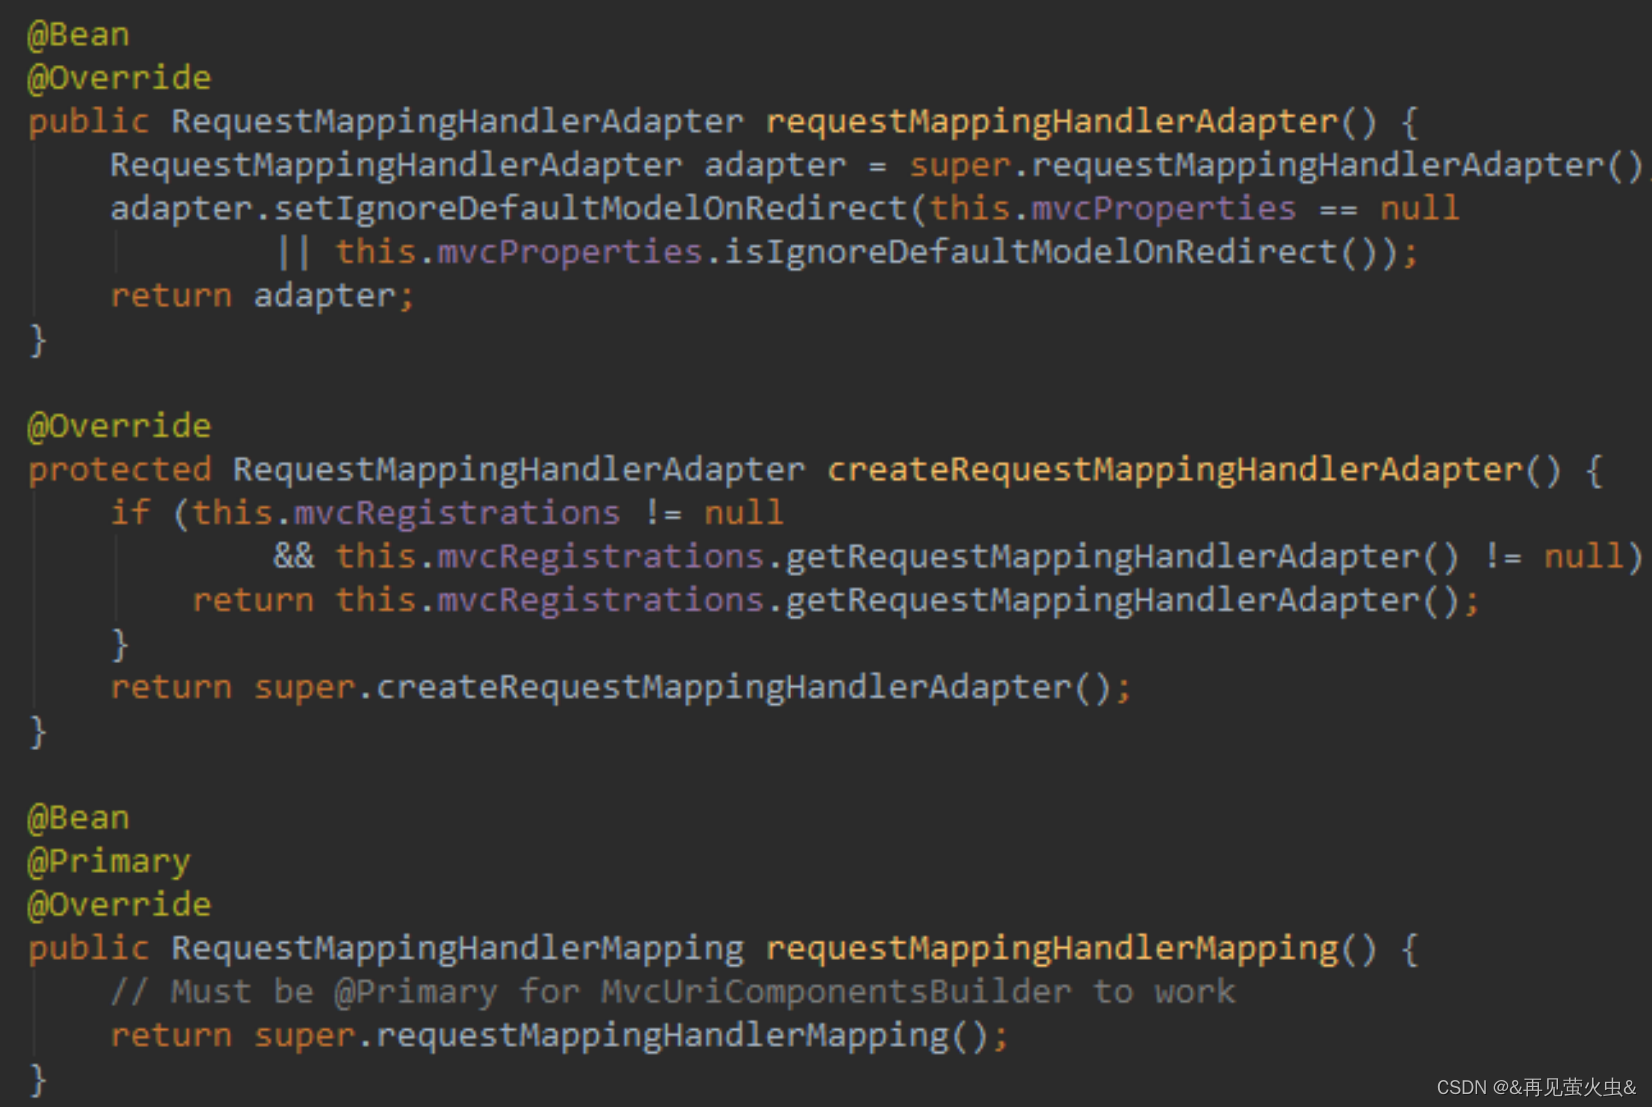
3,接着,我们查看该类中定义了什么:
视图解析器:
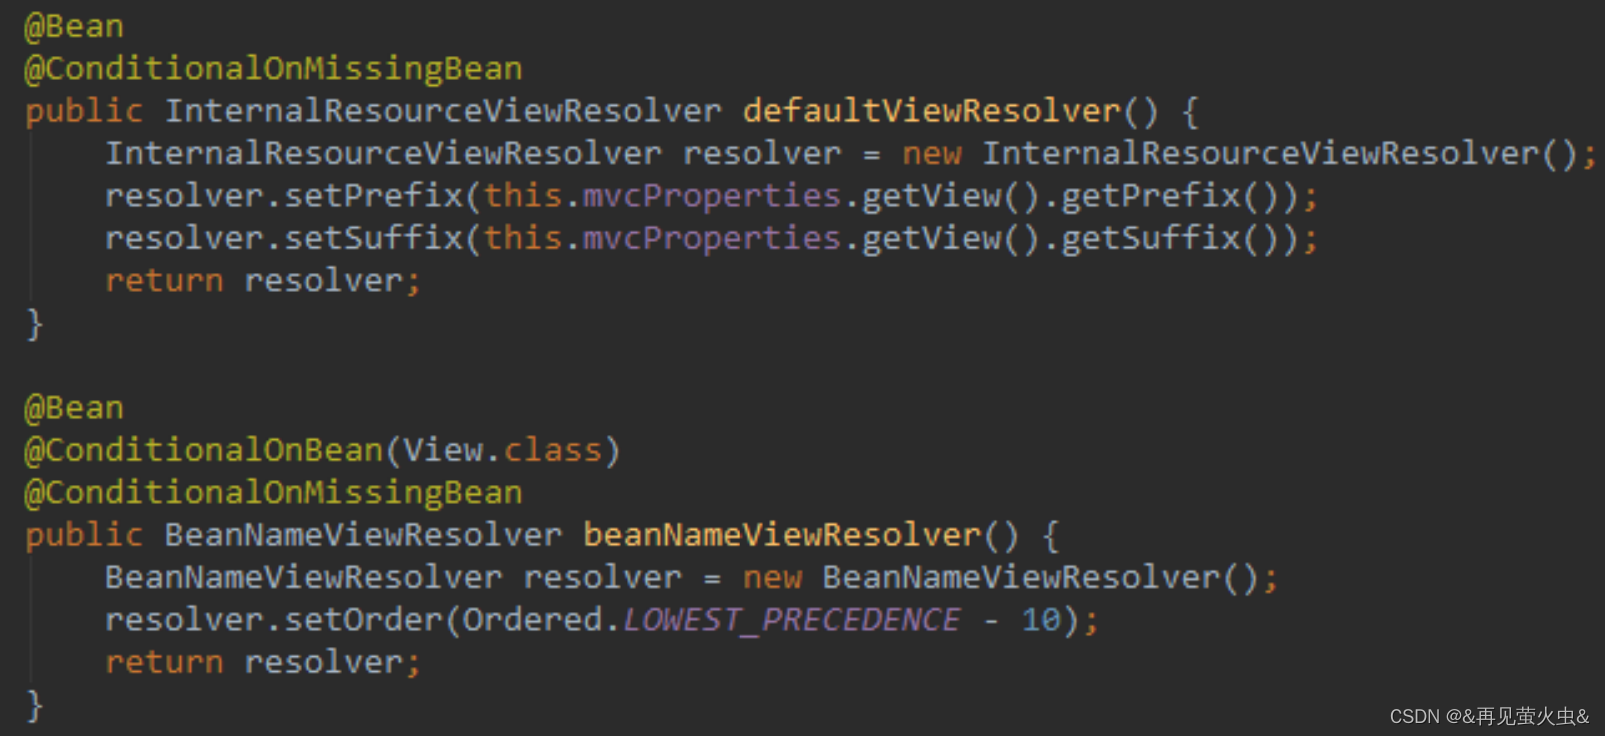
处理器适配器(HandlerAdapter)
4,总结
SpringBoot为我们提供了默认配置,而默认配置生效的条件一般有两个:
- 引入了相关依赖
- 没有自定义配置类
六,整合springmvc
1,修改端口
直接在application.properties中添加
server.port=80重启服务后测试
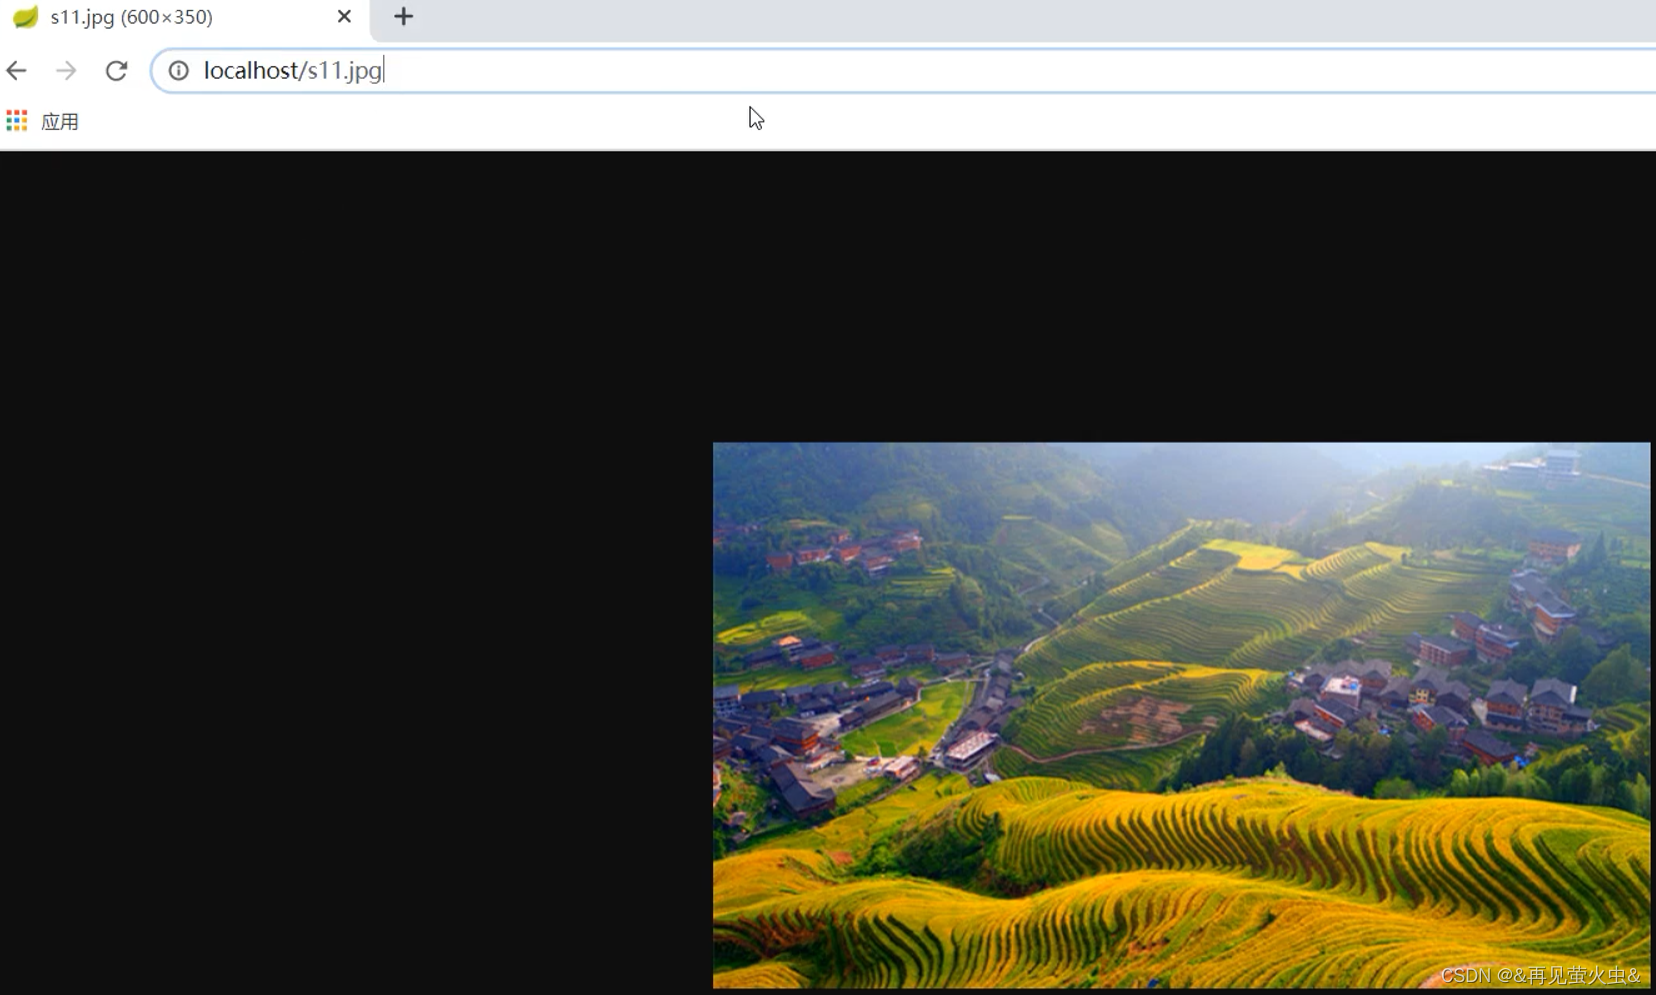
2,访问静态资源
ResourceProperties的类,里面就定义了静态资源的默认查找路径:

默认的静态资源路径为:
- classpath:/META-INF/resources/
- classpath:/resources/
- classpath:/static/
- classpath:/public
只要静态资源放在这些目录中任何一个,SpringMVC都会帮我们处理。
我们习惯会把静态资源放在 classpath:/static/ 目录下。我们创建目录,并且添加一些静态资源:
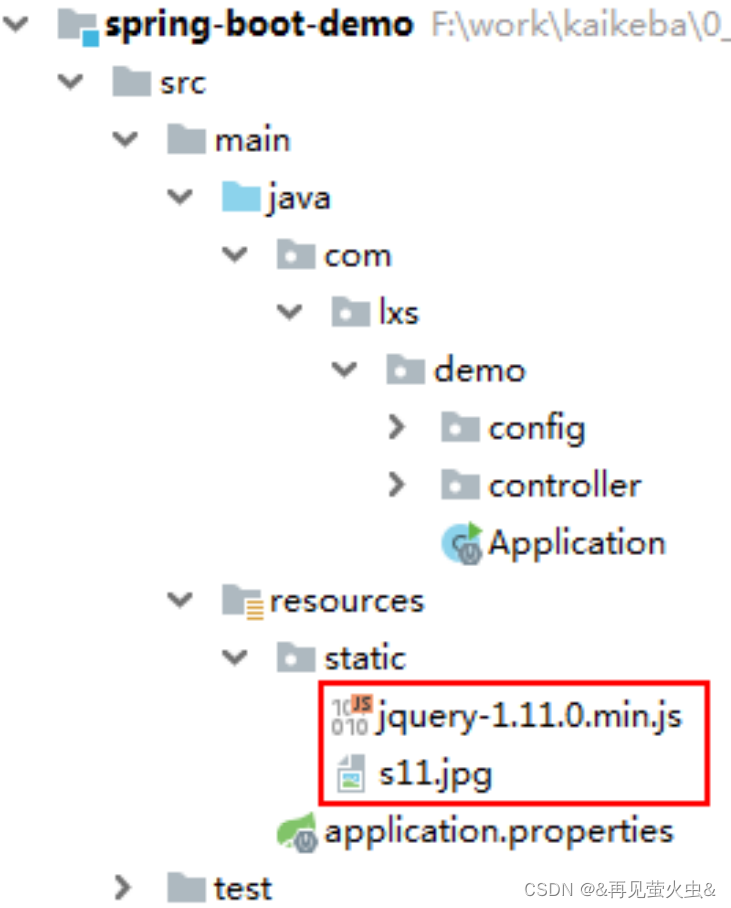
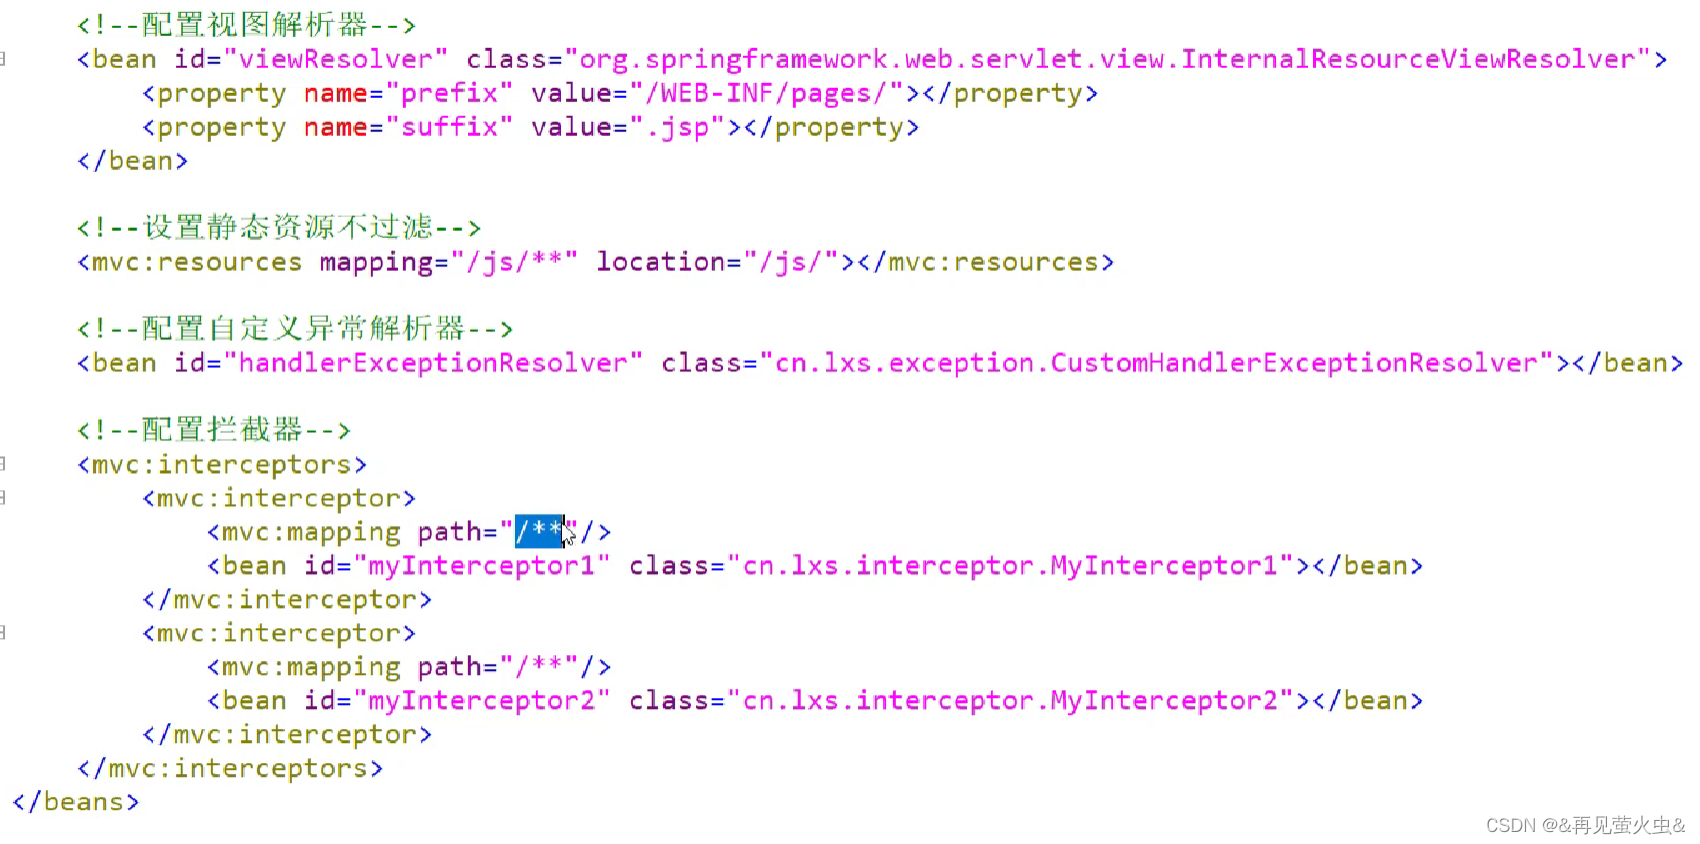
3,拦截器配置
1,首先我们定义一个拦截器:
package com.xxy.interceptor;

import org.slf4j.Logger;
import org.slf4j.LoggerFactory;
import org.springframework.web.servlet.HandlerInterceptor;
import org.springframework.web.servlet.ModelAndView;

import javax.servlet.http.HttpServletRequest;
import javax.servlet.http.HttpServletResponse;

public class LoginInterceptor implements HandlerInterceptor {
    private Logger logger = LoggerFactory.getLogger(LoginInterceptor.class);
    @Override
    public boolean preHandle(HttpServletRequest request, HttpServletResponse response, Object handler) throws Exception {
        logger.debug("处理器执行前执行!");
        return true;
    }

    @Override
    public void postHandle(HttpServletRequest request, HttpServletResponse response, Object handler, ModelAndView modelAndView) throws Exception {
        logger.debug("处理器执行后执行!");
    }

    @Override
    public void afterCompletion(HttpServletRequest request, HttpServletResponse response, Object handler, Exception ex) throws Exception {
        logger.debug("跳转后执行!");
    }
}
2,通过实现 WebMvcConfigurer 并添加 @Configuration 注解来实现自定义部分SpringMvc配置:
之前的配置方法:(在mvc配置文件中添加配置信息)
现在的方法:
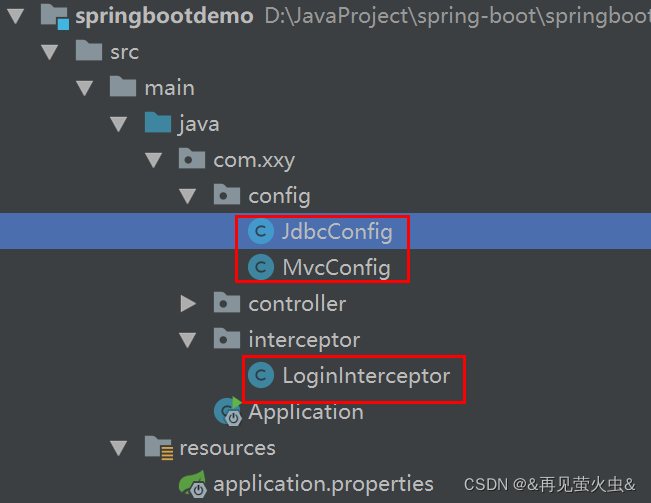
package com.xxy.config;

import com.xxy.interceptor.LoginInterceptor;
import org.springframework.context.annotation.Bean;
import org.springframework.context.annotation.Configuration;
import org.springframework.web.servlet.config.annotation.InterceptorRegistry;
import org.springframework.web.servlet.config.annotation.WebMvcConfigurer;

@Configuration
public class MvcConfig implements WebMvcConfigurer {
    /**
     * 通过@Bean注解,将我们定义的拦截器注册到Spring容器
     * @return
     */
    @Bean
    public LoginInterceptor loginInterceptor() {
        return new LoginInterceptor();
    }

    /**
     * 重写接口中的addInterceptors方法,添加自定义拦截器
     * @param registry
     */
    @Override
    public void addInterceptors(InterceptorRegistry registry) {
        // 通过registry来注册拦截器,通过addPathPatterns来添加拦截路径
        registry.addInterceptor(this.loginInterceptor()).addPathPatterns("/**");
    }
}
路径匹配通配符
- ‘?’ 匹配任何单字符
- ‘*’ 匹配0或者任意数量的字符
- ‘/**’ 匹配0或者更多的目录
结构如下
接下来运行并查看日志:
你会发现日志中什么都没有,因为我们记录的log级别是debug,默认是显示info以上,我们需要进行配置。
SpringBoot通过 logging.level.*=debug 来配置日志级别,*填写包名
logging.level.com.xxy=debug
七,整合jdbc
1,导入资料中的t_user.sql文件
CREATE DATABASE /*!32312 IF NOT EXISTS*/`springboot` /*!40100 DEFAULT CHARACTER SET utf8 */;

USE `springboot`;

/*Table structure for table `tb_user` */

DROP TABLE IF EXISTS `tb_user`;

CREATE TABLE `tb_user` (
  `id` bigint(20) NOT NULL AUTO_INCREMENT,
  `user_name` varchar(50) DEFAULT NULL,
  `password` varchar(50) DEFAULT NULL,
  `name` varchar(50) DEFAULT NULL,
  `age` int(11) DEFAULT NULL,
  `sex` int(11) DEFAULT NULL,
  `birthday` date DEFAULT NULL,
  `created` date DEFAULT NULL,
  `updated` date DEFAULT NULL,
  `note` varchar(2000) DEFAULT NULL,
  PRIMARY KEY (`id`)
) ENGINE=InnoDB AUTO_INCREMENT=6 DEFAULT CHARSET=utf8;

/*Data for the table `tb_user` */

insert  into `tb_user`(`id`,`user_name`,`password`,`name`,`age`,`sex`,`birthday`,`created`,`updated`,`note`) values (1,'zhangsan','1','张三',18,1,'2019-02-27','2019-02-27','2019-02-27','在学习Java...'),(2,'lisi','1','李四',18,1,'2019-02-27','2019-02-27','2019-02-27','在学习Java...'),(3,'wangwu','1','王五',18,1,'2019-02-27','2019-02-27','2019-02-27','在学习Java...'),(4,'fanbingbing','1','范冰冰',18,2,'2019-02-27','2019-02-27','2019-02-27','在学习Java...'),(5,'guodegang','1','郭德纲',18,1,'2019-02-27','2019-02-27','2019-02-27','在学习Java...');
2,引入依赖
(需要删除druid依赖以及JdbcConfig.java)
        <dependency>
            <groupId>org.springframework.boot</groupId>
            <artifactId>spring-boot-starter-jdbc</artifactId>
        </dependency>
        <dependency>
            <groupId>org.springframework.boot</groupId>
            <artifactId>spring-boot-starter-test</artifactId>
        </dependency>
        <dependency>
            <groupId>mysql</groupId>
            <artifactId>mysql-connector-java</artifactId>
            <version>8.0.23</version>
        </dependency>
3,配置连接池
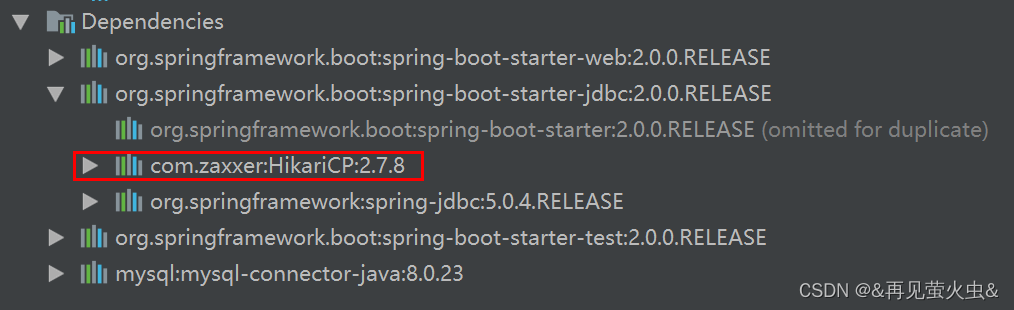
其实,在刚才引入jdbc启动器的时候,SpringBoot已经自动帮我们引入了一个连接池:
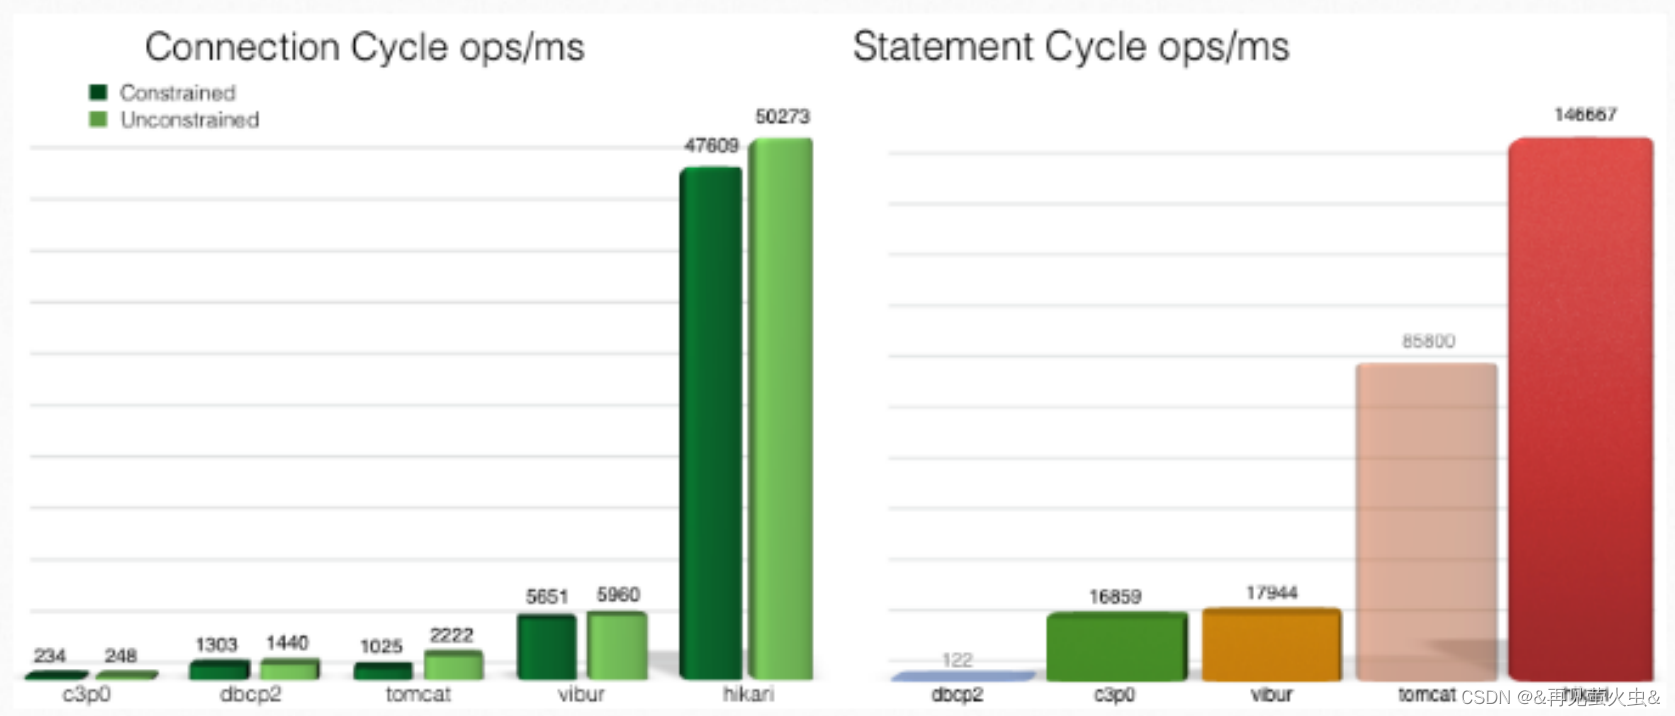
HikariCP应该是目前速度最快的连接池了,我们看看它与c3p0的对比:
因此,我们只需要指定连接池参数即可:
logging.level.com.xxy=debug

# 连接四大参数
spring.datasource.url=jdbc:mysql://localhost:3306/springboot
spring.datasource.username=root
spring.datasource.password=root
# 可省略,SpringBoot自动推断
spring.datasource.driverClassName=com.mysql.jdbc.Driver

spring.datasource.hikari.idle-timeout=60000
spring.datasource.hikari.maximum-pool-size=30
spring.datasource.hikari.minimum-idle=10
4,实体类
import java.util.Date;

public class User {

  private long id;
  private String userName;
  private String password;
  private String name;
  private Integer age;
  private Integer sex;
  private Date birthday;
  private Date created;
  private Date updated;
  private String note;
}
5,dao
@Repository
public class JdbcDao {
    @Autowired
    private JdbcTemplate jdbcTemplate;

    public List<User> findAll() {
        return jdbcTemplate.query("select * from tb_user", new BeanPropertyRowMapper<>(User.class));
    }
}
6,测试
测试类的报名要和启动器所在的包保持一致;
或者在@SpringBootTest注解中加上classer=xxx。
否则会报错
@RunWith(SpringRunner.class)
@SpringBootTest(classes = Application.class)
public class JdbcDaoTest extends TestCase {
    @Autowired
    private JdbcDao jdbcDao;

    @Test
    public void testFindAll() {
        List<User> all = jdbcDao.findAll();
        for (User u : all) System.out.println(u);
    }

}
八,整合mybatis
SpringBoot官方并没有提供Mybatis的启动器,不过Mybatis官网自己实现了:
1,引入依赖
        <dependency>
            <groupId>org.mybatis.spring.boot</groupId>
            <artifactId>mybatis-spring-boot-starter</artifactId>
            <version>1.3.2</version>
        </dependency>
2,配置
# mybatis 别名扫描
mybatis.type-aliases-package=com.xxy.pojo
# mapper.xml文件位置,如果没有映射文件,请注释掉
mybatis.mapper-locations=classpath:mappers/*.xml
3,实体类。仍使用上面例子中的User
4,接口。
这里的dao接口和之前mybatis笔记中的mapper接口功能相同
@Repository
public interface UserDao {
    public List<User> findAll();
}
5,映射文件
映射文件需要和接口名称相同,后缀为xml。比如接口为UserDao.java,映射文件为UserDao.xml;
按照上面在application.properties中配置的mapper-location,这里的映射文件应该放在resources目录下的mappers文件夹中;
<?xml version="1.0" encoding="UTF-8"?>
<!DOCTYPE mapper PUBLIC "-//mybatis.org//DTD Mapper 3.0//EN"
        "http://mybatis.org/dtd/mybatis-3-mapper.dtd">
<mapper namespace="com.xxy.dao.UserDao">
    <select id="findAll" resultType="user">
        select * from tb_user
    </select>
</mapper>
6,Mapper的加载接口代理对象
方式一:使用@Mapper注解(不推荐)
需要注意,这里没有配置mapper接口扫描包,因此我们需要给每一个Mapper接口添加 @Mapper 注解,才能被识 别。
@Mapper
public interface UserMapper {

}
方式二:设置MapperScan,注解扫描的包(推荐)
@MapperScan("dao所在的包"),自动搜索包中的接口,产生dao的代理对象
@SpringBootApplication
@MapperScan("com.xxy.dao")
public class Application {
    public static void main(String[] args) {
        SpringApplication.run(Application.class, args);
    }
}
7,测试
@RunWith(SpringRunner.class)
@SpringBootTest(classes = Application.class)
public class UserDaoTest {
    @Autowired
    private UserDao userDao;

    @Test
    public void findAllTest() {
        List<User> userList = userDao.findAll();
        for (User u : userList) System.out.println(u);
    }

}
九,整合tk-mybatis
使用Mybatis时,最大的问题是,要写大量的重复SQL语句在xml文件中,除了特殊的业务逻辑SQL语句之外,还有 大量结构类似的增删改查SQL。而且,当数据库表结构改动时,对应的所有SQL以及实体类都需要更改。这大量增 加了程序员的负担。避免重复书写CRUD映射的框架有两个
- 通用mybatis(tk mybatis)
- mybatis plus,功能更加强大
1,使用案例
1,通用Mapper的作者也为自己的插件编写了启动器,我们直接引入即可:
        <dependency>
            <groupId>tk.mybatis</groupId>
            <artifactId>mapper-spring-boot-starter</artifactId>
            <version>2.0.2</version>
        </dependency>
2,实体类
tk mybatis 实体类使用的注解是jpa注解(@詠聖wK【JPA注解大全详解参考手册】)
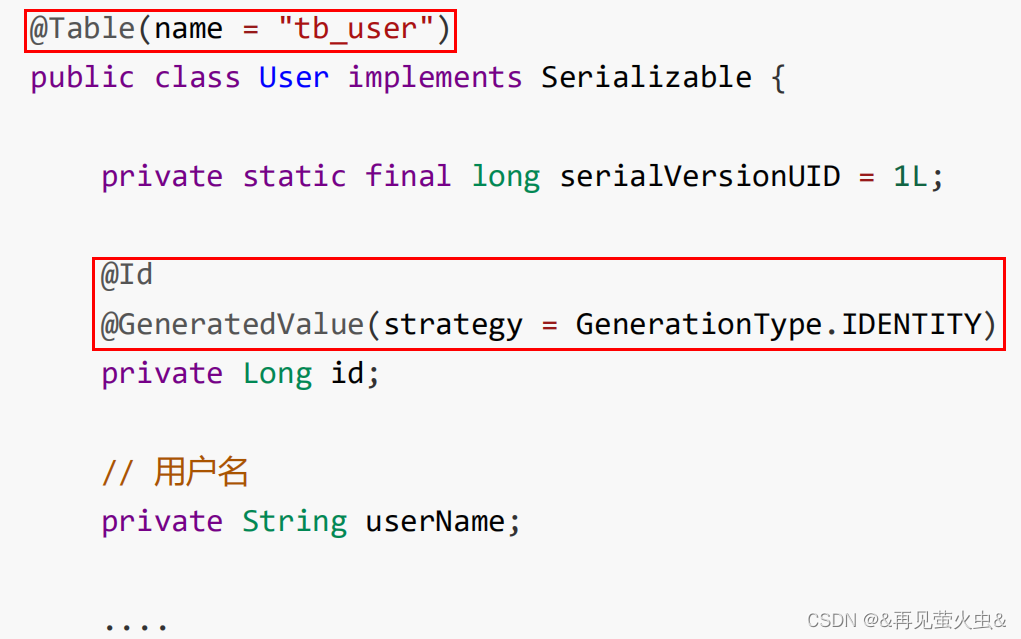
注意事项:
- 1. 默认表名=类名,字段名=属性名
- 2. 表名可以使用 @Table(name = "tableName") 进行指定
- 3. @Column(name = "fieldName") 指定
- 4. 使用 @Transient 注解表示跟字段不进行映射
- 5. 主键和主键策略必须进行指定
@Table(name = "tb_user")
public class User implements Serializable {

  @Id
  @GeneratedValue(strategy = GenerationType.IDENTITY)
  private long id;
  private String userName;
  private String password;
  private String name;
  private Integer age;
  private Integer sex;
  private Date birthday;
  private Date created;
  private Date updated;
  private String note;

  ...
}
3,定义mapper接口,不需要编写映射文件xxx.xml
由于在Application.java中使用了接口扫描的注解,这里的Mapper已经可以自动注入了,不需要再引入@Repository;
接口需要继承Mapper,注意引入tk.mybatis.mapper;
一旦继承了Mapper,继承的Mapper就拥有了Mapper所有的通用方法;
import com.xxy.pojo.User;
import tk.mybatis.mapper.common.Mapper;
public interface UserMapper extends Mapper<User> {
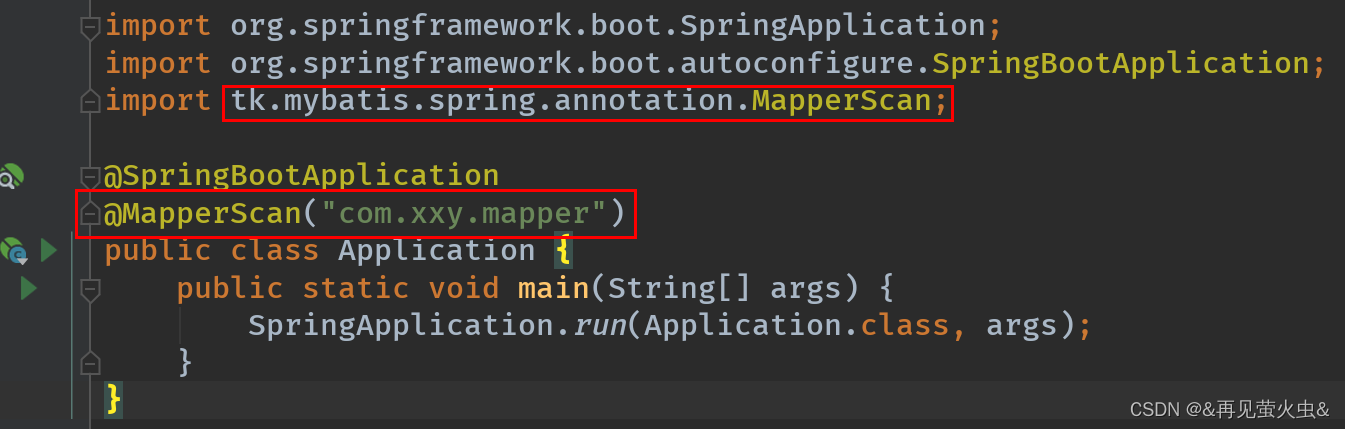
}4,mapper接口扫描
注意要把Application.java中,MapperScan类改成tk-mybatis构件的类
5,测试
引入tk.mybatis的MapperScan扫描包时,可能会飘红,但是不影响测试;
@RunWith(SpringRunner.class)
@SpringBootTest(classes = Application.class)
public class UserMapperTest {
@Autowired
private UserMapper userMapper;
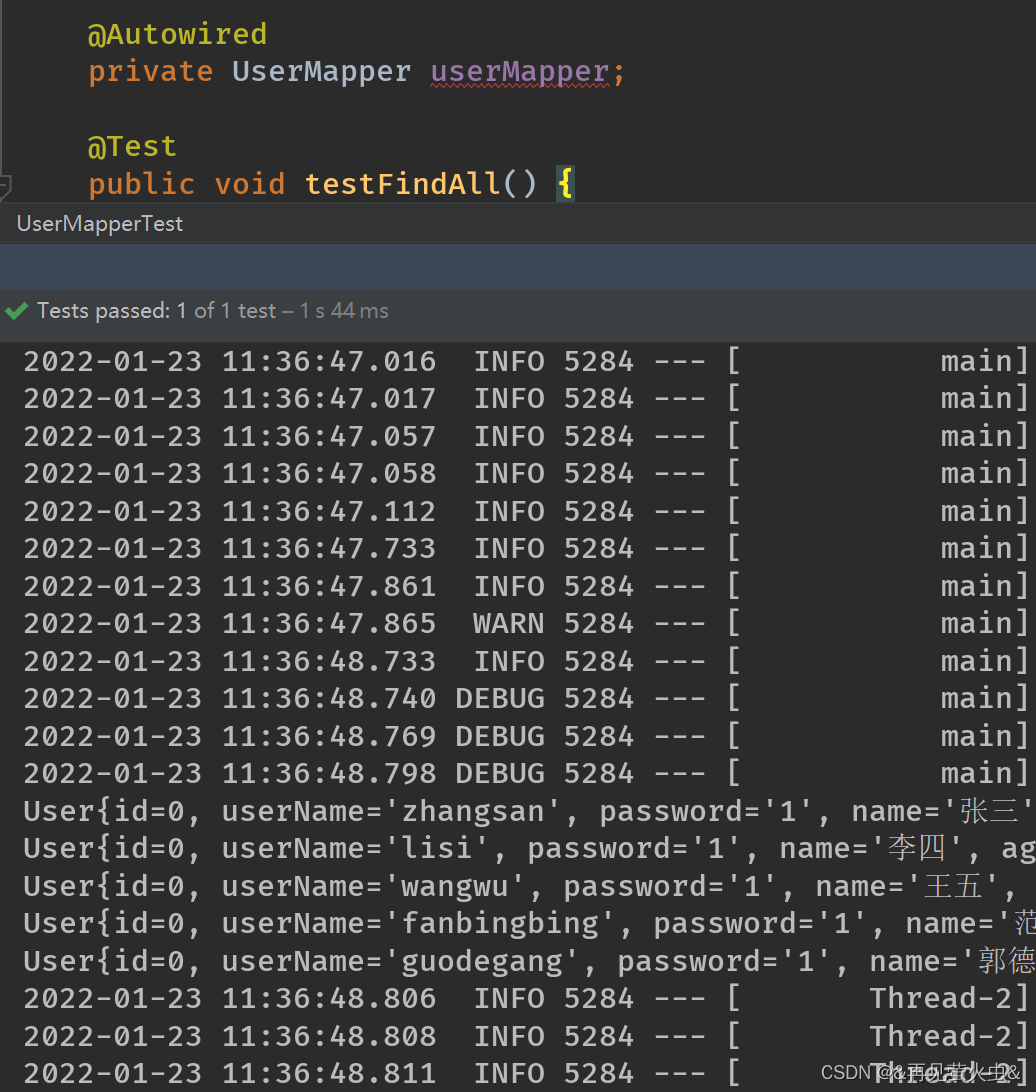
@Test
public void testFindAll() {
userMapper.selectAll().forEach(user -> {
System.out.println(user);
});
}
@Test
public void testByExample () {
Example example = new Example(User.class);
example.createCriteria().andLike("name", "%德%");
userMapper.selectByExample(example).forEach(user -> {
System.out.println(user);
});
}
}
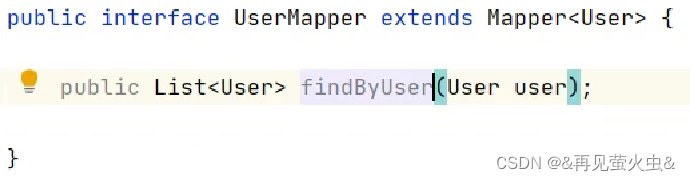
6,映射复杂方法
仍可以通过xml文件配置的方法,编写复杂的查询语句
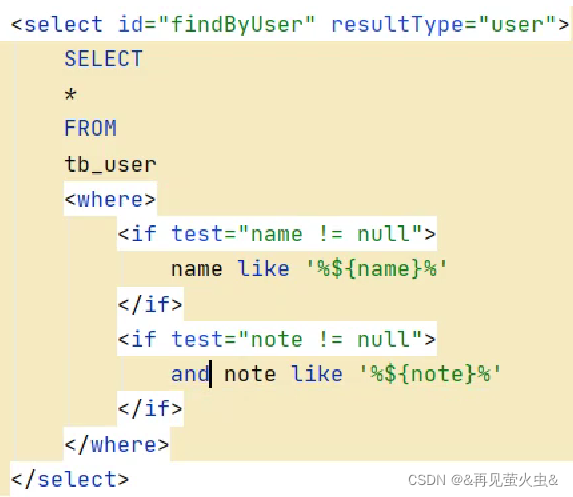
同时要和接口文件中的方法保持一致
2,tk.mybatis中Mapper的内置方法
Select
List<T> select(T record);
- 根据实体中的属性值进行查询,查询条件使用等号
T selectByPrimaryKey(Object key);
- 根据主键字段进行查询,方法参数必须包含完整的主键属性, 查询条件使用等号
List<T> selectAll();
- 查询全部结果,select(null)方法能达到同样的效果
T selectOne(T record);
- 根据实体中的属性进行查询,只能有一个返回值,有多个结果是抛出异 常,查询条件使用等号
int selectCount(T record);
- 根据实体中的属性查询总数,查询条件使用等号
Insert
int insert(T record);
- 保存一个实体,null的属性也会保存,不会使用数据库默认值
int insertSelective(T record);
- 保存一个实体,null的属性不会保存,会使用数据库默认值
Update
int updateByPrimaryKey(T record);
- 根据主键更新实体全部字段,null值会被更新
int updateByPrimaryKeySelective(T record);
- 根据主键更新属性不为null的值
Delete
int delete(T record);
- 根据实体属性作为条件进行删除,查询条件使用等号
int deleteByPrimaryKey(Object key);
- 根据主键字段进行删除,方法参数必须包含完整的主键属性
Example
List<T> selectByExample(Object example);
- 根据Example条件进行查询 重点:这 个查询支持通过 Example 类指定查询列,通过 selectProperties 方法指定查询列
int selectCountByExample(Object example);
- 根据Example条件进行查询总数
int updateByExample(@Param("record") T record, @Param("example") Object example);
- 根据 Example条件更新实体 record 包含的全部属性,null值会被更新
int updateByExampleSelective(@Param("record") T record, @Param("example") Object example);
- 根据Example条件更新实体 record 包含的不是null的属性值
int deleteByExample(Object example);
- 根据Example条件删除数据
十,thymeleaf
Thymeleaf 是一个跟 FreeMarker 类似的模板引擎,它可以完全替代 JSP 。相较与其他的模板引擎,它有如下特 点:
- 动静结合:Thymeleaf 在有网络和无网络的环境下皆可运行,无网络显示静态内容,有网络用后台得到数据 替换静态内容
- 与SpringBoot完美整合,springboot默认整合thymeleaf
1,入门案例
1,编写UserService,调用UserMapper的查询所有方法
@Service
public class UserService {
    @Autowired
    private UserMapper userMapper;

    public List<User> findAll() {
        return userMapper.selectAll();
    }
}
2,编写一个controller,返回一些用户数据
@Controller
public class UserController {

    @Autowired
    private UserService userService;

    @RequestMapping("/all")
    public String findAll(Model model) {
        List<User> all = userService.findAll();
        model.addAttribute("users", all);
        // 返回模板名称(就是classpath:/templates/目录下的html文件名)
        return "users";
    }

}
3,引入启动器
        <dependency>
            <groupId>org.springframework.boot</groupId>
            <artifactId>spring-boot-starter-thymeleaf</artifactId>
        </dependency>
SpringBoot会自动为Thymeleaf注册一个视图解析器:
与解析JSP的InternalViewResolver类似,Thymeleaf也会根据前缀和后缀来确定模板文件的位置
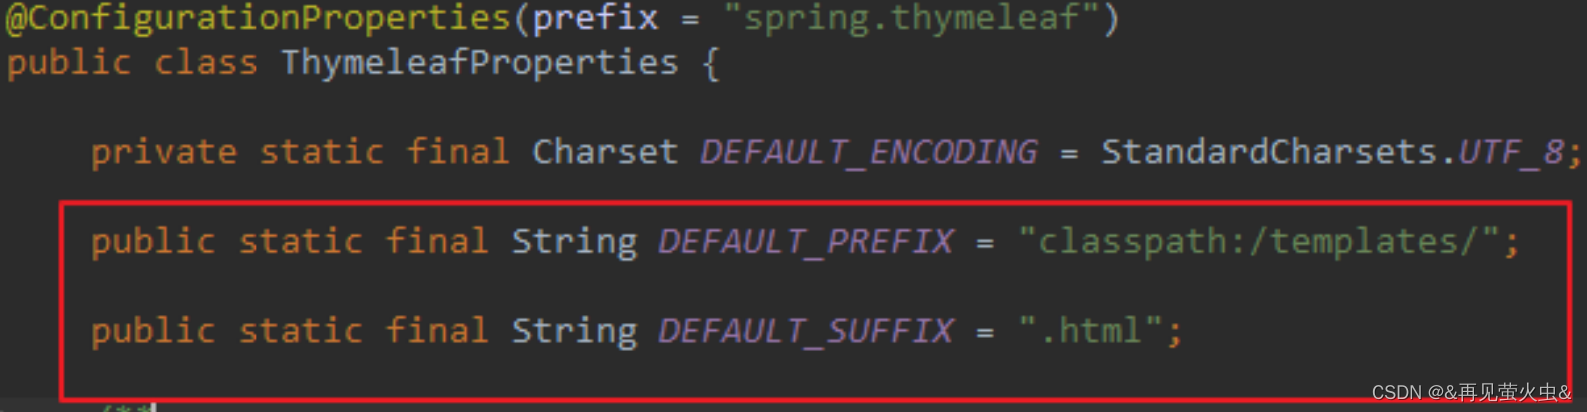
- 默认前缀: classpath:/templates/
- 默认后缀: .html
所以如果我们返回视图: users ,会指向到 classpath:/templates/users.html
一般我们无需进行修改,默认即可。
4,模板默认放在classpath下的templates文件夹,我们新建一个html文件放入其中
注意,把html 的名称空间,改成: xmlns:th="http://www.thymeleaf.org" 会有语法提示
<!DOCTYPE html>
<html xmlns:th="http://www.thymeleaf.org">
<head>
    <meta charset="UTF-8">
    <title>首页</title>
    <style type="test/css">
        table {border-collapse: collapse; font-size: 14px; width: 80%; margin: auto}
        table, th, td {border: 1px solid darkslategray;padding: 10px}
    </style>
</head>
<body>
<div style="text-align: center">
    <span style="color: darkslategray; font-size: 30px">欢迎光临!</span>
    <hr/>
    <table class="list">
        <tr>
            <th>id</th>
            <th>姓名</th>
            <th>用户名</th>
            <th>年龄</th>
            <th>性别</th>
            <th>生日</th>
            <th>备注</th>
            <th>操作</th>
        </tr>
        <tr th:each="user, status : ${users}" th:object="${user}">
            <td th:text="${user.id}">1</td> <td th:text="*{name}">张三</td>
            <td th:text="*{userName}">zhangsan</td>
            <td th:text="${user.age}">20</td>
            <td th:text="${user.sex} == 1 ? '男': '女'">男</td>
            <td th:text="${#dates.format(user.birthday, 'yyyy-MM-dd')}">1980-02-30</td>
            <td th:text="${user.note}">1</td>
            <td>
                <a th:href="@{/delete(id=${user.id}, userName=*{userName})}">删除</a>
                <a th:href="|/update/${user.id}|">修改</a>
                <a th:href="'/approve/' + ${user.id}">审核</a>
            </td>
        </tr>
    </table>
</div>
</body>
</html>
5,模板缓存
Thymeleaf会在第一次对模板解析之后进行缓存,极大的提高了并发处理能力。但是这给我们开发带来了不便,修 改页面后并不会立刻看到效果,我们开发阶段可以关掉缓存使用:
# 开发阶段关闭thymeleaf的模板缓存
spring.thymeleaf.cache=false
十一,mp
Mybatis-Plus(简称MP)是一个 Mybatis 的增强工具,在 Mybatis 的基础上只做增强不做改变,避免了我 们重复CRUD语句。

1,yml配置简介
在Springboot中,推荐使用properties或者YAML文件来完成配置,但是对于较复杂的数据结构来说,YAML又远远 优于properties。我们快速介绍YAML的常见语法格式。
先来看一个Springboot中的properties文件和对应YAML文件的对比:
#properties(示例来源于Springboot User guide):
environments.dev.url=http://dev.bar.com
environments.dev.name=Developer Setup
environments.prod.url=http://foo.bar.com
environments.prod.name=My Cool App
my.servers[0]=dev.bar.com
my.servers[1]=foo.bar.com
可以明显的看到,在处理层级关系的时候,properties需要使用大量的路径来描述层级(或者属性),比如 environments.dev.url和environments.dev.name。
其次,对于较为复杂的结构,比如数组(my.servers),写起 来更为复杂。而对应的YAML格式文件就简单很多:
#YAML格式
environments:
    dev:
        url: http://dev.bar.com
        name: Developer Setup
    prod:
        url: http://foo.bar.com
        name: My Cool App
my:
    servers:
        - dev.bar.com
        - foo.bar.com
2,入门案例
1,引入依赖
<?xml version="1.0" encoding="UTF-8"?>
<project xmlns="http://maven.apache.org/POM/4.0.0"
xmlns:xsi="http://www.w3.org/2001/XMLSchema-instance"
xsi:schemaLocation="http://maven.apache.org/POM/4.0.0 http://maven.apache.org/xsd/maven-4.0.0.xsd">
<modelVersion>4.0.0</modelVersion>
<groupId>com.xxy</groupId>
<artifactId>spring-boot-demo</artifactId>
<packaging>pom</packaging>
<version>1.0-SNAPSHOT</version>
<properties>
<project.build.sourceEncoding>UTF-8</project.build.sourceEncoding>
<project.reporting.outputEncoding>UTF-8</project.reporting.outputEncoding>
<java.version>1.8</java.version>
<mybatisplus.version>3.3.2</mybatisplus.version>
<skipTests>true</skipTests>
</properties>
<parent>
<groupId>org.springframework.boot</groupId>
<artifactId>spring-boot-starter-parent</artifactId>
<version>2.3.0.RELEASE</version>
</parent>
<dependencies>
<dependency>
<groupId>org.springframework.boot</groupId>
<artifactId>spring-boot-starter</artifactId>
</dependency>
<!--基于内存的数据库-->
<dependency>
<groupId>com.h2database</groupId>
<artifactId>h2</artifactId>
<scope>runtime</scope>
</dependency>
<dependency>
<groupId>com.baomidou</groupId>
<artifactId>mybatis-plus-boot-starter</artifactId>
<version>${mybatisplus.version}</version>
</dependency>
<!--测试框架-->
<dependency>
<groupId>org.assertj</groupId>
<artifactId>assertj-core</artifactId>
<scope>test</scope>
</dependency>
<!--简化实体类开发。不需要实现getter和setter方法-->
<dependency>
<groupId>org.projectlombok</groupId>
<artifactId>lombok</artifactId>
<scope>provided</scope>
</dependency>
<dependency>
<groupId>org.springframework.boot</groupId>
<artifactId>spring-boot-starter-test</artifactId>
</dependency>
</dependencies>
<build>
<plugins>
<plugin>
<groupId>org.springframework.boot</groupId>
<artifactId>spring-boot-maven-plugin</artifactId>
</plugin>
</plugins>
</build>
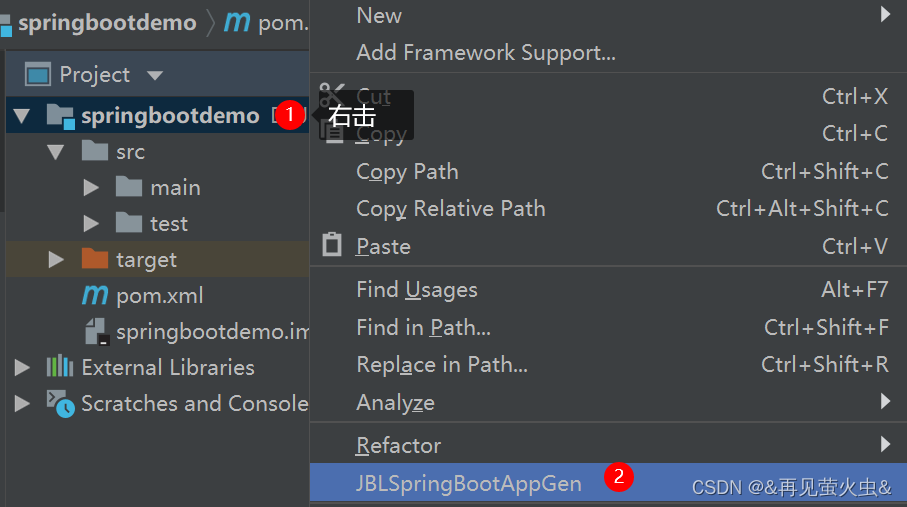
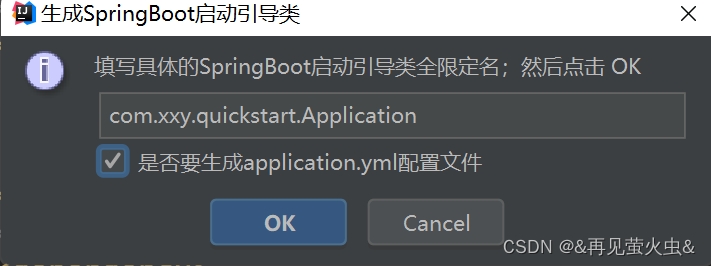
</project>2,安装并使用JBLSpringBootAppGen插件,创建启动类和yml配置文件

3,编写YAML文件
spring:
  datasource:
    driver-class-name: org.h2.Driver
    schema: classpath:db/schema-h2.sql
    data: classpath:db/data-h2.sql
    url: jdbc:h2:mem:test
    username: root
    password: root

logging:
  level:
    com.xxy.quickstart: debug
h2数据库是一个基于内存的数据库(不需要测试人员安装数据库,常用于测试),在jvm启动时,自动执行脚本加载相应的数据。
springboot 中使用h2数据库直接按照上面配置,配置schema表结构脚本和data数据脚本即可。
注意这里用户名密码可以省略不写,或者随意设定。
4,引入数据脚本
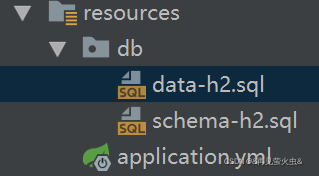
data-h2.sql
DELETE FROM user;

INSERT INTO user (id, name, age, email) VALUES
(1, 'Jone', 18, 'test1@baomidou.com'),
(2, 'Jack', 20, 'test2@baomidou.com'),
(3, 'Tom', 28, 'test3@baomidou.com'),
(4, 'Sandy', 21, 'test4@baomidou.com'),
(5, 'kaikeba1', 331, 'test4@baomidou.com'),
(6, 'kaikeba2', 331, 'test4@baomidou.com'),
(7, 'kaikeba3', 331, 'test4@baomidou.com'),
(8, 'kaikeba4', 331, 'test4@baomidou.com'),
(9, 'kaikeba5', 331, 'test4@baomidou.com'),
(10, 'kaikeba6', 331, 'test4@baomidou.com'),
(11, 'kaikeba7', 331, 'test4@baomidou.com'),
(12, 'kaikeba8', 331, 'test4@baomidou.com'),
(13, 'kaikeba9', 331, 'test4@baomidou.com'),
(14, 'kaikeba10', 331, 'test4@baomidou.com'),
(15, 'kaikeba11', 331, 'test4@baomidou.com'),
(16, 'kaikeba12', 331, 'test4@baomidou.com'),
(17, 'kaikeba13', 331, 'test4@baomidou.com'),
(18, 'kaikeba14', 331, 'test4@baomidou.com'),
(19, 'kaikeba15', 331, 'test4@baomidou.com'),
(20, 'kaikeba16', 331, 'test4@baomidou.com'),
(21, 'kaikeba17', 331, 'test4@baomidou.com'),
(22, 'kaikeba18', 331, 'test4@baomidou.com'),
(23, 'kaikeba19', 331, 'test4@baomidou.com'),
(24, 'kaikeba15', 331, 'test4@baomidou.com'),
(25, 'Billie', 24, 'test5@baomidou.com');
schema-h2.sql
DROP TABLE IF EXISTS user;

CREATE TABLE user
(
	id BIGINT(20) NOT NULL COMMENT '主键ID',
	name VARCHAR(30) NULL DEFAULT NULL COMMENT '姓名',
	age INT(11) NULL DEFAULT NULL COMMENT '年龄',
	email VARCHAR(50) NULL DEFAULT NULL COMMENT '邮箱',
	PRIMARY KEY (id)
);
5,实体类
添加@Data注解。由于之前引入了lombok依赖,这里可以不用编写getter、setter方法
import lombok.Data;

@Data
public class User {
    private Long id;
    private String name;
    private  String email;
    private Integer age;
}
6,dao层
实现BaseMapper类。使用内置的CRUD方法,不需要编写xml文件
import com.baomidou.mybatisplus.core.mapper.BaseMapper;
import com.xxy.quickstart.entity.User;

public interface UserMapper extends BaseMapper<User> {
}
7,添加扫描接口包注解
import org.mybatis.spring.annotation.MapperScan;
import org.springframework.boot.SpringApplication;
import org.springframework.boot.autoconfigure.SpringBootApplication;

@SpringBootApplication
@MapperScan("com.xxy.quickstart.mapper")
public class Application {
    public static void main(String[] args) {
        SpringApplication.run(Application.class, args);
    }
}
8,测试
@RunWith(SpringRunner.class)
@SpringBootTest(classes = Application.class)
public class UserMapperTest {
    @Resource
    private UserMapper userMapper;

    @Test
    public void testFindAll() {
        userMapper.selectList(null).forEach(user -> {
            System.out.println(user);
        });

    }
}
测试时,一直报错,提示user表找不到,应该是h2数据库的问题。最后也没有找到好的解决办法o( ̄┰ ̄*)ゞ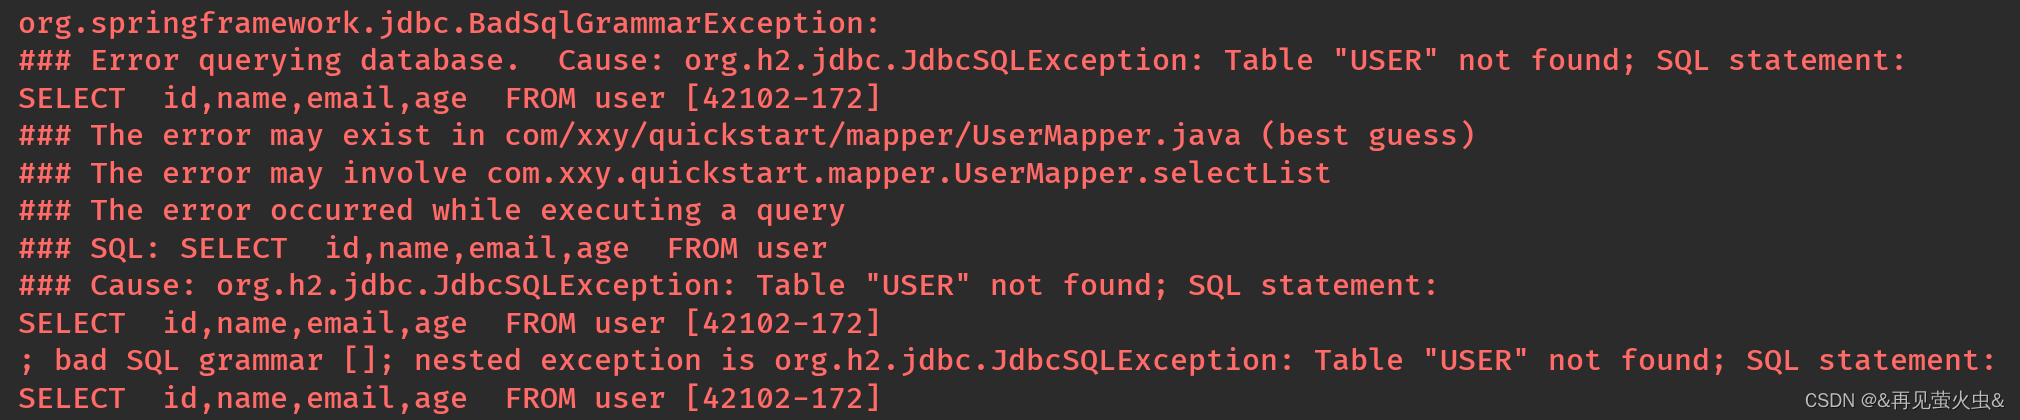
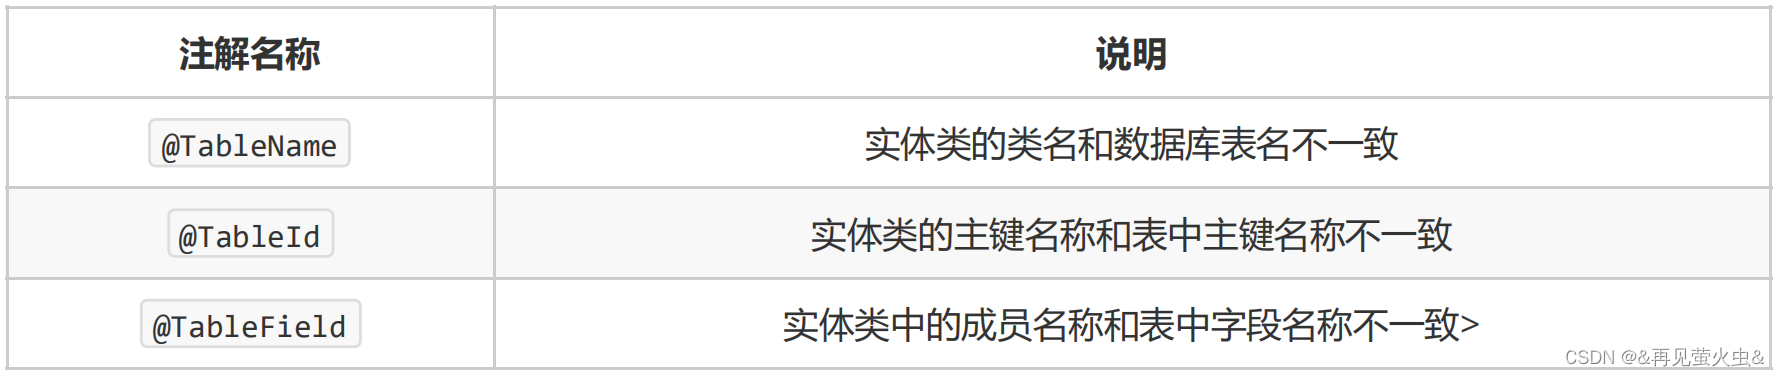
3,常用注解
MyBatisPlus提供了一些注解供我们在实体类和表信息出现不对应的时候使用。通过使用注解完成逻辑上匹 配。
4,内置CRUD
// 插入
Assert.assertTrue(mapper.insert(user) > 0);
// 查找所有
mapper.selectList(null).forEach(System.out :: println);
// 主键删除
mapper.deleteById(3l);
// 批量删除
mapper.delete(new QueryWrapper<User>().like("name", "J"));
// 基本修改
mapper.updateById(new User().setId(1l).setName("慧科"));
// 基本查询
System.out.println(mapper.selectOne(Wrappers.<User>query().eq("name", "Tom")));
// 批量修改
mapper.update(null, Wrappers.<User>update().set("email", "huike@163.com").like("name", "J"));
5,分页
5.1 基本原理
测试
@Test
public void testPage() {
    System.out.println("------ baseMapper 自带分页 ------");
    Page<User> page = new Page<>(1, 5);
    IPage<User> pageResult = mapper.selectPage(page, new QueryWrapper<User>().eq("age", 20));
    System.out.println("总条数 ------> " + pageResult.getTotal());
    System.out.println("当前页数 ------> " + pageResult.getCurrent());
    System.out.println("当前每页显示数 ------> " + pageResult.getSize());
    pageResult.getRecords().forEach(System.out :: println);
}
5.2 自定义xml分页
# 配置mybatis plus
mybatis-plus:
    type-aliases-package: com.lxs.crud.entity #别名搜索
    mapper-locations: classpath:/mappers/*.xml #加载映射文件
UserMapper接口
public interface UserMapper extends BaseMapper<User> {

/**
    * 如果映射的接口方法有2个参数需要@Param定义参数名,定义参数名后,映射文件中使用p.属性 c.属性,具体访问
    *
    * @param page
    * @param conditioin
    * @return
*/

    public IPage<User> selectUserByPage(@Param("p") IPage<User> page, @Param("c") User conditioin);

}
UserMapper.xml映射文件
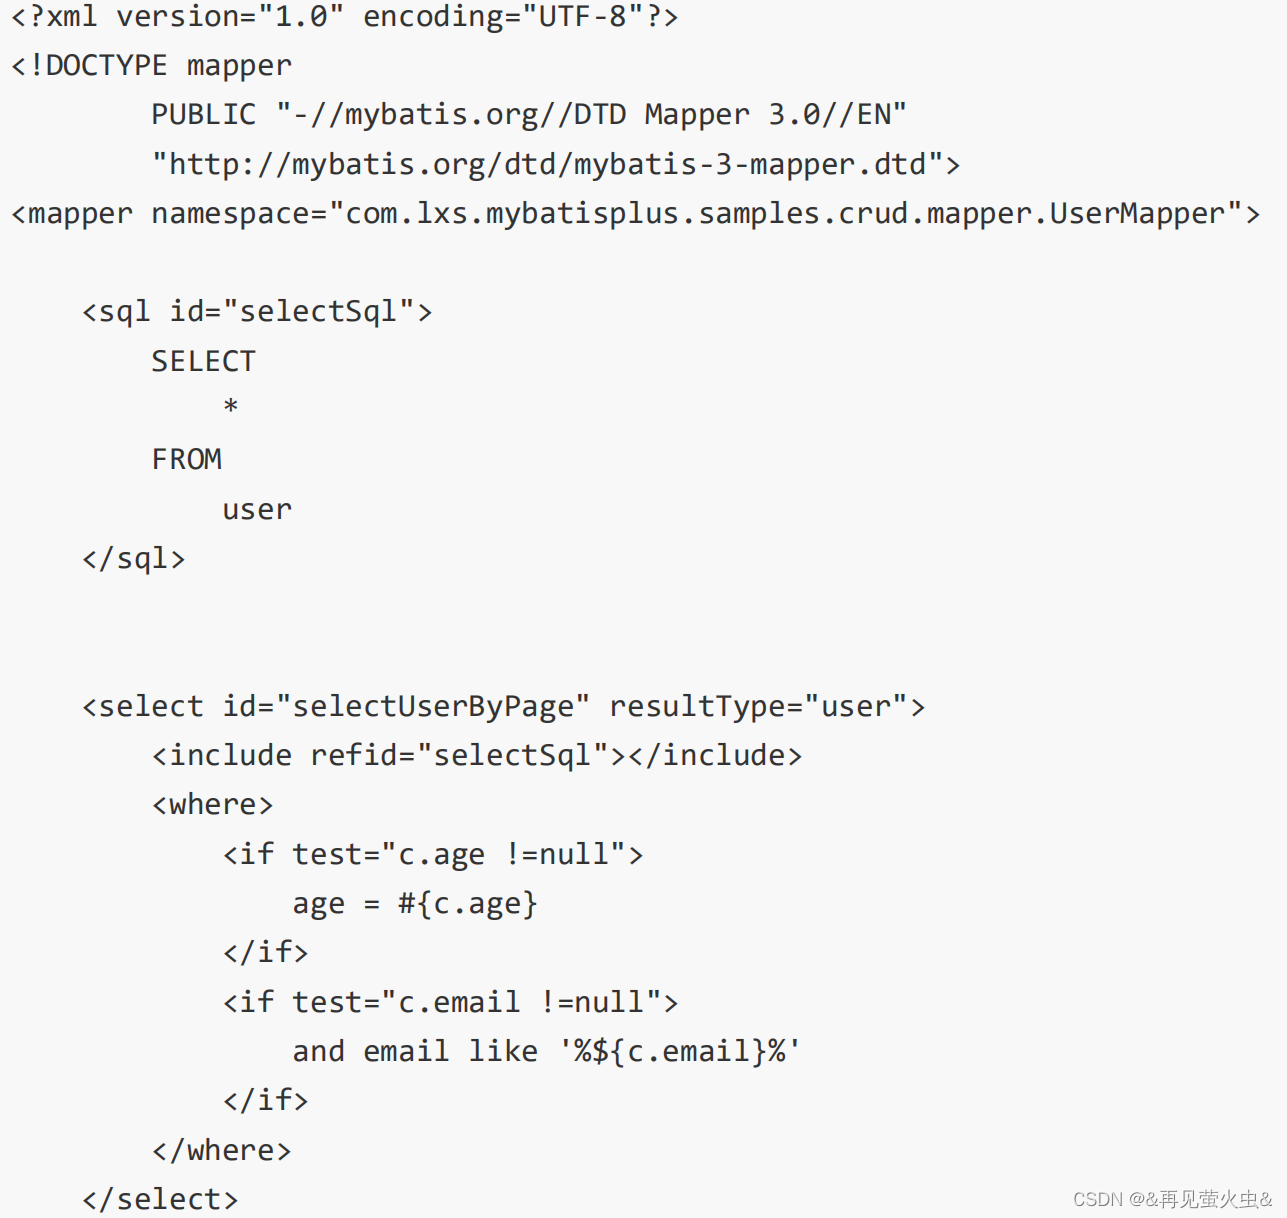
测试
@Test
public void testXmlPage() {
    System.out.println("------ baseMapper 自定义xml分页 ------");
    Page<User> page = new Page<>(1, 5);
    User user = new User();
    user.setAge(20);
    user.setEmail("test");
    IPage<User> pr = mapper.selectUserByPage(page, user);
    System.out.println("总条数 ------> " + pr.getTotal());
    System.out.println("当前页数 ------> " + pr.getCurrent());
    System.out.println("当前每页显示数 ------> " + pr.getSize());
    pr.getRecords().forEach(System.out :: println);
}
5.3 pageHelper分页
1,引入pageHelper依赖
<dependency>
<groupId>com.github.pagehelper</groupId>
<artifactId>pagehelper</artifactId>
<version>5.1.11</version>
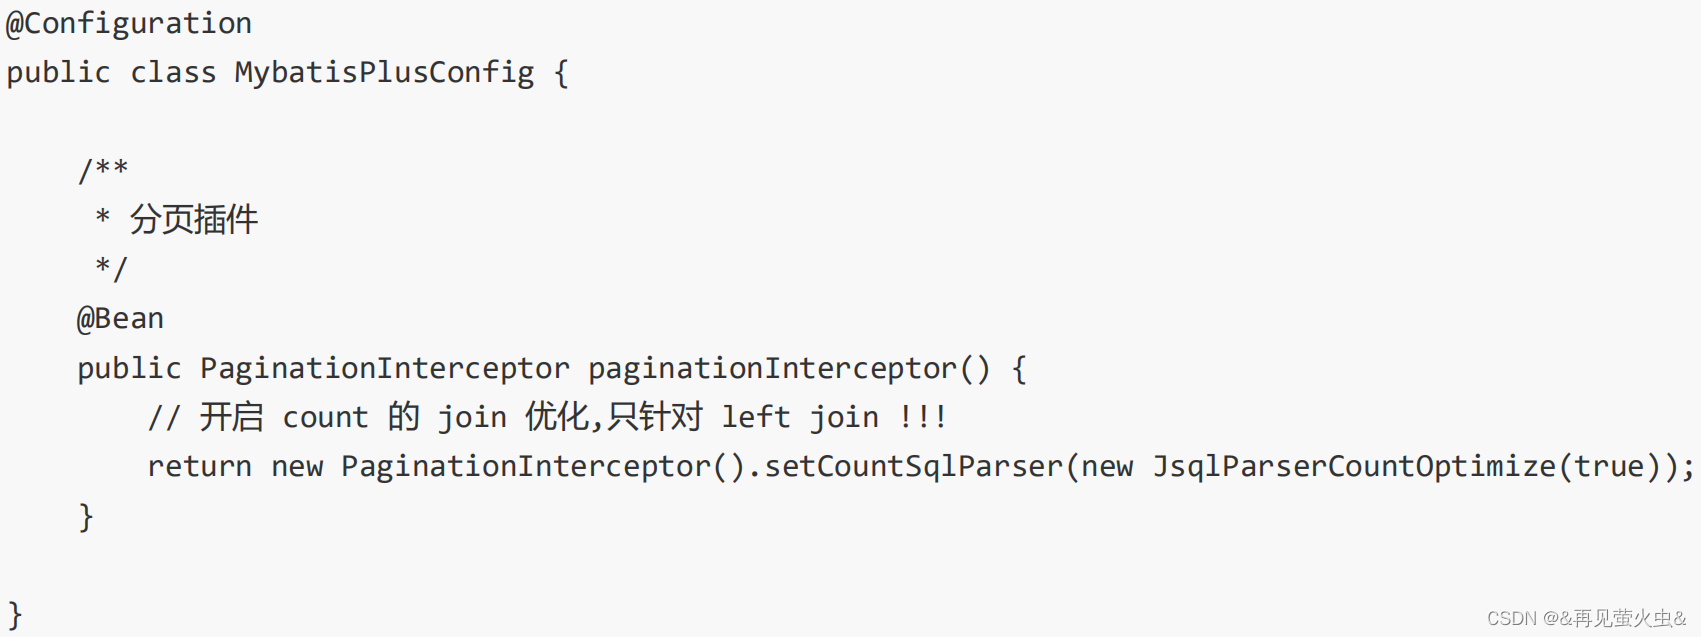
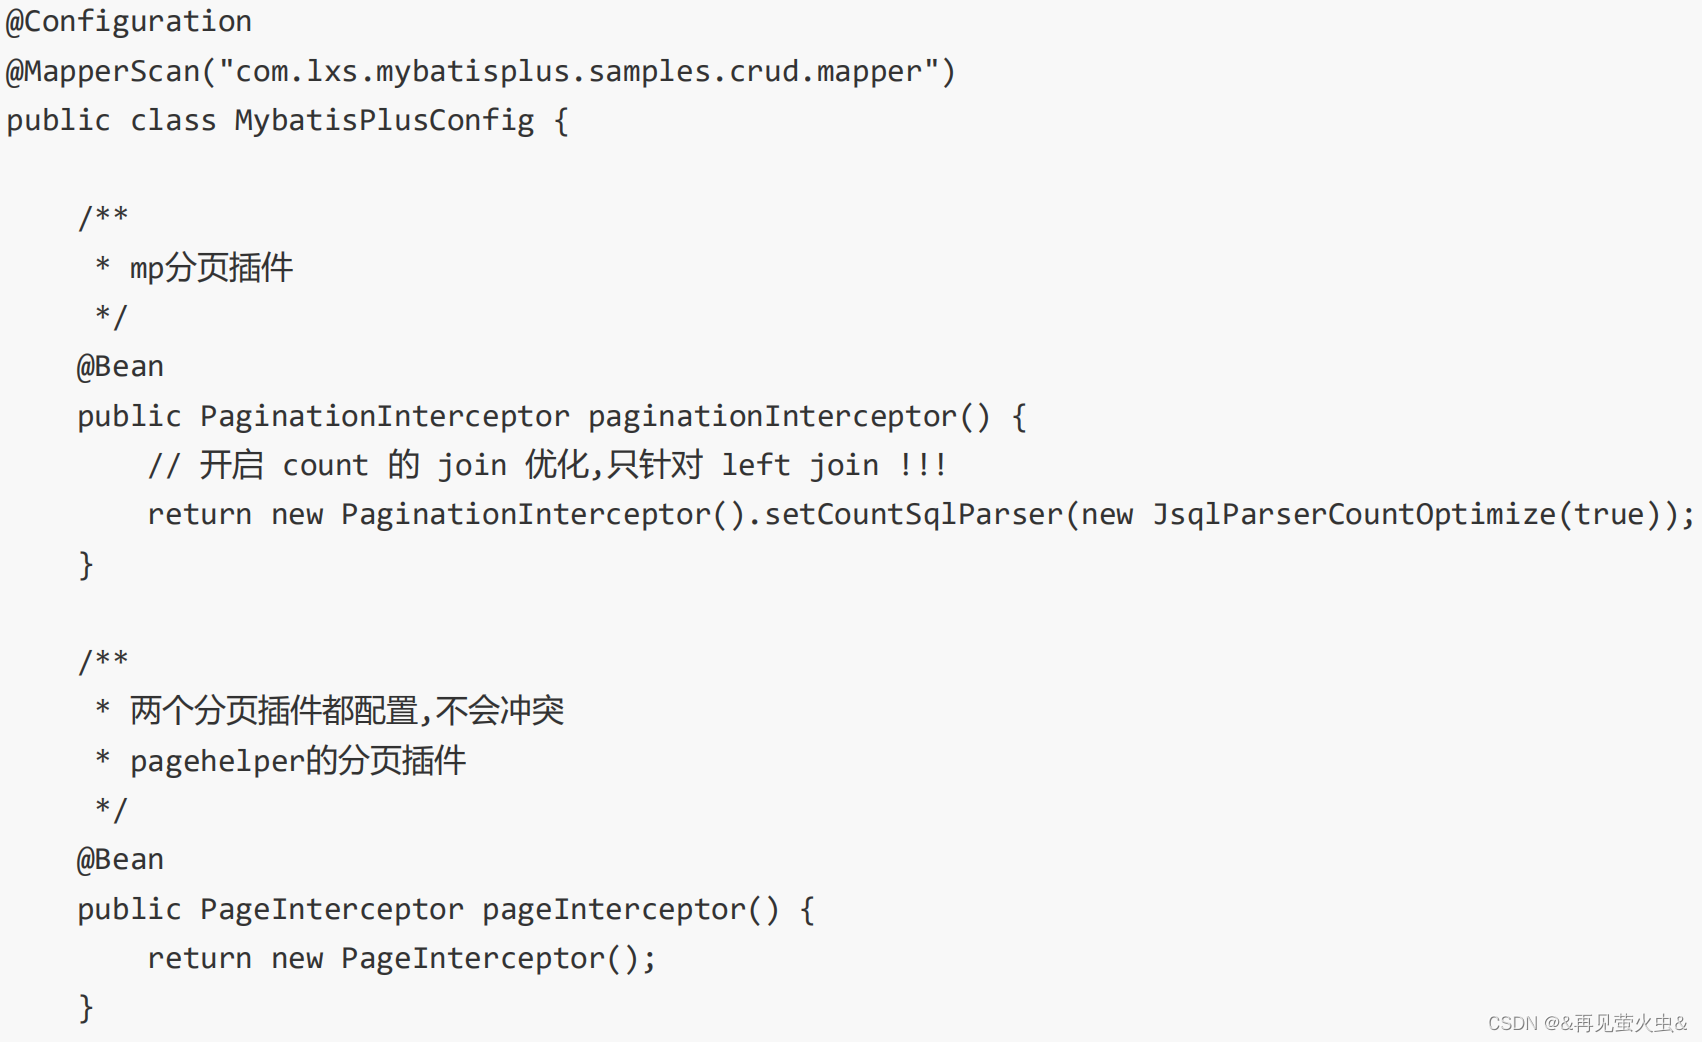
</dependency> 2,mybatis plus 整合pageHelper的配置类
映射文件

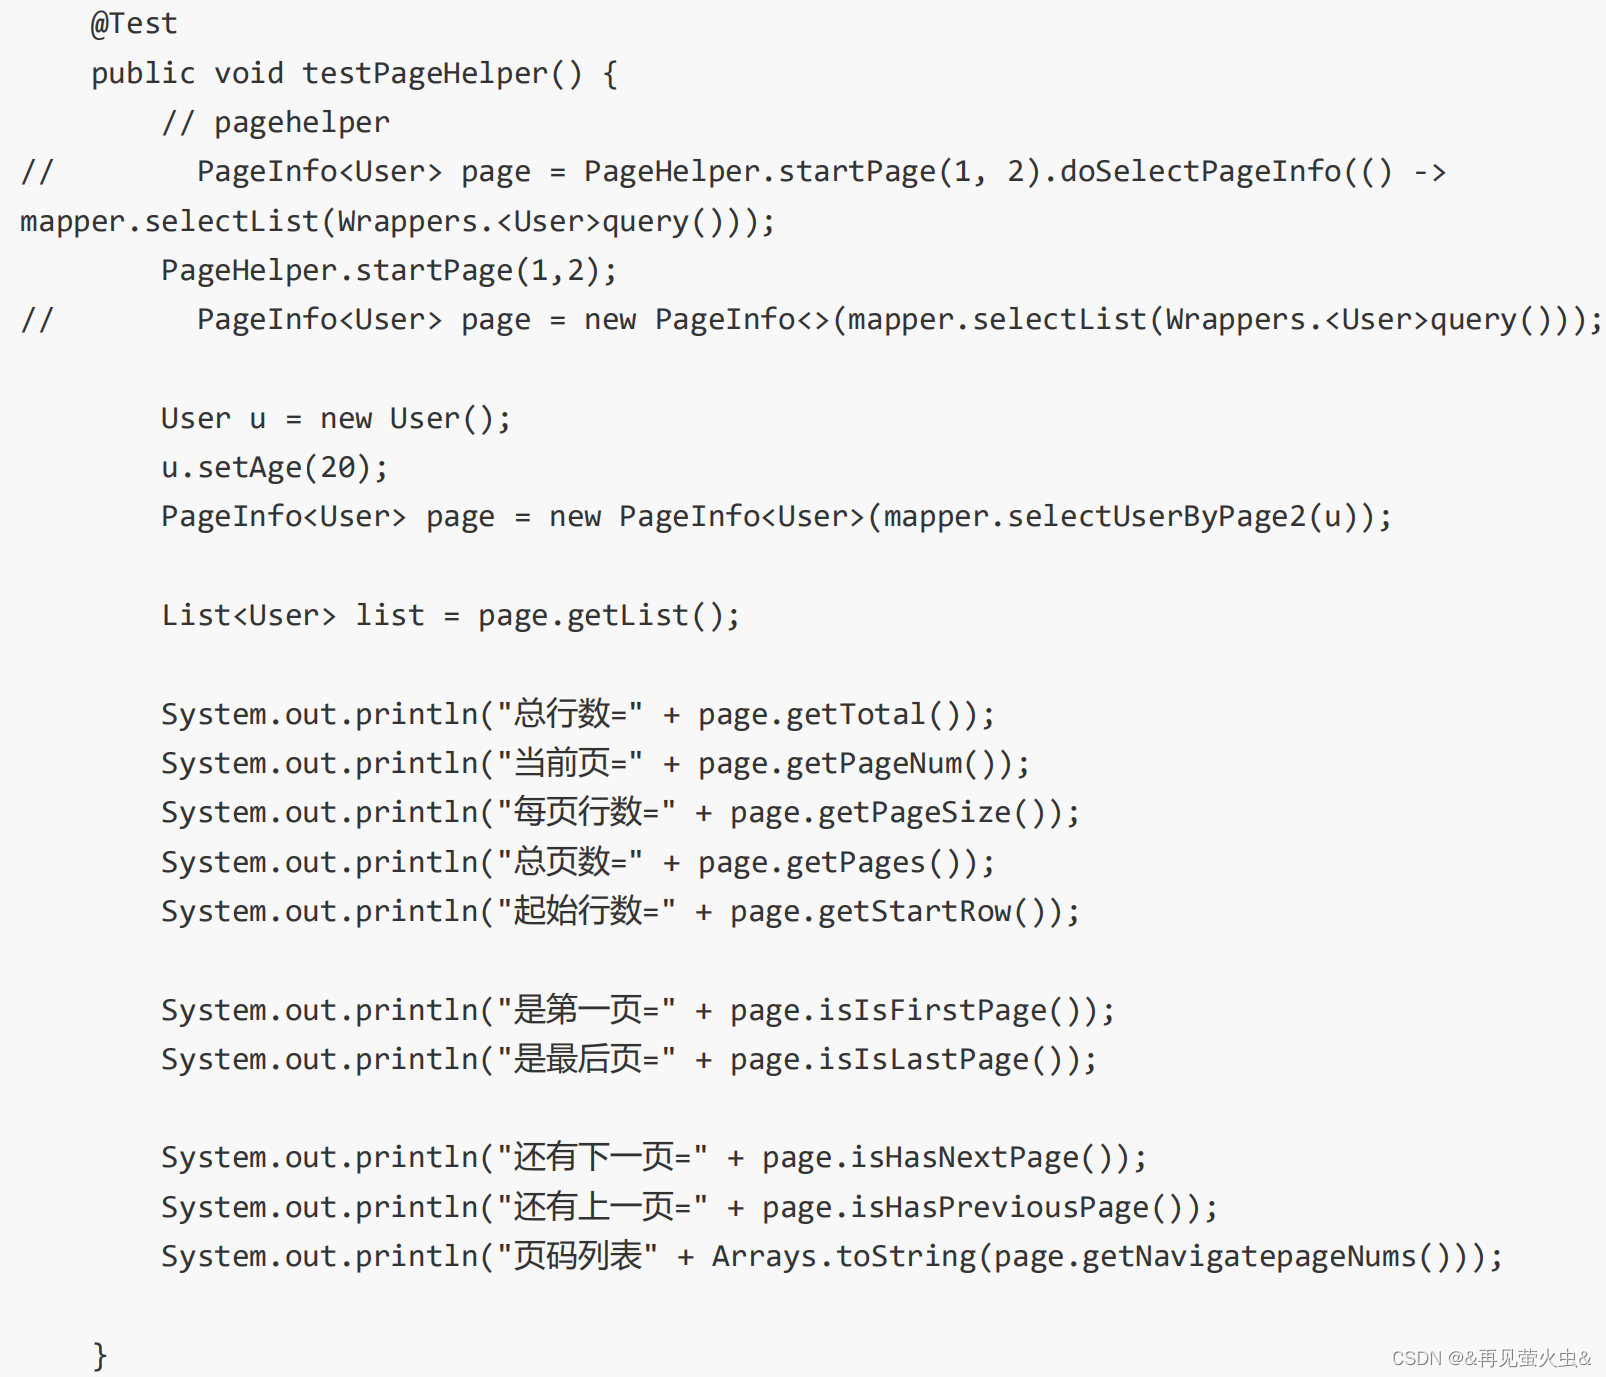
测试


 被折叠的 条评论
为什么被折叠?
被折叠的 条评论
为什么被折叠?
 到【灌水乐园】发言


