


 本文详细介绍使用SpringBoot进行Web开发的方法,包括项目创建、静态资源管理、模板引擎Thymeleaf的使用及控制器编写。SpringBoot简化了Web开发流程,使开发者能够快速搭建和部署Web应用。
SpringBoot之Web开发
今天给大家带来的是使用SpringBoot来进行Web开发的简介。之前通过ssm使用三层框架(表现层、业务层、数据层)来进行web的开发,SpringBoot对web开发实现更简单的功能实现。
使用SpringBoot;
- 创建SpringBoot应用,选中我们所需要的模块。
- SpringBoot已经默认将这些场景配置好了,只需要在配置文件中指定少量配置就可以运行起来。
- 自己编写业务逻辑代码。
一、通过SpringBoot创建一个web项目介绍
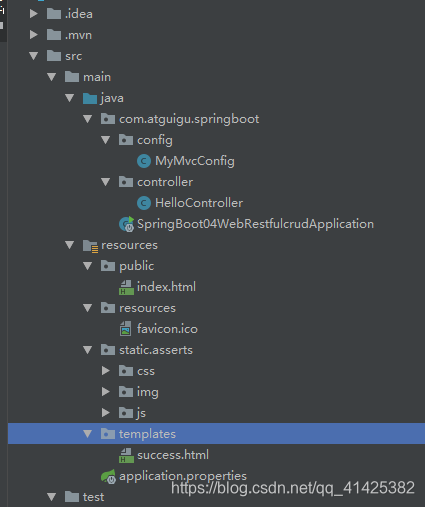
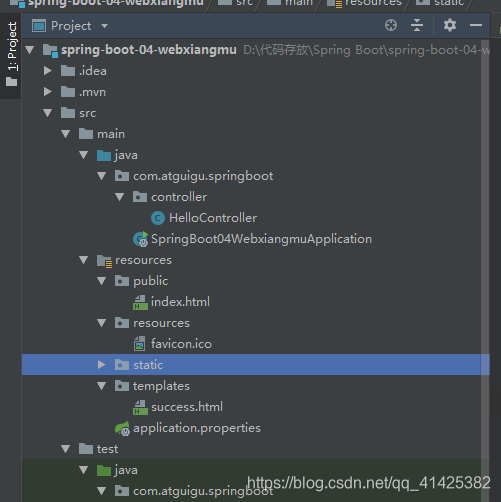
1.1、通过IDEA创建一个有关web的项目创建完如下图所示。
1.2、编写主页面和跳转的页面
在编写主页面和跳转的页面之前我们要先清楚SpringBoot中有关主界面访问和跳转页面访问的映射规则
SpringBoot对静态资源的映射规则
1、所有/webjars/**,都去classpath:META-INF/resources/webjars/找资源;
webjars:以jar包的方式引入静态资源;www.webjars.org
以引入jquery-webjar为例
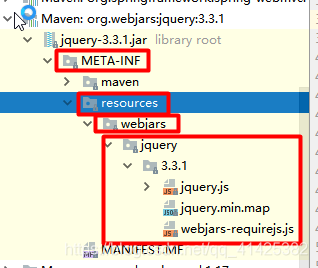
如果页面发送:localhost:8080/webjars/jquery/3.3.1/jquery.js
浏览器就会去META-INF/resources/webjars/的目录下去寻找/jquery/3.3.1/jquery.js页面
        <!--引入jquery-webjar-->在访问的时候只需要写webjars下面的资源的名称即可
        <dependency>
            <groupId>org.webjars</groupId>
            <artifactId>jquery</artifactId>
            <version>3.3.1</version>
        </dependency>
2、“/**”:访问当前项目的任何资源(静态资源的文件夹)
"classpath:/META-INF/resources/"
"classpath:/resources/"
"classpath:/static/"
"classpath:/public/"
"/":当前项目的根路径
例如:localhost:8080/abc==去静态资源文件夹里面去找abc
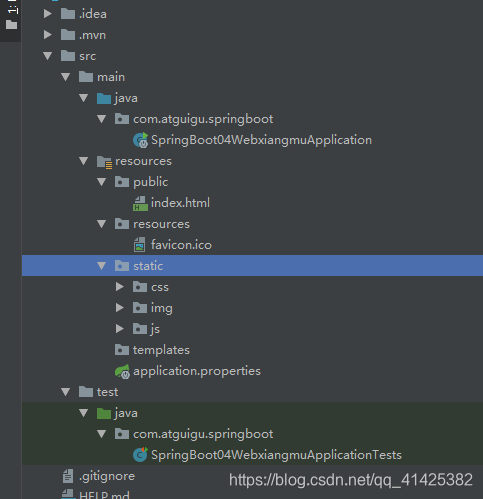
3、欢迎页;静态资源文件夹下的所有index.html页面;被“/**”映射;
例如:localhost:8080/ 就会去找静态文件夹下的index页面
4、所有的**/favicon.ico都是在静态次元文件下找;
5、自定义静态文件夹的路径
spring.resources.static-locations=classpath:/hello/,classpath:/atguigu/
综上所述:SpringBoot的映射规则如下。
如果是localhost:8080/webjars/**的访问连接,那么浏览器就会去META-INF/resources/webjars/**的目录下去寻找链接文件。
如果是:localhost:8080/**的请求链接,那么浏览器就回去根目录下的静态文件夹里面去寻找相关的访问文件,静态文件夹是(resources、static、public)这三个文件夹下去寻找,对于index.html的网页,如果直接放在了静态资源文件夹下那么直接访问localhost就能直接被访问到。并且如果想更改网页的链接旁边的小图标,那么只要将图片的名称为favicon.ico放在静态资源路径下即可。(如下图所示)
做完以上的事情就可以点击启动SpringBoot04WebRestfulcrudApplication里面的程序,等SpringBoot启动完之后直接在浏览器中输入localhost:8080的链接就可直接访问到index.html
1.3、模板引擎
因为运行嵌入式servlet容器的SpringBoot应用程序(并打包为可执行存档)时,JSP支持存在一些限制。
- 只用可执行jar时不支持JSP。
- Undertow不支持JSP
- 创建自定义error.jsp页面不会覆盖错误处理的默认视图。
所以以上的种种原因导致了在SpringBoot中使用JSP会遭到很大的限制,所以我们要采用HTML的页面再配合模板引擎的功能实现页面功能的实现。
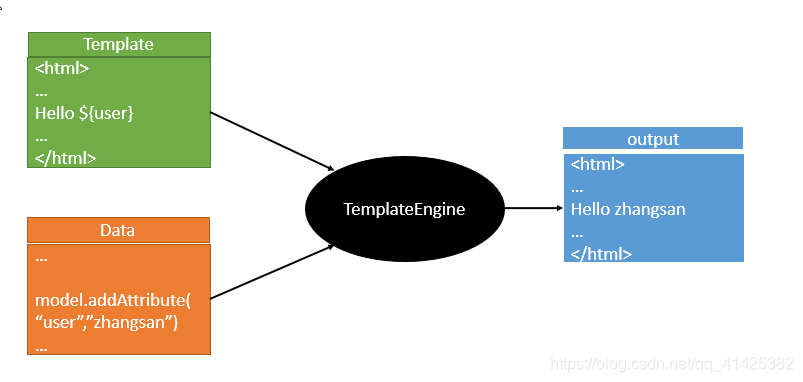
模板引擎:是为了使用户界面与业务数据(内容)分离而产生的,它可以生成特定格式的文档,用于网站的模板引擎就会生成一个标准的文档

现在主要的模板引擎主要有:JSP、Velocity、Freemarker、ThyMeleaf。
然而SpringBoot推荐我们使用Thymeleaf ;语法更简单,功能更强大;
引入Thymeleaf
<properties>
   	<thymeleaf.version>3.0.9.RELEASE</thymeleaf.version>
   	<!-- 布局功能的支持程序  thymeleaf3主程序  layout2以上版本 -->
   	<!-- thymeleaf2   layout1-->
   	<thymeleaf-layout-dialect.version>2.2.2</thymeleaf-layout-dialect.version>
 </properties>
Thymeleaf使用&语法
只要我们把HTML页面放在classpath:/templates/,的文件夹下面thymeleaf 能自动渲染;
使用:
1、在网页页面上导入thymeleaf的名称空间
<html lang="en" xmlns:th="http://www.thymeleaf.org">
2、使用thymeleaf的语法
<!DOCTYPE html>
<html lang="en">
<html lang="en" xmlns:th="http://www.thymeleaf.org">
<head>
    <meta charset="UTF-8">
    <title>Title</title>
</head>
<body>
<h1>成功页面</h1>
<!--th:text将div里面的文本内容设置为-->
<div th:text="${hello}"></div>
</body>
</html>
3、语法规则
3.1、th:text;改变当前元素里面的内容
th:任意的html属性来代替原来的属性
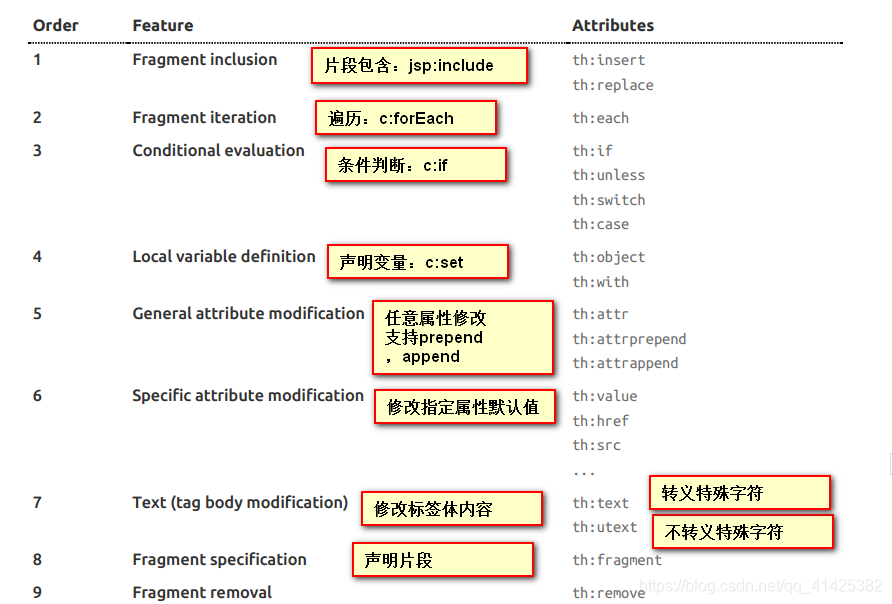
3.2、表达式
Simple expressions:(表达式语法)
 	Variable Expressions: ${...}:获取变量值;OGNL;
 		1、获取对象的属性、调用方法
 		2、使用内置的基本对象
 			#ctx : the context object.
    		#vars: the context variables.
          	 #locale : the context locale.
             #request : (only in Web Contexts) the HttpServletRequest object.
             #response : (only in Web Contexts) the HttpServletResponse object.
             #session : (only in Web Contexts) the HttpSession object.
             #servletContext : (only in Web Contexts) the ServletContext object.
 		3、内置的工具对象
 			#execInfo : information about the template being processed.
			#messages : methods for obtaining externalized messages inside variables expressions, in the same way as they would be obtained using #{…} syntax.
			#uris : methods for escaping parts of URLs/URIs
			#conversions : methods for executing the configured conversion service (if any).
			#dates : methods for java.util.Date objects: formatting, component extraction, etc.
			#calendars : analogous to #dates , but for java.util.Calendar objects.
			#numbers : methods for formatting numeric objects.
			#strings : methods for String objects: contains, startsWith, prepending/appending, etc.
			#objects : methods for objects in general.
			#bools : methods for boolean evaluation.
			#arrays : methods for arrays.
			#lists : methods for lists.
			#sets : methods for sets.
			#maps : methods for maps.
			#aggregates : methods for creating aggregates on arrays or collections.
			#ids : methods for dealing with id attributes that might be repeated (for example, as a result of an iteration).
 	Selection Variable Expressions: *{...}:选择表达式:和${}在功能上是一样;
    		#补充:配合 th:object="${session.user}:
   			#<div th:object="${session.user}">
    			#<p>Name: <span th:text="*{firstName}">Sebastian</span>.</p>
    			#<p>Surname: <span th:text="*{lastName}">Pepper</span>.</p>
    			#<p>Nationality: <span th:text="*{nationality}">Saturn</span>.</p>
   	 		#</div>

    Message Expressions: #{...}:获取国际化内容

    Link URL Expressions: @{...}:定义URL;
    		#@{/order/process(execId=${execId},execType='FAST')}
    Fragment Expressions: ~{...}:片段引用表达式
    		#<div th:insert="~{commons :: main}">...</div>

Literals(字面量)
      Text literals: 'one text' , 'Another one!' ,…
      Number literals: 0 , 34 , 3.0 , 12.3 ,…
      Boolean literals: true , false
      Null literal: null
      Literal tokens: one , sometext , main ,…
Text operations:(文本操作)
    String concatenation: +
    Literal substitutions: |The name is ${name}|
Arithmetic operations:(数学运算)
    Binary operators: + , - , * , / , %
    Minus sign (unary operator): -
Boolean operations:(布尔运算)
    Binary operators: and , or
    Boolean negation (unary operator): ! , not
Comparisons and equality:(比较运算)
    Comparators: > , < , >= , <= ( gt , lt , ge , le )
    Equality operators: == , != ( eq , ne )
Conditional operators:条件运算(三元运算符)
    If-then: (if) ? (then)
    If-then-else: (if) ? (then) : (else)
    Default: (value) ?: (defaultvalue)
Special tokens:
    No-Operation: _
引入好模板引擎之后,编写跳转的页面success.html,将该页面指定的放在templates的目录下
1.4、编写Controller类来接受和处理页面的请求链接
接下来的步骤就和SpringMVC中的过程差不多,因为SpringBoot已经将SpringMVC的功能封装好给了,所以我们只要用Spring的方式就可以处理页面的链接请求。
@Controller
public class HelloController {
    @RequestMapping("/success")
    public String success(Map<String,Object> map){
        map.put("hello","<h1>你好</h1>");
        map.put("users", Arrays.asList("zhangsan","lisi","wangwu"));
        return "success";
    }
}
之后就能实现一个简单的页面跳转程序
完成后程序功能如下图所示


 11万+
11万+

 被折叠的 条评论
为什么被折叠?
被折叠的 条评论
为什么被折叠?
 到【灌水乐园】发言


