


Java连接Redis
- 搭建Maven工程,引入相关的依赖
<dependency>
    <groupId>redis.clients</groupId>
    <artifactId>jedis</artifactId>
    <version>2.9.0</version>
</dependency>
- 使用Jedis提供的API操作Redis
// 1.连接redis
Jedis jedis = new Jedis("192.168.189.137",6379);

jedis.auth("root");  // 设置密码

jedis.set("password","123");
// 2.操作redis
// 3.关闭redis
jedis.close();
Spring操作Redis
- 添加依赖
<dependency>
    <groupId>org.springframework.data</groupId>
    <artifactId>spring-data-redis</artifactId>
    <version>1.8.8.RELEASE</version>
</dependency>
<dependency>
    <groupId>org.springframework</groupId>
    <artifactId>spring-test</artifactId>
    <version>4.3.8.RELEASE</version>
</dependency>
<dependency>
    <groupId>redis.clients</groupId>
    <artifactId>jedis</artifactId>
    <version>2.9.0</version>
</dependency>
- Redis和Spring整合配置
<!-- 配置redis连接池对象 -->
<bean id="poolConfig" class="redis.clients.jedis.JedisPoolConfig">
    <!-- 最大空闲数 -->
    <property name="maxIdle" value="50" />
    <!-- 最大连接数 -->
    <property name="maxTotal" value="100" />
    <!-- 最大等待时间 -->
    <property name="maxWaitMillis" value="20000" />
</bean>

<!-- 配置redis连接工厂 -->
<bean id="connectionFactory"
      class="org.springframework.data.redis.connection.jedis.JedisConnectionFactory">
    <!-- 连接池配置 -->
    <property name="poolConfig" ref="poolConfig" />
    <!-- 连接主机 -->
    <property name="hostName" value="192.168.189.137" />
    <!-- 端口 -->
    <property name="port" value="6379" />
    <!-- 密码 -->
    <property name="password" value="root" />
</bean>

<!-- 配置redis模板对象 -->
<bean class="org.springframework.data.redis.core.RedisTemplate">
    <!-- 配置连接工厂 -->
    <property name="connectionFactory" ref="connectionFactory" />

    <!-- 配置Redis key系列化方式为spring
<property name="keySerializer" ref="stringRedisSerializer"></property>
    <property name="valueSerializer" ref="stringRedisSerializer"></property>
-->
</bean>

<bean id="stringRedisSerializer" class="org.springframework.data.redis.serializer.StringRedisSerializer"></bean>
- 测试
@RunWith(value = SpringJUnit4ClassRunner.class)
@ContextConfiguration(value ="classpath:applicationContext.xml")
public class SpringRedisTest {
    @Autowired
    private RedisTemplate redisTemplate;
    @Test
    public void testSpringRedis(){
        redisTemplate.opsForValue().set("username","admin");
        System.out.println(redisTemplate.opsForValue().get("username"));
    }
}
- 问题
Java客户端可以正常访问存放进去的key,但是如果从服务器的客户端访问却访问不到。

原因:Spring-data-redis提供的模板对象,默认会对我们的信息进行序列化(JDK的方式),所以存放进去的key和value都将会有所变化。
解决方案
利用字符串的方式序列化key和value - Redis保存自定义对象-序列化
如果使用JDK序列化Value,在保存一个对象的时候会出现错误,所以如果保存的是个对象,需要使用JDK序列化器
@Test
public void add(){
    User user = new User();
    user.setId(10);
    user.setUsername("张三");
    redisTemplate.setValueSerializer(new JdkSerializationRedisSerializer());
    redisTemplate.opsForValue().set("user",user);
    User user2 = (User)redisTemplate.opsForValue().get("user");
    System.out.println(user2);
}
Key,采用字符串序列化器
Value,采用JDK序列化器,这样方便对象的存储
特殊情况,程序里面单独设置即可
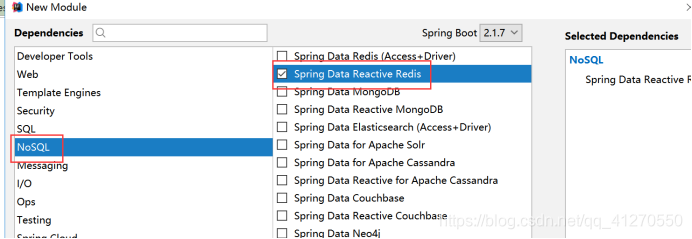
SpringBoot操作Redis
- 添加依赖
- 配置
spring.redis.host=192.168.189.137
spring.redis.port=6379
spring.redis.password=root
- 测试
@RunWith(SpringRunner.class)
@SpringBootTest
public class SbootRedisApplicationTests {

   @Autowired
   private RedisTemplate redisTemplate;

   @Autowired
   private StringRedisTemplate stringRedisTemplate; // 使用字符串序列化的方式

   @Test
   public void testAdd() {
//    redisTemplate.opsForValue().set("age",12);
      stringRedisTemplate.opsForValue().set("sex","12");
   }

   @Test
   public void testQuery() {
//    System.out.println(redisTemplate.opsForValue().get("age"));
      System.out.println(stringRedisTemplate.opsForValue().get("sex"));
   }
}


 被折叠的 条评论
为什么被折叠?
被折叠的 条评论
为什么被折叠?
 到【灌水乐园】发言


