


 这篇博客详细介绍了JavaScript中的日期对象,包括如何实例化、常用方法如获取年份、月份、星期,并展示了时间戳的使用。此外,还讲解了DOM节点的操作,如查找、增加和删除节点的方法,以及移动端事件的处理。示例代码涵盖了日期对象的综合应用,如倒计时和当前时间显示,以及DOM节点操作的实践应用。
1.日期对象
解释:
日期对象:用来表示时间的对象。作用 可以得到当前系统的时间
1.1 实例化
在代码中发现new关键词时,一般将这个操作称为实例化。
1.2时间对象方法
上图控制台中标红的部分是返回的数据,但我们不能直接使用,所以需要转化未实际开发中 常用的格式
常见的使用方法
特殊的以下
getDay 返回的是 0代表星期日 可以调用存储在数组中的进行输出 - 数组下标0开始 刚好匹配
geMonth 返回的0 代表12月份 下图中也有几个也是从0开始的需要注意。 可以通过getMonth()+1 来改变
(因为这是老外写的)
   <script>
        const data = new Date()
        console.log(data.getFullYear());//获取四位年费
        console.log(data.getMonth());//月份从0-11

        console.log(date.getDay())//0是星期日  1是星期一
        const arr = ['星期日','星期一','星期二','星期三','星期四','星期五']
        console.log(arr[date.getDay()])

    </script>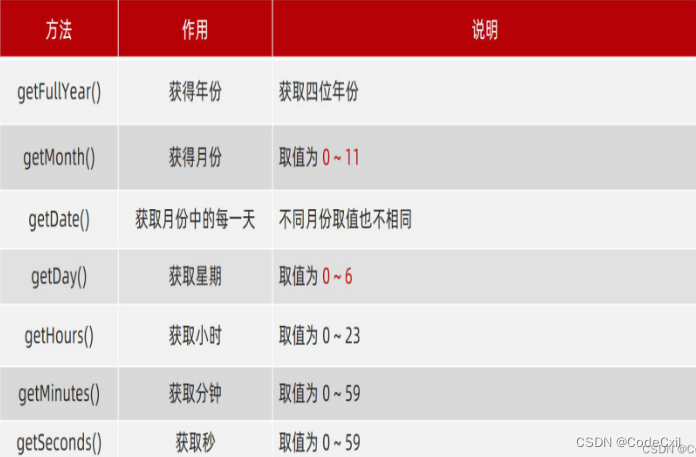
案例 获取当前时间综合 - 注释部分还有另一种简单写法 可以看看
<script>
        function getDate(){
            //获取日期对象
        const date = new Date();
        const year = date.getFullYear();
        let month = date.getMonth()+1;//月份从0开始
        month = month < 10 ? '0'+month : month;
        let day =  date.getDate();
        day = day < 10 ? '0'+day : day;

        let hours = date.getHours();
        hours = hours < 10 ? '0'+hours : hours;
        let mins= date.getMinutes();
        mins = mins < 10 ? '0'+mins : mins;

        const arr=['星期日','星期一','星期二','星期三','星期四','星期五']
        const  week = arr[date.getDay()];


        return `${year}-${month}-${day} ${hours}:${mins} ${week} `
        //输出到网页
        // document.querySelector('.box').innerHTML = date;
        }


        const box = document.querySelector('.box')
        box.innerHTML = getDate();//因为在进入网页时,定时器延时开启 了 所以先调用一下

        setInterval(function(){
            box.innerHTML = getDate();
        },1000)

        //另外一中写法
       //const box = document.querySelector('.box')
       //const date = new Date()
       //box.innerHTML = date.toLocaleString();

        //setInterval(function(){
           //const  date = new Date()
           //box.innerHTML = date.toLocaleString();
        //},1000)

    </script>
1.3时间戳
能够获取当前时间戳
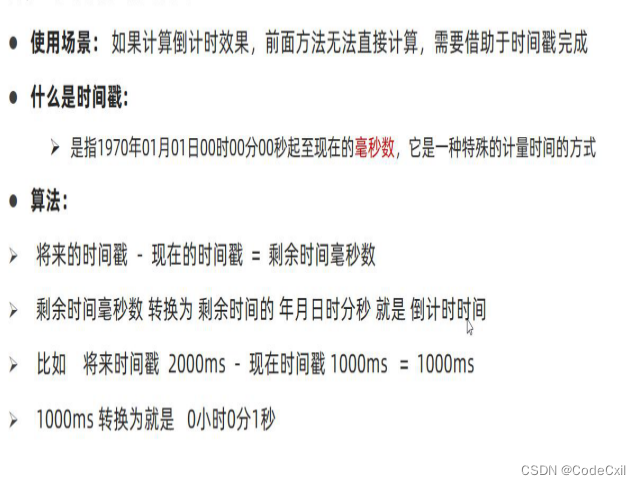
综合案例 倒计时 - 计算分秒的公式看看 头部获取实时时间的两种写法 可以看看
<script>


    function getDjs(){
      const  date = (+new Date('2022-10-23 17:50') - +new Date())/1000
    console.log(date)

    let  h = parseInt(date / 60 / 60 % 24)   //   计算小时
    h = h <10 ? '0'+h:h;
    let  m = parseInt(date / 60 % 60);     //   计算分数
    m = m <10 ? '0'+m:m;
    let  s = parseInt(date % 60);
    s = s <10 ? '0'+s:s;

    const hour = document.querySelector('#hour')
    const minutes = document.querySelector('#minutes')
    const scond = document.querySelector('#scond')
    hour.innerHTML = h;
    minutes.innerHTML=m;
    scond.innerHTML=s;
    }
    getDjs();
//     setInterval(function (){
//  getDjs();

// },1000);
    setInterval(getDjs(),1000);

    //今日写法 另一种写法

    //const date = new Date();
    //const next = document.querySelector('.next')
    //next.innerHTML = '今日是'+ date.toLocaleString();
      //

    //今日是什么
function getDate(){
            //获取日期对象
        const date = new Date();
        const year = date.getFullYear();
        let month = date.getMonth()+1;//月份从0开始
        month = month < 10 ? '0'+month : month;
        let day =  date.getDate();
        day = day < 10 ? '0'+day : day;

        let hours = date.getHours();
        hours = hours < 10 ? '0'+hours : hours;
        let mins= date.getMinutes();
        mins = mins < 10 ? '0'+mins : mins;

        const arr=['星期日','星期一','星期二','星期三','星期四','星期五']
        const  week = arr[date.getDay()];


        return `${year}-${month}-${day} ${hours}:${mins} ${week} `
        //输出到网页
        // document.querySelector('.box').innerHTML = date;
        }


        const next = document.querySelector('.next')
        next.innerHTML = '今日是'+getDate();//因为在进入网页时,定时器延时开启 了 所以先调用一下

        setInterval(function(){
            box.innerHTML = getDate();
        },1000)


    // 获取元素


    // 随机颜色函数
    // 1. 自定义一个随机颜色函数
    function getRandomColor(flag = true) {
      if (flag) {
        // 3. 如果是true 则返回 #ffffff
        let str = '#'
        let arr = ['0', '1', '2', '3', '4', '5', '6', '7', '8', '9', 'a', 'b', 'c', 'd', 'e', 'f']
        // 利用for循环随机抽6次 累加到 str里面
        for (let i = 1; i <= 6; i++) {
          // 每次要随机从数组里面抽取一个
          // random 是数组的索引号 是随机的
          let random = Math.floor(Math.random() * arr.length)
          // str = str + arr[random]
          str += arr[random]
        }
        return str

      } else {
        // 4. 否则是 false 则返回 rgb(255,255,255)
        let r = Math.floor(Math.random() * 256)  // 55
        let g = Math.floor(Math.random() * 256)  // 89
        let b = Math.floor(Math.random() * 256)  // 255
        return `rgb(${r},${g},${b})`
      }

    }
    document.querySelector('.countdown').style.backgroundColor = getRandomColor();
</script>
2.节点操作
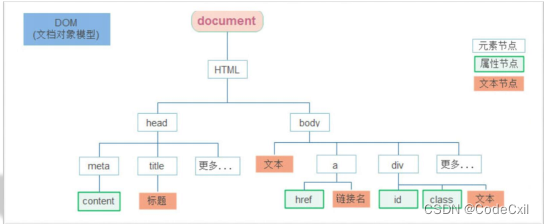
2.1DOM结点
dom树里面的每一个内容都称之为节点
节点类型:有已下几种
元素节点:所有的标签比如body div ;html 是根节点
属性节点 :所有的属性 比如href src 等
文本节点 : 所有文本
2.2查找节点
子元素.parentNode 查找父节点
 const xs = document.querySelectorAll('.box1')
    for(let i =0;i<xs.length;i++){
        xs[i].addEventListener('click',function(){
             this.parentNode.style.display= 'none'
         })
    }
子节点:
子元素.childNodes 获得所有子节点(包含文本节点、空格、换行、注释节点等)
父元素.children (重点) 仅获取所有元素节点,返回伪数组。查找所有的
<ul>
    <li>1</li>
    <li>2</li>
    <li>3</li>
    <li>4</li>
    <li>5</li>
  </ul>
const ul = document.querySelector('ul') // ul
console.log(ul.children) // 得到伪数组 选择的是 亲儿子 兄弟节点:
兄弟元素.nextElementSibling 属性
兄弟元素.previousElementSibling 属性
const li2 = document.querySelector('ul li:nth-child(2)')
console.log(li2.previousElementSibling)  // 上一个兄弟
console.log(li2.nextElementSibling)  // 下一个兄弟
2.3增加节点
使用场景 增加一条留言 新增一条信息
2.3.1.创建一个新的节点
创建一个新的网页元素,添加到网页内
语法:document.createEllement('标签名')
<ul>
    <li>我是老大</li>
  </ul>
// const div = document.createElement('div')创建节点
// document.body.appendChild(div);//给body添加子节点 但是会在JS下面2.3.2.把新创建的节点放入到指定的元素内部
父元素.appendChild(插入的元素名) 插入到已存在标签的最后面
父元素.insertBefore(要插入的元素,在那个元素前面)
 const ul = document.querySelector('ul')

    const li =document.createElement('li')
    li.innerHTML='我是li'
    ul.appendChild(li)//作为最后一个子元素 添加在后面
    //ul.children[0] 用获取子元素来进行获取。
        //作为前面插入insertBefore(要插入的元素,要插在那个元素的前面)
    ul.insertBefore(li,ul.children[0])
2.3.4 元素克隆
元素.cloneNode(布尔值)
true 深克隆 会克隆标签里面包含的内容
false 浅克隆 只会克隆标签
const ul = document.querySelector('ul')
    console.log(ul)
    const li = ul.children[0].cloneNode(false)
    console.log(li)
    ul.appendChild(li)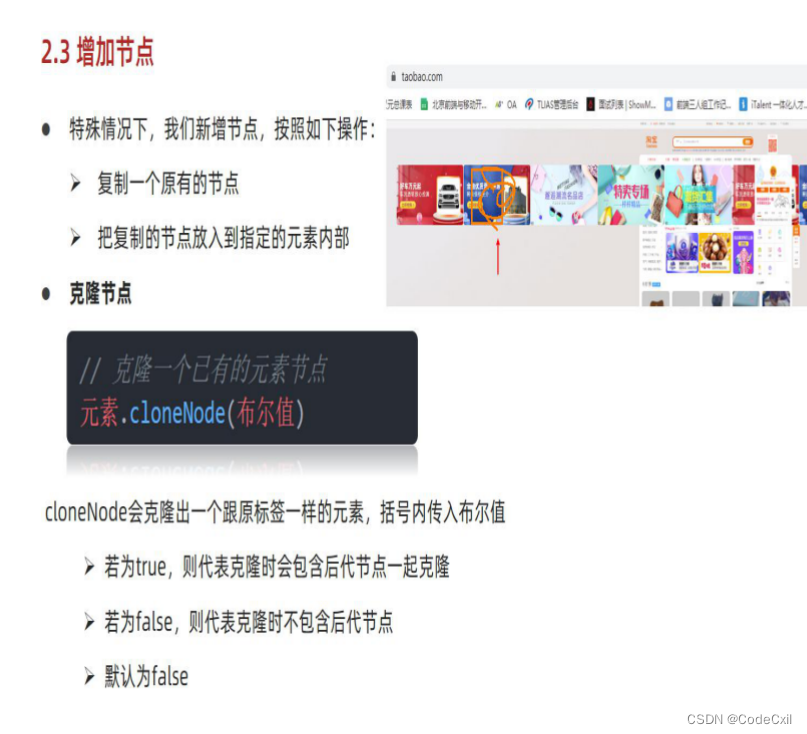
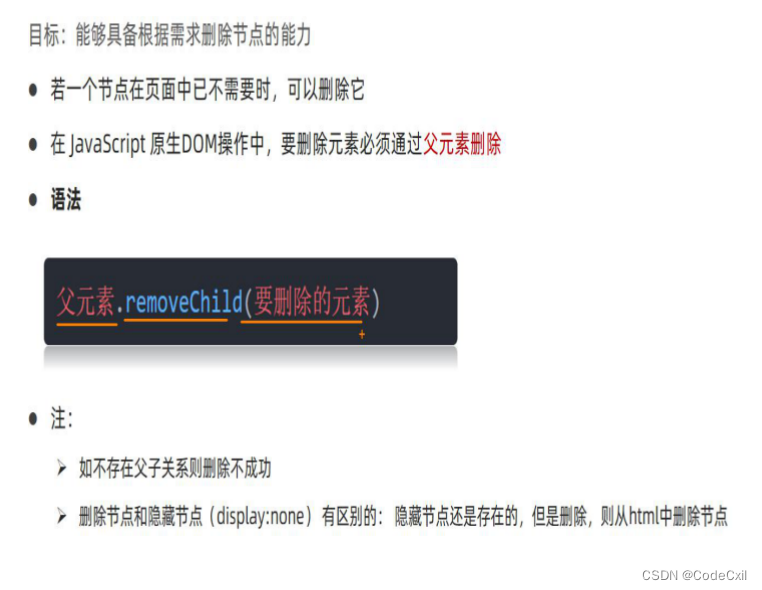
2.4删除节点
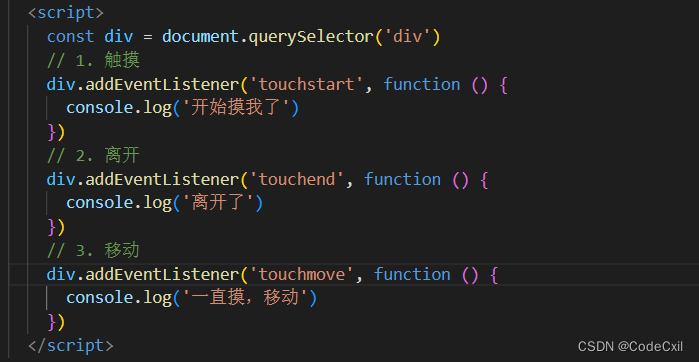
3. m端事件
也就是移动端事件
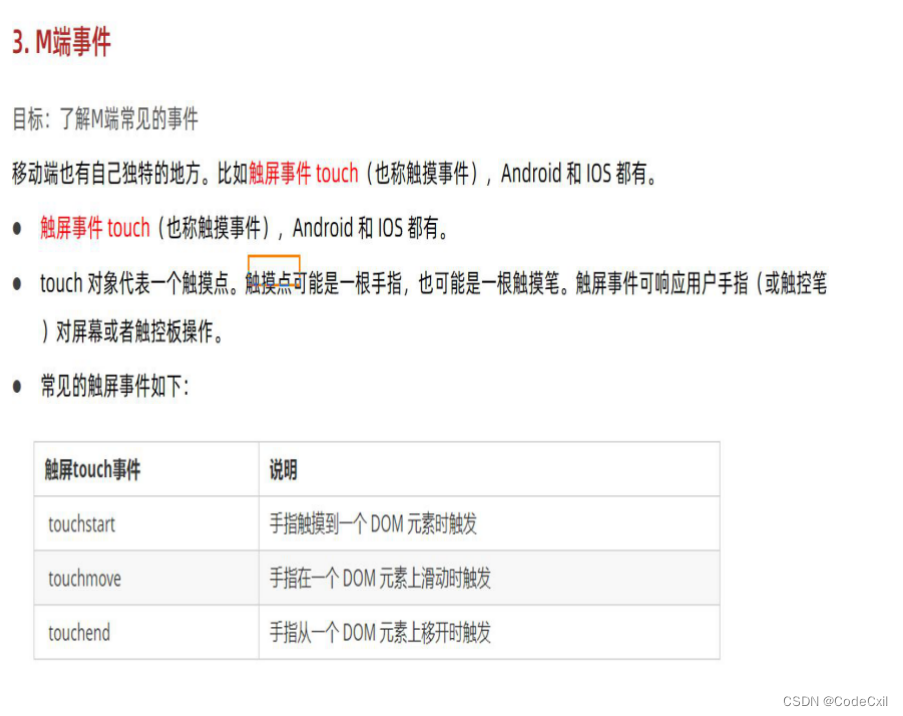
 swiper 插件 适配移动的插件


 被折叠的 条评论
为什么被折叠?
被折叠的 条评论
为什么被折叠?
 到【灌水乐园】发言


