


 本文介绍SSM框架整合,即Spring、SpringMVC和MyBatis三个框架的整合。先阐述各框架基础,如Spring的IoC和AOP,MyBatis用于持久层,SpringMVC用于Servlet层。接着说明整合原理,将MyBatis管理权交Spring,Spring嵌套SpringMVC。最后给出实现步骤,包括准备架包、配置文件、实例验证等。
SSM框架整合,即Spring---SpringMVC---MyBatis 三个框架整合,在整合框架之前,首先,你得对三个框架都有基础的了解。
Spring
Spring是一个轻量级的控制反转(IoC)和面向切面(AOP)的容器框架。我们可以将创建对象的权限交给IoC,IoC将自动对我们需要的对象进行装配和初始化。
MyBatis
MyBatis 是一款优秀的持久层框架,它支持定制化 SQL、存储过程以及高级映射。MyBatis主要工作在Dao层,用于连接数据库。
SpringMVC
Spring 框架提供了构建 Web 应用程序的全功能 MVC 模块,SpringMVC是广义的Spring下的一个框架。SpringMVC主要用于Servlet层(Controller层)。
整合原理:
SSM整合,其实就是将MyBatis的管理权交给Spring,然后在Spring中嵌套SpringMVC。由于Spring和SpringMVC都是同一个公司下的框架,因此不存在整合的道理,采用嵌套。整个整合的过程中,Spring是最大的管理者。
首先是 Spring整合MyBatis:在以往的纯MyBatis项目中,我们是通过MyBatis创建一个SqlSessionFactory,然后通过SqlSessionFactory创建一个SqlSession,通过SqlSession加载映射的接口文件创建一个StudentMapper对象,然后再进行对学生信息的增删改查。思路如下:
SqlSessionFactory ---> SqlSession ---> StudentMapper ---> CRUD
所以最重要的就是SqlSessionFactory,Spring整合MyBatis其实就是将MyBatis的SqlSessionFactory交给Spring管理。
其次是Spring嵌套SpringMVC: 在Spring中嵌套SpringMVC,就是在原有基础上加上web文件,并配置web.xml和dispatcher-servlet.xml文件。
实现步骤:
一,需要的架包:
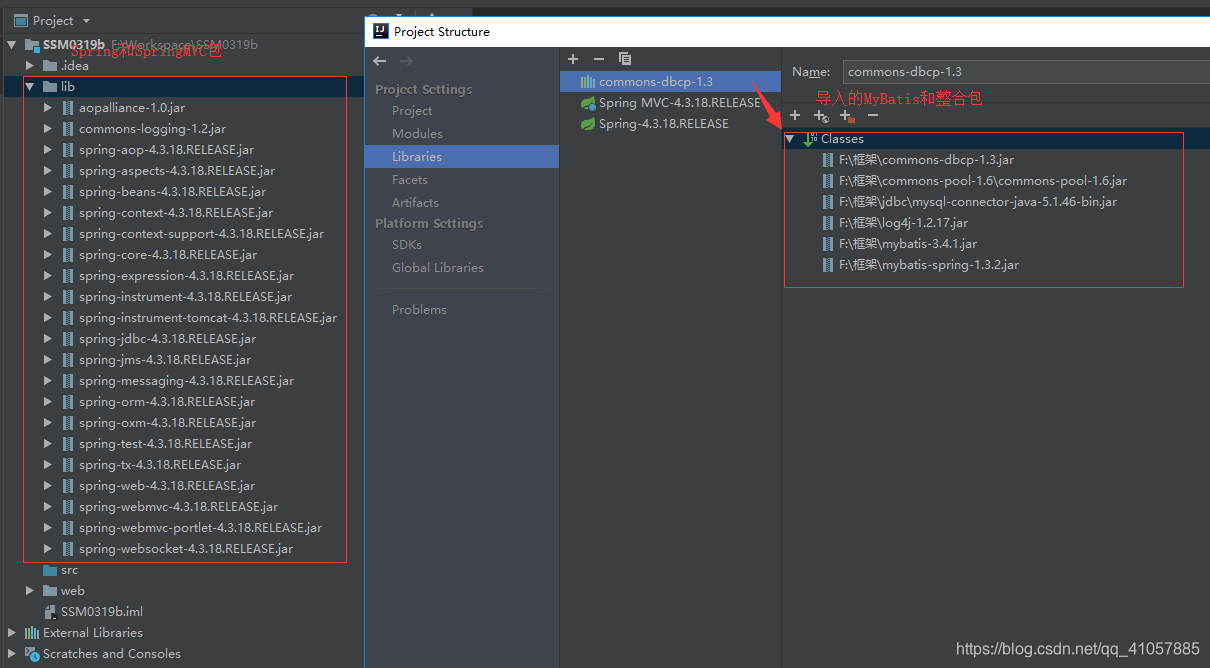
除了基础的Spring、SpringMVC、MyBatis架包之外,还需要整合架包。如下:
- mybatis-spring.jar
- commons-logging.jar
- commons-dbcp.jar
- mysql-connector-bin.jar
- log4j.jar
- commons-pool.jar
其中最后一个架包尤其注意,很多情况下tomcat启动不了就是因为下载了commons-pool2.jar,因此要尤其注意,能选择2.x版本的架包。为了方便我用idea创建一个SpringMVC项目。
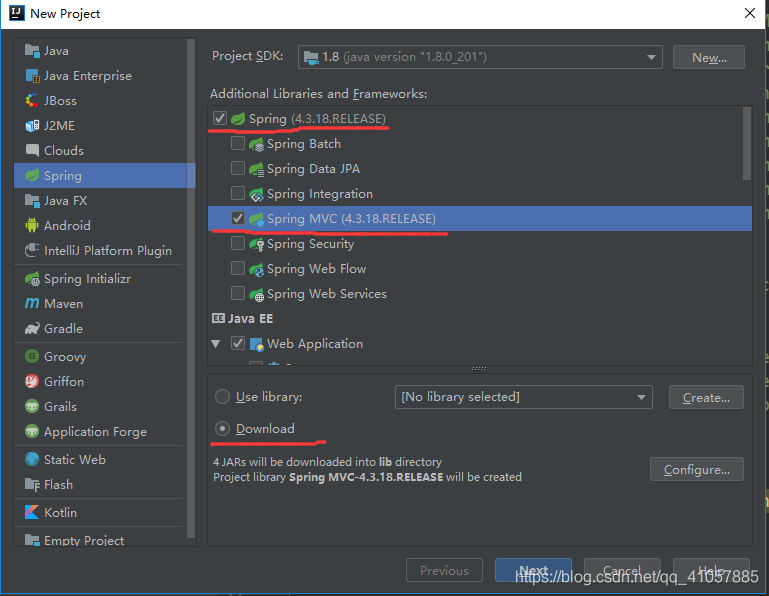
我们就不必导入spring和springMVC的包,idea会自动给我们下载好。我们只需要加入MyBatis和整合包即可。
二,配置tomcat,创建Student表、Student类以及映射文件
项目的路径结构如图所示:
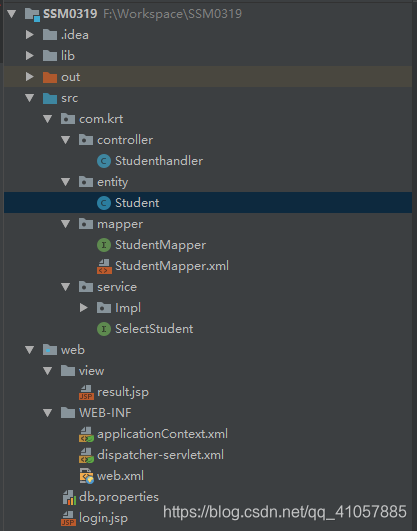
src下面分了四层,分别为:
controller层:功能上和之前的servlet层一样,主要负责和jsp前段页面交互信息。
entity层:存放POJOs类。
mapper层:存放映射文件和接口文件。
service层:向上和controller层交互信息,向下和mapper层交互信息。
web目录下有一下文件:
1,WEB-INF下面存放的是配置文件。
2,view下面存放的是响应文件。
3,web文件夹下面的文件。
package com.krt.entity;

public class Student {
    private int id;
    private String name;
    private int age;


    public Student() {

    }

    public Student(int id, String name, int age) {
        this.id = id;
        this.name = name;
        this.age = age;
    }

    public int getId() {
        return id;
    }

    public void setId(int id) {
        this.id = id;
    }

    public String getName() {
        return name;
    }

    public void setName(String name) {
        this.name = name;
    }

    public int getAge() {
        return age;
    }

    public void setAge(int age) {
        this.age = age;
    }

    @Override
    public String toString() {
        return "Student{ id="+id+", name='"+name+"', age="+age+"}";
    }
}
我只定义一个查询语句,StudentMapper.xml文件代码如下:
<?xml version="1.0" encoding="UTF-8" ?>
<!DOCTYPE mapper PUBLIC "-//mybatis.org//DTD Mapper 3.0//EN"
"http://mybatis.org/dtd/mybatis-3-mapper.dtd">
<mapper namespace="com.krt.mapper.StudentMapper">
<!--查询学生-->
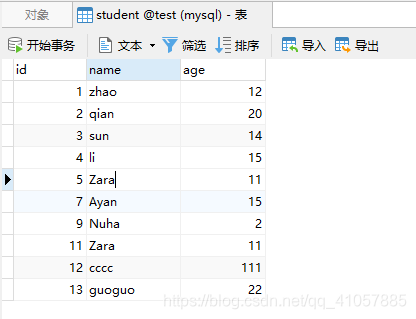
<select id="selectStu" resultType="com.krt.entity.Student" parameterType="int">
select * from student where id = #{id}
</select>
</mapper>
相应的StudentMapper接口映射文件代码如下:
package com.krt.mapper;

import com.krt.entity.Student;

public interface StudentMapper {

    Student selectStu(int id);

}
三,Spring整合MyBatis
1,首先建立一个applicationContext.xml文件用于整合MyBatis
<!--配置数据库信息,替代mybatis的配置文件conf.xml-->
    <bean id="dataSource" class="org.apache.commons.dbcp.BasicDataSource">
        <property name="driverClassName" value="${jdbc.driverClassName}" />
        <property name="url" value="${jdbc.url}" />
        <property name="username" value="${jdbc.username}" />
        <property name="password" value="${jdbc.password}" />
    </bean>
该代码用于配置数据库信息,将MyBatis连接数据库的信息,放在bean中。
<!--加载db.properties文件-->
    <bean id="config" class="org.springframework.beans.factory.config.PropertyPlaceholderConfigurer">
        <property name="locations">
            <array>
                <value>db.properties</value>
            </array>
        </property>
    </bean>
该代码用于将外部的db.properties文件导入
db.properties文件代码如下:
jdbc.driverClassName = com.mysql.jdbc.Driver
jdbc.url = jdbc:mysql://localhost:3306/test?useUnicode=true&characterEncoding=UTF-8&useSSL=false
jdbc.username = root
jdbc.password = root
<!--配置MyBatis需要的核心类,SqlSessionFactory-->
    <!--在SpringIoc容器中创建MyBatis的核心类SqlSessionFactory-->
    <bean id="sqlSessionFactory" class="org.mybatis.spring.SqlSessionFactoryBean">
        <property name="dataSource" ref="dataSource" />
        <!--加载mapper.xml路径-->
        <property name="mapperLocations" value="classpath:com/krt/mapper/*.xml" />
    </bean>
该代码用于在Spring容器中创建SqlSessionFactory bean,将MyBatis的SqlSessionFactory控制权交给Spring。
<bean class="org.mybatis.spring.mapper.MapperScannerConfigurer" >
        <property name="sqlSessionFactoryBeanName" value="sqlSessionFactory" />
        <!--指定批量产生哪个包中的mapper对象-->
        <property name="basePackage" value="com.krt.mapper" />
        <!--
            basePackage所在的property的作用
            将com.krt.mapper包中,所有的接口产生与之对应的动态代理对象
            (对象名就是首字母小写的接口名)
        -->
    </bean>
该代码的作用是将SQL语句的映射文件加载到SqlSessionFactory中。
完整applicationContext.xml文件代码如下:
<?xml version="1.0" encoding="UTF-8"?>
<beans xmlns="http://www.springframework.org/schema/beans"
       xmlns:xsi="http://www.w3.org/2001/XMLSchema-instance"
       xmlns:context="http://www.springframework.org/schema/context"
       xsi:schemaLocation="http://www.springframework.org/schema/beans
       http://www.springframework.org/schema/beans/spring-beans.xsd
       http://www.springframework.org/schema/context
       http://www.springframework.org/schema/context/spring-context.xsd">


    <!--依赖注入:给service注入dao-->
    <bean id="selectService" class="com.krt.service.Impl.SelectService">
        <property name="studentMapper" ref="studentMapper" />
    </bean>

    <!--给controller注入service-->
    <!--<bean id="studenthandler" class="com.krt.controller.Studenthandler">
        <property name="selectService" ref="selectService" />
    </bean>-->

    <!--MyBatis的配置信息(数据源,mapper.xml)控制权交给spring-->
    <!--加载db.properties文件-->
    <bean id="config" class="org.springframework.beans.factory.config.PropertyPlaceholderConfigurer">
        <property name="locations">
            <array>
                <value>db.properties</value>
            </array>
        </property>
    </bean>

    <!--配置数据库信息,替代mybatis的配置文件conf.xml-->
    <bean id="dataSource" class="org.apache.commons.dbcp.BasicDataSource">
        <property name="driverClassName" value="${jdbc.driverClassName}" />
        <property name="url" value="${jdbc.url}" />
        <property name="username" value="${jdbc.username}" />
        <property name="password" value="${jdbc.password}" />
    </bean>

    <!--<context:property-placeholder location="WEB-INF/db.properties"/>-->

    <!--配置MyBatis需要的核心类,SqlSessionFactory-->
    <!--在SpringIoc容器中创建MyBatis的核心类SqlSessionFactory-->
    <bean id="sqlSessionFactory" class="org.mybatis.spring.SqlSessionFactoryBean">
        <property name="dataSource" ref="dataSource" />
        <!--加载mapper.xml路径-->
        <property name="mapperLocations" value="classpath:com/krt/mapper/*.xml" />
    </bean>

    <!--将MyBatis的SqlSessionFactory交给Spring-->
    <!--Spring整合MyBatis -->
    <bean class="org.mybatis.spring.mapper.MapperScannerConfigurer" >
        <property name="sqlSessionFactoryBeanName" value="sqlSessionFactory" />
        <!--指定批量产生哪个包中的mapper对象-->
        <property name="basePackage" value="com.krt.mapper" />
        <!--
            basePackage所在的property的作用
            将com.krt.mapper包中,所有的接口产生与之对应的动态代理对象
            (对象名就是首字母小写的接口名)
        -->
    </bean>

</beans>
然后,我们应该将整合后的Sping放入web.xml文件中,
<!--Web项目中引入整合后的spring-->
    <context-param>
        <param-name>contextConfigLocation</param-name>
        <param-value>/WEB-INF/applicationContext.xml</param-value>
    </context-param>
至此,Spring整合MyBatis就整合好了,然后就是Spring嵌套SpringMVC。
四,配置SpringMVC文件:
首先配置web.xml文件,将所有的页面请求,全部发送给DispatcherServlet处理。web.xml代码如下:
<?xml version="1.0" encoding="UTF-8"?>
<web-app xmlns="http://xmlns.jcp.org/xml/ns/javaee"
         xmlns:xsi="http://www.w3.org/2001/XMLSchema-instance"
         xsi:schemaLocation="http://xmlns.jcp.org/xml/ns/javaee http://xmlns.jcp.org/xml/ns/javaee/web-app_4_0.xsd"
         version="4.0">

    <!--Web项目中引入整合后的spring-->
    <context-param>
        <param-name>contextConfigLocation</param-name>
        <param-value>/WEB-INF/applicationContext.xml</param-value>
    </context-param>

    <!--监听器-->
    <listener>
        <listener-class>org.springframework.web.context.ContextLoaderListener</listener-class>
    </listener>

    <!--拦截器-->
    <!--拦截所有请求,将所有请求交给DispatcherServlet处理-->
    <servlet>
        <servlet-name>dispatcher</servlet-name>
        <servlet-class>org.springframework.web.servlet.DispatcherServlet</servlet-class>
        <load-on-startup>1</load-on-startup>
    </servlet>
    <servlet-mapping>
        <servlet-name>dispatcher</servlet-name>
        <url-pattern>/</url-pattern>
    </servlet-mapping>

    <!--欢迎页-->
    <welcome-file-list>
        <welcome-file>login.jsp</welcome-file>
    </welcome-file-list>

</web-app>
其次是配置SpringMVC的配置文件,主要就是配置视图解析器和扫描注解。
diapatcher-servlet.xml代码如下:
<?xml version="1.0" encoding="UTF-8"?>
<beans xmlns="http://www.springframework.org/schema/beans"
       xmlns:xsi="http://www.w3.org/2001/XMLSchema-instance"
       xmlns:context="http://www.springframework.org/schema/context"
       xmlns:mvc="http://www.springframework.org/schema/mvc"
       xsi:schemaLocation="http://www.springframework.org/schema/beans
       http://www.springframework.org/schema/beans/spring-beans.xsd
       http://www.springframework.org/schema/context
       http://www.springframework.org/schema/context/spring-context.xsd
       http://www.springframework.org/schema/mvc
       http://www.springframework.org/schema/mvc/spring-mvc.xsd">

    <!--扫描有注解的包文件-->
    <context:component-scan base-package="com.krt.controller"/>

    <!--配置视图解析器-->
    <bean class="org.springframework.web.servlet.view.InternalResourceViewResolver">
        <property name="prefix" value="/view/" />
        <property name="suffix" value=".jsp" />
    </bean>

    <!--SpringMVC基础配置-->
    <mvc:annotation-driven></mvc:annotation-driven>


</beans>
五,实例验证:
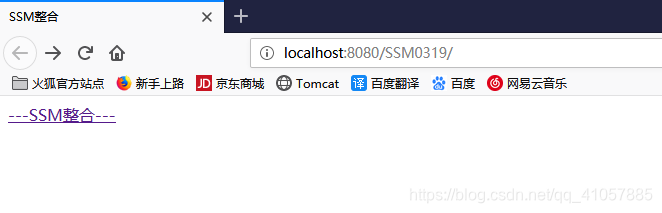
我们写一个login.jsp用于发出请求,写一个a标签。
login.jsp代码如下:
<%@ page contentType="text/html;charset=UTF-8" language="java" %>
<html>
<head>
    <title>SSM整合</title>
</head>
<body>
    <a href="selectStudent">---SSM整合---</a>
</body>
</html>
jsp页面将请求发送给controller层,因此,我们在controller建一个文件接收请求
Studenthandler.java代码如下:
package com.krt.controller;

import com.krt.entity.Student;
import com.krt.service.Impl.SelectService;
import org.springframework.beans.factory.annotation.Autowired;
import org.springframework.beans.factory.annotation.Qualifier;
import org.springframework.stereotype.Controller;
import org.springframework.web.bind.annotation.RequestMapping;

import java.util.Map;

@Controller
public class Studenthandler {
    //控制器依赖于service

    @Autowired
    @Qualifier("selectService")
    private SelectService selectService;

    public void setSelectService(SelectService selectService) {
        this.selectService = selectService;
    }


    @RequestMapping("selectStudent")
    public String selectStudent(Map<String, Object> map){
        Student s= selectService.selectStudent(3);
        //该map会将数据放入request的作用域中,一共后面调用。
        map.put("student", s);

        return "result";
    }

}
a标签发出的请求将会被selectStudent方法拦截,
至此,我们的controller层(servlet)写好了,mapper层(dao)也写好了,entity层也写好了,还差一下service层。
然后,我们创建service层,新建一个接口selectStudent,规范继承类的结构:
代码如下:
package com.krt.service;

import com.krt.entity.Student;

public interface SelectStudent {
    Student selectStudent(int id);

}
其次,我们在service层新建文件夹Impl,用于存放接口的实现类。SelectService.java代码如下:
package com.krt.service.Impl;

import com.krt.entity.Student;
import com.krt.mapper.StudentMapper;
import com.krt.service.SelectStudent;

public class SelectService implements SelectStudent {
    //service依赖于dao(mapper)
    private StudentMapper studentMapper;

    public void setStudentMapper(StudentMapper studentMapper) {
        this.studentMapper = studentMapper;
    }

    @Override
    public Student selectStudent(int id) {
        Student s = studentMapper.selectStu(id);
        return s;
    }

}
我们可以在applicationContext.xml中加入一个bean,这样我们就不需要初始化studentMapper变量,Spring会给我们自动注入。
<!--依赖注入:给service注入dao-->
    <bean id="selectService" class="com.krt.service.Impl.SelectService">
        <property name="studentMapper" ref="studentMapper" />
    </bean>
这和controller层中的Studenthandler.java中的 @Autowired 注解的功能是一样,只是,加上该注解,Spring会给我们自动去获取和该类下面的变量名相同的id的bean,给我们注入。
最后我们创建result.jsp文件
<%--
  Created by IntelliJ IDEA.
  User: krt
  Date: 2019/3/19
  Time: 12:07
  To change this template use File | Settings | File Templates.
--%>
<%@ page contentType="text/html;charset=UTF-8" language="java" %>
<html>
<head>
    <title>Title</title>
</head>
<body>
    ${student.id}--
    ${student.name} --
    ${student.age} --
</body>
</html>
该文件用到了C标签,需要导入C标签的架包:

然后,我们启动tomcat,
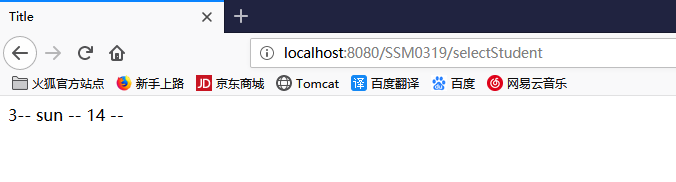
SSM项目就搭建好了。
参看这篇博客在测试的过程中,总会遇到各种问题:
要静下心,耐住性
--------致程序员


 464
464

 被折叠的 条评论
为什么被折叠?
被折叠的 条评论
为什么被折叠?
 到【灌水乐园】发言


