


1. 构建项目
- 创建package.json
npm init
# 全部使用默认配置
npm init --yes
2. 安装包
# 全局安装
npm install 包名 -g
# 本地安装
npm install 包名
# 一次安装多个
npm install 包1 包2 包3 --save
# 安装运行时依赖包,--save会将包引入到package.json中
npm install 包名 --save
3. 查看安装目录
# 本地安装目录
npm root
# 全局安装目录
npm root -g
4. 卸载包
# 本地
npm uninstall 包名
# 全局
npm uninstall 包名 -g
5. 更新包
npm update 包名
npm update 包名 -g
6. 查看已安装的包
npm ls
npm ls -g
7. 使用国内npm镜像源
- 使用配置
npm config set registry https://registry.npm.taobao.org
查看
npm config get registry
- 使用cnpm
# 安装cnpm
npm install -g cnpm --registry=https://registry.npm.taobao.org
# 使用cnpm
cnpm install 包名
8. 使用yarn
- npm和yarn同为node.js的依赖管理工具,功能相同,但是yarn的下载和启动速度比npm快
# 安装yarn
npm install -g yarn --registry=https://registry.npm.taobao.org
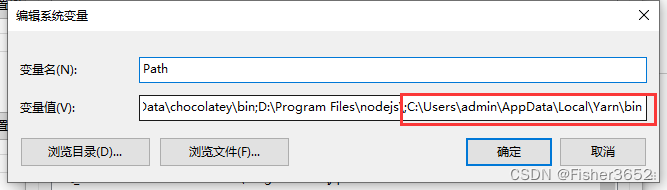
- 安装yarn后需要添加环境变量,这里安装后的目录是
C:\Users\admin\AppData\Local\Yarn\bin,替换成你自己的
| Value | Value | |
|---|---|---|
| 初始化 | npm init | yarn init |
| 安装依赖 | npm install xxx | yarn install |
| 安装依赖并保存 | npm install xxx --save | yarn add xxx |
| 安装全局依赖 | npm install -g xxx | yarn global add xxx |
| 移除依赖 | npm uninstall xxx | yarn remove xxx |
| 更新依赖 | npm update xxx | yarn upgrade xxx |
| 运行指令 | npm run | yarn run |
9. 查看配置
#全局配置
npm config list
10. 配置代理
npm config set proxy http://server:port
npm config set https-proxy http://server:port
- 查看代理
npm config get proxy
npm config get https-proxy
- 删除代理
npm config delete proxy
npm config delete https-proxy


 825
825

 被折叠的 条评论
为什么被折叠?
被折叠的 条评论
为什么被折叠?
 到【灌水乐园】发言


