


 本文详细解析了Redis配置文件的各项参数,包括大小单位、守护进程模式、日志级别、最大客户端连接数、内存限制策略等,帮助读者理解如何优化Redis性能。
units单元
- 配置大小单位,开头定义了一写基本的度量单位,只支持
bytes,不支持bit - 对大小写不敏感
# Redis configuration file example

# Note on units: when memory size is needed, it is possible to specify
# it in the usual form of 1k 5GB 4M and so forth:
#
# 1k => 1000 bytes
# 1kb => 1024 bytes
# 1m => 1000000 bytes
# 1mb => 1024*1024 bytes
# 1g => 1000000000 bytes
# 1gb => 1024*1024*1024 bytes
#
# units are case insensitive so 1GB 1Gb 1gB are all the same.
INCLUDE 包含
- 和struts2配置文件类似,可以通过
include包含,redis.conf可以作为总闸,包含其他的配置文件
################################## INCLUDES ###################################

# Include one or more other config files here.  This is useful if you
# have a standard template that goes to all Redis servers but also need
# to customize a few per-server settings.  Include files can include
# other files, so use this wisely.
#
# Notice option "include" won't be rewritten by command "CONFIG REWRITE"
# from admin or Redis Sentinel. Since Redis always uses the last processed
# line as value of a configuration directive, you'd better put includes
# at the beginning of this file to avoid overwriting config change at runtime.
#
# If instead you are interested in using includes to override configuration
# options, it is better to use include as the last line.
#
# include /path/to/local.conf
# include /path/to/other.conf
GENERAL通用
daemonize no,默认值为no,当前界面将会进入Redis的命令行模式界面,关闭连接工具和退出都会导致Redis进程的退出daemonize yes,Redis采用的是单进程多线程模式,yes代表开启守护线程模式,在该模式下,Redis将会在后台运行,并将线程pid号写入至redis.conf选项pidfile设置的文件中此时Redis将一直运行,除非手动kill该进程
################################ GENERAL  #####################################

# By default Redis does not run as a daemon. Use 'yes' if you need it.
# Note that Redis will write a pid file in /var/run/redis.pid when daemonized.
daemonize yes
#daemonize no,默认值为no,当前界面将会进入Redis的命令行模式界面,关闭连接工具和退出都会导致Redis进程的退出
#daemonize yes,Redis采用的是单进程多线程模式,yes代表开启守护线程模式,在该模式下,Redis将会在后台运行,并将线程pid号写入至redis.conf选项pidfile设置的文件中此时redis将一直运行,除非手动kill该进程
- 指定pid文件的路径
# When running daemonized, Redis writes a pid file in /var/run/redis.pid by
# default. You can specify a custom pid file location here.
pidfile /var/run/redis.pid
- 指定Redis的端口号
# Accept connections on the specified port, default is 6379.
# If port 0 is specified Redis will not listen on a TCP socket.
port 6379
tcp-backlog设置tcp的backlog,backlog其实是一个连接队列,backlog队列总和 = 未完成三次握手队列 + 已经完成三次握手队列- 在高并发环境下你需要一个高backlog值来避免慢客户端连接问题。注意
Linux内核会将这个值减小到/proc/sys/net/core/somaxconn的值,所以需要确认增大somaxconn和tcp_max_syn_backlog两个值来达到想要的效果
# TCP listen() backlog.
#
# In high requests-per-second environments you need an high backlog in order
# to avoid slow clients connections issues. Note that the Linux kernel
# will silently truncate it to the value of /proc/sys/net/core/somaxconn so
# make sure to raise both the value of somaxconn and tcp_max_syn_backlog
# in order to get the desired effect.
tcp-backlog 511
- 绑定网卡、ip
# By default Redis listens for connections from all the network interfaces
# available on the server. It is possible to listen to just one or multiple
# interfaces using the "bind" configuration directive, followed by one or
# more IP addresses.
#
# Examples:
#
# bind 192.168.1.100 10.0.0.1
# bind 127.0.0.1
timeout表示多少秒后关闭客户端连接,0代表不关闭
# Close the connection after a client is idle for N seconds (0 to disable)
timeout 0
- 单位为秒,设置为0代表不会进行keepalived检测,建议值为60
# TCP keepalive.
#
# If non-zero, use SO_KEEPALIVE to send TCP ACKs to clients in absence
# of communication. This is useful for two reasons:
#
# 1) Detect dead peers.
# 2) Take the connection alive from the point of view of network
#    equipment in the middle.
#
# On Linux, the specified value (in seconds) is the period used to send ACKs.
# Note that to close the connection the double of the time is needed.
# On other kernels the period depends on the kernel configuration.
#
# A reasonable value for this option is 60 seconds.
tcp-keepalive 0
日志级别:
- debug
- verbose
- notice
- warning
越往下日志级别越高
# Specify the server verbosity level.
# This can be one of:
# debug (a lot of information, useful for development/testing)
# verbose (many rarely useful info, but not a mess like the debug level)
# notice (moderately verbose, what you want in production probably)
# warning (only very important / critical messages are logged)
loglevel notice
- 日志的名字
# Specify the log file name. Also the empty string can be used to force
# Redis to log on the standard output. Note that if you use standard
# output for logging but daemonize, logs will be sent to /dev/null
logfile ""
- 是否把日志输出到syslog(系统日志)里
# To enable logging to the system logger, just set 'syslog-enabled' to yes,
# and optionally update the other syslog parameters to suit your needs.
# syslog-enabled no
- 指定syslog(系统日志)里的日志标识
# Specify the syslog identity.
# syslog-ident redis
- 指定syslog(系统日志)的设备,值可以是USER和LOCAL0-LOCAL7
# Specify the syslog facility. Must be USER or between LOCAL0-LOCAL7.
# syslog-facility local0
- 系统默认库数量
# Set the number of databases. The default database is DB 0, you can select
# a different one on a per-connection basis using SELECT <dbid> where
# dbid is a number between 0 and 'databases'-1
databases 16
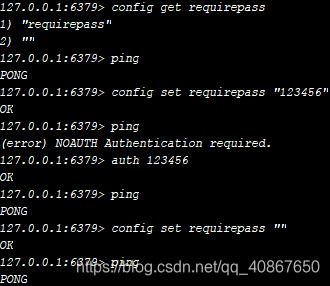
SECURITY 安全
- Redis 默认是没有设置密码的
命令:config get requirepass 查看密码
命令:config set requirepass "密码" 设置密码
设置密码后需要用命令:auth "密码" 才能进行操作
LIMITS 限制
- 最大连接客户端
# Set the max number of connected clients at the same time. By default
# this limit is set to 10000 clients, however if the Redis server is not
# able to configure the process file limit to allow for the specified limit
# the max number of allowed clients is set to the current file limit
# minus 32 (as Redis reserves a few file descriptors for internal uses).
#
# Once the limit is reached Redis will close all the new connections sending
# an error 'max number of clients reached'.
#
# maxclients 10000
- 最大缓存设置
# Don't use more memory than the specified amount of bytes.
# When the memory limit is reached Redis will try to remove keys
# according to the eviction policy selected (see maxmemory-policy).
#
# If Redis can't remove keys according to the policy, or if the policy is
# set to 'noeviction', Redis will start to reply with errors to commands
# that would use more memory, like SET, LPUSH, and so on, and will continue
# to reply to read-only commands like GET.
#
# This option is usually useful when using Redis as an LRU cache, or to set
# a hard memory limit for an instance (using the 'noeviction' policy).
#
# WARNING: If you have slaves attached to an instance with maxmemory on,
# the size of the output buffers needed to feed the slaves are subtracted
# from the used memory count, so that network problems / resyncs will
# not trigger a loop where keys are evicted, and in turn the output
# buffer of slaves is full with DELs of keys evicted triggering the deletion
# of more keys, and so forth until the database is completely emptied.
#
# In short... if you have slaves attached it is suggested that you set a lower
# limit for maxmemory so that there is some free RAM on the system for slave
# output buffers (but this is not needed if the policy is 'noeviction').
#
# maxmemory <bytes>
缓存过期清理策略
volatile-lru:使用LRU(最近最少使用)算法移除key,只对设置了过期时间的键allkeys-lru:使用LRU算法移除keyvolatile-random:在过期集合中移除随机的key,只对设置了过期时间的键allkeys-random:移除随机的keyvolatile-ttl:移除那些TTL值最小的key,即那些最近要过期的keynoeviction:不进行移除。针对写操作,只是返回错误信息
# MAXMEMORY POLICY: how Redis will select what to remove when maxmemory
# is reached. You can select among five behaviors:
#
# volatile-lru -> remove the key with an expire set using an LRU algorithm
# allkeys-lru -> remove any key according to the LRU algorithm
# volatile-random -> remove a random key with an expire set
# allkeys-random -> remove a random key, any key
# volatile-ttl -> remove the key with the nearest expire time (minor TTL)
# noeviction -> don't expire at all, just return an error on write operations
#
# Note: with any of the above policies, Redis will return an error on write
#       operations, when there are no suitable keys for eviction.
#
#       At the date of writing these commands are: set setnx setex append
#       incr decr rpush lpush rpushx lpushx linsert lset rpoplpush sadd
#       sinter sinterstore sunion sunionstore sdiff sdiffstore zadd zincrby
#       zunionstore zinterstore hset hsetnx hmset hincrby incrby decrby
#       getset mset msetnx exec sort
#
# The default is:
#
# maxmemory-policy noeviction

# LRU and minimal TTL algorithms are not precise algorithms but approximated
# algorithms (in order to save memory), so you can tune it for speed or
# accuracy. For default Redis will check five keys and pick the one that was
# used less recently, you can change the sample size using the following
# configuration directive.
#
# The default of 5 produces good enough results. 10 Approximates very closely
# true LRU but costs a bit more CPU. 3 is very fast but not very accurate.
#
# maxmemory-samples 5
- 设置样本数量,LRU算法和最小TTL算法都并非是精确的算法,而是估算值,所以你可以设置样本的大小,redis默认会检查这么多个key并选择其中LRU的那个
# LRU and minimal TTL algorithms are not precise algorithms but approximated
# algorithms (in order to save memory), so you can tune it for speed or
# accuracy. For default Redis will check five keys and pick the one that was
# used less recently, you can change the sample size using the following
# configuration directive.
#
# The default of 5 produces good enough results. 10 Approximates very closely
# true LRU but costs a bit more CPU. 3 is very fast but not very accurate.
#
# maxmemory-samples 5
常见配置文件介绍
参数说明redis.conf 配置项说明如下:
- Redis默认不是以守护进程的方式运行,可以通过该配置项修改,使用yes启用守护进程
daemonize no - 当Redis以守护进程方式运行时,Redis默认会把pid写入/var/run/redis.pid文件,可以通过pidfile指定
pidfile /var/run/redis.pid - 指定Redis监听端口,默认端口为
6379,作者在自己的一篇博文中解释了为什么选用6379作为默认端口port 6379 - 绑定的主机地址
bind 127.0.0.1 - 当客户端闲置多长时间后关闭连接,如果指定为
0,表示关闭该功能 ,
建议timeout 300 - 指定日志记录级别,Redis总共支持四个级别:
debug、verbose、notice、warning,默认为verbose
loglevel verbose - 日志记录方式,默认为标准输出,如果配置Redis为守护进程方式运行,而这里又配置为日志记录方式为标准输出,则日志将会发送给
/dev/null logfile stdout - 设置数据库的数量,默认数据库为0,可以使用SELECT
[dbid]命令在连接上指定数据库id
databases 16 - 指定在多长时间内,有多少次更新操作,就将数据同步到数据文件,可以多个条件配合
save [seconds] [changes]Redis默认配置文件中提供了三个条件:
save 900 1save 300 10save 60 10000分别表示900秒(15分钟)内有1个更改,300秒(5分钟)内有10个更改以及60秒内有10000个更改。 - 指定存储至本地数据库时是否压缩数据,默认为
yes,Redis采用LZF压缩,如果为了节省CPU时间,可以关闭该选项,但会导致数据库文件变的巨大
rdbcompression yes - 指定本地数据库文件名,默认值为
dump.rdb
dbfilename dump.rdb - 指定本地数据库存放目录
dir ./ - 设置当本机为slav服务时,设置master服务的IP地址及端口,在Redis启动时,它会自动从master进行数据同步 slaveof
[masterip] [masterport] - 当master服务设置了密码保护时,slav服务连接master的密码 masterauth
<master-password> - 设置Redis连接密码,如果配置了连接密码,客户端在连接Redis时需要通过
AUTH [password]命令提供密码,默认关闭
requirepass foobared - 设置同一时间最大客户端连接数,默认无限制,Redis可以同时打开的客户端连接数为Redis进程可以打开的最大文件描述符数,如果设置
maxclients 0,表示不作限制。当客户端连接数到达限制时,Redis会关闭新的连接并向客户端返回max number of clients reached错误信息
maxclients 128 - 指定Redis最大内存限制,Redis在启动时会把数据加载到内存中,达到最大内存后,Redis会先尝试清除已到期或即将到期的Key,当此方法处理 后,仍然到达最大内存设置,将无法再进行写入操作,但仍然可以进行读取操作。Redis新的vm机制,会把Key存放内存,Value会存放在swap区
maxmemory[bytes] - 指定是否在每次更新操作后进行日志记录,Redis在默认情况下是异步的把数据写入磁盘,如果不开启,可能会在断电时导致一段时间内的数据丢失。因为 redis本身同步数据文件是按上面save条件来同步的,所以有的数据会在一段时间内只存在于内存中。默认为
no
appendonly no - 指定更新日志文件名,默认为
appendonly.aof appendfilename appendonly.aof - 指定更新日志条件,共有3个可选值:
no:表示等操作系统进行数据缓存同步到磁盘(快)
always:表示每次更新操作后手动调用fsync()将数据写到磁盘(慢,安全)
everysec:表示每秒同步一次(折衷,默认值)
appendfsync everysec - 指定是否启用虚拟内存机制,默认值为
no,简单的介绍一下,VM机制将数据分页存放,由Redis将访问量较少的页即冷数据swap到磁盘上,访问多的页面由磁盘自动换出到内存中(在后面的文章我会仔细分析Redis的VM机制)
vm-enabled no - 虚拟内存文件路径,默认值为
/tmp/redis.swap,不可多个Redis实例共享
vm-swap-file /tmp/redis.swap - 将所有大于
vm-max-memory的数据存入虚拟内存,无论vm-max-memory设置多小,所有索引数据都是内存存储的(Redis的索引数据 就是keys),也就是说,当vm-max-memory设置为0的时候,其实是所有value都存在于磁盘。默认值为0
vm-max-memory 0 - Redis swap文件分成了很多的page,一个对象可以保存在多个page上面,但一个page上不能被多个对象共享,vm-page-size是要根据存储的 数据大小来设定的,作者建议如果存储很多小对象,page大小最好设置为
32或者64bytes;如果存储很大大对象,则可以使用更大的page,如果不确定,就使用默认值
vm-page-size 32 - 设置swap文件中的page数量,由于页表(一种表示页面空闲或使用的bitmap)是在放在内存中的,在磁盘上每
8个pages将消耗1byte的内存。
vm-pages 134217728 - 设置访问swap文件的线程数,最好不要超过机器的核数,如果设置为0,那么所有对swap文件的操作都是串行的,可能会造成比较长时间的延迟。默认值为
4
vm-max-threads 4 - 设置在向客户端应答时,是否把较小的包合并为一个包发送,默认为开启
glueoutputbuf yes - 指定在超过一定的数量或者最大的元素超过某一临界值时,采用一种特殊的哈希算法
hash-max-zipmap-entries 64
hash-max-zipmap-value 512 - 指定是否激活重置哈希,默认为开启(后面在介绍Redis的哈希算法时具体介绍)
activerehashing yes - 指定包含其它的配置文件,可以在同一主机上多个Redis实例之间使用同一份配置文件,而同时各个实例又拥有自己的特定配置文件
include /path/to/local.conf


 1059
1059

 被折叠的 条评论
为什么被折叠?
被折叠的 条评论
为什么被折叠?
 到【灌水乐园】发言


