


 本文介绍了如何在Linux CentOS7.4中进行telnet连接,包括新建用户、安装并启动telnet服务、自定义登录前后提示信息,以及解决密码修改时遇到的常见问题。
1、被连接的系统新建用户:
2、安装telnet并启动服务
yum -y install telnet-server.x86_64
yum -y install telnet.x86_64
yum -y install xinetd.x86_64

vim /etc/securetty
最后一行添加:pts/0 和 pts/1

systemctl enable xinetd.service
systemctl enable telnet.socket

systemctl start telnet.socket
systemctl start xinetd

开放23端口号
firewall-cmd --permanent --add-port=23/tcp
firewall-cmd --reload

查看Telnet的日志信息
tail -f /var/log/secure
3、telnet连接:

4、修改欢迎语和登录后提示语句:
/etc/issue #登录前提示
/etc/motd #登录后提示
欢迎语:
vim /etc/issue.net


================================= welcome to 192.168.194.6 ==============================
machine:\m
time:\t
date:\d
for:\n
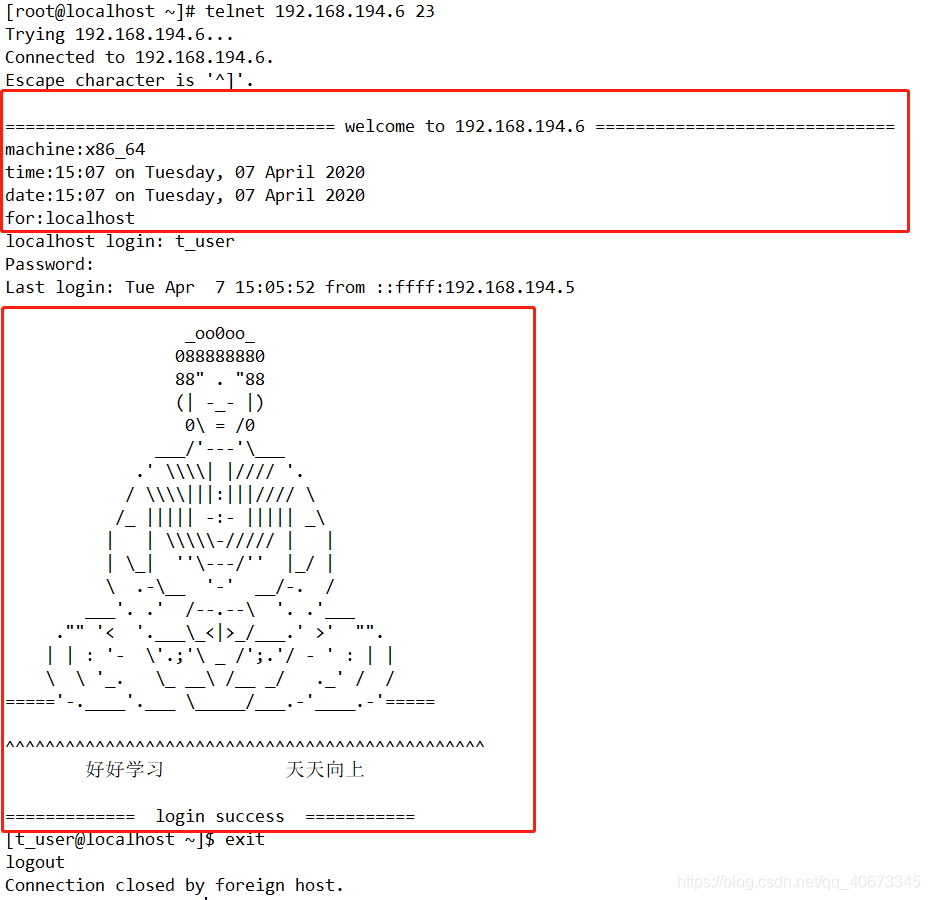
[root@localhost ~]# cat /etc/motd

                  _oo0oo_
                 088888880
                 88" . "88
                 (| -_- |)
                  0\ = /0
               ___/'---'\___
             .' \\\\| |//// '.
            / \\\\|||:|||//// \
           /_ ||||| -:- ||||| _\
          |   | \\\\\-///// |   |
          | \_|  ''\---/''  |_/ |
          \  .-\__  '-'  __/-.  /
        ___'. .'  /--.--\  '. .'___
     ."" '<  '.___\_<|>_/___.' >'  "".
    | | : '-  \'.;'\ _ /';.'/ - ' : | |
    \  \ '_.   \_ __\ /__ _/   ._' /  /
====='-.____'.___ \_____/___.-'____.-'=====

^^^^^^^^^^^^^^^^^^^^^^^^^^^^^^^^^^^^^^^^^^^^^^^^
        好好学习            天天向上

=============  login success  ===========
效果图:
常见问题:
1、修改linux密码的时候提示我user not known to the underlying authentication module。
#passwd XXXXX //XXXXX为帐号
New UNIX password:
Retype new UNIX password:
passwd: User not known to the underlying authentication module
这个时候可能是/etc/passwd和/etc/shadow 内容不一致的问题,使用pwconv同步下。
在单用户下输入:pwconv,然后重新设置密码就能成功了!


 563
563

 被折叠的 条评论
为什么被折叠?
被折叠的 条评论
为什么被折叠?
 到【灌水乐园】发言


