


 本文详细介绍JetPack Room数据库的集成与使用,结合RecyclerView展示数据,包括普通与卡片视图切换,点击反馈及在线搜索功能。
初步了解JetPack中的Room(3)
本文为学习类文档,通过学习B站up主longway777的视频,再加上自己的总结与理解的学习类文章,如有侵权,请联系博主进行删除
初步了解JetPack中的Room(3)
关于使用RecyclerView

点击下载并添加依赖,系统会自己进行添加,我们等待加载完成即可。
手动添加如下,在gradle中添加依赖:
dependencies {
        implementation "androidx.recyclerview:recyclerview:1.1.0"
        // For control over item selection of both touch and mouse driven selection
        implementation "androidx.recyclerview:recyclerview-selection:1.1.0-rc01"
    }
修改界面
RecyclerView的使用
- 将之前的TextView删除,变更为RecyclerView代码如下:
<?xml version="1.0" encoding="utf-8"?>
<androidx.constraintlayout.widget.ConstraintLayout xmlns:android="http://schemas.android.com/apk/res/android"
    xmlns:app="http://schemas.android.com/apk/res-auto"
    xmlns:tools="http://schemas.android.com/tools"
    android:layout_width="match_parent"
    android:layout_height="match_parent"
    tools:context=".MainActivity">

    <androidx.constraintlayout.widget.Guideline
        android:id="@+id/guideline"
        android:layout_width="wrap_content"
        android:layout_height="wrap_content"
        android:orientation="horizontal"
        app:layout_constraintGuide_percent="0.7" />

    <androidx.recyclerview.widget.RecyclerView
        android:layout_width="match_parent"
        android:layout_height="0dp"
        app:layout_constraintBottom_toTopOf="@+id/guideline"
        app:layout_constraintEnd_toEndOf="parent"
        app:layout_constraintStart_toStartOf="parent"
        app:layout_constraintTop_toTopOf="parent" />

    <Button
        android:id="@+id/buttonInsert"
        android:layout_width="wrap_content"
        android:layout_height="wrap_content"
        android:text="insert"
        app:layout_constraintBottom_toBottomOf="parent"
        app:layout_constraintEnd_toStartOf="@+id/buttonUpdate"
        app:layout_constraintHorizontal_bias="0.5"
        app:layout_constraintStart_toStartOf="parent"
        app:layout_constraintTop_toTopOf="@+id/guideline"
        app:layout_constraintVertical_bias="0.25" />

    <Button
        android:id="@+id/buttonUpdate"
        android:layout_width="wrap_content"
        android:layout_height="wrap_content"
        android:text="update"
        app:layout_constraintBottom_toBottomOf="@+id/buttonInsert"
        app:layout_constraintEnd_toEndOf="parent"
        app:layout_constraintHorizontal_bias="0.5"
        app:layout_constraintStart_toEndOf="@+id/buttonInsert"
        app:layout_constraintTop_toTopOf="@+id/buttonInsert" />

    <Button
        android:id="@+id/buttonClear"
        android:layout_width="wrap_content"
        android:layout_height="wrap_content"
        android:text="clear"
        app:layout_constraintBottom_toBottomOf="parent"
        app:layout_constraintEnd_toStartOf="@+id/buttonDelete"
        app:layout_constraintHorizontal_bias="0.5"
        app:layout_constraintStart_toStartOf="parent"
        app:layout_constraintTop_toBottomOf="@+id/buttonInsert" />

    <Button
        android:id="@+id/buttonDelete"
        android:layout_width="wrap_content"
        android:layout_height="wrap_content"
        android:text="delete"
        app:layout_constraintBottom_toBottomOf="@+id/buttonClear"
        app:layout_constraintEnd_toEndOf="parent"
        app:layout_constraintHorizontal_bias="0.5"
        app:layout_constraintStart_toEndOf="@+id/buttonClear"
        app:layout_constraintTop_toTopOf="@+id/buttonClear" />
</androidx.constraintlayout.widget.ConstraintLayout>
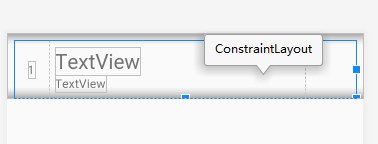
- 创建单元布局cell_normal.layout
<?xml version="1.0" encoding="utf-8"?>
<androidx.constraintlayout.widget.ConstraintLayout xmlns:android="http://schemas.android.com/apk/res/android"
xmlns:app="http://schemas.android.com/apk/res-auto"
xmlns:tools="http://schemas.android.com/tools"
android:layout_width="match_parent"
android:layout_height="wrap_content">
<androidx.constraintlayout.widget.Guideline
android:id="@+id/guideline2"
android:layout_width="wrap_content"
android:layout_height="wrap_content"
android:orientation="vertical"
app:layout_constraintGuide_percent="0.1" />
<androidx.constraintlayout.widget.Guideline
android:id="@+id/guideline3"
android:layout_width="wrap_content"
android:layout_height="wrap_content"
android:orientation="vertical"
app:layout_constraintGuide_percent="0.85" />
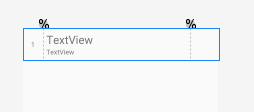
<TextView
android:id="@+id/textView"
android:layout_width="wrap_content"
android:layout_height="wrap_content"
app:layout_constraintBottom_toBottomOf="parent"
app:layout_constraintEnd_toStartOf="@+id/guideline2"
app:layout_constraintStart_toStartOf="parent"
app:layout_constraintTop_toTopOf="parent"
tools:text="1" />
<TextView
android:id="@+id/textView2"
android:layout_width="wrap_content"
android:layout_height="wrap_content"
android:layout_marginStart="8dp"
android:layout_marginTop="8dp"
android:text="TextView"
android:textSize="24sp"
app:layout_constraintBottom_toTopOf="@+id/textView3"
app:layout_constraintEnd_toStartOf="@+id/guideline3"
app:layout_constraintHorizontal_bias="0.0"
app:layout_constraintStart_toStartOf="@+id/guideline2"
app:layout_constraintTop_toTopOf="parent" />
<TextView
android:id="@+id/textView3"
android:layout_width="wrap_content"
android:layout_height="wrap_content"
android:layout_marginBottom="8dp"
android:text="TextView"
app:layout_constraintBottom_toBottomOf="parent"
app:layout_constraintStart_toStartOf="@+id/textView2"
app:layout_constraintTop_toBottomOf="@+id/textView2" />
</androidx.constraintlayout.widget.ConstraintLayout>
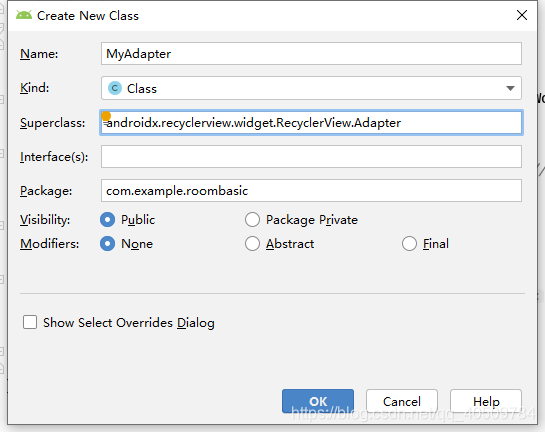
- 制作关于RecyclerView的适配器Adapter
创建一个MyAdapter类继承RecyclerView.Adapter
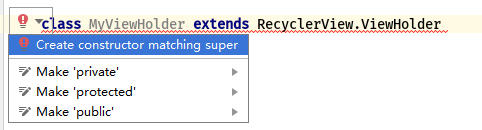
编写内部类MyViewHolder并添加constructor方法:
import android.view.LayoutInflater;
import android.view.View;
import android.view.ViewGroup;
import android.widget.TextView;
import androidx.annotation.NonNull;
import androidx.recyclerview.widget.RecyclerView;
import java.util.ArrayList;
import java.util.List;

public class MyAdapter extends RecyclerView.Adapter<MyAdapter.MyViewHolder> { //<>中表示使用的ViewHolder为自己写的静态内部类MyViewHolder
    List<Word> allWords = new ArrayList<>(); //初始化一个空列表

    public void setAllWords(List<Word> allWords) {
        this.allWords = allWords;
    }

    @NonNull
    @Override
    public MyViewHolder onCreateViewHolder(@NonNull ViewGroup parent, int viewType) {
        /*
        * 当创建ViewHolder时
        * 从Layout文件中
        * 加载View
        * */
        LayoutInflater layoutInflater = LayoutInflater.from(parent.getContext());
        View itemView = layoutInflater.inflate(R.layout.cell_normal,parent,false);
        return new MyViewHolder(itemView);
    }

    @Override
    public void onBindViewHolder(@NonNull MyViewHolder holder, int position) {
        //绑定逻辑上的关联
        Word word = allWords.get(position);
        holder.textViewNumber.setText(String.valueOf(position));
        holder.textViewEnglish.setText(word.getWord());
        holder.textViewChinese.setText(word.getChineseMeaning());
    }

    @Override
    public int getItemCount() {
        return allWords.size();  //返回列表数据个数
    }

    static class MyViewHolder extends RecyclerView.ViewHolder {
        TextView textViewNumber,textViewEnglish,textViewChinese;
        public MyViewHolder(@NonNull View itemView) {  //自带View类型的itemView
            super(itemView);
            textViewNumber = itemView.findViewById(R.id.textViewNumber);
            textViewEnglish = itemView.findViewById(R.id.textViewEnglish);
            textViewChinese = itemView.findViewById(R.id.textViewChinese);
        }
    }
}
- 在MainActivity中添加变量
import androidx.appcompat.app.AppCompatActivity;
import androidx.lifecycle.Observer;
import androidx.lifecycle.ViewModelProvider;
import androidx.recyclerview.widget.LinearLayoutManager;
import androidx.recyclerview.widget.RecyclerView;
import android.os.Bundle;
import android.view.View;
import android.widget.Button;
import android.widget.TextView;
import java.util.List;

public class MainActivity extends AppCompatActivity {
    Button buttonInsert,buttonUpdate,buttonDelete,buttonClear;
    WordViewModel wordViewModel;
    RecyclerView recyclerView;
    MyAdapter myAdapter;

    @Override
    protected void onCreate(Bundle savedInstanceState) {
        super.onCreate(savedInstanceState);
        setContentView(R.layout.activity_main);
        recyclerView = findViewById(R.id.recyclerView);
        myAdapter = new MyAdapter();
        recyclerView.setLayoutManager(new LinearLayoutManager(this));  //创建一个一维线性列表,二维则是GridLayoutManager
        recyclerView.setAdapter(myAdapter);

        wordViewModel = new ViewModelProvider(this).get(WordViewModel.class);

        //LiveData观察变动呼叫onchange函数,完成界面自动刷新
        wordViewModel.getAllWordsLive().observe(this, new Observer<List<Word>>() {
            @Override
            public void onChanged(List<Word> words) {
                myAdapter.setAllWords(words);
                myAdapter.notifyDataSetChanged();  //数据变动通知视图
            }
        });

        buttonInsert = findViewById(R.id.buttonInsert);
        buttonClear = findViewById(R.id.buttonClear);
        buttonDelete = findViewById(R.id.buttonDelete);
        buttonUpdate = findViewById(R.id.buttonUpdate);

        //插入
        buttonInsert.setOnClickListener(new View.OnClickListener() {
            @Override
            public void onClick(View v) {
                String[] english = {
                        "Hello",
                        "World",
                        "Android",
                        "Studio",
                        "Google",
                        "Project",
                        "Database",
                        "Recycler",
                        "View",
                        "String",
                        "Value",
                        "Integer"
                };
                String[] chinense = {
                        "你好",
                        "世界",
                        "安卓系统",
                        "工作室",
                        "谷歌",
                        "项目",
                        "数据库",
                        "回收站",
                        "视图",
                        "字符串",
                        "价值",
                        "整数类型"
                };
                for (int i = 0;i <english.length;i++) {
                    wordViewModel.insertWords(new Word(english[i],chinense[i]));
                }
            }
        });

        //清空
        buttonClear.setOnClickListener(new View.OnClickListener() {
            @Override
            public void onClick(View v) {
                wordViewModel.clearWords();
            }
        });

        //删除
        buttonDelete.setOnClickListener(new View.OnClickListener() {
            @Override
            public void onClick(View v) {
                Word word = new Word("",""); //删除只与id有关,内容无所谓
                word.setId(90);  //根据ID修改对应的表单名
                wordViewModel.deleteWords(word);
            }
        });

        //修改
        buttonUpdate.setOnClickListener(new View.OnClickListener() {
            @Override
            public void onClick(View v) {
                Word word = new Word("Android","安卓");
                word.setId(90);  //根据ID修改对应的表单名
                wordViewModel.updateWords(word);
            }
        });
    }
}
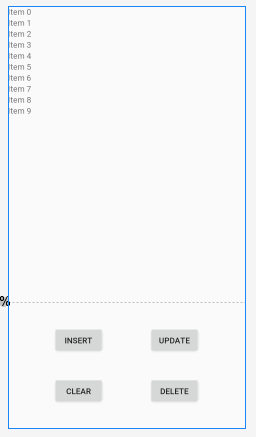
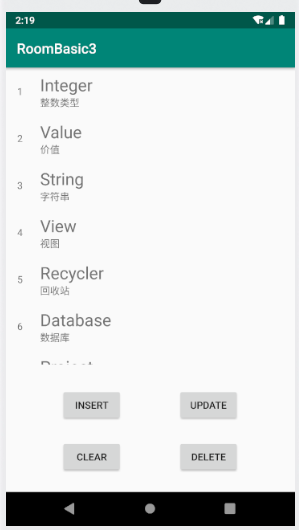
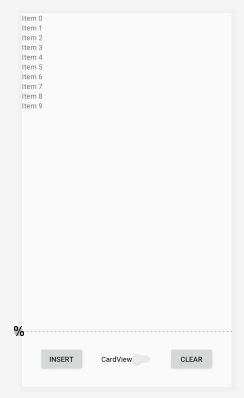
- 运行程序如图:
CardView的使用
依旧需要添加依赖:
- 创建一个新的界面布局,并编辑卡片界面layout:
<?xml version="1.0" encoding="utf-8"?>
<LinearLayout xmlns:android="http://schemas.android.com/apk/res/android"
    xmlns:app="http://schemas.android.com/apk/res-auto"
    xmlns:tools="http://schemas.android.com/tools"
    android:layout_width="match_parent"
    android:layout_height="wrap_content"
    android:orientation="vertical">

    <androidx.cardview.widget.CardView
        android:layout_width="match_parent"
        android:layout_height="match_parent"
        android:layout_marginStart="8dp"
        android:layout_marginTop="8dp"
        android:layout_marginEnd="8dp">

        <androidx.constraintlayout.widget.ConstraintLayout
            android:layout_width="match_parent"
            android:layout_height="match_parent">

            <androidx.constraintlayout.widget.Guideline
                android:id="@+id/guideline4"
                android:layout_width="wrap_content"
                android:layout_height="wrap_content"
                android:orientation="vertical"
                app:layout_constraintGuide_begin="55dp"
                app:layout_constraintGuide_percent="0.1" />

            <androidx.constraintlayout.widget.Guideline
                android:id="@+id/guideline5"
                android:layout_width="wrap_content"
                android:layout_height="wrap_content"
                android:orientation="vertical"
                app:layout_constraintGuide_begin="55dp"
                app:layout_constraintGuide_percent="0.85" />

            <TextView
                android:id="@+id/textViewNumber"
                android:layout_width="wrap_content"
                android:layout_height="wrap_content"
                app:layout_constraintBottom_toBottomOf="parent"
                app:layout_constraintEnd_toStartOf="@+id/guideline4"
                app:layout_constraintStart_toStartOf="parent"
                app:layout_constraintTop_toTopOf="parent"
                tools:text="1" />

            <TextView
                android:id="@+id/textViewEnglish"
                android:layout_width="wrap_content"
                android:layout_height="wrap_content"
                android:layout_marginStart="8dp"
                android:layout_marginTop="8dp"
                android:text="TextView"
                android:textSize="24sp"
                app:layout_constraintBottom_toTopOf="@+id/textViewChinese"
                app:layout_constraintEnd_toStartOf="@+id/guideline5"
                app:layout_constraintHorizontal_bias="0.0"
                app:layout_constraintStart_toStartOf="@+id/guideline4"
                app:layout_constraintTop_toTopOf="parent" />

            <TextView
                android:id="@+id/textViewChinese"
                android:layout_width="wrap_content"
                android:layout_height="wrap_content"
                android:layout_marginBottom="8dp"
                android:text="TextView"
                app:layout_constraintBottom_toBottomOf="parent"
                app:layout_constraintStart_toStartOf="@+id/textViewEnglish"
                app:layout_constraintTop_toBottomOf="@+id/textViewEnglish" />
        </androidx.constraintlayout.widget.ConstraintLayout>
    </androidx.cardview.widget.CardView>
</LinearLayout>
- 改变适配器MyAdapter的itemView显示:
View itemView = layoutInflater.inflate(R.layout.cell_card,parent,false); //卡片模式界面
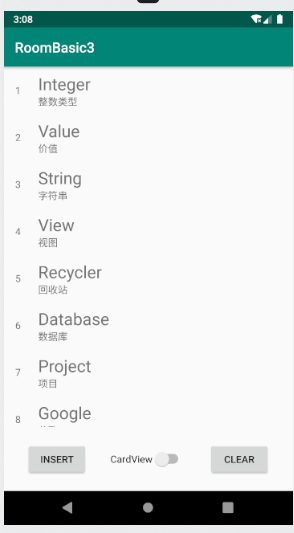
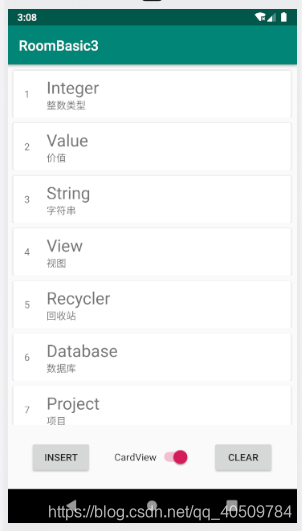
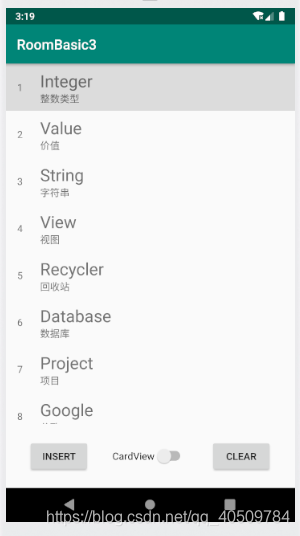
- 运行显示界面如下:
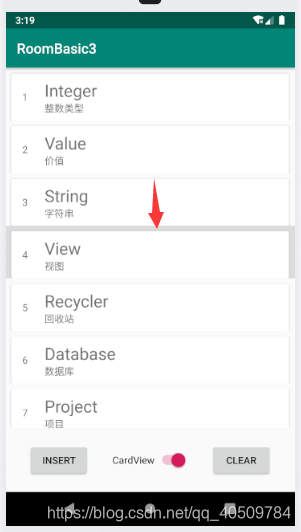
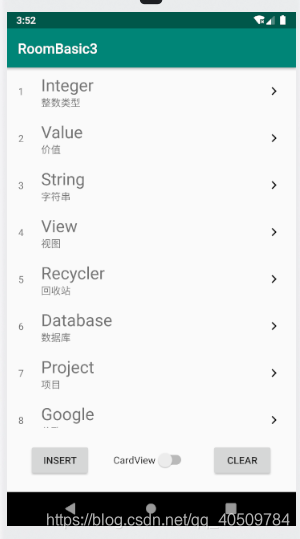
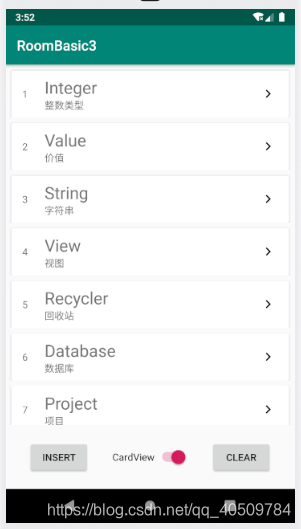
做一个界面显示切换按钮,点击按钮进行普通与卡片布局的切换显示
- 界面中做一个switch开关(多余的更新按钮和据项删除按钮在此没用,删除掉)
<?xml version="1.0" encoding="utf-8"?>
<LinearLayout xmlns:android="http://schemas.android.com/apk/res/android"
    xmlns:app="http://schemas.android.com/apk/res-auto"
    xmlns:tools="http://schemas.android.com/tools"
    android:layout_width="match_parent"
    android:layout_height="wrap_content"
    android:orientation="vertical">

    <androidx.cardview.widget.CardView
        android:layout_width="match_parent"
        android:layout_height="match_parent"
        android:layout_marginStart="8dp"
        android:layout_marginTop="8dp"
        android:layout_marginEnd="8dp">

        <androidx.constraintlayout.widget.ConstraintLayout
            android:layout_width="match_parent"
            android:layout_height="match_parent">

            <androidx.constraintlayout.widget.Guideline
                android:id="@+id/guideline4"
                android:layout_width="wrap_content"
                android:layout_height="wrap_content"
                android:orientation="vertical"
                app:layout_constraintGuide_begin="55dp"
                app:layout_constraintGuide_percent="0.1" />

            <androidx.constraintlayout.widget.Guideline
                android:id="@+id/guideline5"
                android:layout_width="wrap_content"
                android:layout_height="wrap_content"
                android:orientation="vertical"
                app:layout_constraintGuide_begin="55dp"
                app:layout_constraintGuide_percent="0.85" />

            <TextView
                android:id="@+id/textViewNumber"
                android:layout_width="wrap_content"
                android:layout_height="wrap_content"
                app:layout_constraintBottom_toBottomOf="parent"
                app:layout_constraintEnd_toStartOf="@+id/guideline4"
                app:layout_constraintStart_toStartOf="parent"
                app:layout_constraintTop_toTopOf="parent"
                tools:text="1" />

            <TextView
                android:id="@+id/textViewEnglish"
                android:layout_width="wrap_content"
                android:layout_height="wrap_content"
                android:layout_marginStart="8dp"
                android:layout_marginTop="8dp"
                android:text="TextView"
                android:textSize="24sp"
                app:layout_constraintBottom_toTopOf="@+id/textViewChinese"
                app:layout_constraintEnd_toStartOf="@+id/guideline5"
                app:layout_constraintHorizontal_bias="0.0"
                app:layout_constraintStart_toStartOf="@+id/guideline4"
                app:layout_constraintTop_toTopOf="parent" />

            <TextView
                android:id="@+id/textViewChinese"
                android:layout_width="wrap_content"
                android:layout_height="wrap_content"
                android:layout_marginBottom="8dp"
                android:text="TextView"
                app:layout_constraintBottom_toBottomOf="parent"
                app:layout_constraintStart_toStartOf="@+id/textViewEnglish"
                app:layout_constraintTop_toBottomOf="@+id/textViewEnglish" />
        </androidx.constraintlayout.widget.ConstraintLayout>
    </androidx.cardview.widget.CardView>
</LinearLayout>
- MainActivity中添加变量:
Switch aSwitch;
MyAdapter myAdapter1,myAdapter2;
- 在MyAdapter适配器中添加域
boolean useCardView; //是否使用卡片布局视图
在加载View中做更改
@Override
    public MyViewHolder onCreateViewHolder(@NonNull ViewGroup parent, int viewType) {
        /*
        * 当创建ViewHolder时
        * 从Layout文件中
        * 加载View
        * */
        LayoutInflater layoutInflater = LayoutInflater.from(parent.getContext());
        View itemView;
        if (useCardView) {  //实现加载不同视图
            itemView = layoutInflater.inflate(R.layout.cell_card,parent,false);  //卡片模式界面
        } else {
            itemView = layoutInflater.inflate(R.layout.cell_normal,parent,false);  //普通模式界面
        }
        return new MyViewHolder(itemView);
    }
- 在MainActivity中做修改:
import androidx.appcompat.app.AppCompatActivity;
import androidx.lifecycle.Observer;
import androidx.lifecycle.ViewModelProvider;
import androidx.recyclerview.widget.LinearLayoutManager;
import androidx.recyclerview.widget.RecyclerView;
import android.os.Bundle;
import android.view.View;
import android.widget.Button;
import android.widget.CompoundButton;
import android.widget.Switch;
import android.widget.TextView;
import java.util.List;

public class MainActivity extends AppCompatActivity {
    Button buttonInsert,buttonClear;
    WordViewModel wordViewModel;
    RecyclerView recyclerView;
    Switch aSwitch;
    MyAdapter myAdapter1,myAdapter2;

    @Override
    protected void onCreate(Bundle savedInstanceState) {
        super.onCreate(savedInstanceState);
        setContentView(R.layout.activity_main);
        recyclerView = findViewById(R.id.recyclerView);
        myAdapter1 = new MyAdapter(false);
        myAdapter2 = new MyAdapter(true);
        recyclerView.setLayoutManager(new LinearLayoutManager(this));  //创建一个一维线性列表,二维则是GridLayoutManager
        recyclerView.setAdapter(myAdapter1);
        aSwitch = findViewById(R.id.switch1);
        aSwitch.setOnCheckedChangeListener(new CompoundButton.OnCheckedChangeListener() {
            @Override
            public void onCheckedChanged(CompoundButton buttonView, boolean isChecked) {
                if (isChecked) {
                    recyclerView.setAdapter(myAdapter2);
                } else {
                    recyclerView.setAdapter(myAdapter1);
                }
            }
        });

        wordViewModel = new ViewModelProvider(this).get(WordViewModel.class);

        //LiveData观察变动呼叫onchange函数,完成界面自动刷新
        wordViewModel.getAllWordsLive().observe(this, new Observer<List<Word>>() {
            @Override
            public void onChanged(List<Word> words) {
                myAdapter1.setAllWords(words);
                myAdapter1.notifyDataSetChanged();  //数据变动通知视图
                myAdapter2.setAllWords(words);
                myAdapter2.notifyDataSetChanged();  //数据变动通知视图
            }
        });

        buttonInsert = findViewById(R.id.buttonInsert);
        buttonClear = findViewById(R.id.buttonClear);

        //插入
        buttonInsert.setOnClickListener(new View.OnClickListener() {
            @Override
            public void onClick(View v) {
                String[] english = {
                        "Hello",
                        "World",
                        "Android",
                        "Studio",
                        "Google",
                        "Project",
                        "Database",
                        "Recycler",
                        "View",
                        "String",
                        "Value",
                        "Integer"
                };
                String[] chinense = {
                        "你好",
                        "世界",
                        "安卓系统",
                        "工作室",
                        "谷歌",
                        "项目",
                        "数据库",
                        "回收站",
                        "视图",
                        "字符串",
                        "价值",
                        "整数类型"
                };
                for (int i = 0;i <english.length;i++) {
                    wordViewModel.insertWords(new Word(english[i],chinense[i]));
                }
            }
        });

        //清空
        buttonClear.setOnClickListener(new View.OnClickListener() {
            @Override
            public void onClick(View v) {
                wordViewModel.clearWords();
            }
        });
    }
}
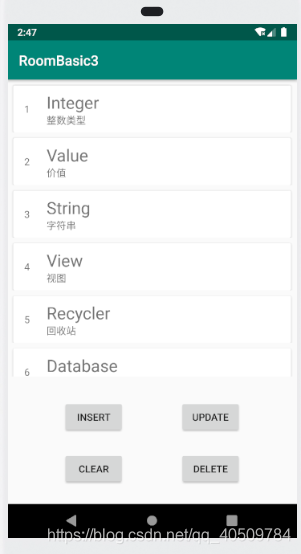
- 运行显示如下,切换按钮实现卡片布局显示:
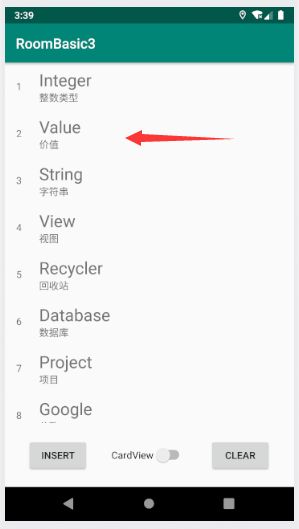
制作点击单项ItemView点击反馈
(区别于点击事件,只是单纯的反馈给用户确实点击了该项ItemView)
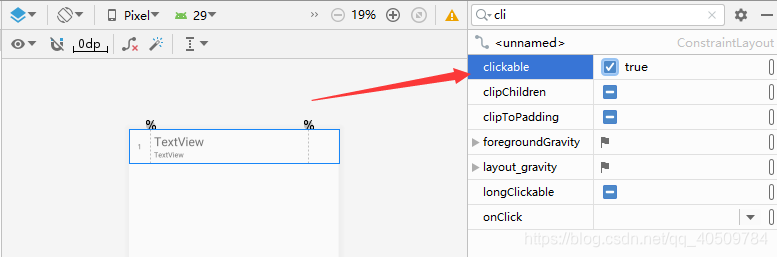
- 在cell单项布局中的根节点设置clickable选为true
- 在cell单项布局中的根节点设置background(普通布局与卡片布局均要操作)

完成点击时反馈波纹效果
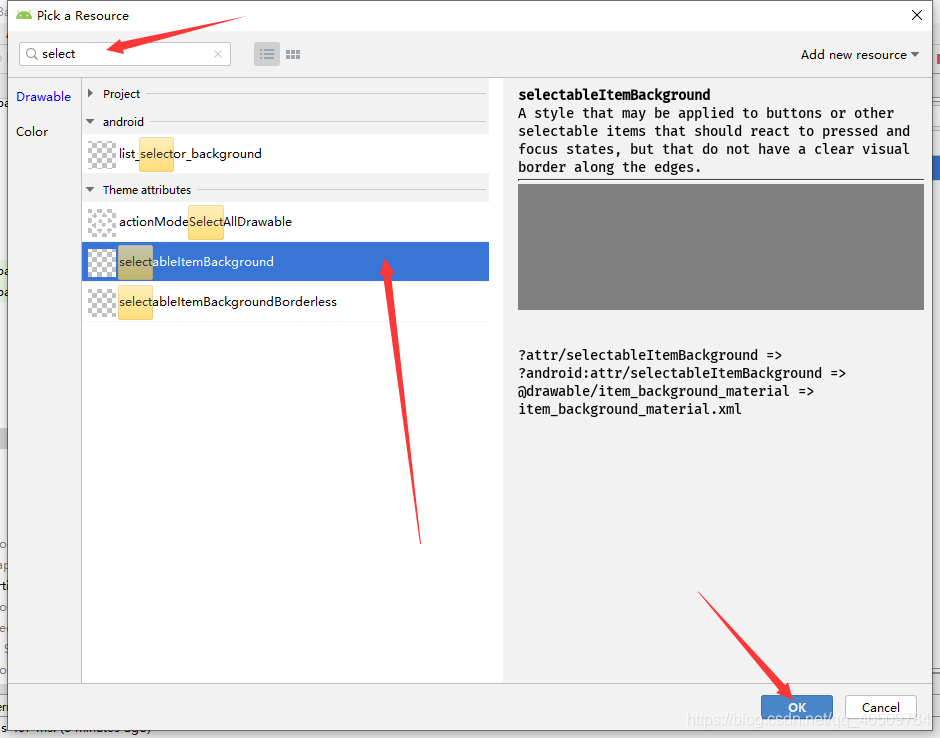
此处卡片布局的波纹显示不在前面,做更改为前景设置
<androidx.cardview.widget.CardView
        ...
        android:foreground="?selectableItemBackground"
...>
完成点击单项Item跳转在线搜索(类似api接口)
- 在适配器中绑定网易跳转的逻辑关联
@Override
public void onBindViewHolder(@NonNull final MyViewHolder holder, int position) {
//绑定逻辑上的关联
Word word = allWords.get(position);
holder.textViewNumber.setText(String.valueOf(position + 1));
holder.textViewEnglish.setText(word.getWord());
holder.textViewChinese.setText(word.getChineseMeaning());
holder.itemView.setOnClickListener(new View.OnClickListener() {
@Override
public void onClick(View v) {
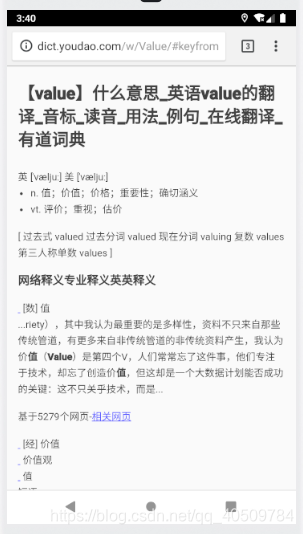
Uri uri = Uri.parse("http://dict.youdao.com/w/" + holder.textViewEnglish.getText() + "/#keyfrom=dict2.top");
Intent intent = new Intent(Intent.ACTION_VIEW);
intent.setData(uri);
holder.itemView.getContext().startActivity(intent);
}
});
}
点击单项词缀,完成网页翻译跳转:
2. 页面中设置点击符号(增加人性化设置)
Layout布局中添加图标(矢量图在res中创建并根据提示添加兼容性语句)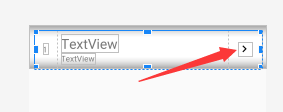
<ImageView
                android:id="@+id/imageView2"
                android:layout_width="wrap_content"
                android:layout_height="wrap_content"
                app:layout_constraintBottom_toBottomOf="parent"
                app:layout_constraintEnd_toEndOf="parent"
                app:layout_constraintStart_toStartOf="@+id/guideline5"
                app:layout_constraintTop_toTopOf="parent"
                app:srcCompat="@drawable/ic_keyboard_arrow_right_black_24dp" />
预览图如下:


 775
775

 被折叠的 条评论
为什么被折叠?
被折叠的 条评论
为什么被折叠?
 到【灌水乐园】发言


