


 本文详细解析了Java线程池的工作机制,包括任务队列、线程数量管理、拒绝策略等,通过实例展示了ThreadPool接口、RunnableQueue接口、ThreadFactory和DenyPolicy接口的实现。同时,介绍了如何构建和测试一个基本线程池,以应对实际开发中的多线程挑战。
Java线程池在实际的应用开发中十分广泛。虽然Java1.5之后在JUC包中提供了内置线程池可以拿来就用,但是这之前仍有许多老的应用和系统是需要程序员自己开发的。因此,基于线程池的需求背景、技术要求了解线程池原理和实现,一方面可以更为深刻理解Java多线程开发,有助于解决业务系统中因为线程问题所产生的bug;另一方面也有利于对遗留代码的重构。
线程池原理
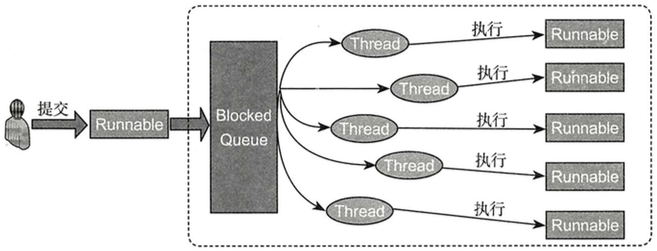
所谓的线程池,跟JDBC连接池、代理池等一样,属于一种“池”的设计模式。在设计好的数据结构中存放一定数量的线程,并且根据任务需要自动调整线程数量的多少,直到峰值。具体说来,线程池需要满足若干条件:
1. 任务队列:用于缓存提交的任务
2. QueueSize:任务队列存放的Runnable任务实例的数量,需要有限制值防止内存溢出。
3. 线程数量管理:创建线程时初始的数量init;线程池自动扩充时最大的线程数量max;空闲时的活跃线程或核心线程数量core。三者满足init<=core<=max
4. 工作线程队列:用于存储工作线程,并统计工作线程的数量。
5. 任务拒绝策略:如果线程数量达到上限且任务队列已满,需要有拒绝策略通知任务提交者,这个在工程实践中非常重要。
6. 线程工厂:用于个性化定制线程,如设置守护线程、线程名称等。
7. Keepedalive时间:线程各个重要参数自动维护的时间间隔。
线程池原理图如下:
线程池实现
“模块设计,类图先行”。明确了线程池需要实现的功能之后,就可以画出线程池的草图了,核心接口及实现类如下:
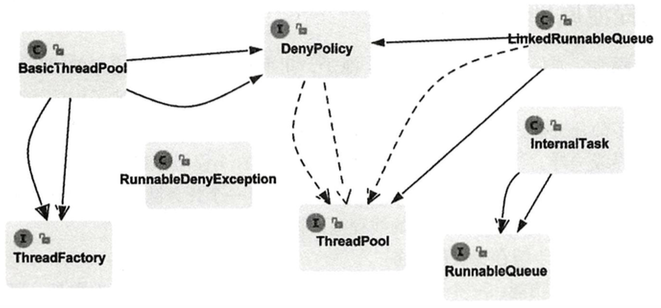
ThreadPool接口
ThreadPool接口主要定义一个线程池的基本属性,如任务提交、初始容量、最大容量、核心容量等。实现代码如下:
public interface ThreadPool {

      //submit tasks to thread pool
      void execute(Runnable runnable);
      //close pool
      void shutdown();
      //get the initial size of pool
      int getInitSize();
     //get the max size of pool
     int getMaxSize();
     //get the core size of pool
     int getCoreSize();
     //get the cache tasks queue of pool
     int getQueueSize();
     //get the active thread volume of pool
     int getActiveCount();
     //check if pool has been shutdown
     boolean isShutdown();
 }
RunnableQueue接口
这个接口的作用与BlockingQueue接口一样,用于存储提交的Runnable实现类任务。
public interface RunnableQueue {
     //提交任务到队列
     void offer(Runnable runnable);
     //从队列中获取任务
     Runnable take() throws InterruptedException;
     //返回队列中任务数
     int size();
 }
ThreadFactory接口
定义了个性化创建线程的工厂方法
@FunctionalInterface
public interface ThreadFactory {

     Thread createThread(Runnable runnable);

 }
DenyPolicy接口
定义了线程池的拒绝策略,即当任务队列达到上限时,采取何种措施拒绝。注意接口内定义了内部类作为外围接口的实现类(该类自动为public和static,像这种嵌套类的实现,可查询《Java编程思想》)。
@FunctionalInterface
 public interface DenyPolicy {

     void reject(Runnable runnable, ThreadPool threadPool);
     //定义嵌套类作为拒绝策略的实现类
     //1.拒绝并丢弃任务
     class DiscardDenyPolicy implements DenyPolicy{

         @Override
         public void reject(Runnable runnable, ThreadPool threadPool) {

         }
     }

     //2.拒绝并抛出自定义异常
     class AbortDenyPolicy implements DenyPolicy{

         @Override
         public void reject(Runnable runnable, ThreadPool threadPool) {
             throw new RunnableDenyException("The runnable " + runnable + " will abort.");
         }
     }

     //3.拒绝, 使用提交者所在线程来完成线程任务.
     class RunnerDenyPolicy implements DenyPolicy{

         @Override
         public void reject(Runnable runnable, ThreadPool threadPool) {

             if(!threadPool.isShutdown()) {
                 runnable.run();
             }
         }
     }
 }
其实实现了自定义异常类RunnableDenyException:
 public class RunnableDenyException extends RuntimeException {

     private static final long serialVersionUID = 112311231231412L;

     public RunnableDenyException(String message) {
         super(message);
     }
 }
InternalTask实现类
Runnable的实现类,会使用到RunnableQueue,它的作用其实是封装了一个任务实例,把Runnable任务的run方法封装到自己的Run方法实现中,并且提供了一个stop方法,用于在线程池销毁或数量维护时停止当前线程。
 public class InternalTask implements Runnable {
     //组合一个RunnableQueue的引用
     private final RunnableQueue runnableQueue;
     //使用volatile关键字修饰开关变量
     private volatile boolean running = true;

     public InternalTask(RunnableQueue runnableQueue) {
         this.runnableQueue = runnableQueue;
     }
     @Override
     public void run() {
         // if current task match "both running and isInterrupt" are true
         // continue to take runnable from queue and run
         while(running && !Thread.currentThread().isInterrupted()) {
             try {
                 Runnable task = runnableQueue.take();
                 task.run();
             } catch (Exception e) {
                 running = false;
                 break;
             }
         }

     }
     //停止线程的开关方法
     public void stop() {
         this.running = false;
     }
 }
到这里,一个基本线程池的骨架就搭好了,接下来主要是实现各接口,实现具体的方法。
1. 队列的实现类LinkedRunnableQueue
public class LinkedRunnableQueue implements RunnableQueue {
     //设置队列上限
     private final int limit;
     //设置拒绝策略的引用
     private final DenyPolicy denyPolicy;
     //使用LinkedList作为队列的具体实现类
     private final LinkedList<Runnable> runnableList = new LinkedList<>();
     //设置线程池的引用
     private final ThreadPool threadPool;
     //构造方法时赋初始值
     public LinkedRunnableQueue(int limit, DenyPolicy denyPolicy, ThreadPool threadPool) {
         this.limit = limit;
         this.denyPolicy = denyPolicy;
         this.threadPool = threadPool;
     }

     @Override
     public void offer(Runnable runnable) {
         //使用同步锁, 确保入队的线程安全
         synchronized (runnableList) {
             //当达到队列上限, 调用拒绝策略;否则加入队尾, 并唤醒阻塞中的线程.
             if(runnableList.size() >= limit) {
                 denyPolicy.reject(runnable, threadPool);
             }else {
                 runnableList.addLast(runnable);
                 runnableList.notifyAll();
             }
         }
     }

     @Override
     public Runnable take() throws InterruptedException {
         synchronized (runnableList) {

             while(runnableList.isEmpty()) {
                 try {
                     //如果队列中没有可执行任务, 线程挂起, 进入runnableList关联的monitor waitset中等待被唤醒
                     runnableList.wait();
                 } catch (InterruptedException e) {
                     //如果被中断, 需要抛出异常
                     throw e;
                 }
             }
             return runnableList.removeFirst();
         }
     }

     @Override
     public int size() {
         synchronized (runnableList) {
             //返回队列中的任务数量
             return runnableList.size();
         }
     }
 }
2. 线程工厂的实现
 public class DefaultThreadFactory implements ThreadFactory {
     //定义原子类的Integer作为线程组的计数
     private static final AtomicInteger GROUP_COUNTER = new AtomicInteger(1);
     //定义线程组对象
     private static final ThreadGroup group = new ThreadGroup("MyThreadPool-"+ GROUP_COUNTER.getAndDecrement());
     //定义生产的线程计数
     private static final AtomicInteger COUNTER = new AtomicInteger(0);

     @Override
     public Thread createThread(Runnable runnable) {
         return new Thread(group, runnable, "thread-pool-" + COUNTER.getAndDecrement());
     }
 }
3. 线程池的实现
线程池的实现相对比较复杂, 运用了多种设计模式的思想,核心的要点包括:
1. 使用私有内部类的方式来复用Thread类,防止向外暴露Thread类的方法;
2. 核心组成部分主要是LinkedList实现的任务队列和ArrayDeque实现的工作线程队列,构成了主要的存储主体。
3. 核心的扩容机制需要RunnableQueue + InternalTask + ThreadFactory的结合, 简单说来就是通过判定任务数是否达到阈值,然后增加工作线程的数量。
public class BasicThreadPool implements ThreadPool {
     //为了不暴露Thread类的方法, 使用私有内部类WorkThread来继承Thread类
     private WorkThread workThread;
     //线程池的基本属性
     private final int initSize;
     private final int maxSize;
     private final int coreSize;
     private int activeCount;
     //线程工厂引用
     private final ThreadFactory threadFactory;
     //队列引用
     private final RunnableQueue runnableQueue;
     //线程池销毁标识
     private volatile boolean isShutdown = false;
     //工作线程的队列, 使用ArrayDeque实现
     private final Queue<ThreadTask> threadQueue = new ArrayDeque<>();
     //定义了一个默认的拒绝策略
     private final static DenyPolicy DEFAULT_DENY_POLICY = new DenyPolicy.DiscardDenyPolicy();
     //定义了一个默认的工厂对象
     private final static ThreadFactory DEFAULT_THREAD_FACTORY = new DefaultThreadFactory();

     private final long keepAliveTime;
     private final TimeUnit timeUnit;
     //默认的构造器, 只需要传入初始容量, 最大容量, 核心容量和队列上限
     public BasicThreadPool(int initSize, int maxSize, int coreSize, int queueSize) {
         this(initSize, maxSize, coreSize, queueSize, DEFAULT_THREAD_FACTORY,
                 DEFAULT_DENY_POLICY,10,TimeUnit.SECONDS);
     }
     //完整构造器
     public BasicThreadPool(int initSize, int maxSize, int coreSize, int queueSize, ThreadFactory threadFactory,
             DenyPolicy denyPolicy,long keepAliveTime, TimeUnit timeUnit) {
         this.workThread = new WorkThread();
         this.initSize = initSize;
         this.maxSize = maxSize;
         this.coreSize = coreSize;
         this.threadFactory = threadFactory;
         this.runnableQueue = new LinkedRunnableQueue(queueSize, denyPolicy, this);
         this.keepAliveTime = keepAliveTime;
         this.timeUnit = timeUnit;
         this.init();
     }
     //线程池的初始化方法, 在构造器中被调用, 用于启动工作线程
     private void init() {
         workThread.start();
         for(int i = 0; i < initSize; i++) {
             newThread();
         }
     }
     //封装了工作线程的启动方法:
     //1. 使用InternalTask封装RunnableQueue对象
     //2. 通过工厂方法制造工作线程并启动
     //3. 工作线程入队, 工作线程队列计数器+1
     private void newThread() {
         InternalTask internalTask = new InternalTask(runnableQueue);
         Thread thread = this.threadFactory.createThread(internalTask);
         ThreadTask threadTask = new ThreadTask(thread, internalTask);
         threadQueue.offer(threadTask);
         this.activeCount++;
         thread.start();
     }
     //工作线程出队的方法
     private void removeThread() {
         ThreadTask threadTask = threadQueue.remove();
         threadTask.internalTask.stop();
         this.activeCount--;
     }
     //核心:通过内部类继承Thread方法, 设计了自动扩容的机制.
     //为了防止过快增加到Max容量, 使用continue来退出循环
     private class WorkThread extends Thread{
         @Override
         public void run() {
             while(!isShutdown && !isInterrupted()) {
                 try {
                     timeUnit.sleep(keepAliveTime);
                 } catch (InterruptedException e) {
                     isShutdown = true;
                     break;
                 }
                 synchronized (this) {
                     if(isShutdown) {
                         break;
                     }
                     if(runnableQueue.size() > 0 && activeCount < coreSize) {
                         for(int i = initSize; i<coreSize;i++) {
                             newThread();
                         }
                         continue;
                     }
                     if(runnableQueue.size() > 0 && activeCount < maxSize) {
                         for(int i = coreSize; i<maxSize;i++) {
                             newThread();
                         }
                     }
                     if(runnableQueue.size()==0 && activeCount > coreSize) {
                         for(int i = coreSize; i < activeCount; i++) {
                             removeThread();
                         }
                     }

                 }
             }
         }
     }

     @Override
     public void execute(Runnable runnable) {
         //如果线程池已经销毁, 将抛出异常
         if(this.isShutdown) {
             throw new IllegalStateException("the thread pool is destoried");
         }
         this.runnableQueue.offer(runnable);
     }

     @Override
     public void shutdown() {
         synchronized(this) {
             //防止重复销毁
             if(isShutdown) {
                 return;
             }
             //重置关闭标识
             isShutdown = true;
             //关闭任务工作线程
             threadQueue.forEach(threadTask -> {
                 threadTask.internalTask.stop();
                 threadTask.thread.interrupt();
             });
             //关闭线程池的工作线程
             this.workThread.interrupt();
         }
     }

     @Override
     public int getInitSize() {
         if(isShutdown) {
             throw new IllegalStateException("The thread pool is destroy");
         }
         return this.initSize;
     }

     @Override
     public int getMaxSize() {
         if(isShutdown) {
             throw new IllegalStateException("The thread pool is destroy");
         }
         return this.maxSize;
     }

     @Override
     public int getCoreSize() {
         if(isShutdown) {
             throw new IllegalStateException("The thread pool is destroy");
         }
         return this.coreSize;
     }

     @Override
     public int getQueueSize() {
         if(isShutdown) {
             throw new IllegalStateException("The thread pool is destroy");
         }
         return runnableQueue.size();
     }

     @Override
     public int getActiveCount() {
         synchronized(this) {
             return this.activeCount;
         }
     }

     @Override
     public boolean isShutdown() {
         return this.isShutdown;
     }
 }
线程池的测试
编写一个简单的测试类,同时启动20个任务,测试线程池的活动状态:
public class ThreadPoolTest {

     public static void main(String[] args) throws InterruptedException {

         final ThreadPool threadPool = new BasicThreadPool(2, 6, 4, 1000);

         for(int i = 0; i < 20; i++) {
             threadPool.execute(() -> {
                 try {
                     TimeUnit.SECONDS.sleep(10);
                     System.out.println(Thread.currentThread().getName() + "is Running and done");
                 } catch (InterruptedException e) {
                     e.printStackTrace();
                 }
             });
         }
         while(true) {
             System.out.println("getActiveCount: " + threadPool.getActiveCount());
             System.out.println("getQueueSize: " + threadPool.getQueueSize());
             System.out.println("getCoreSize: " + threadPool.getCoreSize());
             System.out.println("getMaxSize: " + threadPool.getMaxSize());
             System.out.println("================================================");
             TimeUnit.SECONDS.sleep(5);
         }
     }
 }
输出结果如下
thread-pool--1is Running and done
thread-pool-0is Running and done
getActiveCount: 4
getQueueSize: 14
getCoreSize: 4
getMaxSize: 6
================================================
getActiveCount: 4
getQueueSize: 14
getCoreSize: 4
getMaxSize: 6
================================================
thread-pool--3is Running and done
thread-pool--2is Running and done
thread-pool--1is Running and done
thread-pool-0is Running and done
getActiveCount: 6
getQueueSize: 8
getCoreSize: 4
getMaxSize: 6


 被折叠的 条评论
为什么被折叠?
被折叠的 条评论
为什么被折叠?
 到【灌水乐园】发言


