


1.我们可以通过在官网下载tar.gz的安装包,或者通过wget的方式下载
[root@localhost data]# wget http://download.redis.io/releases/redis-4.0.1.tar.gz
--2017-09-03 09:51:27--  http://download.redis.io/releases/redis-4.0.1.tar.gz
正在解析主机 download.redis.io... 109.74.203.151
正在连接 download.redis.io|109.74.203.151|:80... 已连接。
已发出 HTTP 请求,正在等待回应... 200 OK
长度:1711660 (1.6M) [application/x-gzip]
正在保存至: “redis-4.0.1.tar.gz”

57% [=====================================>                             ] 981,091      298K/s eta(英国中部时
64% [==========================================>                        ] 1,105,869    309K/s eta(英国中部时
72% [===============================================>                   ] 1,237,657    321K/s eta(英国中部时
80% [====================================================>              ] 1,376,455    334K/s eta(英国中部时
86% [========================================================>          ] 1,478,801    341K/s eta(英国中部时
92% [============================================================>      ] 1,582,549    349K/s eta(英国中部时
100%[==================================================================>] 1,711,660    380K/s   in 4.6s

2017-09-03 09:51:32 (363 KB/s) - 已保存 “redis-4.0.1.tar.gz” [1711660/1711660])

[root@localhost data]#
- 解压
[root@localhost data]# tar -zxvf redis-4.0.1.tar.gz
- 接下来就是编译了,通过make命令,如果编译的时候报gcc命令找不到的话,可以通过下面的命令安装gcc命令,gcc是c的编译命令
yum install gcc-c++
- 下面就通过make来编译,make是自动编译,会根据Makefile中描述的内容来进行编译。
[root@localhost redis]# make
cd src && make all
make[1]: Entering directory `/usr/local/redis/src'
    CC Makefile.dep
.
.
.
.
Hint: It's a good idea to run 'make test' ;)
[root@localhost redis]# make instal
[root@localhost local]# redis-server
9190:C 03 Sep 10:19:09.291 # oO0OoO0OoO0Oo Redis is starting oO0OoO0OoO0Oo
9190:C 03 Sep 10:19:09.292 # Redis version=4.0.1, bits=32, commit=00000000, modified=0, pid=9190, just started
9190:C 03 Sep 10:19:09.292 # Warning: no config file specified, using the default config. In order to specify a config file use redis-server /path/to/redis.conf
9190:M 03 Sep 10:19:09.295 * Increased maximum number of open files to 10032 (it was originally set to 1024).
9190:M 03 Sep 10:19:09.312 # Warning: 32 bit instance detected but no memory limit set. Setting 3 GB maxmemory limit with 'noeviction' policy now.
                _._
           _.-``__ ''-._
      _.-``    `.  `_.  ''-._           Redis 4.0.1 (00000000/0) 32 bit
  .-`` .-```.  ```\/    _.,_ ''-._
 (    '      ,       .-`  | `,    )     Running in standalone mode
 |`-._`-...-` __...-.``-._|'` _.-'|     Port: 6379
 |    `-._   `._    /     _.-'    |     PID: 9190
  `-._    `-._  `-./  _.-'    _.-'
 |`-._`-._    `-.__.-'    _.-'_.-'|
 |    `-._`-._        _.-'_.-'    |           http://redis.io
  `-._    `-._`-.__.-'_.-'    _.-'
 |`-._`-._    `-.__.-'    _.-'_.-'|
 |    `-._`-._        _.-'_.-'    |
  `-._    `-._`-.__.-'_.-'    _.-'
      `-._    `-.__.-'    _.-'
          `-._        _.-'
              `-.__.-'

9190:M 03 Sep 10:19:09.316 # WARNING: The TCP backlog setting of 511 cannot be enforced because /proc/sys/net/core/somaxconn is set to the lower value of 128.
9190:M 03 Sep 10:19:09.316 # Server initialized
9190:M 03 Sep 10:19:09.318 # WARNING overcommit_memory is set to 0! Background save may fail under low memory condition. To fix this issue add 'vm.overcommit_memory = 1' to /etc/sysctl.conf and then reboot or run the command 'sysctl vm.overcommit_memory=1' for this to take effect.
9190:M 03 Sep 10:19:09.318 * Ready to accept connections
看到这个界面的话,就表示安装成功了。
后台启动Redis、并使用工具连接
- 首先去copy安装包中的redis.conf 拷贝到安装目录下创建myconf目录
[root@yeliangcentos ~]# cp  redis.conf myconf
[root@yeliangcentos ~]# cd myconf
[root@yeliangcentos ~]# vim myconf/redis.conf
然后打开配置文件,做一些修改,
(1)将文件中的daemonize设置为yes。

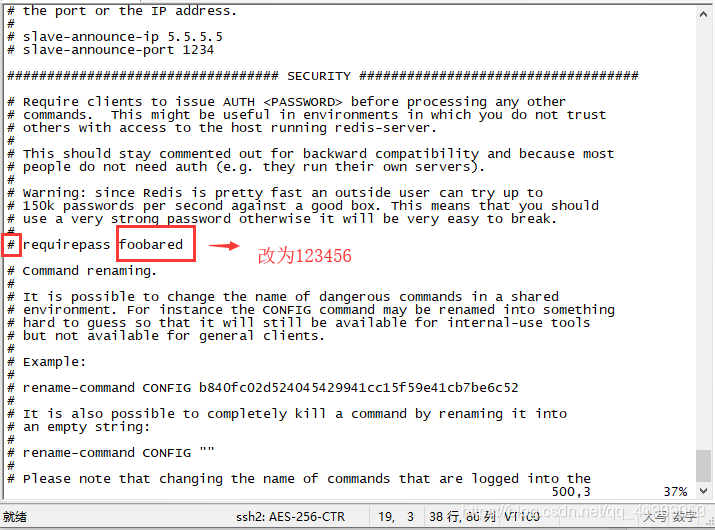
(2)将requirepass密码注释去掉改为自己设置的,这里我改为了123456,如下图所示
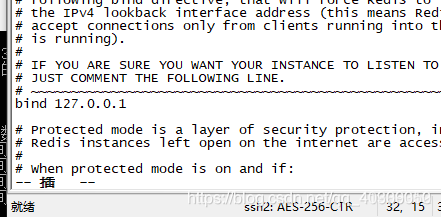
(3)找到bind 127.0.0.1用#将其注释
设置完毕按Esc 输入:然后输入wq保存退出。
2)输入以下命令后台启动Redis:
redis-server myconf/redis.conf
执行完之后,我们发现没有出现原来的 redis 的数据库图片,执行 ps -ef|grep redis查看一下后台与 redis 相关的进程,发现 redis 已经在后台执行。
再执行 redis-cli命令,启动 redis 客户端,就可以执行 redis 的命令了:
启动 redis 客户端之后,我们可以进行连通性测试,确保真的连接上了 redis 服务端,输入 ping命令:
127.0.0.1:6379> ping
能够出现 PONG 说明已经连通了 redis 服务端
若要关闭 redis 只需要执行
netstat -tunlp

kill -9 24475
24475 是对应的pid
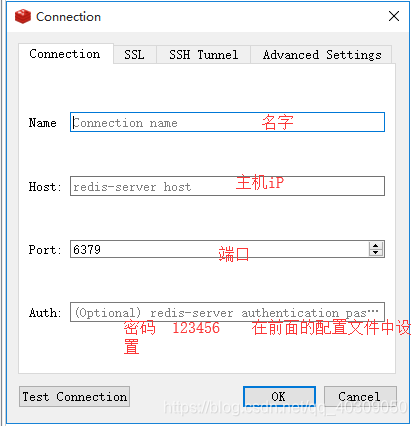
使用redisDesktopManager 工具连接


 555
555

 被折叠的 条评论
为什么被折叠?
被折叠的 条评论
为什么被折叠?
 到【灌水乐园】发言


