


(会有大量的代码,不便于理解,方便复制,红色为修改部分)
1.创建User类,用户存储获取到的用户信息,和错误提示
package servlet;

public class User {
    static String index1="";
    private String user;
    private String password;
    private String email;

    public  static void setIndex(String index){
        index1=index;
    }
    public static String getIndex(){
        return index1;
    }

    public String getUser() {
        return user;
    }

    public void setUser(String user) {
        this.user = user;
    }

    public String getPassword() {
        return password;
    }

    public void setPassword(String password) {
        this.password = password;
    }

    public String getEmail() {
        return email;
    }

    public void setEmail(String email) {
        this.email = email;
    }
}
2.创建CheckImgServlet 类
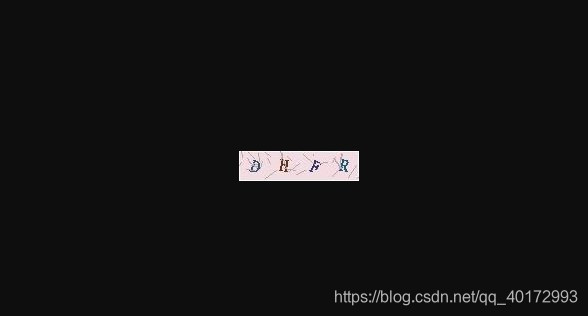
用于生成验证码图片。(下面直接附代码,这里需要new_words.txt 文件,存放验证码)
java 生成验证码源代码 https://pan.baidu.com/s/1_6BScuGCtcqNFtzhJMNOUw 提取码 :u88l
package servlet;

import java.awt.Color;
import java.awt.Font;
import java.awt.Graphics;
import java.awt.Graphics2D;
import java.awt.image.BufferedImage;
import java.io.BufferedReader;
import java.io.FileReader;
import java.io.IOException;
import java.util.ArrayList;
import java.util.List;
import java.util.Random;
import javax.imageio.ImageIO;
import javax.servlet.ServletException;
import javax.servlet.http.HttpServlet;
import javax.servlet.http.HttpServletRequest;
import javax.servlet.http.HttpServletResponse;

/**
 * 验证码生成程序
 *
 *
 *
 */
public class CheckImgServlet extends HttpServlet {

    // 集合中保存所有成语
    private List<String> words = new ArrayList<String>();

    @Override
    public void init() throws ServletException {
        // 初始化阶段,读取new_words.txt
        // web工程中读取 文件,必须使用绝对磁盘路径
        String path = getServletContext().getRealPath("/WEB-INF/new_words.txt");
        try {
            BufferedReader reader = new BufferedReader(new FileReader(path));
            String line;
            while ((line = reader.readLine()) != null) {
                words.add(line);
            }
            reader.close();
        } catch (IOException e) {
            e.printStackTrace();
        }
    }

    public void doGet(HttpServletRequest request, HttpServletResponse response)
            throws ServletException, IOException {
        // 禁止缓存
        // response.setHeader("Cache-Control", "no-cache");
        // response.setHeader("Pragma", "no-cache");
        // response.setDateHeader("Expires", -1);

        int width = 120;
        int height = 30;

        // 步骤一 绘制一张内存中图片
        BufferedImage bufferedImage = new BufferedImage(width, height,
                BufferedImage.TYPE_INT_RGB);

        // 步骤二 图片绘制背景颜色 ---通过绘图对象
        Graphics graphics = bufferedImage.getGraphics();// 得到画图对象 --- 画笔
        // 绘制任何图形之前 都必须指定一个颜色
        graphics.setColor(getRandColor(200, 250));
        graphics.fillRect(0, 0, width, height);

        // 步骤三 绘制边框
        graphics.setColor(Color.WHITE);
        graphics.drawRect(0, 0, width - 1, height - 1);

        // 步骤四 四个随机数字
        Graphics2D graphics2d = (Graphics2D) graphics;
        // 设置输出字体
        graphics2d.setFont(new Font("宋体", Font.BOLD, 18));

        Random random = new Random();// 生成随机数
        int index = random.nextInt(words.size());
        String word = words.get(index);// 获得成语

        // 定义x坐标
        int x = 10;
        for (int i = 0; i < word.length(); i++) {
            // 随机颜色
            graphics2d.setColor(new Color(20 + random.nextInt(110), 20 + random
                    .nextInt(110), 20 + random.nextInt(110)));
            // 旋转 -30 --- 30度
            int jiaodu = random.nextInt(60) - 30;
            // 换算弧度
            double theta = jiaodu * Math.PI / 180;

            // 获得字母数字
            char c = word.charAt(i);

            // 将c 输出到图片
            graphics2d.rotate(theta, x, 20);
            graphics2d.drawString(String.valueOf(c), x, 20);
            graphics2d.rotate(-theta, x, 20);
            x += 30;
        }

        // 将验证码内容保存session
        request.getSession().setAttribute("checkcode_session", word);

        // 步骤五 绘制干扰线
        graphics.setColor(getRandColor(160, 200));
        int x1;
        int x2;
        int y1;
        int y2;
        for (int i = 0; i < 30; i++) {
            x1 = random.nextInt(width);
            x2 = random.nextInt(12);
            y1 = random.nextInt(height);
            y2 = random.nextInt(12);
            graphics.drawLine(x1, y1, x1 + x2, x2 + y2);
        }

        // 将上面图片输出到浏览器 ImageIO
        graphics.dispose();// 释放资源

        //将图片写到response.getOutputStream()中
        ImageIO.write(bufferedImage, "jpg", response.getOutputStream());

    }

    public void doPost(HttpServletRequest request, HttpServletResponse response)
            throws ServletException, IOException {
        doGet(request, response);
    }

    /**
     * 取其某一范围的color
     *
     * @param fc
     *            int 范围参数1
     * @param bc
     *            int 范围参数2
     * @return Color
     */
    private Color getRandColor(int fc, int bc) {
        // 取其随机颜色
        Random random = new Random();
        if (fc > 255) {
            fc = 255;
        }
        if (bc > 255) {
            bc = 255;
        }
        int r = fc + random.nextInt(bc - fc);
        int g = fc + random.nextInt(bc - fc);
        int b = fc + random.nextInt(bc - fc);
        return new Color(r, g, b);
    }

}
为CheckImgServlet类配置xml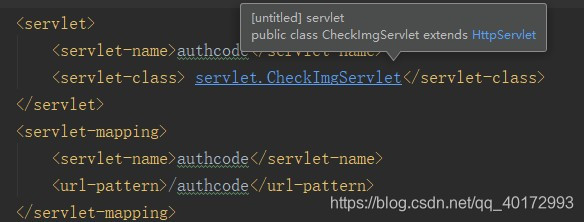
发布项目,打开浏览器访问该类试试看,是否能正常运行并生成.jpg的图片
![]()
https://blog.youkuaiyun.com/qq_40172993/article/details/88075987(此处有连接数据库的代码)
3.编写log_in_verification类,用于验证登陆密码和校验验证码
package servlet;

import org.apache.commons.dbutils.QueryRunner;
import org.apache.commons.dbutils.handlers.BeanHandler;
import javax.servlet.http.HttpServlet;
import javax.servlet.http.HttpServletRequest;
import javax.servlet.http.HttpServletResponse;
import javax.servlet.http.HttpSession;


public class log_in_verification  extends HttpServlet {

    public void doGet(HttpServletRequest req, HttpServletResponse resp){
        this.doPost(req,resp);
    }
    public void doPost(HttpServletRequest req,HttpServletResponse resp){

        //获取用户提交的用户名和密码
        String name=req.getParameter("user");
        String password=req.getParameter("password");
        //从数据库中验证密码是否正确
        QueryRunner runner=new QueryRunner(DataSourceUtils.getDataSource());
        String sql="select * from user where username=? and password=?";
        User user=null;
        try{
            user=runner.query(sql,new BeanHandler<User>(User.class),name,password);
            if(user!=null){
                user.setUser(name);
                resp.getWriter().write("greet"+user.getUser());
                //获取用户提交的验证码
                req.setCharacterEncoding("utf-8");
                String imgsrc=req.getParameter("authcode");
                System.out.println(imgsrc);
                //获取session中的验证码
                HttpSession cuthcode=req.getSession();
                String imgsrc2= (String)cuthcode.getAttribute("checkcode_session");
                System.out.println(imgsrc2);
                //比较两个验证码
                if(imgsrc.equals(imgsrc2))
                    resp.sendRedirect("/demo/welcome.jsp");
                else
                    User.setIndex("请输入正确的验证码!");
                    resp.sendRedirect("/demo/index.jsp");
            }else{
                resp.getWriter().write("login failure");
            }
        }catch (Exception e){
            e.printStackTrace();
        }


    }

}
4.写一个用户登陆注册的页面,这里借用之前模拟登陆的案例,进行修改。
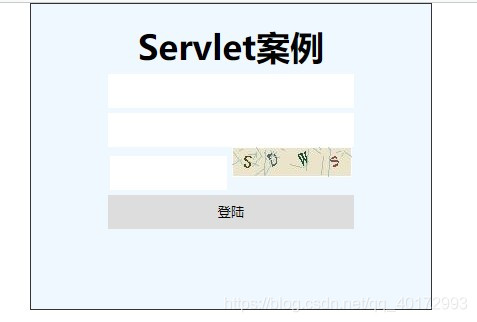
下面也直接附上代码吧
<%@ page import="servlet.User" %><%--
  Created by IntelliJ IDEA.
  User: Administrator
  Date: 2019/2/27
  Time: 14:29
  To change this template use File | Settings | File Templates.
--%>
<%@ page contentType="text/html;charset=UTF-8" language="java" %>
<html>
  <head>
    <title>登陆</title>
    <style type="text/css">
      *{
        padding: 0px;
        margin: 0px;
      }
      .text{
        width: 246px;
        height: 34px;
        border: none;
        margin-top: 5px;
      }
      #box{
        width: 400px;
        height: 285px;
        margin: 0px auto ;
        background-color: aliceblue;
        border: 1px solid #333;
        text-align: center;
        padding-top: 20px;
      }
      .authcode{
        width: 117px;
        height: 34px;
        border: none;
        margin-top: 5px;
      }
    </style>
    //点击图片重新设置img属性src的值,以达到单击验证码实现刷新的效果。
    <script type="text/javascript">
      function way(obj) {
        obj.src="/demo/authcode?time="+new Date().getTime();
      }
    </script>
  </head>
  <body>
        <div id="box">
          <h1>Servlet案例</h1>
          <form action="/demo/untitled/log_in_verification" method="post">
          <input type="text" name="user" class="text"/><br/>
          <input type="text" name="password" class="text"/><br/>
            <input type="text" name="authcode" class="authcode"/>
            <img src="/demo/authcode" onclick="way(this)" /><br/>
            <span style="color: red"><%=User.getIndex()%></span>
            <input type="submit" value="登陆" class="text"/>
          </form>
        </div>
  </body>
</html>
5.编写welcome.jsp (省略)
用户登陆成功后掉跳转页面(就四个字)
6.演示
http://39.108.158.0:8080/mp4/20190312_193710.mp4


 1070
1070

 被折叠的 条评论
为什么被折叠?
被折叠的 条评论
为什么被折叠?
 到【灌水乐园】发言


