


 本文详细介绍了如何在PSOC62开发板上基于RT_thread操作系统配置和使用PWM驱动L298N电机控制器。通过修改board/Kconfig和RT_thread设置,以及更新drv_pwm.h和drv_pwm.c文件,实现了对电机的正反转控制。在sys_init()函数中初始化了L298N的输入引脚模式,并在main函数中调用相关函数进行运行、后退和停止操作。
1.新建工程
选择基于开发板为PSOC62-IFX-EVAL-KIT
BSP为1.0.3
选择RT_thread为5.0.1
2.硬件连接
硬件:L298N电机驱动
| L298N | B2B | B2A | B1B | B1A | ENA | IN1 | IN2 | IN3 | IN4 | ENB |
| Port | 5.0 | 5.1 | 11.2 | 11.3 | 11.4 | 11.5 | 5.6 | 5.7 | 0.5 | 0.2 |
| 功能 | 右电机编码器 | 左电机编码器 | 左轮PWM | 左进 | 左退 | 右进 | 右退 | 右轮pwm | ||
| 特殊功能 | pwm0channel3 | pwm0channel1 | ||||||||
3.board/Kconfig设置
menuconfig BSP_USING_PWM0_CH1
    bool "Enable PWM0 channel1"
    default n
    if BSP_USING_PWM0_CH1
        config BSP_USING_PWM0_PORT0
        bool "Enable PWM0-PORT0 output pwm"
        default n
    endif
menuconfig BSP_USING_PWM0_CH3
    bool "Enable PWM0 channel3"
    default n
    if BSP_USING_PWM0_CH3
        config BSP_USING_PWM0_PORT11
        bool "Enable PWM0-PORT11 output pwm"
        default n
    endif
4.RT_thread设置
打开RT-thread settings,进入硬件,选中下列PWM项,保存退出
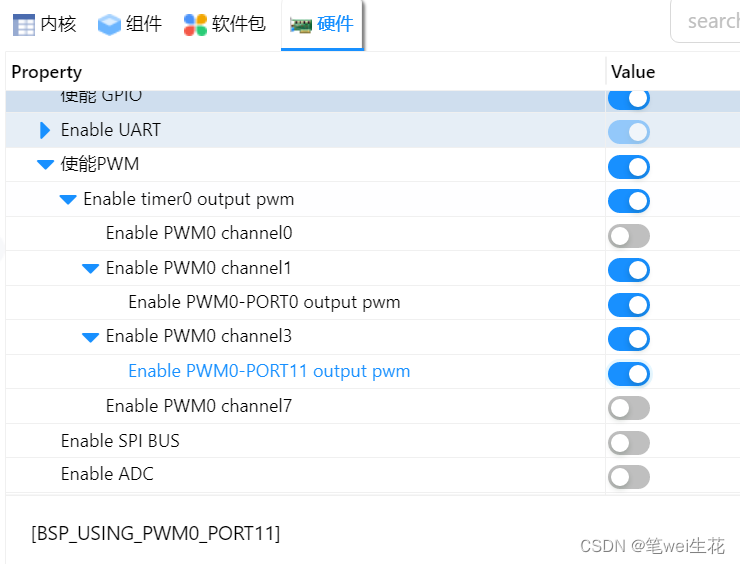
此时rtconfig.h中会出现
#define BSP_USING_PWM0
#define BSP_USING_PWM0_PORT0
#define BSP_USING_PWM0_CH1
#define BSP_USING_PWM0_CH3
#define BSP_USING_PWM0_PORT11
同时libraries/HAL_Drivers下会出现drv_pwm.h和drv_pwm.c
5.修改drv_pwm.h
仿照其他内容新增如下项
#ifndef PWM0_CH1_PORT0_CONFIG
#define PWM0_CH1_PORT0_CONFIG       \
    {                               \
        .name = "pwm0",             \
        .channel = 1,               \
        .gpio = GET_PIN(0, 2),      \
    }
#endif /* PWM0_CH1_PORT0_CONFIG */

#ifndef PWM0_CH3_PORT11_CONFIG
#define PWM0_CH3_PORT11_CONFIG       \
    {                               \
        .name = "pwm0",             \
        .channel = 3,               \
        .gpio = GET_PIN(11, 4),      \
    }
#endif /* PWM0_CH3_PORT11_CONFIG */
6.修改drv_pwm.c
新增第32行中的static struct ifx_pwm ifx_pwm_obj[]项如下:
#ifdef BSP_USING_PWM0_PORT0
    PWM0_CH0_PORT0_CONFIG,
    PWM0_CH1_PORT0_CONFIG,
#endif

#ifdef BSP_USING_PWM0_PORT11
    PWM0_CH3_PORT11_CONFIG,
#endif
7.相关rt_thread函数介绍
使用到的rt_thread函数介绍:
rt_device_find(const char* name)
应用程序通过该接口查找到设备,然后使用I/O设备管理接口来访问硬件
rt_pwm_set(struct rt_device_pwm *device,
int channel,
rt_uint32_t period,
rt_uint32_t pulse);
设置PWM周期和脉冲宽度
rt_pwm_enable(struct rt_device_pwm *device, int channel);
使能PWM设备
8.PWM命令驱动两轮
#define PWM_DEV_NAME "pwm0"
#define PWM_DEV_CHANNEL 3
#define PWM1_DEV_NAME "pwm0"
#define PWM1_DEV_CHANNEL 1

struct rt_device_pwm *pwm_dev;
struct rt_device_pwm *pwm1_dev;

int pwm_init(void)
{
    rt_uint32_t period, pulse, dir;

    period = 1 * 1000 * 1000;
    dir = 1;
    pulse = 0;

    pwm_dev = (struct rt_device_pwm *)rt_device_find(PWM_DEV_NAME);
    pwm1_dev = (struct rt_device_pwm *)rt_device_find(PWM1_DEV_NAME);

    if (pwm_dev == RT_NULL)
    {
        rt_kprintf("pwm sample run failed! can't find %s device!\n", PWM_DEV_NAME);
        return -RT_ERROR;
    }

    rt_pwm_set(pwm_dev, PWM_DEV_CHANNEL, period, pulse);
    rt_pwm_enable(pwm_dev, PWM_DEV_CHANNEL);
    rt_pwm_set(pwm1_dev, PWM1_DEV_CHANNEL, period, pulse);
    rt_pwm_enable(pwm1_dev, PWM1_DEV_CHANNEL);

    rt_kprintf("Now PWM[%s] Channel[%d] Period[%d] Pulse[%d]\n", PWM_DEV_NAME, PWM_DEV_CHANNEL, period, pulse);

    while (1)
    {
        rt_thread_mdelay(50);

        if (dir)
        {
            pulse += 100000;
        }
        else
        {
            pulse -= 100000;
        }

        if (pulse >= period)
        {
            dir = 0;
        }

        if (0 == pulse)
        {
            dir = 1;
        }

        rt_pwm_set(pwm_dev, PWM_DEV_CHANNEL, period, pulse);
        rt_pwm_set(pwm1_dev, PWM1_DEV_CHANNEL, period, pulse);
    }
}
9.L298N初始化
#define IN1         GET_PIN(11, 5)
#define IN2         GET_PIN(5, 6)
#define IN3         GET_PIN(5, 7)
#define IN4         GET_PIN(0, 5)
#define left_run    {rt_pin_write(IN2, PIN_LOW);rt_pin_write(IN1, PIN_HIGH);}
#define right_run    {rt_pin_write(IN4, PIN_LOW);rt_pin_write(IN3, PIN_HIGH);}
#define left_back    {rt_pin_write(IN1, PIN_LOW);rt_pin_write(IN2, PIN_HIGH);}
#define right_back    {rt_pin_write(IN3, PIN_LOW);rt_pin_write(IN4, PIN_HIGH);}
#define left_stop       {rt_pin_write(IN2, PIN_LOW);rt_pin_write(IN1, PIN_LOW);}
#define right_stop      {rt_pin_write(IN4, PIN_LOW);rt_pin_write(IN3, PIN_LOW);}

void sys_init(void)
{
    rt_pin_mode(IN1, PIN_MODE_OUTPUT);
    rt_pin_mode(IN2, PIN_MODE_OUTPUT);
    rt_pin_mode(IN3, PIN_MODE_OUTPUT);
    rt_pin_mode(IN4, PIN_MODE_OUTPUT);
}

void run(void){
    left_run;
    right_run;
}

void back(void){
    left_back;
    right_back;
}

void stop(void){
    left_stop;
    right_stop;
}
10.加入main函数中
int main(void)
{
    rt_pin_mode(LED_PIN, PIN_MODE_OUTPUT);
    sys_init();
    run();
    for (;;)
    {
        rt_pin_write(LED_PIN, PIN_HIGH);
        rt_thread_mdelay(500);
        pwm_init();
        rt_pin_write(LED_PIN, PIN_LOW);
        rt_thread_mdelay(500);
    }
}


 被折叠的 条评论
为什么被折叠?
被折叠的 条评论
为什么被折叠?
 到【灌水乐园】发言


