


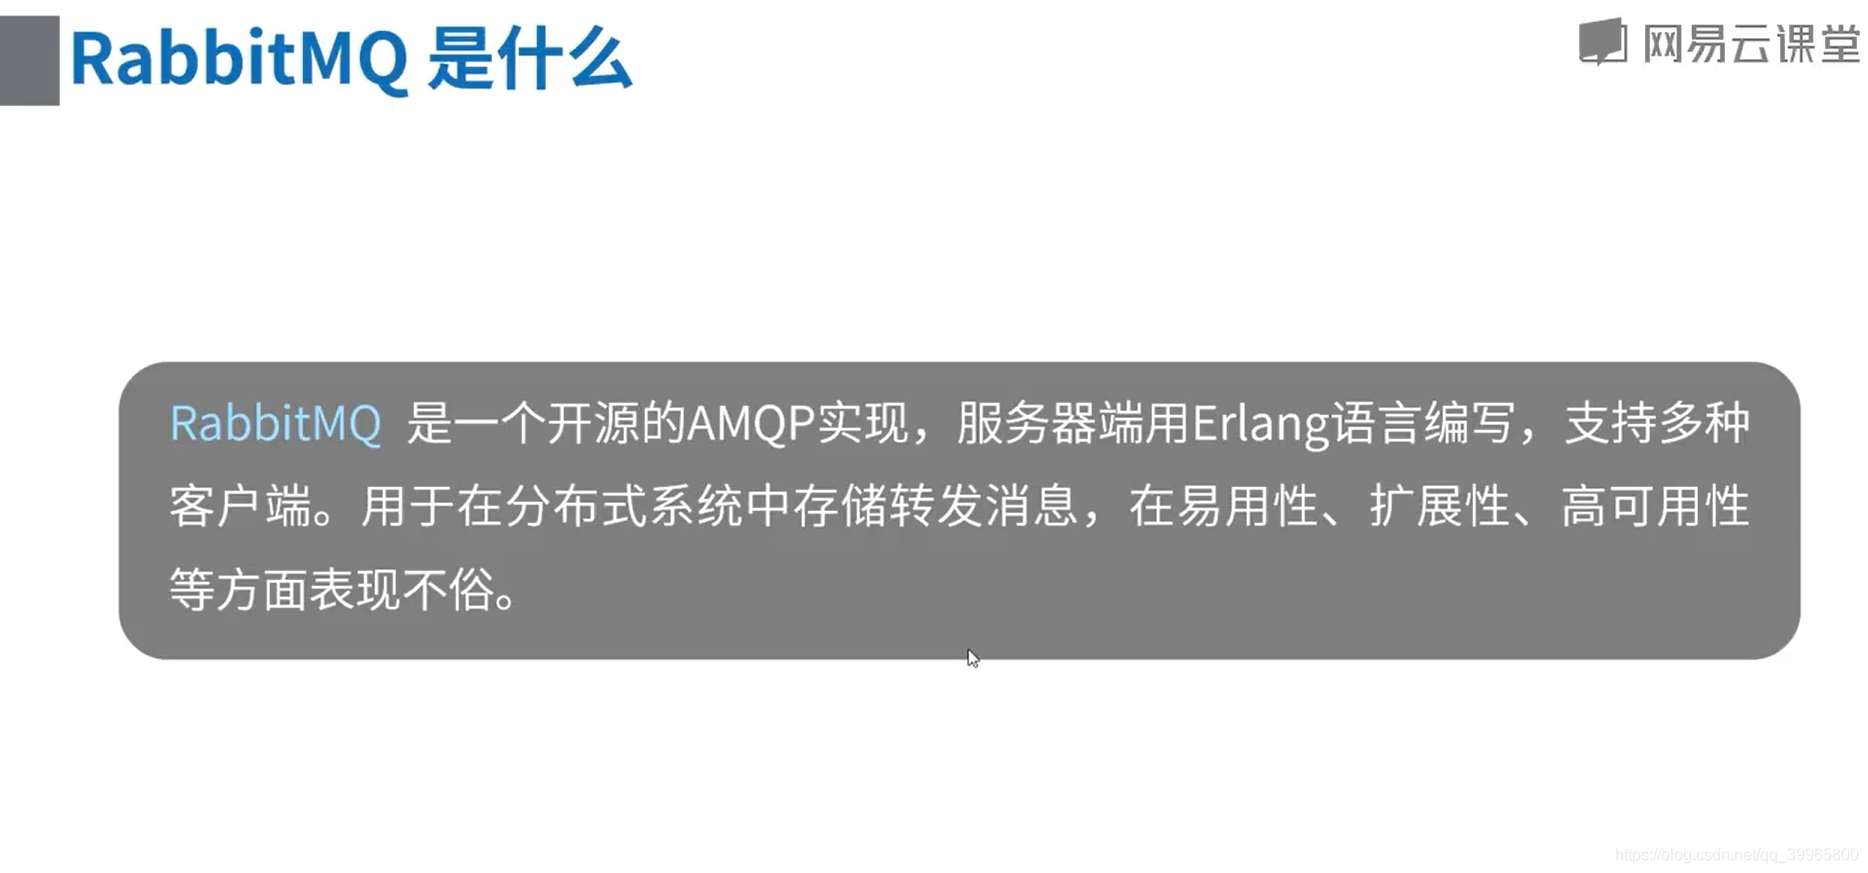
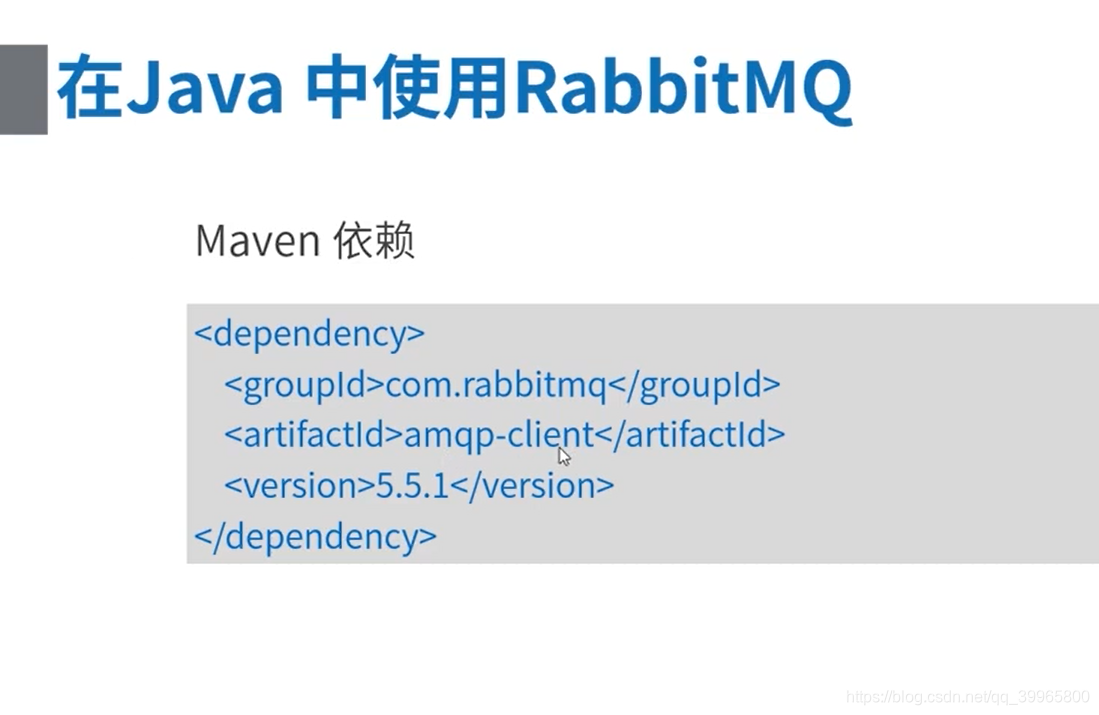
RabbitMQ是实现了高级消息队列协议(AMQP)的开源消息代理软件(亦称面向消息的中间件)。RabbitMQ服务器是用Erlang语言编写的,而集群和故障转移是构建在开放电信平台框架上的。所有主要的编程语言均有与代理接口通讯的客户端库。
1、安装erlang
由于rabbitMq需要erlang语言的支持,在安装rabbitMq之前需要安装erlang
sudo apt-get install erlang-nox2、安装Rabbitmq
更新源
sudo apt-get update安装
sudo apt-get install rabbitmq-server启动、停止、重启、状态rabbitMq命令
sudo rabbitmq-server start
sudo rabbitmq-server stop
sudo rabbitmq-server restart
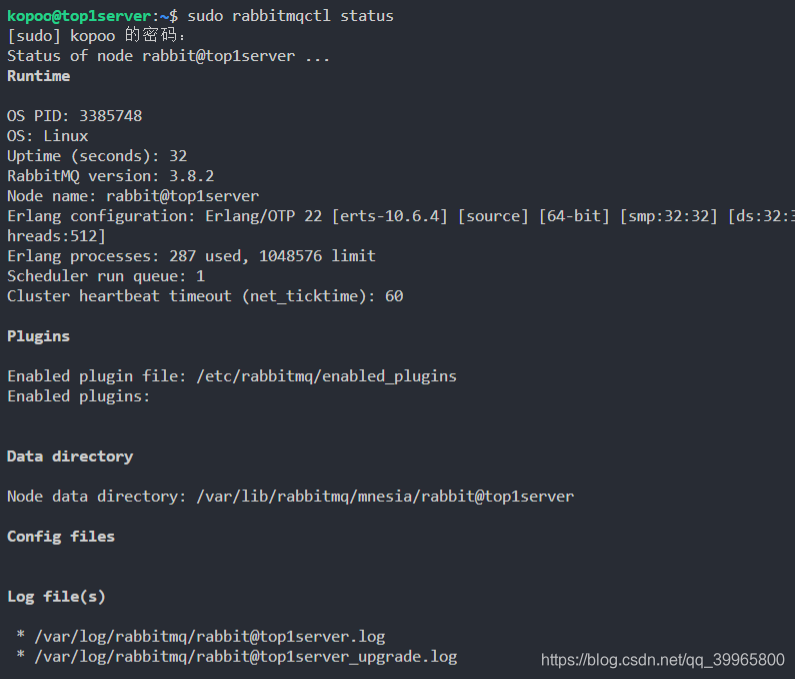
sudo rabbitmqctl status

使用教程
启动RabbitMQ服务
#service rabbitmq-server start
状态查看
#rabbitmqctl status
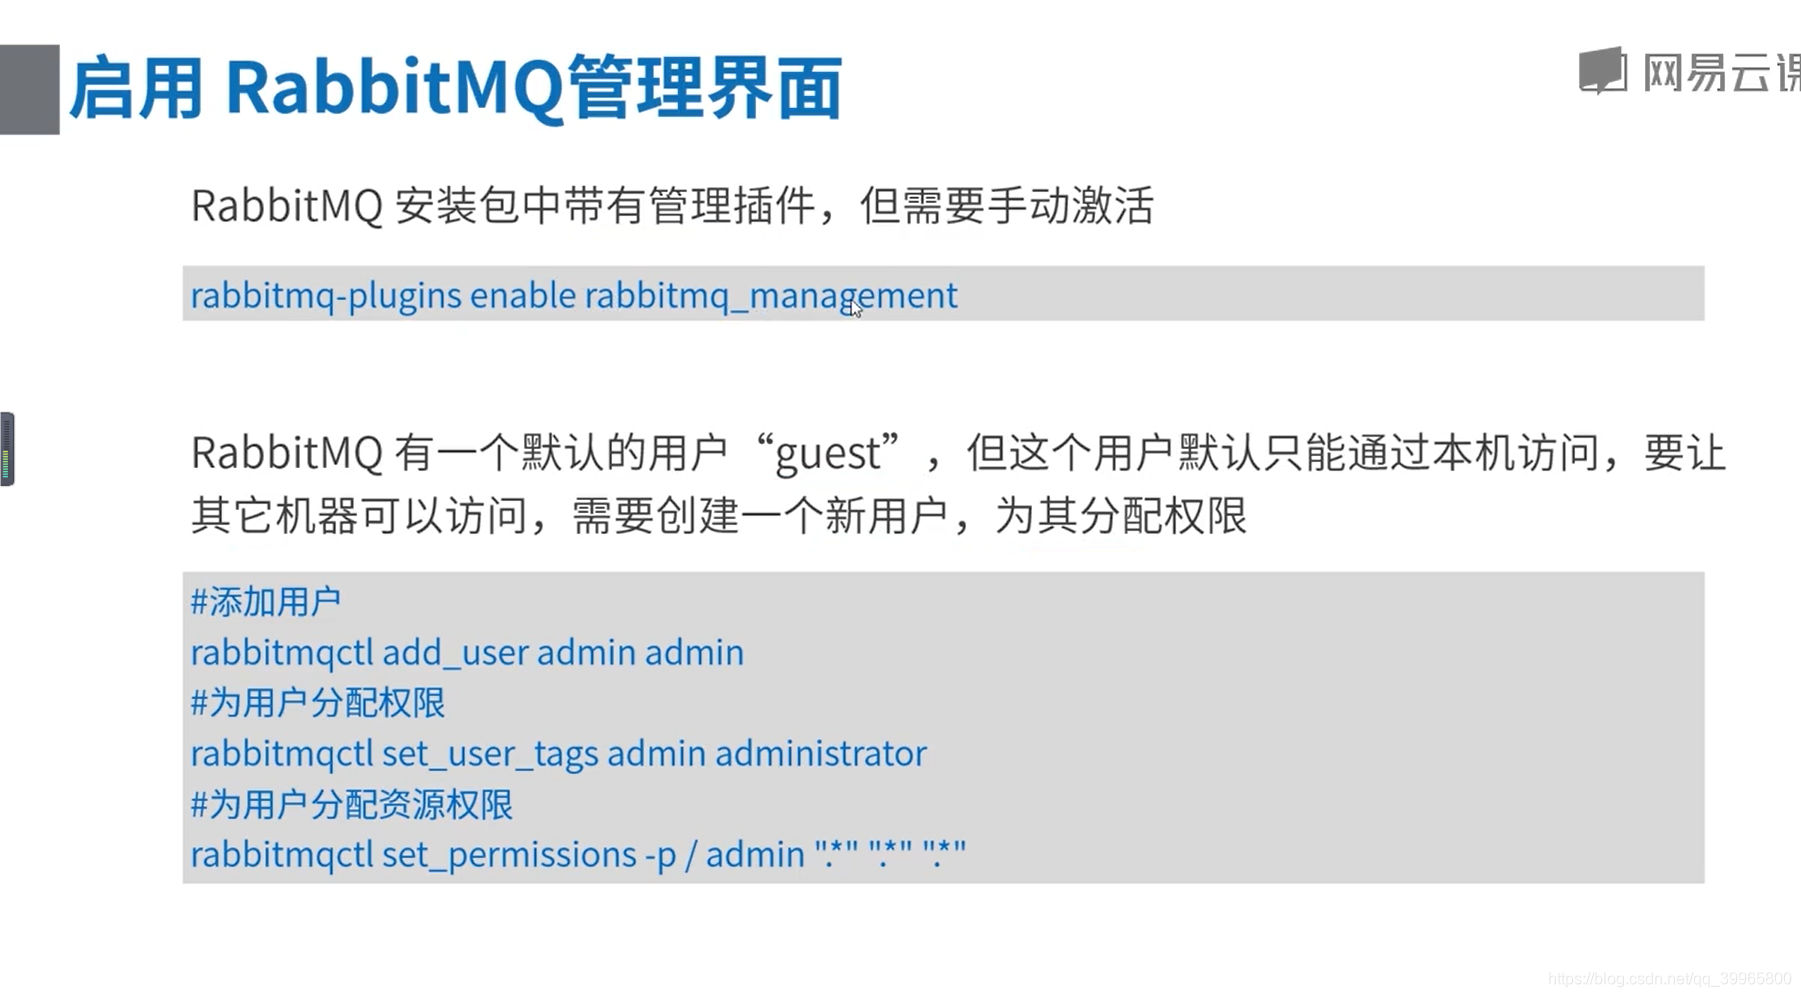
启用插件
#rabbitmq-plugins enable rabbitmq_management
重启服务
#service rabbitmq-server restart
添加帐号:name 密码:passwd
#rabbitmqctl add_user name passwd
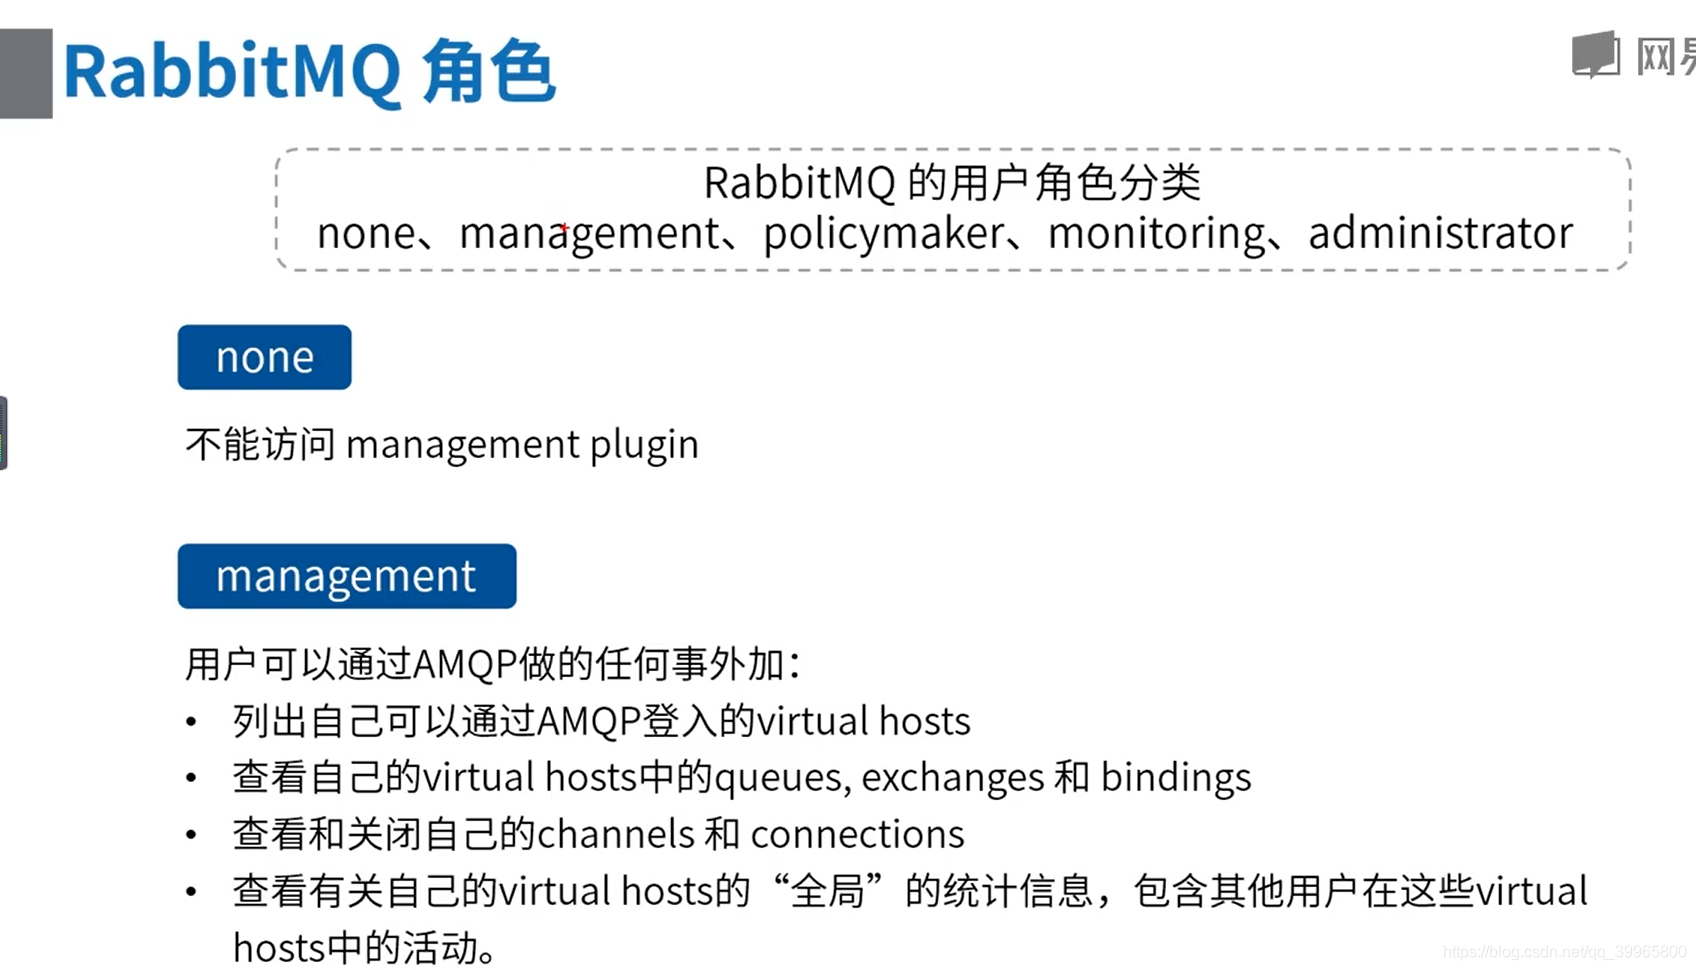
赋予其administrator角色
#rabbitmqctl set_user_tags name administrator
设置权限
#rabbitmqctl set_permissions -p / name ".*" ".*" ".*"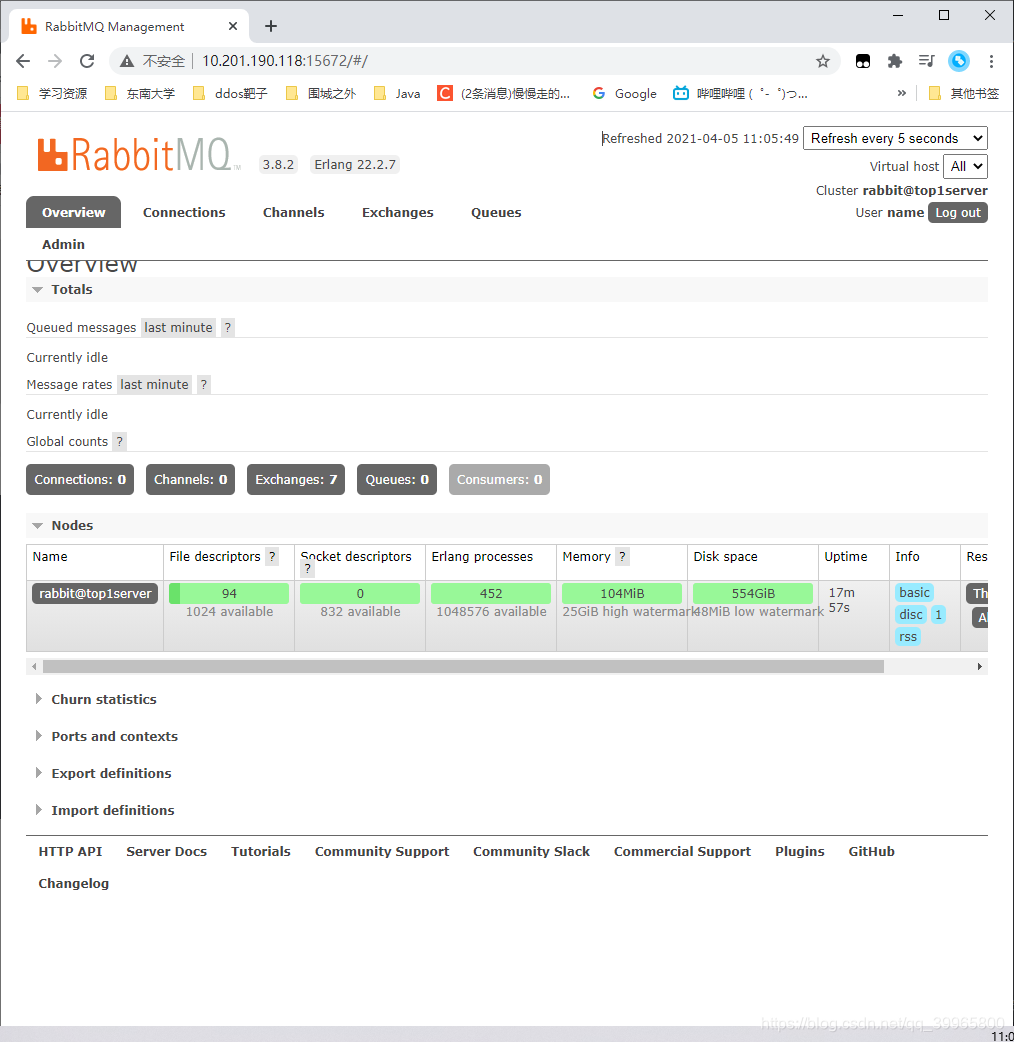
package com.study.rabbitmq.a132.simple;
import com.rabbitmq.client.Channel;
import com.rabbitmq.client.Connection;
import com.rabbitmq.client.ConnectionFactory;
import java.io.IOException;
import java.util.concurrent.TimeoutException;
/**
* 简单队列生产者
* 使用RabbitMQ的默认交换器发送消息
*/
public class Producer {
public static void main(String[] args) {
// 1、创建连接工厂
ConnectionFactory factory = new ConnectionFactory();
// 2、设置连接属性
factory.setHost("192.168.100.242");
factory.setPort(5672);
factory.setUsername("admin");
factory.setPassword("admin");
Connection connection = null;
Channel channel = null;
try {
// 3、从连接工厂获取连接
connection = factory.newConnection("生产者");
// 4、从链接中创建通道
channel = connection.createChannel();
/**
* 5、声明(创建)队列
* 如果队列不存在,才会创建
* RabbitMQ 不允许声明两个队列名相同,属性不同的队列,否则会报错
*
* queueDeclare参数说明:
* @param queue 队列名称
* @param durable 队列是否持久化
* @param exclusive 是否排他,即是否为私有的,如果为true,会对当前队列加锁,其它通道不能访问,并且在连接关闭时会自动删除,不受持久化和自动删除的属性控制
* @param autoDelete 是否自动删除,当最后一个消费者断开连接之后是否自动删除
* @param arguments 队列参数,设置队列的有效期、消息最大长度、队列中所有消息的生命周期等等
*/
channel.queueDeclare("queue1", false, false, false, null);
// 消息内容
String message = "Hello World!";
// 6、发送消息
channel.basicPublish("", "queue1", null, message.getBytes());
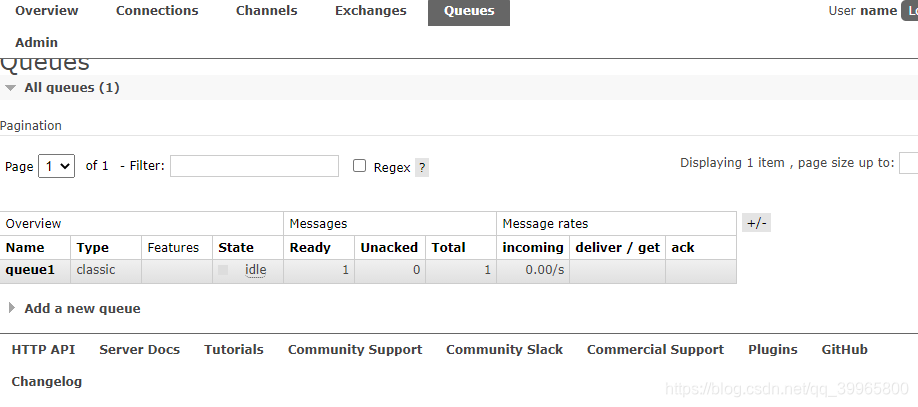
System.out.println("消息已发送!");
} catch (IOException e) {
e.printStackTrace();
} catch (TimeoutException e) {
e.printStackTrace();
} finally {
// 7、关闭通道
if (channel != null && channel.isOpen()) {
try {
channel.close();
} catch (IOException e) {
e.printStackTrace();
} catch (TimeoutException e) {
e.printStackTrace();
}
}
// 8、关闭连接
if (connection != null && connection.isOpen()) {
try {
connection.close();
} catch (IOException e) {
e.printStackTrace();
}
}
}
}
}

package com.study.rabbitmq.a132.simple;

import com.rabbitmq.client.*;

import java.io.IOException;
import java.util.concurrent.TimeoutException;

/**
 * 简单队列消费者
 */
public class Consumer {

    public static void main(String[] args) {
        // 1、创建连接工厂
        ConnectionFactory factory = new ConnectionFactory();
        // 2、设置连接属性
        factory.setHost("192.168.100.242");
        factory.setUsername("admin");
        factory.setPassword("admin");

        Connection connection = null;
        Channel channel = null;

        try {
            // 3、从连接工厂获取连接
            connection = factory.newConnection("消费者");

            // 4、从链接中创建通道
            channel = connection.createChannel();

            /**
             * 5、声明(创建)队列
             * 如果队列不存在,才会创建
             * RabbitMQ 不允许声明两个队列名相同,属性不同的队列,否则会报错
             *
             * queueDeclare参数说明:
             * @param queue 队列名称
             * @param durable 队列是否持久化
             * @param exclusive 是否排他,即是否为私有的,如果为true,会对当前队列加锁,其它通道不能访问,
             *                  并且在连接关闭时会自动删除,不受持久化和自动删除的属性控制。
             *                  一般在队列和交换器绑定时使用
             * @param autoDelete 是否自动删除,当最后一个消费者断开连接之后是否自动删除
             * @param arguments 队列参数,设置队列的有效期、消息最大长度、队列中所有消息的生命周期等等
             */
            channel.queueDeclare("queue1", false, false, false, null);

            // 6、定义收到消息后的回调
            DeliverCallback callback = new DeliverCallback() {
                public void handle(String consumerTag, Delivery message) throws IOException {
                    System.out.println("收到消息:" + new String(message.getBody(), "UTF-8"));
                }
            };
            // 7、监听队列
            channel.basicConsume("queue1", true, callback, new CancelCallback() {
                public void handle(String consumerTag) throws IOException {
                }
            });

            System.out.println("开始接收消息");
            System.in.read();

        } catch (IOException e) {
            e.printStackTrace();
        } catch (TimeoutException e) {
            e.printStackTrace();
        } finally {
            // 8、关闭通道
            if (channel != null && channel.isOpen()) {
                try {
                    channel.close();
                } catch (IOException e) {
                    e.printStackTrace();
                } catch (TimeoutException e) {
                    e.printStackTrace();
                }
            }

            // 9、关闭连接
            if (connection != null && connection.isOpen()) {
                try {
                    connection.close();
                } catch (IOException e) {
                    e.printStackTrace();
                }
            }
        }
    }
}

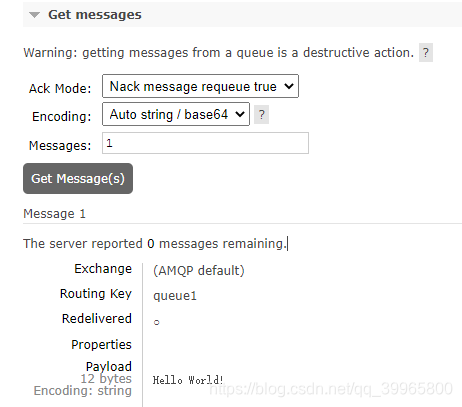
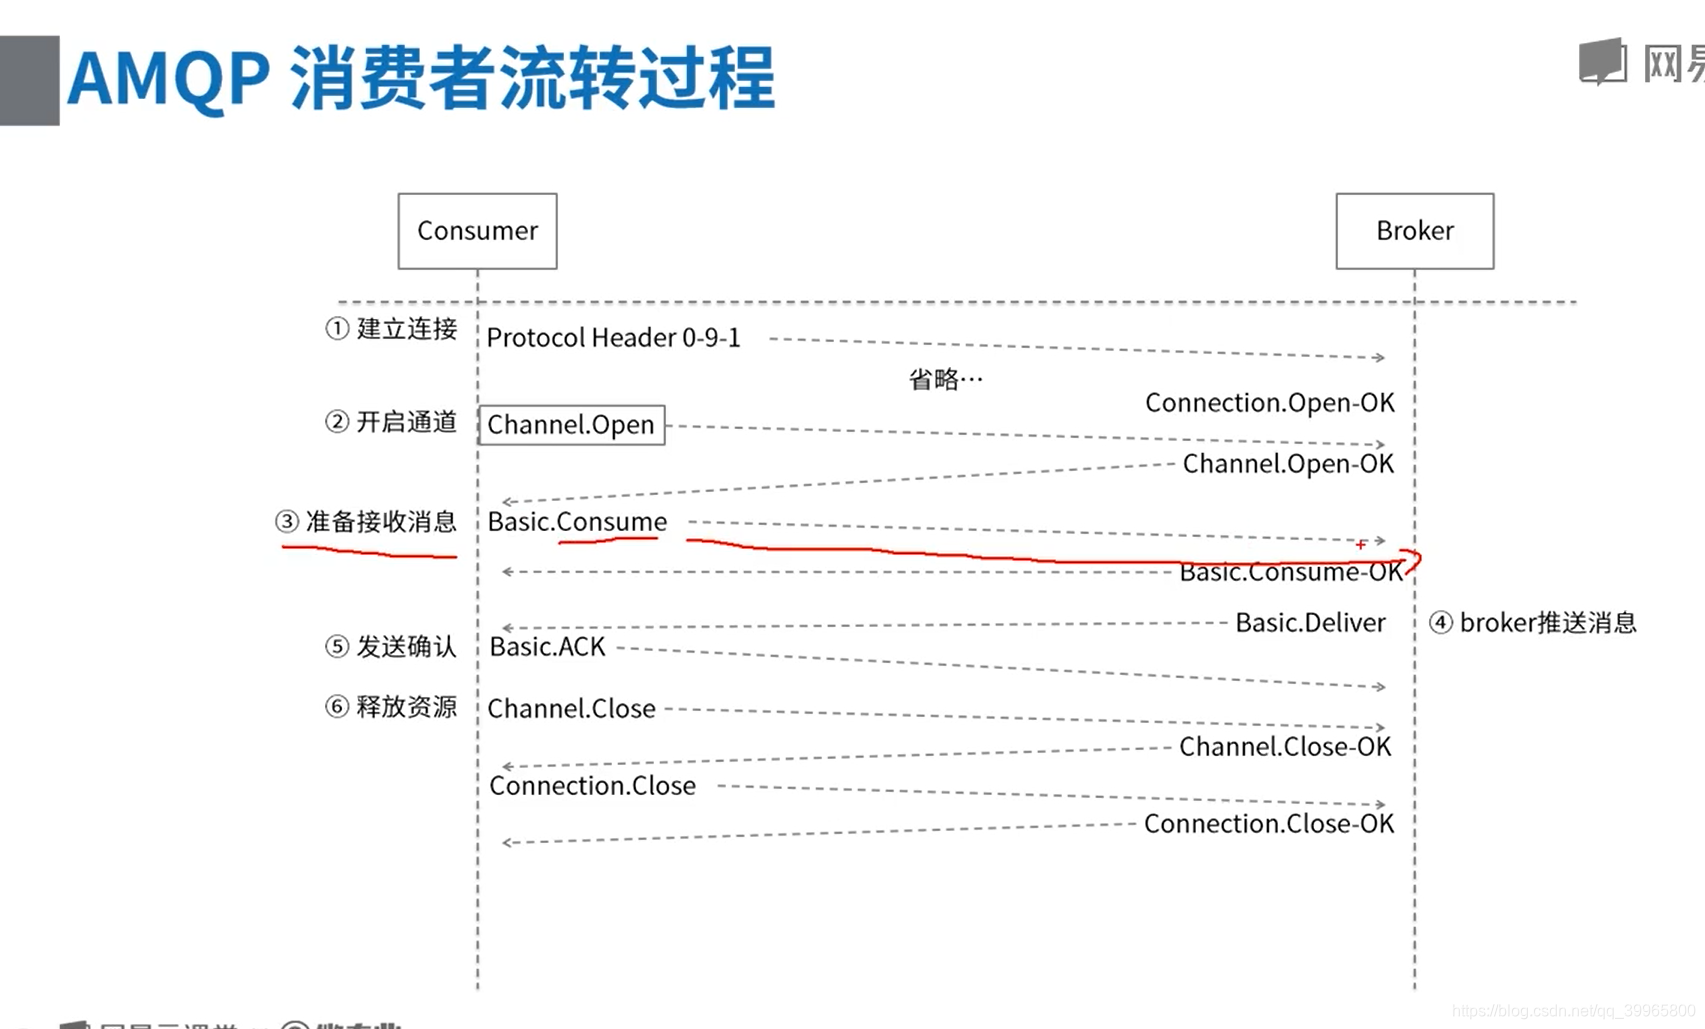
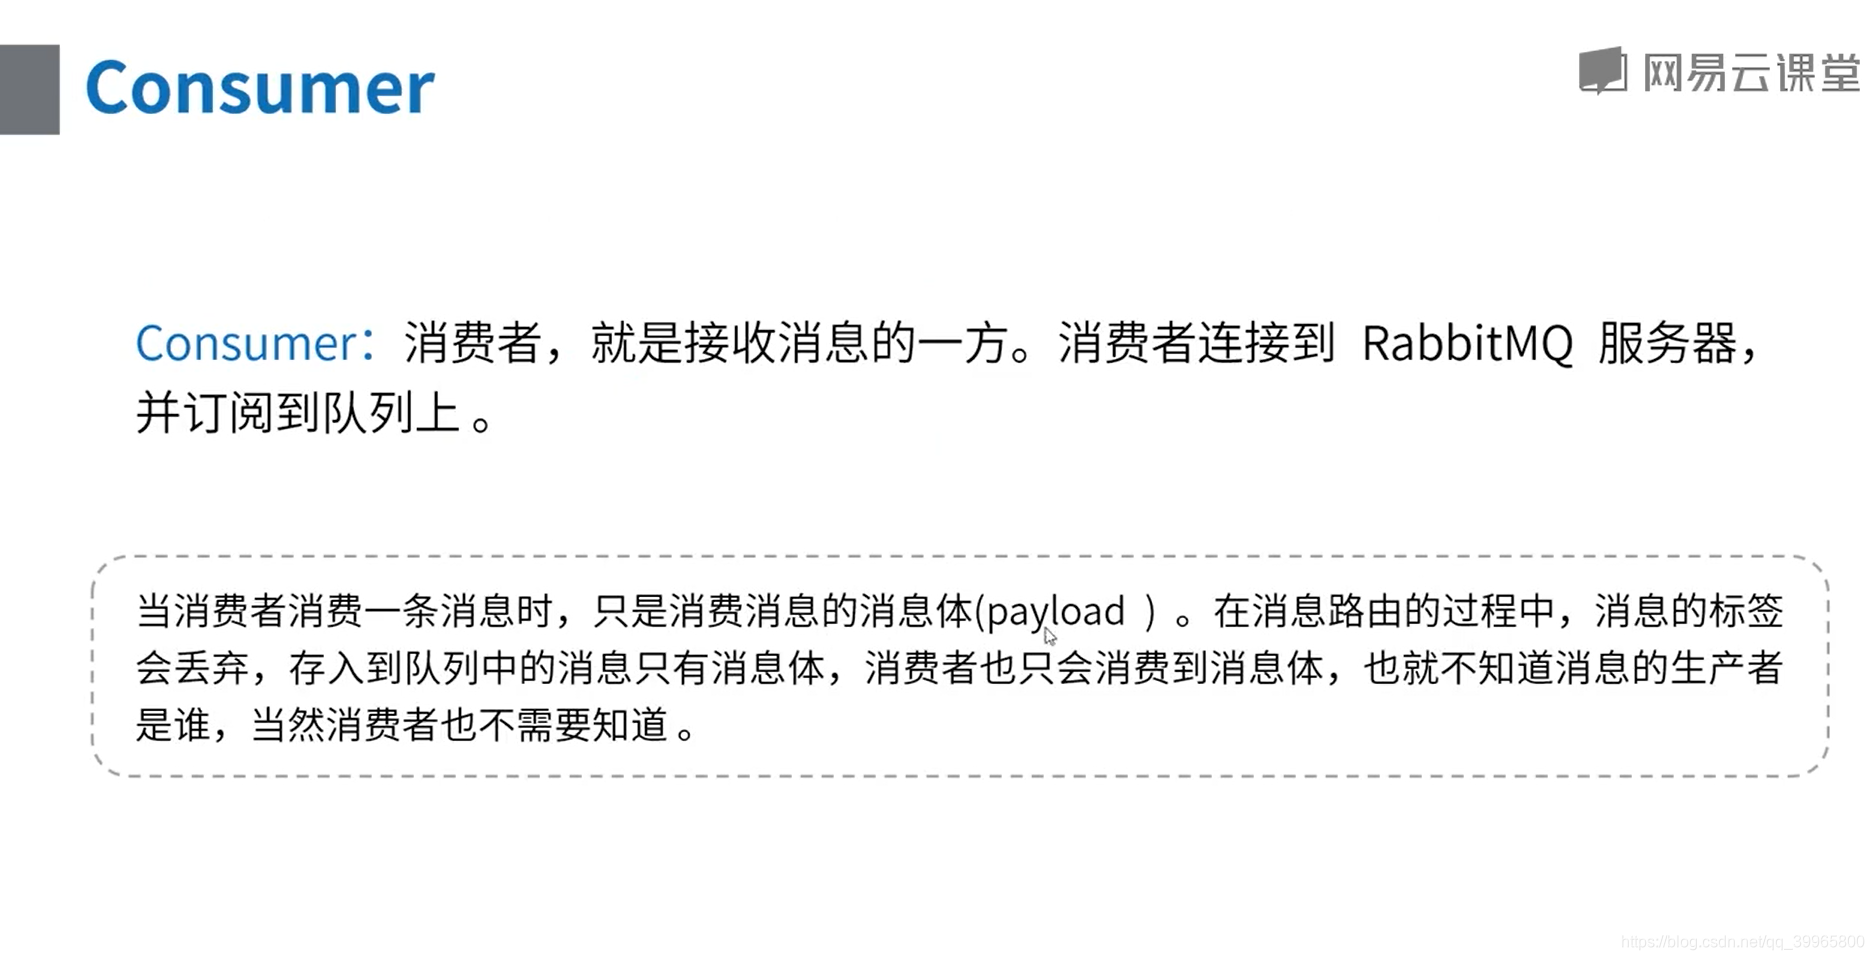
消息被消费

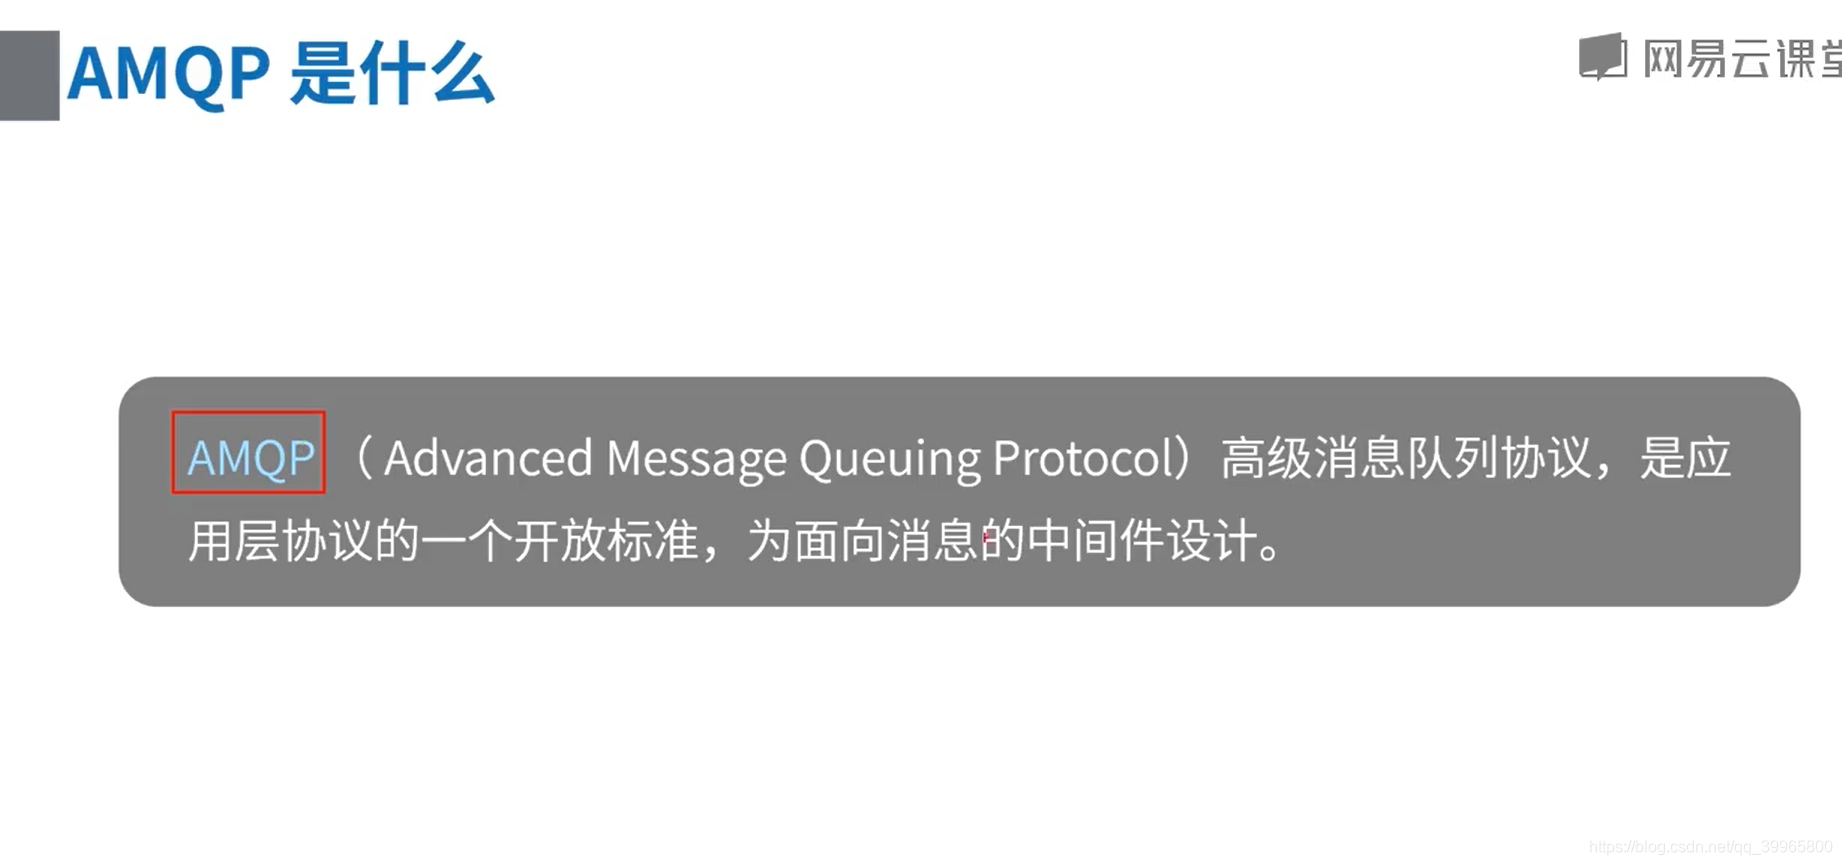
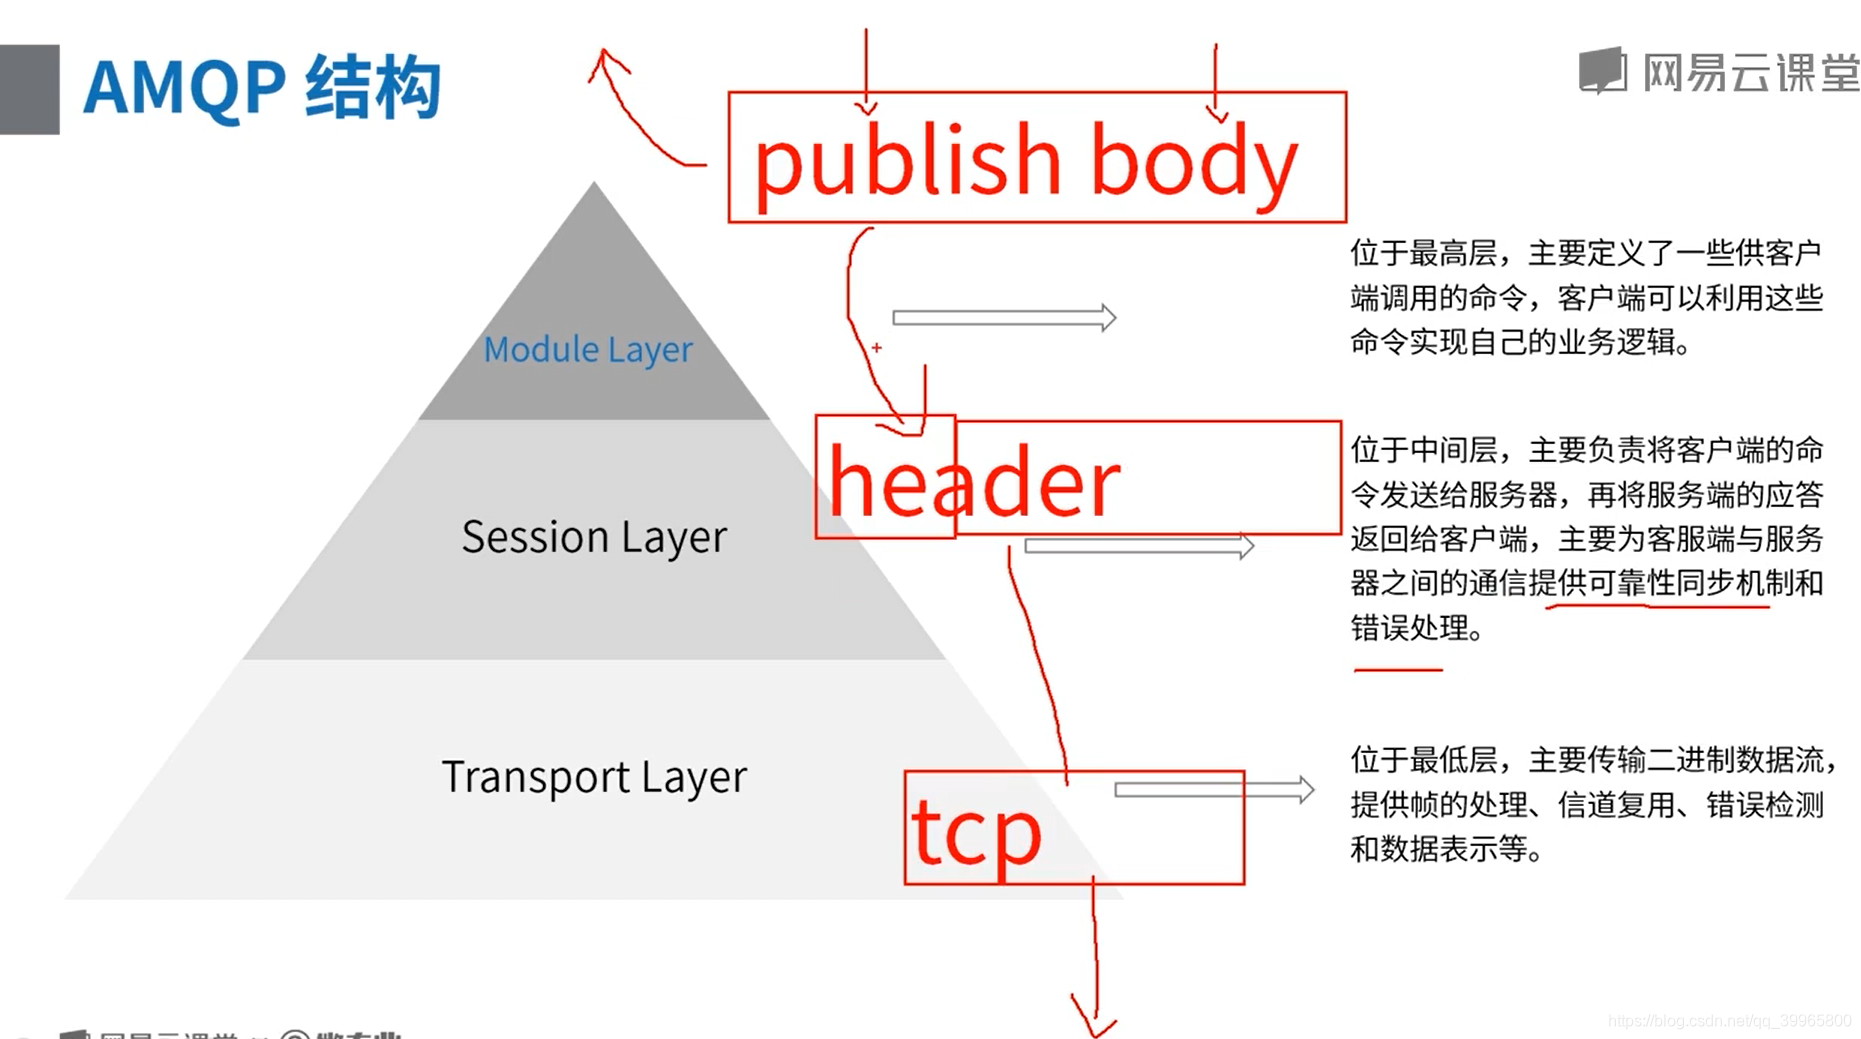
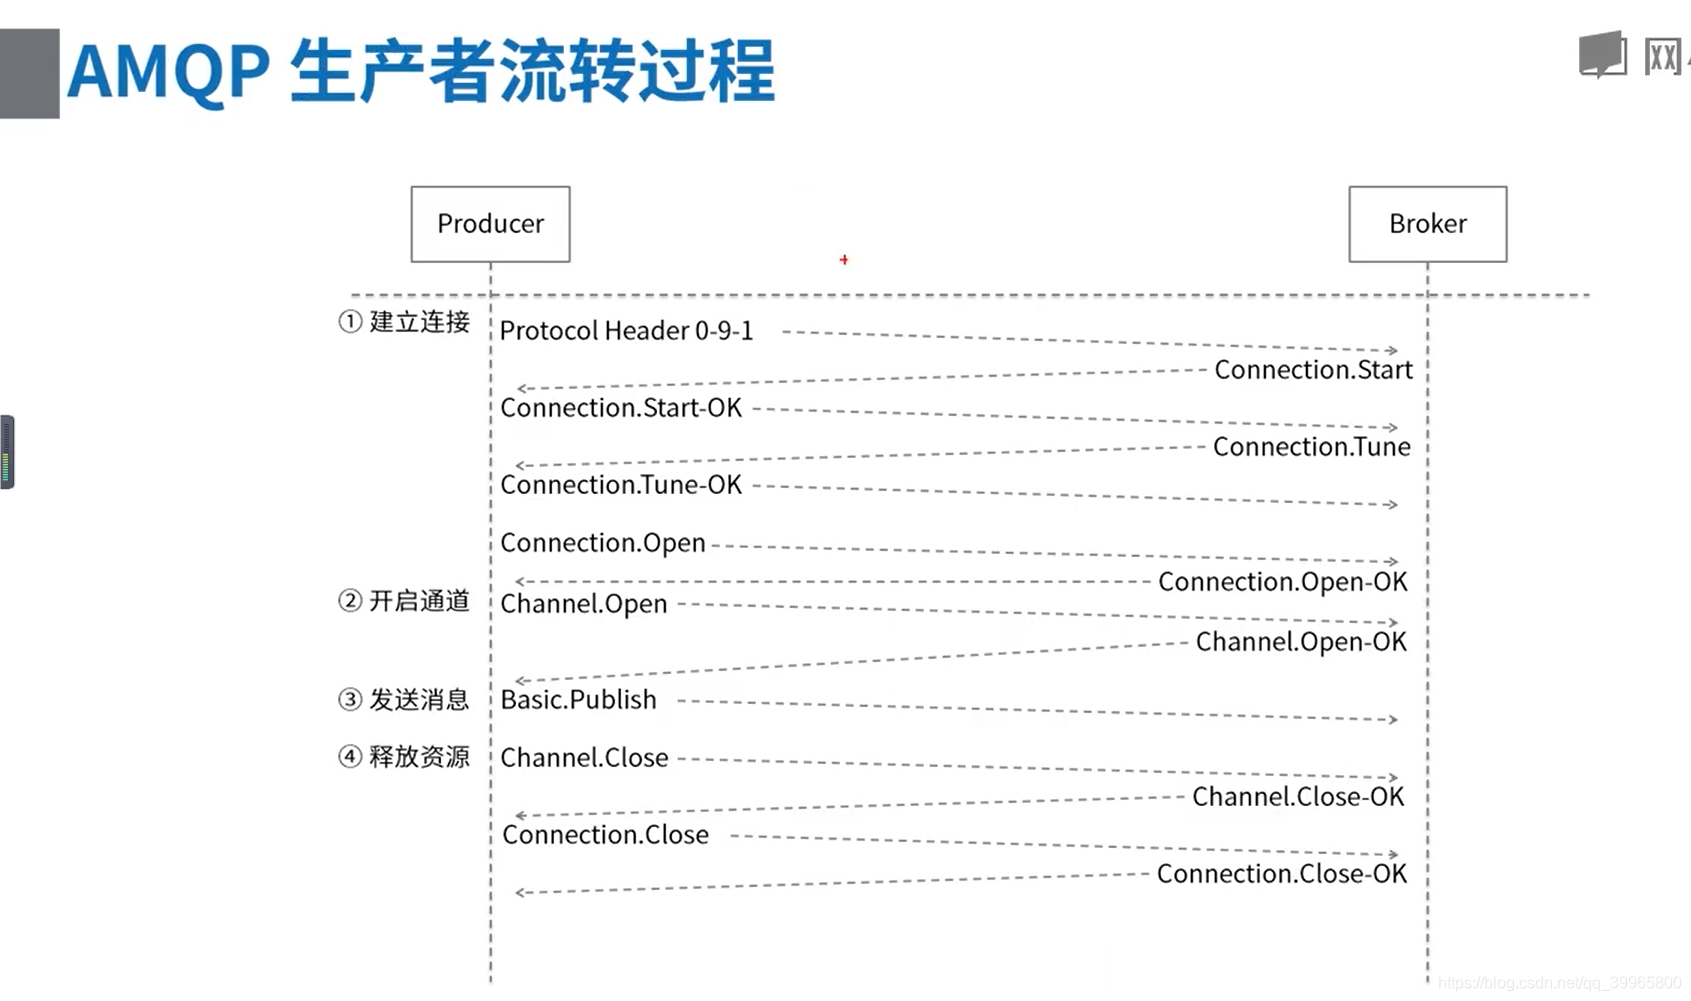
AMQP协议
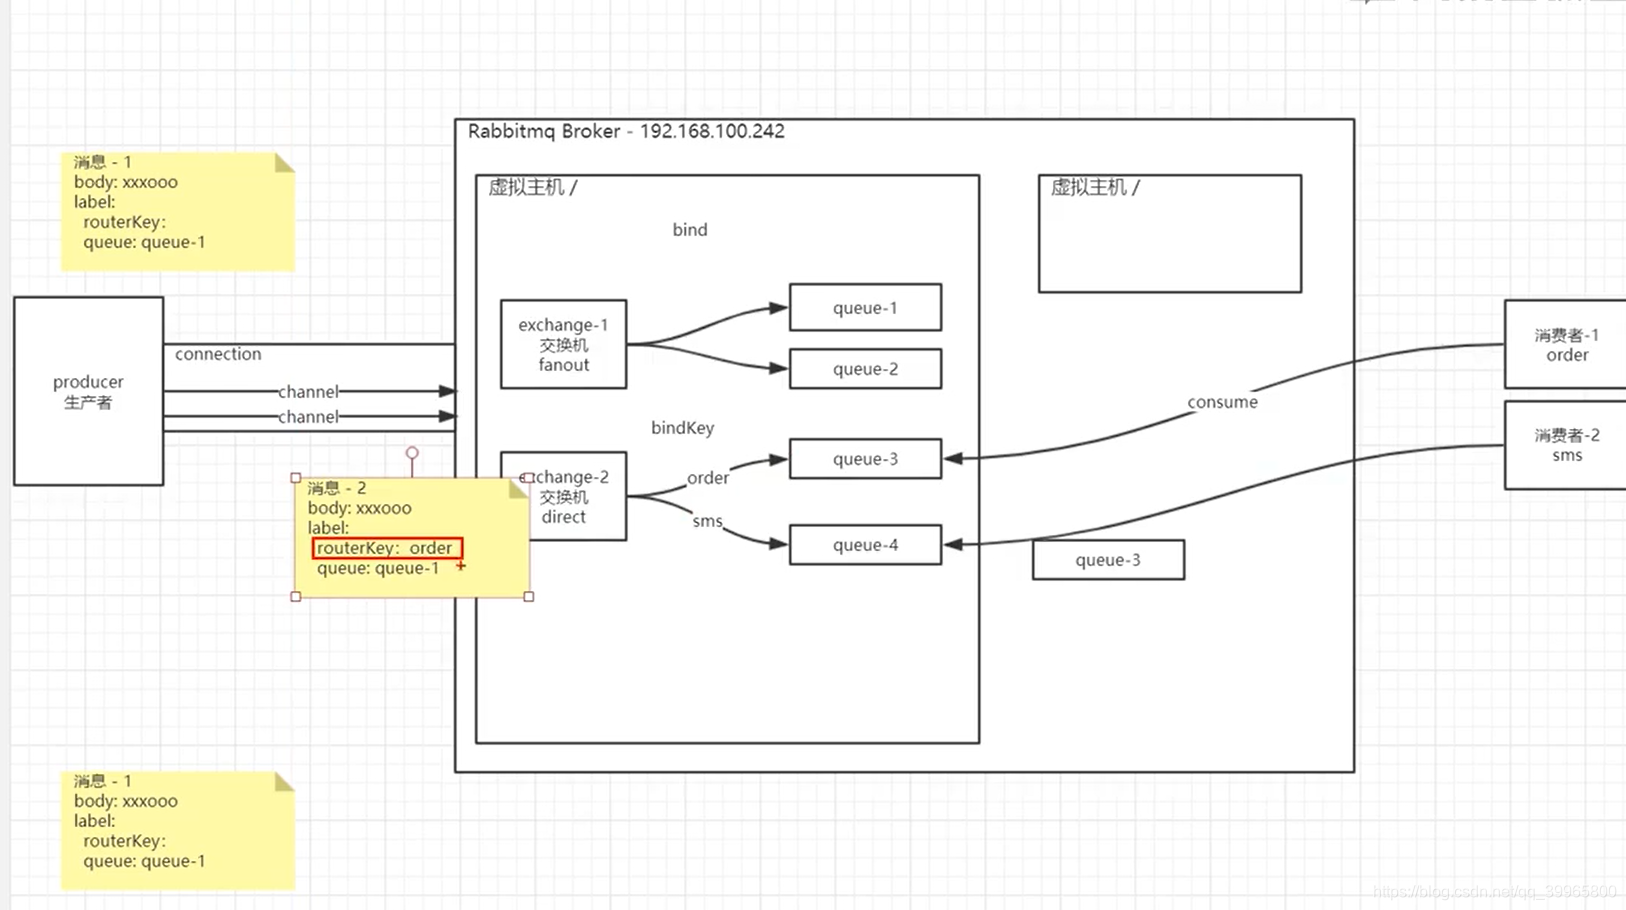
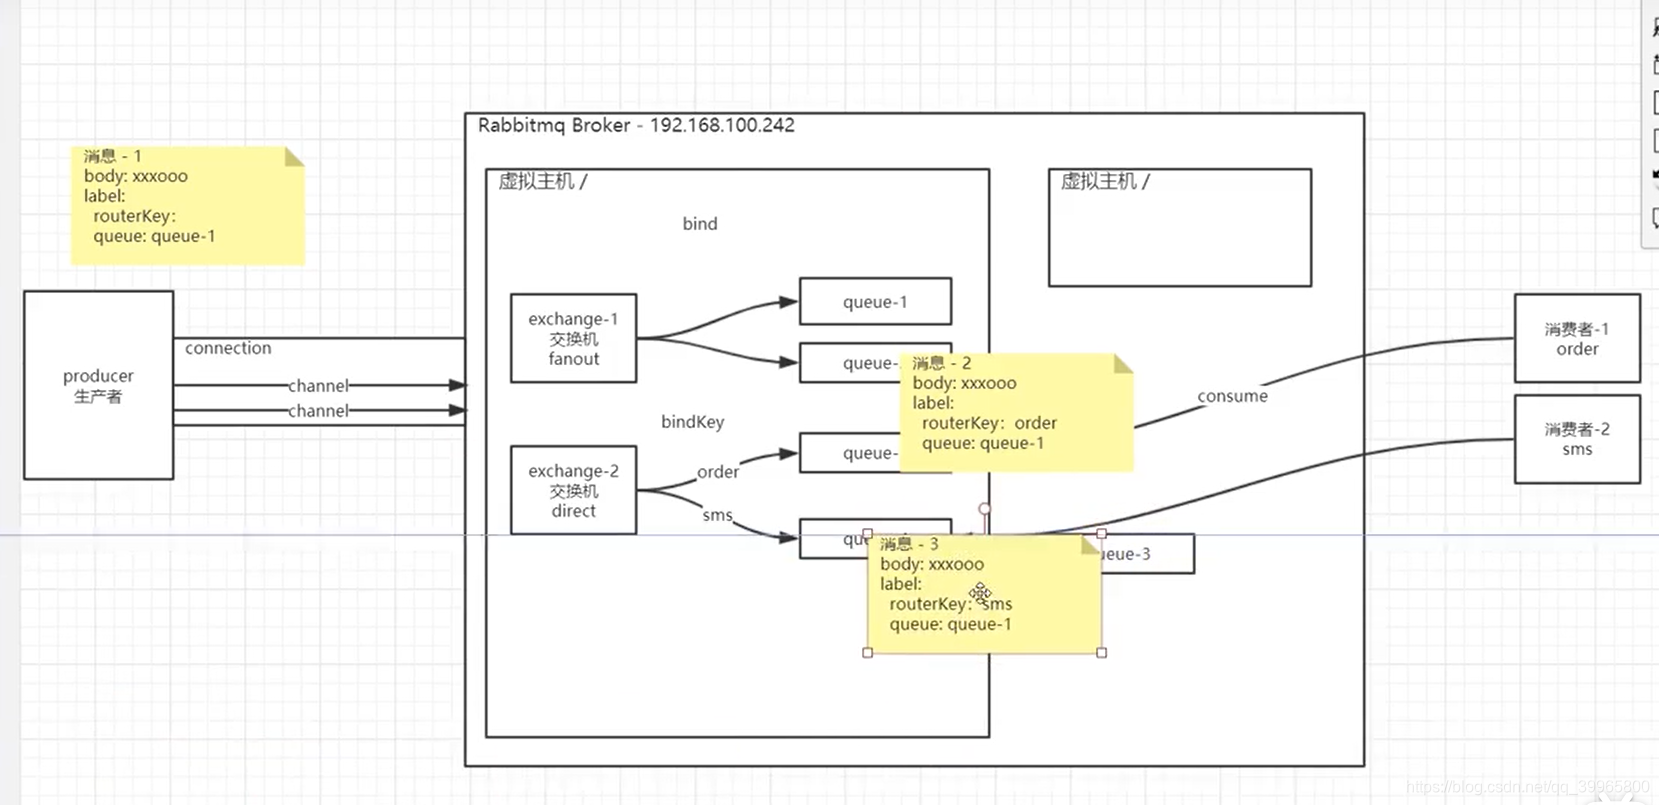
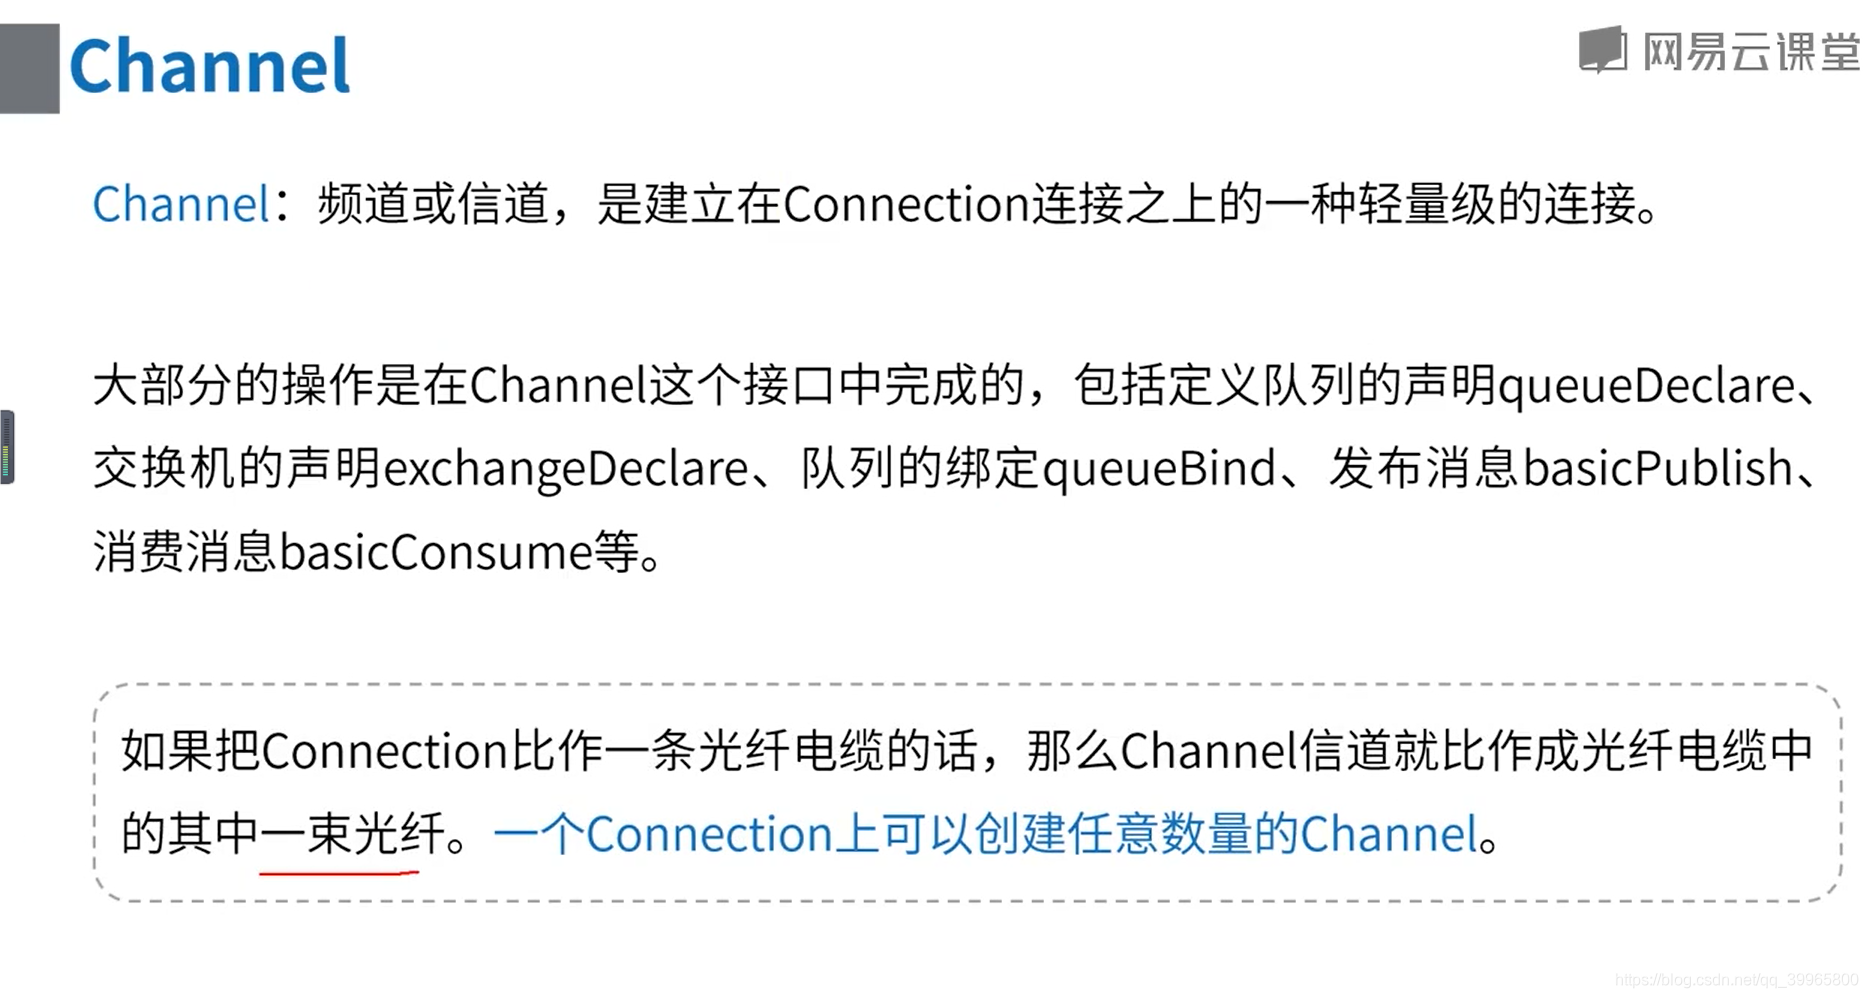
RabbitMQ核心概念
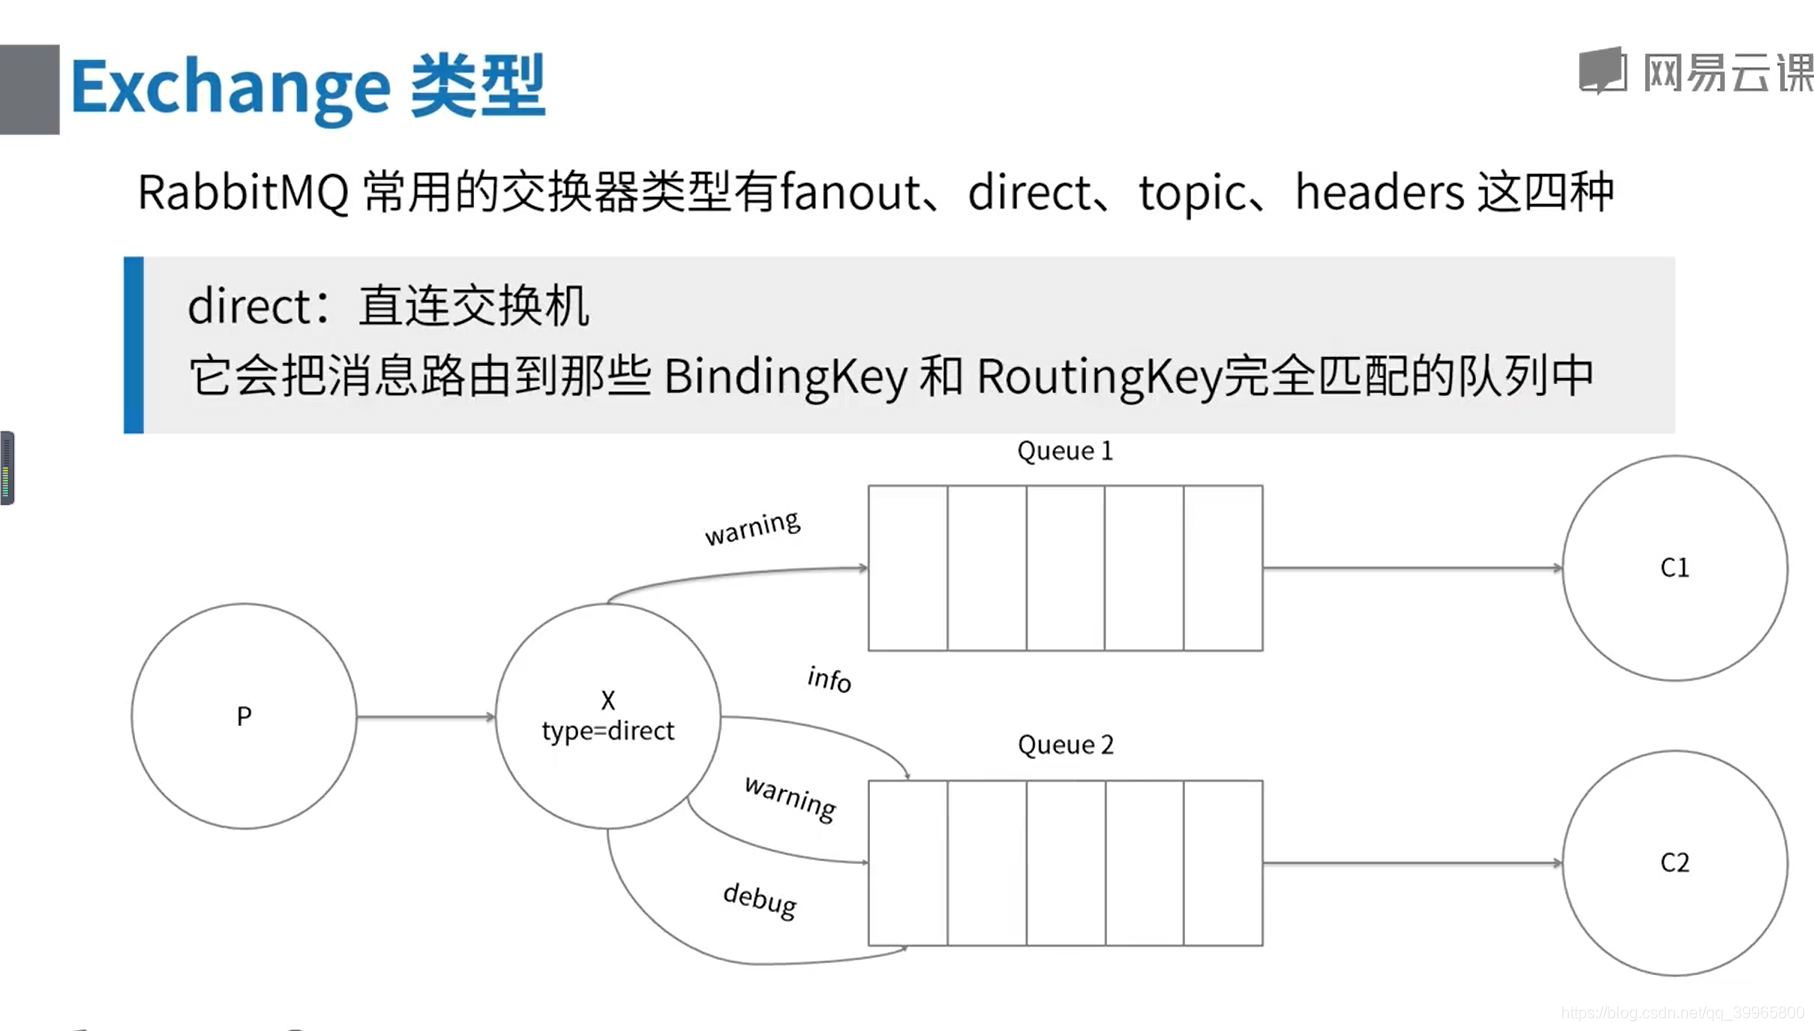
- direct
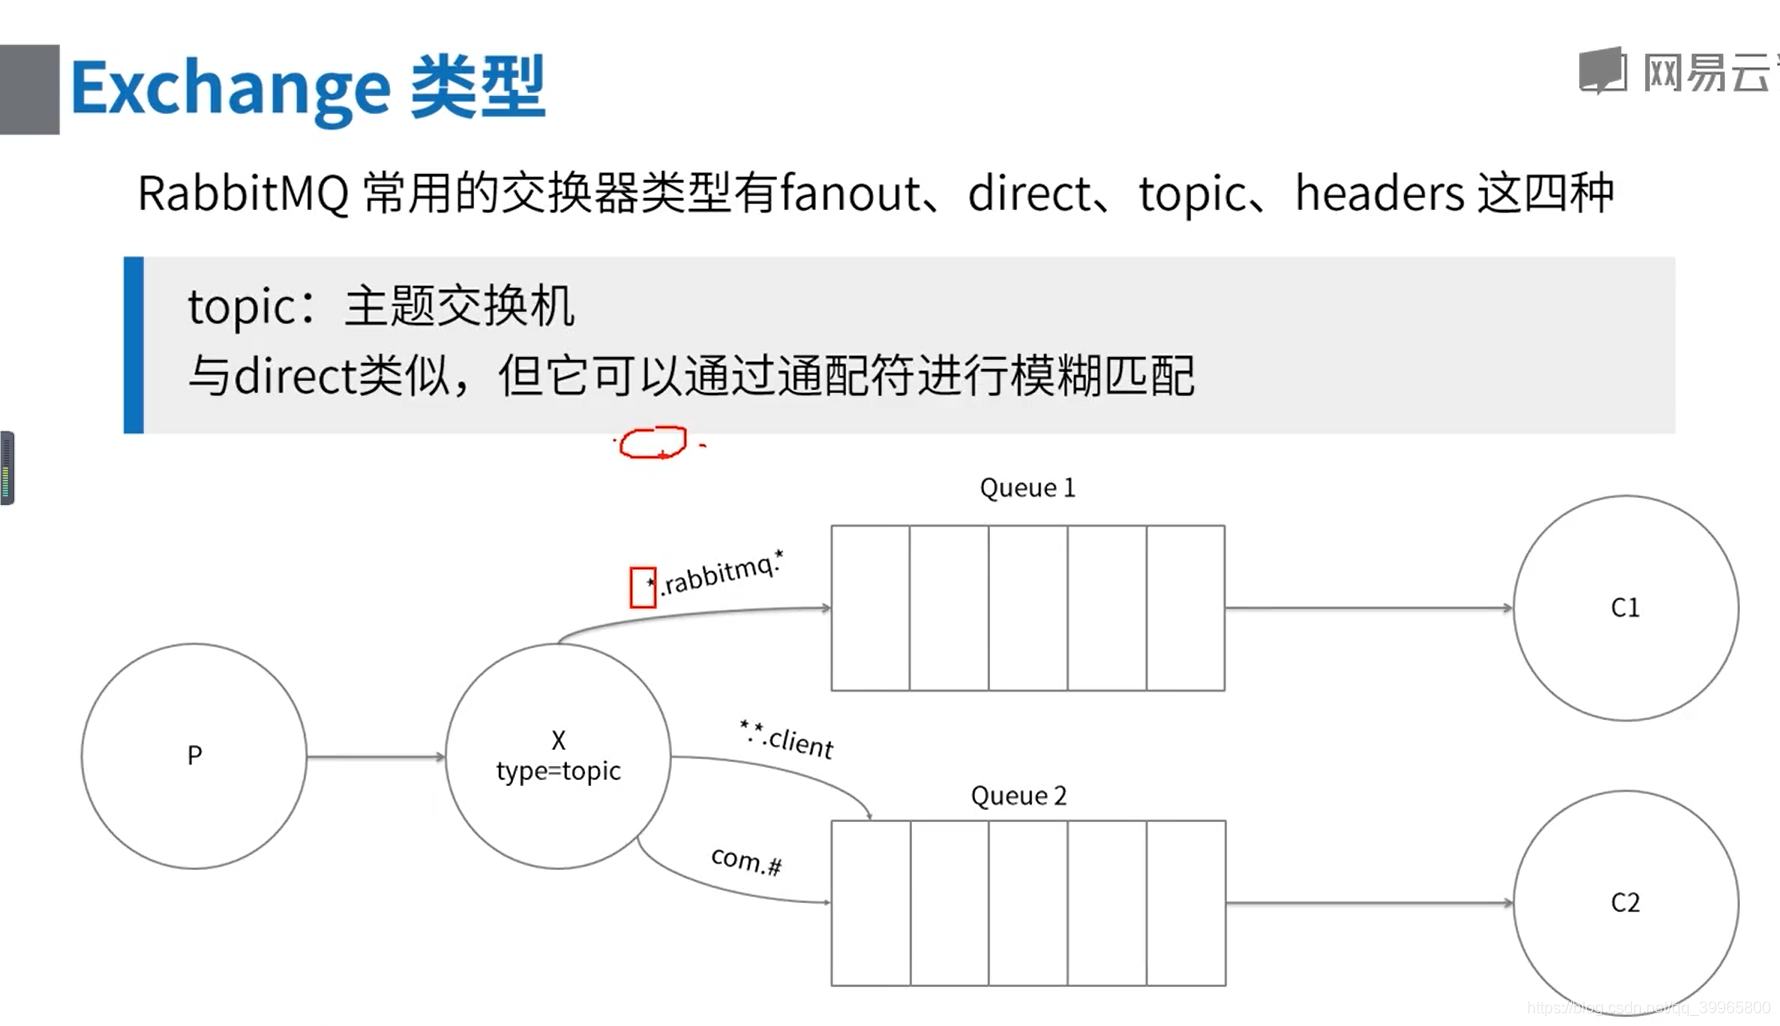
- topic
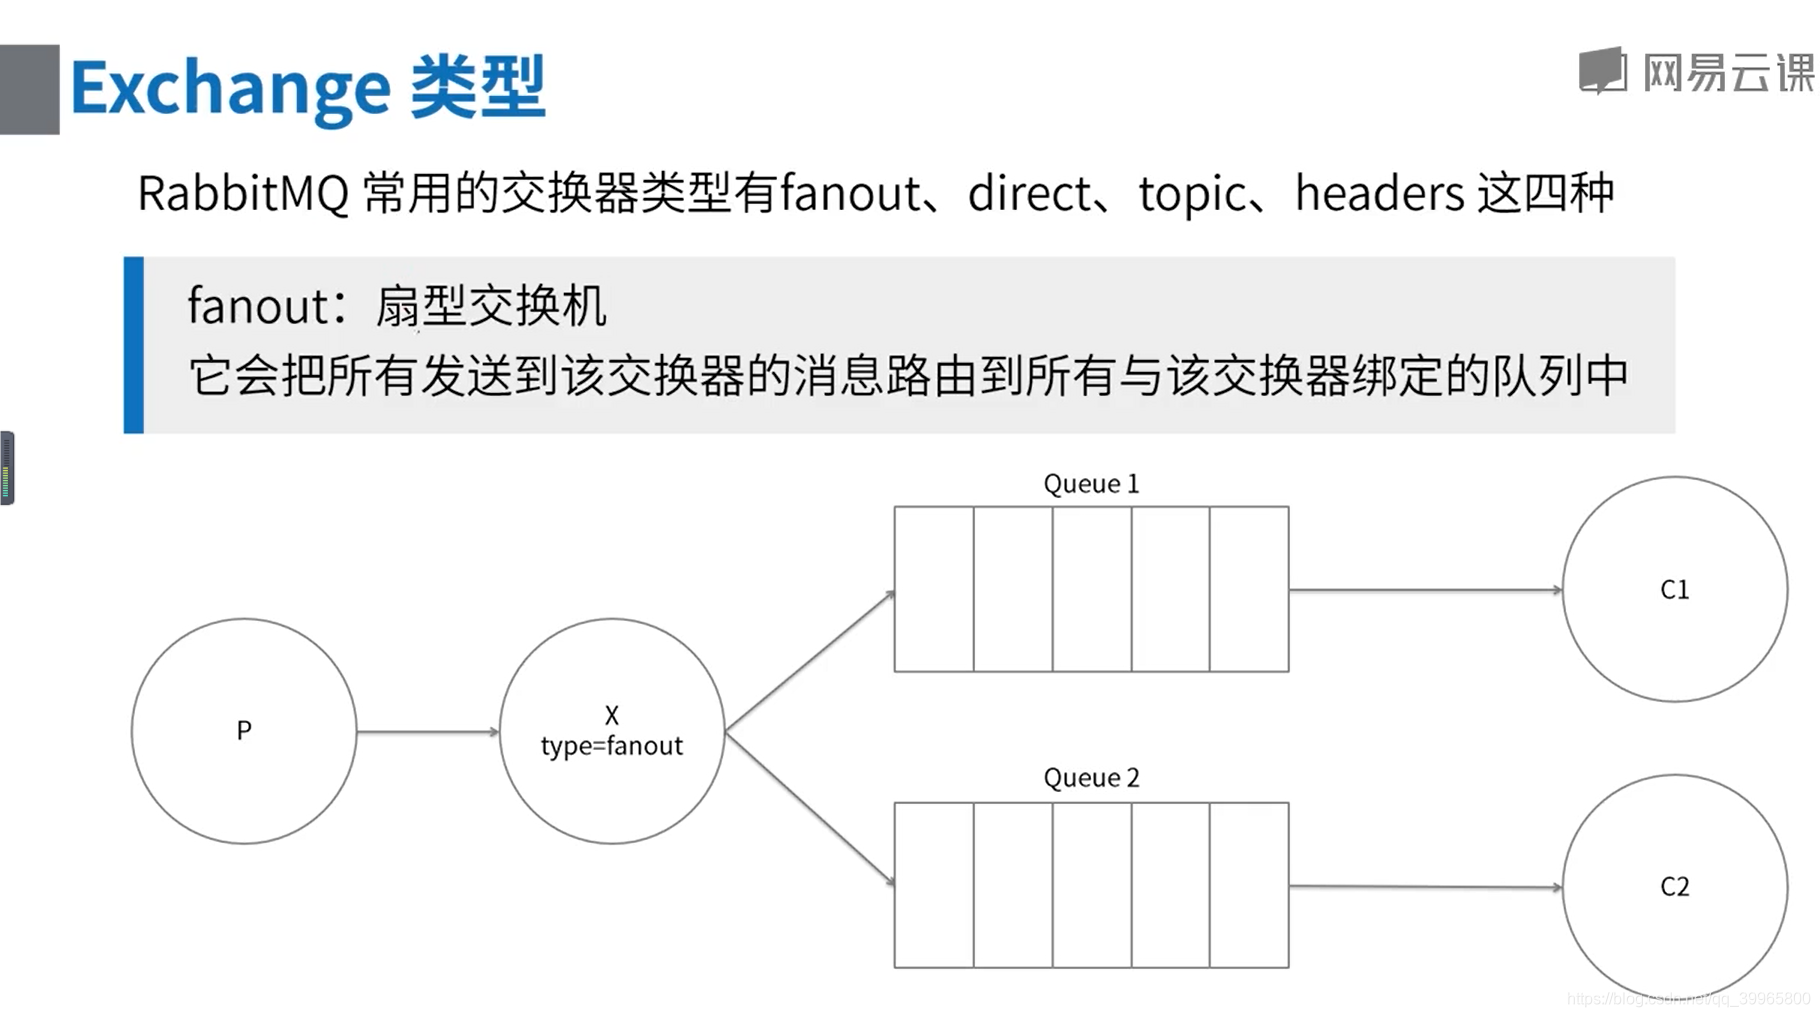
- fanout
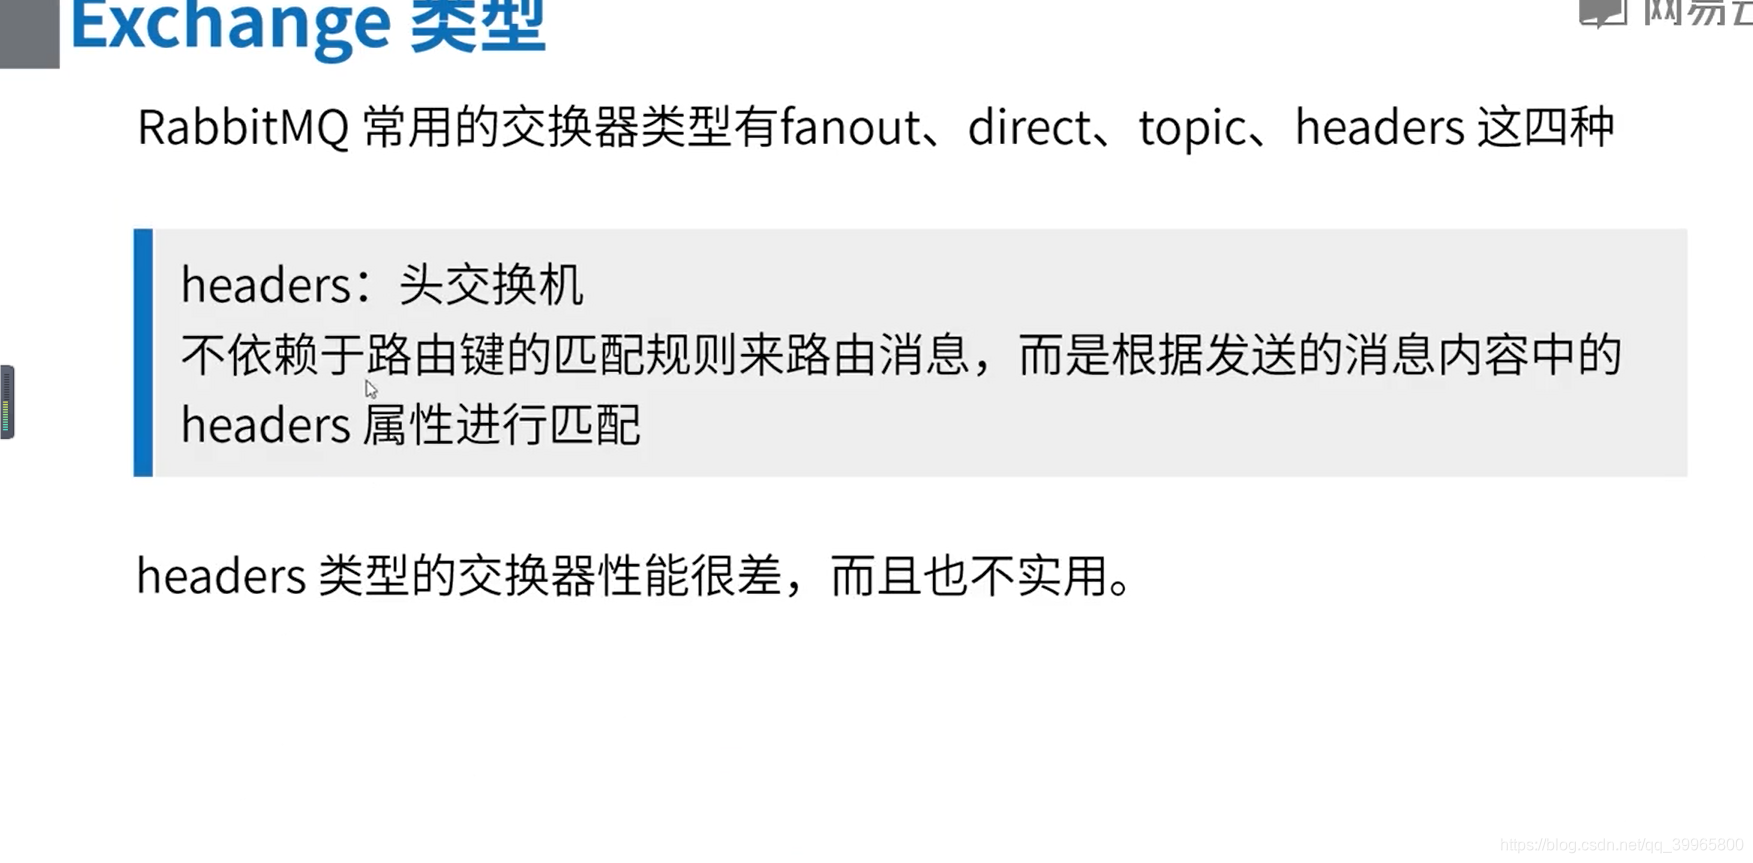
- headers

默认交换机是直接转发到对应的queue中
topic可以模糊匹配,direct要严格的一一对应
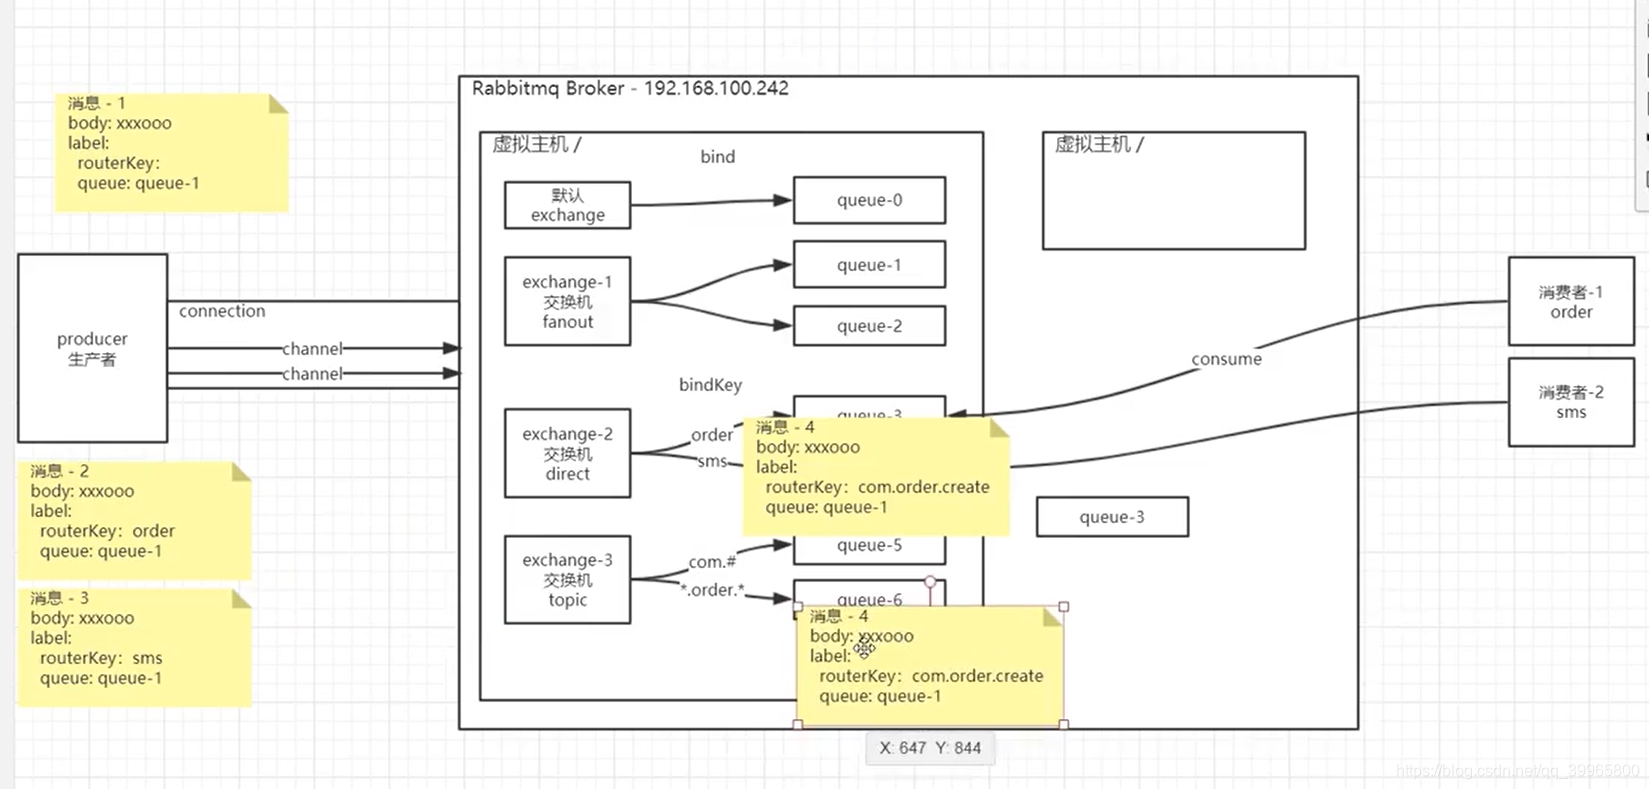
headers交换机
exchange交换机可以根据各种不同方式进行匹配
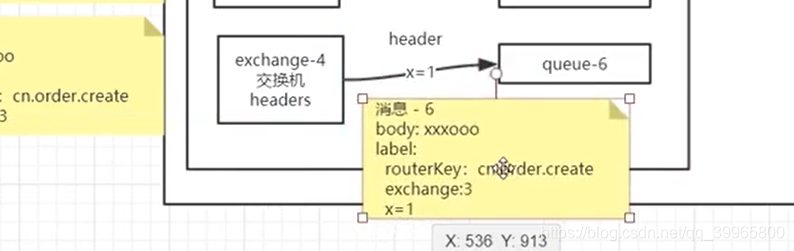
# 示例说明

本示例是RabbitMQ 的topic示例,启动Consumer 类会开启三个消费者。

第一个消费者接收topic_test交换器上所有消息。

第二个消费者接收topic_test交换器上routingKey以`a.`开头的所有消息。

第三个消费者接收topic_test交换器上routingKey以`b.`开头的所有消息。

Producer 会发送三条不同的消息,三条消息的routingKey分别为:`a.c1`、`a.c2`、`b.c1`。
* 路由--消费者
*
* 消费者通过一个临时队列和交换器绑定,接收发送到交换器上的消息
*/
public class Consumer {
private static Runnable receive = new Runnable() {
public void run() {
// 1、创建连接工厂
ConnectionFactory factory = new ConnectionFactory();
// 2、设置连接属性
factory.setHost("192.168.100.242");
factory.setPort(5672);
factory.setUsername("admin");
factory.setPassword("admin");
Connection connection = null;
Channel channel = null;
final String queueName = Thread.currentThread().getName();
try {
// 3、从连接工厂获取连接
connection = factory.newConnection("消费者");
// 4、从链接中创建通道
channel = connection.createChannel();
// 定义消息接收回调对象
DeliverCallback callback = new DeliverCallback() {
public void handle(String consumerTag, Delivery message) throws IOException {
System.out.println(queueName + " 收到消息:" + new String(message.getBody(), "UTF-8"));
}
};
// 监听队列
channel.basicConsume(queueName, true, callback, new CancelCallback() {
public void handle(String consumerTag) throws IOException {
}
});
System.out.println(queueName + " 开始接收消息");
System.in.read();
} catch (IOException e) {
e.printStackTrace();
} catch (TimeoutException e) {
e.printStackTrace();
} finally {
// 8、关闭通道
if (channel != null && channel.isOpen()) {
try {
channel.close();
} catch (IOException e) {
e.printStackTrace();
} catch (TimeoutException e) {
e.printStackTrace();
}
}
// 9、关闭连接
if (connection != null && connection.isOpen()) {
try {
connection.close();
} catch (IOException e) {
e.printStackTrace();
}
}
}
}
};
public static void main(String[] args) {
new Thread(receive, "queue-1").start();
new Thread(receive, "queue-2").start();
new Thread(receive, "queue-3").start();
}
}
package com.study.rabbitmq.a132.routing;
import com.rabbitmq.client.Channel;
import com.rabbitmq.client.Connection;
import com.rabbitmq.client.ConnectionFactory;
import java.io.IOException;
import java.util.concurrent.TimeoutException;
/**
* Topic--生产者
*
* 生产者将消息发送到topic类型的交换器上,和routing的用法类似,都是通过routingKey路由,但topic类型交换器的routingKey支持通配符
*/
public class Producer {
public static void main(String[] args) {
// 1、创建连接工厂
ConnectionFactory factory = new ConnectionFactory();
// 2、设置连接属性
factory.setHost("10.201.190.118");
factory.setPort(5672);
factory.setUsername("name");
factory.setPassword("passwd");
Connection connection = null;
Channel channel = null;
try {
// 3、从连接工厂获取连接
connection = factory.newConnection("生产者");
// 4、从链接中创建通道
channel = connection.createChannel();
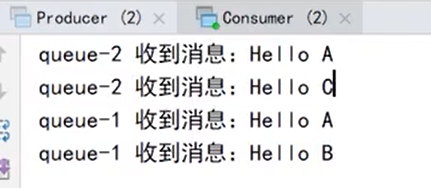
// 路由关系如下:com.# --> queue-1 *.order.* ---> queue-2
// 消息内容
String message = "Hello A";
// 发送消息到topic_test交换器上
channel.basicPublish("topic-exchange", "com.order.create", null, message.getBytes());
System.out.println("消息 " + message + " 已发送!");
// 消息内容
message = "Hello B";
// 发送消息到topic_test交换器上
channel.basicPublish("topic-exchange", "com.sms.create", null, message.getBytes());
System.out.println("消息 " + message + " 已发送!");
// 消息内容
message = "Hello C";
// 发送消息到topic_test交换器上
channel.basicPublish("topic-exchange", "cn.order.create", null, message.getBytes());
System.out.println("消息 " + message + " 已发送!");
} catch (IOException e) {
e.printStackTrace();
} catch (TimeoutException e) {
e.printStackTrace();
} finally {
// 7、关闭通道
if (channel != null && channel.isOpen()) {
try {
channel.close();
} catch (IOException e) {
e.printStackTrace();
} catch (TimeoutException e) {
e.printStackTrace();
}
}
// 8、关闭连接
if (connection != null && connection.isOpen()) {
try {
connection.close();
} catch (IOException e) {
e.printStackTrace();
}
}
}
}
}
也可以直接用代码进行定义
package com.study.rabbitmq.a132.ps;
import com.rabbitmq.client.*;
import java.io.IOException;
import java.util.concurrent.TimeoutException;
/**
* 发布订阅模式--订阅者
*
* 消费者通过一个临时队列和交换器绑定,接收发送到交换器上的消息
*/
public class Consumer {
private static Runnable receive = new Runnable() {
public void run() {
// 1、创建连接工厂
ConnectionFactory factory = new ConnectionFactory();
// 2、设置连接属性
factory.setHost("10.201.190.118");
factory.setUsername("name");
factory.setPassword("passwd");
Connection connection = null;
Channel channel = null;
final String clientName = Thread.currentThread().getName();
try {
// 3、从连接工厂获取连接
connection = factory.newConnection("消费者");
// 4、从链接中创建通道
channel = connection.createChannel();
// 代码定义交换器
channel.exchangeDeclare("ps_test", "fanout");
// 还可以定义一个临时队列,连接关闭后会自动删除,此队列是一个排他队列
String queueName = channel.queueDeclare().getQueue();
// 将队列和交换器绑定
channel.queueBind(queueName, "ps_test", "");
// 定义消息接收回调对象
DeliverCallback callback = new DeliverCallback() {
public void handle(String consumerTag, Delivery message) throws IOException {
System.out.println(clientName + " 收到消息:" + new String(message.getBody(), "UTF-8"));
}
};
// 监听队列
channel.basicConsume(queueName, true, callback, new CancelCallback() {
public void handle(String consumerTag) throws IOException {
}
});
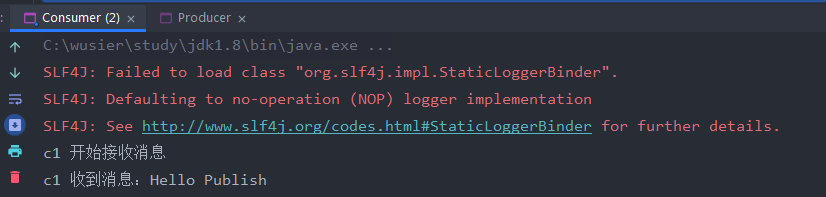
System.out.println(clientName + " 开始接收消息");
System.in.read();
} catch (IOException e) {
e.printStackTrace();
} catch (TimeoutException e) {
e.printStackTrace();
} finally {
// 8、关闭通道
if (channel != null && channel.isOpen()) {
try {
channel.close();
} catch (IOException e) {
e.printStackTrace();
} catch (TimeoutException e) {
e.printStackTrace();
}
}
// 9、关闭连接
if (connection != null && connection.isOpen()) {
try {
connection.close();
} catch (IOException e) {
e.printStackTrace();
}
}
}
}
};
public static void main(String[] args) {
new Thread(receive, "c1").start();
}
}
package com.study.rabbitmq.a132.ps;

import com.rabbitmq.client.Channel;
import com.rabbitmq.client.Connection;
import com.rabbitmq.client.ConnectionFactory;

import java.io.IOException;
import java.util.concurrent.TimeoutException;

/**
 * 发布订阅模式--发布者
 *
 * 生产者将消息发送到fanout类型的交换器上
 */
public class Producer {

    public static void main(String[] args) {
        // 1、创建连接工厂
        ConnectionFactory factory = new ConnectionFactory();
        // 2、设置连接属性
        factory.setHost("10.201.190.118");
        factory.setUsername("name");
        factory.setPassword("passwd");

        Connection connection = null;
        Channel channel = null;

        try {
            // 3、从连接工厂获取连接
            connection = factory.newConnection("生产者");

            // 4、从链接中创建通道
            channel = connection.createChannel();

            // 定义fanout类型的交换器
            channel.exchangeDeclare("ps_test", "fanout");

            // 消息内容
            String message = "Hello Publish";
            // 发送消息到ps_test交换器上
            channel.basicPublish("ps_test", "", null, message.getBytes());
            System.out.println("消息 " + message + " 已发送!");

        } catch (IOException e) {
            e.printStackTrace();
        } catch (TimeoutException e) {
            e.printStackTrace();
        } finally {
            // 7、关闭通道
            if (channel != null && channel.isOpen()) {
                try {
                    channel.close();
                } catch (IOException e) {
                    e.printStackTrace();
                } catch (TimeoutException e) {
                    e.printStackTrace();
                }
            }

            // 8、关闭连接
            if (connection != null && connection.isOpen()) {
                try {
                    connection.close();
                } catch (IOException e) {
                    e.printStackTrace();
                }
            }
        }
    }
}
l临时队列会被删除
从而实现了发布订阅的实现
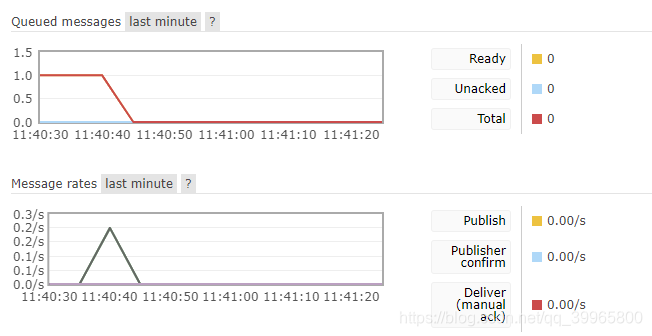
有大量的数据堆积在队列中
package com.study.rabbitmq.a132.work;

import com.rabbitmq.client.Channel;
import com.rabbitmq.client.Connection;
import com.rabbitmq.client.ConnectionFactory;

import java.io.IOException;
import java.util.concurrent.TimeoutException;

/**
 * 工作队列生产者
 */
public class Producer {

    public static void main(String[] args) {
        // 1、创建连接工厂
        ConnectionFactory factory = new ConnectionFactory();
        // 2、设置连接属性
        factory.setHost("47.106.202.10");
        factory.setUsername("guest");
        factory.setPassword("guest");

        Connection connection = null;
        Channel channel = null;

        try {
            // 3、从连接工厂获取连接
            connection = factory.newConnection("生产者");

            // 4、从链接中创建通道
            channel = connection.createChannel();

            /**
             * 5、声明(创建)队列
             * 如果队列不存在,才会创建
             * RabbitMQ 不允许声明两个队列名相同,属性不同的队列,否则会报错
             *
             * queueDeclare参数说明:
             * @param queue 队列名称
             * @param durable 队列是否持久化
             * @param exclusive 是否排他,即是否为私有的,如果为true,会对当前队列加锁,其它通道不能访问,并且在连接关闭时会自动删除,不受持久化和自动删除的属性控制
             * @param autoDelete 是否自动删除,当最后一个消费者断开连接之后是否自动删除
             * @param arguments 队列参数,设置队列的有效期、消息最大长度、队列中所有消息的生命周期等等
             */
            channel.queueDeclare("queue1", false, false, false, null);

            for (int i = 0; i < 20; i++) {
                // 消息内容
                String message = "Hello " + i;
                // 6、发送消息
                channel.basicPublish("", "queue1", null, message.getBytes());

                System.out.println("消息 " + i + " 已发送!");
                try {
                    Thread.sleep(i * 10);
                } catch (InterruptedException e) {
                    e.printStackTrace();
                }
            }

        } catch (IOException e) {
            e.printStackTrace();
        } catch (TimeoutException e) {
            e.printStackTrace();
        } finally {
            // 7、关闭通道
            if (channel != null && channel.isOpen()) {
                try {
                    channel.close();
                } catch (IOException e) {
                    e.printStackTrace();
                } catch (TimeoutException e) {
                    e.printStackTrace();
                }
            }

            // 8、关闭连接
            if (connection != null && connection.isOpen()) {
                try {
                    connection.close();
                } catch (IOException e) {
                    e.printStackTrace();
                }
            }
        }
    }
}
多个消费者消费一个queue

# 示例说明

本示例是RabbitMQ 的工作队列示例,通过开启或关闭`channel.basicQos(1);`的注释,演示工作队列的效果
是一个提前预处理的机制 ,有助于消息处理的速度
消费者的集群不能设置这个参数不能太大,不然就不起作用,每个消费者的业务场景里有一定的处理时间
package com.study.rabbitmq.a132.work;

import com.rabbitmq.client.*;

import java.io.IOException;
import java.util.concurrent.TimeoutException;

/**
 * 工作队列消费者
 */
public class Worker2 {

    public static void main(String[] args) {
        // 1、创建连接工厂
        ConnectionFactory factory = new ConnectionFactory();
        // 2、设置连接属性
        factory.setHost("47.106.202.10");
        factory.setUsername("guest");
        factory.setPassword("guest");

        Connection connection = null;
        Channel channel = null;


        try {
            // 3、从连接工厂获取连接
            connection = factory.newConnection("消费者");

            // 4、从链接中创建通道
            channel = connection.createChannel();

            /**
             * 5、声明(创建)队列
             * 如果队列不存在,才会创建
             * RabbitMQ 不允许声明两个队列名相同,属性不同的队列,否则会报错
             *
             * queueDeclare参数说明:
             * @param queue 队列名称
             * @param durable 队列是否持久化
             * @param exclusive 是否排他,即是否为私有的,如果为true,会对当前队列加锁,其它通道不能访问,
             *                  并且在连接关闭时会自动删除,不受持久化和自动删除的属性控制。
             *                  一般在队列和交换器绑定时使用
             * @param autoDelete 是否自动删除,当最后一个消费者断开连接之后是否自动删除
             * @param arguments 队列参数,设置队列的有效期、消息最大长度、队列中所有消息的生命周期等等
             */
            channel.queueDeclare("queue1", false, false, false, null);

            // 同一时刻,服务器只会发送一条消息给消费者
            channel.basicQos(10);

            // 定义消息接收回调对象
            final Channel finalChannel = channel;
            DeliverCallback callback = new DeliverCallback() {
                @Override
                public void handle(String consumerTag, Delivery message) throws IOException {
                    try {
                        System.out.println("收到消息:" + new String(message.getBody(), "UTF-8"));
                        Thread.sleep(800); // 模拟操作耗时
                    } catch (Exception e) {
                        e.printStackTrace();
                    }
                    finalChannel.basicAck(message.getEnvelope().getDeliveryTag(), false);
                }
            };
            // 监听队列
            channel.basicConsume("queue1", false, callback, new CancelCallback() {
                public void handle(String consumerTag) throws IOException {
                }
            });

            System.out.println("开始接收消息");
            System.in.read();

        } catch (IOException e) {
            e.printStackTrace();
        } catch (TimeoutException e) {
            e.printStackTrace();
        } finally {
            // 8、关闭通道
            if (channel != null && channel.isOpen()) {
                try {
                    channel.close();
                } catch (IOException e) {
                    e.printStackTrace();
                } catch (TimeoutException e) {
                    e.printStackTrace();
                }
            }

            // 9、关闭连接
            if (connection != null && connection.isOpen()) {
                try {
                    connection.close();
                } catch (IOException e) {
                    e.printStackTrace();
                }
            }
        }
    }
}
package com.study.rabbitmq.a132.work;

import com.rabbitmq.client.*;

import java.io.IOException;
import java.util.concurrent.TimeoutException;

/**
 * 工作队列消费者
 */
public class Worker1 {

    public static void main(String[] args) {
        // 1、创建连接工厂
        ConnectionFactory factory = new ConnectionFactory();
        // 2、设置连接属性
        factory.setHost("47.106.202.10");
        factory.setUsername("guest");
        factory.setPassword("guest");

        Connection connection = null;
        Channel channel = null;


        try {
            // 3、从连接工厂获取连接
            connection = factory.newConnection("消费者");

            // 4、从链接中创建通道
            channel = connection.createChannel();

            /**
             * 5、声明(创建)队列
             * 如果队列不存在,才会创建
             * RabbitMQ 不允许声明两个队列名相同,属性不同的队列,否则会报错
             *
             * queueDeclare参数说明:
             * @param queue 队列名称
             * @param durable 队列是否持久化
             * @param exclusive 是否排他,即是否为私有的,如果为true,会对当前队列加锁,其它通道不能访问,
             *                  并且在连接关闭时会自动删除,不受持久化和自动删除的属性控制。
             *                  一般在队列和交换器绑定时使用
             * @param autoDelete 是否自动删除,当最后一个消费者断开连接之后是否自动删除
             * @param arguments 队列参数,设置队列的有效期、消息最大长度、队列中所有消息的生命周期等等
             */
            channel.queueDeclare("queue1", false, false, false, null);

            // 同一时刻,服务器只会发送一条消息给消费者
            channel.basicQos(10);

            // 定义消息接收回调对象
            final Channel finalChannel = channel;
            DeliverCallback callback = new DeliverCallback() {
                @Override
                public void handle(String consumerTag, Delivery message) throws IOException {
                    try {
                        System.out.println("收到消息:" + new String(message.getBody(), "UTF-8"));
                        Thread.sleep(200);
                    } catch (Exception e) {
                        e.printStackTrace();
                    }
                    finalChannel.basicAck(message.getEnvelope().getDeliveryTag(), false);
                }
            };
            // 监听队列
            channel.basicConsume("queue1", false, callback, new CancelCallback() {
                public void handle(String consumerTag) throws IOException {
                }
            });

            System.out.println("开始接收消息");
            System.in.read();

        } catch (IOException e) {
            e.printStackTrace();
        } catch (TimeoutException e) {
            e.printStackTrace();
        } finally {
            // 8、关闭通道
            if (channel != null && channel.isOpen()) {
                try {
                    channel.close();
                } catch (IOException e) {
                    e.printStackTrace();
                } catch (TimeoutException e) {
                    e.printStackTrace();
                }
            }

            // 9、关闭连接
            if (connection != null && connection.isOpen()) {
                try {
                    connection.close();
                } catch (IOException e) {
                    e.printStackTrace();
                }
            }
        }
    }
}
package com.study.rabbitmq.a132.work;

import com.rabbitmq.client.Channel;
import com.rabbitmq.client.Connection;
import com.rabbitmq.client.ConnectionFactory;

import java.io.IOException;
import java.util.concurrent.TimeoutException;

/**
 * 工作队列生产者
 */
public class Producer {

    public static void main(String[] args) {
        // 1、创建连接工厂
        ConnectionFactory factory = new ConnectionFactory();
        // 2、设置连接属性
        factory.setHost("47.106.202.10");
        factory.setUsername("guest");
        factory.setPassword("guest");

        Connection connection = null;
        Channel channel = null;

        try {
            // 3、从连接工厂获取连接
            connection = factory.newConnection("生产者");

            // 4、从链接中创建通道
            channel = connection.createChannel();

            /**
             * 5、声明(创建)队列
             * 如果队列不存在,才会创建
             * RabbitMQ 不允许声明两个队列名相同,属性不同的队列,否则会报错
             *
             * queueDeclare参数说明:
             * @param queue 队列名称
             * @param durable 队列是否持久化
             * @param exclusive 是否排他,即是否为私有的,如果为true,会对当前队列加锁,其它通道不能访问,并且在连接关闭时会自动删除,不受持久化和自动删除的属性控制
             * @param autoDelete 是否自动删除,当最后一个消费者断开连接之后是否自动删除
             * @param arguments 队列参数,设置队列的有效期、消息最大长度、队列中所有消息的生命周期等等
             */
            channel.queueDeclare("queue1", false, false, false, null);

            for (int i = 0; i < 20; i++) {
                // 消息内容
                String message = "Hello " + i;
                // 6、发送消息
                channel.basicPublish("", "queue1", null, message.getBytes());

                System.out.println("消息 " + i + " 已发送!");
                try {
                    Thread.sleep(i * 10);
                } catch (InterruptedException e) {
                    e.printStackTrace();
                }
            }

        } catch (IOException e) {
            e.printStackTrace();
        } catch (TimeoutException e) {
            e.printStackTrace();
        } finally {
            // 7、关闭通道
            if (channel != null && channel.isOpen()) {
                try {
                    channel.close();
                } catch (IOException e) {
                    e.printStackTrace();
                } catch (TimeoutException e) {
                    e.printStackTrace();
                }
            }

            // 8、关闭连接
            if (connection != null && connection.isOpen()) {
                try {
                    connection.close();
                } catch (IOException e) {
                    e.printStackTrace();
                }
            }
        }
    }
}
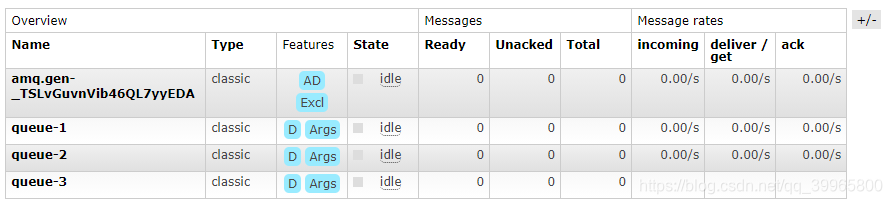
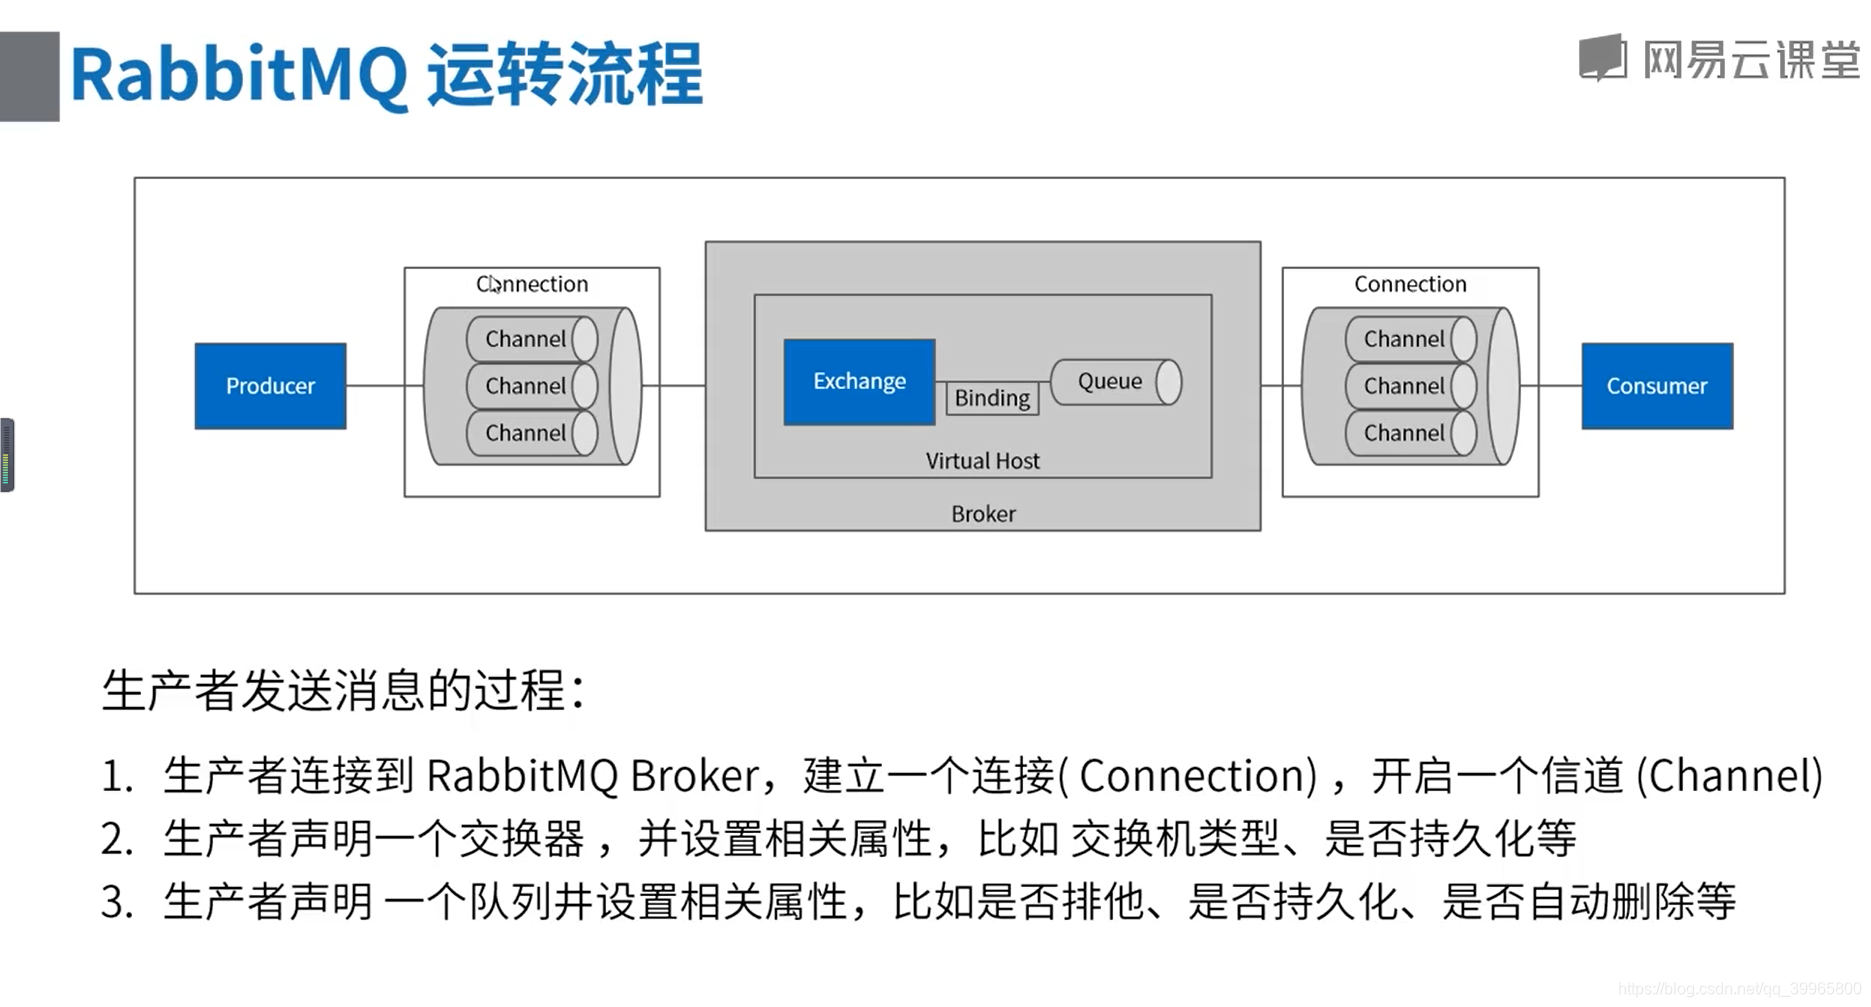
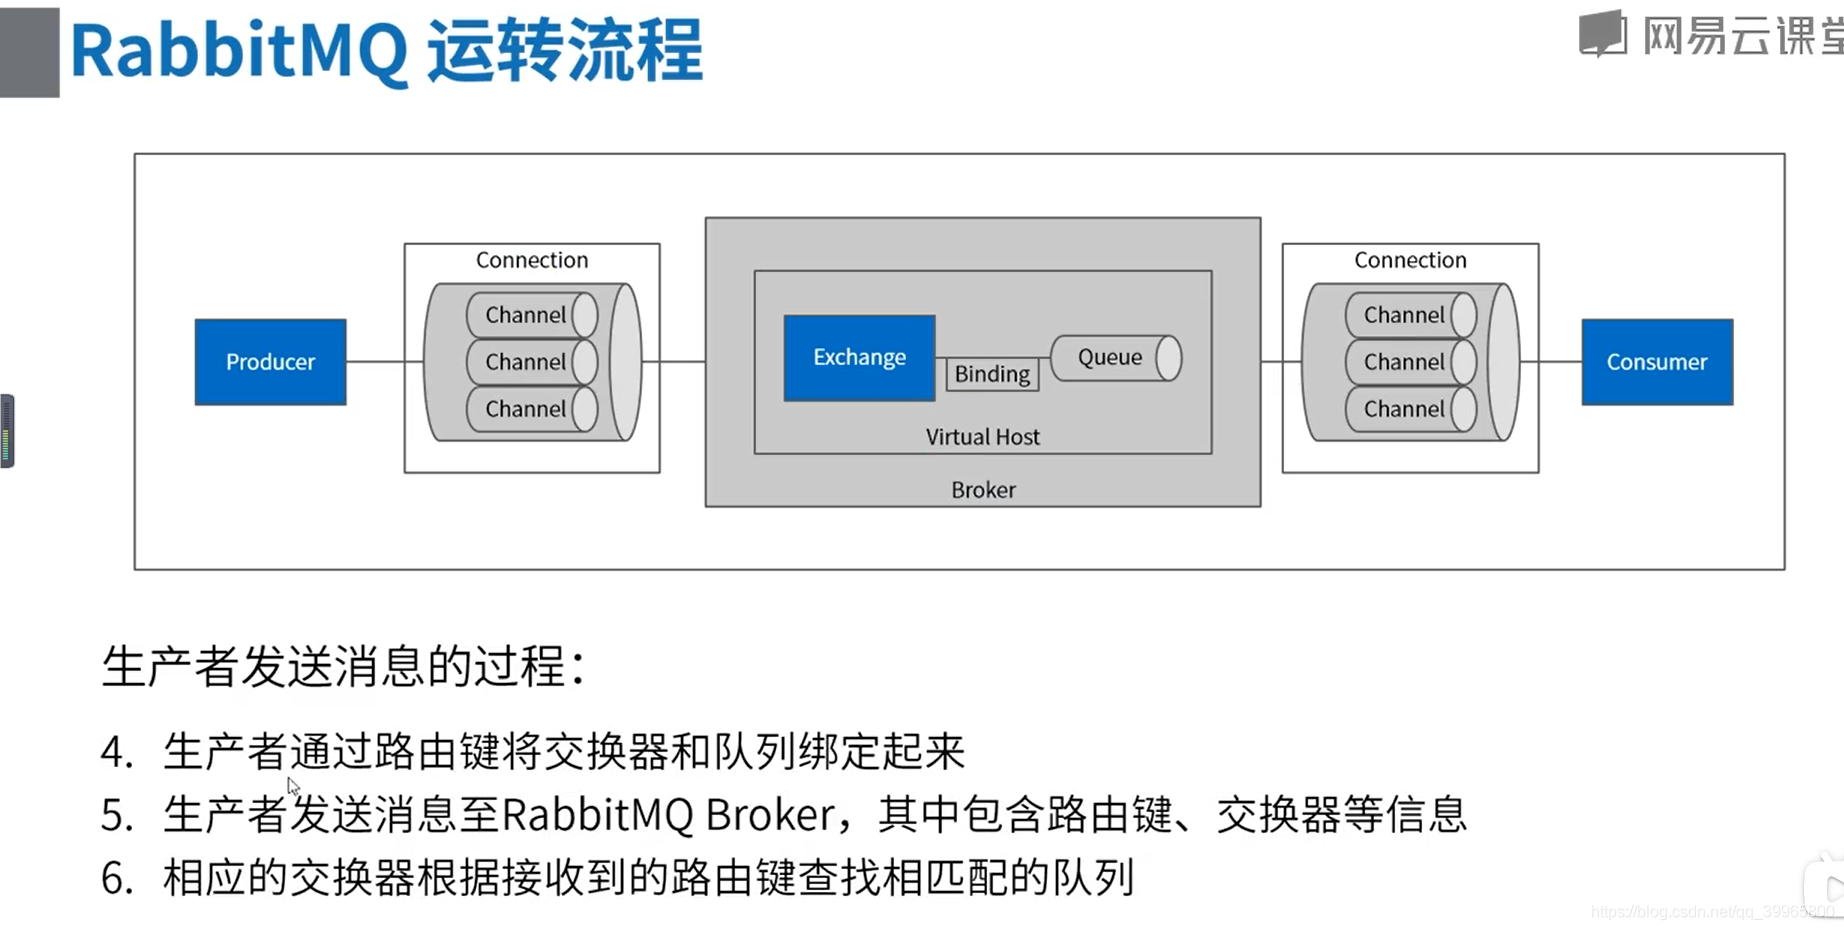
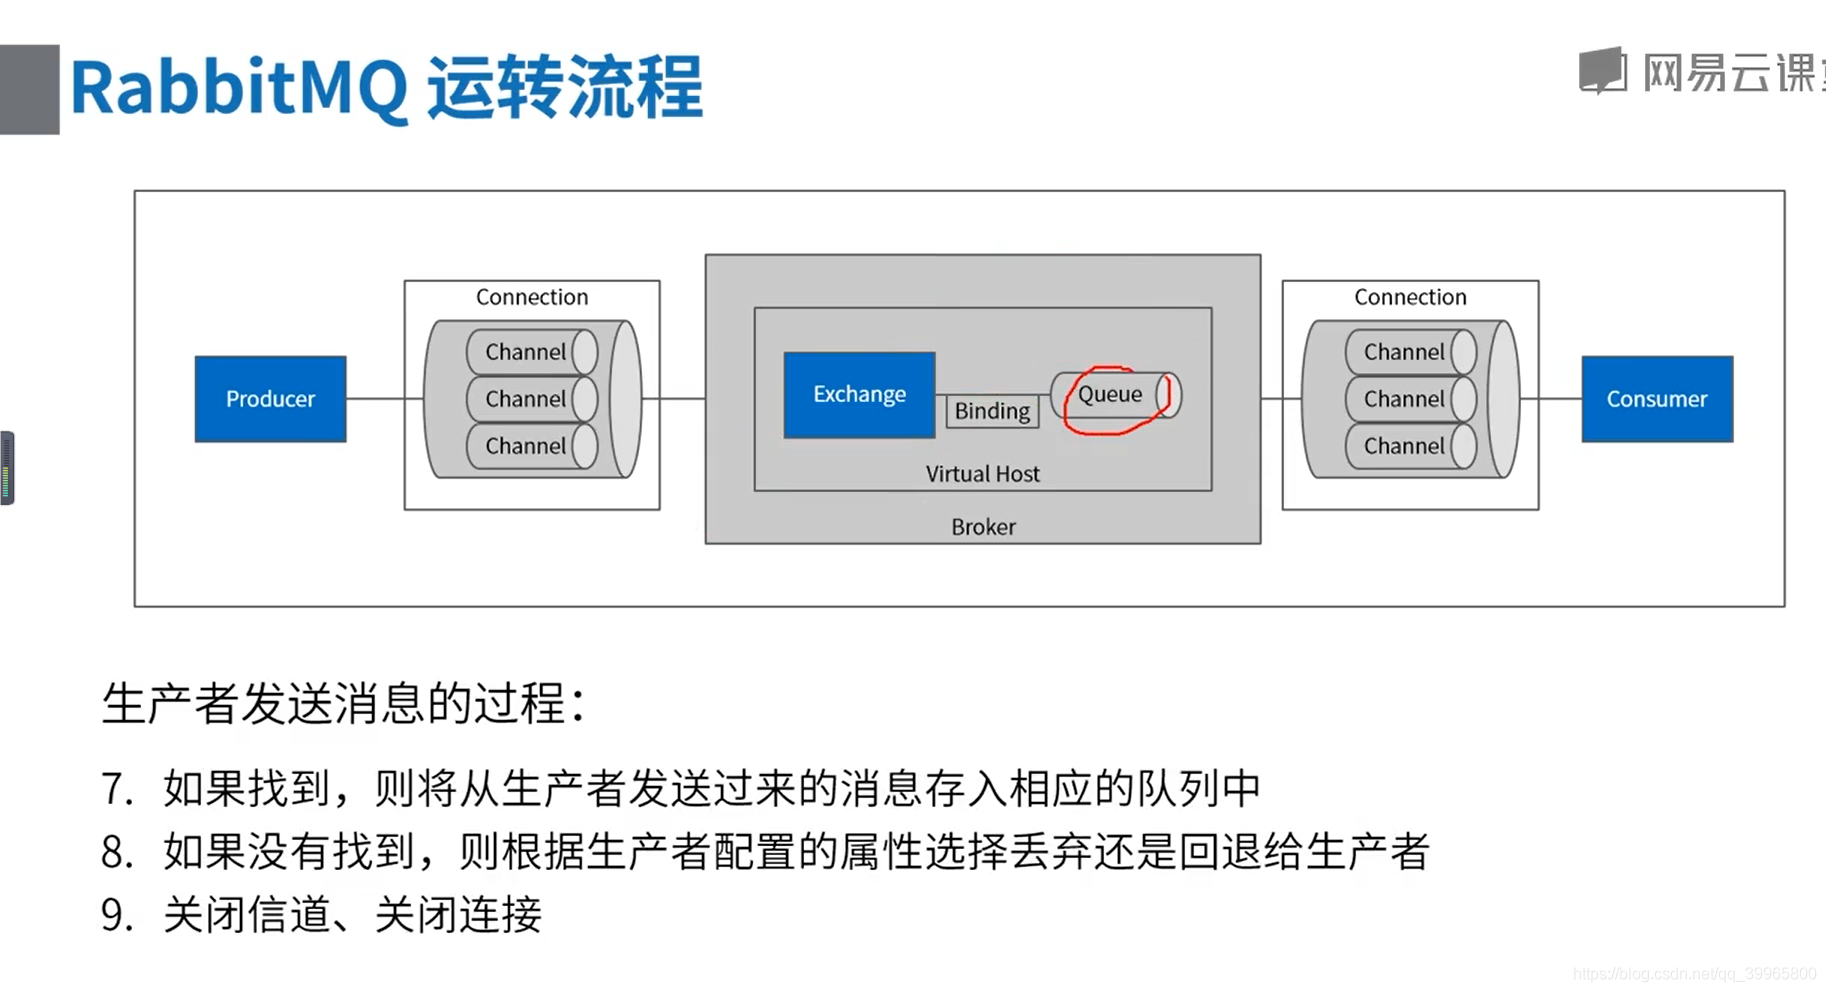
RabbitMQ的核心概念
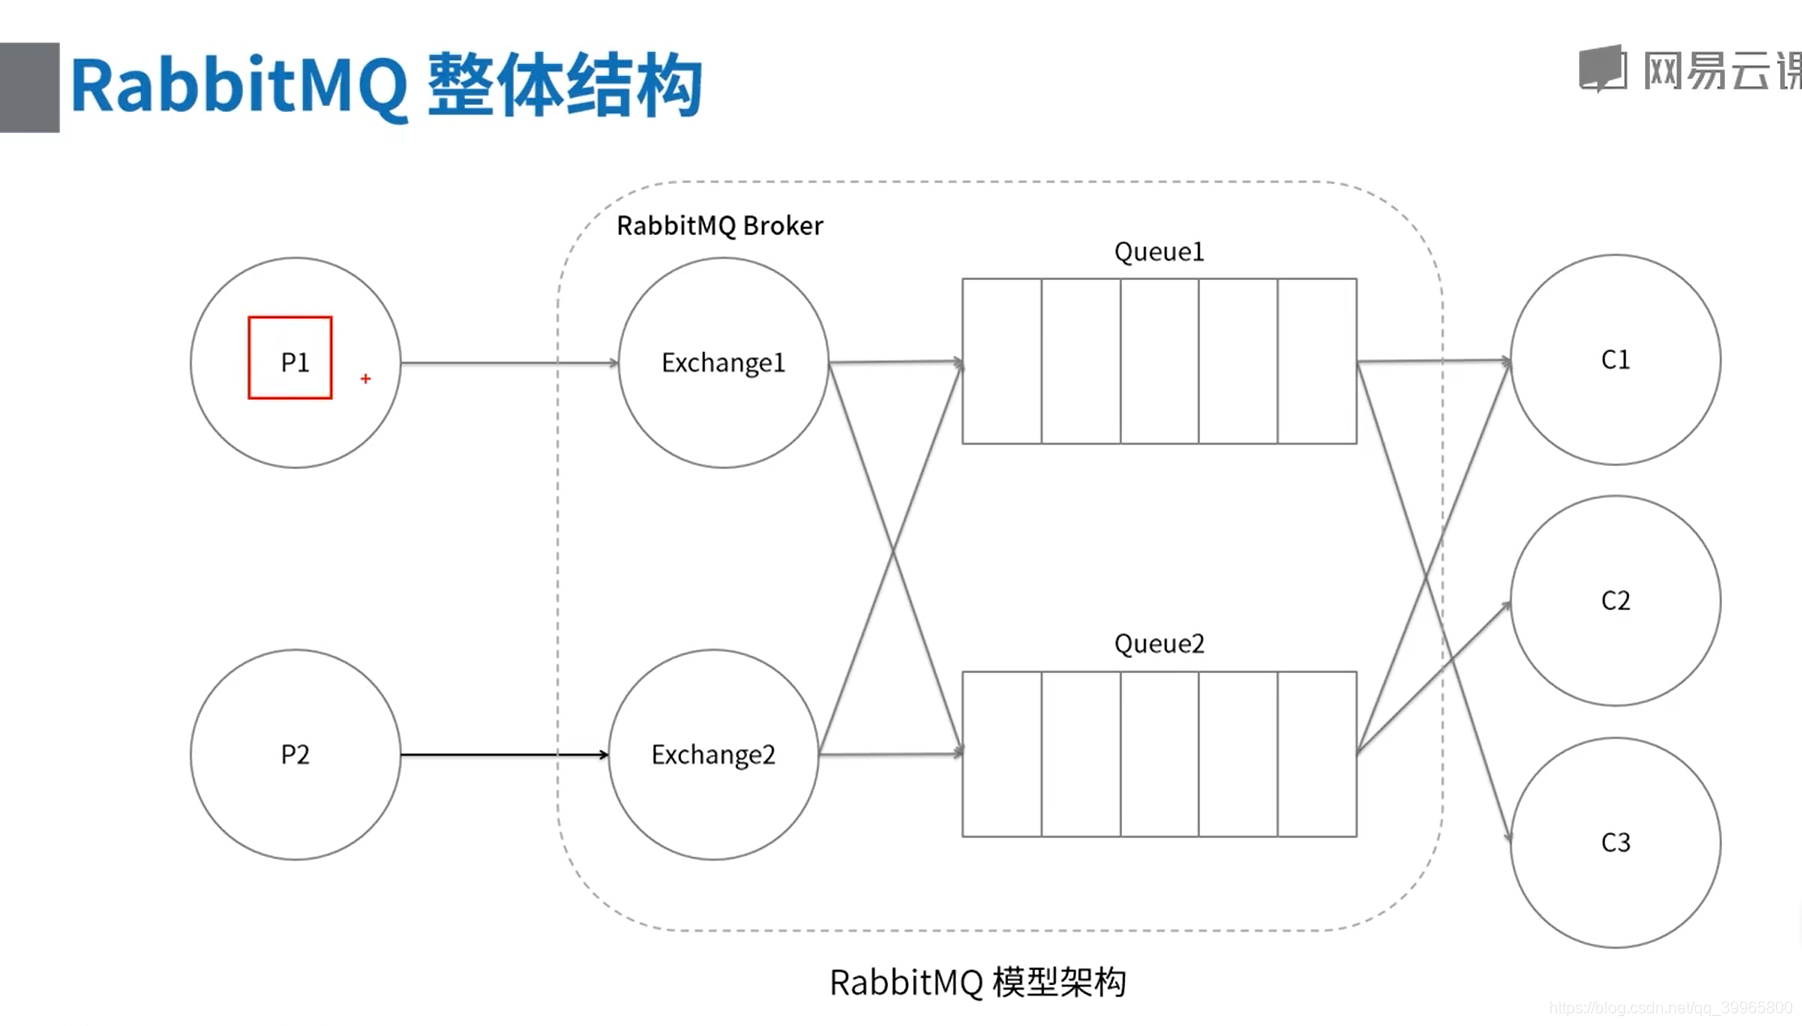
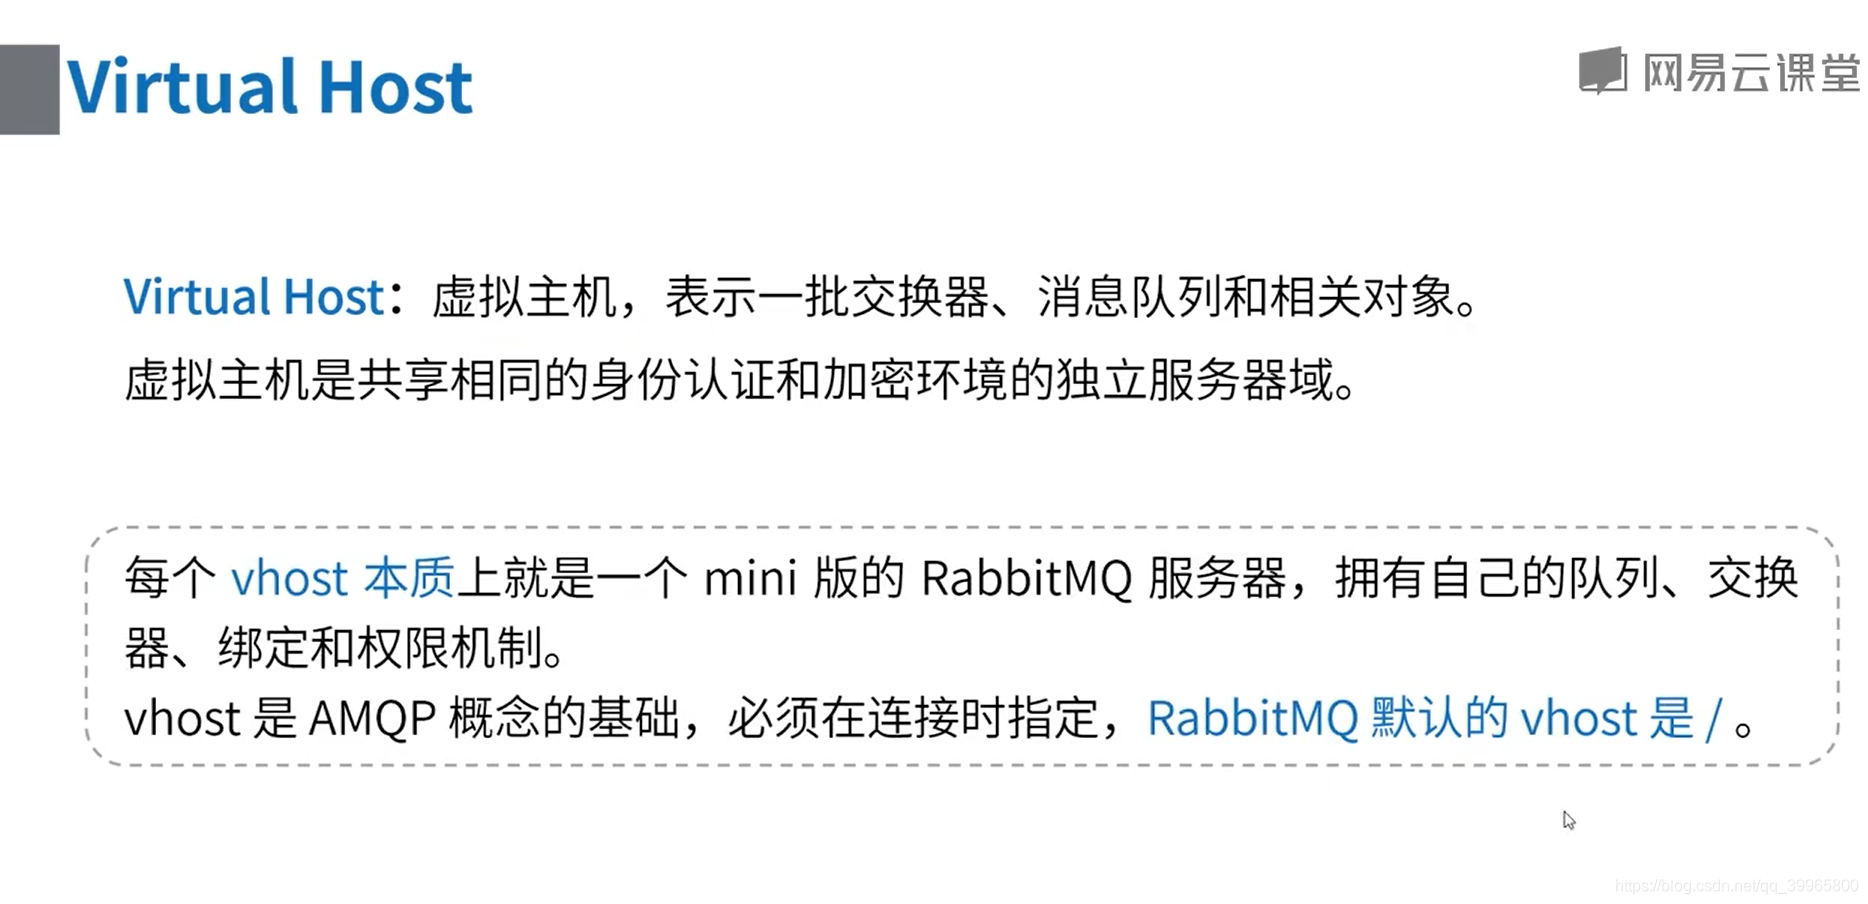
每个borker里面有对应的虚拟主机

会忽略routekey
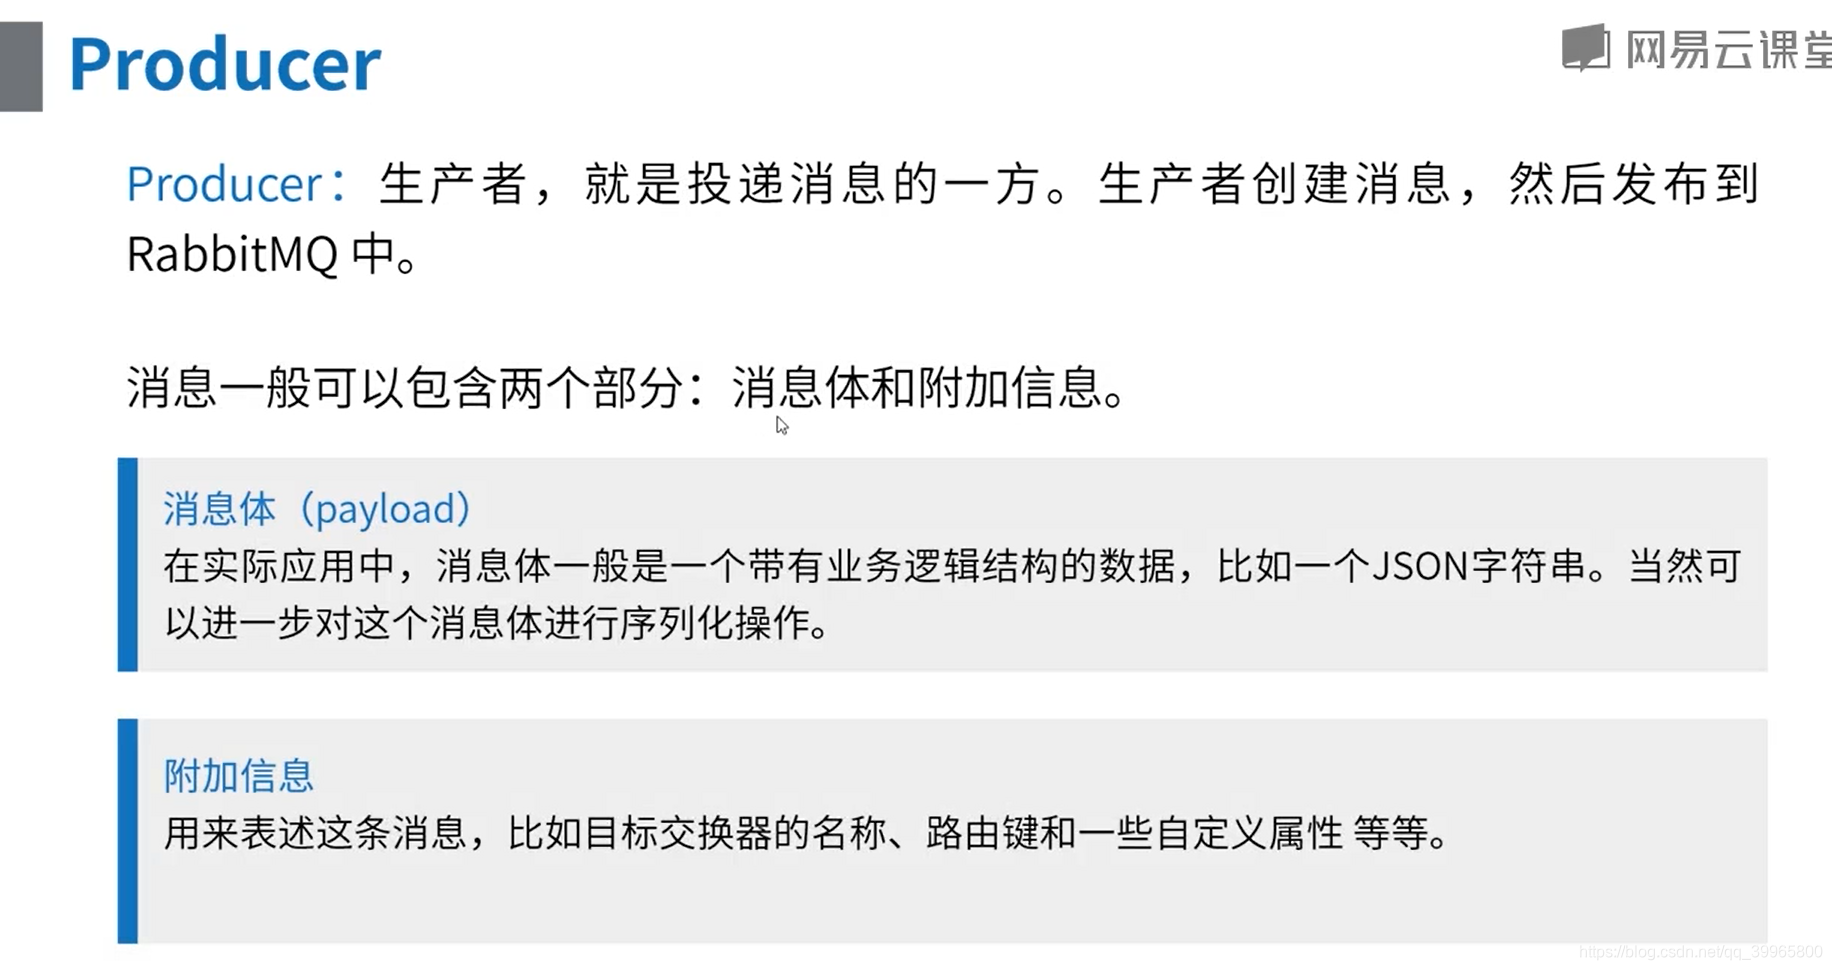
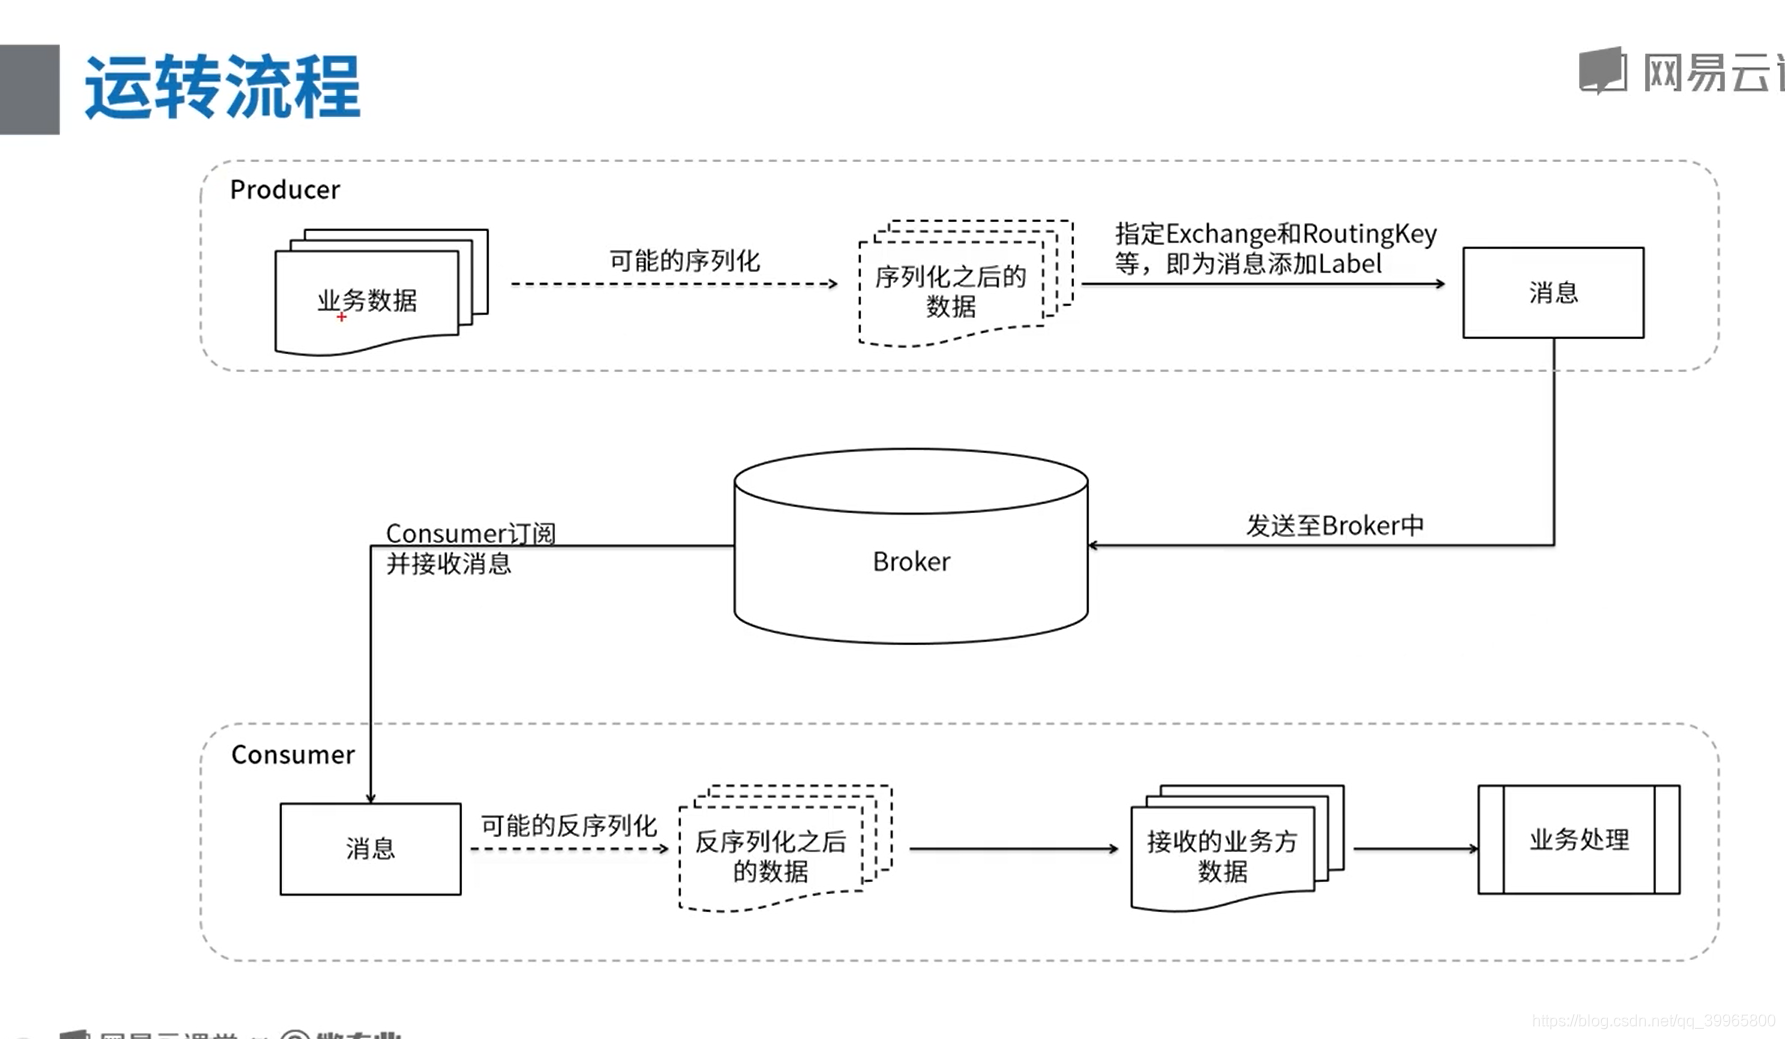
将业务数据进行序列化,转化为json格式


 被折叠的 条评论
为什么被折叠?
被折叠的 条评论
为什么被折叠?
 到【灌水乐园】发言


